


We may receive a commission when you use our affiliate links. However, this does not impact our recommendations.
Speaker Stand with Hidden Storage
By Gary Wentz
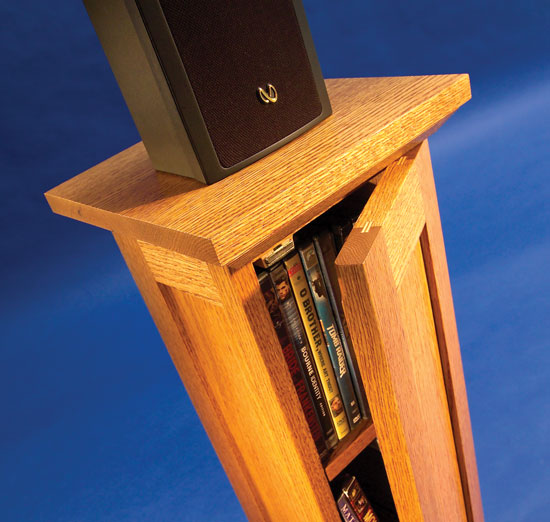
| Don’t you love hearing great sound with your movies at home? A pair of these oak stands puts today’s small speakers at the ideal height—3 ft. above the floor. We’ve built cabinets under the speakers that hold a total of 60 DVDs behind secret doors. And we’ve tucked the the speaker wires out of sight—they run inside the stands. |
You may also like…
|
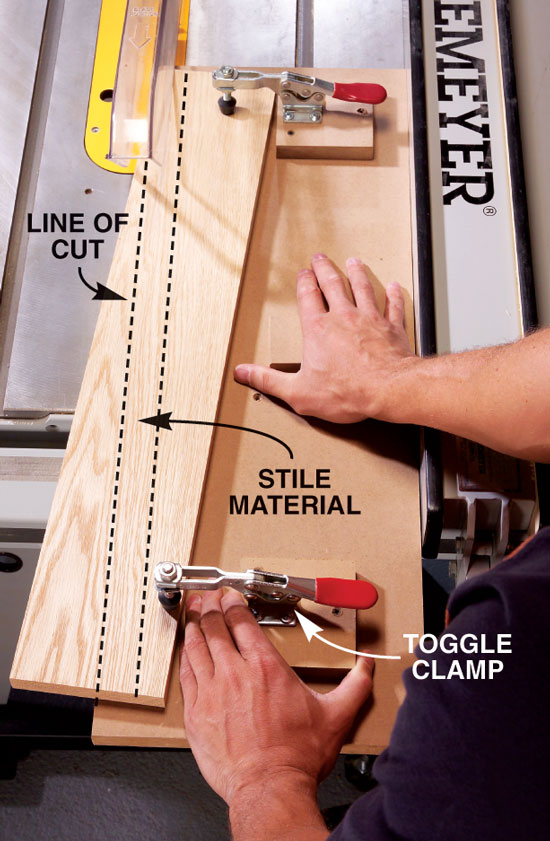
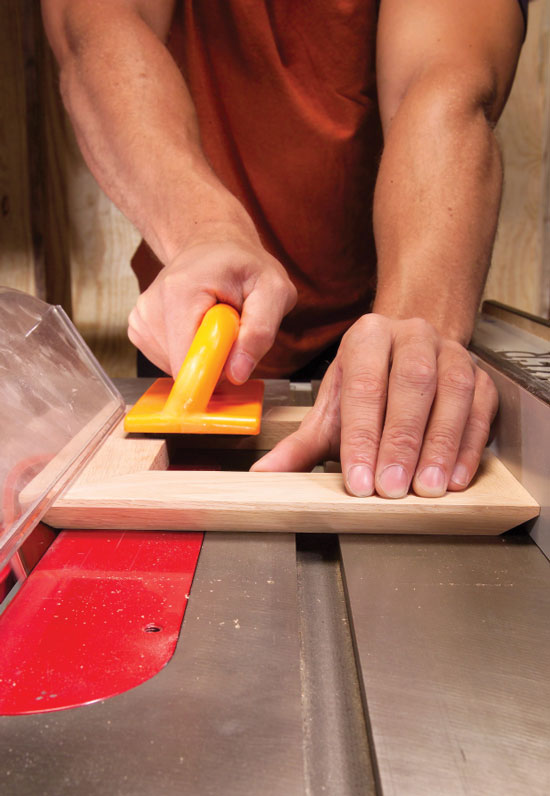
Start with straight-grained woodWood selection makes all the difference in this project. Straight-grained pieces emphasize the stand’s simple lines. Wild or angled grain is distracting, but often it’s the norm in oak. No problem. If you don’t mind wasting some wood, you can make your own great-looking straight-grained boards. Begin by selecting boards for the stiles and rails. You don’t need many. It doesn’t matter what angle the grain runs at in these pieces, as long as some of it is straight. Save the parts of these boards with really wild grain for the frames (K) and top (P) since their faces don’t show. Rip the boards at an angle that follows the grain (Photo 1). Use the new edge to cut your stiles and rails.
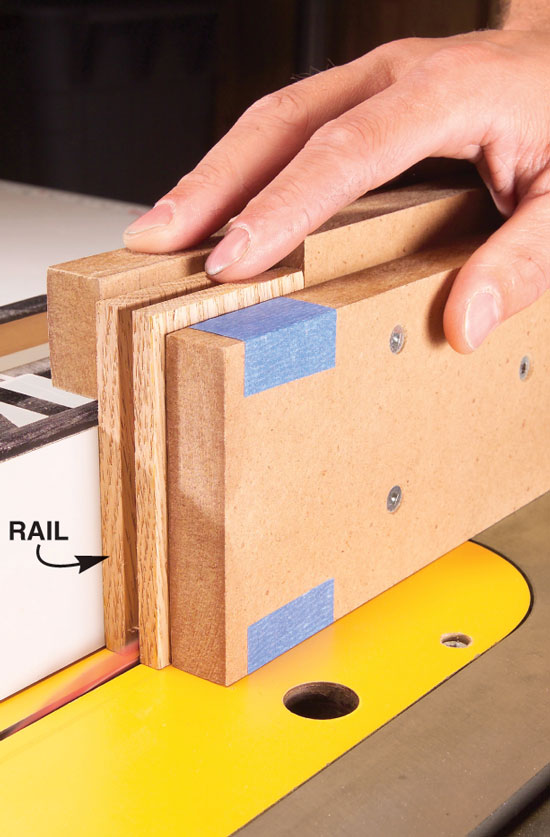
Rails, stiles and panelsThe storage cabinet is basically four frame-and-panel assemblies with similar stiles and rails. They are grooved to hold plywood panels (G) and splines (E, F). The splines join each assembly. We’ll use a standard blade to cut the grooves, rather than a dado blade, because 1/4-in.plywood is usually undersized. 1. Rip and crosscut the stiles (A, B) and rails (C, D). Hang on to your offcuts to use as trial pieces when making the grooves. Note that the stiles are two different widths. The back has two narrow stiles; the door has two wide ones. The sides have a narrow stile in front, a wide stile in back. 2. Cut the plywood panels (G) and use leftover scraps to make splines. 3. To make assembly easier, use sandpaper to slightly round the edges of the panels. 4. Select and mark the best-looking side of each rail and stile as its face. Place the face against the fence each time you cut a groove. That way, any slight variations in wood thickness will create uneven joints on the inside rather than the outside of the speaker stand. 5. Set your blade to 1/4-in. cutting depth and set your fence 1/4 in. from the blade. Cut one kerf in some trial pieces and every stile and rail (Photo 2; Fig. A, Detail 1, below). Move the fence and make a second pass in one of the trial pieces. Use a spline to check the fit of the groove. The spline should slip in easily, allowing room for glue. Adjust the fence if necessary and finish grooving all the pieces.
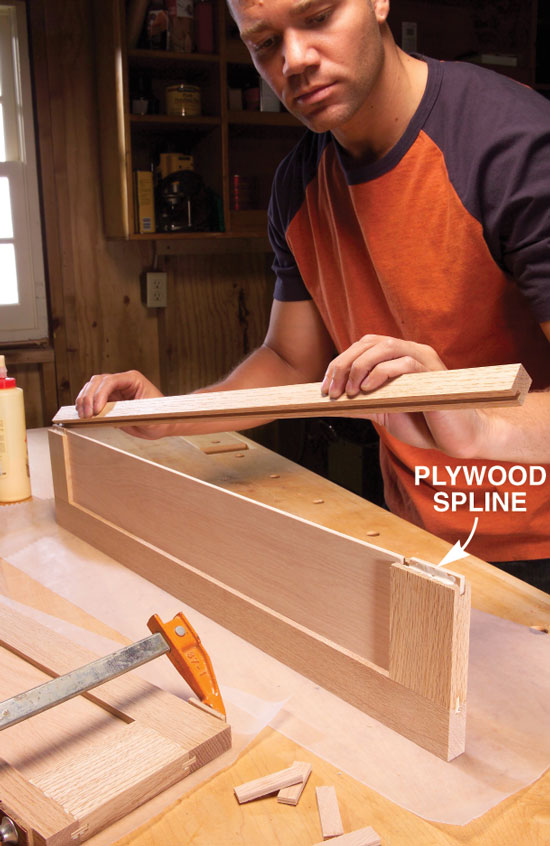
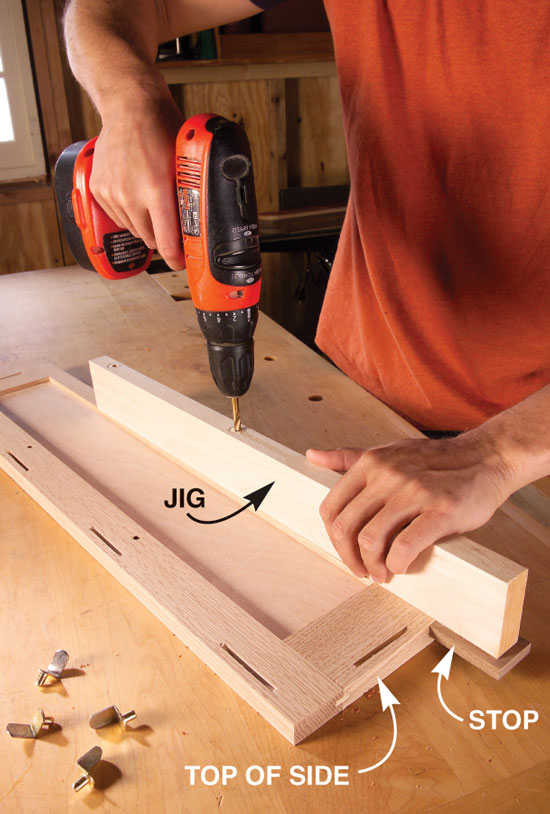
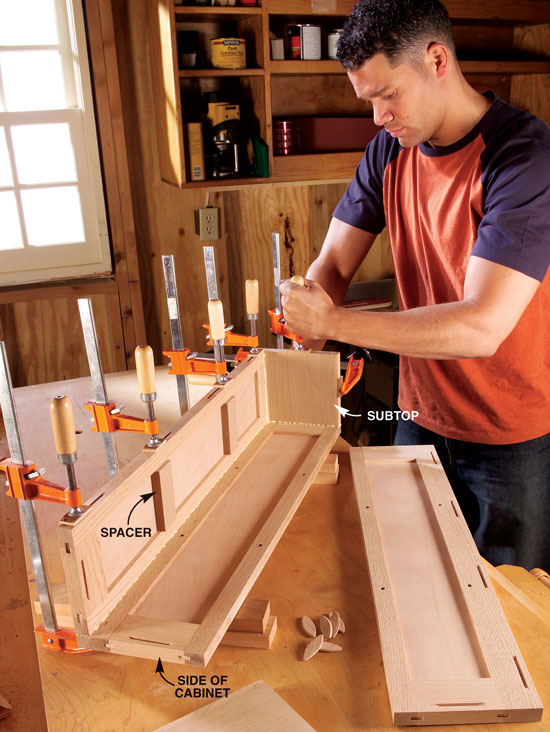
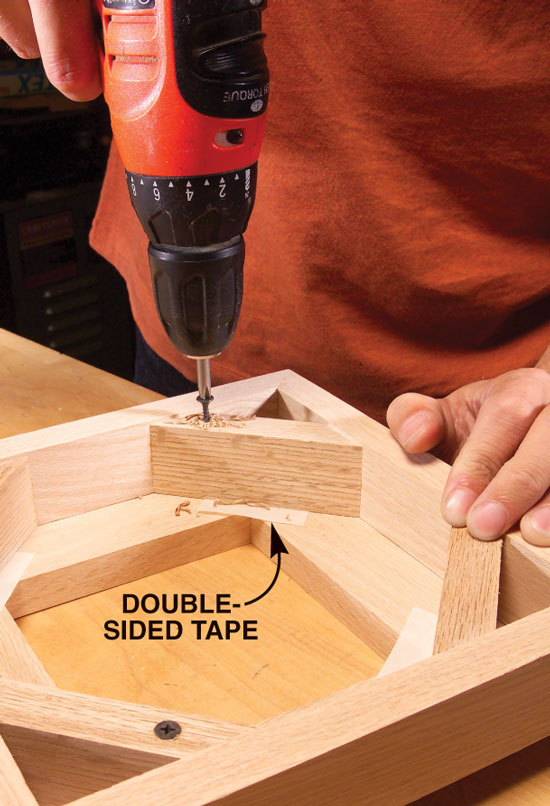
Assemble the cabinetMake a dry-run assembly to ensure everything goes together smoothly. You’re assembling rails and stiles of different widths and each part has a face and a backside, so take a moment to double-check the configuration before you spread any glue. Pay special attention to the face sides when cutting biscuit slots and assembling the left and right sides of the cabinet. Otherwise, you might end up with a side that’s inside out. 6. Assemble the door, sides and back of the cabinet (Photo 3). 7. Cut the subtop and subbottom (H) of the cabinet from 3/4-in. plywood. We covered the front edges of these parts (and the shelves) with 1/4-in.-thick strips of oak banding (Q, R). 8. Cut slots for No. 0 biscuits. Biscuits aren’t vital to the strength of the cabinet, but they hold the parts in alignment and make assembly much easier. 9. Drill the holes for shelf pins before assembly (Photo 4). 10. Glue up the cabinet in two stages. First, glue and clamp the back to one of the sides. Immediately add the subtop and subbottom to square the assembly (Photo 5). When the glue has set, add the other side.
The top and baseThe top and base are attached to identical mitered frames that are beveled to 45 degrees. 11. Miter the frame sides (K) and cut slots for No. 0 biscuits. 12. Glue up the frames (Photo 6). 13. Bevel the frames by running them over—not under—the tilted blade (Photo 7; Fig. A, Detail 2, below). If you have a right-tilt saw, move the fence to the blade’s left side. If there isn’t enough room, cut the bevels using a 45-degree chamfer bit in your router. 14. Cut the sides (L) and corner blocks (M) for the base. 15. Assemble the base sides and glue in the corner blocks. 16. Stick the frame and base together with double-sided carpet tape. Screw and glue them together (Photo 8). 17. Use the same tape-screw-glue method to fasten the beveled frame to the cabinet. 18. Make the top (P) by gluing three boards together. A single, wide board is less likely to stay flat. 19. Attach the beveled frame to the top using screws, but no glue. Drill oversize clearance holes in the frame so the top can move freely with changes in humidity. 20. Screw a scrap of 3/4-in. plywood (N) to the top, inside the frame, so you can screw the top to the cabinet. 21. Fasten weights to the base to stabilize the stand (Photo 9).
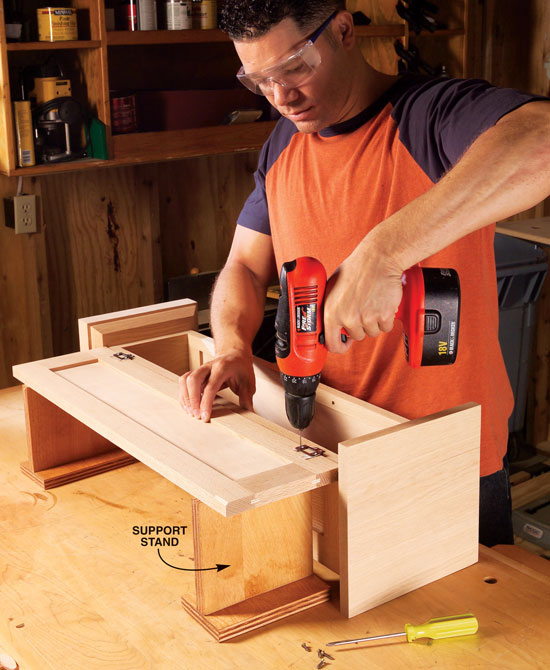
Hang the doorAt this point, the door is the same height as the cabinet. The top and bottom ends need to be trimmed to leave 1/8-in. gaps above and below the door. Make the trim cuts with a miter saw or tablesaw sled. 22. Trim the door just enough so that you can set it in place and check the fit. Adjust the angle of the final trim cuts to compensate if the cabinet is slightly out of square. 23. Cut a 1/8-in.-deep, 1-1/4-in.-long finger pull at the top of the door using a router and chamfer bit (Fig. A, below). 24. Hang the door using no-mortise hinges (Photo 10). Install a magnetic catch (not pictured) to keep the door shut.
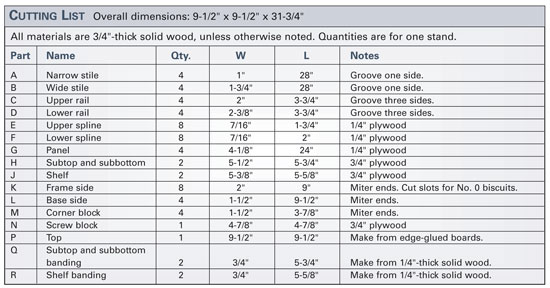
Finishing touches25. Drill holes in the top and bottom for speaker wire. Set a speaker on the stand to determine the best hole position. 26. Finish the speaker stand with golden oak stain followed by three coats of spray-on polyurethane. 27. Stick adhesive-backed felt pads to the underside of the base. Sources(Note: Product availability and costs are subject to change since original publication date.) Lee Valley, leevalley.com, 800-871-8158, No-mortise hinge, 1-1/2 x 5/8-in., bronze finish, #00H51.21; Band clamp, includes 90-degree corners, #17F10.13; Adhesive-backed felt pads, 3/4-in.-dia., #93K86.03. Woodcraft, woodcraft.com, 800-225-1153, Bracket-style shelf support, 1/4-in. shank, #27I14; Toggle clamp, 6-1/2 x 1-3/4-in., #143993. Minwax Co., minwax.com, 800-523-9299 (for dealer locations), Golden oak stain, #210B; Satin polyurethane. Cutting List
Fig. A: Exploded View
Fig. B: Rail Jig
This story originally appeared in American Woodworker September 2004, issue #109.
|
Click any image to view a larger version.
1. Straight-grained wood complements the simple lines of this project. This simple jig with toggle clamps lets you rip straight-grained pieces from ordinary boards.
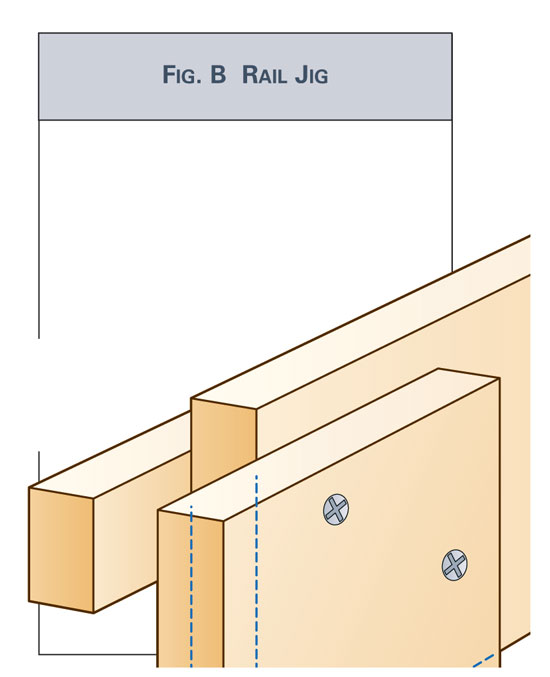
2. Cut grooves in the rails and stiles to hold plywood panels and splines. The rails are very short and unsafe to hold by themselves, so push them with a shop-made jig (Fig. B).
3. Glue each side of the cabinet using 1/4-in. plywood splines. The back and the door are built exactly the same way, although the back is narrower.
4. Cut biscuit slots; then drill holes in the sides for shelf supports. This jig indexes the holes and acts as a depth stop. The chuck of the drill hits the jig before the bit goes too deep.
5. Assemble the cabinet using the subtop and subbottom to square the sides to the back. Place spacers between the stiles so they don’t flex under clamping pressure. Biscuits make aligning the parts a no-brainer for this critical step.
6. Glue the mitered frames that go on the top and bottom of the cabinet. This awkward glue-up is a cinch with a band clamp.
7. Bevel the mitered frames with the blade tilted away from the fence. It’s safer to run your workpiece over a tilted blade rather than under the blade. Plus, this leaves a cleaner cut.
8. Attach the mitered frame to the base with double-sided tape. Drive a couple of screws and check the alignment. Back out the screws, remove the tape and reassemble using screws and glue.
9. Mount two 5-lb. barbell weights inside the base so the stand is more stable. Make a sturdy post for the weights from a toilet bolt and a fender washer with four holes drilled in it for screws.
10. Attach the door to the cabinet. First screw the hinges to the cabinet. Stick double-sided tape to the loose side of the hinges. Set the door in place and gently swing it open. Support the door with stands as you screw the hinges to the door.
|


Here are some supplies and tools we find essential in our everyday work around the shop. We may receive a commission from sales referred by our links; however, we have carefully selected these products for their usefulness and quality.


