We may receive a commission when you use our affiliate links. However, this does not impact our recommendations.
 Make accurate and safe crosscuts with ease – and set the stage for clever accessories
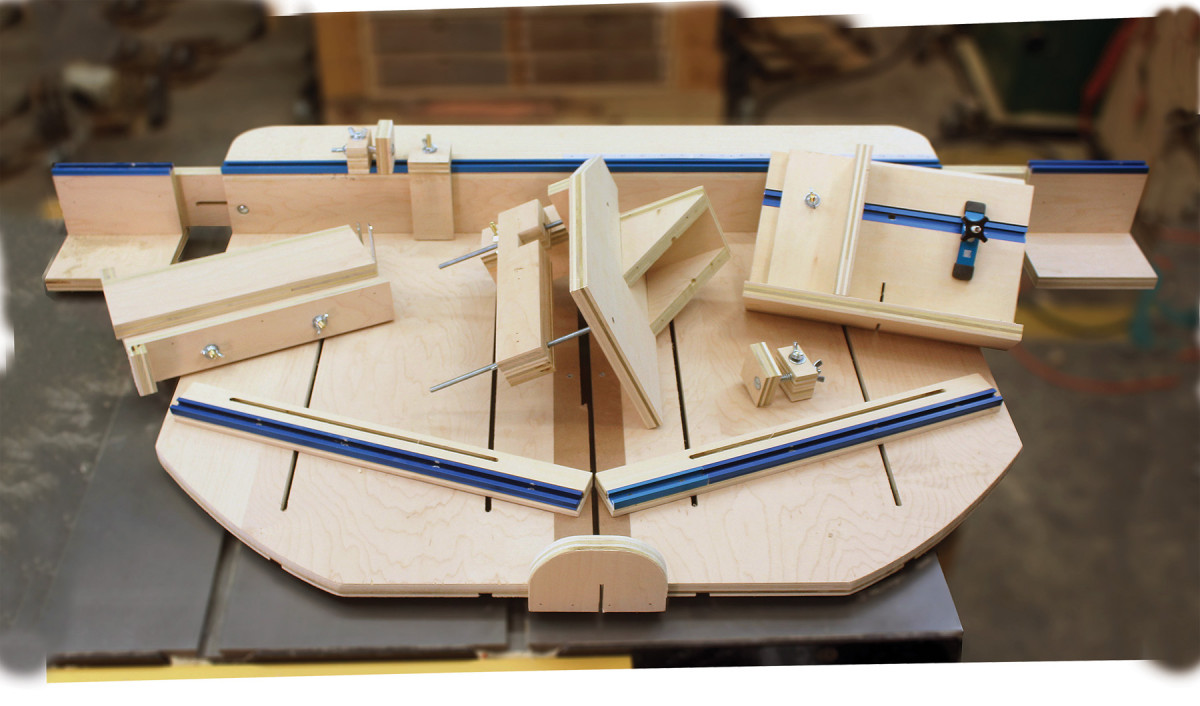
Most power-tool woodworkers have at least one table saw sled. And while a sled can make your work safer and more accurate, a well-thought-out sled can also do much more.
Sometimes I call this one the “MegaSled,” other times the “Super Sled,” because its large size makes it so versatile. In fact, it’s the perfect platform for any number of joinery jig attachments. Since designing the sled I’ve added jigs for cutting miters, splines, tenons, finger joints and dovetails, and I have plans for more jig attachments in the future. It’s all possible because of the sled’s fence design. In fact, you will see several unique and useful features as you build this table saw fixture. In this article, I’ll focus on the sled itself; in the next article, I’ll cover the jigs. Let’s get started!
Table Saw MegaSled Cut List
No. Item Dimensions (inches) Material Comments
t w l
❏ 2 Fence extensions 3⁄4 x 3 1⁄8 x 22 3⁄4 Plywood A&B
❏ 2 Extension spacers 3⁄4 x 3 1⁄2 x 6 Plywood C&E
❏ 2 Extension supports 3⁄4 x 5 1⁄2 x 6 Plywood D&F
❏ 6 Fence support blocks 3⁄4 x 3 1⁄8 x 3 Plywood H-M
❏ 1 Fence face panel 3⁄4 x 3 1⁄8 x 36 Plywood G
❏ 1 Fence guard 3⁄4 x 3 1⁄8 x 6 1⁄2 Plywood N
❏ 1 Upper fence panel 3⁄4 x 4 1⁄2 x 36 Plywood O
❏ 2 Base panels 3⁄4 x 18 x 28 1⁄2 Plywood P&Q
❏ 1 End piece 3⁄4 x 3 1⁄4 x 5 Plywood R
❏ 10 Replaceable inserts 1⁄4 x 1 1⁄2 x 24 MDF S&T
❏ 2 Runners 1⁄4 x 1 1⁄2 x 24 MDF or HDPE U
Cut the Parts
I don’t typically recommend beginning a project by cutting out all the parts. It’s usually best to cut each part as needed (and make sure it fits before committing) as the project moves along. But in this case, it is simpler to prepare the entire cutlist at the outset.
As you do, use a pencil to label each piece with its assigned letter from the exploded diagram provided. I’ll refer to these letters as I go along.
Take care to cut each piece carefully. Check that your table saw’s blade is perpendicular to the table. Square parts should be square, both in their corners and on their edges. As you assemble the project, use a combination square to keep everything true – extra care now will pay off in the end with an accurate sled.
Also, choose quality plywood. While Baltic birch is always an excellent choice for jig making, I’ve had good success with off-the-shelf, hardwood-veneered plywood from the home center – but I don’t recommend construction-grade plywood.
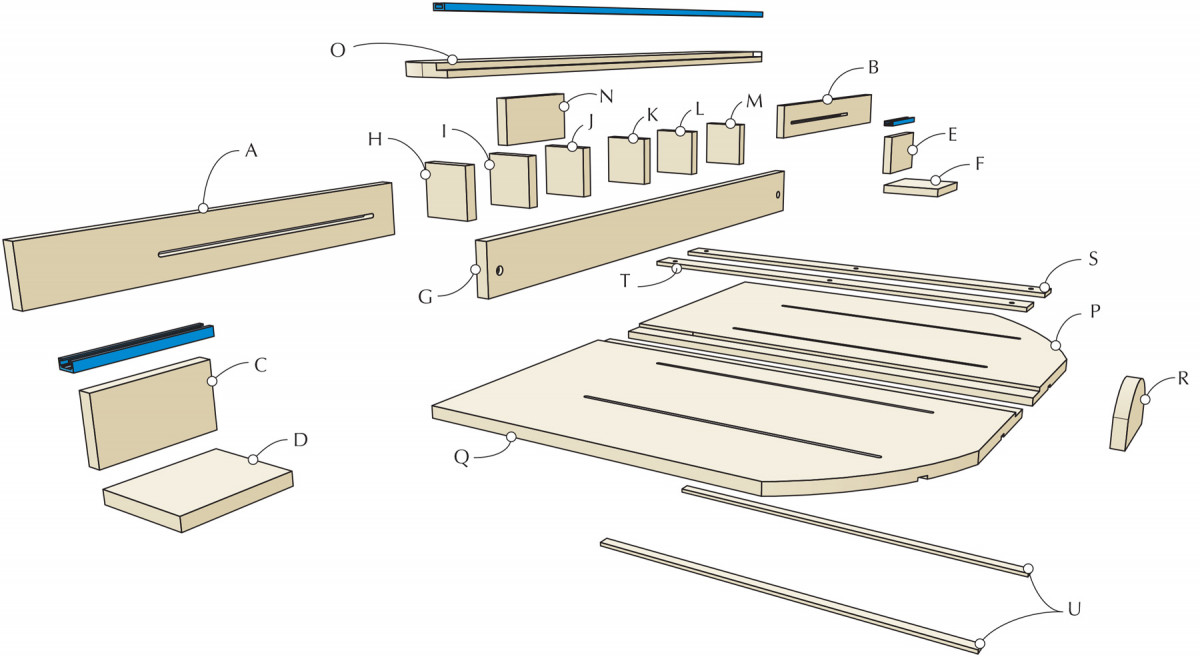
Exploded View

Base
The Base
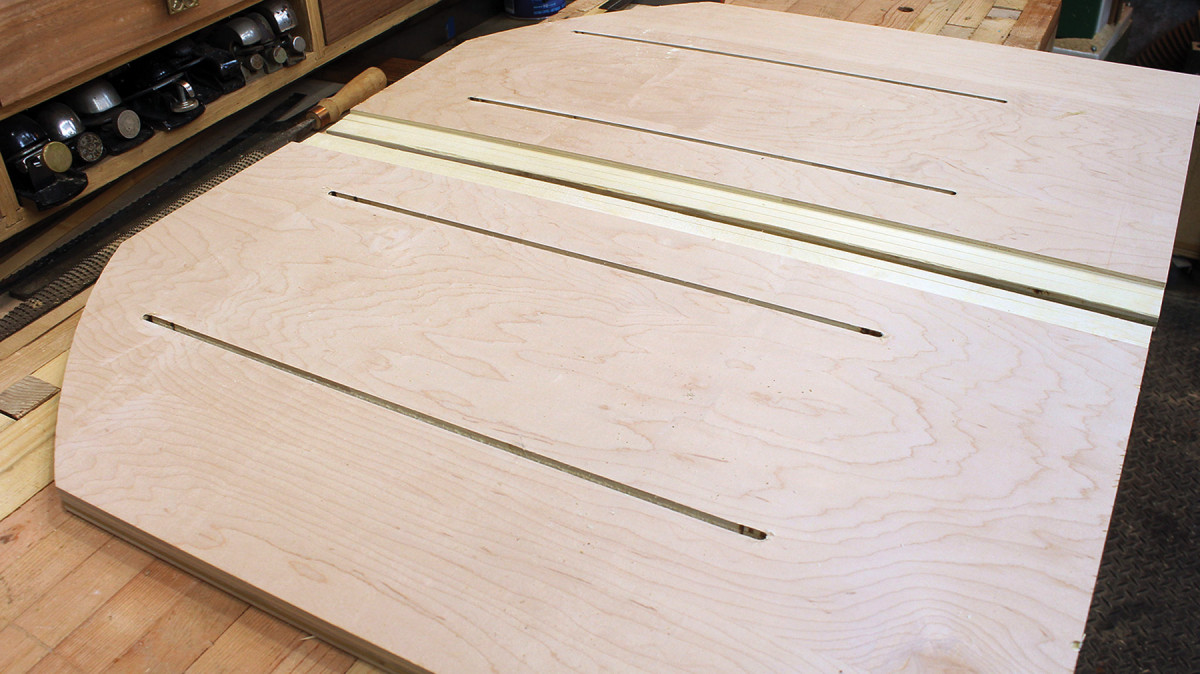
Most table saw sleds are made from a single plywood panel, which is cut in half the first time you use the sled. But I made this sled’s extra-large base from two panels (P and Q on the drawings). As you work on the two panels, keep in mind that they are mirror images of each other. As you lay out the dados, rabbets and slots, reference from the right edge of the right panel and the left edge of the left panel.
Begin by cutting a pair of 1⁄2″-wide x about 3⁄16″-deep dados in the bottom surface of each panel, using the locations provided in the accompanying diagram. Then flip the panels over and cut 1-1⁄2″-wide rabbets along what will become the two inner edges once the sled is assembled. These rabbets should be deep enough that your 1⁄4″-MDF inserts will lay in them flush with the panel’s surface. It’s a good idea to cut them with several incremental passes, checking the depth with one of the inserts as you go.

Dados & rabbets. Plow the dados in the bottoms of base panels, then the rabbets on the top interior sides.
Place the two panels on your benchtop with the rabbets facing upward and touching each other. Mark the edges nearest you as “front” and the opposite edges as “back.” Now use a 5⁄16″ router bit to cut a slot down the center of each of the four dados, beginning 6-1⁄2″ from the front edge and 4″ from the back edge of each panel. The slots are for the T-bolts.

Slots. Rout slots down the center of the dados, creating a track for the shaft of your T-bolts to run in. You might also wish to round off the front corners of the panels, though it’s not strictly necessary.
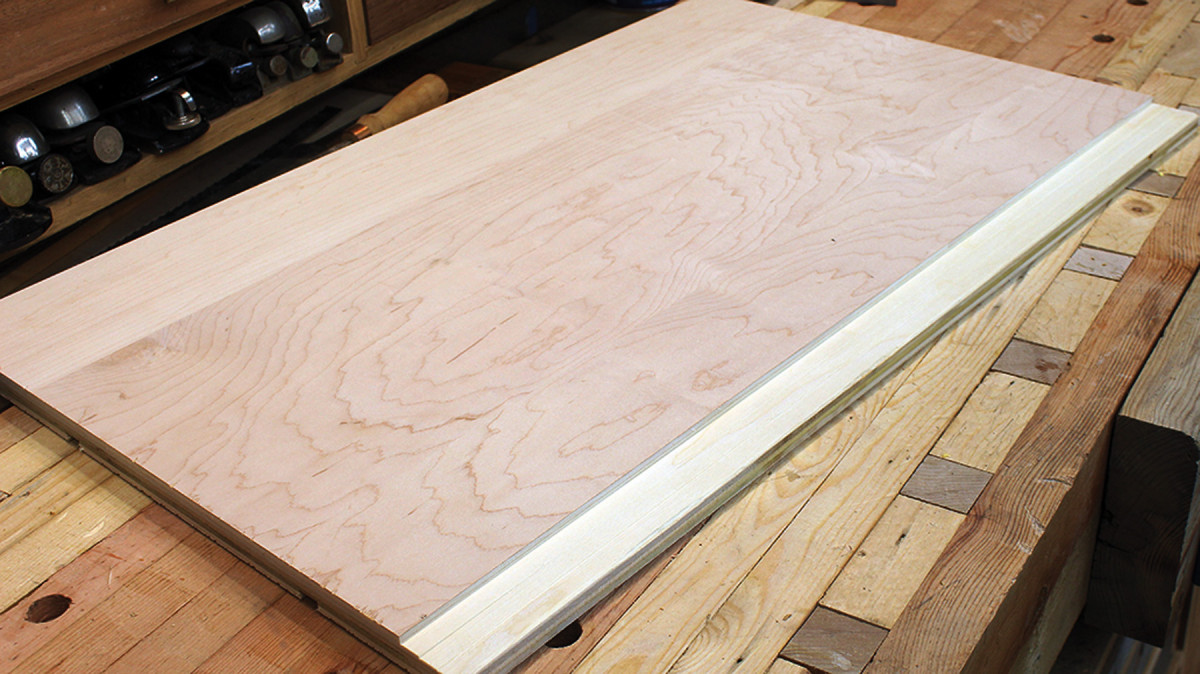
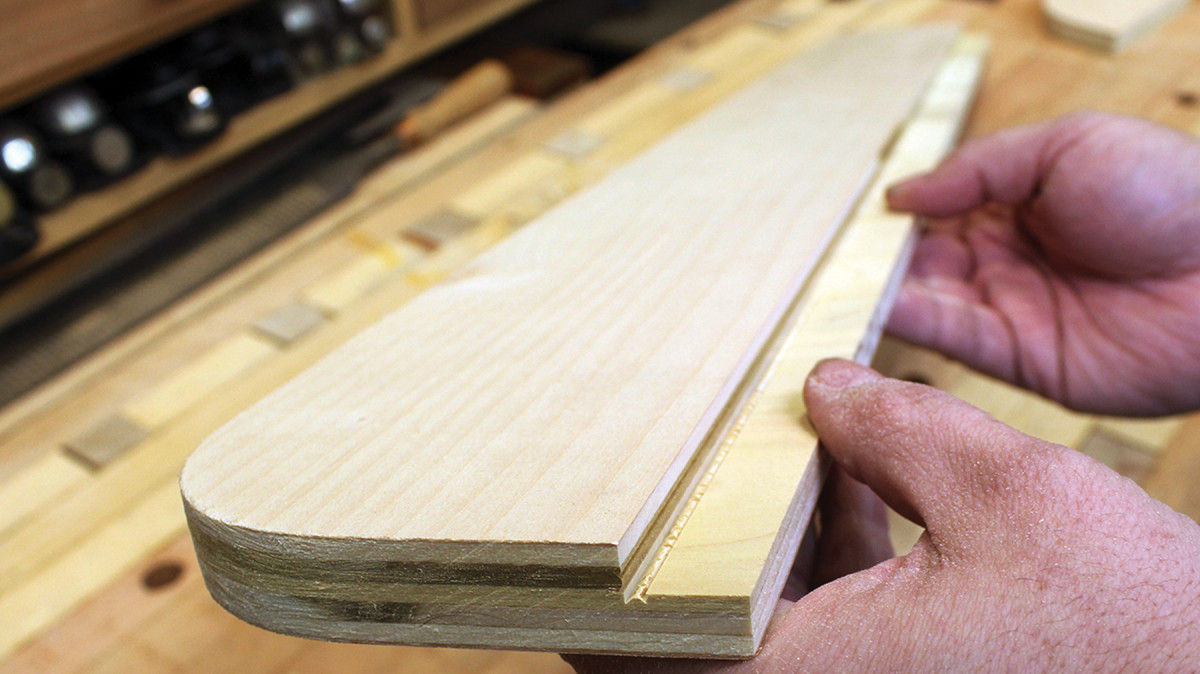
While you have your 5⁄16″ router bit handy, cut the slots in the fence extensions (A and B), centered 1-3⁄8″ from the bottom edge; they start 6″ from the outside end and terminate 1-1⁄2″ from the inside end of each part. Now set those aside and locate the upper fence panel (O). Along one of its edges, cut a rabbet to fit a piece of T-track. Most T-track is 3⁄4″ wide x 3⁄8″ deep, but take care to size the rabbet to your particular brand.
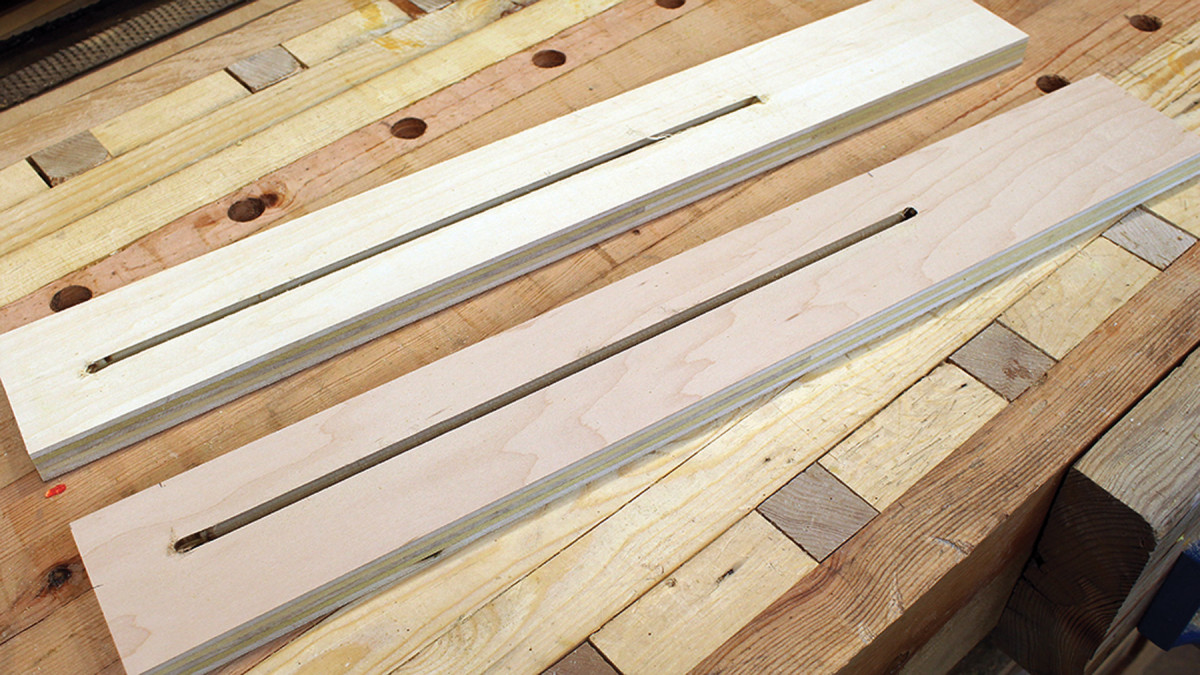
Fence extensions. Keep the slotted fence extensions close by; you’ll soon use them as spacers.
T-track rabbet. Size the rabbet in the upper fence panel carefully so that your T-track will be flush with both the top surface and the edge.
It’s time to begin putting all the parts together, so if your two base panels have wandered off, return them to their former position on the benchtop, facing upward with the rabbets together. The fence support blocks (H-M) must be positioned along the front edge of the base panels.
Referencing from the left edge of the base panel assembly, place one block 2-3⁄4″ away from that edge, another 8-3⁄8″ away and a third 14″ away. Place three more of the blocks the same distances from the right edge of your right base panel assembly. This should leave just enough space between the two inner blocks to fit the fence guard (N).
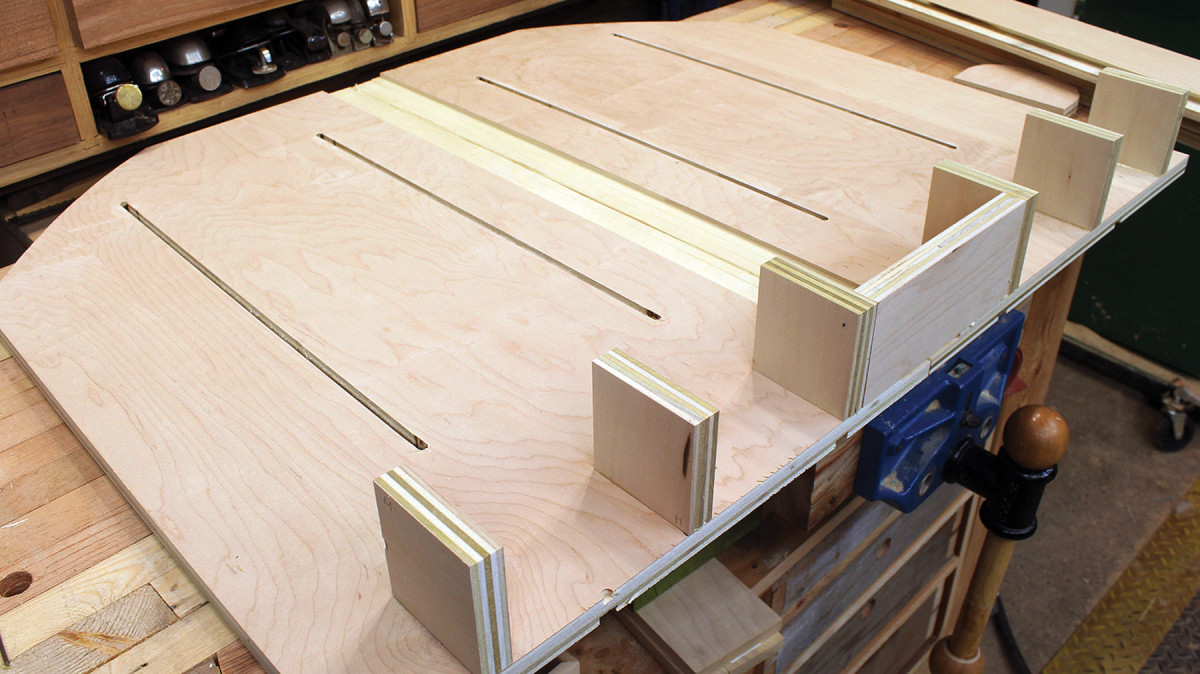
Get it square. Ensure your table saw sled will be accurate in the end by taking care to square the parts up during assembly.
Secure all the blocks to the base panels with glue, taking care that they are perpendicular to the front edge. Brad nails driven from the underside of the base panels will hold the blocks in place as the glue dries, but take care that the two halves remained aligned as you move them around your benchtop. At this point, only the fence guard (N) holds the panels together. You can add more support by attaching the end piece (R) to the far side, centering it over the seam on the back edge between the two base panels.
Careful now. As you move things around during assembly, keep in mind that the seam is supported only by small blocks on each end at this point, so take care!
The Fence
Next you will attach the fence face panel (G) to the rabbeted edge of the upper fence panel (O), rabbet-side up, as shown in the photograph below, left. Before nailing the joint, be sure the seam is flush, and wipe away any glue squeeze-out. This will be a critical surface of your sled’s fence.
The fence face panel (G) and upper fence panel (O) together make up what I’ll call from here on out the fence panel assembly.
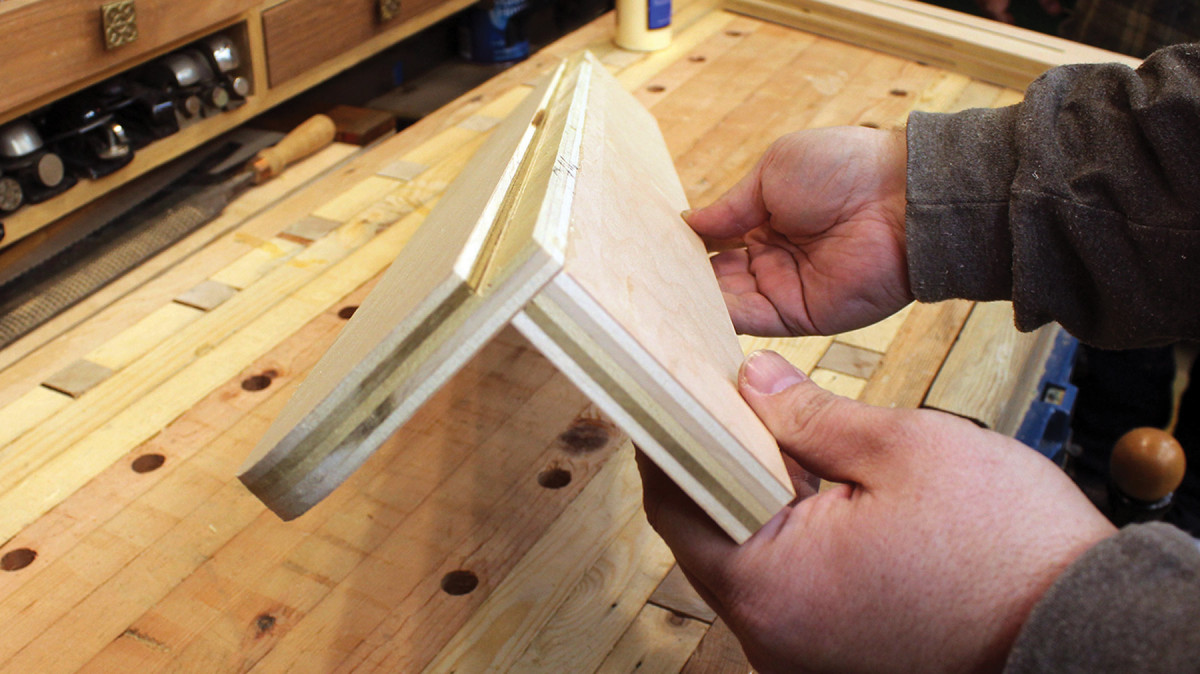
Fence panel assembly. Here’s how the fence face panel and upper fence panel look when combined to make the fence panel assembly.
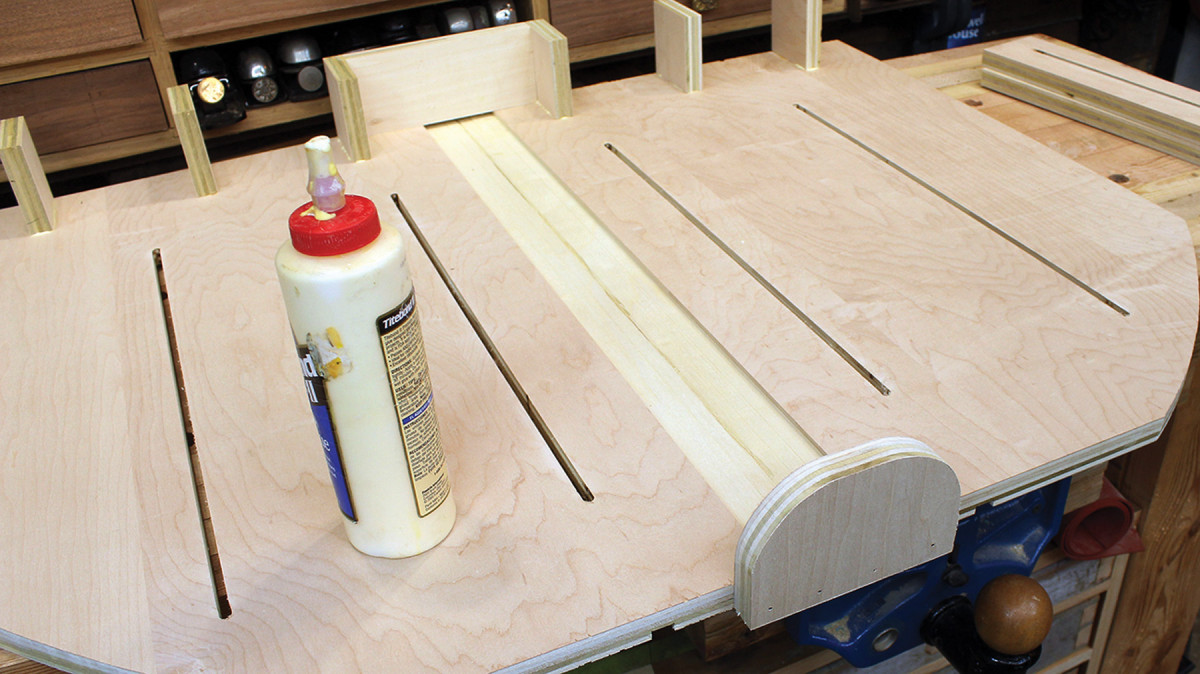
Retrieve the slotted fence extensions (A and B). Place them on edge across the sled’s base against the row of fence blocks, where they will serve as temporary spacers. Now run a bead of glue on the top edge of each of the seven fence support blocks (H-M), and along the lower edge of the fence face panel (G). Carefully set the fence panel assembly on top of the blocks, with the rabbeted panel facing upward. The glued edge of the fence panel will contact the sled’s base just in front of the slotted “spacers.”
Those two slotted parts should be able to slide smoothly in and out of the gap created. You don’t want them pinched in there too tightly – but you also don’t want any extra space.
From beneath the sled, shoot a few brads through the base panels up into the edge of the fence face panel to secure it in place.
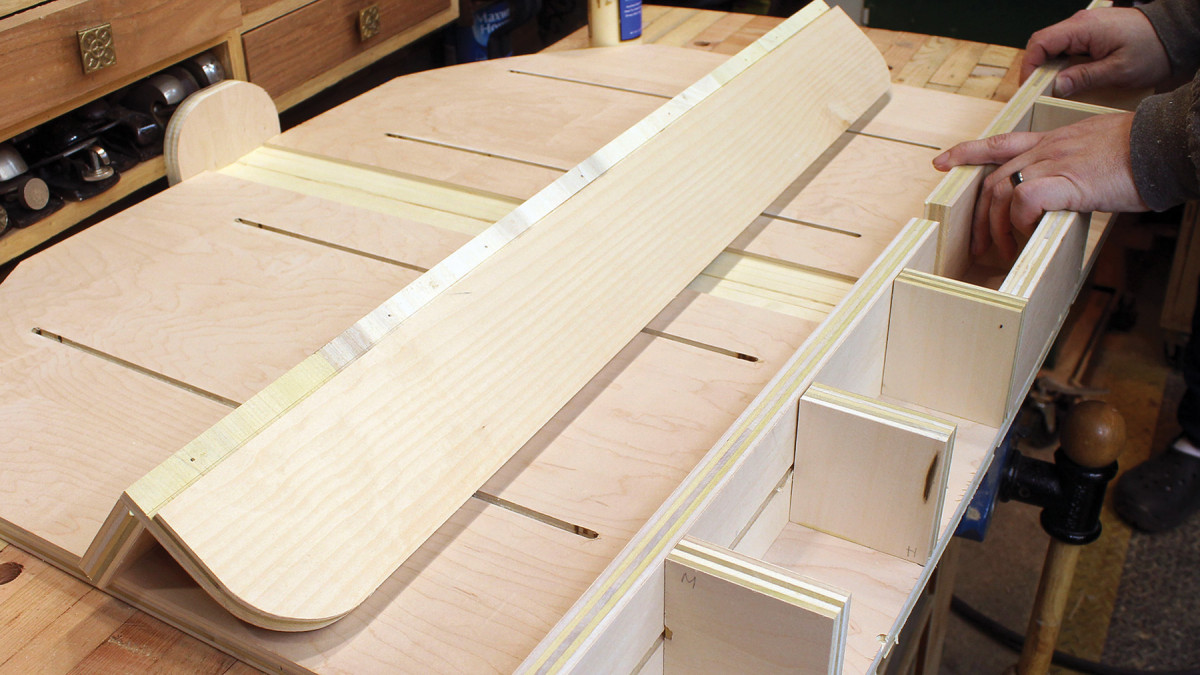
Space out. Use your fence extensions as temporary spacers before attaching the fence panel assembly.
Returning to the top of the sled, check the fence panel assembly for square before the glue sets up. If the face panel isn’t perpendicular to the base of the sled, nudge the rabbeted top panel forward or backward a tiny bit as needed to correct it. Finally, remove the two fence extensions you’ve been using as spacers…before the glue dries and they stay in there forever.
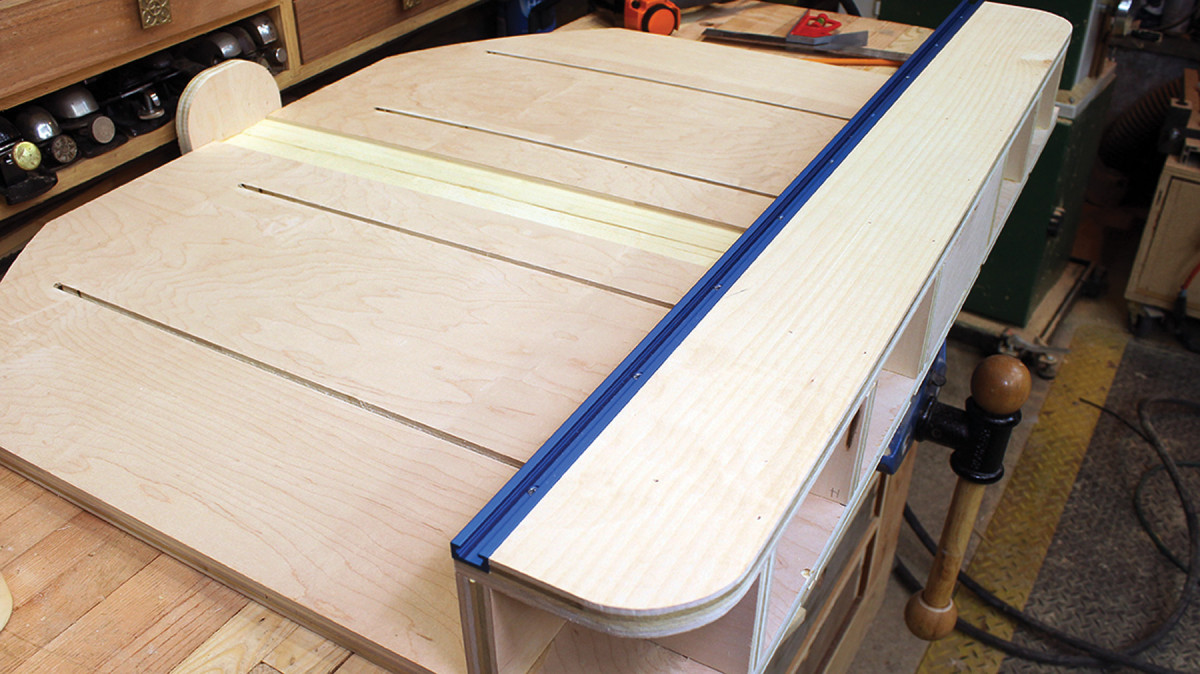
Secure fence. Here’s how the fence panel assembly appears once it’s been secured in place (note that I’ve already installed the T-track here).
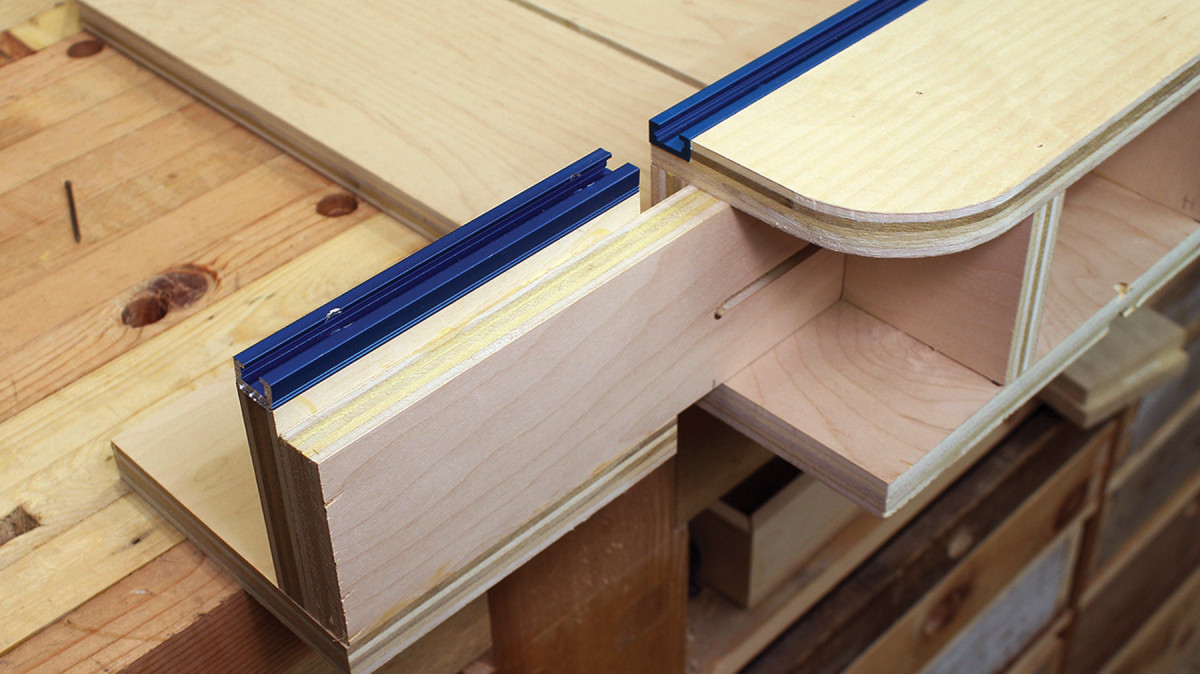
Now grab the extension supports (D and F). Fasten these to the bottom edges of your fence extensions, as shown in the photograph at top right. Note their location near the ends farthest from the slots, and that the two resulting assemblies are mirror images. Also, note that open space on the slotted parts above the pieces you just connected. There, glue the extension spacers (C and E) on edge, on top of the extension supports. I think it’s a good idea to shoot some brads through those support blocks from beneath to reinforce the joints. This completes what have now become your fence slide-outs. Slip them back into their slots on either side of the sled when the glue is dry.
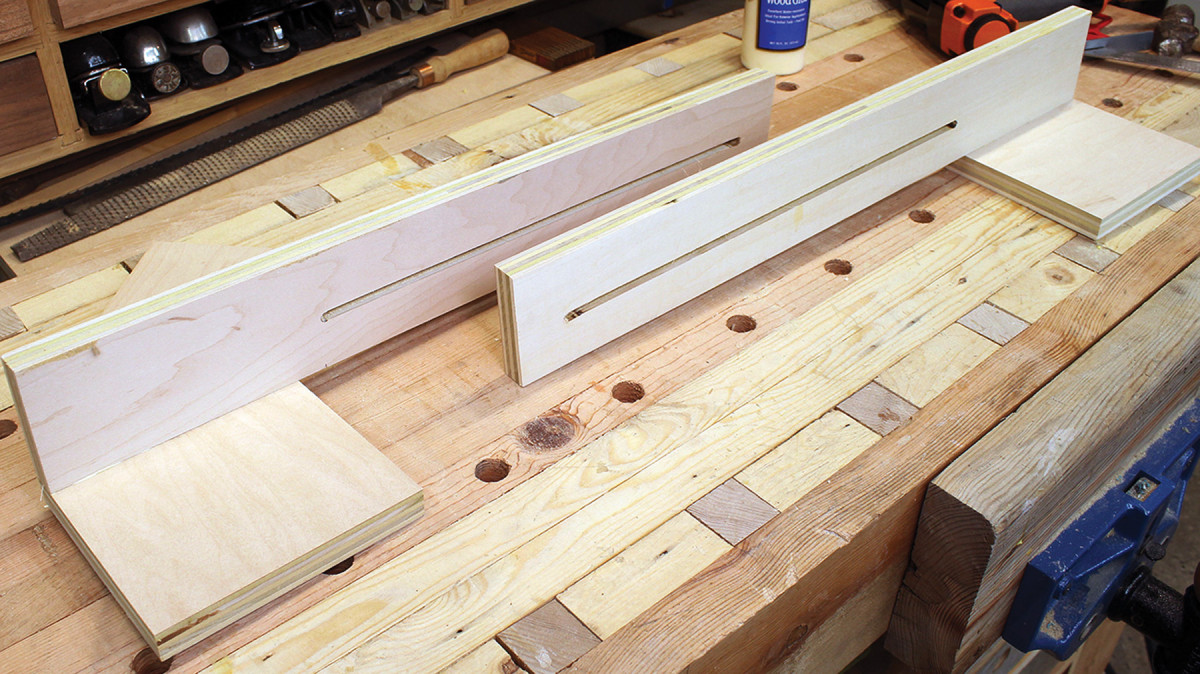
Look at the mirror. The fence slide-outs must be mirror images of each other.
Begin the hardware installation by securing T-track in the rabbet on the fence panel assembly, and to the top edges of the extension supports on your fence slide-outs. Don’t try to drive the screws without first boring pilot holes! You risk spreading the plies in the edge of the fence face panel beneath, compromising its smooth and accurate surface.
On track. After boring pilot holes, attach T-track to the fence and slide-outs.
Chuck a 1⁄4″ bit into a drill. Withdraw one of the slide-outs a few inches and place the bit in the center of the slot, about 1″ from the end of the fence. Bore a hole through, then counterbore the hole from the other side so you can slip a carriage bolt through the hole, locating its head below the surface of the fence face. Repeat these steps on the other end of the fence, then secure both slide-outs with washers and wing nuts.
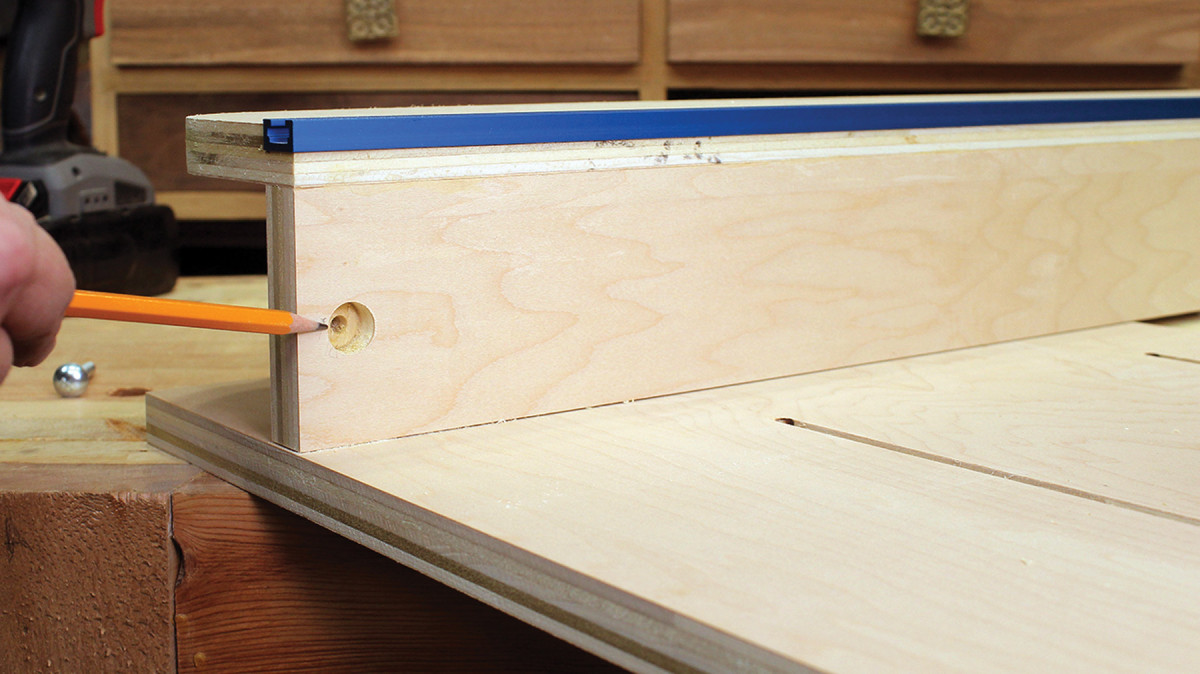
Bore & counterbore. Bore a 1⁄4″ hole in the center of the slot, then counterbore from the opposite side to create an inset for the carriage bolt head.
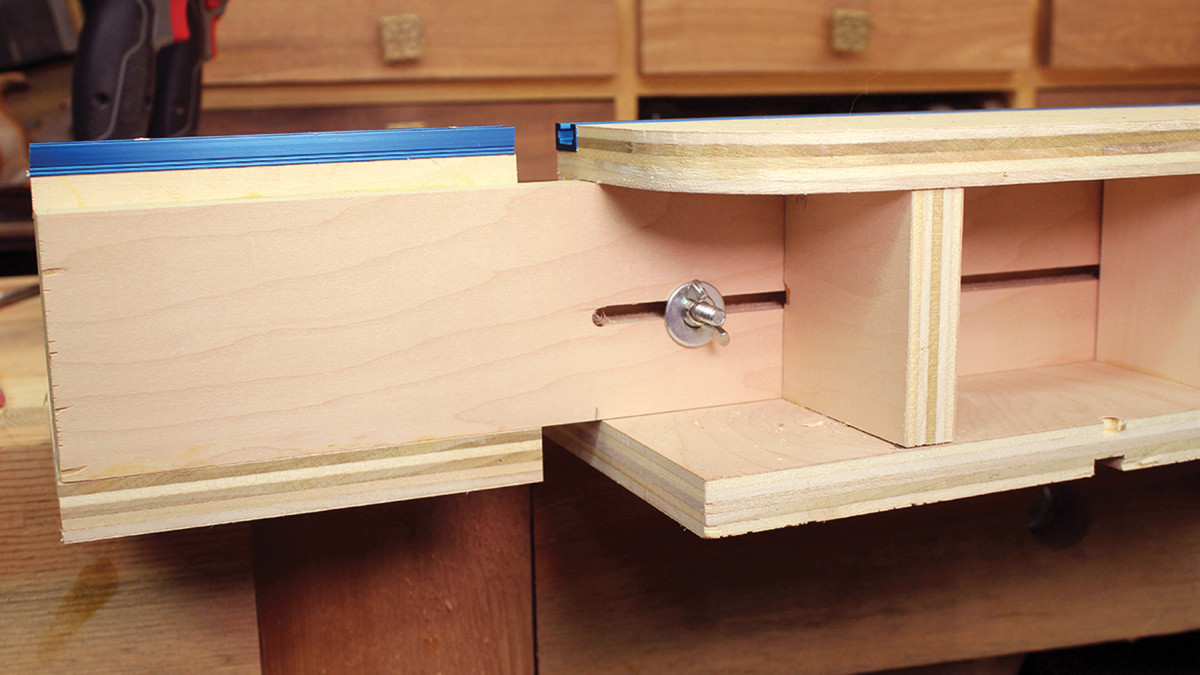
Secure. The slide-outs are secured with wing nuts and washers.

 Article: Build Jigs for your MegaSled
Video. See how to make runners and use them to adjust your sled.
Videos: Watch an overview of the sled’s features and jigs, as well as a scaled-down version: https://www.youtube.com/watch?v=tGmQBMSXt4Y
https://www.youtube.com/watch?v=ROPv_6fczwQ
https://www.youtube.com/watch?v=4ahJmNtMp-g
https://www.youtube.com/watch?v=YYOQqG0LZW4
Here are some supplies and tools we find essential in our everyday work around the shop. We may receive a commission from sales referred by our links; however, we have carefully selected these products for their usefulness and quality.