


We may receive a commission when you use our affiliate links. However, this does not impact our recommendations.

Simple joinery serves this sophisticated geometric design.
Mid-century modern design is enjoying a surge in popularity, and rightly so: Its clean lines and functional design make it practical and attractive, two traits evident in this bookcase by an unknown designer.
Its stark, geometric design shows modern roots while giving it a strong graphic presence. And because it looks good from both the front and back, it’s perfect for dividing a space without completely partitioning it, making it a good match for the open-plan homes of the period, and of today.
Simple construction techniques underlie the sophisticated design: Rabbets in the leg assemblies capture the case, with its interior dividers and shelves joined by dados. The asymmetrical dividers are made from 1⁄2“-thick stock while the outer case is made from 3⁄4“-thick material. The legs and rails are 1” thick. The varying thicknesses, and a 1⁄2” reveal of the case in the legs, add another subtle detail to the design.
The original case was executed in rosewood, but I opted for cherry finished with oil and shellac. It provides a warmth similar to rosewood without the expense. Too, the design lends itself to a variety of materials, so pick your materials to suit your décor.
Following the original, I built the case from sheet goods (the legs and rails are solid cherry), but there’s no reason to choose sheet goods over solid wood. While plywood does require edge-banding, you’ll likely spend the same amount of time gluing up narrower solid stock to produce the wide boards required for the project, so let your preference and working style guide your choice of material.
Mid-century Modern Bookcase Cut List
No.Item Dimensions (inches) Material
t w l
❏ 2 Case bottom/top 3⁄4 x 10 1⁄2* x 35 3⁄4 Plywood
❏ 2 Case side panels 3⁄4 x 10 1⁄2 x 38 3⁄4 Plywood
❏ 1 Long shelf 1⁄2 x 10 1⁄2* x 17 3⁄8 Plywood
❏ 1 Medium-long shelf 1⁄2 x 10 1⁄2* x 10 1⁄2 Plywood
❏ 5 Medium shelves 1⁄2 x 10 1⁄2* 81 x 1⁄16 Plywood
❏ 1 Short shelf 1⁄2 x 10 1⁄2* x 7 3⁄8 Plywood
❏ 2 Tall vertical dividers 1⁄2 x 10 1⁄2* x 37 3⁄4 Plywood
❏ 1 Short vertical divider 1⁄2 x 10 1⁄2* x 28 5⁄16 Plywood
❏ 2 Side frame rails 1 x 1 1⁄2 x 12 Cherry
❏ 4 Legs 1 x 1 1⁄2 x 48 1⁄2 Cherry
Drawer
❏ 1 bottom 1⁄4 x 6 3⁄8 x 9 1⁄2 Plywood
❏ 2 Front/back 3⁄4 x 6 7⁄8 x 6 15⁄16 Maple
❏ 2 Sides 1⁄2 x 6 15⁄16 x 10 Poplar
*Includes 1⁄8″-thick solid edge-banding on both edges

Elevation

Profile

Plan
Edge-banding Two Ways

Edge-banding two ways: clamp and caul, or use masking tape. For either approach, make sure your banding is wide enough to stand slightly proud of both faces of the board.
Because it simplifies cleaning glue squeeze-out, I prefer to pre-finish my parts when a design allows it. That’s the approach I took here for the case interior, wiping on a coat of boiled linseed oil, followed by padding on a couple of coats of blonde shellac.
 Rip the 3⁄4” and 1⁄2” plywood to 10-1⁄4” (which allows for 1⁄8“-thick edge-banding on both sides to produce 10-1⁄2“-wide panels). Then apply the boiled linseed oil and first coat of shellac. With the panels ripped and pre-finished, you’re ready for edge-banding.
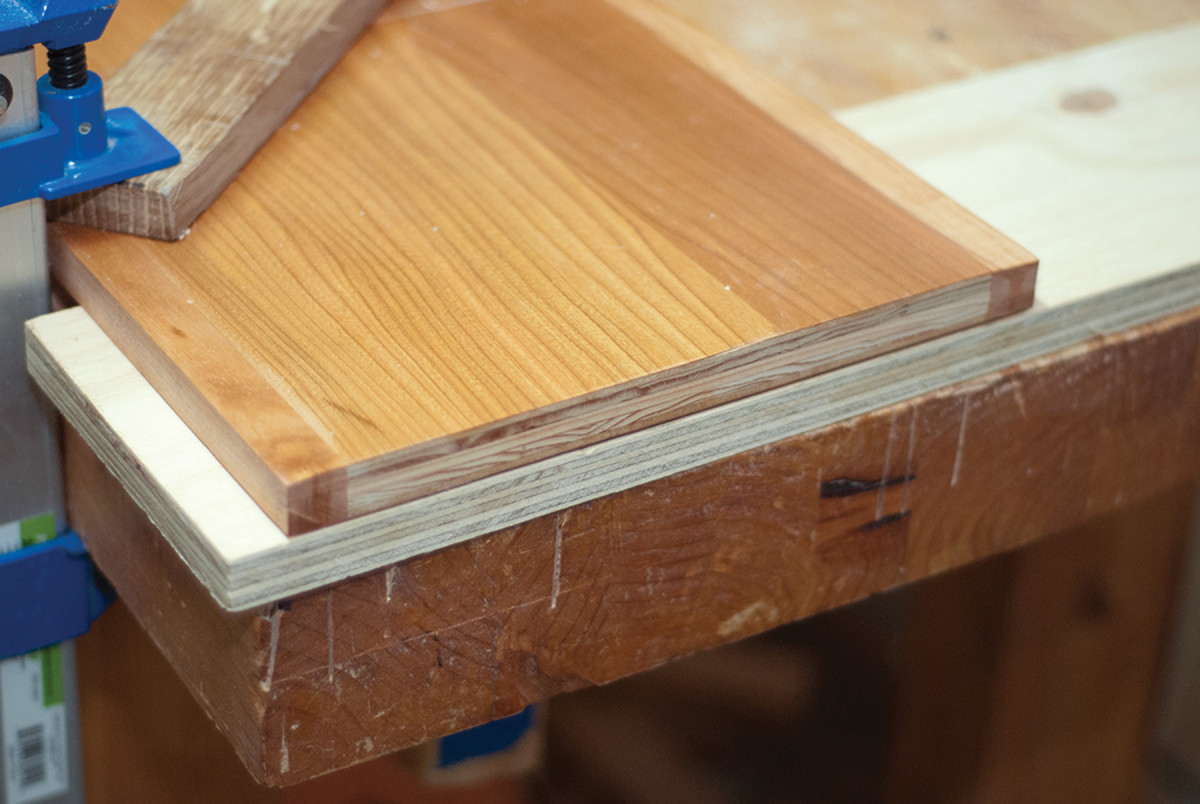
You can use commercial veneer tape and iron it to the edges of your plywood, but ripping your own banding gives you enough thickness to round or chamfer your finished edges. That looks nicer, and it makes the banding blend better with the sheet stock.

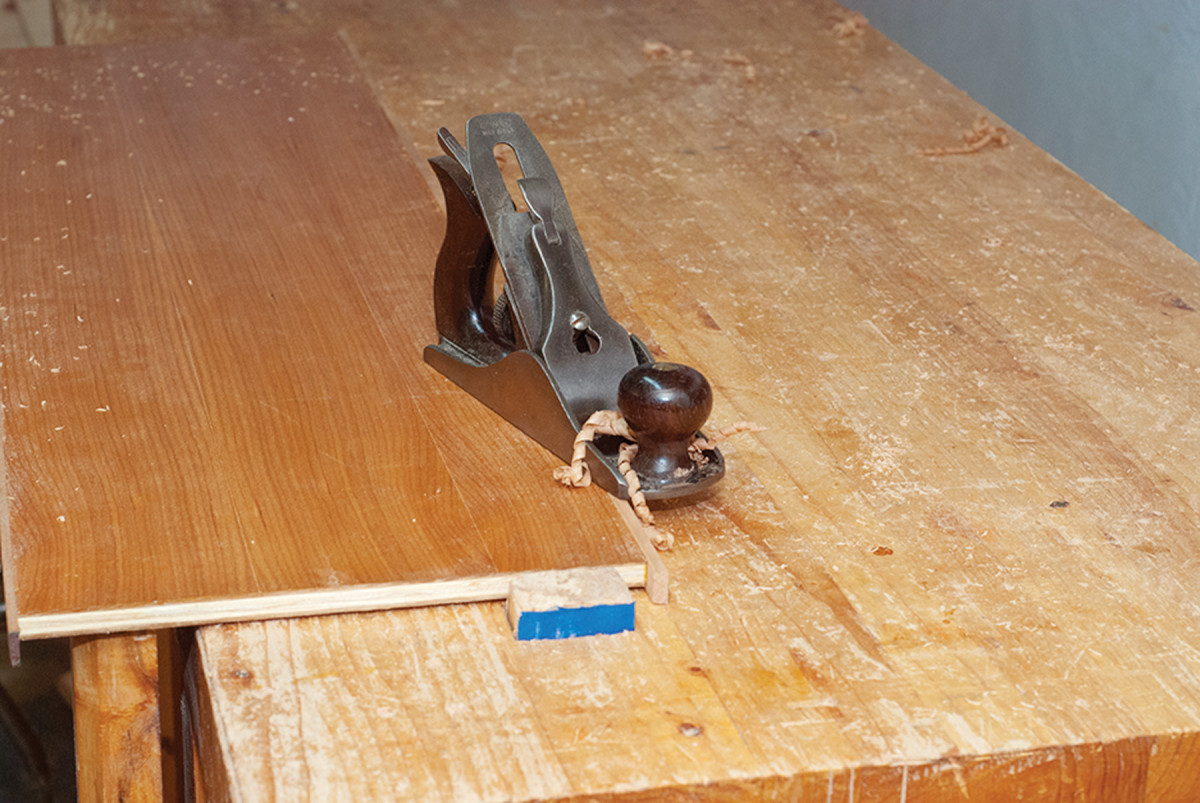
Flush it. A trim router equipped with a flush-cutting bit makes quick work of trimming the edge-banding – but so can a block plane or smoothing plane (though you need to take care to avoid gouging the thin veneer face).
While it’s tempting to set the fence for a narrow cut for ripping, you’ll avoid the risk of the narrow stock jamming in the throat plate if you position the fence to produce a strong 1⁄8” offcut, and reset the fence after every pass.
 After ripping my banding, I planed one face smooth for gluing, then applied it to my plywood. I sized the edge of the plywood by brushing on a thin layer of glue, letting it sit for a minute for the long-grain plies to absorb glue, then applying another thin coat before aligning the banding to the sheet-good edges.
You can use a clamp and cauls to secure the banding while the glue dries, or you can use masking tape, scraping away any glue squeeze-out after it gels.
Once the glue is dry, cut the banding flush with the plywood. A trim router equipped with a flush-cutting bit is designed for this work. The hand-tool alternative is a sharp plane set for a shallow cut.
Dados Join the Interior

Easy dados. This simple jig holds the router base in position and guides it while cutting stopped dados.
The case interior is joined with 1⁄4” x 1⁄4” dados, stopped about 1⁄2” from the edges of the boards. A simple plywood jig guides the router for making these cuts.

Align the bit at the start of the cut (1⁄2″ in from the edge), plunge, then plow.
Mark the location of the dados, align the cut in the fence with your marks, position the router, plunge and plow. Note that where two shelves line up on either side of a divider, the dados will cut all the way through the plywood, leaving solid stock only at either end of the cut.

Router tenons. I used a router with a rabbeting bit to cut 1⁄4″-thick tenons on the divider and shelf ends.
Take care when handling the unassembled 1⁄2“-thick dividers to avoid breaking the workpiece – or set your router a little shallow for these cuts, then trim the corresponding tenons to fit.
Tenon the ends of the interior parts with a rabbeting bit (router) or dado stack (table saw), then notch the ends of the boards for the stopped dados. You’ll need to round over the tenons or square the dados with a chisel to get the parts to fit.
Cut the Miters
Perfect miters. A simple plywood fence clamped flush with the end of the board guides the 45° chamfer bit (take multiple passes) for clean miters.
Miters join the case. I used a length of plywood as a fence to guide a large 45° chamfer bit to cut these joints with a router. Simply position the fence along the end of the board, set the bit for a 3⁄4“-deep cut, and rout the chamfer, easing up to the final depth with multiple passes. Cut and miter the case sides now, but leave the ends a little long until after you’ve dry-fit the case. Doing so allows you to size the pieces for perfect fit.

The fence should extend past the edges of the board, and the inside edge of the board should face up.
The frame assembly pieces are also mitered, but these can be cut with a miter saw. If your stock is long enough, cut each assembly from a single board so the grain runs continuously around it.
Rip the parts to width, cut your miters, then cut the legs to final length.
Size the ends of the boards before gluing and clamp in both directions across the joint, taking care that the boards align and the miters stay tight. When the glue is dry, rout a stopped 3⁄4“-wide x 1⁄2“-deep rabbet for the case, then square the ends of your cut with a chisel.
Decorative Drawer

Drawer details. After cutting the drawer front to size, I drilled a clearance space for fingers at the drill press, then chopped a mortise to house the pull. After coving the edge with a router, I glued in the wooden pull.
With its prominent placement, the drawer creates a strong focal point for the design of the case – so it’s a great place to express yourself.
 Do you have a special piece of stock or veneer you’ve been saving? What about that custom wooden pull you’ve been wanting to try out? Or Greene & Greene-style finger joints? The drawer’s small scale makes it the perfect place for experimentation.
 I used some figured maple and created a simple wooden pull, then coved the edges to create a shadow line. Half-blind dovetails join the drawer box, and the plywood bottom is glued into a rabbet.
—MC
Assemble in Stages

Staged assembly. Assemble the case in stages, building from one side to the other. After the first section is glued up and dry, the second series of shelves and the divider are glued to the first sub-assembly. And so on.
Assembling the case is a bit like putting together a jigsaw puzzle. I built the case from left to right in stages. Join the first series of dividers and shelves and let that section dry before adding the next series. Finally, size the miters and glue the ends to the case.
 Once the assembly is out of the clamps, level its hardwood faces with a smoothing plane or sander and ease the edges of the boards. Now’s a good time to smooth and finish the leg assemblies, too. Glue them to the case, taking care to remove squeeze-out after the glue has gelled, then finish the outside of the case.
 With the case and drawer complete, now comes the hard part: deciding what deserves pride of place on your stylish new bookcase.
Click to download the PDF, with drawings and a cutlist: Mid-century Modern Bookcase PDF
Blog: Read about ways to modify the bookcase for various purposes
Plan: Download a free SketchUp model of this bookcase.
Here are some supplies and tools we find essential in our everyday work around the shop. We may receive a commission from sales referred by our links; however, we have carefully selected these products for their usefulness and quality.


