We may receive a commission when you use our affiliate links. However, this does not impact our recommendations.
A thickness tester makes plywood joinery easy, accurate and predictable.
One of the great questions every woodworker asks is why wood you buy from a home center is never its stated thickness. You already know that 2 x 4’s are actually 1-1/2” x 3-1/2”. At least you can depend on lengths being accurate. Far worse is plywood. 3/4” plywood is only in the range of 3/4”. Manufacturing tolerances are supposed to be: plus/minus 0.8 mm (1/32 inch) for some soft plywoods and plus/minus 0.4 mm (1/64 inch) for utility grade plywoods, to an entirely different set of tolerances for hardwood plywoods: plus 0.0 mm/minus 1.2 mm (3/64 inch).
Besides thickness standards being confusing, there are added variables of temperature, moisture content and significant manufacturing variations from batch to batch.
The result of all this is that a woodworker can’t depend on any stated plywood thickness. If plywood thickness is a critical dimension to your project, you always have to measure it and test it. Never is this issue more relevant than when it comes to CNC based plywood joinery.
If you’re a CNC user, variations in plywood thickness are big challenge because we regularly work in .001”. Once you set your standard to that level of accuracy, there’s no going back. For digital woodworkers, there are many excellent plywood-based CNC joinery projects that all rely on very accurate plywood measurements.
I’ve found that even after using accurate digital calipers, I still have to test critical plywood joints. To deal with this problem and speed up the process of testing and fitting, I’ve devised a simple solution: a plywood thickness gauge.
Yes, you could just use a micrometer to measure thickness, but even in digital woodworking a number is not the same as how a joint feels as it comes together. Numbers are great, but when it comes to joinery, it’s the feel that’s most important. To do that, you need to test cut the joint parts and fit them together. Hand tool woodworkers know that if a joint is too tight, you’ll know it right away after you attempt a test fit. With a plywood thickness tester, you can dramatically shorten the testing process and adjust your cuts before any parts are cut. Once you find the fit you’re after, enter the information into your CAD dimensions for the mortised joint area of your drawing or if your CAM software allows fine tuning as mine does, you can adjust your settings there.
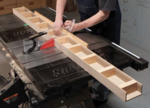
The gauge is very simple. It’s just slots with different precision openings cut on a small piece of plywood. In use it works much like the metal feeler gauges that mechanics use for gapping spark plugs and setting valves. The gauge consists of slots based on the expected standard thickness of a given size — 21/32” or .71875” or 19 mm for 3/4” plywood for example. You test a sample or slip the tester over the corner of a large piece of the plywood in the default, smaller, and larger slots — incrementally sized plus or minus 005”, until you get the fit you’re after.

First prototype of the plywood tester has worked great over the last 3 years. Now, it’s time to build a refined version.
Making a Plywood Thickness Gauge
Though overall size is not critical, I’ve made several for students and have found that a 12” x 18” x 3/4” plywood blank will give you all the slots needed to test 1/4”, 3/8”, 1/2”, 3/4” or metric sizes of 6mm, 9mm, 12mm and 18mm plywood through a range of actual thicknesses of -.010” to +.020”. Because you’re not just testing clearances, but the feel of a joint, I suggest making your plywood gauge out of 3/4” or a 1/2” thick plywood so there’s some drag as you test fit.
If you have access to a CNC, I’ve inclosed a link to a Rhino3D and a DXF file to make your own plywood feeler gauge. To make one you need to mount a .75” – 1” long x .250” spiral bit (compression preferred) in your spindle or router. Unfortunately, you can never trust that .250” cutting diameter is really .250”, so, I strongly suggest you get in the habit of using a precision micrometer to verify the cutting diameter of all your bits. I’ve found that it’s rare to have a bit to be the stated diameter. Plus, after sharpening, bits are even smaller. In the .001” world of CNCs, it always pays to check your bits. Once you have the measured diameter of the cutting diameter of your bit (not the shaft!), enter the information into your CAM programming tool information. For example if a bit is .244” in diameter enter that diameter instead of .250”. This way your slots will be cut accurately and the numbers on the tester will be correct.
Since I had a little extra room on my tester, I included variations in .5” holes along with the slots I often use .5” hard nylon stock for positioning pins on my CNCs and this way I can test the pin mortises I most frequently use.
Remember to Go Slow
When machining with a small diameter bit, don’t be too aggressive or you’ll over-heat or break the bit. On my CNCs that use 2.2kW spindles, I usually cut plywood in multiple passes at around 50-60” per minute with a depth of .26” per pass. If you have a smaller spindle or trim router on your CNC such as a Shapeoko you might want to slow this to 30-40″ per minute or use an upcut spiral bit and reduce your cut depth to 1/8″.
Once you’ve completed machining it’s time to write relevant size information of the openings on the thickness tester. That’s the information you’ll transfer into your CAD or CAM software to get the right fit. For the latest versions of my plywood testers, I laser-etched the information on to the tester using a Dremel LC40 Laser Cutter. Here’s a link to the DXF file to make your own plywood tester and a PDF file with the details to write on your plywood thickness tester. Every CNC user should have one around.
Additional Resources
- Digital Woodworking Plywood Tester Files to Download
- Digital Woodworking on Instagram
- Digital Woodworking YouTube Channel
- Personal Work on Instagram
Here are some supplies and tools we find essential in our everyday work around the shop. We may receive a commission from sales referred by our links; however, we have carefully selected these products for their usefulness and quality.