We may receive a commission when you use our affiliate links. However, this does not impact our recommendations.
Learn techniques for ‘shallow relief’ and ‘applied’ carvings.
Have you ever been involved in something where you get completely absorbed in it? Where hours go by without realizing it? Those are the moments when you discover something you truly love.
Within a month of taking classes from European Master Carver Konstantinos Papadakis, I knew carving would be my life. I often found myself dreaming of my next project. When speaking with people, I would find myself studying their faces intently and wondering which gouge I would use to achieve those shapes. That’s when I knew I was obsessed.
This article is a walk through the basics of getting started in carving so the idea and possibility of this art form can become a reality – and hopefully prevent injury, tears and frustration. Who knows? It might become an obsession in your life, too.
Two Approaches
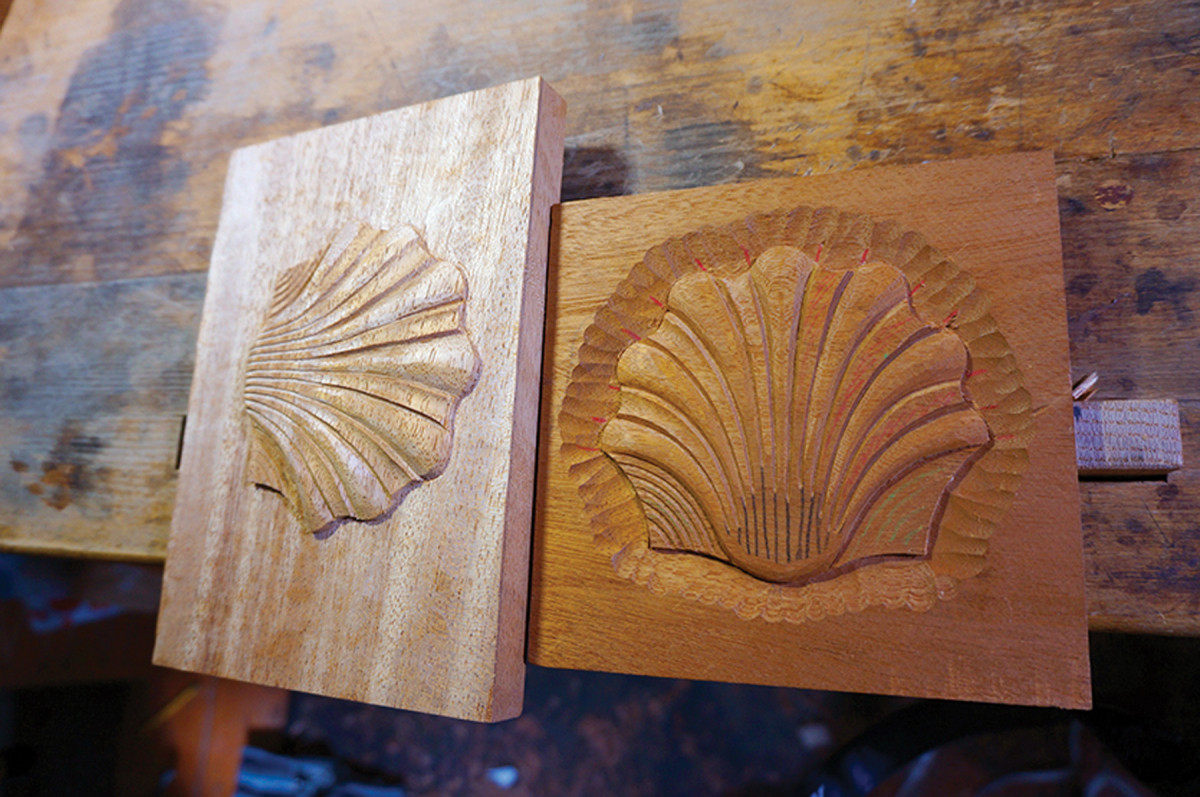
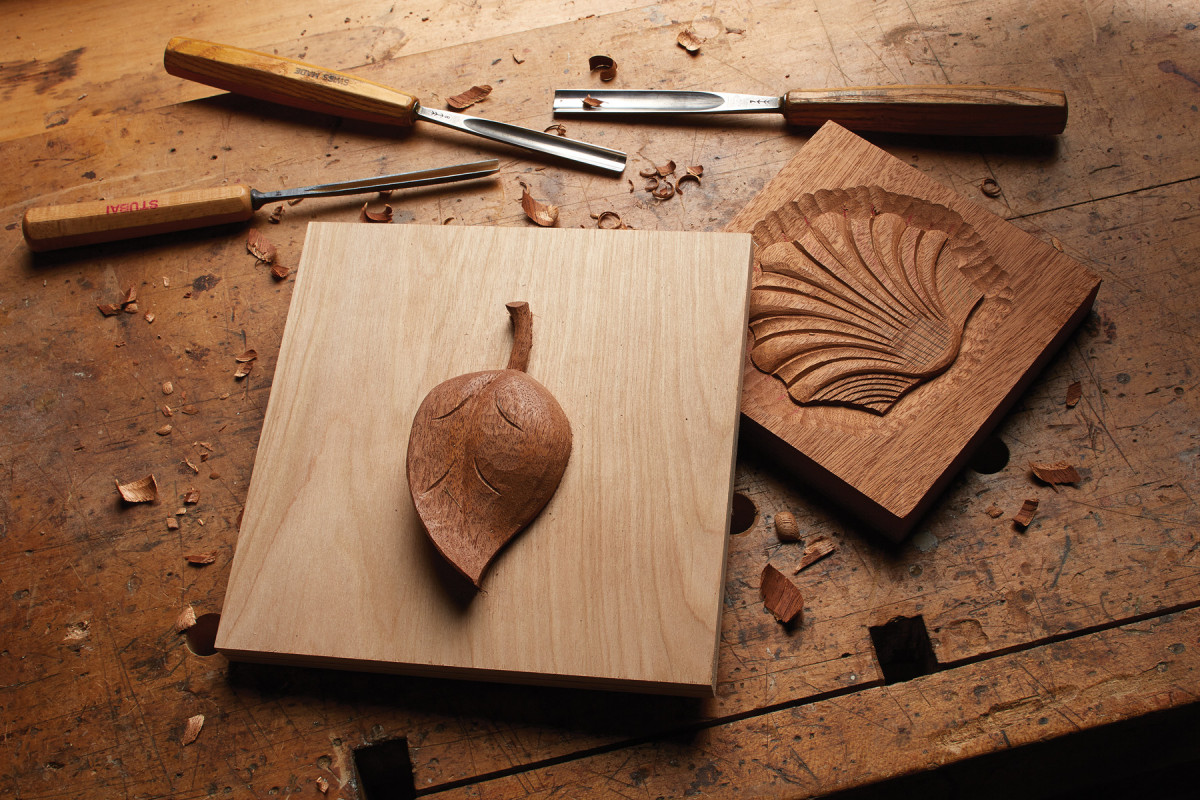
Relief two ways. The entire background of the shell at left has been lowered. At right, a series of angled cuts around the perimeter of the carving sets it off from the background.
Carving a shallow design directly into a flat board is the simplest way to start. This is referred to as “shallow relief carving,” where the background is lowered with gouges and the carving appears to be raised off the surface. There’s no sawing necessary, and it’s easy to clamp your wood to a workbench.
There are two ways to carve shallow relief in a flat board. One is to lower the entire background flat and the other is to carve down at an angle close to the design. This technique can be used as a design on the top of a jewelry box, for example.
Another technique, referred to as “appliqué” or “applied carving,” is to cut the outline of the design with a band saw or scroll saw before carving. When the carving is finished, it is glued to your piece of furniture. With this technique, the carving is attached to a temporary backer board. This process is explained in the “Clamp Without Damage” below.
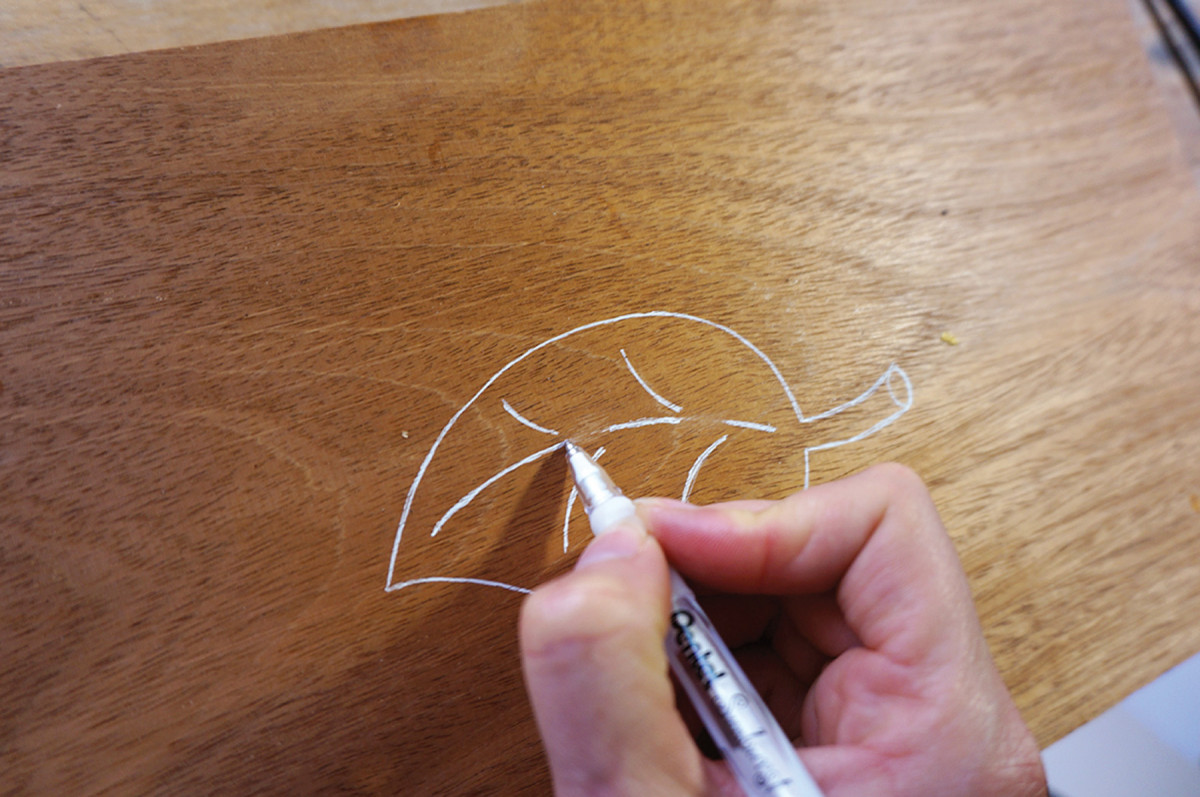
Transfer a Design to Wood

Apply yourself. Carvings may also be separate from the background and applied to a panel after the carving is complete.
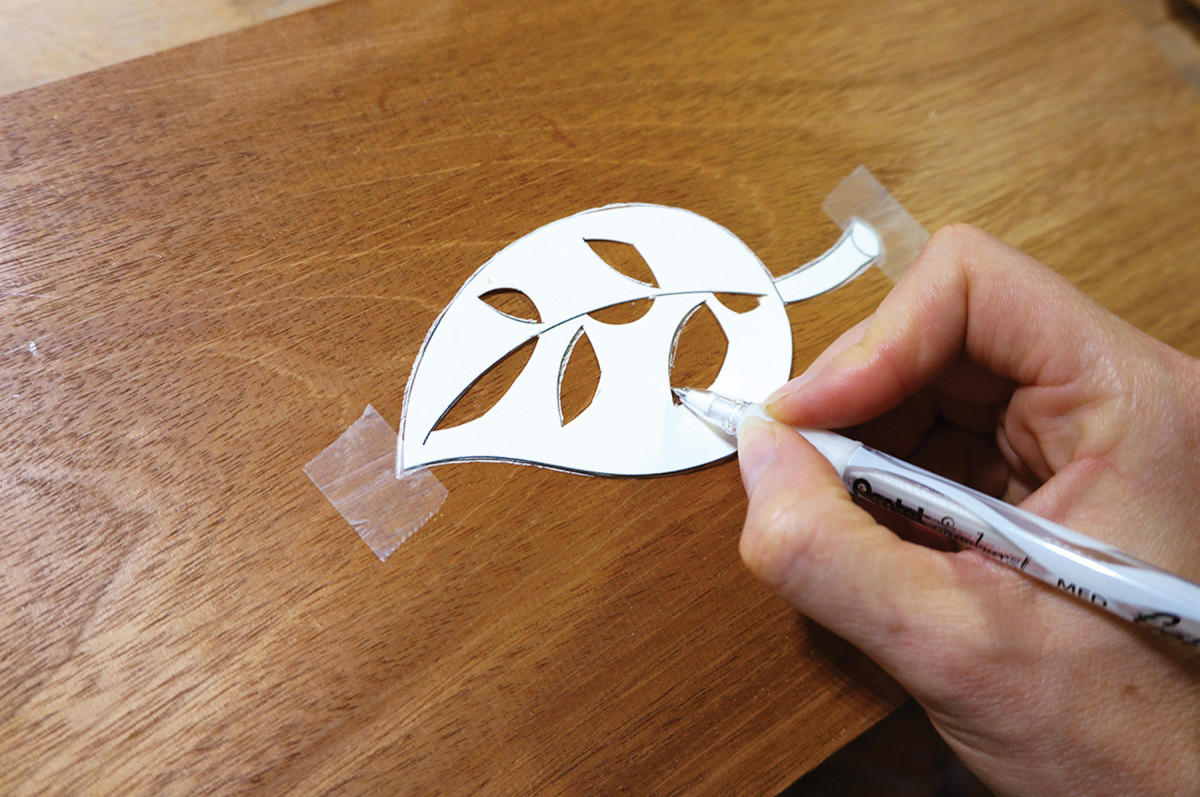
One of the simplest methods to transfer a design to wood is to use carbon paper or transfer paper and trace a design. Carbon paper (from an office supply store) produces a blue or black line, while transfer paper (from a craft store)comes in a variety of colors. Lighter colors are more visible on dark woods, such as walnut or mahogany. Carbon paper is difficult to erase, while most transfer paper can be erased with a regular pencil eraser.
Another method is to trace around a template. This is approach is often used when the design repeats a pattern, and speed and accuracy of the transfer process are important.
Templates work well with patterns that have a mirror image. The template can be flipped on a centerline and a reverse pattern drawn.
A template, however, can make it difficult to transfer interior lines. Strategic holes in the template can help, but be careful how you cut the holes or your template may fall apart. You may need to complete any interior lines by hand.
Template Materials
Repeat after me. Templates make it quick and easy to duplicate a pattern, including complex shapes with interior elements.
For templates, a variety of materials can be used; I use card stock, flexible plastic or metal. A template works best if it has some thickness so a pencil can run along the edge. Use a white or colored gel pen, or a colored pencil, to transfer onto dark wood to see the drawing better.
To use manila folders or card stock as a template, glue a photocopy of the design to the heavy paper with spray adhesive, a glue stick or other adhesive. As this type of template is used, the outside edge will become worn and distorted. Put Super Glue along the edge of the template to keep it intact.
Plastic page dividers or disposable plastic chopping mats work well for templates. Because the plastic is transparent, the design can be easily traced. Keep in mind that the plastic will need to have at least one rough side to receive a pencil line, or you can use a marker that will write on smooth plastic.
Lighten up. On dark woods, a light-colored pencil or gel marker creates lines that are easy to see. Complete the interior lines by drawing freehand.
Aluminum or copper can also be used as template material. These materials are especially useful for transferring a design to a curved surface because the material can form along a contour and hold a shape.
Another way to transfer a design is to use a photocopied image (from a toner copier, not an ink-jet printer). The image is transferred by turning the design over and rubbing over the paper with lacquer thinner or with a hot iron to release the toner ink to the wood. (Note: The wood must be smooth.)
This is a great method for transferring large detailed designs where the lines need to be transferred accurately.
Not all copy machines are the same. Some release every detail; with others, it’s difficult to get a clean line. When working with solvents, work in a well-ventilated space and use proper safety gear (gloves, mask and safety glasses).
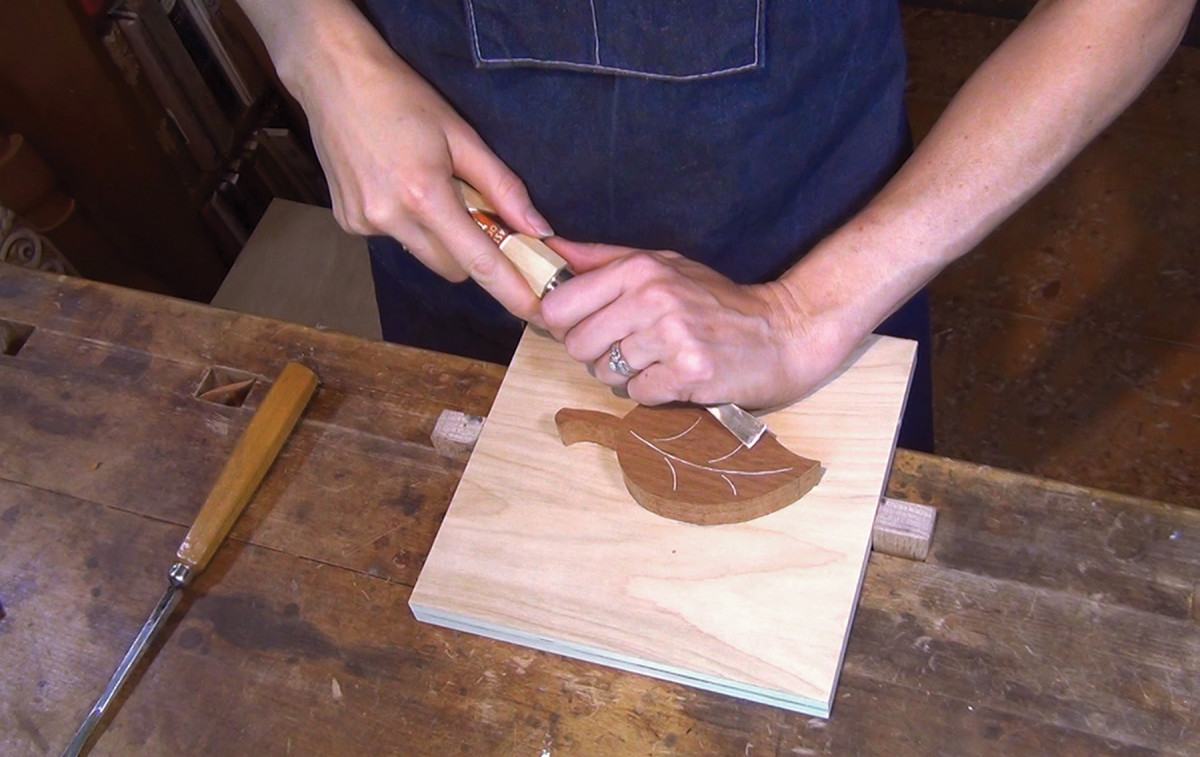
Clamp Without Damage

Temporary fix. Paper glued between a backer board and a carving can be easily removed after the carving is complete.
The best way to hold the wood while carving is to use bench dogs with a vise. I started on a kitchen table and held my carving with two bench clamps. (It’s not great for the table if you slip, though!)
When using metal clamps, place pieces of wood, cardboard, cork or leather between the clamp and your wood to protect it from damage or dents. And be careful not to hit the clamps with your tools. (If the clamps get in the way, attach your work to a backer board.)
Carvings that are applied or glued to furniture are often cut out with a scrollsaw or band saw. This makes the carvings fragile and difficult to clamp. Attach the carving blank to a temporary backer board, then clamp that to your bench.
Find a board that extends several inches past your carving on all sides. Trace the pattern onto the board and spread white or yellow wood glue in this area. Place newspaper or brown paper over the glue, then cut the paper close to the shape of your carving.
Spread glue on the back of the carving, using enough to saturate the paper, but not so much that it seeps along the edge when clamped. If any glue does squish out, wipe it away with a damp cloth. It’s best to clean any excess now rather than let dried glue interfere with your carving.
Place the carving on the backer board and clamp it flat. With larger or intricate carvings, place a board over the carving blank, then clamp to ensure even pressure on all parts of the blank. When the glue is dry, you’re ready to get to work.
To remove the carving when you’re finished, place a flat chisel or a sharp putty knife between the carving and the backer board and gently tap it with a mallet, working around the carving. The paper will split and release. Be careful; it is easy to break the carving in fragile areas.
Strong double-sided tape is better than the glue-down method for delicate carvings. I use ShurTape double-sided cloth tape, which can be purchased at most hardware stores. Woodturner’s double-sided tape can also be used.
Trace the pattern on the backer board, then place double-sided tape over the outline. Remove the back of the tape, place the carving on the board and clamp. Remove any excess tape with a small knife – wood chips sticking to exposed tape while carving are annoying.
When the carving is finished, brush along the edge with a solvent such as acetone, lacquer thinner or denatured alcohol to release the blank from the backer board. Test to see what solvent releases your tape, using proper care and ventilation.
A Good Set of Tools

Within reach. These two gouges are the same size and sweep, but the fishtail gouge at the top is more versatile. It can cut into corners and other tight spaces.
I prefer full-length gouges (9″ to 11″ long) over shorter palm gouges for safety and control. These are held with both hands, which keeps your hands away from the tool’s sharp edge. One hand is always on the handle pushing the gouge, and the other hand is always on the metal shank guiding the cut.
Most European tools are identified with two numbers, such as a 14mm, No. 5. The “mm” is the width in millimeters and the “number” refers to the curvature, or “sweep.” No. 1 is a flat chisel and as the numbers increase from 2 to 11, the curve increases.
I prefer fishtail-shaped gouges because they fit nicely into corners. Straight gouges are for more heavy or sculptural carving. Most European woodcarving gouges are good quality and I use tools from a variety of makers.
Brass, steel, wooden or rubber mallets work well at a weight of 1 to 1 1⁄2 pounds. Wooden mallets are better for heavy pounding and removing a lot of wood because they do not damage gouge handles. Brass or steel mallets work well for lighter tapping and controlled cuts. I use metal mallets for all my carving because I prefer their small size.
If you like, wear fingerless gloves to protect the sides of your hand from the rough edges of the wood. Kevlar carving gloves can also be used to prevent cutting your fingers.
Basswood and butternut are the best woods to start with. They are soft and easy to work. For more advanced carving projects, mahogany and walnut are good woods to tackle after learning the basic techniques in softer, more forgiving species.
Start with Good Techniques
Get a grip. Use both hands on the gouge for control and safety. Keep the hand that holds the metal shaft in contact with the wood and use it to pivot the tool.
Position the wood with the grain parallel to the edge of the bench so that most cuts are made to the right and left, instead of toward and away from your body. Keep the base of the hand holding the metal shank of the gouge on the wood at all times. This creates a pivot that controls and guides the tool.
Most people have one hand that is dominant. This hand feels more natural holding the handle of the gouge and the less dominant hand holds the metal shank. But the carving process is more efficient and flexible when you can switch back and forth between your right and left hand.
With basic relief carving, the ideal work height is an inch or two below elbow height. This allows you to lean into the work without bending too far. If the workbench is higher than your elbows, you will lift your shoulders too high; if it is lower, you can strain your back.
If you are able to, stand to have the most flexibility while carving. This allows you to shift your entire body for better leverage and access to the carving. It also allows you to lean and use the weight of your body to make cuts, rather than relying on arm strength. I have had several students who are confined to wheelchairs and they have been successful using small laptop benches.
Never cut toward yourself. Even if it seems like there is enough wood between you and the gouge, make it a habit to never point the gouge toward your body – even if it is just a small cut. Turn the wood around if needed to stay safe.
Basic Tools & Equipment
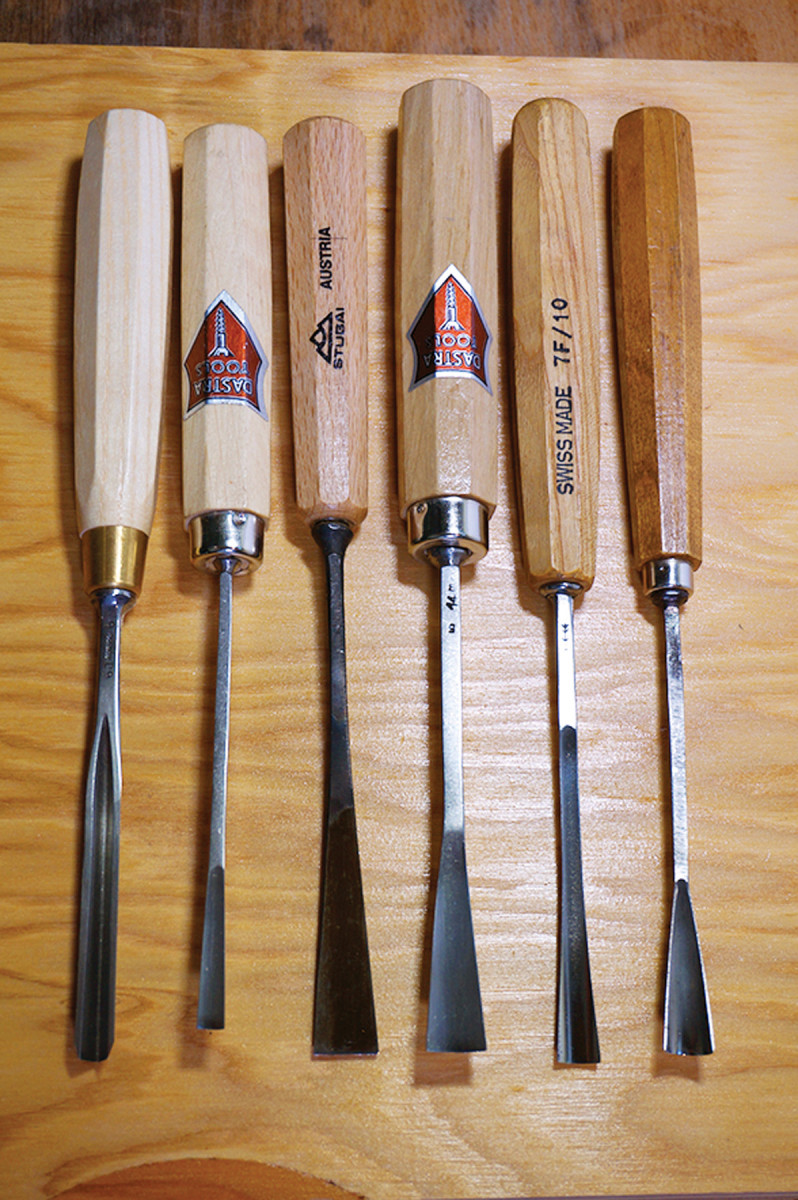
Begin with the basics. The assortment of gouges at right can create a surprising variety of shapes and allow you to get a good start in carving. From top: ■ 6mm V-chisel ■ 6mm, No. 3 gouge ■ 14mm, No. 3 gouge ■ 14mm, No. 5 gouge ■ 10mm, No. 7 gouge ■ 10mm, No. 8 gouge
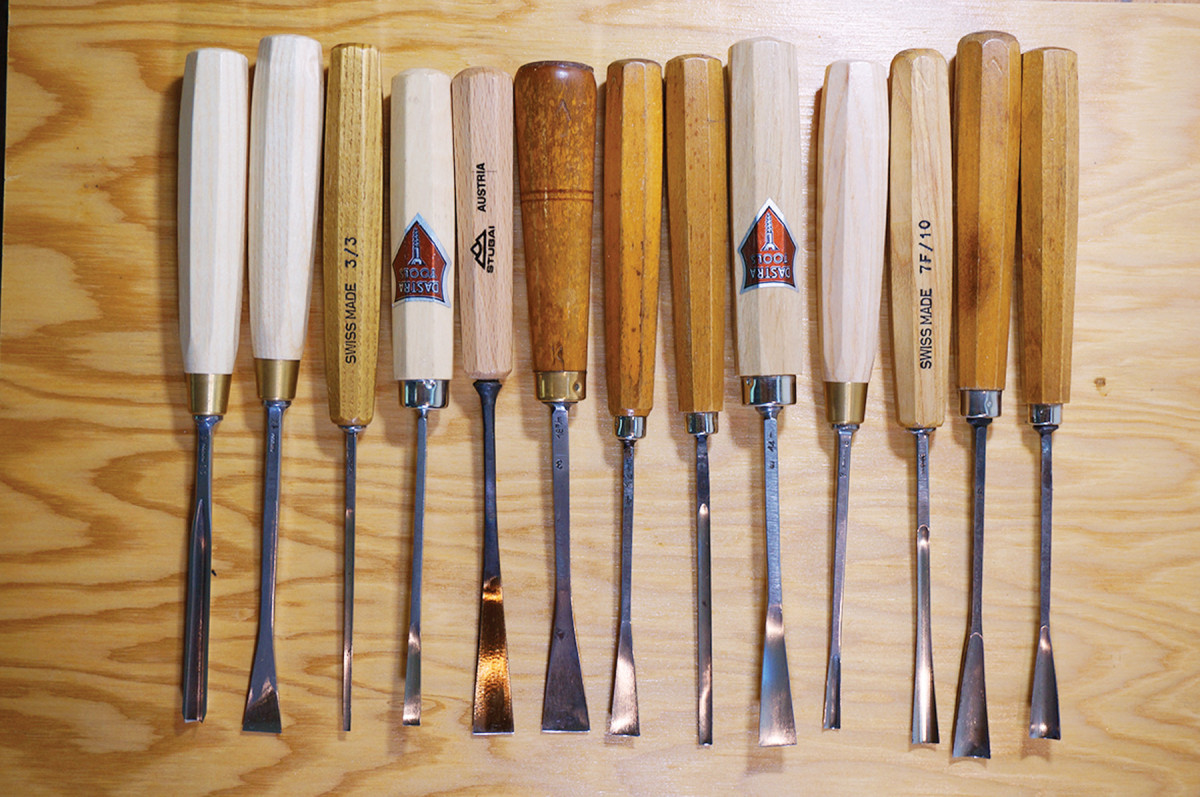
Add as needed. As you gain experience, you will discover the need to add to your set of carving tools. This group will take you to the next level. From top: ■ 6mm V-chisel (60°) ■ 14mm, No. 1 gouge ■ 3mm, No. 3 gouge ■ 6mm, No. 3 gouge ■ 14mm, No. 3 gouge ■ 18mm, No. 3 gouge ■ 12mm, No. 4 gouge ■ 5mm, No. 5 gouge ■ 14mm, No. 5 gouge ■ 6mm, No. 7 gouge ■ 10mm, No. 7 gouge ■ 14mm, No. 7 gouge ■ 10mm, No. 8 gouge
The tools in my preferred sets are mostly the sizes I used when I started carving. I became accustomed to these particular sizes and shapes. The tools in these sets can vary slightly in width and curvature, but they are a good general set of tools. You can add tools as you find a need for them.
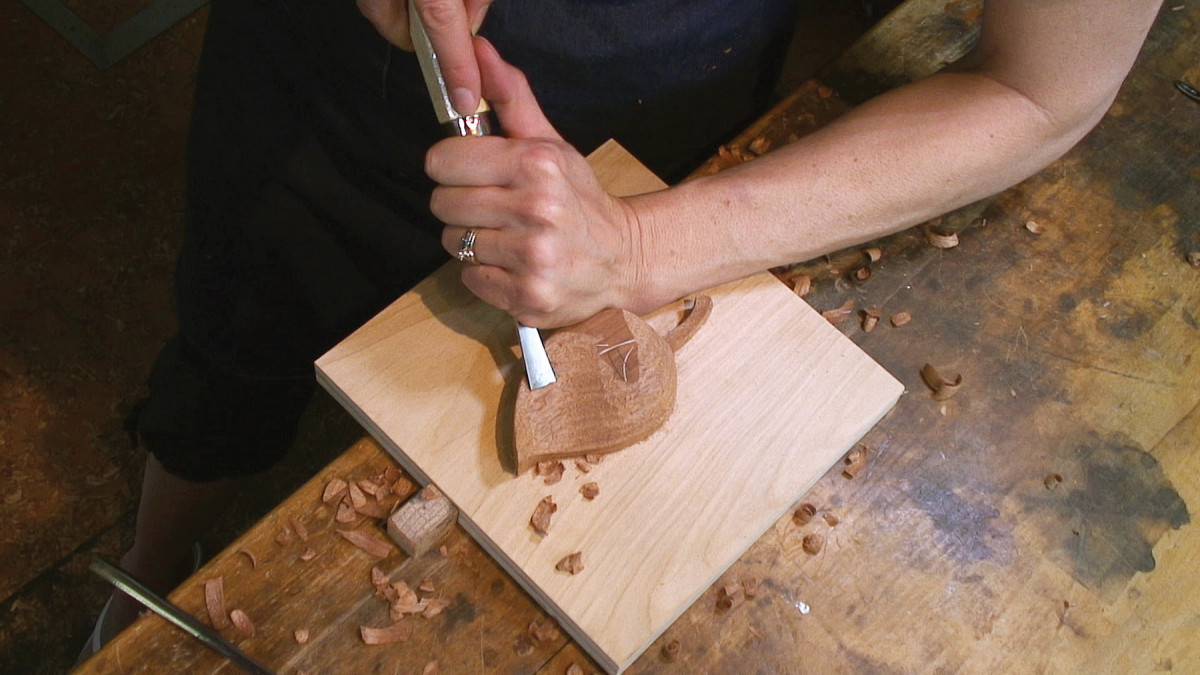
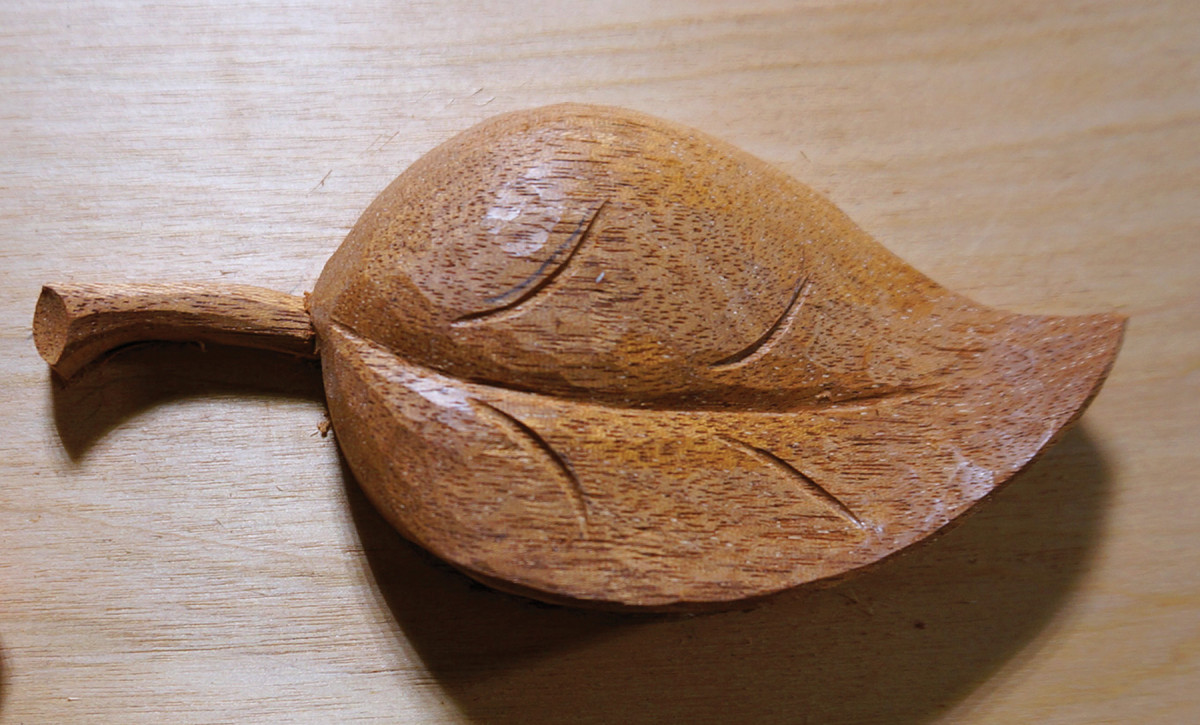
Carving a Simple Leaf
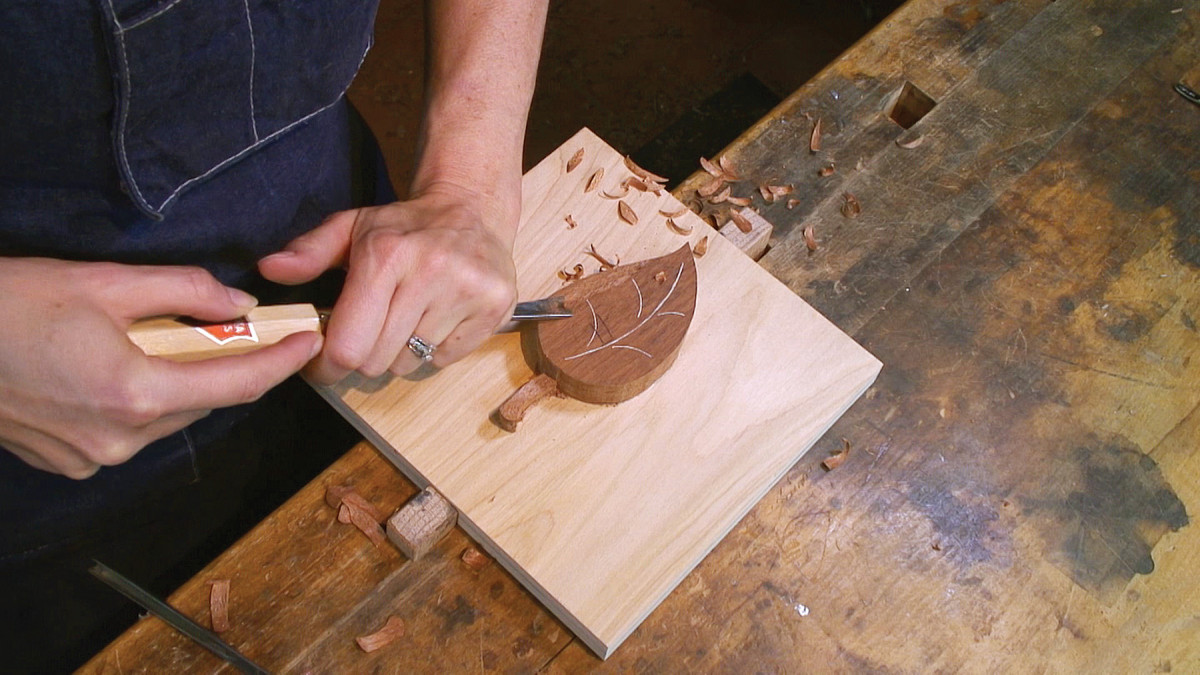
1. Correct grain direction. Using a 14mm, No. 3 gouge, round over one side of the leaf, starting this cut at the peak of the curve where the grain switches direction. Work downhill to stay in control and to prevent the wood from splitting ahead of the cut.
2. Also correct grain direction. Reverse direction at the peak of a curve to follow the grain. Learn to hold the handle with either hand to work efficiently.
One of the most challenging parts in learning to carve is figuring out how to cut in the correct grain direction. As a teacher, this is also one of the most difficult things to explain. Sometimes the best way to discover this is to put the gouges to wood and see what happens. If it fights with you, turn around and go in the other direction.
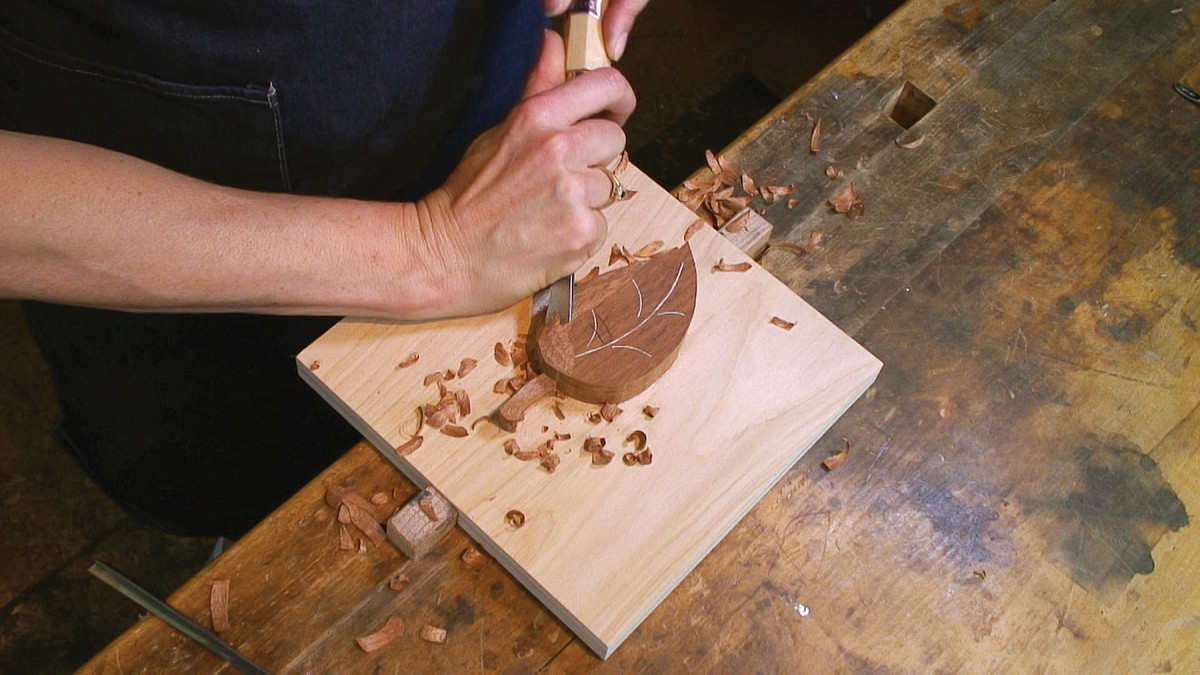
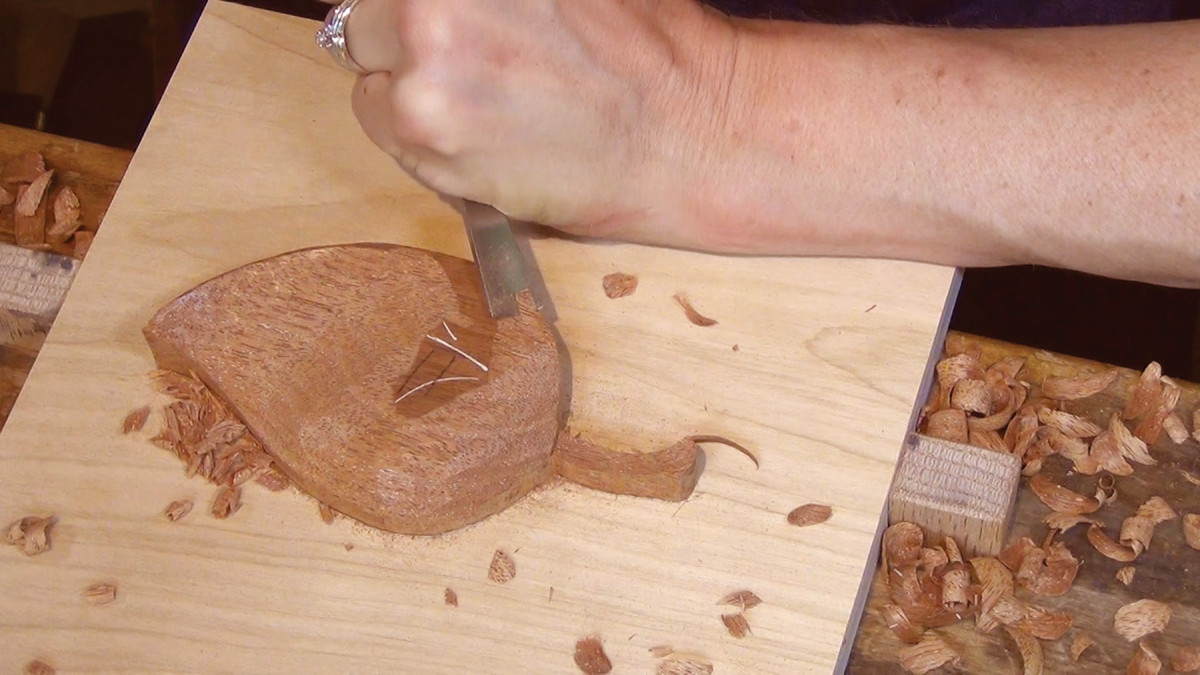
3. Meet in the middle. To carve the hollow of the leaf, use a 14mm, No. 3 gouge to carve down from both sides to meet at the bottom of the hollow.
4. Define the edge. Using a 14mm, No. 5 gouge, continue shaping the hollow section of the leaf by carving along its perimeter. Notice the direction I am carving. This will also create a sharp, high leaf edge.
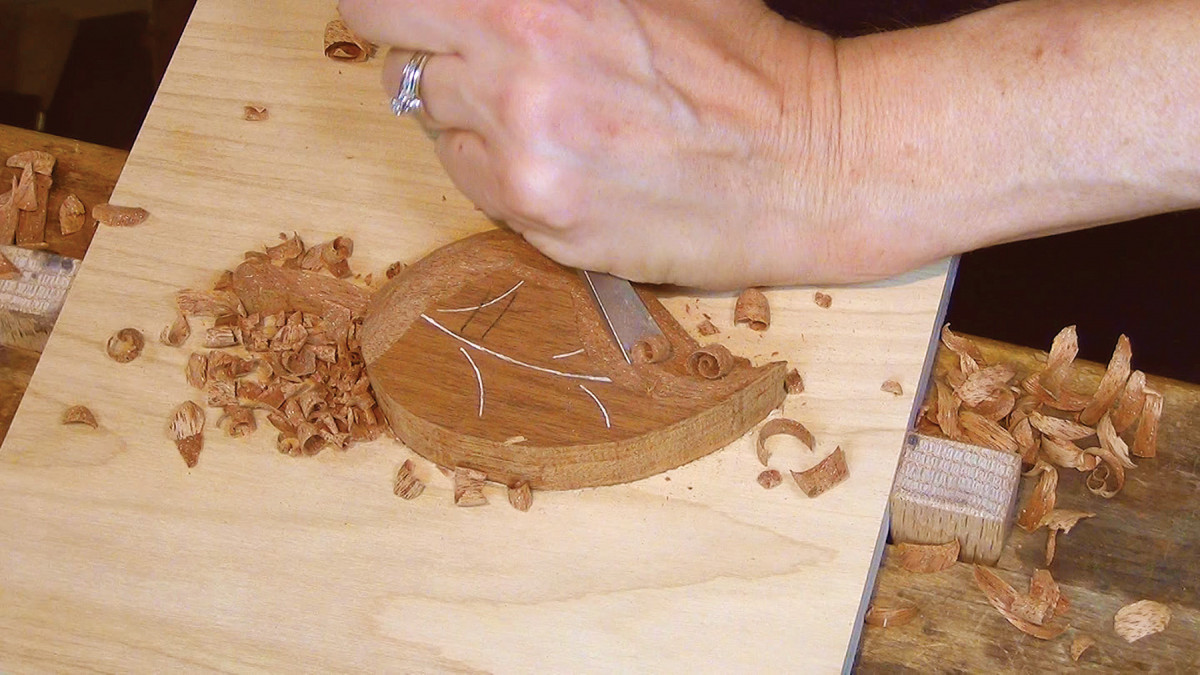
5. Across the grain. To finish defining this part of the leaf, make a gentle slicing cut across the grain at the bottom of the hollow. This technique of cutting across the grain is very useful when making these final clean-up cuts.
To get a basic idea of how the grain works in carving, study the eight numbered photos on this page and the next, in which I carve the simple leaf design.
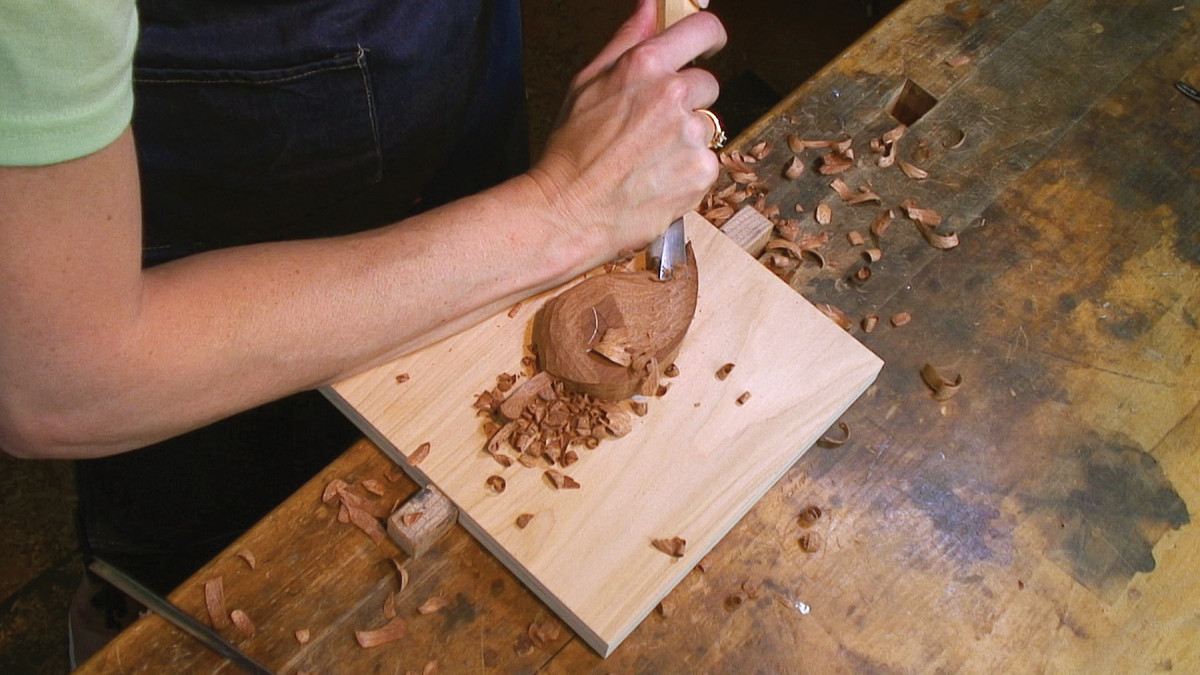
6. Finish shaping. Using a 14mm, No. 3 gouge, finish rounding over the other side of the leaf to complete the shape.
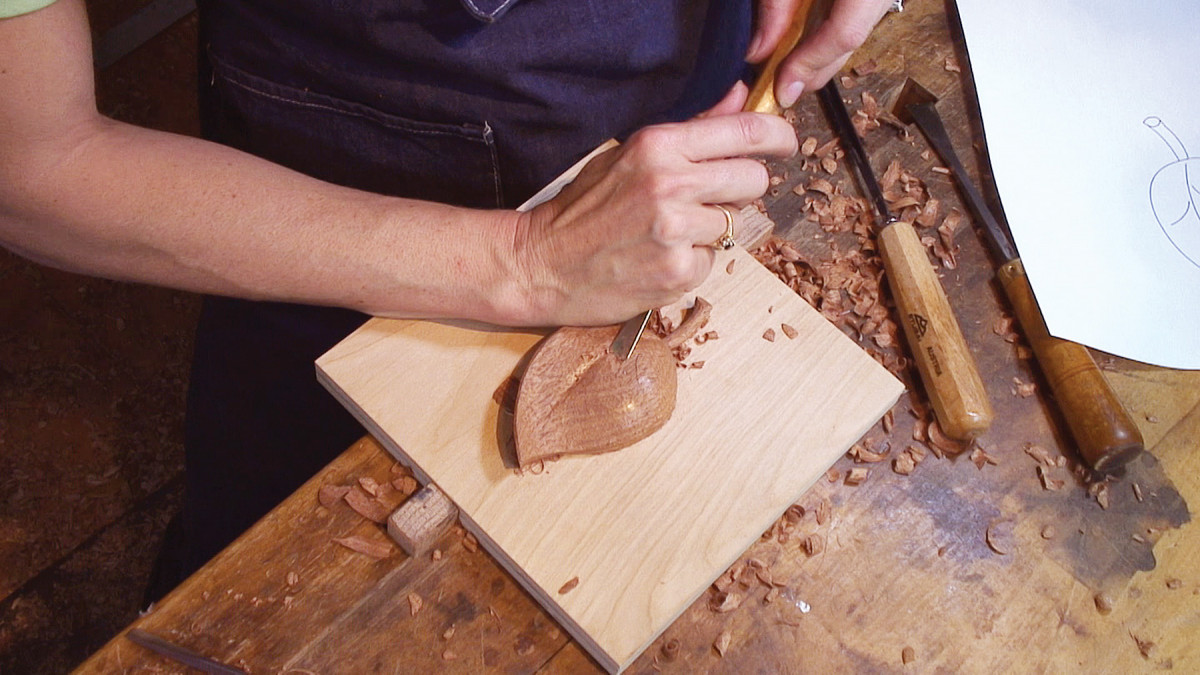
7. Vein line. With a 6mm V-chisel, carve the center vein of the leaf, making sure there is a gentle curve to this line. With a 14mm, No. 3 gouge, round over the leaf so that it curves down toward the center vein.
8. Final Details. Finish up by making several small vein lines with a 3mm V-chisel. A shallow undercut around the perimeter of the leaf removes saw marks and cleans up the outside edge.
If you have never carved before, start with a simple design. This helps get the feel of the tools and basic carving cuts. Base your design on something in nature because there are so many wonderful references – go outside and pick a flower or leaf and place it on your bench for reference. Find a nice soft piece of basswood, get a basic set of carving gouges and escape into the wonderful world of woodcarving. Watch out – once you start, you could get hooked!
Here are some supplies and tools we find essential in our everyday work around the shop. We may receive a commission from sales referred by our links; however, we have carefully selected these products for their usefulness and quality.