We may receive a commission when you use our affiliate links. However, this does not impact our recommendations.

Learn to make your own and you’ll never have to compromise your design.
Bandings and stringing are a dramatic and exciting way to dress up your period furniture. I see them as a way to highlight some aspect of a piece by directing the viewer’s eye to a particular area. Bandings give emphasis to the lines of a piece, similar to pinstriping on a car.
The use of bandings also demonstrates a skill closely tied to the successful design of a piece. In other words, a too-thick, busy or colorful banding can ruin a piece. That’s why I never buy bandings; I make them. That way, I get to decide on the pattern, colors, types of wood and size. I never have to settle or compromise, or modify my design to suit what’s commercially available.
Here are a few tenets to which I always adhere:
■ Eye-catching patterns: Design or copy a pattern that causes the viewer to pause, and perhaps ponder how it was made. An attractive pattern will be part puzzle and part tease, with a touch of pizzazz.
■ Clarity and high contrast: The most successful bandings are constructed in a manner that amplifies the contrast between different pieces and colors. Each piece clearly stands out from the surrounding pieces/segments. That means the grain direction should be oriented to stand out in contrast to the surrounding wood.
For example, to maintain the sharpest, truest color and the greatest contrast, I never show end grain. While cutting to display only long grain can present problems in how to safely, uniformly and efficiently produce the components for an attractive banding pattern, the result is always worth the extra effort.
■ High-quality material: I always set aside any scrap with an interesting or unusual grain pattern or color. And I always select the cleanest, straightest board stock I can find. Clean, straight stock behaves well and thus presents fewer problems and yields the most banding for the effort. For example, pin knots, cracks or abrupt changes in color could create a distraction that would compromise your design.
■ Materials of uniform thickness: Stock of the same thicknesses and dimensions will produce the most handsome banding. Carefully dimensioned stock is easier to glue up and clamp, and will produce banding without visible voids and gaps. Using a micrometer (calipers) is a big help in this task.
Basic Equipment & Tools
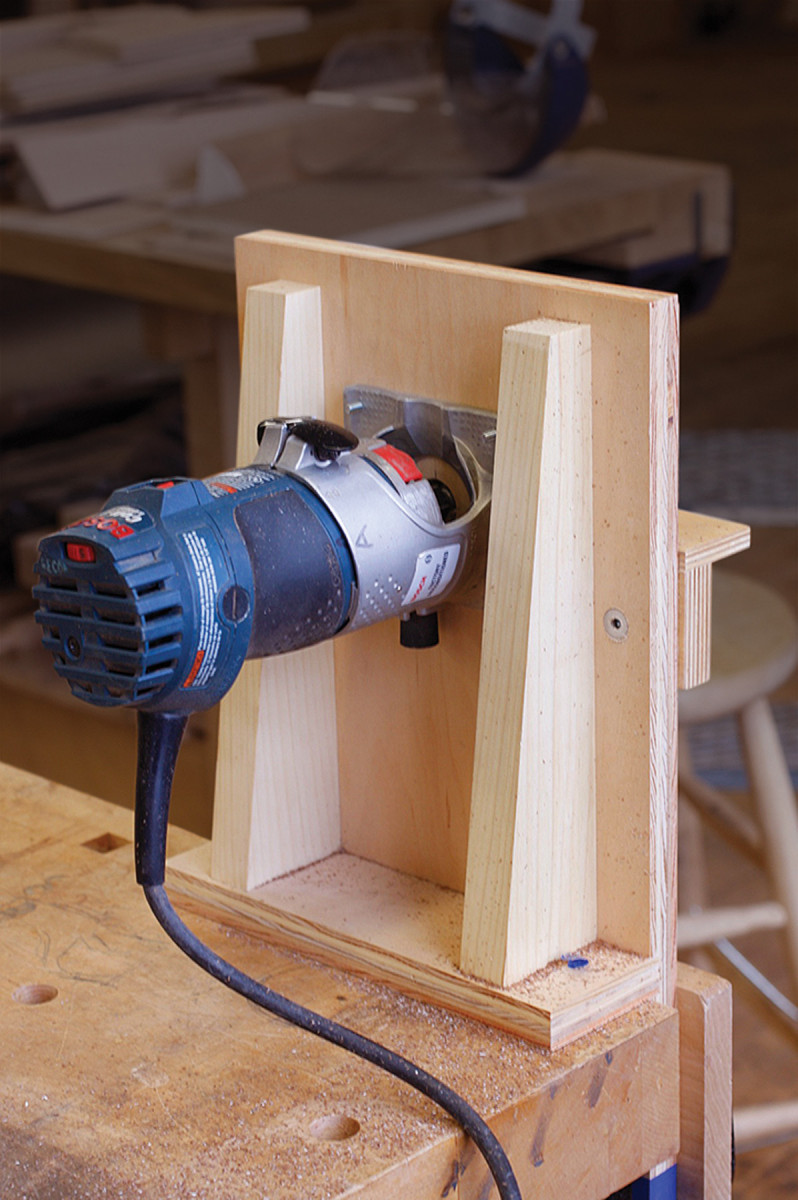
Helping “hand.” This Baltic birch plywood push stick not only has a hook to push the back edge of a thin piece of stock through the blade, the projection holds thin, lightweight workpieces flat to the table of the saw.
No matter how simple or complex your bandings, there are some basic tools, equipment and jigs necessary to produce great work. None are expensive, or difficult to obtain or make.
A high-quality, thin-kerf table saw blade is essential. At my school (Philadelphia Furniture Workshop), we use a 50-tooth, 10° hook, 10″ Freud Industrial blade. It easily and smoothly handles a range of cuts with excellent results. The narrow kerf also cuts down on waste.
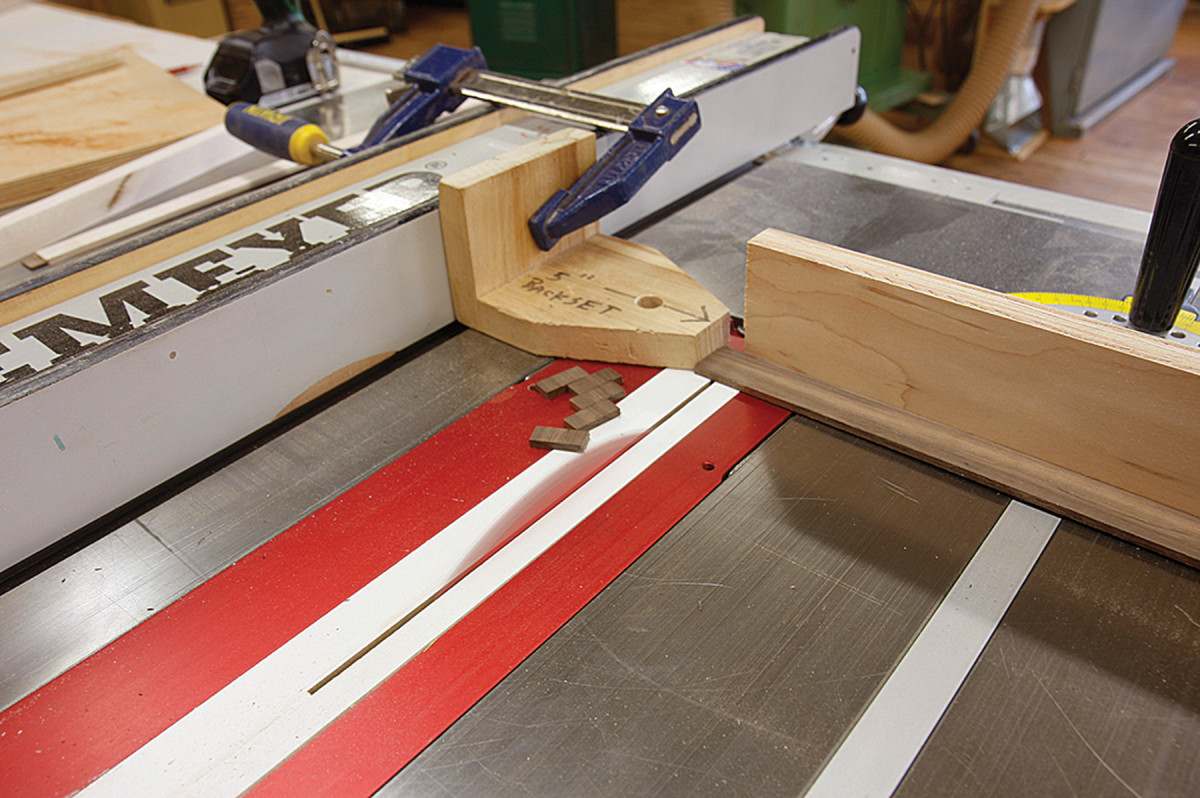
Measured cuts. A standoff block provides a safe way to cut very small pieces (when used in conjunction with a crosscut fence).
A solid and accurate table saw crosscut guide, fitted with a replaceable wooden fence, will ensure accuracy and safety. You’ll also need a zero-clearance table saw insert to prevent gaps between the blade and the worksurface; a gap can trap material, jam the blade and interrupt your work.
Ripping thin and narrow pieces requires careful cutting technique(s), so keeping your fingers well away from the spinning blade is paramount for safety. A push stick designed for the task (shown above) will manage even the thinnest pieces of material safely.
A stand-off block gives me the ability to produce precise and uniform pieces for gluing up bandings, and prevents pieces from becoming trapped or flying back at me.
You’ll also want a digital or dial micrometer to accurately measure the thickness of your material.
Federal Embellishment

Dressing mirror. This piece features three banding designs: a simple three-piece banding that separates the case from the base; a lunette banding around the case top and an arrow banding around the mirror.
In the last few years, Federal-period furniture has become more popular than ever (outside of the Federal period itself, of course). Woodworkers all over the country are building sideboards, Pembroke tables and card tables that feature stringing, inlay and gorgeous bandings.
Of the many (furniture) makers working during this period (circa 1790-1830), John and Thomas Seymour stand out and their masterful pieces fetch astronomical prices at auctions. Besides the impeccable construction, Seymour pieces are distinguished by their striking bandings, two of which are unique and almost exclusive to their work. The best-known and most widely used of these is the lunette banding. The other is the distinctive and challenging arrow banding.
On a dressing mirror build I designed (and what I teach at the Philadelphia Furniture Workshop), both the arrow and lunette bandings are major features, along with a simple vertically oriented band that separates the case from the base.
3-piece Banding
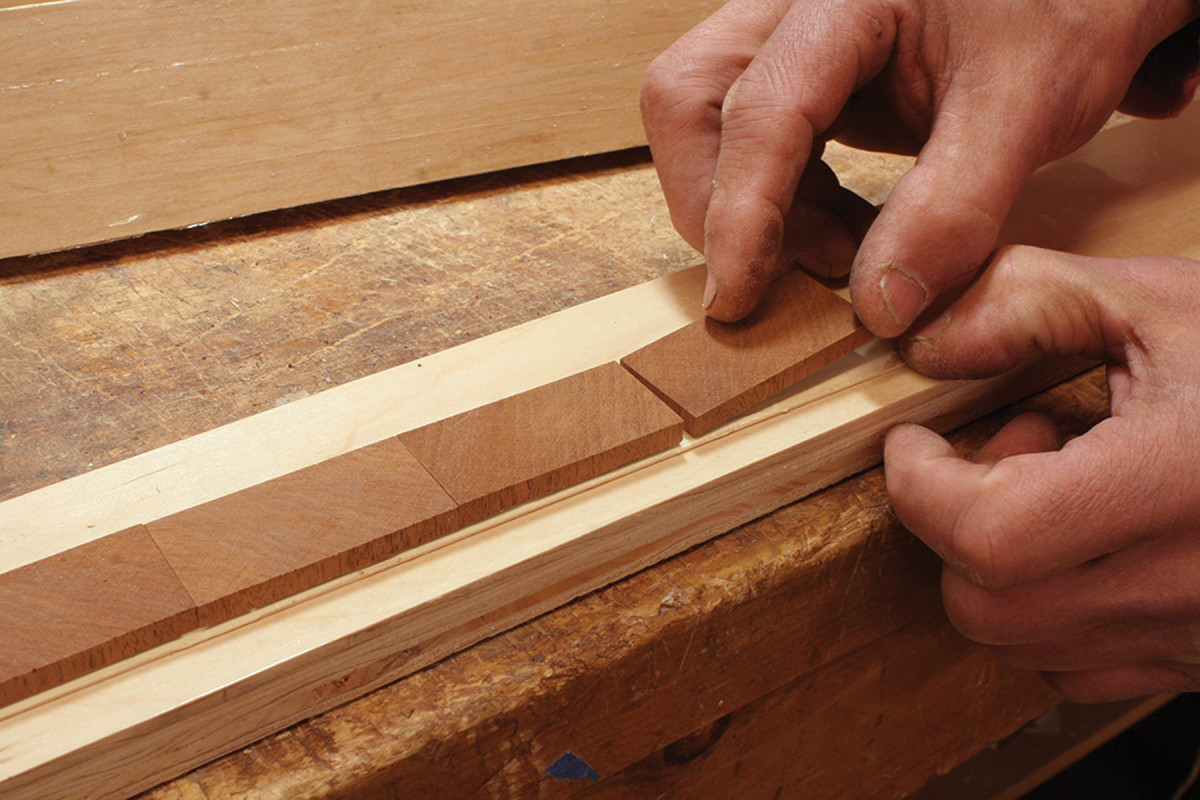
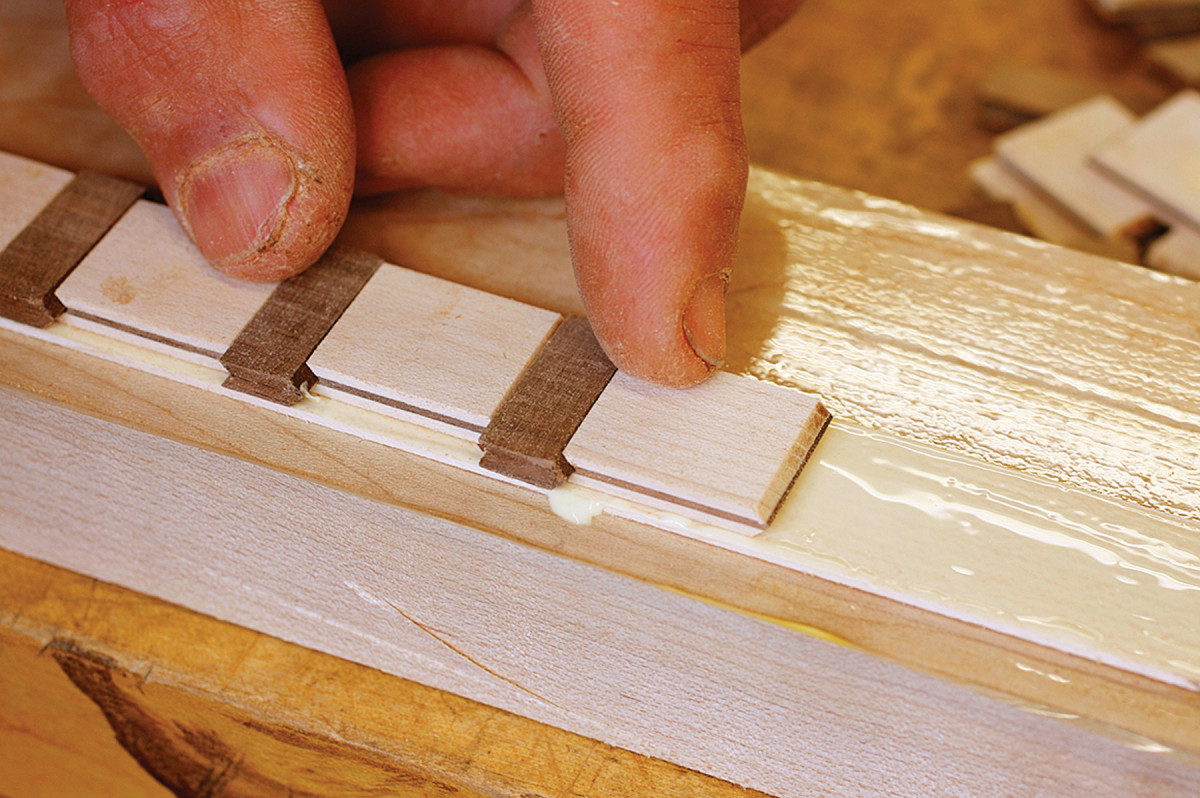
Glue up. The short chips of mahogany get sandwiched in between thin strips of maple.
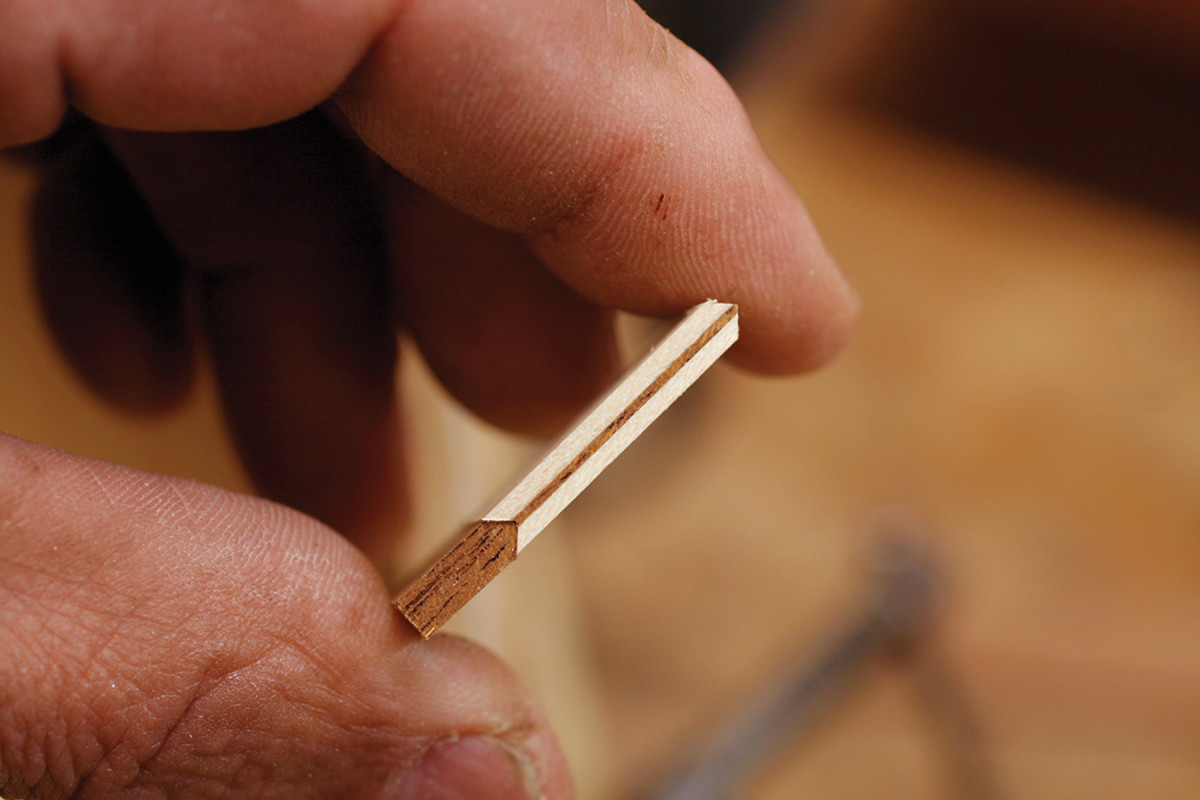
This is the easiest to make of the three banding designs used on the dressing mirror. It’s a three-part pattern made up of a core strip flanked by lighter contrasting strips. In this case I used 3⁄8“-thick mahogany for the core layer and sandwiched it between 1⁄16“-thick layers of maple.
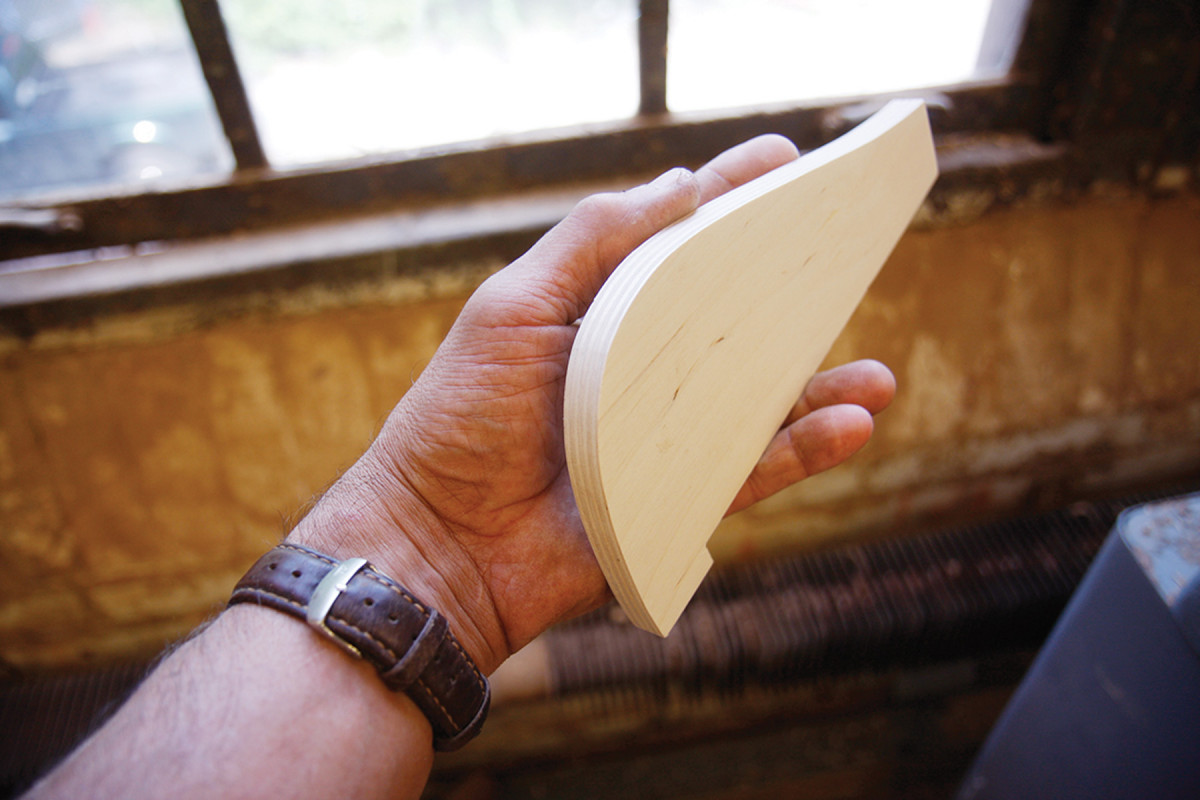
 Notice in the photo above that the grain of the core is vertically oriented and not running along the length of the banding. That means there are no miters to cut as it turns the corners on a case.
The safest way to cut these cross-grain pieces is to use a stand-off block with a zero-clearance table saw insert. This simple shop-made device (see the photo at top center on the previous page) provides essential clearance for the small chips as they separate from the larger workpiece; otherwise they could become trapped between the blade and fence, posing a hazard.
After cutting as many pieces as you think you’ll need, cut 20 percent more. Discard chips with any flaws, tear-out or abrupt changes in color. Apply glue to the surface of a maple strip and place the mahogany chips end to end atop the maple strip, keeping the chips tight together and square to the maple below.
Then apply glue to the second maple strip and set it on top of the mahogany chips. Align the layers carefully and tape the lamination together with masking tape to prevent any sliding. Then clamp the brick and allow it to dry overnight.
I usually clamp directly to the benchtop with a caul on top of the glue-up, after covering both the caul and benchtop with non-stick tape. The benchtop ensures flatness (assuming your bench is flat, of course) and the caul provides even pressure along the length of the banding brick.
Lunette Banding
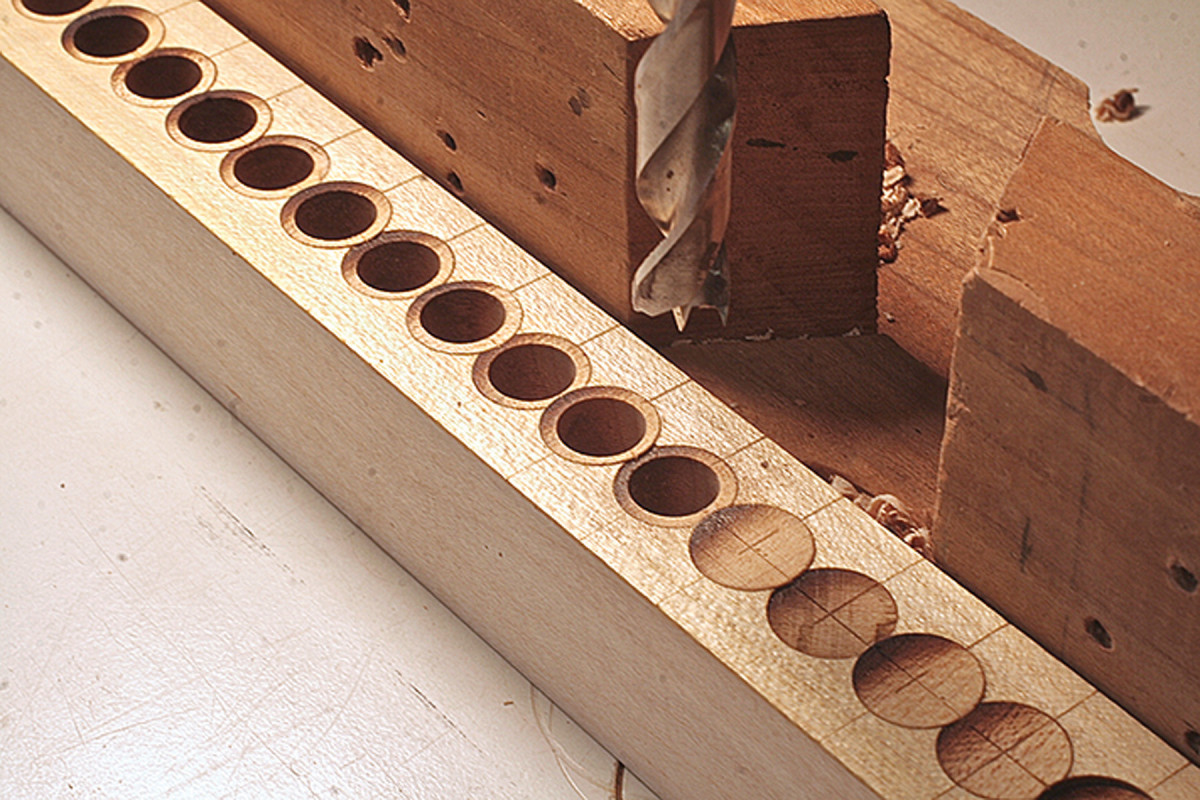
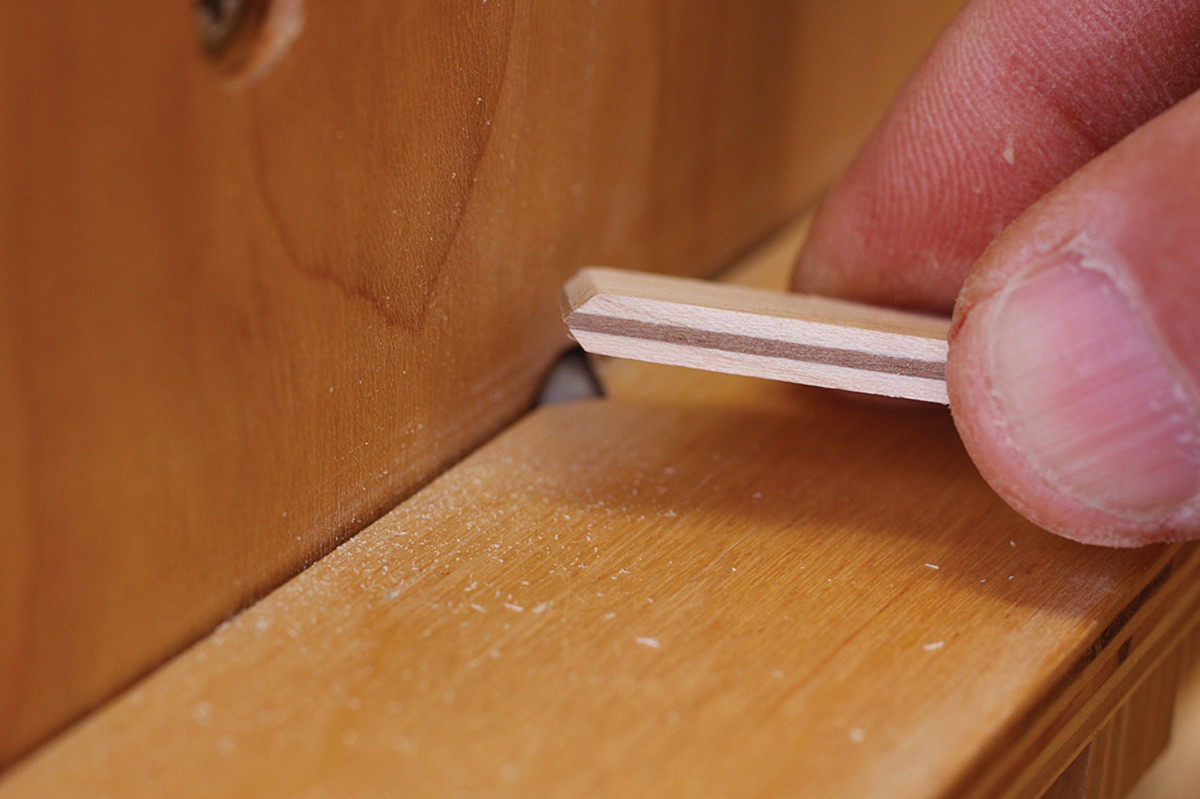
Plugged. Using a good-quality plug cutter and a tight-grained species such as the maple shown here, cut more plugs than you think you’ll need.
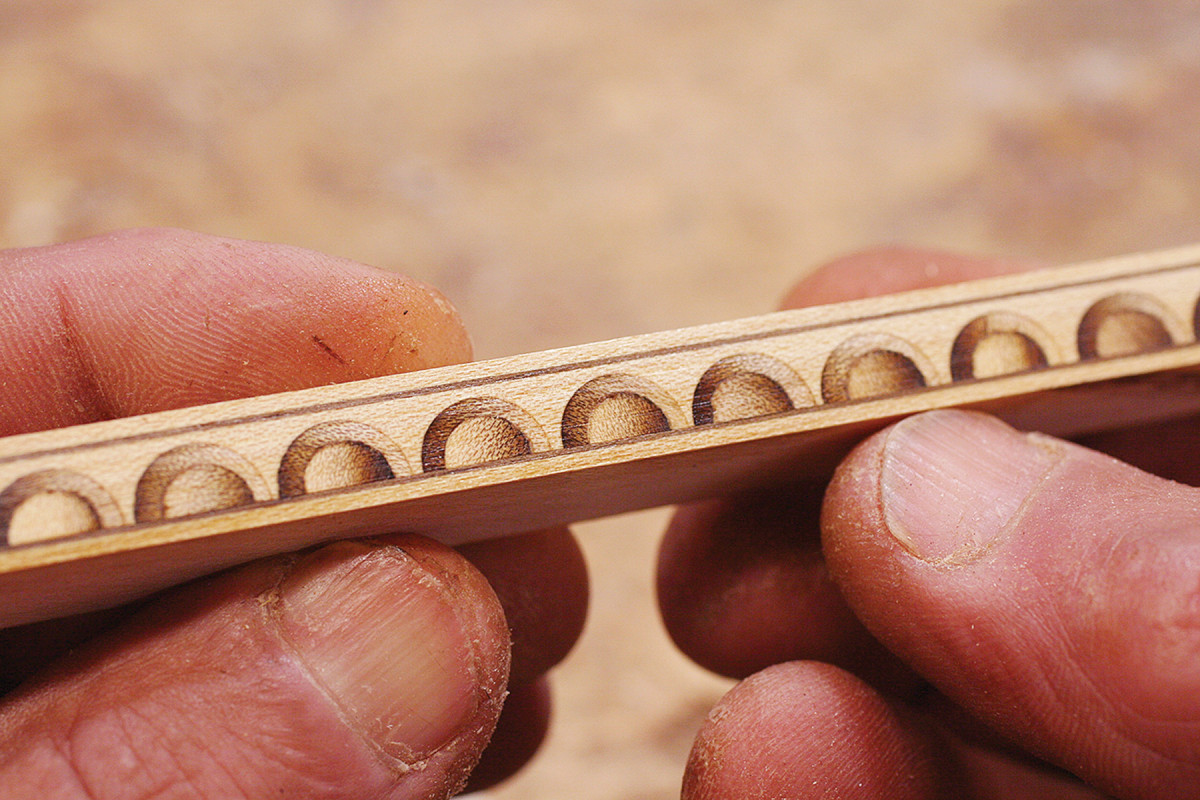
A strip of shaded half-rounds set close together is called “lunette” banding. Each semi-circle displays shading on one side only. Inside the larger half-circle is a smaller one, shaded on the opposite side. The trompe l’oeil effect creates the illusion of depth and relief.

Feel the heat. It will likely take a little trial and error to get the sand temperature right. Aim for about 1⁄4″ of sand in the bottom of the pan, and don’t stir. It should be hot at the bottom and cooler toward the top.
I’ve examined many examples of this distinctive pattern and pondered how it might have been fabricated in the 18th and 19th centuries. I imagine period woodworkers cut a series of half-moon shapes using curved gouges, then sand shaded the individual pieces before joining them together. This always sounded both tedious and ominous to me, with a dubious outcome at best.
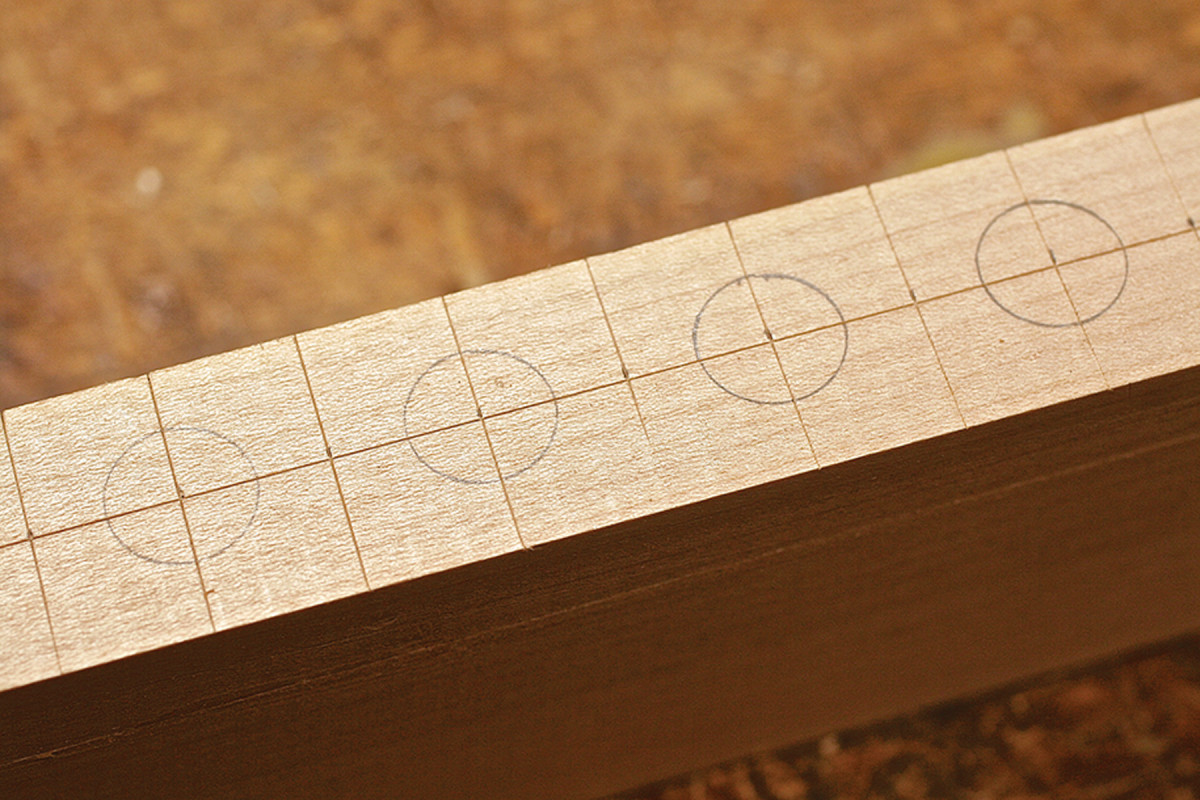
Grid. Aim for perfection by marking out a grid on the lunette strip blank (the “ground”).
Freddy Roman, a Massachusetts-based furniture maker, came up with this elegant method for producing lunette banding. His method involves embedding shaded plugs into a strip, then ripping the strip in two and capping each half with contrasting bands to make up the brick. Here’s how to do it.
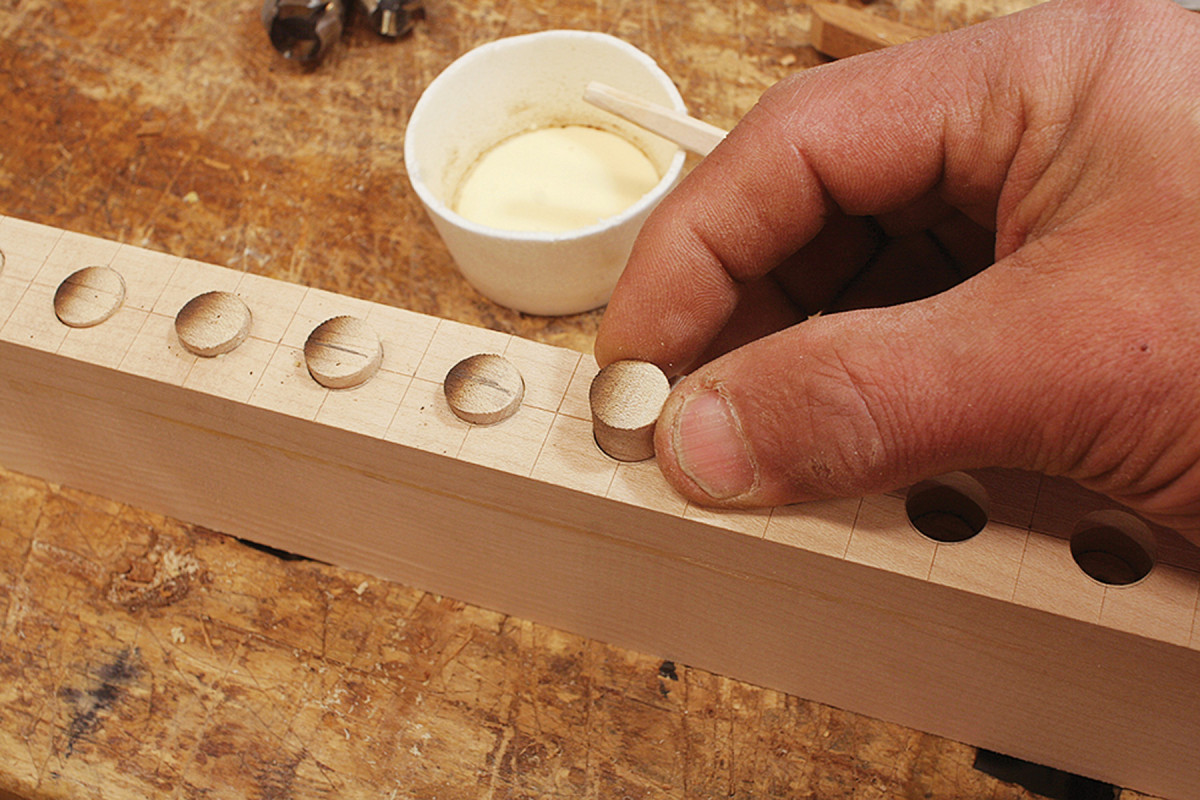
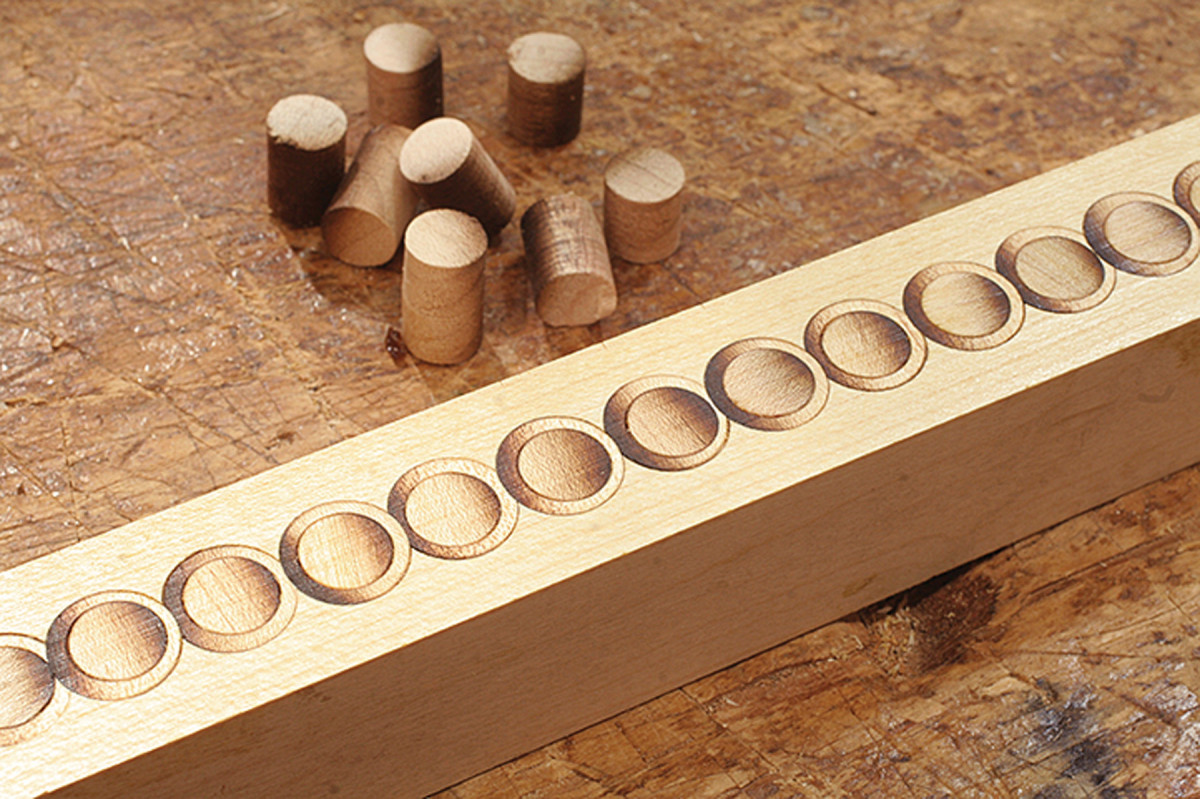
Plug. Glue the shaded 1⁄2″ plugs into the holes, making sure the shaded sides all face the same direction.
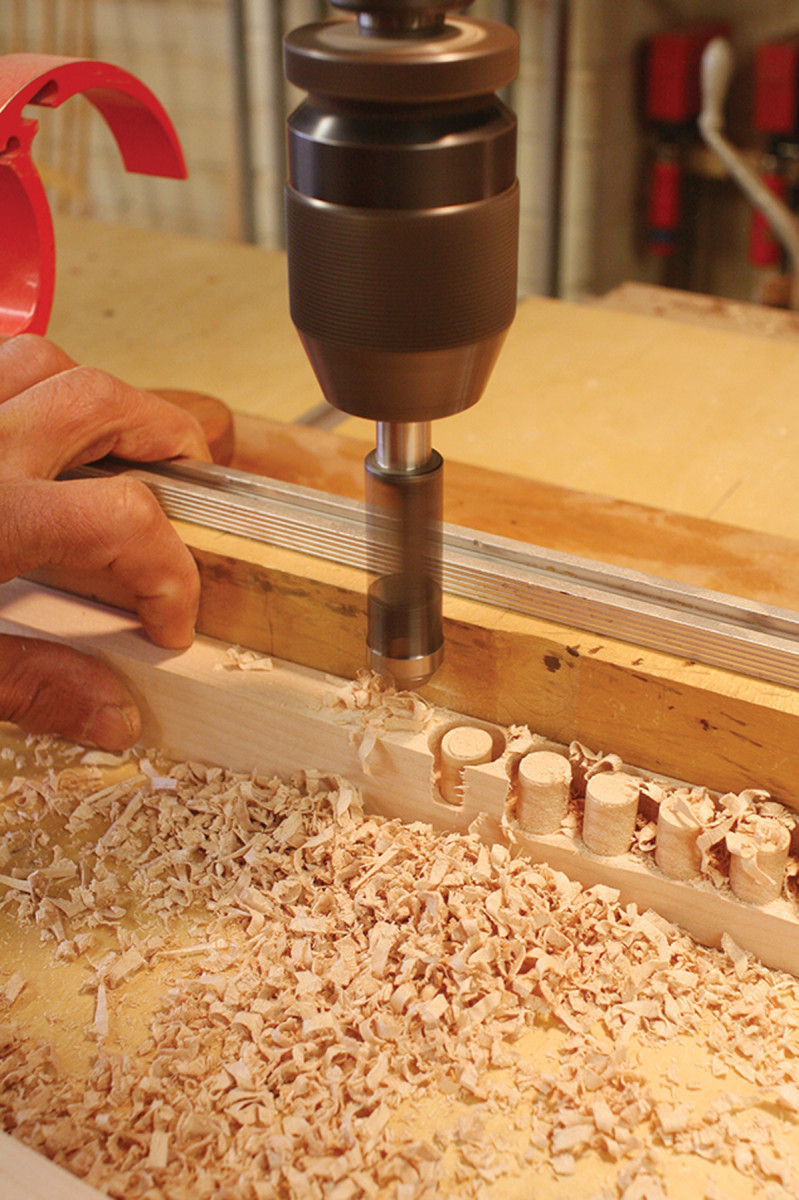
Using high-quality 3⁄8” and 1⁄2” plug cutters (I like the ones sold by Tools for Working Wood), I produce a quantity of each size plug, punching out about 25 percent more than I need so I can pick the best ones. I chose maple for the plugs here because the tight, close grain will show well and produce even, gradual shading.
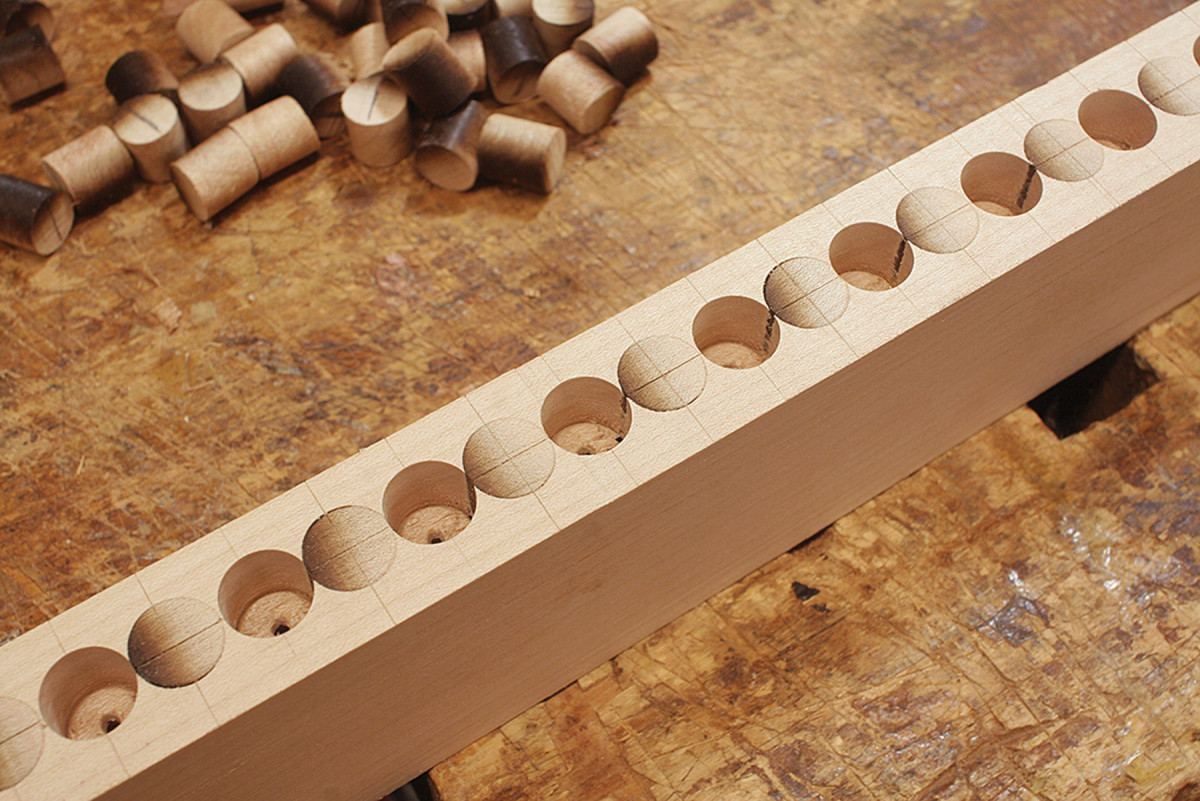
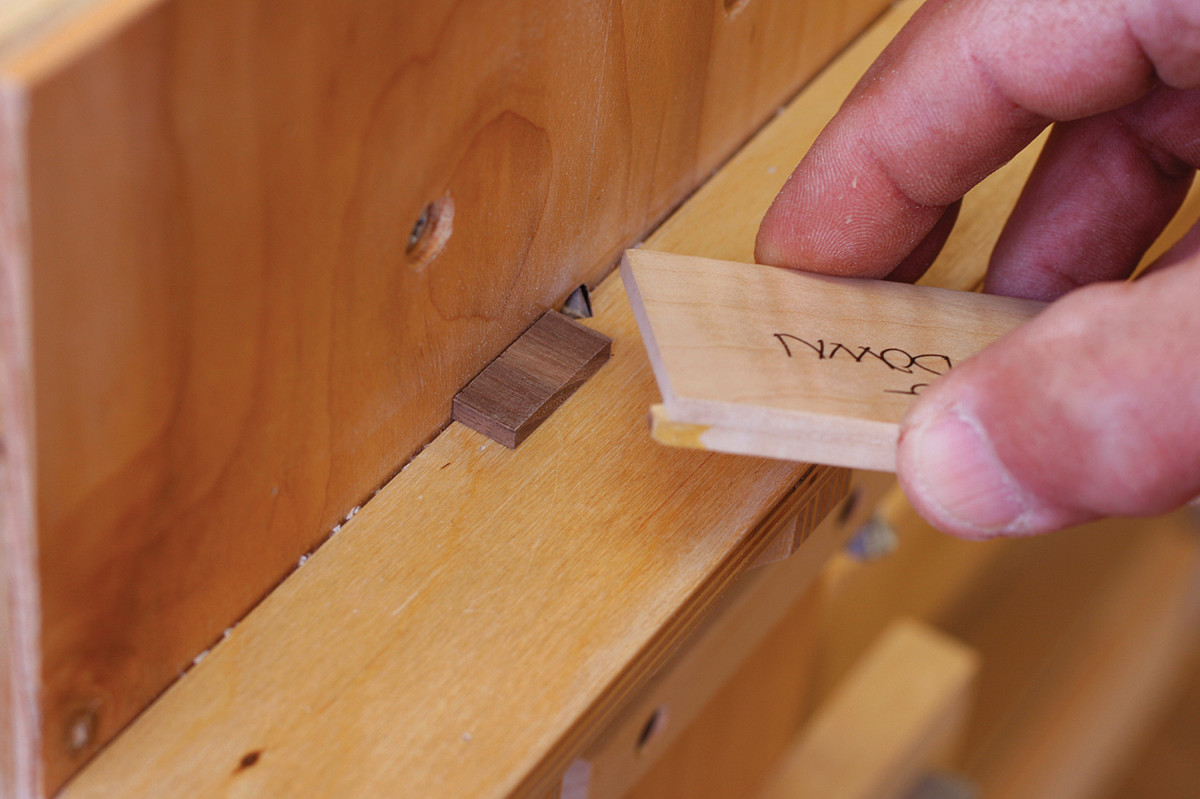
Drill & plug again. Now drill holes on center in between the plugs, and plug those.
After cutting the plugs, sand shade them on one half. For the best results, I recommend using a small hot plate, a cast iron skillet and a cup of fine-grained sand. Turn the thermostat to high and allow the sand to heat up (it should feel hot to your hand about 6″ above the surface), then select your best plugs and set them into the heated sand. I prefer to shade them a little dark to ensure that once inlaid and sanded, the plugs will still show nicely. It might take some trial and error to determine how long to leave your plugs in the sand.
After sand shading the plugs, I arrange them in rows by size (1⁄2” and 3⁄8“), from dark to light, left to right. That way, any differences in shading will be gradual along the length of the banding strip and less noticeable.
Plugged plugs. Drill 3⁄8″-diameter holes centered in the 1⁄2″ plugs, then glue the 3⁄8″ plugs in place.
Begin the next part of the process with a clean, straight-grained block of maple, measuring 1″ x 11⁄2“. Onto this “ground,” carefully mark out a 1⁄2” grid.
Drilling and plugging the strip is done in two stages. In the first, drill 1⁄2“-diameter holes at 1” intervals to a depth of 3⁄4“. Glue the 1⁄2” plugs into these holes, with the shaded sides facing in the same direction, and allow the glue to thoroughly dry before proceeding. This is critical. Any attempt to rush the process will result in failure.
Note the direction of the shaded edges of the smaller plugs.
In the second stage, drill 1⁄2“-diameter holes – again at 1” intervals – in between the already plugged holes. Now fill the new holes with shaded plugs (again making sure the shaded halves are in the same orientation).
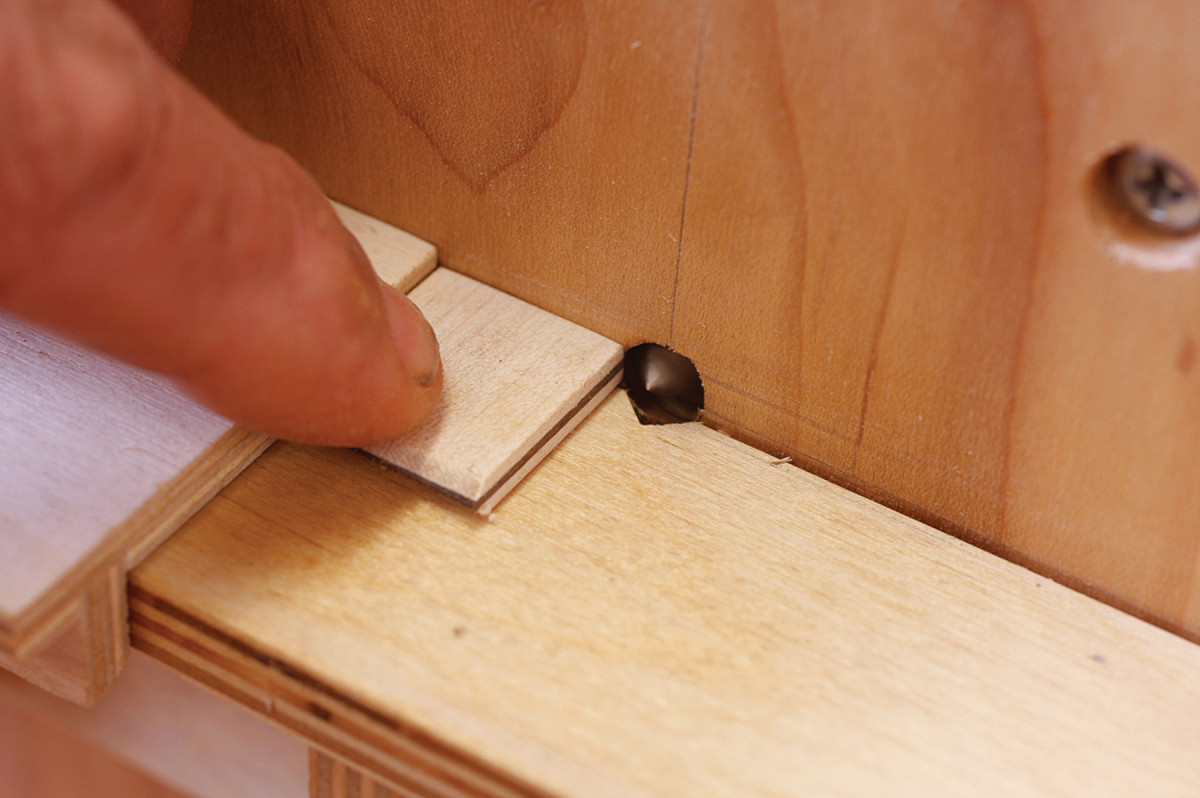
When all the 1⁄2” plugs are glued and thoroughly dry, trim them flush with the maple ground to create a clean, flat surface. Mark the centers of all the 1⁄2” plugs clearly. Now carefully drill 3⁄8“-diameter holes on those marks.
Into these holes, you can now safely glue all the 3⁄8“-diameter shaded plugs (there’s no need to do it in stages), with the shaded edges facing the opposite direction as on the 1⁄2” plugs. When these are dry, trim the entire strip flush.
Bricked. Here’s the completed glue-up of ground, sand-shaded plugs and walnut and maple laminations, ready to be sliced into 1⁄16″-thick strips for use.
Now glue up a two-part lamination of 1⁄32“-thick walnut and 3⁄32“-thick maple strips, and allow it to dry.
Rip the plugged strip in half at the band saw (because of the thin bladekerf, you’ll get two usable pieces, each about 7⁄16” wide). Plane or sand the surface flat, then glue the walnut and maple lamination to the freshly cut side. Because this banding will be set into a dark mahogany ground, I placed the maple side out for the best contrast against the mahogany. Secure the lamination between a benchtop and a caul, then clamp it to set up.
After the glue is dry, rip the plugged strip to about 3⁄8” wide, then glue on the second walnut and maple lamination.
Router Jig
Shelf side. A strip of tapped hardwood holds a screw that moves the table up and down.
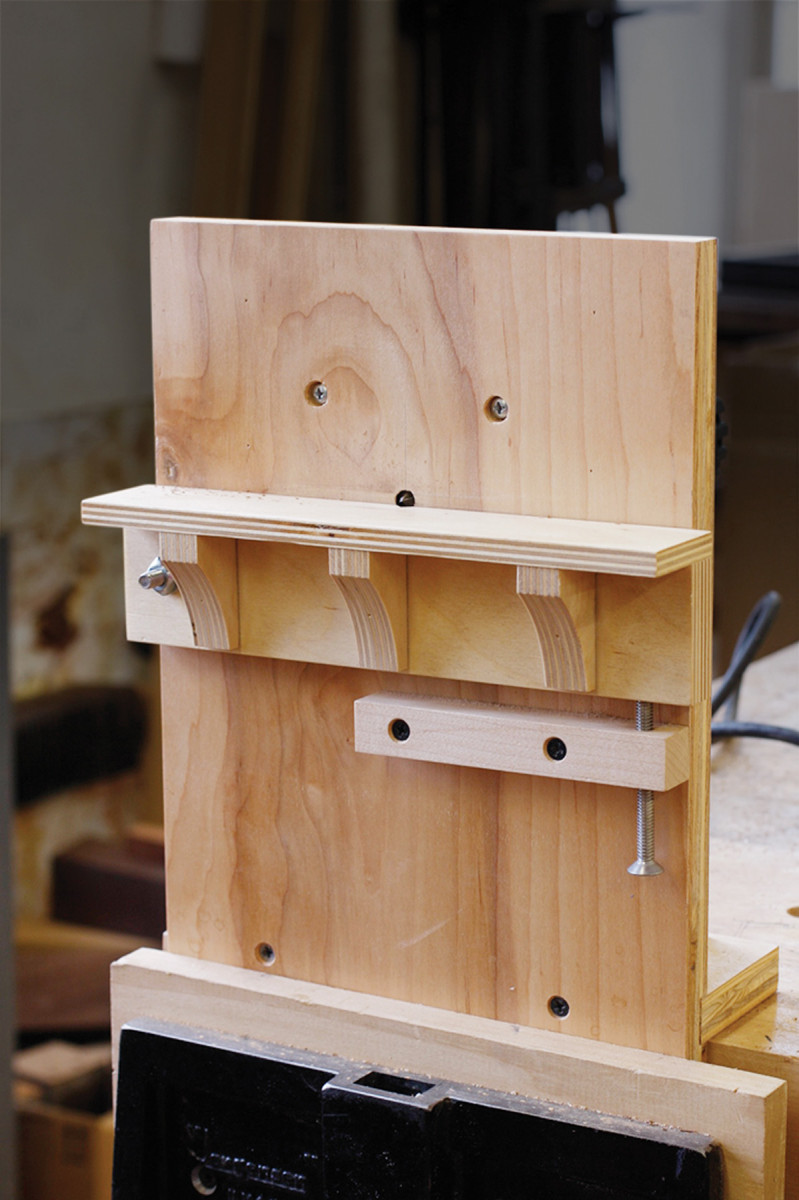
This simple-to-build jig (designed by Frank Vucolo) holds a trim router for making perfect V-cuts for the arrow banding.
Trim-router side The back simply needs to accommodate the trim router in position.
The exact dimensions aren’t critical – what makes it work is the micro-adjustable table that holds the workpiece so you can center the trim router bit on the work.
This one is made from 3⁄4“-thick plywood with a 1⁄2” plywood table; the overall dimensions are 9″ x 16″.
— MR
Arrow Banding
Test cuts. Using a longer piece of the center shaft lamination (because the contrast makes it easier to see that the point is centered), adjust the jig until the bit is cutting a perfect point.
This is a handsome banding pattern that although rare, was not exclusive to Seymour furniture. Similar to the lunette pattern, the arrow banding requires a number of carefully executed steps to achieve the desired and elusive result. The completed pattern should be crisp and tight.
Frank Vucolo (a student at my school and an accomplished maker in his own right) and I struggled with various methods to accomplish this tiny joint. Frank beat me to an ingenious solution and came up with a simple router setup that got the job done. Once he brought it to the school’s shop, we refined the jig with a micro-adjuster, which permits fine-tuning of the shelf that holds the workpiece to ensure perfect centering of the cuts and deliver impeccable results.
Hold down. The arrowhead pieces are tiny and the router bit is sharp. Protect your fingers – and hold the workpieces tight to the jig’s table – with a hold-down that helps push the workpiece across the bit.
The jig is shop-made from plywood scrap, fitted with an off-the-shelf 1⁄4“-20 threaded screw. The bit is a 45° sign maker’s router bit from Infinity (#15-127 1101). The jig supports a trim router and has a table that is adjustable relative to the router bit. (It can also pivot slightly.) It’s the adjusted position of the same bit that allows the creation of both the pointed and recessed cuts (see “Router Jig” above).
The arrow design is made of five layers of veneer with three separate parts to the design: the arrowhead (or tail feather), the center shaft and two outer layers. The hardest part is milling the delicate cuts that engage the center shaft and arrowhead sections, which must be exactly the same thickness.
V-cut. Lower the platform to center the point of the bit on the workpiece, then cut the mating Vs on each piece. Note the push stick/support to the left; I use that to push the piece across the cutter.
The first task is to laminate three layers of veneer to form the center shaft. The darker arrow shaft should gauge at 1⁄16” thickness, with the lighter surrounding layers at 1⁄32“. Glue up the three layers to make up the center shaft.
The arrowhead material should gauge at 1⁄8” thickness. Once properly thicknessed, each of the parts should be cut to exact length: 7⁄8” for the center shaft and 7⁄16” for the arrowhead.
A perfect match. With the V-cuts centered on both pieces, they’ll mate perfectly.
I make these cuts at the table saw using a thin-kerf blade, a zero-clearance insert, a crosscut guide with a plywood fence and a stand-off block.
Clamp the router jig securely to your bench. Position its table and extend the bit just enough to bevel half the thickness of a test piece. Then turn it over and bevel the other side. This should create a perfectly centered point without reducing the size of the workpiece. Adjust the setup until you’re satisfied – it’s important that the cut be perfectly centered for the pieces to nest properly.
Then, run one end of each arrowhead and center shaft sections.
Nested. Alternate arrowheads and center shafts as you glue the pointed pieces to the outer maple strip. (The clamping caul underneath is covered in packing tape to keep glue from sticking to it.)
To make the mating cut, drop the router jig’s table down until the bit makes a centered V-cut on the other edge of each piece. The cuts should fit perfectly – one neatly into the other.
To glue up the arrow banding, mill two strips of 1⁄16“-thick maple for the outer layer, place one piece face up on a caul atop your benchtop, and coat it with yellow glue. Then simply alternate the placement of the arrowhead and center shaft sections onto the wet glue. Push the sections together firmly, eliminating any gaps.
Now glue on the second maple strip.

Caul & clamps. With the two outer strips sandwiching the arrowheads and center shafts, place a caul on top and clamp everything to your benchtop until the glue dries.
Check everything for alignment, then clamp up the lamination using your benchtop and a stout caul to provide even pressure.
Of course, all of these bandings must be dressed on a sander or with a handplane before ripping them for use in a project. For maximum yield, I recommend ripping at the band saw, and to a thickness of 1⁄16“. That’s thin enough so that the strips will obediently follow a curve – but not so thin that they’ll come apart as you use them.
And that’s it – you now know how to make banding in three designs for use on the dressing mirror or any build you like. Now take the techniques you’ve learned here and try out a couple of designs of your own.
Here are some supplies and tools we find essential in our everyday work around the shop. We may receive a commission from sales referred by our links; however, we have carefully selected these products for their usefulness and quality.