We may receive a commission when you use our affiliate links. However, this does not impact our recommendations.
A furniture maker visits the Pleasant Hill, Ky., community and unearths a fair number of surprises (nails!) about Shaker joinery.
Editor’s note: This article originally appeared in the December 2005 issue of Popular Woodworking.
If you’re planning to stay at the restored Shaker Village at Pleasant Hill, Ky., I have some advice: At dawn, after spending the night in a building designed, built and once occupied by the Shakers, walk out onto the lawn. At that moment when the gathering heat of day is burning away the last smoky tendrils of nighttime fog, look across the hills surrounding the village. Scan the horizon to the early morning music of birds and distant livestock. If you do this, I think you’ll know something about how it felt to have awakened there 150 years ago when Pleasant Hill was a thriving community of 500 practicing Shakers.
I know. This past summer I did it on three consecutive mornings during a visit I made in order to study some of the Shaker furniture in the Pleasant Hill collection.
Of course, the Shakers wouldn’t have slept in air-conditioned comfort, as I had. And they were more likely to have gone to their early morning job assignments than to have stepped outside at dawn for a quiet, reflective moment alone.
But if – like me – you’ve spent a good part of your adult life studying and building Shaker furniture, you’re susceptible to the power of the moment. You step outside and you look and you believe.
This signed piece by Charles Hamlin bears the date “Jan. 30th 1877,” although some authorities believe it is a much earlier construction.
The Problem With Modern Versions of Shaker Forms
I’ve been working in the Shaker genre for more than 25 years, and for much of that time, I’ve been writing about the stuff I build in an effort to share with others what I have learned about Shaker design principles and construction methods. Like most contemporary makers of Shaker work, I have found the drawing books of Ejner Handberg (Berkshire House Publishers) to be rich sources of ideas – although there is little detail in Handberg’s books about how the pieces he studied and measured were assembled.
That kind of technical information can best be found in John Kassay’s magnificent volume: “The Book of Shaker Furniture” (University of Massachusetts Press), a book I’ve encountered on the bench of just about every maker of Shaker furniture I’ve ever visited. But even in the cases of those pieces so beautifully drawn by Kassay, there are bits and pieces of missing and/or puzzling information that forces makers like myself to offer up our best guesses.
For example, in my book “Authentic Shaker Furniture” (Popular Woodworking Books), I documented the re-creation of a Shaker sewing desk drawn by Kassay. Some of the construction methods detailed by Kassay seemed eccentric, suggesting to me that the original Shaker craftsman had added complexities for reasons that are not now obvious to the modern eye.
As a result, I simplified the construction of the desk to eliminate enigmatically placed parts. I also changed the drawer graduation to an arrangement I found more appealing, and I opted to open each drawer with a pair of relatively small knobs, rather than the single oversized knob affixed to each drawer in the original. These were all changes that – in my opinion – constituted improvements on the original, while remaining faithful to the Shaker aesthetic of minimalism and elegance.
In addition, despite the wealth of detail in Kassay’s many drawings of the piece, there are no references in those drawings to the methods used by the Shaker builder to fasten in place the desk’s two different tops. So here too I had to proceed guided by my instincts and experience. The result is a piece of furniture that – although it is recognizably Shaker – is not an exact replica of any Shaker original.
And this circumstance is not unusual. Although I’ve built and sold hundreds of pieces of “Shaker” work, I can’t recall a single piece that was an absolute replica of any specific original. All were modified to a greater or lesser extent to suit my tastes and/or those of my clients. Sometimes the changes were nothing more than the substitution of one material for another – say cherry for plain hard maple. At other times, the changes were more comprehensive, as in the case of the Shaker sewing desk that appeared in “Authentic Shaker Furniture.”
I think this approach is common among contemporary makers of Shaker-inspired work. We rarely produce exact replicas. Instead, we do what the 19th-century Shaker craftsmen did: We take a form that has been passed down to us from earlier makers and re-create that form in the light of our own tastes and experiences.
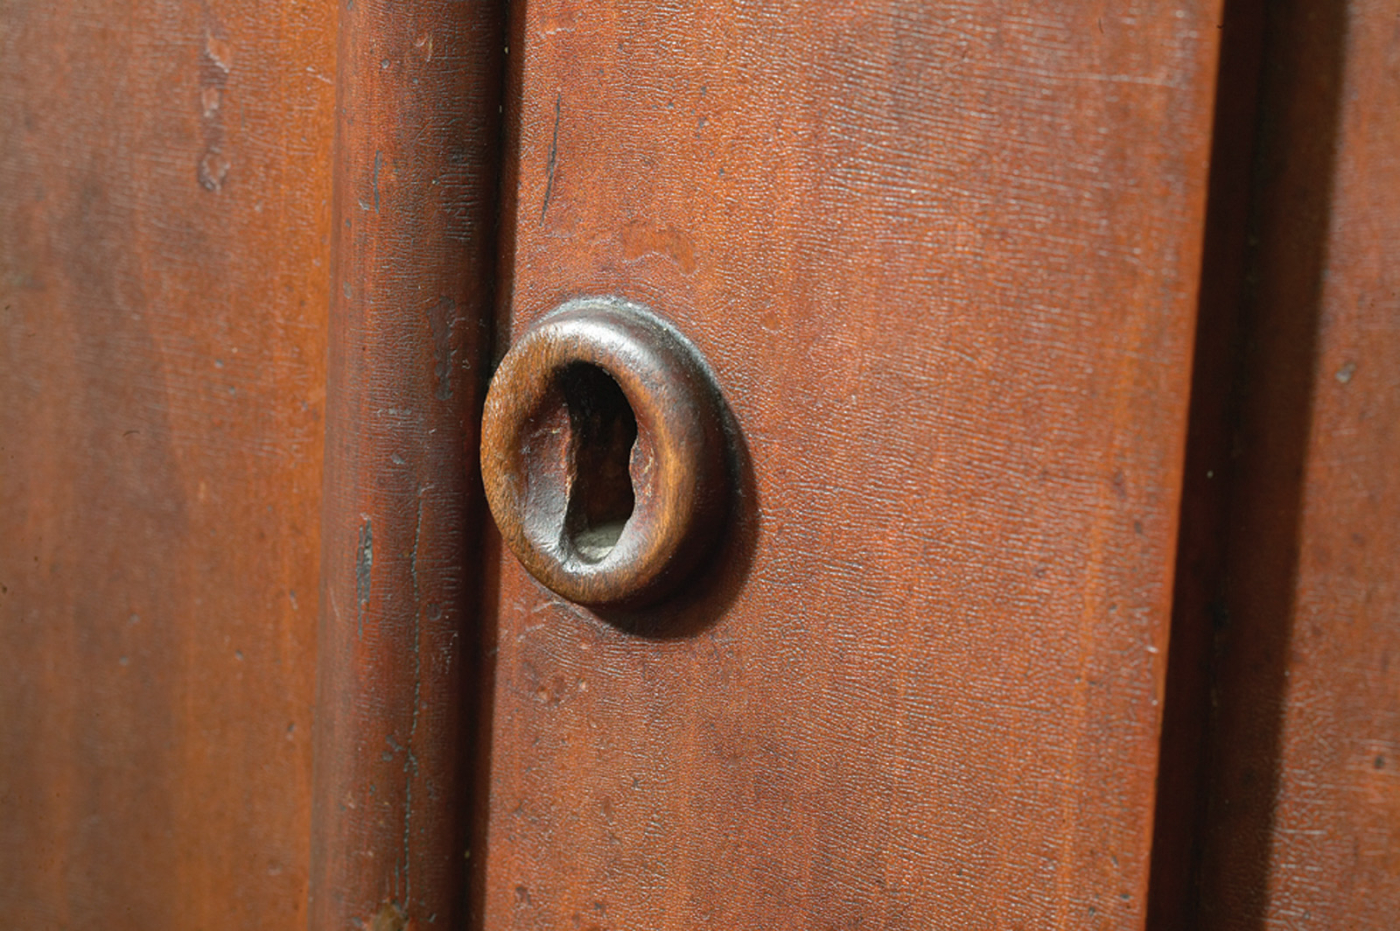
These wood escutcheons integrate nicely into the expansive wood doors of the Hamlin cupboard over case of drawers.
Built the Way Furniture Should be Built
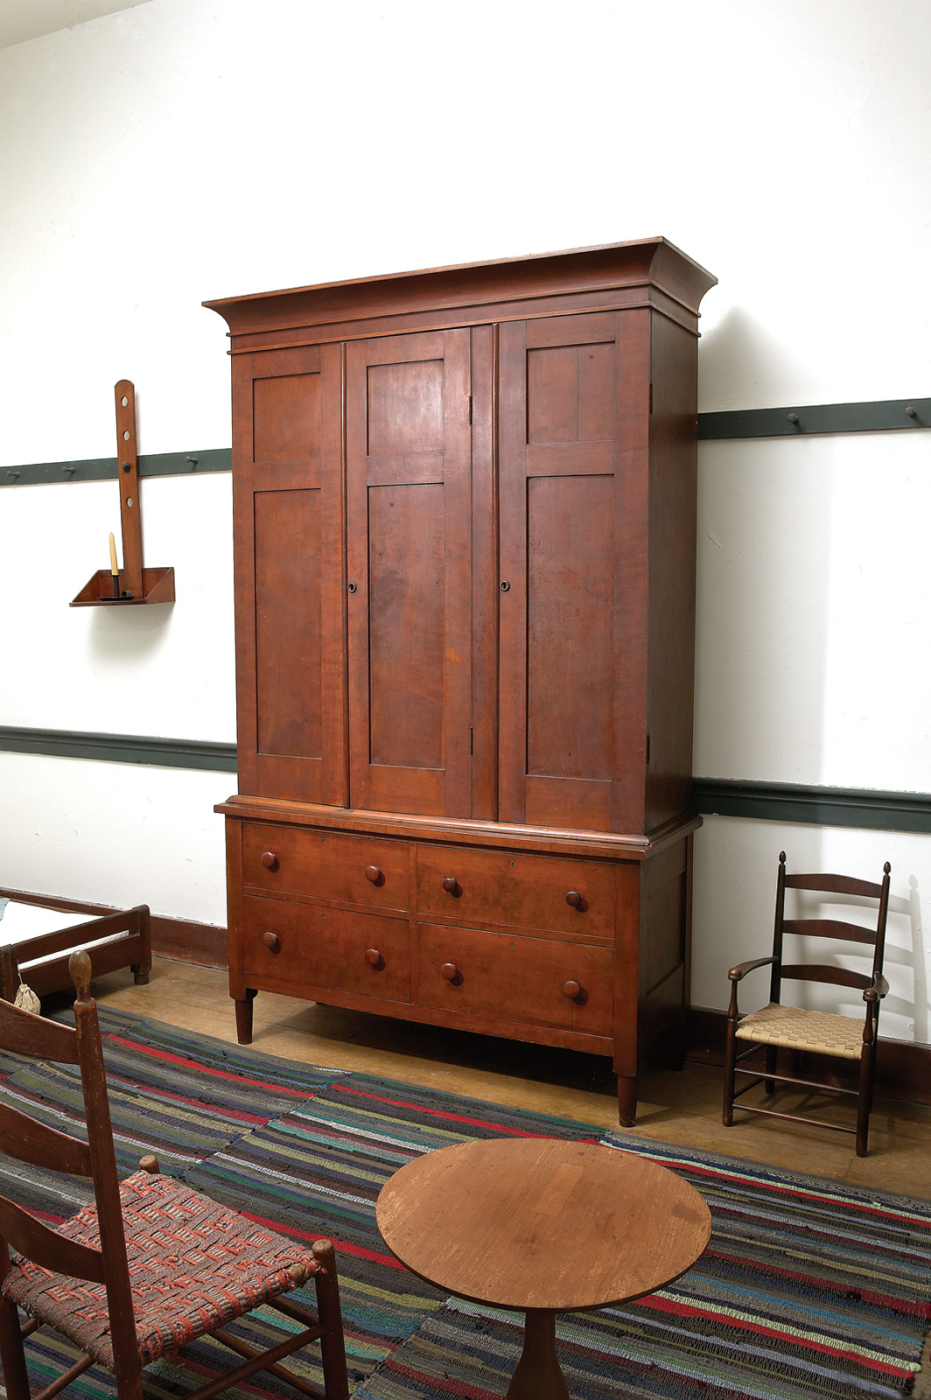
Most of the furniture in the Pleasant Hill collection is well conceived and well executed, some of it brilliantly so. The cupboard over chest of drawers, signed and dated by Charles Hamlin in 1877, is one such piece (shown above). This towering monument to the art of furniture making has a weight and presence rivaling that of large, high-style casework built in the outside world.
A trio of enormous frame-and-panel doors conceals the cupboard’s interior. The geometry of these doors consists of two horizontal series of rectangles unadorned by shaped edges. Above the doors, the case is surmounted by a wide cove moulding anchored in place by a pair of horizontal fillets. In the outside world, the doors would have been framed in moulded edges and the crown moulding would have presented a clutter of shadow lines. Such an iteration would certainly have had appeal, but I prefer the simplicity of the straightforward handling of forms in the Hamlin piece.
For me, this piece comes most sharply into focus when I examine the tiny wood escutcheons on the doors. The maker wisely chose to avoid the visual distraction of metal escutcheons on the front of a piece that, except for the slivers of visible hinge pins, is an unbroken seascape of wood.
Good joinery is evident throughout the piece. The lower case is built between a pair of post-and-panel ends with mortise-and-tenon joinery used to frame the drawers, which are nicely dovetailed. The frame-and-panel doors of the upper case also employ mortise-and-tenon joinery, and the crown moulding is held in place with a series of glue blocks.
This use of good wood-to-wood joinery is evident almost everywhere in the Pleasant Hill furniture collection. There are, however, some exceptions, and that’s where I think the story of Pleasant Hill joinery becomes very intriguing.
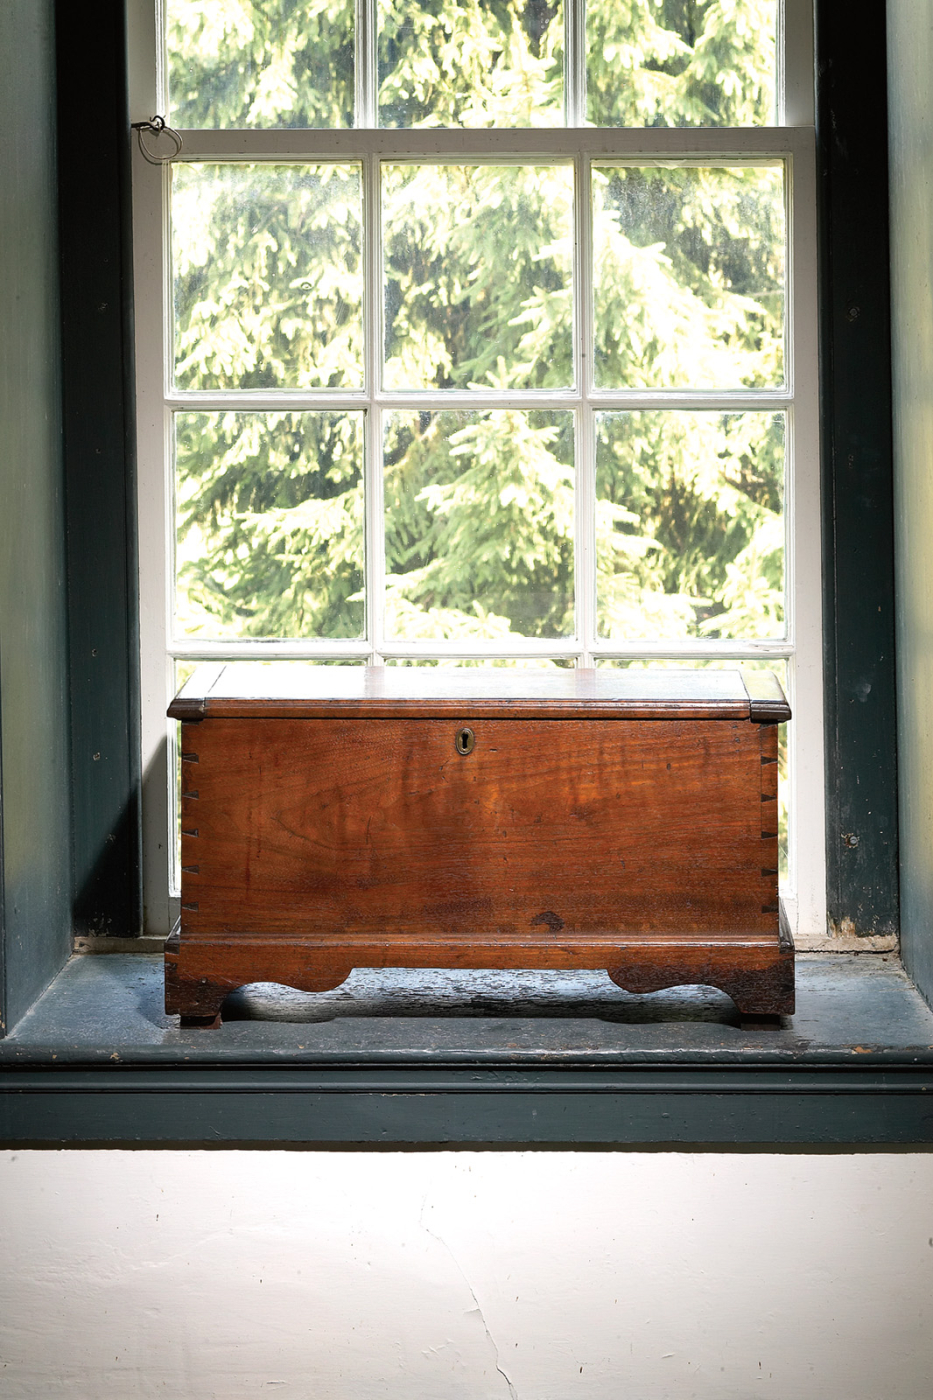
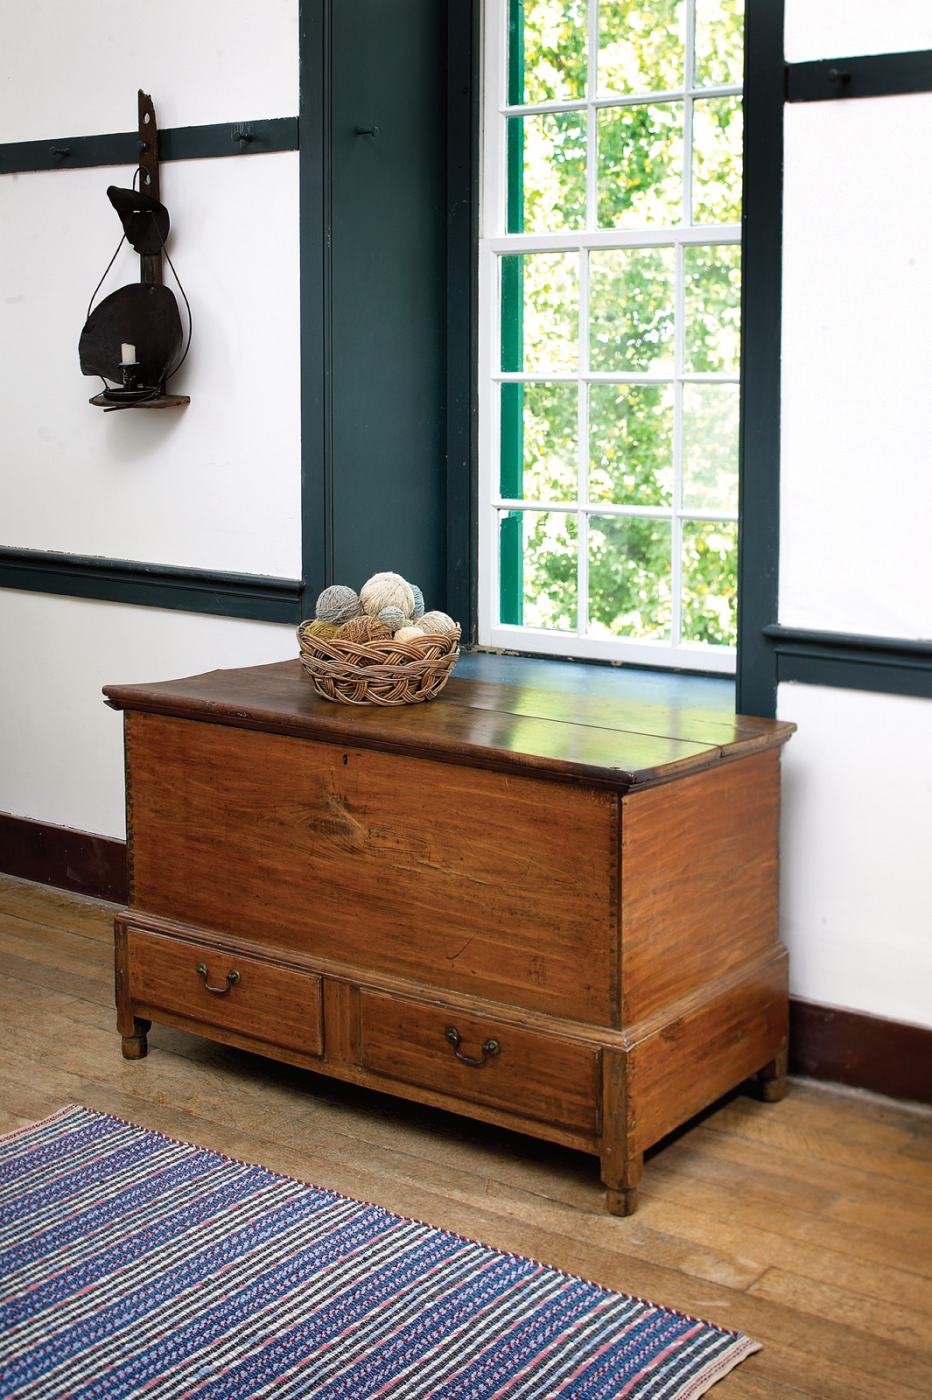
This nicely proportioned miniature blanket chest features dovetailed joinery on the case itself and simple nails to hold in place the chest’s bottom.
The Exalted Place Of the Lowly Nail
Shaker furniture makers have been revered, in particular since the Shaker chairmaking operation of Mt. Lebanon under the direction of Brother Robert Wagan won acclaim at the Philadelphia Centennial Exhibition in 1876. In fact, at one point in the mid-20th century, this reverence had reached such a point that any country piece assembled with dovetails was apt to be identified as Shaker. That perception was inaccurate – as you’ll see, there is some Shaker furniture built to different standards of craftsmanship than you might expect. And that perception was also unfair to those craftsmen in the outside world who made carefully constructed country furniture using dovetails, as well as executing many other signatures of fine workmanship.
While the craftsmanship in the very best Shaker work did, in fact, rival high-style furniture of the period, the Shakers were capable of employing techniques, even in their best work, that modern craftsmen might find unusual or disconcerting.
For example, Shaker craftsmen made widespread use of nails – and not just for the installation of mouldings, but also for structural applications.
During my visit at Pleasant Hill, I did measured drawings of several pieces, including the miniature blanket chest and the hanging cupboard shown above, and several of those pieces, including these two, are held together, – at least in part – by nails.
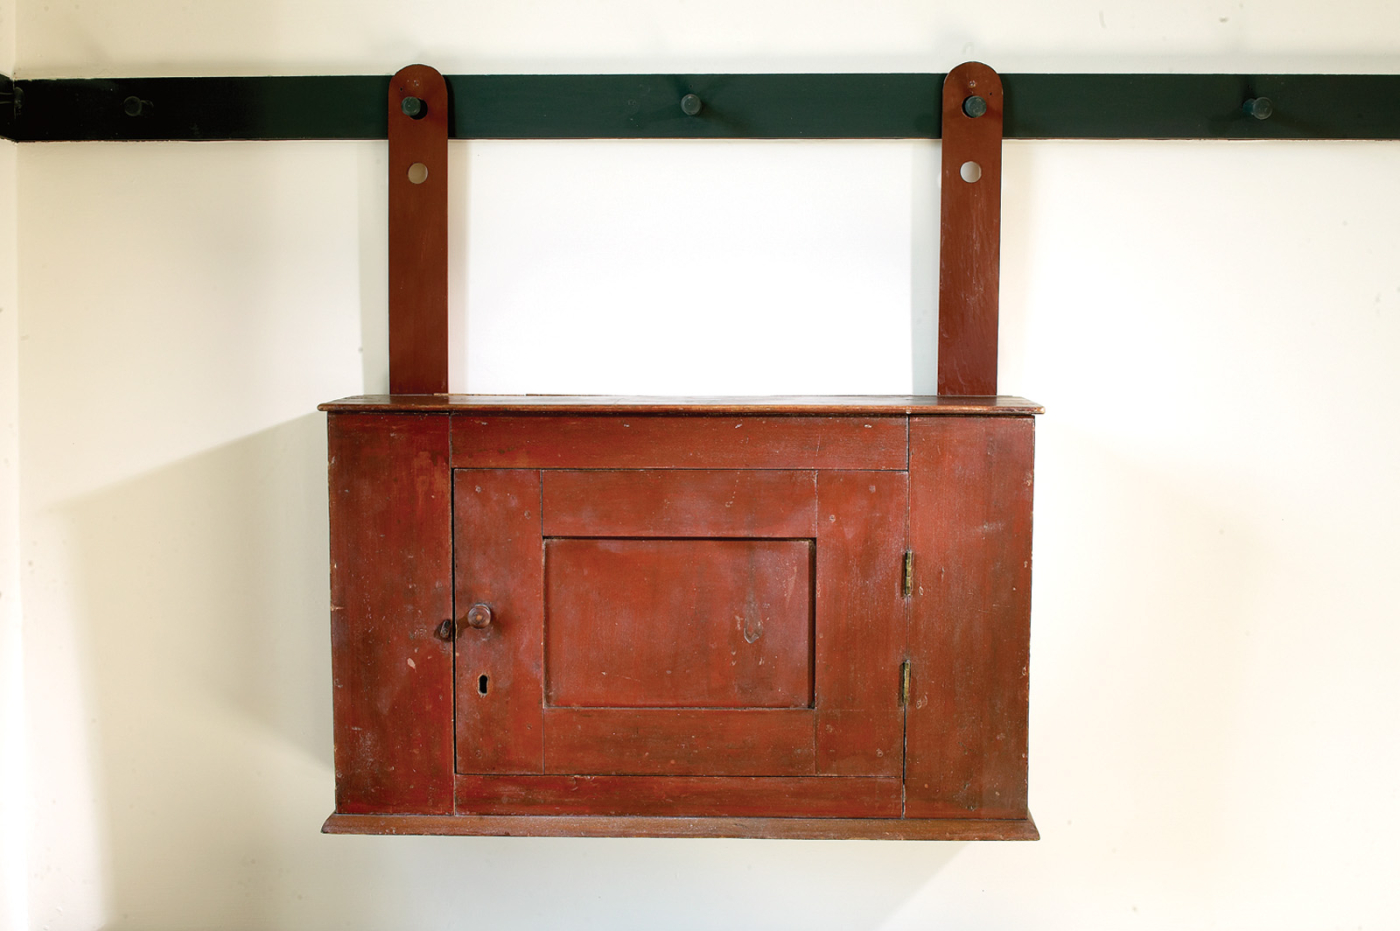
Many Shaker utilitarian pieces, such as this hanging cupboard, made use of nails in structural contexts.
The case and plinth of the miniature chest are, of course, nicely dovetailed, but the bottom of the chest is held in place through the use of nails driven through the chest’s front and back into the edges of the chest bottom. This is not what most contemporary makers would describe as good joinery. In fact, because the chest bottom has shrunk across its width, there are unsightly gaps visible on each side of that bottom panel when you look down into the open chest from above.
More properly that bottom would have been fitted into grooves plowed on the insides of the chest sides and ends. That technique would have eliminated not only the nails that hold the bottom in place but also the unsightly gaps.
The hanging cupboard, although an elegant manifestation of the Shaker aesthetic, uses nails for nearly all its structural elements. The sides, top and bottom are nailed together. The bottom and back are nailed in place, as is the frame around the door. Only the door itself exhibits the kind of joinery, through tenons, that could be identified as truly appropriate for that application.
But, having said that, I must then remind myself that the cabinet is still intact, 150 years after its construction. Yes, I would have preferred to find in the cabinet the kind of joinery that a first-class modern maker would employ in assembling such a piece. Specifically, I would have preferred that the cabinet’s sides, top and bottom be assembled with dovetails, and I would have preferred to find mortise-and-tenon joinery in the frame around the door. But my preferences have more to do with my woodworking prejudices than with the ability of the piece to survive from one generation to the next.
And I have firsthand knowledge that my joinery prejudices aren’t necessarily supported by the facts. In the small stand of trees beside my shop, we have a chicken coop that has a door I made almost 20 years ago from some common-grade cherry boards which, because of knots, wane and sap streaks, were just not good enough to be used in furniture. I built the door when the cherry was green and soft enough to be nailed easily. In the 20 years since its construction, the cherry has hardened and shrunk around those nails, clenching each in a death grip with this result: That door will now never come apart.
I know that hardwood furniture nailed together in such a way is all but indestructible, but my woodworking prejudices, honed by 30 years of cutting wood-to-wood joinery, are difficult to ignore.
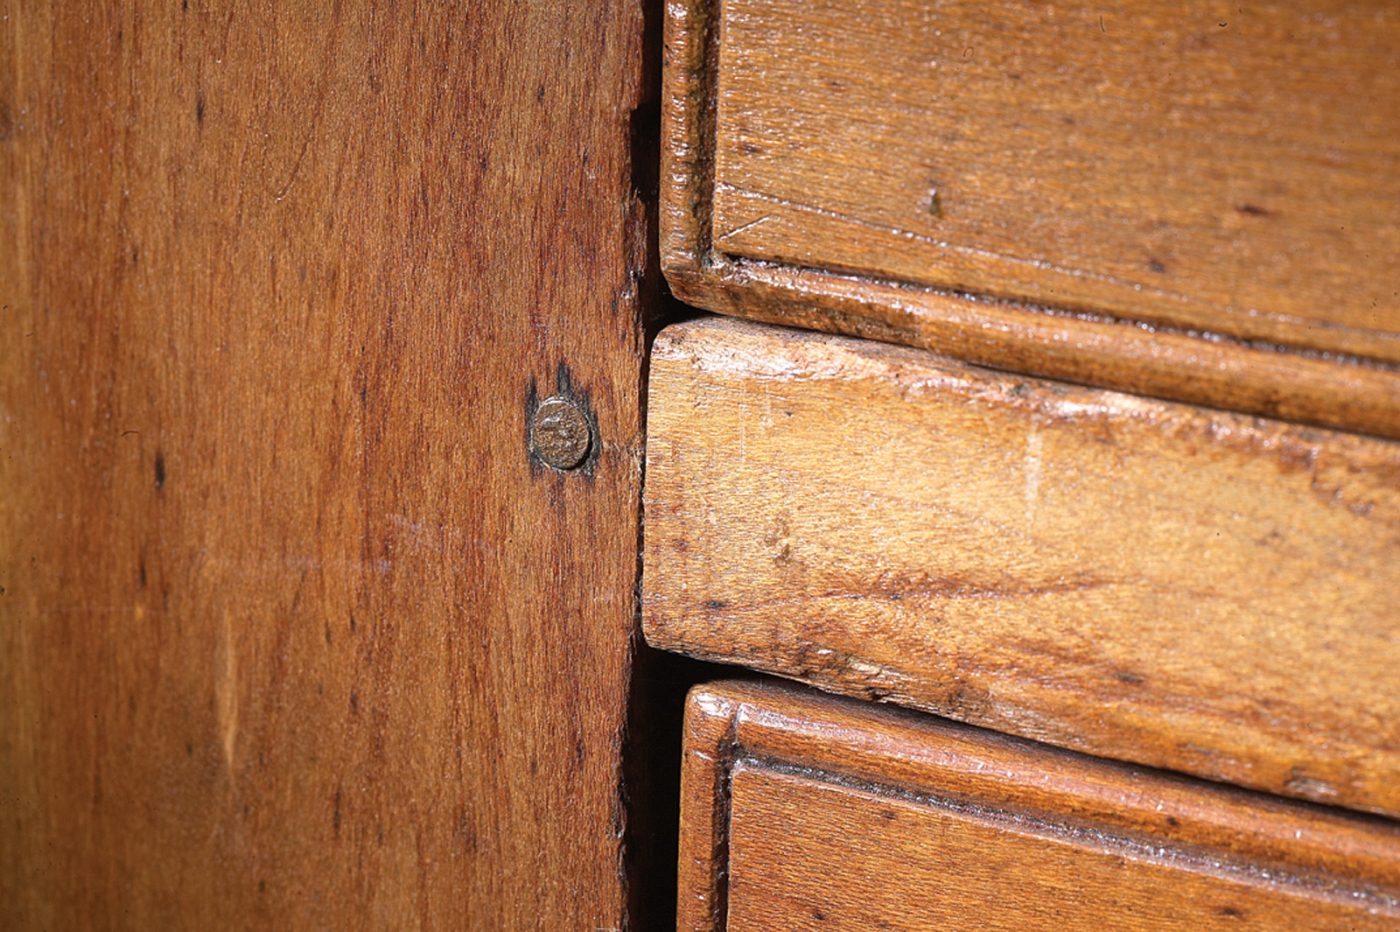
This detail shows the head of a nail driven through a mortise-and-tenon joint.
The Intersection of Joinery and Aesthetics
The hanging cupboard is made of poplar, a soft material usually green in color, often exhibiting wide areas of gray and black. Poplar is an easily worked species, frequently used by Midwestern cabinetmakers as a secondary wood for drawer sides and bottoms, as well as the interior structural components of cabinets featuring more desirable primary woods, such as cherry or walnut. Poplar is not, however, often itself used as a primary wood, except in the case of utilitarian furniture, such as this hanging cupboard.
I am, therefore, more inclined to accept nailed construction in such a piece. Plus, the cupboard was given a heavy red stain which, when the piece was new, probably all but obliterated any sign of the nails in the finished piece.
The Pleasant Hill craftsmen, however, didn’t restrict the use of nails to utilitarian furniture made of poplar and stained red. They also made use of nails in the construction of furniture made of the finest locally available materials, and in the construction of pieces finished natural, used these nails even in places where they could be easily seen.
The chest of drawers appearing below is one such piece. The chest has its mortise-and-tenoned frame pegged together, not with wood pegs, but with nails, the heads of which are clearly visible.
For many years, I repaired antique furniture in my shop, and I sometimes came across constructions like the one appearing in this detail photo. Usually, however, the nail driven through the tenon was a fairly recent addition. Someone, perhaps the current owner, perhaps another recent owner, had opted to fix a weakened glue joint by driving a nail through a tenon. But I suspect the nails in this Pleasant Hill chest of drawers were driven through the tenons by the Shaker craftsman who built the piece.
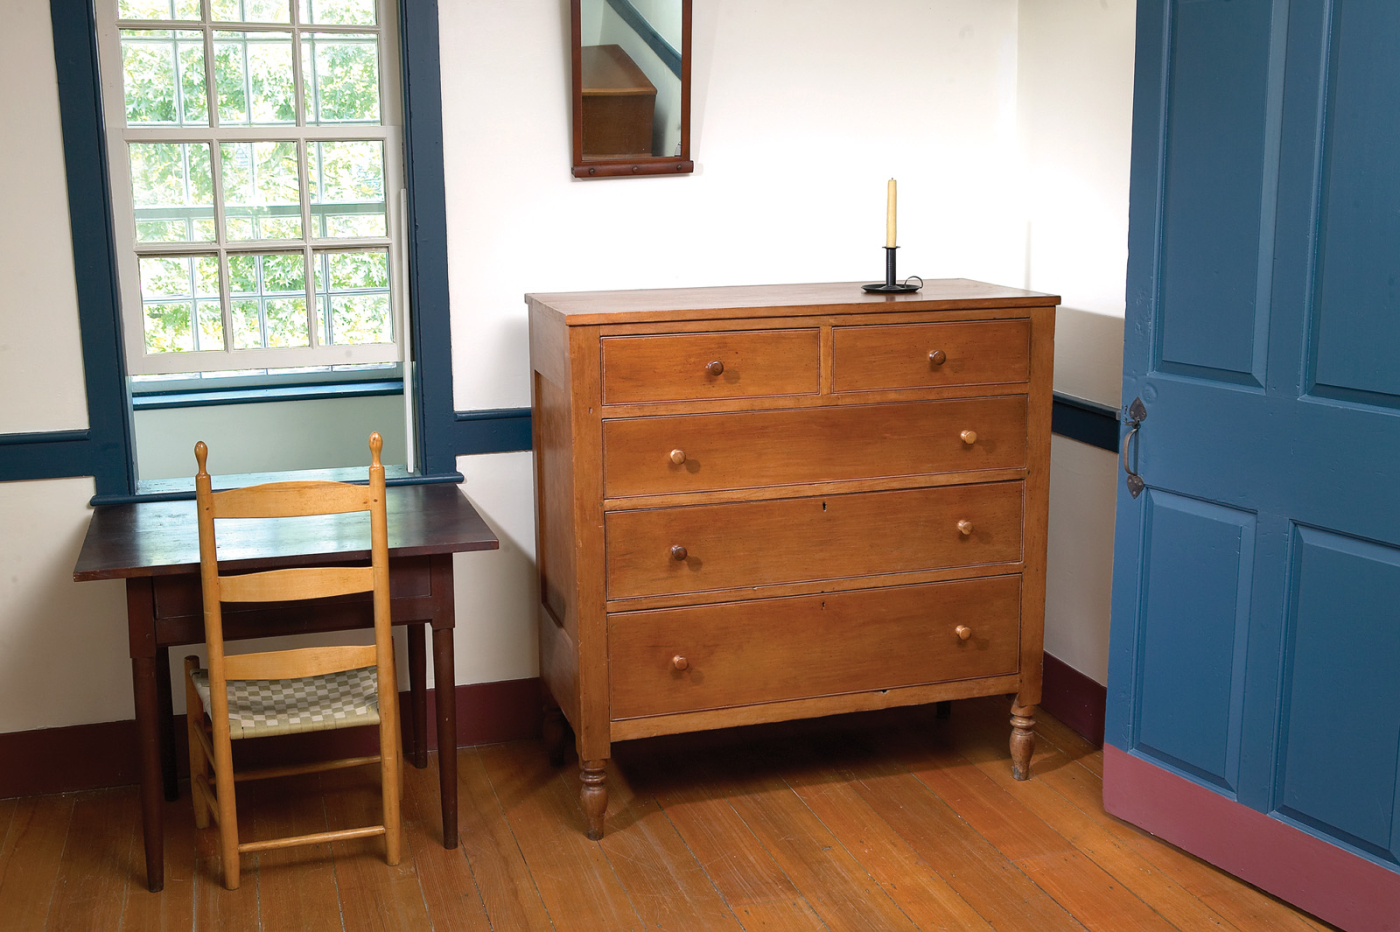
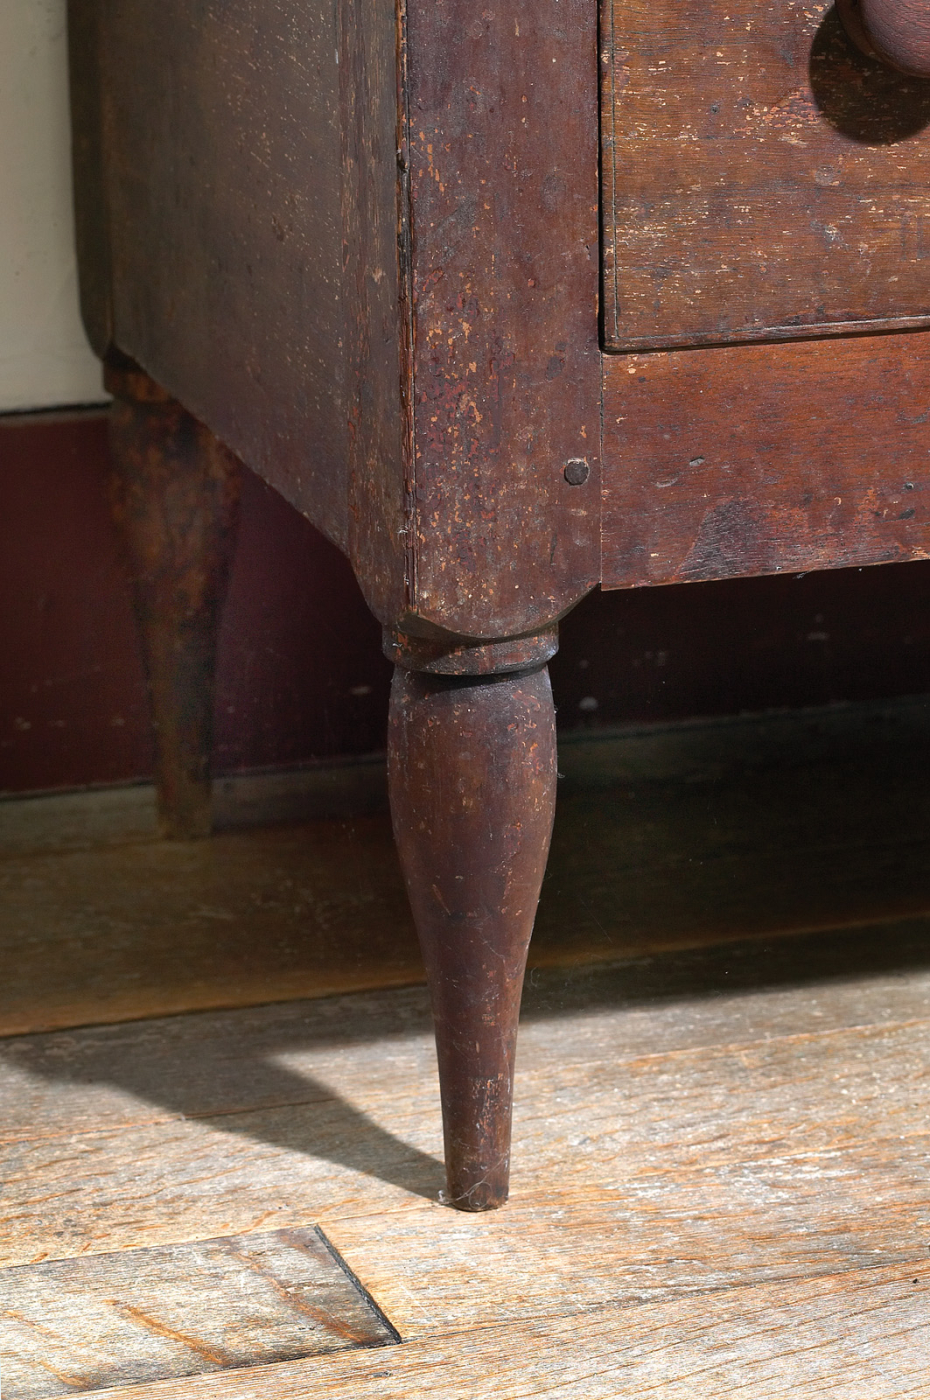
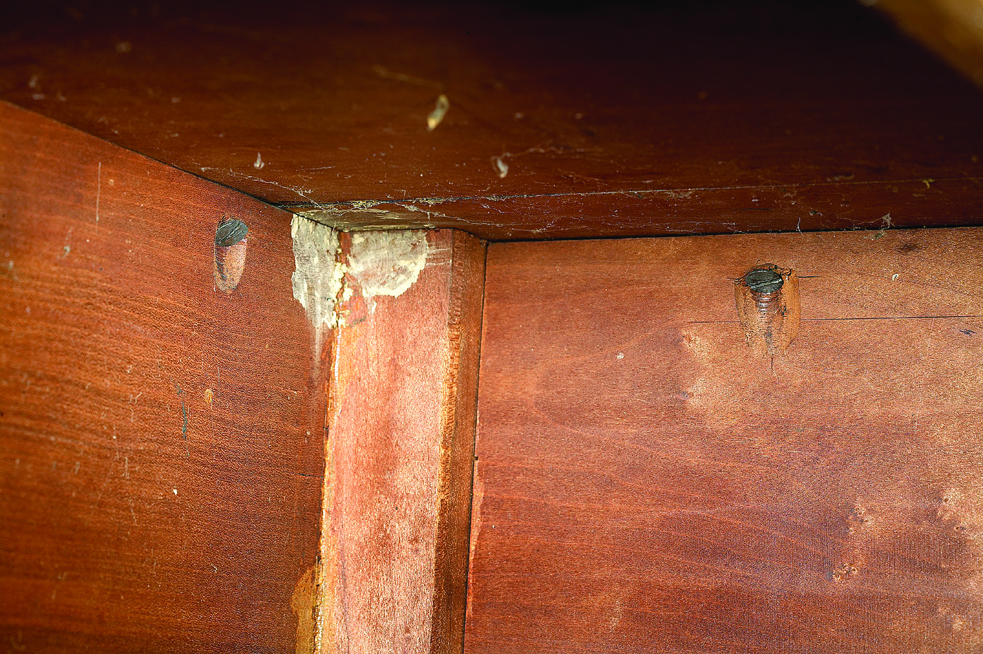
Shaker craftsmen used nails as structural devices even when those nails were visible and became, therefore, a part of a piece’s aesthetic. This chest of drawers, for example, has nails driven through the tenons of its mortise-and-tenon front, as well as nails driven down through the top into the posts on the ends of the chest.
I say this for several reasons. First, there is the evident age of the nails. They have been in place so long that the iron in the nails has leached into the surrounding wood, darkening its color. Second, this piece, and some others like it in the Pleasant Hill collection, made such widespread use of nails in similar contexts that this form of joinery appears to have been an accepted method of assembly in the Pleasant Hill workshops under the direction of at least some Shaker craftsmen. And third, this is a technique I have seen not only in the work of this Shaker community, but also in the work of other Shaker communities (as well as in the work of many country furniture makers of the period in the outside world).
In the Pleasant Hill furniture I examined, nails showed up in other contexts as well. Although cabinet tops were typically fastened in place with pocket screws, this method of attachment seems to have been routinely reinforced by nails driven down through the top into the end grain of a table or chest’s posts.
When used to peg tenons or to hold down a top, this use of nails is not just a matter of joinery; it is also a part of the Pleasant Hill aesthetic. These metal fasteners are visible to the casual viewer, sometimes glinting reflected light into the eye, drawing our attention to something our modern perceptions of joinery tells us should not be there.
It is in this context that the nails used in Pleasant Hill furniture are most problematic for me. If you drive a nail through a mortise-and-tenon joint some would argue that you have created a powerful joint, particularly after the wood has shrunk down around that nail, but I am, nevertheless, troubled by the fact that the nail head is visible in the finished piece.
The Mystery of the Half-blind Dovetail
Pocket screws, like these crudely formed examples, were often used by Shaker craftsmen to hold tops in place.
When you’re cutting dovetails by hand (the only way I know how to cut them and the method used by 19th-century Shakers), the easiest type to cut are through dovetails. Half-blind dovetails are much more time-consuming to create by hand because every socket for every tail must be chopped out with chisels. This probably doubles the time and effort required to cut a set of dovetails, but there are many applications for which this extra effort is justified.
For example, while through dovetails are perfectly acceptable at the back of a drawer, half-blind dovetails are preferred – in most cases – for attaching the drawer front because half-blind dovetails don’t allow the joinery to disturb the look of that drawer front. This is because the ends of the tails will be concealed by a covering of wood when the drawer is closed.
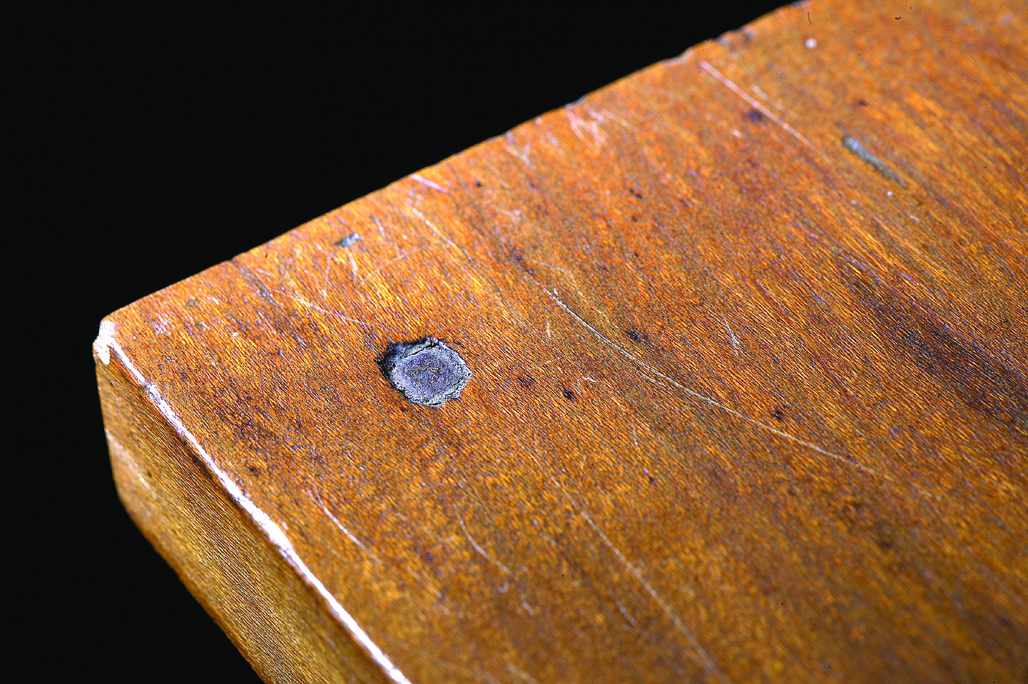
This nail is driven through the top of a chest of drawers into the chest’s end panel.
It’s customary for modern makers who are assembling a case in which all sides are open to the eye to assemble that case with through dovetails. This is because the extra effort required to cut half-blind dovetails seems misplaced when the dovetails can be seen from one side, if not from both. Nevertheless, there are a number of Pleasant Hill blanket chests on which the maker (s) took the time to cut half-blind dovetails on the front corners of the chest but used through dovetails on the back corners.
Puzzling Over Why
If the craftsman’s intention was to hide the joinery, full-blind dovetails would have been the correct choice because the half-blind joinery is still visible to an observer standing at the front of the chest. Plus, the backs of these chests feature through dovetails which are visible from both the back and the sides.
And this approach was not used consistently in the creation of Pleasant Hill chests. The miniature blanket chest mentioned earlier in this story was assembled with through dovetails on all four corners, a method that would be used by most modern makers of such casework.
I’m attracted to this puzzle for two reasons. First, I enjoy the process of trying to determine why a maker, separated from me by a century or more, might have chosen to do a thing in a way that – at least to me – seems counter-intuitive. That is, I’m drawn by my nosiness, my unvarnished need to pry. But the puzzle is important in another way as well. If I someday decide to reproduce one of these Pleasant Hill blanket chests, what kind of joinery will I use? The one I found in the original or the one that makes the most sense to me?
The Exuberant Expression of Craftsmanship
This large Pleasant Hill blanket chest features a proliferation of finely cut dovetails as well as an ingeniously executed bit of joinery uniting the post and rail in the chest’s base.

Dovetail joinery is the best option when joining one end of a board to another at an angle of 90°. This traditional joint provides mechanical resistance to separation in one direction while providing a significant amount of glue surface to resist separation in the other direction.
The number of dovetails a craftsman might distribute along a 90° corner is determined by the amount of abuse the piece might experience as well as the look the craftsman wants to achieve. If you’ll examine the miniature blanket chest on page 40, you’ll see a fairly typical distribution of pins and tails for a context like this. That is, you’ll see a fairly small number of fairly wide tails. This is more than enough joinery to keep these sides together. But if you look at the corners of the full-size blanket chest on page 43, you’ll see a much different situation. The maker of this chest packed that corner with a huge number of pins and tails. This significantly increased the amount of time and effort required to cut the joinery, an increase that probably can’t be explained simply by considering the amount of abuse the chest was likely to receive.
Then why? Why go through the trouble to cut all those pins and tails? Why not lighten the workload with a distribution more like that found on the miniature blanket chest?
Before I offer my best guess at an answer, I’d like to draw your attention to one other feature of the full-sized blanket chest. Look closely at the joinery with which the base of the chest is assembled. When I first examined this piece, I didn’t really see the many complications presented by this union of post and rail.
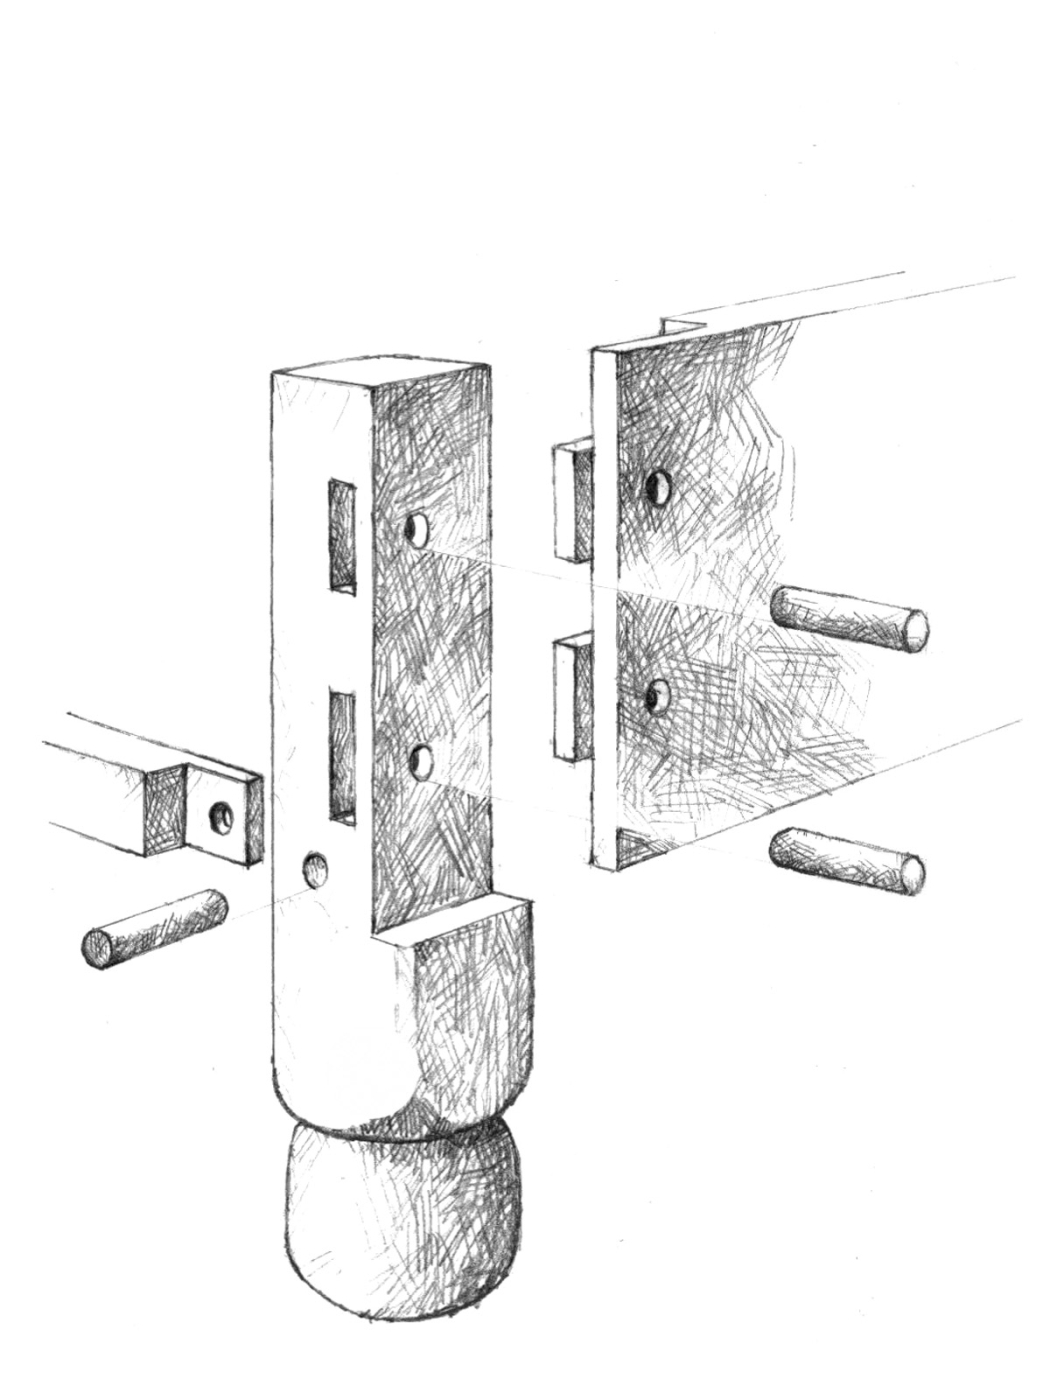
A look inside the complicated joinery in the base of the large blanket chest.
But later – after I’d gotten out a pencil and piece of paper, after I’d taken the time to articulate the cutting of this little flourish of skill – I had what I think is an insight into the mind of the craftsman who made this chest.
He was, I believe, a man who loved joinery, a man who loved the process of carefully fitting one part to another. Maybe that precision was an act of worship, an offering to God, but maybe it was something else as well, something that all of us – regardless of our religious persuasion – can understand. Maybe it was nothing more than an exuberant expression of the sheer joy he found in craftsmanship.
What They Knew
I think we study the furniture of our woodworking ancestors for two reasons. First, we want to grow as furniture makers. We want to know what they knew, and the record of what they knew is written in the work that survives them. But there is another motivation that is, to me, even more important. It is the same motivation that pushed me out of bed at dawn onto the lawn behind the East Family Dwelling.
To the extent that is possible when separated from them by a 150-year chasm of time, I want to know what it felt like to be one of the 19th-century Shakers who produced the marvelous furniture now on display at Pleasant Hill. I want to climb inside their woodworking skin, to feel the heft of their tools in my hands, to experience vicariously the joy they found in the simple act of creating beautiful objects in wood. PW
Visit Pleasant Hill
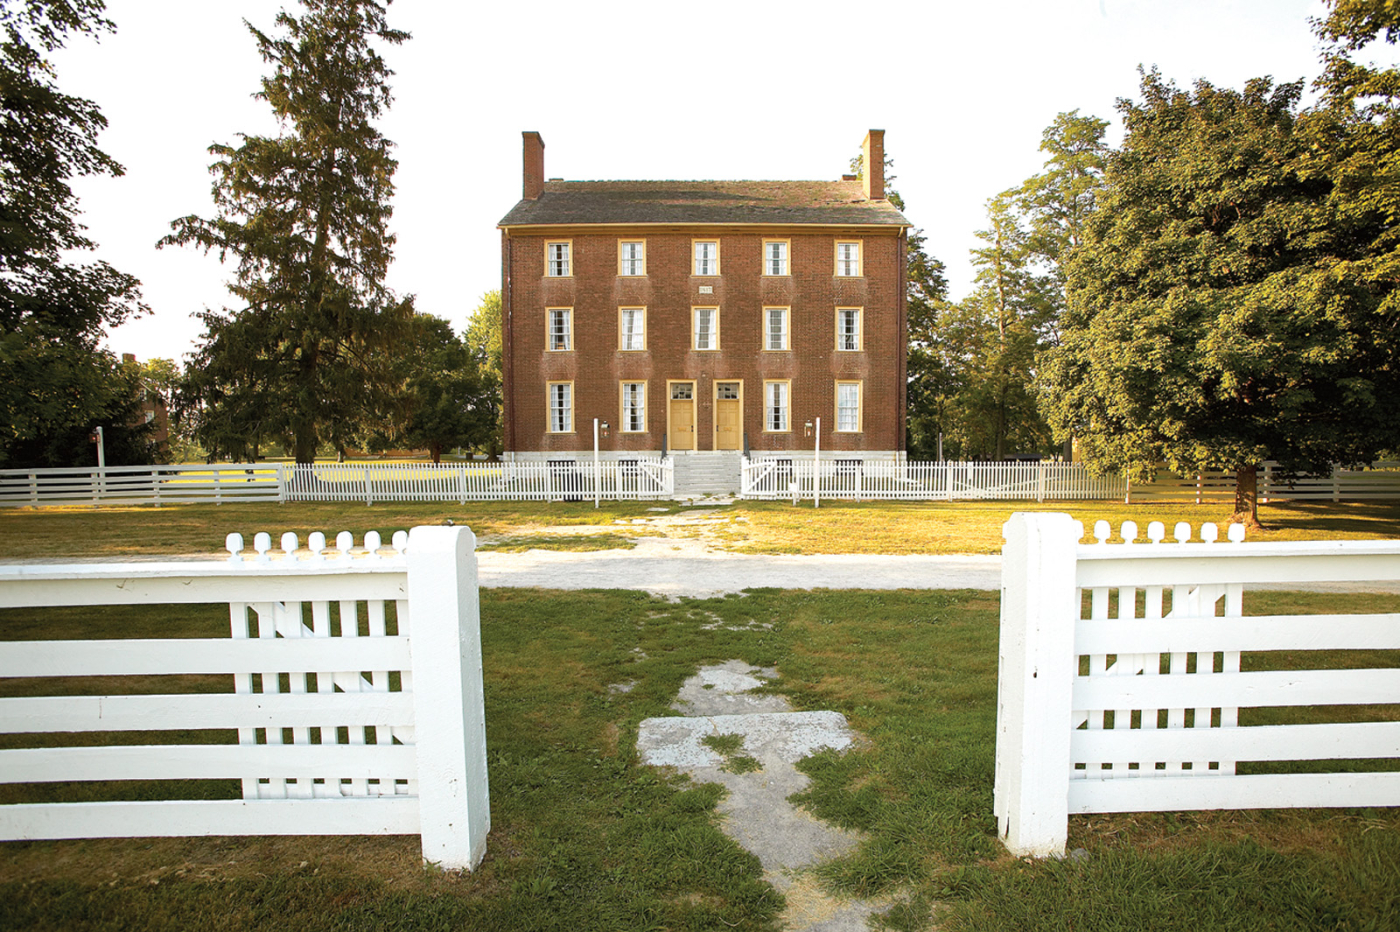
The East Family Dwelling is one of several buildings on the grounds of the restored Shaker community at Pleasant Hill, Ky., in which visitors can stay in comfortable rooms with air conditioning and private baths while enjoying the community’s 19th-century ambiance.
Tucked into the rolling hills of the bluegrass region of Kentucky, the Shaker Village of Pleasant Hill is an inspiring place for woodworkers and their families to experience Shaker life. Here you can stay in their buildings (updated with air conditioning and private baths), eat Shaker meals in the Trustee’s Office dining room, and explore all the details and trappings of Shaker life at your leisure.
Pleasant Hill includes 34 restored buildings from the community, which existed in the area from 1805 until 1923, when the last remaining resident of the community died. The 2,800 acres includes hiking and horse trails, and a steamwheeler excursion on the Dixie Belle from the village’s dock on the Kentucky River.
The Centre Family Dwelling is home to a large collection of Shaker furniture pieces, including most of those in this article (some are in the Meeting House, and can be viewed on daily tours). The other buildings are also loaded with the details of Shaker craftsmanship you’ve seen in the many books about Shaker work. Plus, you can experience demonstrations of Shaker singing and craftsmanship ongoing at the village.
For those seeking a complete woodworking vacation, Berea, Ky., is a short drive away, which is home to many of the regions best woodworkers (Brian Boggs, Kelly Mehler, Warren May, David Wright and Don Weber to name just a few).
For more information on Pleasant Hill, call 800-734-5611 or visit shakervillageky.org.
This article originally appeared in the December 2005 issue of Popular Woodworking.
Here are some supplies and tools we find essential in our everyday work around the shop. We may receive a commission from sales referred by our links; however, we have carefully selected these products for their usefulness and quality.