We may receive a commission when you use our affiliate links. However, this does not impact our recommendations.
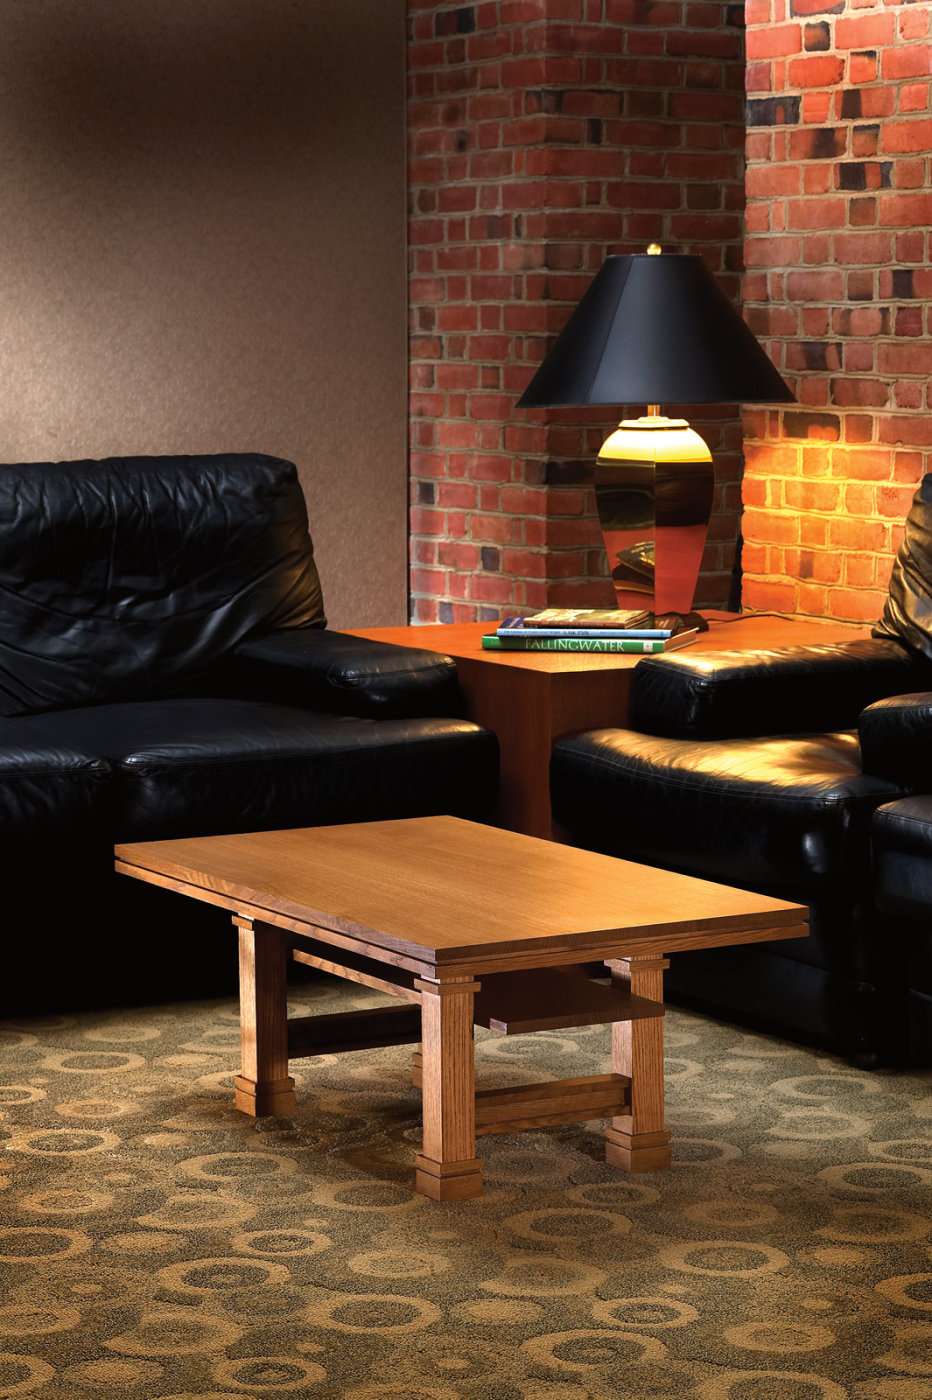
An anachronism in its time, this table now fits perfectly in our homes.
Frank Lloyd Wright would probably be dismayed to see a coffee table built in his Prairie furniture style. In fact he and his fellow early 20th-century designers all would have been disturbed by the concept of a coffee table. Eating or drinking in the living room? Unheard of! That type of informality in furniture is a product of the latter half of the 20th century.
But, there is a fine, old Russian proverb that says necessity is the mother of invention. And so I offer you the Prairie-style coffee table. At least it’ll keep my kids from leaving plates, glasses and remote controls on the floor.
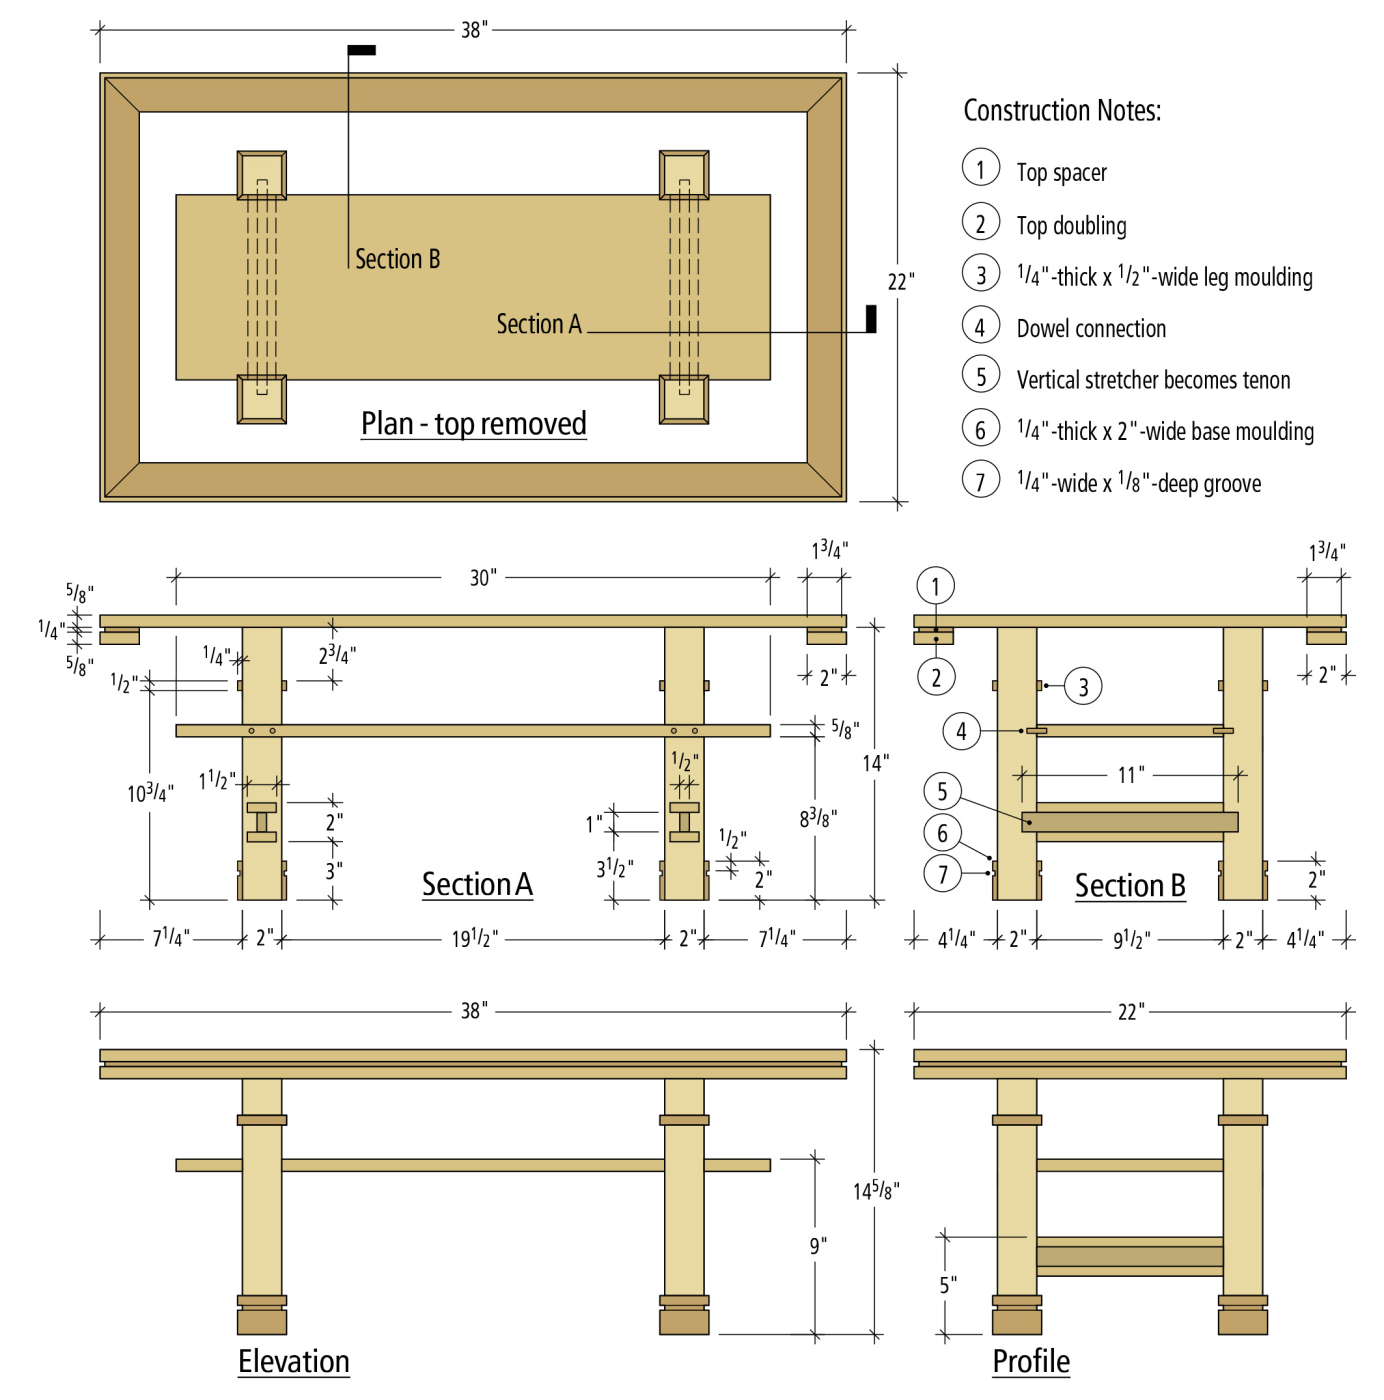
This project is an adaptation of a number of Wright’s pieces, utilizing applied moulding to a generally simple design. The shelf is placed high on the legs and extends beyond the base to match the wide and low look of Wright’s Prairie-style buildings and furniture.
The construction is simple, with the most complicated joint being a mortise-and-tenon attachment on the legs, which I’ve simplified even further for you.
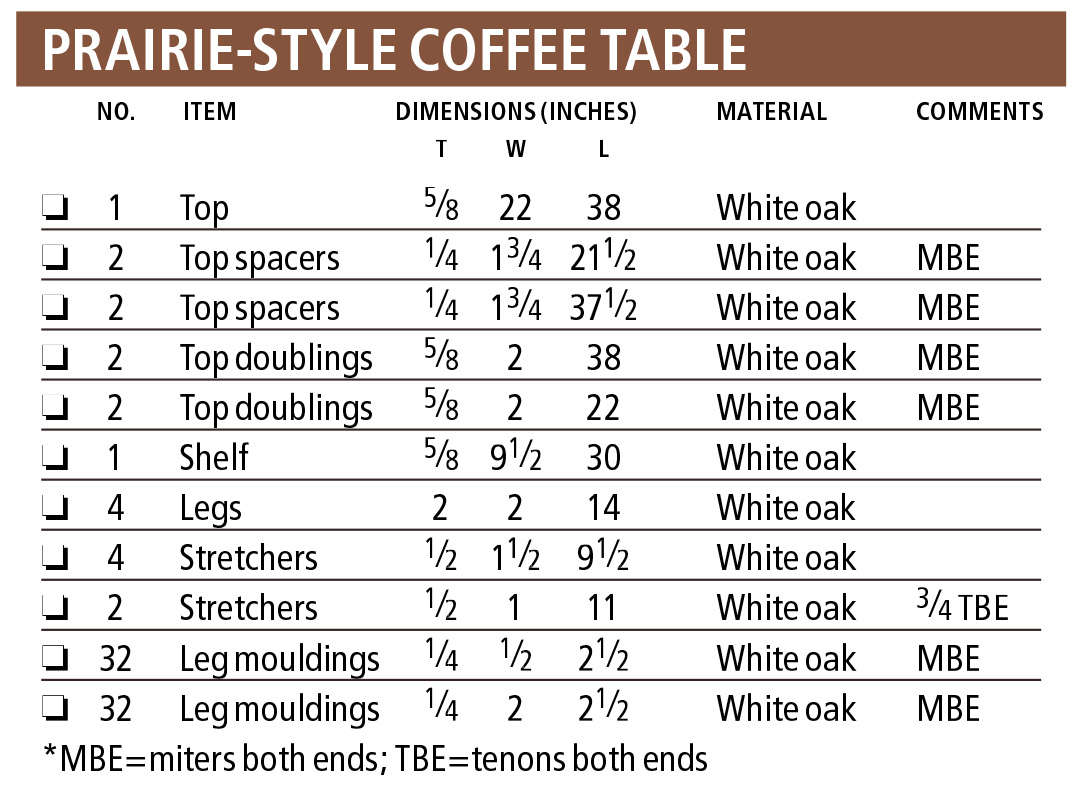
Prairie-style coffee table Cut List
Ground-up Construction
I started building the table at the base with the four legs. For a larger table I would have used a mitered or lock-mitered leg to make sure the dramatic grain commonly found in quartersawn white oak was visible on all four sides of the legs. But for a table this small, the work really didn’t justify the benefit, so I started with 2″ x 2″ white oak turning blanks, choosing the straightest grain possible.
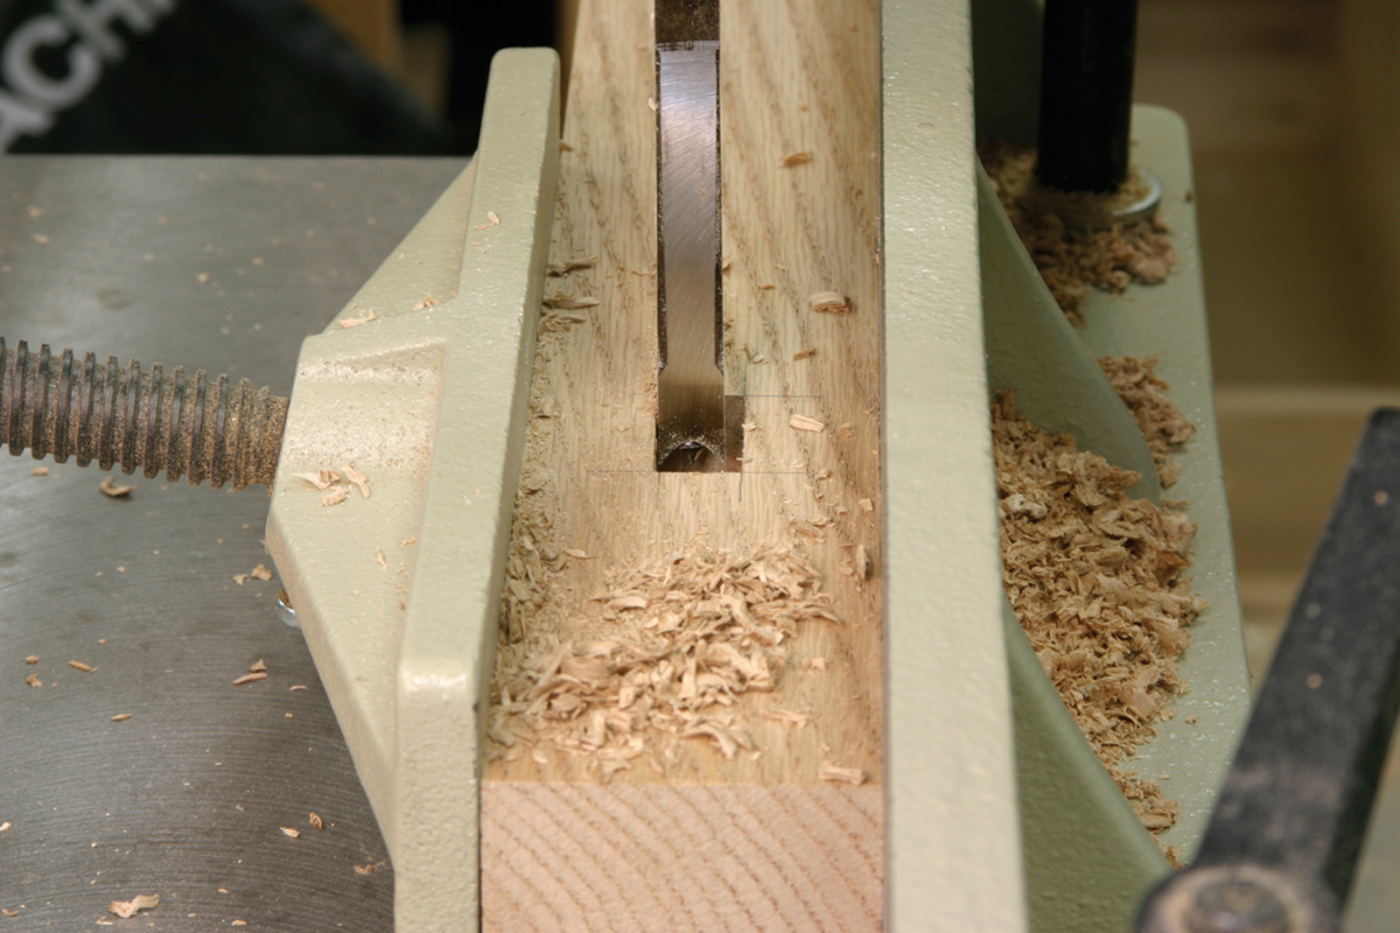
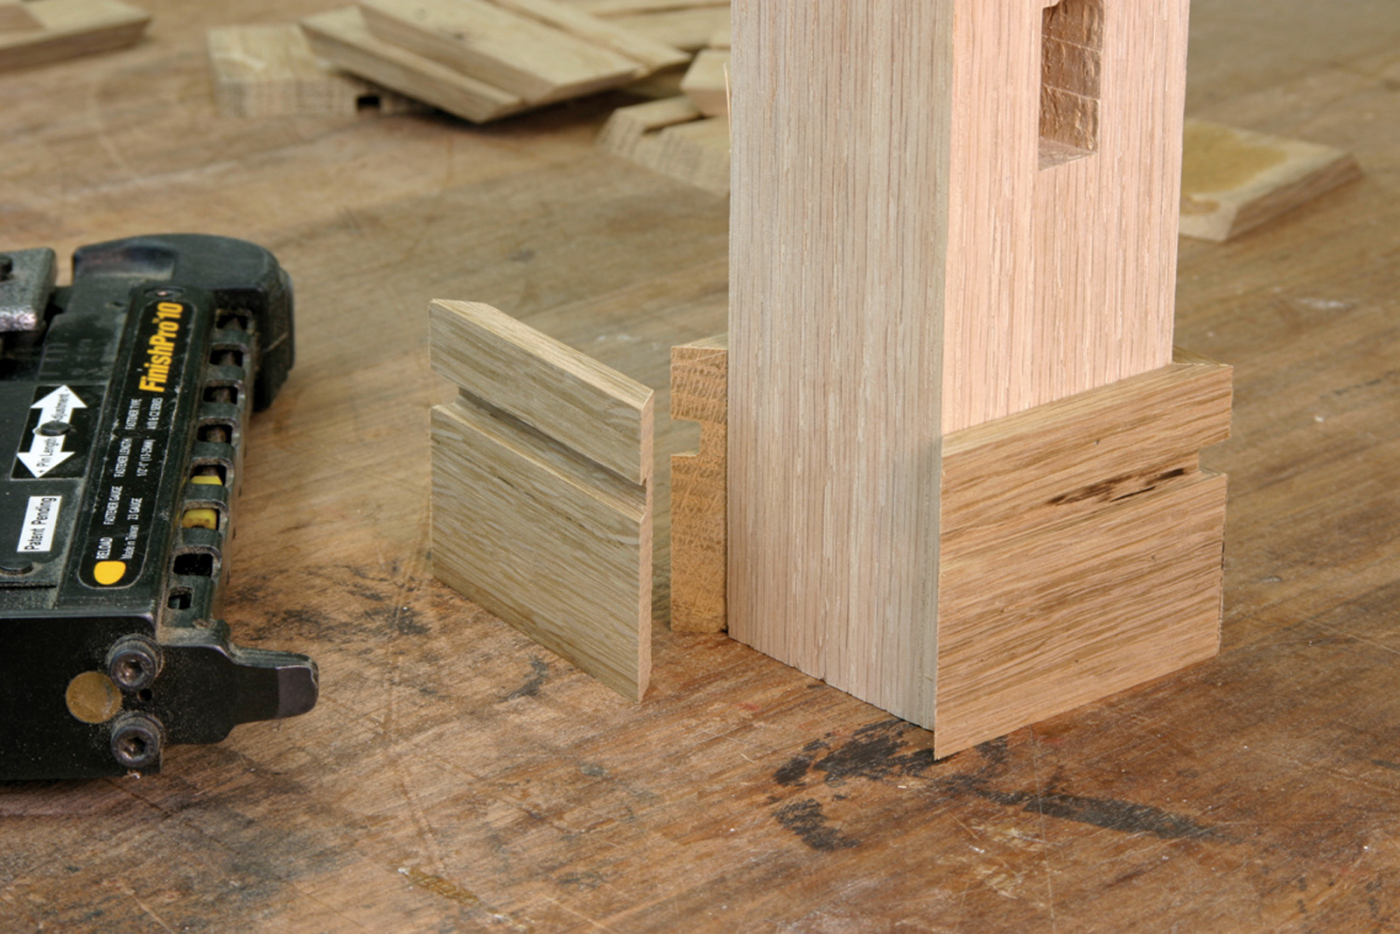
The lower stretchers tie into mortises cut in each of the four legs. I made the mortises 1⁄2″ wide so I wouldn’t have to cut tenon cheeks on the stretchers. Unfortunately I only had a 3⁄8″-wide mortising chisel, so I overlapped the mortise cuts to achieve a snug 1⁄2″-wide mortise.
With the legs cut to length, the first step is to mark the mortise locations and then make the mortise holes. Traditionally it makes sense to make the mortises and then fit the tenon to the mortise. Because I’m short-circuiting the tenon process by using part of the stretcher as the tenon, I needed to make the mortise match the tenon this time. The photos show the details.
The next step is assembling the stretchers. This is where the fun starts. The two stretchers are of an I-beam design, with a top and bottom that are horizontal, and a middle piece that is oriented vertically. The top and bottom stretcher pieces are 91⁄2” long, which is the actual size of the space between the legs. The middle stretcher is 11″ long. When the three pieces are assembled, the middle piece extends 3⁄4” on either side, creating the tenons.
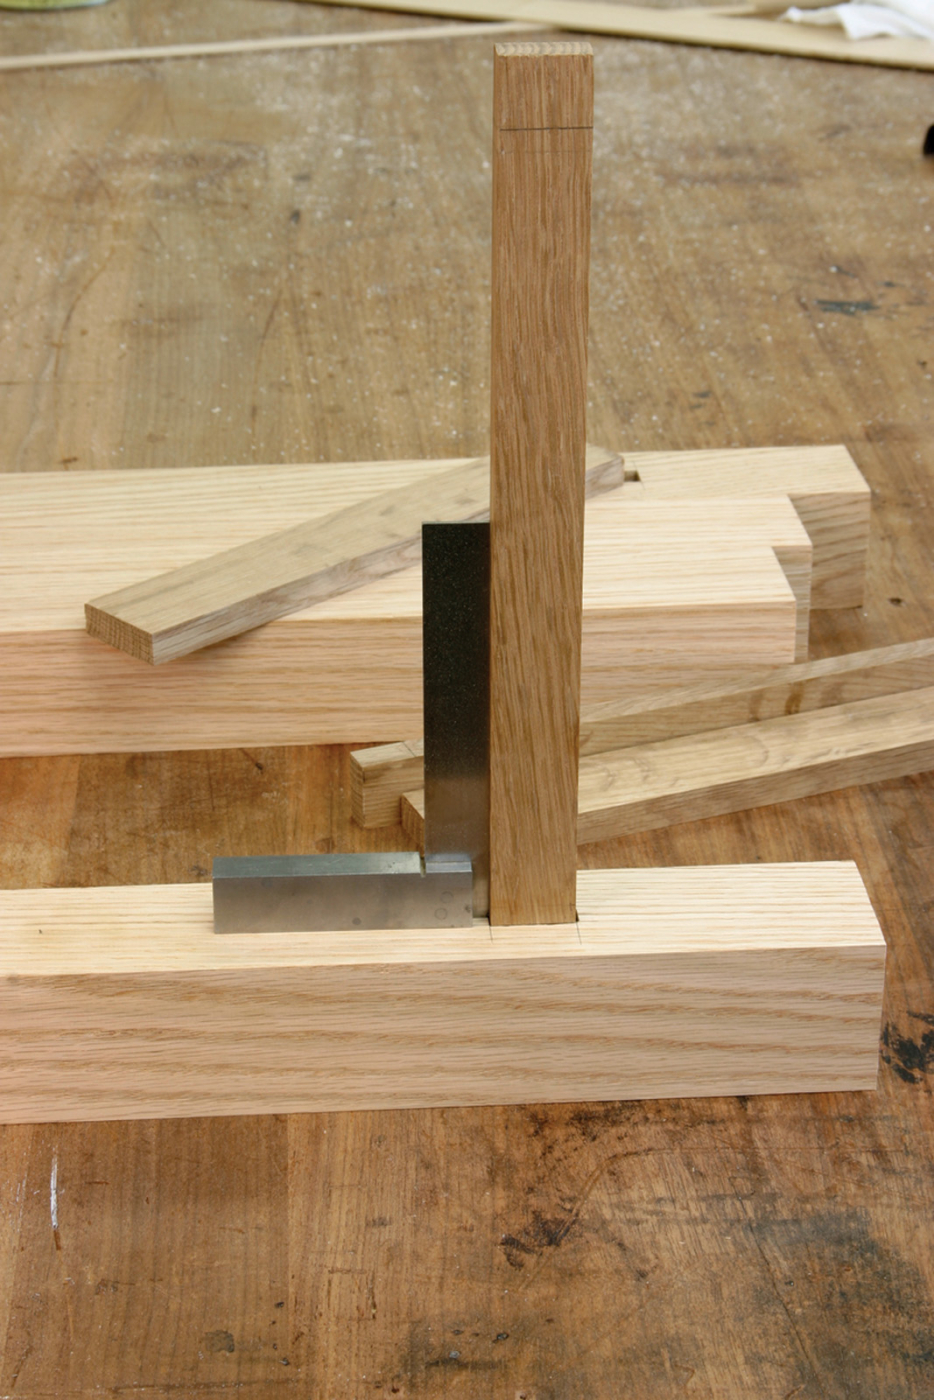
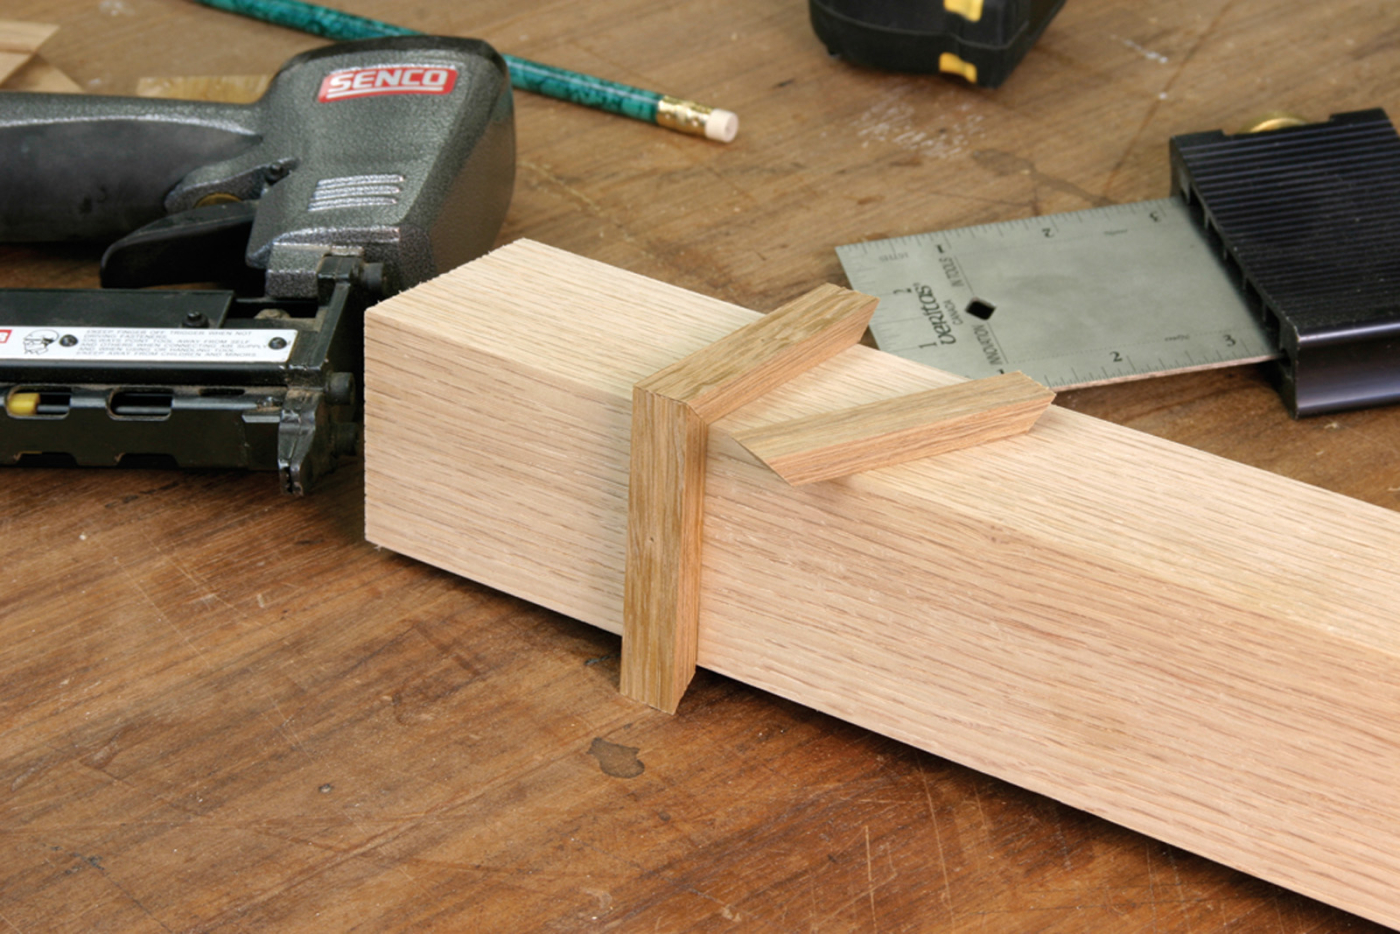
With the mortises cut, it was time to assemble the three-piece stretchers. To ensure a square fit, I first squared the center stretcher piece while it was fit into the mortise. Remember, no glue at this point!
It’s important that the stretchers fit tight against the legs, so I assembled the stretchers while they were in place in the legs. Before you do that, though, sand all the pieces, because it’s next to impossible to sand inside the channel once the stretcher is assembled. By squaring the stretchers to the legs while assembling, everything fits tight without a lot of extra fitting.
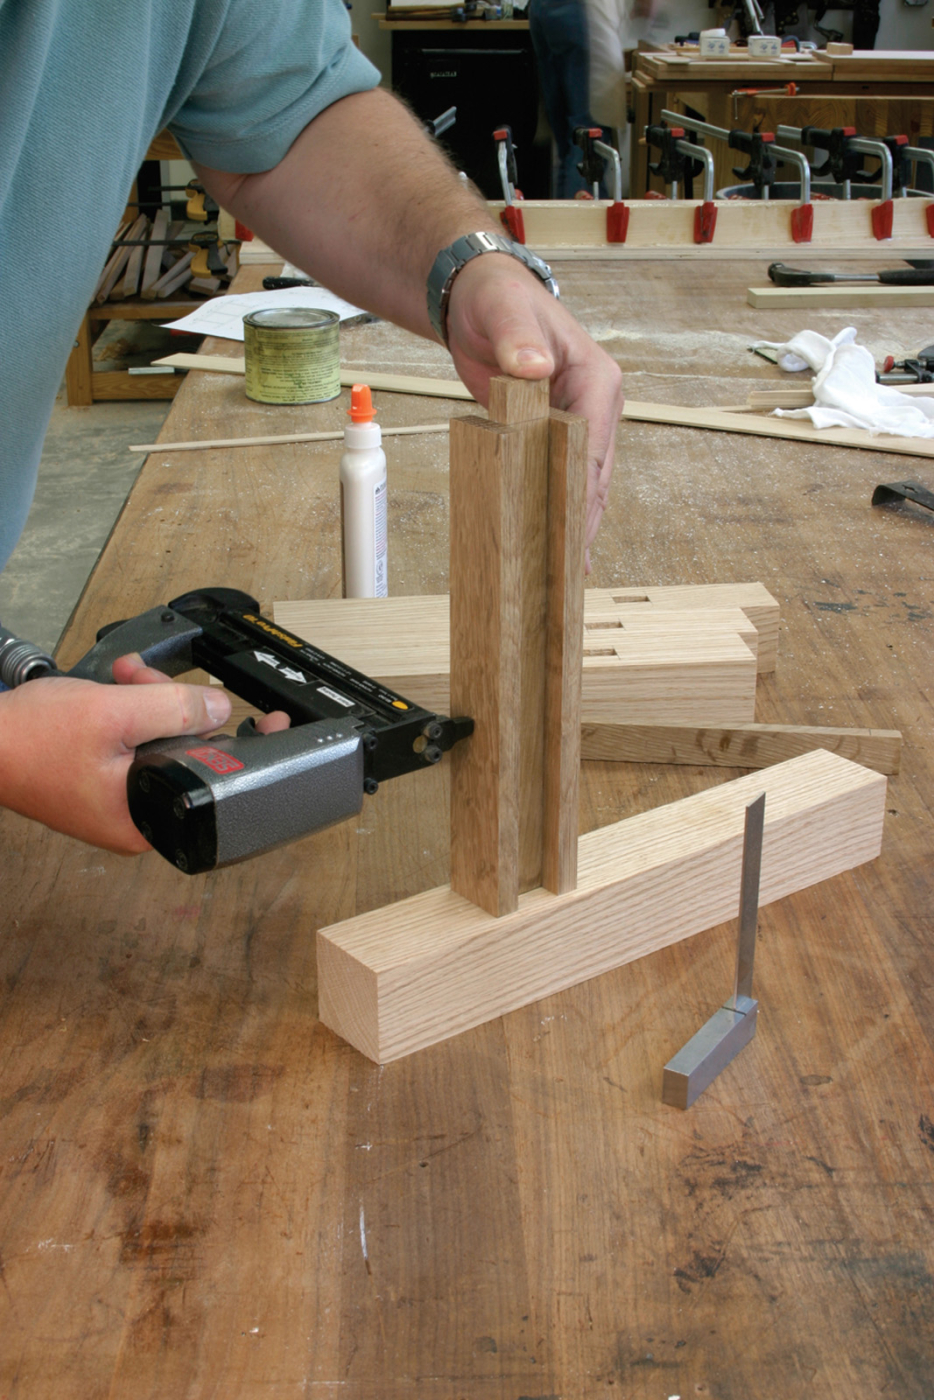
With the center stretcher square, it’s simple to pin the upper and lower stretchers in place, maintaining the square relationship and forming the tenons on the stretchers simultaneously.
The other part of the support structure on the table is the shelf. Traditionally this would be positioned much lower, but the Wright design dictates a higher shelf. Useless you say? Posh! It’s the perfect height for hiding the remotes and the TV Guide. Maybe they won’t all end up stuck in the couch cushions if they have a proper home.
The shelf is attached to the legs using dowels. I used only one dowel per leg. Because it’s such a small table and the top is attached to the legs as well, one dowel is likely adequate for a small-scale table.
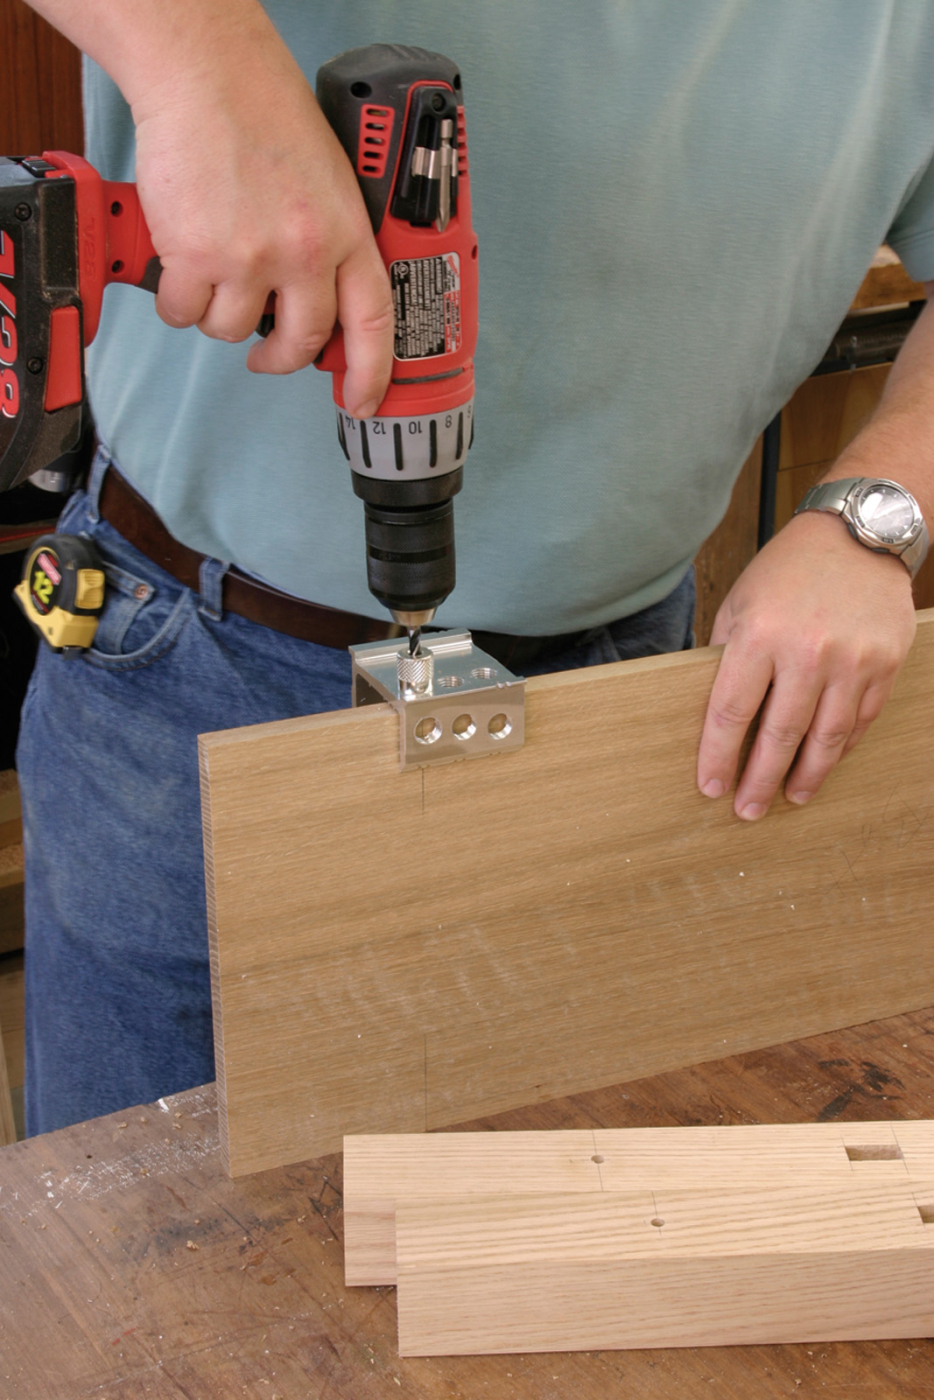
The shelf is dowelled into the legs to make assembly simple. A dowelling jig makes this even easier. Locate the dowel holes on the legs 4-3⁄4″ down from the top of the legs and centered. The locations on the shelves are 4-1⁄4″ in from the ends and centered on the thickness of the shelf.
However, if you look at the drawing, we’ve shown two dowels at each location. One thing that’s nice about this design is if you cared to scale this up to dining table size, all the proportions would still work and it would be an attractive larger table. In that case, two dowels per leg would be recommended.
At this point, leave the stretchers and shelf separate from the legs. We still have some detailing to do on the legs themselves before assembling the base.
Mitering Small Mouldings
There are two moulding details on the leg – a lower “foot” and a small upper strip. The upper piece is simply 1⁄4” x 1⁄2” material mitered around the perimeter of the leg. The lower moulding is 1⁄4” x 2″ material that has a 1⁄8” x 1⁄4“-wide groove cut into the length, 1⁄2” down from the top. I cut the groove in two passes on the table saw on a long strip before mitering the pieces to length.
After running the 1⁄8″-deep x 1⁄4″ groove in the lower mouldings using the table saw, they were ready to miter and hand-fit on a sanding disk. This is the tricky part, so take your time. Then glue and pin the pieces in place.
The first time I ever saw one of Wright’s Prairie designs, I looked at the mouldings and thought, “Wow, that’s simple! All you do is miter the pieces and nail them on!” Well, that is the process, but it’s not as simple as it seems. While fitting a single miter isn’t too awkward, getting four miters to align perfectly around a leg is darn tricky. In fact, this step turned out to be the most difficult part of the project.
I started out assuming that I could simply use my miter saw and a stop block to cut the pieces. But working with such small pieces is actually a little scary. Your fingers are too close to the blade. A table saw could work as well, if you have a sled that works with the blade either tilted or beveled to 45°. But, again, the small pieces and the concern of tear-out make it a task not for the faint of heart.
Instead, I relied on a slower method, but one that proved more reliable. After rough-cutting the moulding pieces to length (using a clamping jig on the miter saw). I hand-fit each piece using a small disk sander with the table set to a 45° angle.
The same mitering technique is used to fit and then attach the upper mouldings on the legs. Remember that part of the leg is hidden behind the top’s built-up edge, so locate the moulding 2-3⁄4″ down from the top of the legs.
Tiny Nails
After fitting the pieces to the legs, it’s a good time to sand all the pieces before attaching the mouldings. It’s just easier to get in the corners this way. Then it really is as simple as adding a little glue and nailing them in place. Actually, I pinned the pieces in place using a 23-gauge pneumatic pinner. I love this tool. The pins are so small that the hole looks like a freckle on the wood. The holes are easily filled, or you can actually be a little lazy and let the stain cover up the hole.
One tip when using a pinner (or nailer) like this: Rather than drive all the pins straight into the piece, angle the pins toward one another. While it’s unlikely the pins will fail, this will add extra strength to help keep the moulding from ever pulling loose.
Start with the lower moulding, setting the leg upright on your work surface as you attach the pieces. This helps to make sure you have a flat bottom to the leg and helps align the pieces at the miters.
The next step is the upper mouldings. You’ll need to add some location lines to the legs to orient these mouldings. Measure down 23⁄4” from the top of the leg to the top of the mouldings.
Base Assembly
At this point you’re ready to assemble the base. Work with two of the legs flat on your work platform, with the mortises facing up. Add glue to the one set of dowels and tenons, and attach the shelf and two stretchers to the legs. Then add glue to the remaining dowels and mortises, and attach the other two legs.
At this point, stand the base up and allow the legs to sit flat on the work platform. Then clamp across the legs to hold everything together while the glue dries. Use a square to double check the angle of the legs to the shelf while clamping the base. Set this aside to dry and turn to the top.
The spacers required to create the 1⁄4″ x 1⁄4″ shadow line are mitered and held 1⁄4″ in from the edges, then pinned in place (no glue). The pieces don’t need to be 13⁄4″ wide. My scrap was narrow, but no one will know.
Doubling the Top
Part of the look of the top is achieved by recessing a piece of 1⁄4“-thick material between two thicker pieces, leaving a 1⁄4” x 1⁄4” channel that creates a delicate shadow line on the top’s edge.
One of the other benefits of this process is making the top look more substantial without adding too much weight.
Start with the main top glued-up and trimmed to finished size. The spacer and doubling material also are solid white oak, cut to width and thickness as given.
The doubling pieces work the same as the spacers, but they’re held flush to the top piece. A square works well to orient the pieces before pinning through the spacers into the top.
Now flip the top upside down and mark the corners 1⁄4” in from each edge. By holding the spacer pieces at this offset you will create the recess for the shadow line.
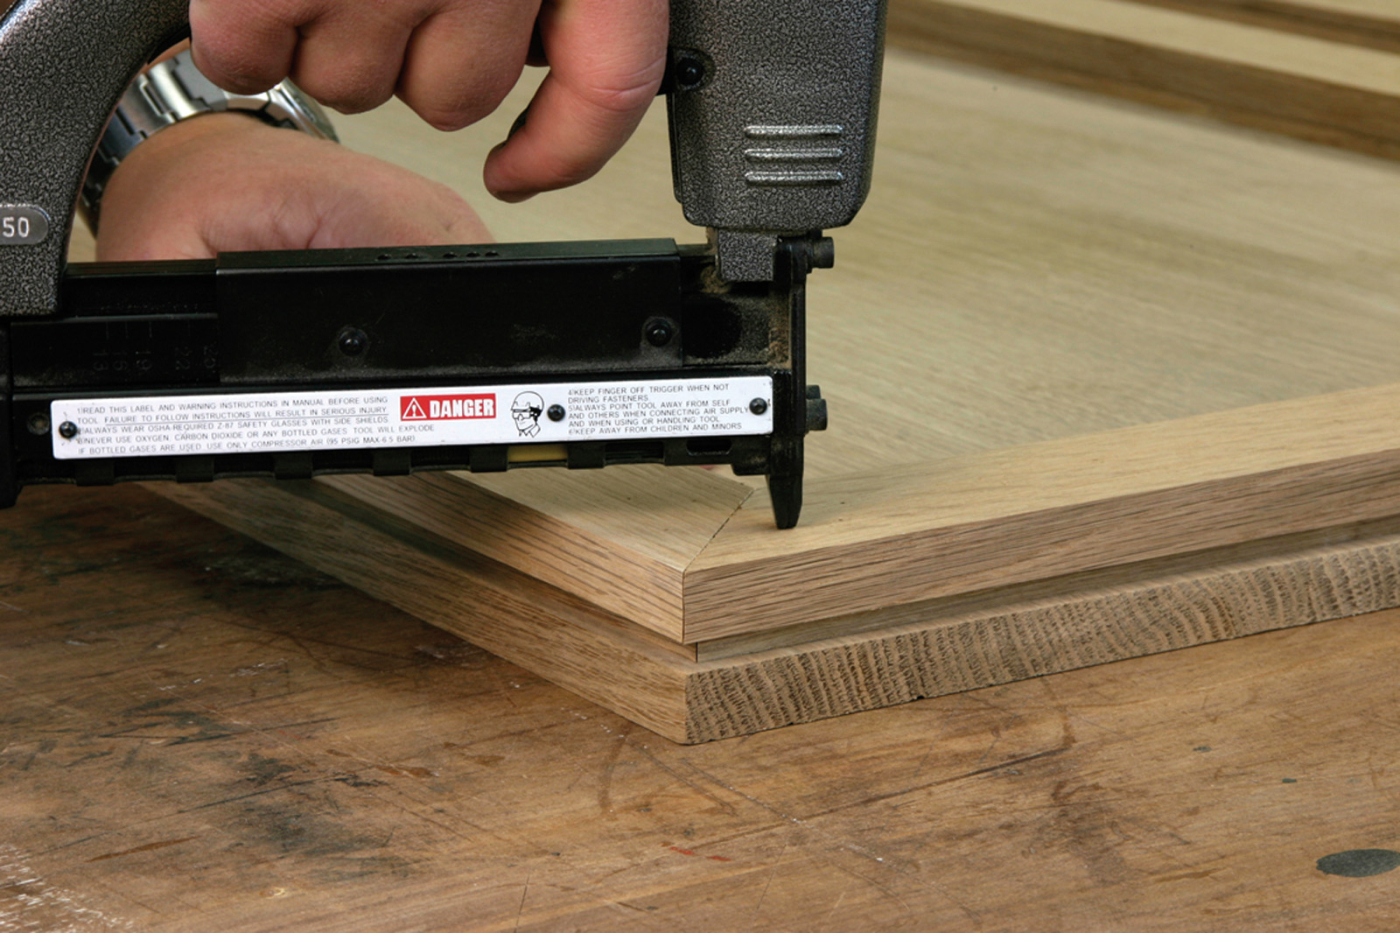
A note here on wood movement: Because the top is solid wood, it will move across the width with seasonal changes in humidity. If you attach the spacers and doubling across the ends of the top with glue, they will likely break or shift with this movement. Because of this, I didn’t use glue and simply pinned the pieces in place. I used a few extra pins, but because of how thin the pins are, they’re more likely to bend slightly with the wood movement, rather than tear the top apart.
Attach the spacers, mitering the corners. I used 1⁄2” pins at this point, holding the pieces 1⁄4” in all the way around the top.
The doubling is next and it’s important to align the doubling flush to the top piece for a good look. I used a square against the table to align the doubling, then used 11⁄8” pins to nail through the doubling and the spacer into the top.
I used figure-eight fasteners (Rockler, #21650) to attach the top. These allow the top to move without affecting the base.
Attaching the Top
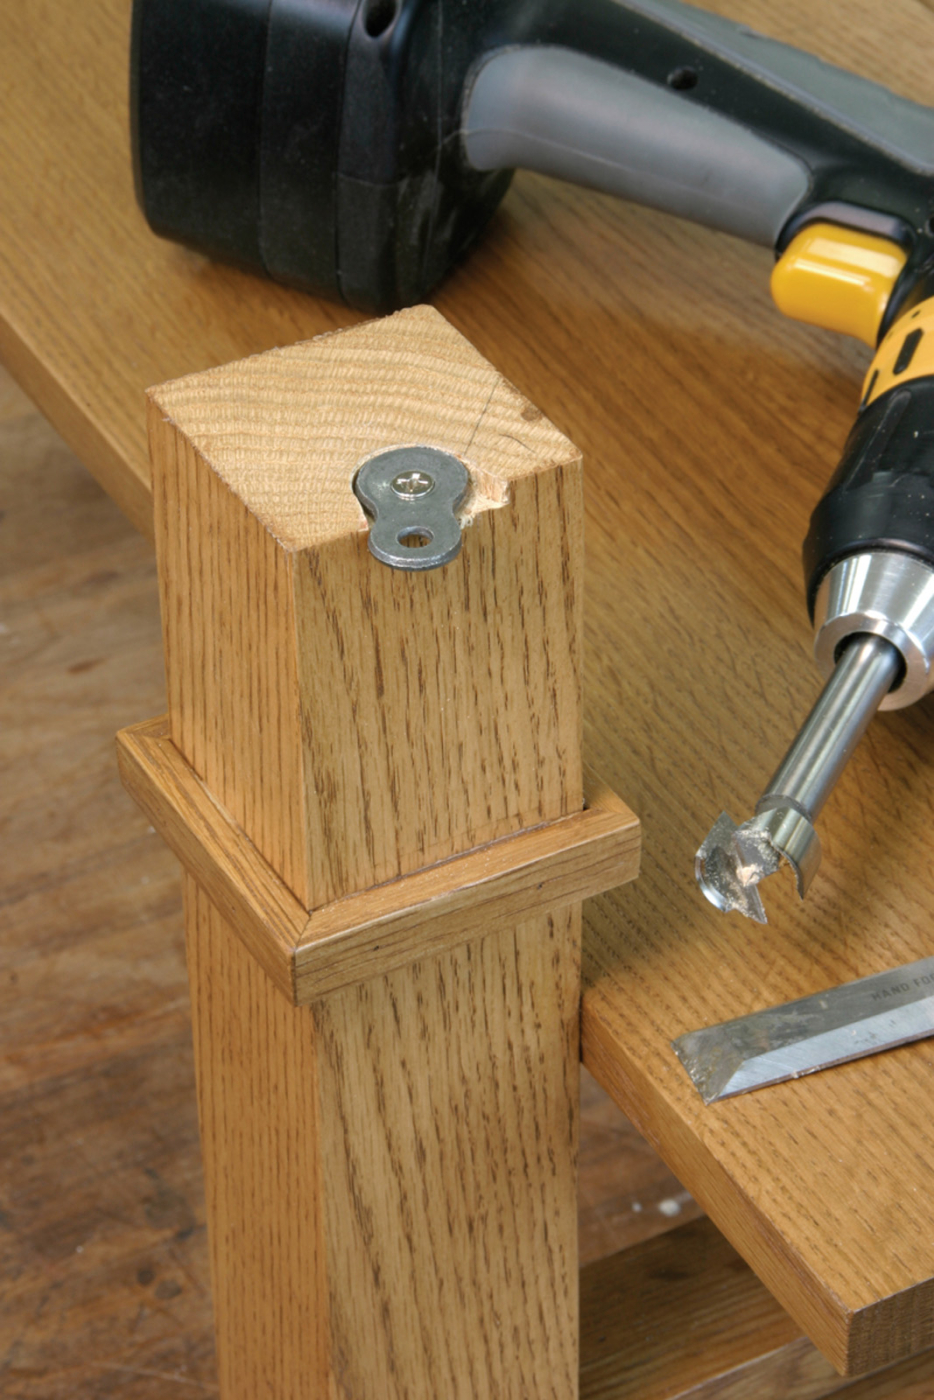
I attached the top to the legs using figure-eight-shaped fasteners that are recessed into the tops of the legs – not just recessed, but also given a little extra space so the fasteners can swivel on the screws in the legs. This solves the wood-movement problem at this joint, allowing the top to expand with changes in humidity without affecting the base.
Drill a hole matching the diameter of the fastener, just to the depth of the thickness of the fastener. Then widen the hole to allow that fastener to swivel.
After attaching all four fasteners to the legs, flip the top over, center the base on the top and attach the base. Remember the top is only 5⁄8“-thick, so don’t use screws that are too long!
The Wright Finish
Unlike many of his contemporaries in the early 20th century, Wright didn’t stress too much about the finish on his Prairie furniture. While Gustav Stickley preferred a rather dark, heavy finish on many of his pieces, Wright settled instead on a pleasant, lighter mocha finish for his Prairie furniture pieces.
I found an off-the-shelf stain that adequately matched that philosophy. I wiped on a coat of Olympic Colonial Oak gel stain (available from Lowe’s), then wiped off the excess to leave an even, warm-brown color.
A few quick coats of spray lacquer in a can (Deft semi-gloss Clear Wood finish in a spray can from Lowe’s), sanding lightly with #320-grit paper between coats, and the table was finished.
While Wright might not approve of the application I’ve chosen for his design, I think he’d be happy with the way it looks. Now where is that remote?
Here are some supplies and tools we find essential in our everyday work around the shop. We may receive a commission from sales referred by our links; however, we have carefully selected these products for their usefulness and quality.