We may receive a commission when you use our affiliate links. However, this does not impact our recommendations.
It’s accurate, easy to use and built to last.
There are all manner of drill press tables and fences, from a simple 2×4 clamped to the machine’s cast iron table to ones with gadgets and gizmos galore. The latter is not my style, so when the time came to replace my drill press table the list of requirements was short:
■ Accuracy. The table must be flat and stay flat, and the fence must be square to the table.
■ Ease of use. My prior table had a fence fixed to the table itself, so every fence adjustment required loosening and tightening F-style clamps to the irregular bottom of the cast iron table.
■ Longevity. Though I tried not to, I eventually fouled my old table by drilling into it too many times.
■ Workholding. There are times when I need to clamp down my work but normal clamps won’t reach.
With these issues in mind, I developed the drill press table seen here.
Choose Your Materials
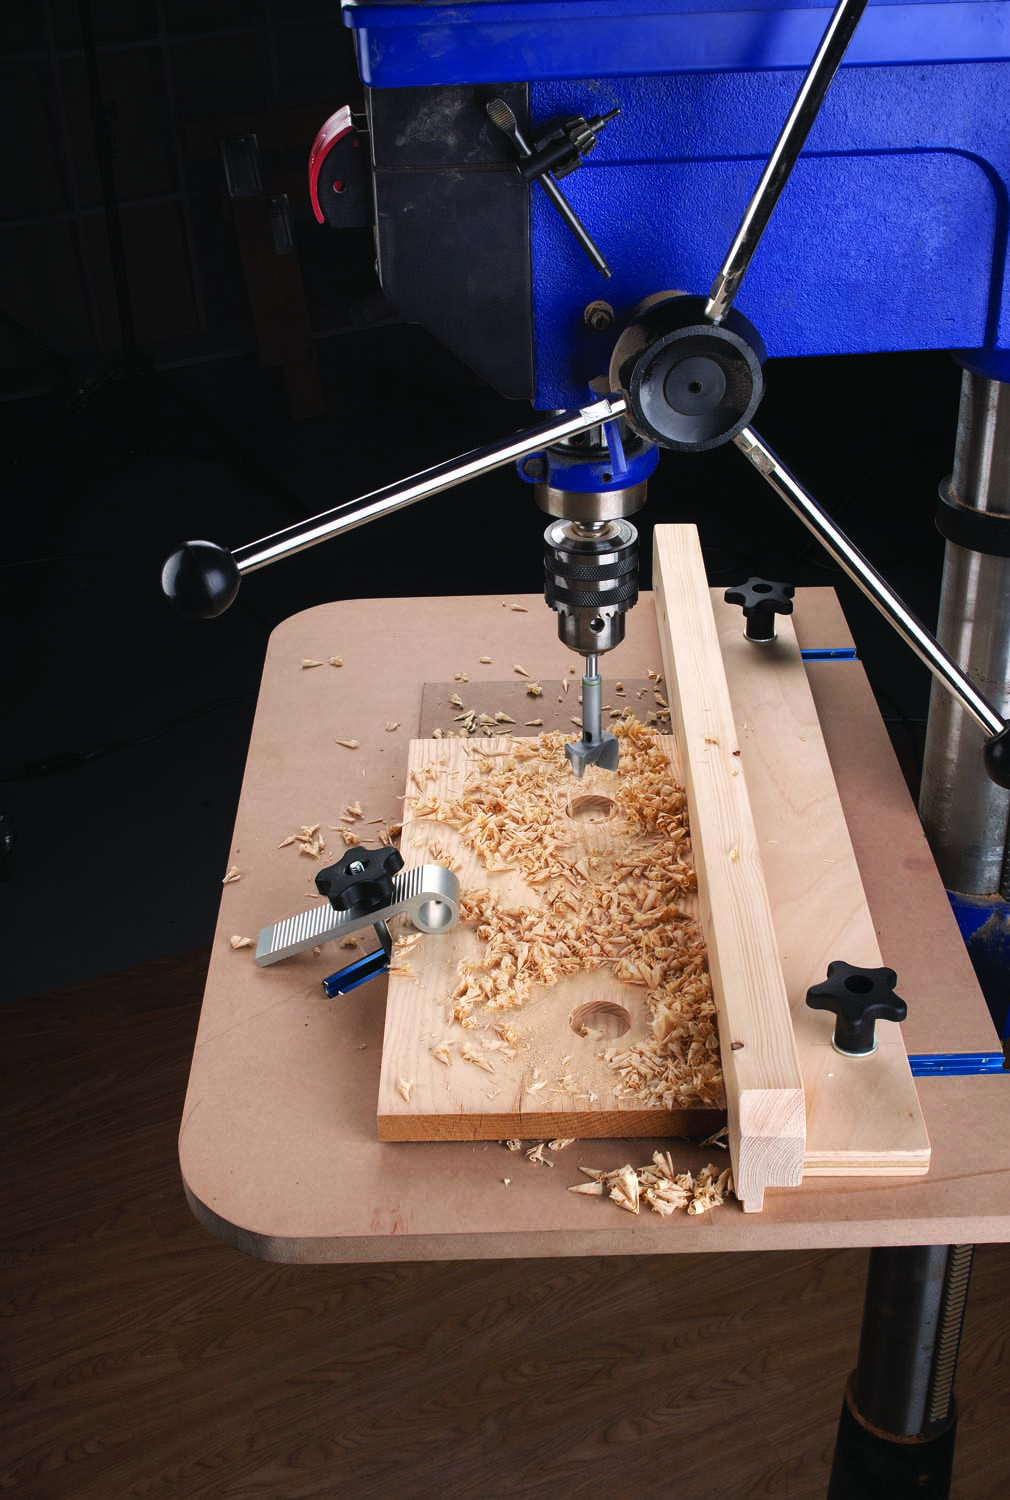
I decided to use MDF for the table because it is flat and stable. Plywood is another option so long as it’s flat (which is typically the case only in the highest grades). I dismissed a melamine-clad particleboard because the surface is too slippery. The fence is cut from a clear section of a 2×4 that I jointed straight and square. A piece of plywood is screwed to the bottom of the fence. The plywood itself is clamped to the MDF table. T-track and T-bolts are used for fence adjustment and securing it to the table. An additional piece of T-track is set closer to the front of the table for workholding when the need arises.
Make the Table
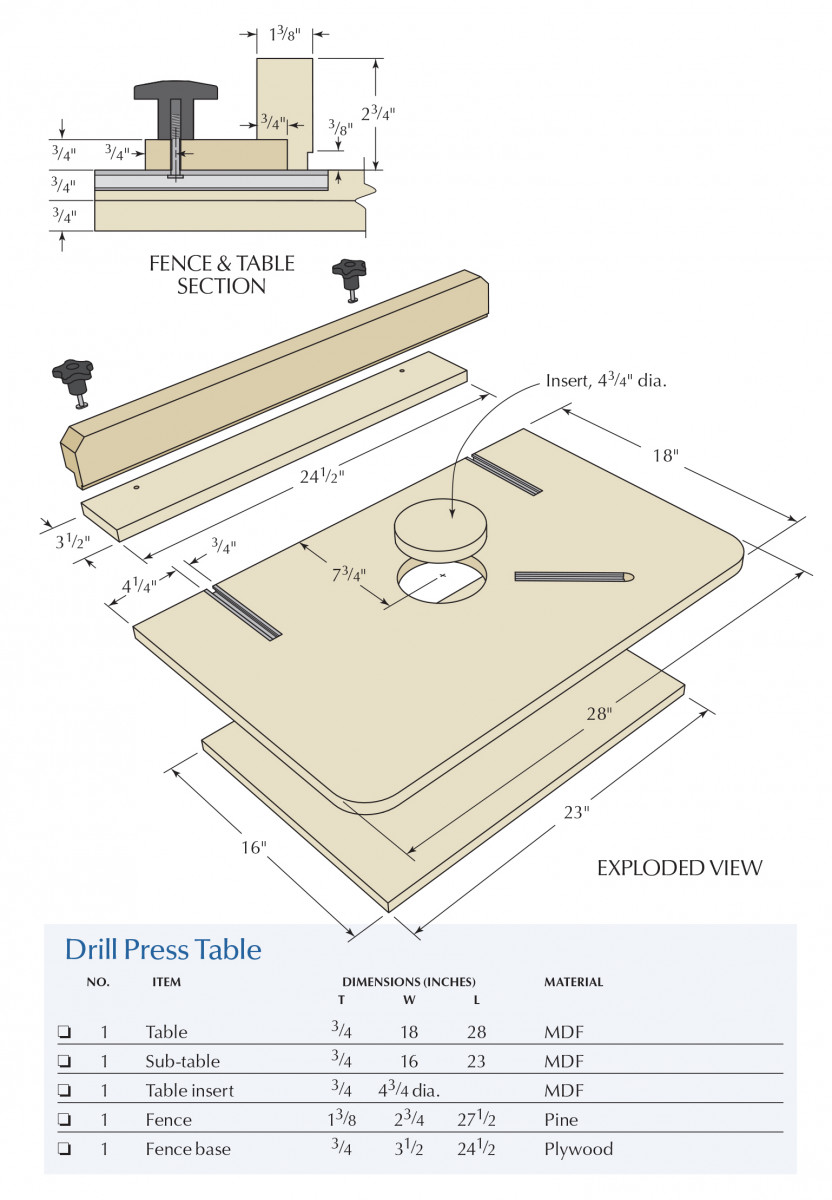
My table is 18″ x 28″ – a generous size for most work. If you are challenged for space in your shop you may want to scale it down. I should also note that my drill press has an 18″ swing. If your drill press is smaller, you’ll need to shorten the amount of travel for the fence.
Below the table surface is a second piece of MDF that is 16″ x 23″, which I’ll call a sub-table. The sub-table gets screwed on later but its main purpose is to provide more thickness to the table in order to securely screw down the T-track. Set the sub-table aside for now.
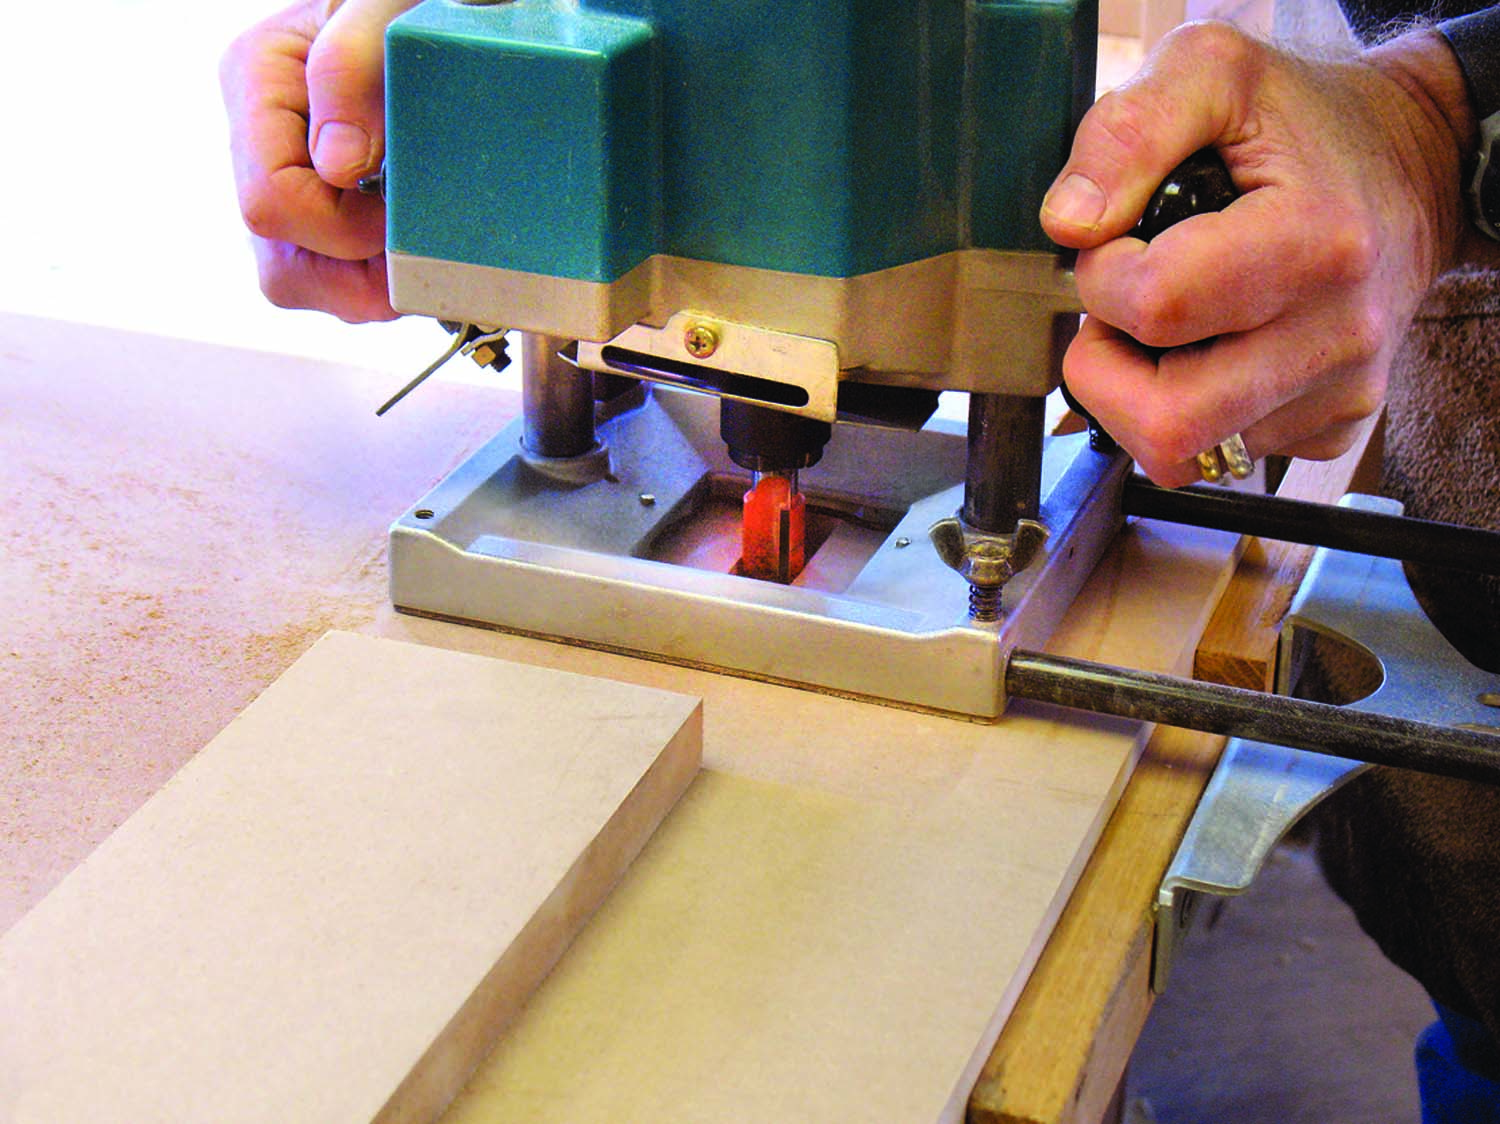
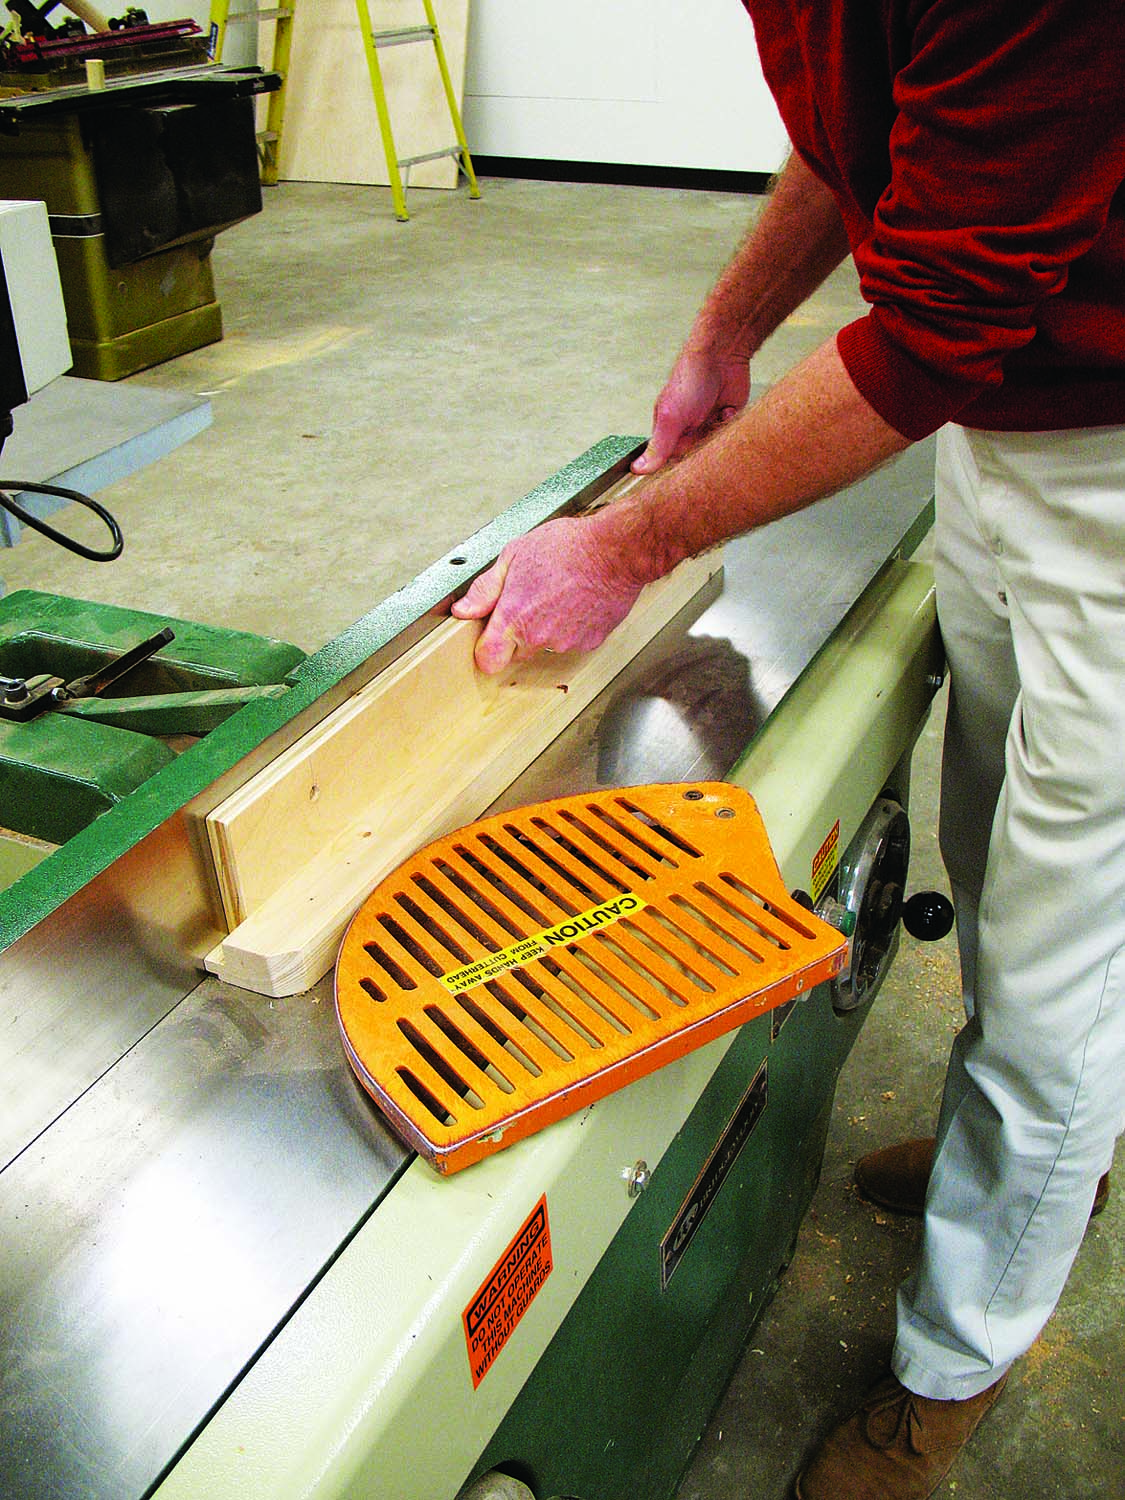
Take the plunge. I used a plunge router with a fence to cut the 3⁄4″-wide by 1⁄2″-deep grooves for the T-track. I also clamped a piece of stock to the table to act as a stop for the router cut.
First up on the table was routing the grooves for the T-track. My T-track is 3⁄4” wide x 1⁄2” thick. When routing these grooves, make them a hair deeper than the T-track’s thickness. I routed the two grooves for the fence about 41⁄4” in from each side and made them 53⁄4” long, as measured from the back edge. To cut the grooves I used a plunge router with a fence attached.
The groove for the workholding piece of T-track is routed at about a 45° angle. Its placement is somewhat arbitrary, but you can use the drawing to see where I positioned mine. Again, this piece is about 53⁄4” long, but make your groove slightly longer so you can insert a T-bolt in the track.

Square is a must. Your fence and table must be square so check it carefully.
Next, I made a 43⁄4“-diameter hole using a fly cutter. It is centered side to side on the table, and 73⁄4” from the back edge. In this hole I drop in a like-sized insert that can easily be replaced as needed – that remedies the problem of ruining the table from repeatedly drilling into it. To make the insert I simply drew the circle using a compass and carefully cut out the circle on the band saw. A few minutes of sanding the outside edge and the fit was good.

Let ‘er fly. The large hole in the table is made using a fly cutter. Keep your hands well away from the spinning cutter and be careful using this tool.
Before assembling all the table parts I rounded the front corners, cutting a 2″ radius using the band saw.
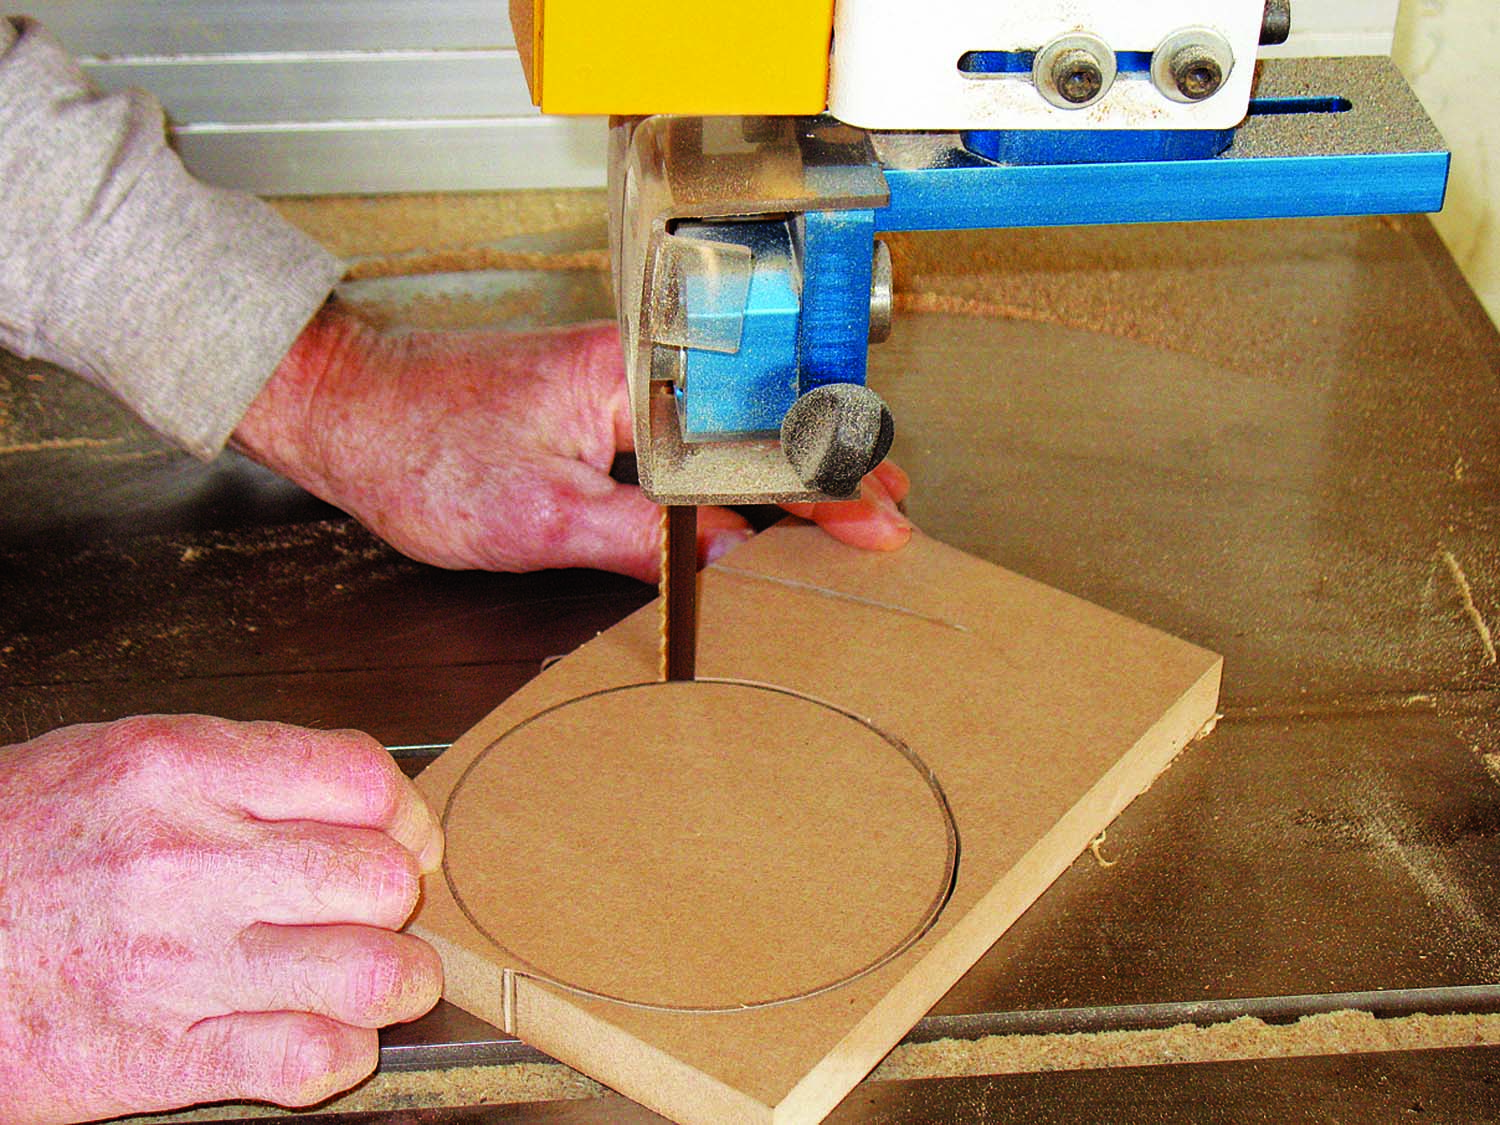
Round up your insert. To make the round insert for the table, simply draw the circle with a compass, then carefully cut it out at the band saw.
To complete the table, screw the sub-table to the table from below. Keep the screw locations away from the center area and the T-track grooves. Then screw the T-track in place and pop the round insert into the table. At this stage, you can go ahead and bolt the table assembly to the cast iron table of the drill press.
Make the Fence
Before you start, make sure the fence material is dead flat and square all around. As mentioned earlier, I used a clear piece of 2×4 that I milled flat and square using a jointer and planer . Next, cut a piece of plywood 31⁄2” wide and about as long as the fence. Designate what will be the face of the fence and the back. On the bottom back edge, cut a rabbet about 3⁄4” wide and as deep as the plywood is thick. Try to get everything nice and square – both the plywood edge and the rabbet. Now, on the bottom front face, cut a small rabbet about 1⁄8“ deep and 3⁄8” wide. Before you screw the plywood into the rabbet on the fence, clip the upper corners of the ends of the fence. It’s more user-friendly and looks nice.
The fix is in. You can always square up the drill press fence by taking a pass over your jointer after making sure the jointer fence is square.
Once the fence is screwed together, set it on the drill press table and carefully compare the fence face to the table to determine if it is indeed square. If it’s out even slightly, here’s the fix: Go to your jointer (make sure the jointer fence is dead square to the table) and, with the plywood base of the fence against the jointer fence, take a light jointer pass over the face of the drill press’s fence face. This should correct any irregularity and true it up. Go back to the drill press table and check it again. If square, it’s done.
Then, set the fence above the T-track so it’s centered side to side. Mark the centers of the track slots on the plywood base of the fence. Then drill clearance holes for the T-bolts through the plywood in locations away from the fence that will allow the knobs to turn freely.
There are a few additional features on this fence. That shallow rabbet you made on the lower front will allow a 1⁄4“-thick sacrificial board to slide in and still allow space for wood chips so the stock stays tight against the fence. Also, you can turn the fence around so that the plywood edge faces the front. This low fence is perfect for drilling small holes close to the edge of a board. This low fence also prevents the drill press chuck from hitting the fence before the bit can be sufficiently lowered into the work.
Model: Download the free SketchUp model for this article.
Here are some supplies and tools we find essential in our everyday work around the shop. We may receive a commission from sales referred by our links; however, we have carefully selected these products for their usefulness and quality.