We may receive a commission when you use our affiliate links. However, this does not impact our recommendations.
 If something is worth doing, it’s worth doing excessively.
 If something is worth doing, it’s worth doing excessively.
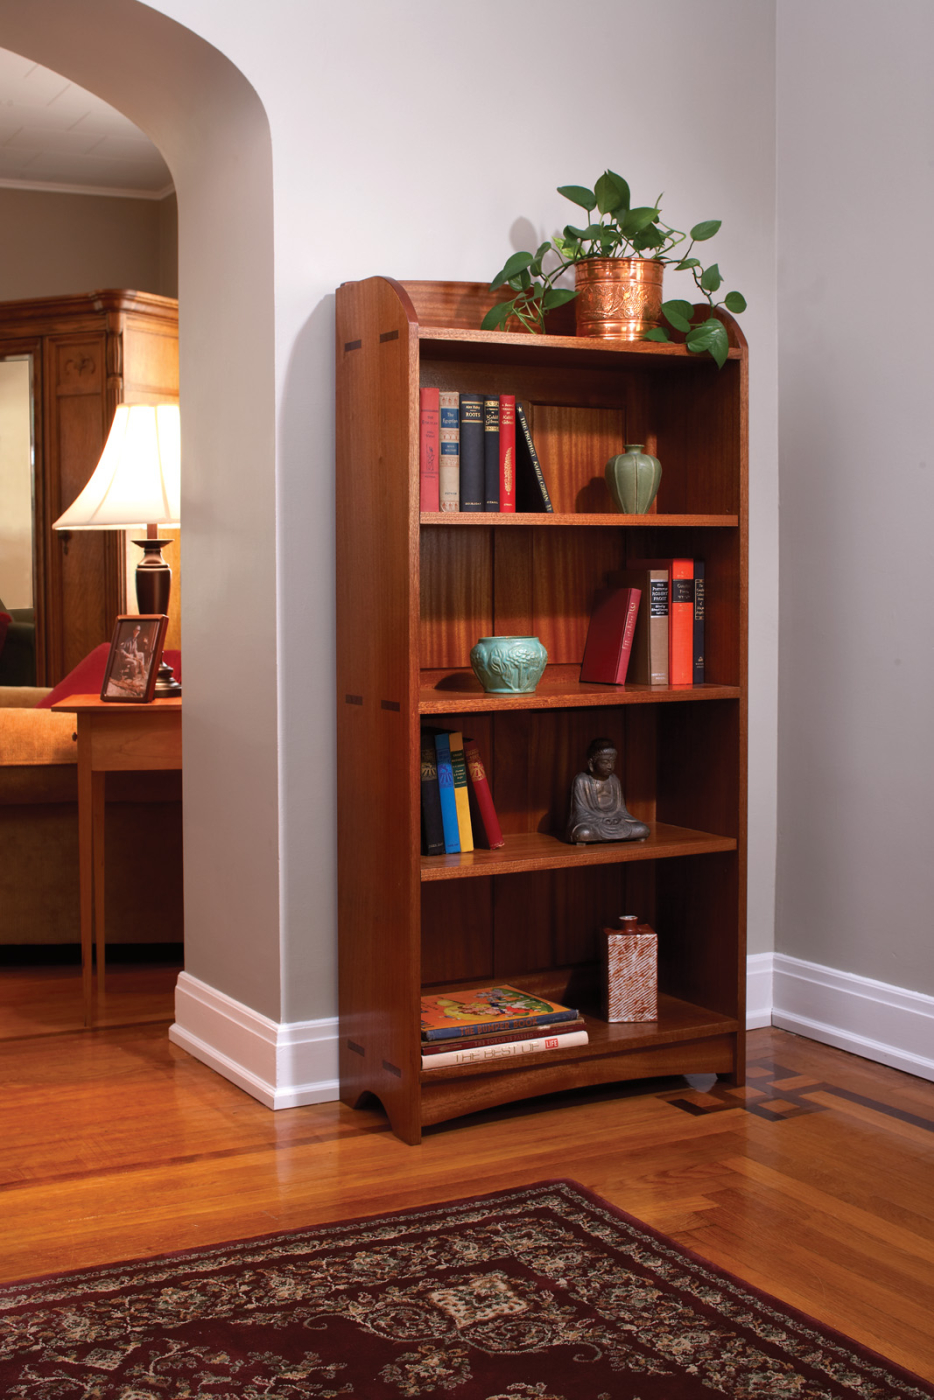
There are many bookcases in my house, but they’re a motley collection – poor cousins to the rest of the furniture. The really nice bookcases I’ve made have gone to live with clients, while I have kept the prototypes and the also-rans. They are nicer than concrete blocks and pine planks, but not my best work. The cherry bookcase in my living room was a test case – both of a dovetail jig and the wood’s moisture content.
It was time for something nicer. This design is an adaptation of early 20th-century Gustav Stickley bookcases. I wanted to use nice wood, and show off a bit with the joinery.
I didn’t have a specific species of wood in mind when I went to the lumberyard, but I knew I wanted something attractive and wide enough to avoid gluing up individual boards. I found a nice batch of sapele, also known as African mahogany, and brought home 50 board feet of wide planks.
Craftsman Bookcase Cut List and Diagrams

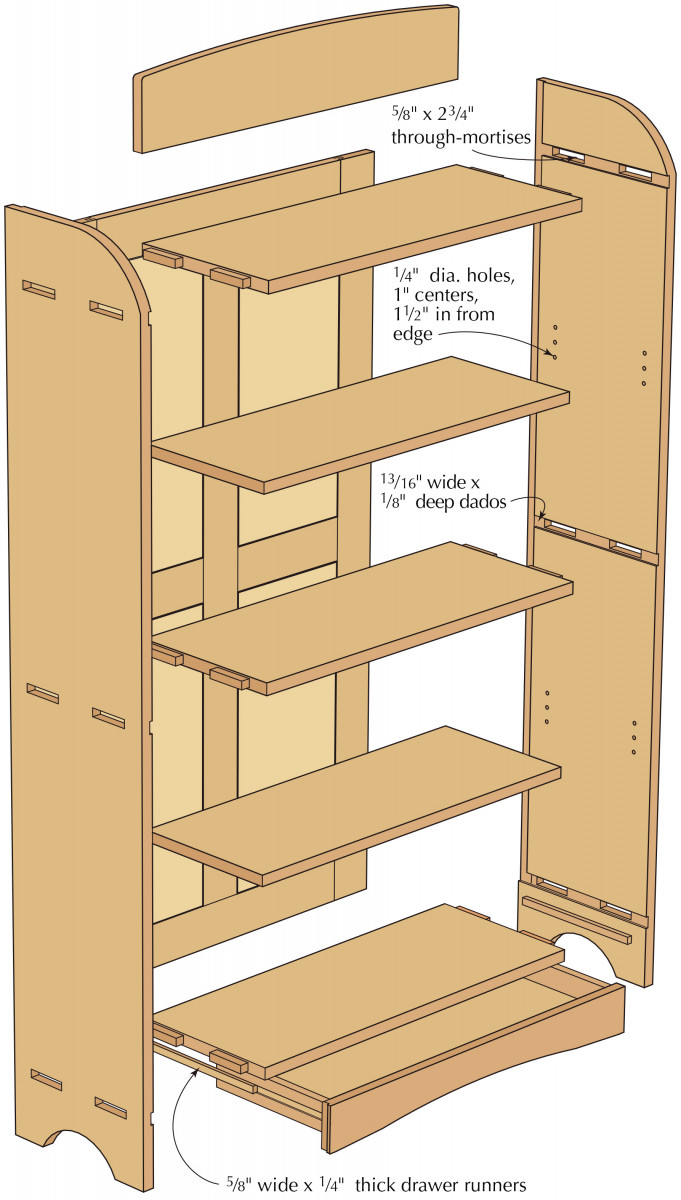
Exploded view
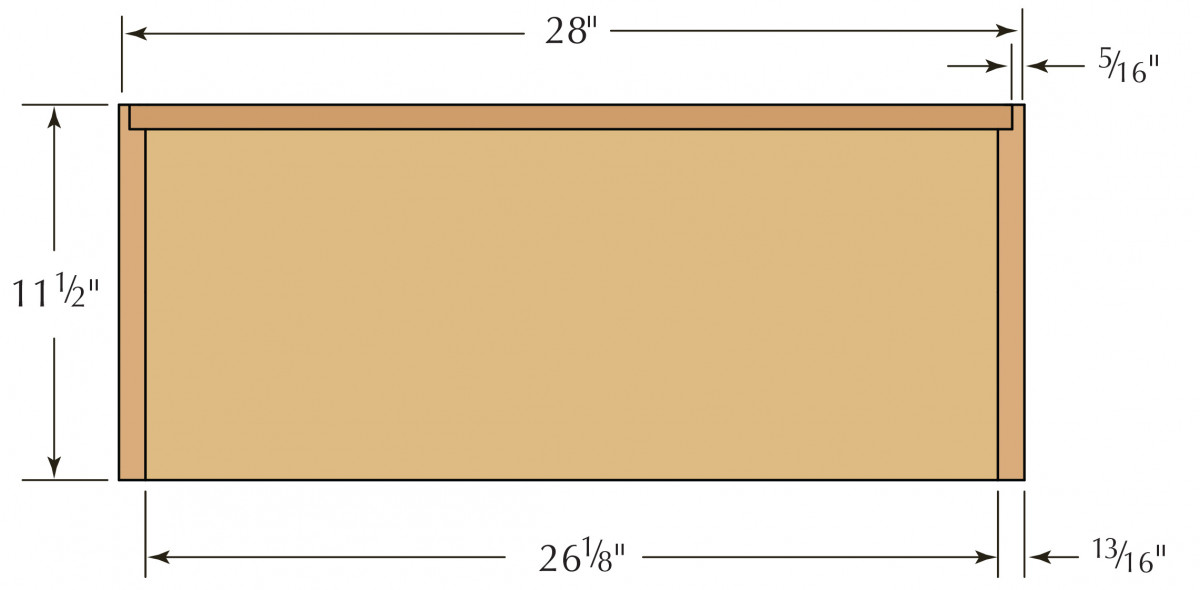
Plan
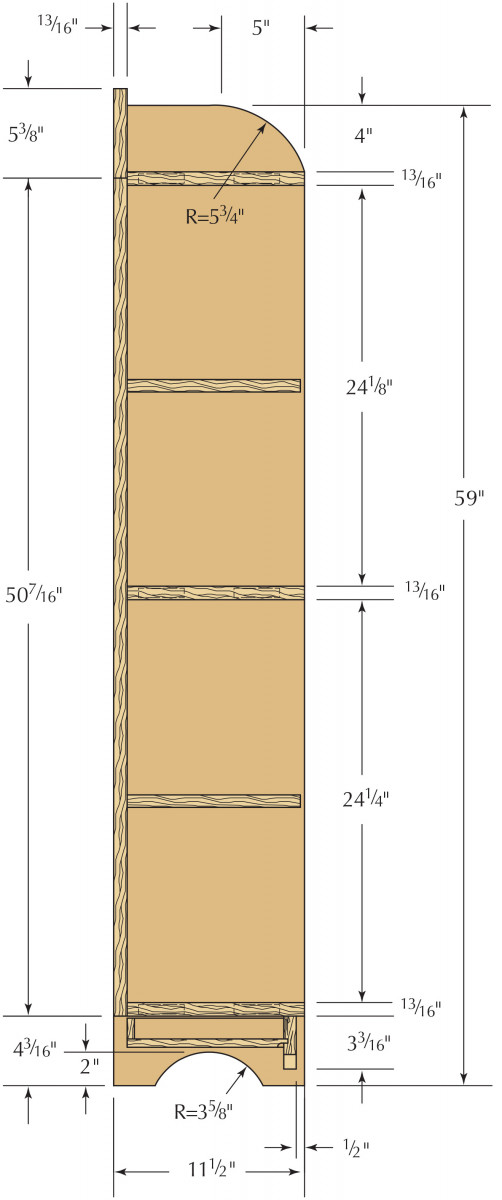
Side Section
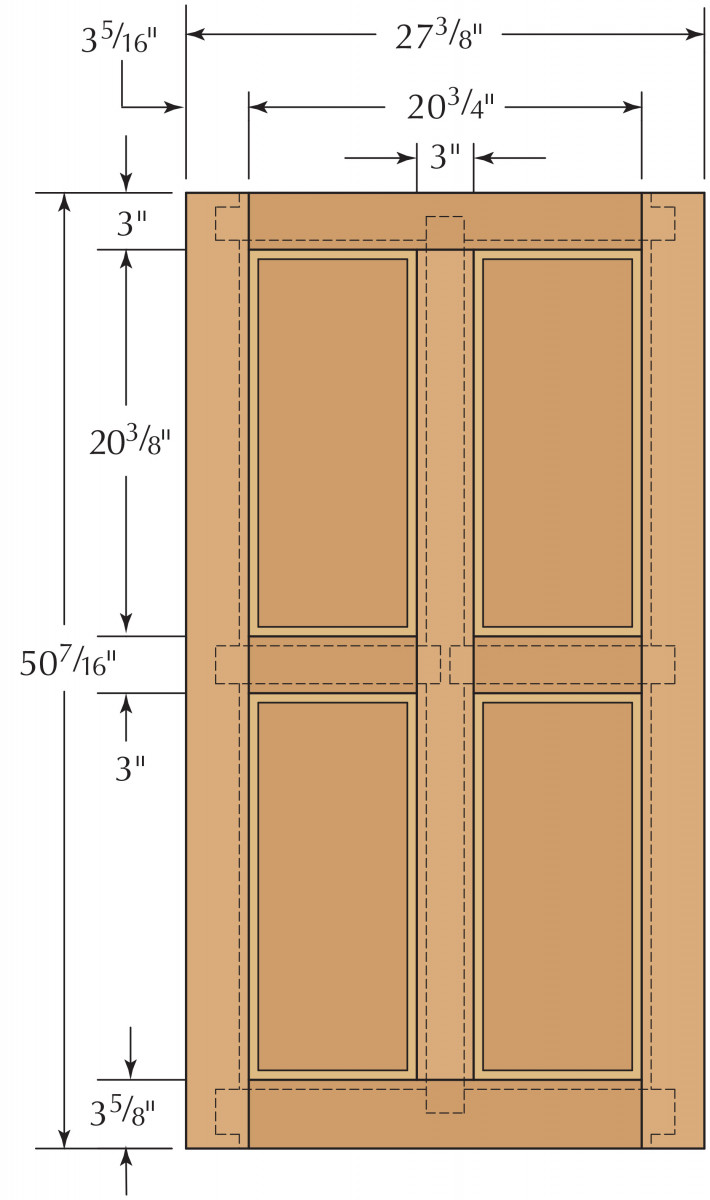
Back panel

Back panel detail
Off to a Good Start
My lumber had been surfaced to 15⁄16“, but it wasn’t quite flat. After cutting the parts to rough sizes, I ran the material over the jointer and through the planer to remedy that, ending up with stock slightly thicker than 13⁄16“. I planed off the mill marks with a smoothing plane, and dressed all of the stock with a scraper before working on the joinery.
This exercise served two purposes: I now knew the material was straight and true, and having the faces at a nearly finished state would save work later on. It’s a lot easier to work on a plank on a bench than it is to work inside an assembled cabinet.
When the faces were smooth, I cut the sides and fixed shelves to their final sizes. I determined which side should be right and which should be left, situating the most attractive faces on the outside.
I put a 1″-diameter straight bit in my plunge router, and set the fence to cut a 7⁄8“-wide, 1⁄2“-deep rabbet on the back edge of each side, stopping at the bottom edge of the lowest shelf.
Doing this step first established the sides as right and left, and it kept me from confusing the inside and outside faces as I worked on the remaining joints. Each of the three shelves connects to the cabinet sides with a pair of wedged through-tenons. On the inside of the case, each shelf sits in a 1⁄8“-deep dado.
The dados aren’t really needed structurally, but they ensure that the inner surfaces of the joints always look good, and they help to locate the through-mortises with the jigs that I used. With a dozen through-mortises to fit, I needed a method to make the process efficient and idiot-resistant, if not idiot-proof.

Dedicated jig. This dado jig is made to fit the thickness of the shelves, and utilizes a flush-cutting bit with the bearing on top.
Because I didn’t have a router bit the exact size to match the thickness of the shelves, I decided to use a 5⁄8“-diameter, 1⁄2“-long bit with a guide bearing mounted above the cutters. I made a jig to match the thickness of the shelves by clamping an offcut from one of the shelves between the two fences.
I then screwed a straight piece of scrap to one end of the fences, making certain that the inner edge was square to the working edges of the fences. I screwed another piece of scrap to the opposite end of the fences, and I was ready to make a test cut. The resulting dado was just a bit narrow, and a few swipes with the smoothing plane on the bottom of the shelves made for a snug fit.
After routing the three dados in each of the case sides, I began to make the second jig, which is used to cut the mortises. The mortises are 5⁄8” wide and 2-3⁄4” long, and they are equal distances from the front and back of the case sides with a 3″ space in between. Rather than cut the mortises in the jig, I made them by assembling pieces of 1⁄2“-thick plywood in two layers.
I laid out the locations of the mortises on the larger, bottom part of the jig, then I glued and nailed smaller pieces along the layout lines. I drilled holes in the waste area, and with a flush-trim bit in my router, I trimmed the bottom of the jig to match the top. A few cuts with a chisel to clean out the corners and I was ready to make mortises – almost.

Built around the holes. This jig for the through-mortises is made by assembling small pieces to a backer. The openings are then cut with a router and a locating fence is added.

Double duty. After routing, the mortising jig also serves as a guide for the chisel to square the corners of the through-mortises.
The mortises need to be exactly centered in the dados, and I needed a way for the jig to be clamped to the case sides. I made an edge piece the thickness of the case side, plus the thickness of the jig, and used the same jig that I used to cut the dados in the sides to cut a notch across this piece. This notch aligns the jig to the shelf dados.
After carefully centering this piece on the mortises, I screwed it in place and made a test cut. I used an offcut from one of the shelves to align the jig for routing. I jammed the offcut in the dado in the case side, leaving an inch or so protruding from the edge of the side. This allowed me to knock the notch in the jig over the scrap. With the jig properly aligned to the case side, I clamped it in place. After drilling a hole to get the bit started, I cut the mortises with a flush-trim bit in my router.
After routing each pair of mortises, I left the jig clamped in place, flipped the side over and used the jig as a guide to cut the corners of the mortises square with a chisel.
At this point, I walked away from mortise-and-tenon territory and went to work on the curved profiles at the top front corner of each side, and the arched cutouts at the bottom. After laying out the curves on one side, I cut close to the line with a jigsaw and cleaned up the edges with a rasp.

Getting in shape. After cutting the lower arch with a jigsaw, the curve is smoothed with a rasp.
The first side was put into service as a template for the second. I put the finished side on top of the other and traced the curves. After cutting the curves in the second side, I clamped the two together, and used a flush-cutting bit in the router to make the second side an exact match of the first.

One side makes another. After the curves on one side are completed, the first side is used as a template to make the second side.
A Trip to Through-Tenon Territory
The next step is where the dados in the case sides saved a tremendous amount of time and prevented the formation of even more grey hair. The layout for the tenons needs to match the mortise locations exactly.

Marked in place. The tenons are marked directly from the mortises, ensuring that the locations match.
At this point I looked at the three shelves, marked the best face and edge of each, and decided which one would be the top, middle and bottom. I clamped the entire cabinet together and with a lumber crayon, marked the locations of the shelves in relation to the cabinet sides.
Some hand fitting would be needed, and putting a carefully fit bottom shelf upside down in the top shelf location wouldn’t be a good thing. With the case together, I ran the point of my knife around the perimeter of each mortise, marking the location of the tenons in the ends of the shelves.
I set up a small plunge router with a fence set to leave the tenons slightly proud of the outside of the cabinet sides. I set the depth to the top of the knife marks, checking both sides of each end to be sure that the tenons were centered. I wanted to make the cheek cuts quickly, but I didn’t want to go too far.

Shoulders first. A shallow rabbet is cut on each side of the shelves to start the making of the tenons.
I cut the edge cheeks of the tenons with a dovetail saw, and used a jigsaw to remove the waste between the two tenons. With the end of each shelf housed in the dado these cuts didn’t need to be pretty; I only needed to get material out of the way.

Ends second. The ends of the tenons are cut by hand, then the waste in between is removed.
Before starting the fitting process, I took a chisel and chamfered the inside edge of each mortise, and with a piece of sandpaper I broke the sharp edge of each tenon to prevent damge to the outside of the mortises during fitting.
With a soft pencil, I made a series of hatch marks on the tenon cheeks and eased them into place. When I met resistance, I removed the shelf and examined the marks. The tight spots showed as smears in the pencil lines and I used a float to reduce the thickness until I had a good fit.

Test, don’t guess. Penciled hatch marks on the tenons will smear reveal tight spots within the joints during test fitting.

A little off the top. The pencil lines smear where material needs to be removed. A planemaker’s float gives good control and leaves a smooth surface.
A Further Complication
Clearly in the grips of an obsessive-compulsive exposed-joinery episode, I laid out each tenon end for a pair of wedges. Unable to leave well enough alone, I decided it would look nice to set the wedges on a slight angle, making dovetail-like shapes in the end of each tenon.

How it ought to be. The ends can be a bit loose because the wedges will expand the tenons.
I marked the distance to the edge of each cut on the ends of the tenons with a combination square, then marked the angles with a bevel gauge and knife. The slots for the wedges are at a compound angle, but I only fussed about the start of each cut. Using a dovetail saw, I cut the vertical angles by eye.
This meant that the wedges also had to be a complex shape. I began by cutting simple wedges from a piece of purpleheart, about 1″ thick, 8″ wide and 1-1⁄2” long. I set the miter gauge on the band saw to 3º and made the wedges by making a cut, flipping the wood over and making a second cut.
I put each wedge in place, trimmed off the end with a saw, then pared the edges with a chisel to match the tenon cheeks. To keep the wedges organized, after fitting a group I stuck them in order on a strip of blue painter’s tape, then stuck the tape to the face of each shelf. On final assembly, each group of wedges would be where they belonged.
One size fits all. In theory, the tapered wedges will fit anywhere. In reality, I fit each one and kept them in order.

The easy part. Each wedge is pared flush with the surrounding tenon. Then they are removed and stuck to a piece of blue painter’s tape.
For assembly, I used liguid hide glue to allow plenty of open time to put the joints together and set the wedges in place. After clamping the assembly, I brushed glue in each slot then drove the wedges in with a hammer. While the glue was drying, I made the back panel.
This panel is straightforward: The rails and stiles join with mortises and tenons that are haunched at the top and bottom extremes to fill the grooves for the panels. The panels are slightly thinner than the frame, and they are raised on both sides. The panel was made about 1⁄16” too wide to allow for fitting to the case, and the top is trimmed to land in the center of the top shelf.
Back to Level Ground
When the glue on the case had completely dried, it was time to trim the wedges and exposed tenons down to the surface of the case sides. The first step was to use a flush-cutting saw to remove the ends of the wedges. Then I took a rag soaked with mineral spirits, and wet the ends of the tenons.

Soak then shave. After sawing off the wedges, the joints are soaked with paint thinner to make it easier to trim the end grain flush.
This saturation makes the tough end-grain fibers easier to trim with a block plane. The final bit of leveling was with a card scraper and when the tenons were flush, I scraped the entire surface of both cabinet sides.

At the same level. Following the plane, a scraper is used to smooth the exposed tenon ends and the cabinet sides.
I had set aside a small piece of stock for the backsplash. The grain on this piece arched to match the profile I intended to cut, and with the back in place in the carcase, I trimmed it to final width and length, then marked the curved top edge. After cutting the shape on the band saw, I removed the saw marks with my block plane and shaped the corners with a rasp where the splash meets the case sides.
I’ve Got a Secret
The arched apron below the lowest shelf also was selected with the curve of the grain centered on the cut-out shape. The apron attaches to the cabinet in an unusual way. It actually is the front of a hidden drawer.

No one will ever know. Located below the shelf and 1⁄2″ back from the front edge, the drawer appears to be a fixed apron.
The apron is 1⁄16” shorter than the distance between the two sides of the cabinet, and the 5⁄8“-thick maple drawer sides are 13⁄4” wide and 10-1⁄4” long. The sides join the drawer front with half-blind dovetails, and are set in from the ends about 1⁄8” on each side. A 3⁄4“-wide, 1⁄8“-deep groove was cut in the outer face of each drawer side after the drawer was assembled to hang the drawer on runners.
The drawer runners are strips of maple, 3⁄4” wide x 1⁄4” thick, held to the cabinet sides with screws. The reason for setting the drawer sides in was to leave the smallest possible gap between the ends of the drawer front and the cabinet sides, and to make the runners a substantial thickness.

Simple enough. Maple runners below the bottom shelf support and guide the hidden drawer.
A small rabbeted lip is left on the end grain of the drawer front, so that any trimming needed to fit the front would be on this small edge. I’d seen a similar detail on an original drawer, and was curious to see if it would be as easy to trim and fit as it first appeared. The final fitting was indeed easier, but this complicated the drawer construction.
I cut the dovetail joints at the front and made the sockets between the pins 1⁄8” deeper than the thickness of the drawer sides. After fitting the pieces, I took them apart, and cut the rabbets on the ends of the drawer front at the table saw. When I was satisfied with the joints at the front of the drawer, I cut the drawer back to length, then cut the through-dovetails at the rear of the drawer’s sides.

Now you see it. The rabbet in the end of the drawer front provides clearance for the sides, while allowing a narrow margin to be trimmed easily.
Setting the sides of the drawer in from the ends of the drawer front posed a problem for letting in the groove for the drawer runners. I used a small router with a fence to cut the grooves, but had to temporarily attach thin pieces of scrap on each side of the groove location to keep the base of the router above the end of the drawer front’s lip.
After cutting the grooves, I carefully measured back 1″ from the inside edge of the rabbet on each side. The fence on the router left the grooves short of this, so I used a chisel to extend the groove to this line, squaring up the end of the groove in the process. It’s important that the grooves end at the same point, so that the ends of the runners can act as drawer stops.
I cut the maple runners and fit them to the width of the grooves in the drawer sides. Gravity will keep the top edge of the groove in contact with the runner, so the runner can be sized to slide easily. I left a margin of 1⁄32” so that the drawer won’t bind if the runner swells in width.

Hidden away. The hidden drawer rides on wooden slides attached to the carcase. The end of the groove will act as a stop for the runners, and needs to end in the right spot.
After fitting the width, I planed the faces of the runners until the combined width of the drawer and runners with both runners in place was 1⁄16” less than the inside of the cabinet. There needs to be some room to allow for easy movement of the drawer, but not so much as to make the drawer sloppy.
The drawer bottom is 1⁄2” thick, and slides into 1⁄4“-wide, 1⁄4“-deep grooves in the insides of the drawer sides and front. I used the same setup on the router table for raising the back panels to form the tongue on three edges of the drawer bottom. The back of the drawer is 1⁄2” narrower than the sides to allow the bottom to slide in after the drawer is assembled. A couple screws in elongated holes secure the thick back edge of the bottom to the drawer back and allow for seasonal wood movement.

Sliding home. The drawer bottom slides past the drawer back and into grooves in the sides and front. Screws in elongated holes will hold the bottom to the back and allow the bottom to shrink or swell.
With the drawer completely assembled, I measured in from the front of the case 2-5⁄16” (the 1-3⁄16” thickness of the drawer front, plus the 1″ distance from the back of the front to the end of the groove in the side, plus the 1⁄2” set-back of the drawer front from the front of the case).
I measured down from the bottom of the lowest shelf and drew a line parallel to the shelf to locate the runner. With the drawer front 1⁄2” behind the edge of the shelf, the top of the drawer front can’t be seen when it is closed, so I left a 1⁄16” gap so the drawer wouldn’t scrape the shelf on its way in and out. When I had the positions of the runners located, I screwed them to the inside of the case with #6 x 5⁄8” flathead screws.
Easy Elbow Grease Finish
Because I had planed and scraped all the large flat surfaces before assembly, there wasn’t much to be done to get ready for finishing the bookcase. I planed the front edges of the fixed shelves flush to the cabinet sides, chamfered all of the edges slightly with a block plane, and gave everything a light sanding with #240 grit.
The first coat of finish was Watco Light Walnut Danish Oil. I saturated the surface, wet-sanded it with a nylon abrasive pad, kept the surface wet for about 45 minutes, then wiped off the excess. This was followed by two coats a day of Waterlox for three days. After allowing the finish to cure for a couple days, I wet-sanded it with Watco Satin Wax and #400 grit wet/dry paper, leaving a nice sheen and a surface that is pleasant to the touch.
The joinery, details and finish on this bookcase are more than what is needed to store some books, but that really wasn’t the purpose in making it. The idea was to leave something behind that demonstrates what a bit of extra effort looks like. It makes me look like a competent craftsman. Now to fill it with some books that might make me look intelligent, as well.
Here are some supplies and tools we find essential in our everyday work around the shop. We may receive a commission from sales referred by our links; however, we have carefully selected these products for their usefulness and quality.