


We may receive a commission when you use our affiliate links. However, this does not impact our recommendations.
One of the biggest frustrations is when the grain tears out instead of slicing clean. Conventional wisdom has some solutions, but some of them might not help.
Nothing in handplaning is more frustrating than tear-out – which is when the wood rips up in small chunks instead of being sliced clean away. Over the years, I’ve collected solutions to eliminate it and found the following ones to be the most useful.
No 1: The Answer is in the Branches
Whenever I’m working a booth at a woodworking show, there’s a fair chance that some power-tool-only woodworkers will give me some grief. Usually it starts with a few taunts during a handplaning demonstration (“Hey buddy where do you plug that thing in?”).
But I always relish the moments when they start to ask real questions. Here’s my favorite question (slightly edited to make it saucier):
“So Mr. Handplane guy,” they’d say. “Let’s say you have a hickory board that’s 8′ long from a tree that grew on a hill. The board’s in wind, and it’s got a good crook in it as well. How would you flatten that board?”
“Oh that’s easy,” I’d reply. “I’d start with my broad axe.”
“Axe?” they’d say, confusion spreading across their brow.
“Yup, I’d chop the board into 12″ lengths and feed them to the wood-burning stove.”
I know this sounds like Southern hyperbole (to which I am prone), but I’m serious when I say that the best way to reduce your tear-out problems (with both hand and machine tools) is through careful stock selection.
About seven years ago I worked with Sam Sherrill and Michael Romano on a project to encourage woodworkers to use lumber in their projects that woodworkers harvested from downed or doomed urban trees.
One of these projects was a large dining table that Sherrill had built using a gargantuan pin oak. The table was nice, but the story behind it was not.
The lumber for the table had come from the enormous, Jurassic-scale branches of the pin oak. The boards were wide (like those from a bole) but they were still reaction wood. Branch wood. Junk wood.
When Sherrill and Romano went to dry the wood and surface it, the wood self-destructed. It warped, split, you name it. They told wild tales of how it exploded (yes, exploded) in the planer. They lost the majority of what they had cut, according to Sherrill.
That story sticks with me to this day. When I pick my boards for any project. I stay tuned to the grain of the boards at hand. If the grain reverses on itself through the plank a good deal, then I skip the board or saw it into short lengths, which might not give me trouble.
That sounds wasteful. But the most precious commodity in woodworking is not the wood, but the time we spend working (or butchering) it. You can make your work faster and easier just by being a lot more choosy.
No. 2: Look Sharp
Everybody must get stoned. When I have some tear-out that I cannot tame, the first place I turn is my sharpening stones. A sharp iron greatly reduces tearing.
For me, sharpening is like changing the oil in my car. It’s messy and time-consuming, but you do it regularly or disaster will befall you eventually.
So I’m not a sharpening fascist. I’m a good sharpener, but I don’t take more than five to 10 minutes to renew a micro-bevel. But I firmly believe that a sharp iron is the second best way to reduce tear-out when handplaning.
This belief guides me when I sharpen my tools and regulates the attention I pay to each tool’s edge. Here is what my typical sharpening chores look like in my shop:
For me, sharpening begins at the end of a project. With the piece of furniture complete and the deadline pressure off, I take a few hours to sharpen my tools. I always sharpen the iron of my jointer, smoothing and block planes. If I used any chisels for more than a quick pare, I hone them. Then I move through the rest of the tool box. Any joinery planes (such as router, shoulder, fillister and plow planes) and moulding planes that I used get sharpened. I’ll also examine my marking knives, jack plane, auger bits and marking gauges. If they’re dull, I touch them up.
I do this at the conclusion of the project so when I start a new piece of furniture, everything is ready to go. Anal-retentive? Perhaps. But as I build the next project I don’t stop to sharpen unless I damage a tool by dropping it or hitting a nail, or my smoothing plane leaves tear-out.
If my other planes give me tear-out, I can usually wait it out. But tear-out at the smoothing stage of a project is a frustrating battle to fight. You can try a bunch of different strategies to eliminate the tear-out, but the first one should be to hone up your smoothing plane’s iron and try again.
No. 3: Think Small
Most handplane geeks know that across the Pacific Ocean there is a culture that is even more obsessed than we are with the mechanics of cutting wood with a plane.
I’m speaking, of course, about the Japanese, who hold handplaning contests where competitors see who can make the longest and thinnest full-width shaving.
They measure the thickness of these champion shavings in microns. And the results are often affected by the weather. A wet day will swell the shavings by a few microns.
Sadly, Western woodworkers have become obsessed by creating ultra-thin shavings, which requires planes to be tuned to a very high note. What’s wrong with this philosophy is that it focuses on the garbage instead of the good stuff. The shavings get thrown away, remember? It’s the resulting work surface that we keep.
You want to be able to take the thickest shaving you can without tear-out, chatter or requiring you to bulk up like Conan the Barbarian. A thick shaving will get you done with fewer passes of the smoothing plane over your workpiece.
So how thick should your shaving be? Good question. Most people talk about getting shavings that are less than .002″ thick. Or they talk about “sub-thou” shavings. Yes, it’s all very empirical, except for the fact that few woodworkers really know how to measure shaving thickness. Squeeze a dial caliper hard enough and you can make almost any shaving into a “sub-thou” shaving. Wood compresses. Metal bends.
So I go for visual cues instead.
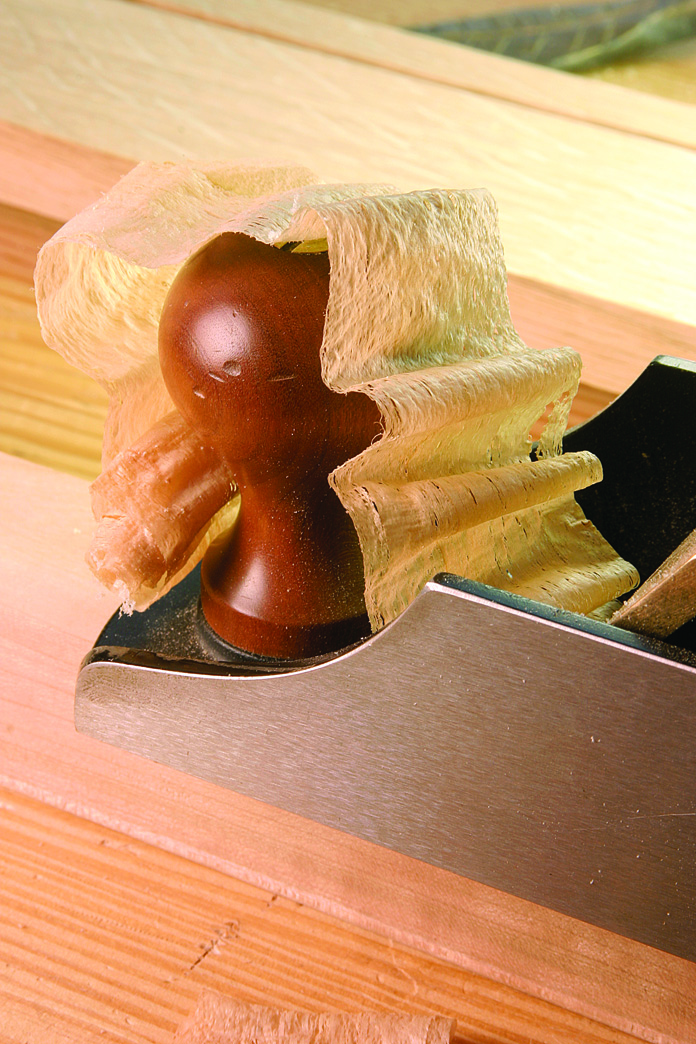
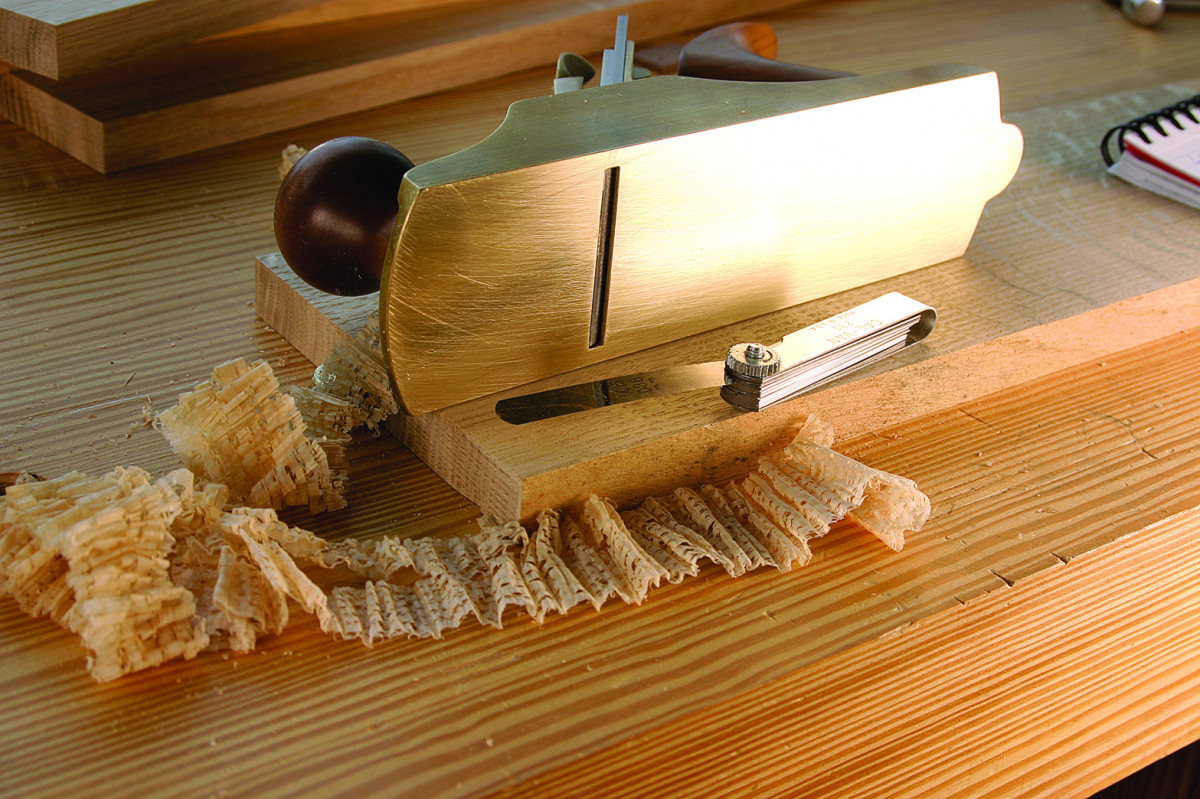
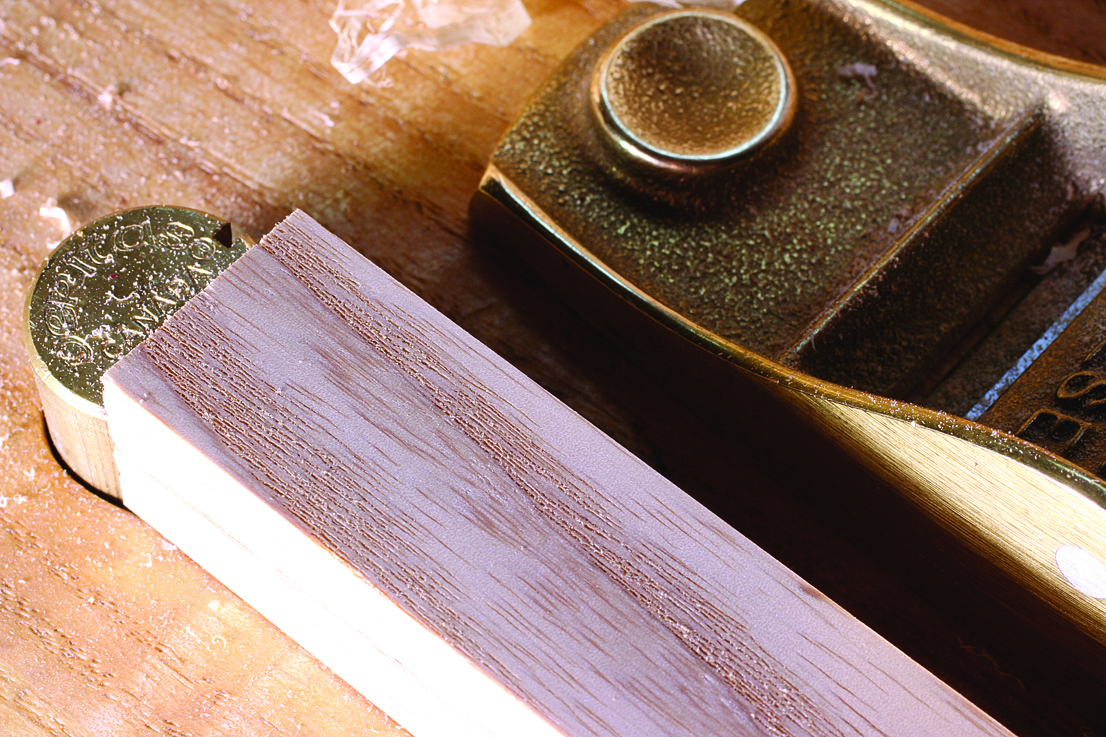
Thicker is faster. A substantial shaving such as this one reduces the number of passes you take, but it can increase your chances of getting tear-out.
If the wood is well-behaved, I go for an opaque shaving – that is, as long as the curvature of the cutting edge of my iron is significant enough to keep the corners of my iron from digging into my work. See the photo above to see what this shaving looks like. This shaving gets the work done fast. If the surface has been flattened by a jointer plane, a shaving like this will dress a surface for final finishing in one or two passes.
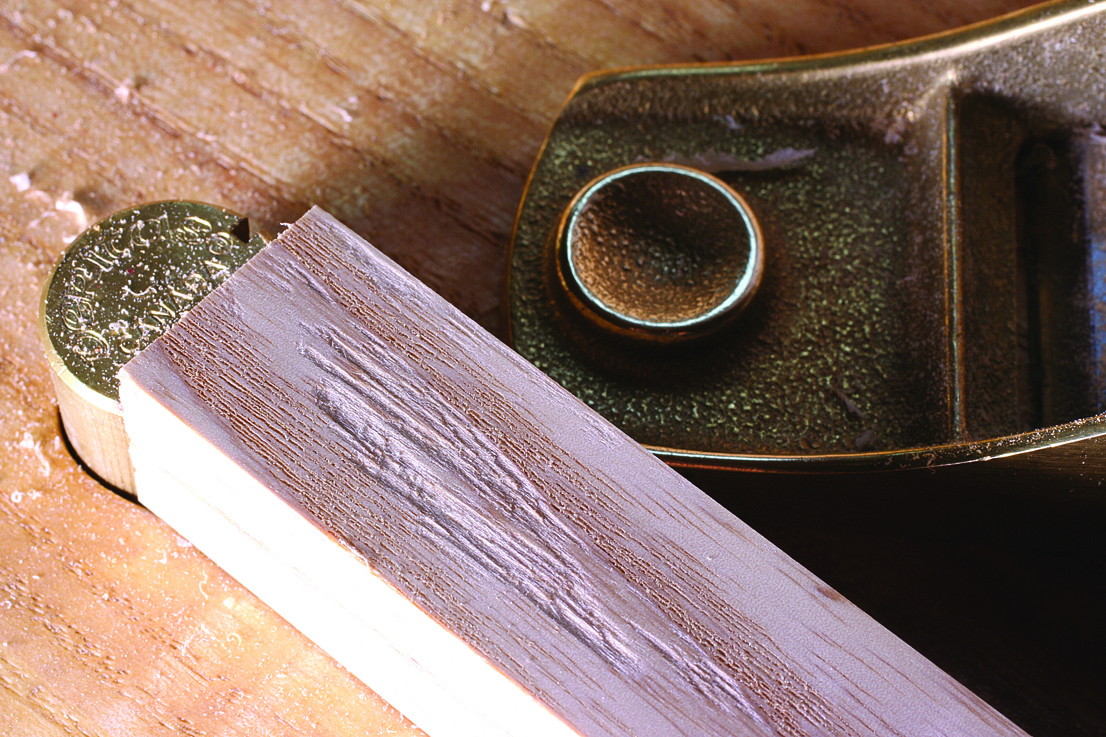
If I get tear-out with a beefy shaving, I retract the iron into the mouth of the handplane and extend it until the shaving looks like the photo below.
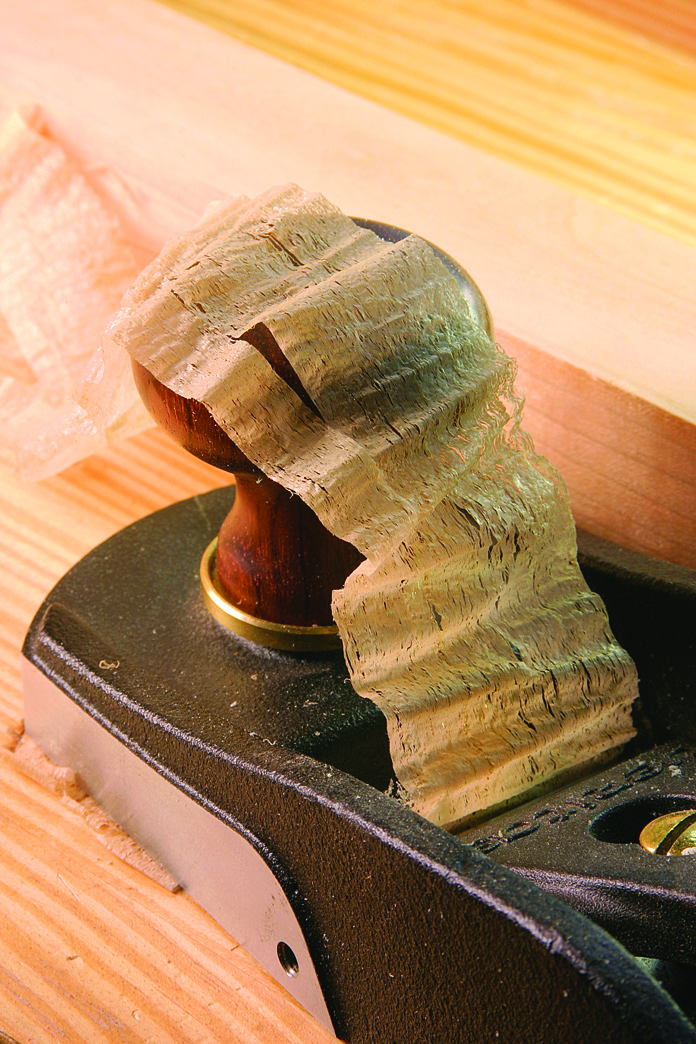
A bit thinner. This shaving is about half the thickness of the thick one. Use this size shaving if you start to see tearing on the surface of your project.
This shaving will clean up my surfaces in three of four passes. It usually eliminates tear-out more than the shaving above. But sometimes I need to get nuttier.
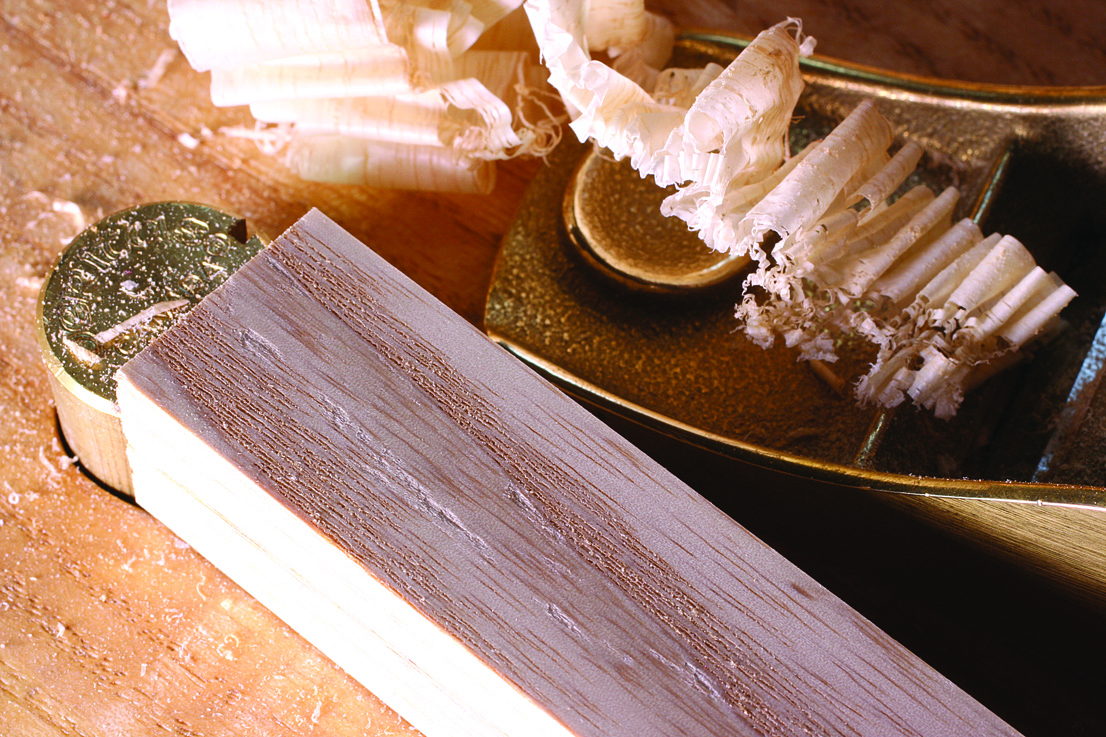
And that’s when I push my tool to get a shaving like the one below this paragraph. This thing is about to fall apart. In fact, it sometimes will fall apart when you remove it from the mouth. Usually, this sort of shaving requires a persnickety setup to achieve. I can’t get this shaving with an Anant, new Stanley or Groz plane. They are just too coarse to tune to this high level. This is what you are paying your money for when you buy a premium tool. Premium tools will do this with little fettling. My vintage planes that I’ve fussed over will do this as well.
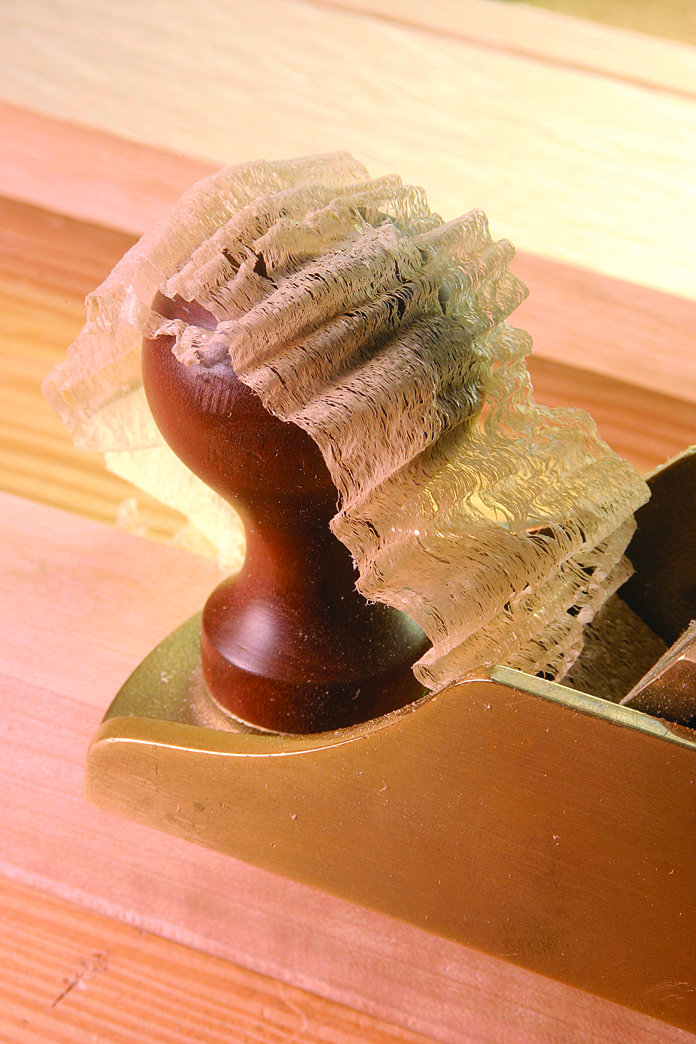
Tissue stops tearing. Before I break out the sander I try cutting a shaving such as this one. It takes more passes than I like, but it is less likely to tear the grain.
The downside to this shaving is that you will be making a lot of them to remove the tear-out on the board. About 10 cycles or more is typical for some small tear-out.
Can you get nuttier? Sure. If all else fails, I can set my plane to remove something between a shaving and dust. These “shavings” don’t really look like much. How do you get them? That’s easy. When I get my thinnest smoothing-plane shaving possible, I’ll rub some paraffin on the sole of the tool. This actually reduces the depth of cut just enough to get the furry, dusty stuff. Beware: Taking a shaving that small will force you into a lot of work. Lots of passes.
But when you need it, you need it.
No. 4: Perfect Pitch
After taking a recent course in handwork, Rick Gayle, a reader and professional painter, visited our shop at the magazine and looked over some of the planes in my wall-hung toolbox. He reached up and pulled out the Veritas Bevel-Up Smoother Plane.
“This plane has made all other planes obsolete,” Rick said. “Well, that’s what my instructor said.”
It’s a strong statement to say that hundreds of years of handplane manufacturing have been eclipsed by one tool, but I know what Rick’s instructor was getting at. When it comes to reducing tear-out, one of the most important weapons is the angle of the tool’s cutter – a.k.a. the “angle of attack.” And no other tool gets you to a high planing angle as easily.
Bevel-up can help. All three of these tools have their bevels facing up. This fact makes them easy to configure to a high angle of attack. It just takes a little sharpening.
The higher the angle of attack, the less likely the wood fibers will lift up and tear out. Sounds good, right? What’s the catch?
The only practical downside to a high angle of attack is that the tool is harder to push. And that’s not too much of a factor when your shavings are tissue-thin. Plus, the high angle of attack works great with well-behaved hardwoods, too.
So what does the Veritas plane have to do with the angle of attack? After all, its cutter seems slung a lot lower than the cutter on a traditional plane. Well, the difference is that the Veritas (and some other block-plane-like tools such as the Lie-Nielsen No. 164) work with the cutter’s bevel facing up, while traditional planes cut with the bevel facing down.
This makes a huge difference.
In a traditional plane with the bevel facing down, the angle of attack is almost always set by the frog (the casting that holds the cutter). In almost all vintage metal planes, this angle is 45° (new planes by Lie-Nielsen let you pick a 50° or 55° frog, however).
When you flip the cutter over, the angle the bevel is sharpened at comes into the equation when figuring out the angle of attack. Here’s how: The cutter in a bevel-up plane is usually bedded at 12° or 20° to the sole of the plane. Let’s use 12° for our example. If you sharpen the cutter so it has a 30° microbevel on it, then you add the angle of the bed (12°) to the angle sharpened on your cutter (30°) to get the angle of attack (42°).
So this configuration would make a bevel-up plane behave much like a traditional bevel-down plane – or perhaps even a bit worse.
But if you sharpen the cutter at 45° instead of 30°, then the world changes. You add the 45° to the 12° and suddenly you have an angle of attack that is 57° – that’s fairly steep. And you can achieve that angle (and remove it) with just one quick sharpening.
So what’s the best angle of attack for gnarly woods? I’ve found that with almost all woods, tear-out tends to disappear with a 62° angle of attack – that means sharpening a 50° bevel on your cutter and putting it on a 12° bed in our example.
If you have a bevel-down plane, you get to this high angle by sharpening your iron with a knife edge, which is more work.
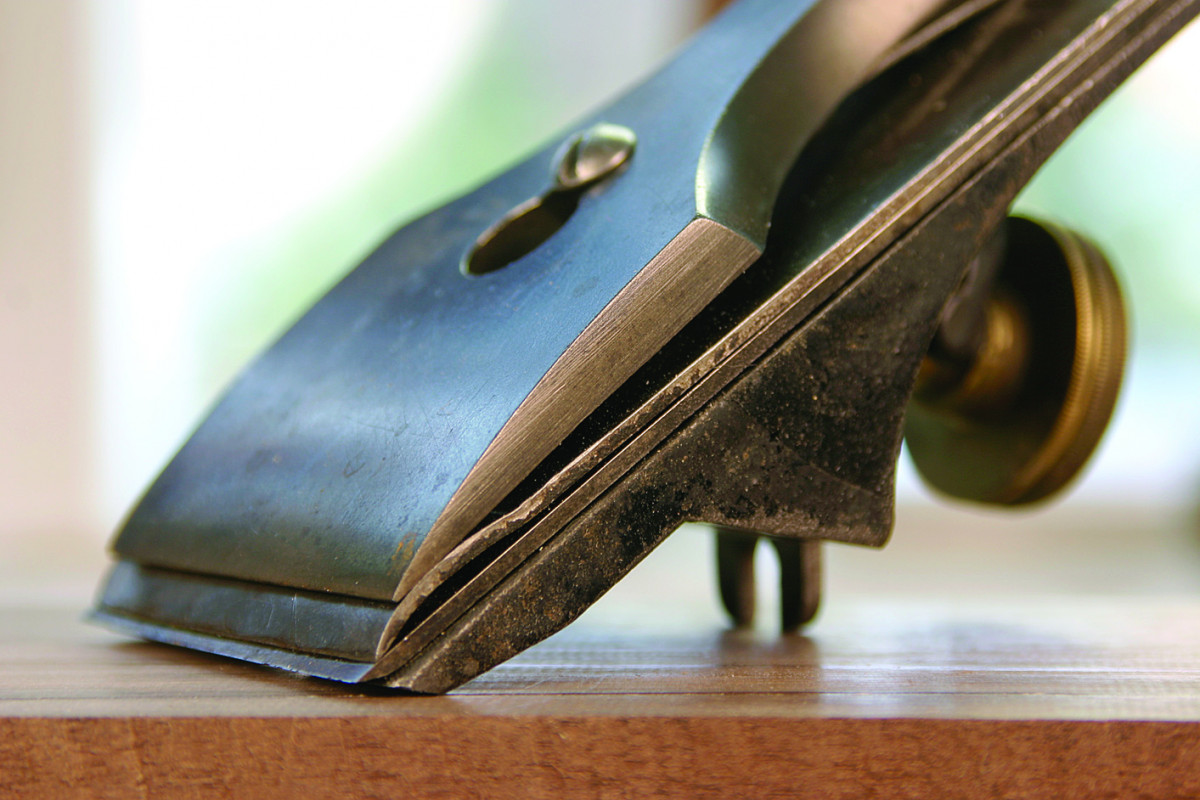
No. 5: Button Your Lip
I have held (and used) three of Karl Holtey’s revolutionary No. 98 planes. The first thing you notice about these tools is that they are flawless. Holtey lavishes attention on his planes like Gollum on the Precious. Every surface, inside and out, is perfect. Once you take that in, the next thing you notice is the non-adjustable mouth of the tool. It is, by most tool snob standards, big enough to drive a scrub plane shaving through. What gives?
A mini-mouth. Tightening up the mouth aperture of your plane can help in some cases, but you are likely to increase the chance of clogging up the works.
To find out, I sharpened up two planes: My trusty Lie-Nielsen No. 4 with a 50° frog and a mouth aperture between .002″ and .0025″ wide. Then I sharpened up the Holtey so its angle of attack was also 50°. Then I took a board of nasty, surly Jatoba (it’s almost as mean as coconut) and planed it with both tools. Then I turned that board around and planed it against the grain with both tools.
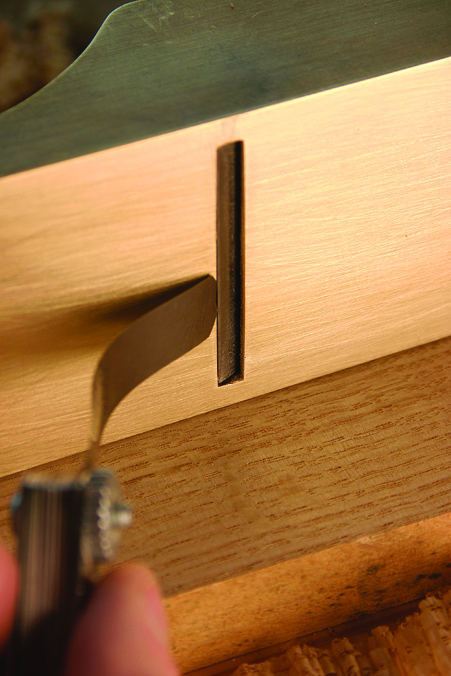
I know this board, and it’s about as bad a board as I ever want to work. Most standard-pitch planes tear it out. But both the Holtey and the Lie-Nielsen cleaned it up with no problems – both with the grain and against the grain.
This little experiment calls into question the plane snob’s obsession with tiny mouth apertures. (By the way, I’m the chapter president of the local plane snob club.) After planing that Jatoba, I had to ask myself: Do you need a fine mouth for high-tolerance work?
I think the answer is: It depends. I think tightening up the mouth aperture of your plane is just one of the weapons you have in your battle against tear-out. But I don’t think it’s the doomsday weapon.
The long-held theory about the plane’s mouth is that a small aperture is preferred because it will press down the grain of the wood as the cutter slices it. If the mouth is tight, then the cutter will be unable to get under the grain and lever it up ahead of your cut, tearing out the grain. This sounds reasonable, but there’s more to it.
The sometimes-forgotten problem with a fine aperture is that it makes your tool more likely to clog, especially if you have the chipbreaker set close. So a tight mouth is usually a time-consuming set-up, unless you have a smoothing plane dedicated to fine cuts.
I start closing up the mouth of a tool only when my other efforts fail: I’ve sharpened the iron, I’ve set it to take a fine cut, and I’m using the tool that has a high (62°) angle of attack. If all those efforts fail, then I’ll weigh my choices: Tighten up the mouth and face some clogging issues, or get out the card scraper or sandpaper and call it a day.
No 6: Chipbreakers
Break-down at the chipbreaker. The chipbreaker is supposed to reduce tear-out, but if it is set too closely, it will clog your plane. When you have a problem with your tool, investigate the chipbreaker first.
If you follow the conventional wisdom for setting your chipbreaker, you might hate your handplane.
What’s the conventional wisdom? According to Charles Holtzapffel’s seminal 19th-
century work on the cutting action of tools, you should set your smoothing plane’s chipbreaker .02″ from the cutting edge of your iron (other respected sources say to set it even closer) and to have an extremely tight mouth.
This, Holtzapffel says, prevents tear-out.
This, says your neighborhood editor, makes your plane choke.
Chipbreakers can do more harm than good in a handplane. Whenever I’m having trouble with a plane (especially if the plane is choking or refuses to cut), the first place I look is the chipbreaker. Whenever I fettle a new or vintage handplane and the thing won’t behave, the first thing I’ll do is swap out its chipbreaker with another plane that has a working chipbreaker. In almost all cases, this solves my problem.
So what is the purpose of the chipbreaker? My cynical view is that it became widely used so toolmakers could use a cheap, thin steel cutter and reinforce it with an inexpensive iron or soft-steel plate. This is supported by the odd names given to chipbreakers. Some early sources call them cap irons, double irons, break irons or top irons. In other words, not everyone agrees that they were designed to break chips.
Early planes had thick irons and didn’t have chipbreakers, even during the age of mahogany, which is hard to plane well.
In my view, the chipbreaker’s primary purpose in a modern plane is to mate with the tool’s blade-adjustment mechanism and to aid in chip ejection. Oh, and it exists to frustrate you.
So in what position should you place your chipbreaker? I set mine back about 3⁄32” in a smoothing plane – sometimes even a little further back if the mouth is tight. All I’m really trying to do is to prevent clogging.
Which begs the question: Why did I list a chipbreaker as one of the ways to reduce tear-out? Well, I did mention one use for the chipbreaker in a modern Bailey-style plane – it mates with the tool’s depth-adjustment mechanism. This mechanism allows you to easily set your tool to take the finest cut possible, which really will reduce tear-out.
No. 7: Skewing
No skew. No tear-out. Planing with no skew resulted in no tear-out on this ash board.
I keep a list in my head of what I call “The Woodworking Mysteries” – things I pretend to understand but are outside my grasp.
One mystery is how a tree can pump water to the furthest reaches of its branches. There are many clues as to how it works, but a complete picture eludes me. Another mystery is about how yellow glue actually works. Again, I’ve never read a satisfying explanation.
A third mystery relates to handplanes and basic geometry. One common strategy for reducing tear-out in a board is to skew the plane as you make the cut. This strategy was beaten into my head by all my teachers both dead and living. It’s repeated on the Internet by people I deeply respect and trust. And I do it myself in my work.
But if you do the math, you see how this strategy doesn’t make much sense.
Skewing and tearing. Planing with a 30° skew (both skewing left and skewing right) created this ugly patch of torn grain.
Let’s start with a fact: The higher the angle of attack when you plane a board, the less likely you are to experience tear-out. Another fact: Skewing a plane in use reduces your angle of attack. Mike Dunbar, the founder of The Windsor Institute, explains this in the clearest way possible. When a shaving encounters a plane iron, the angle of attack is like a hill that the shaving has to walk up. If you walk straight up that 45° hill, that’s a lot of work. When you skew the tool, it’s like the shaving is walking up the hill at a lower angle. Or put another way, it’s a bit like building a road up a steep mountain. You don’t make the road go straight up the mountain, you build switchbacks so the vehicles can actually make it up the incline. Skewing reduces the amount of work required – both to plane a board and to climb a hill.
How much does skewing reduce your angle of attack? Skewing a 45°-pitch handplane by 30° will reduce your effective angle of attack to 40.9° – that’s significant.
And at 20°. Planing at a 20° skew (both skewing left and skewing right) created a little tear-out.
So here’s the problem: If high planing angles reduce tear-out, and skewing a plane reduces your angle of attack, then how can skewing the plane reduce tear-out?
Hint: The answer is in the branches.
To explore this seeming contradiction, I did a little experiment. I took a short piece of ash with pronounced grain direction – that is, there was no question about which way the grain was traveling in the board.
I cleaned up one face with a smoothing plane and then turned the board around so that I planed against the grain, which is when you are more likely to encounter tear-out. Then I planed the board with a bevel-up block plane. This plane is bedded at 12° and the iron is sharpened with a 35° micro-bevel, so its angle of attack is 47°. The mouth on the plane is wide open, so it’s not much of a factor. The tool is set to take a shaving that is about .002″ thick.
First I planed the board against the grain without skewing the tool. This cleaned up the board just fine with no tear-out. Then I skewed the tool by 30° (which lowered my effective planing angle to about 43°) and did the same operation. I tried skewing both to the left and to the right. Two areas of the board tore out grotesquely.
Then I cleaned up the board again and tried skewing the plane at 20°. Tear-out occurred at the same two places but not as badly. So I tried skewing the plane at a variety of angles. And without fail, the more I skewed the plane, the more tear-out occurred.
So how can skewing reduce tear-out?
You have to remember that trees are not manufactured items. They are giant cones made of fibers that grow in different directions as the tree responds to its environment: a hill, a disease, a wind storm. Then we slice them up into shapes suitable for building things, regardless of how the fibers are traveling through the tree.
In some boards, grain can change directions on you a couple times. And the grain can be at odd angles – you cannot assume that all your boards will have grain running from one end to the other – the grain may be traveling at a 20° direction along the face of the board and 10° along the edge. And the grain might be in the shape of a shallow wave.
So there are times when skewing the plane puts the edge in the right position at the right time to deal with that patch of grain.
In my example board above, the two places where the tear-out occurred were at places where the grain rose quickly. So how did I deal with this board? As I encountered the areas that tore out, I straightened out the tool – no skew. When I worked the areas that didn’t tear out, I skewed the tool to reduce the effort required for planing.
So the trick with skewing takes us back to the No. 1 way to reduce tear-out: The best strategy is to select the best wood possible and learn to read the grain so you can begin to predict how your tools will behave. Sometimes, the best strategy is to not skew the tool.
Or put another way: Because grain is irregular, sometimes skewing the plane allows the blade to encounter the grain at a non-skewed angle – and to therefore you can plane it without tear-out.
Here are some supplies and tools we find essential in our everyday work around the shop. We may receive a commission from sales referred by our links; however, we have carefully selected these products for their usefulness and quality.


Very good article. Thank you and all the best!
Thanks for this piece Chris. As I have just started working with wood other than pine, popular, etc. I’ve encountered tearout. I picked zebra wood for a project for my grandson and working this wood has been a nightmare. I really needed this information,
Thank You
I know this is old but I’m surprised no one has commented so I thought I’d be first. Awesome words as usual Chris, makes so much sense when you think about all that you wrote in this article. I often relate to so much of what you write and usually come away thinking in my head ‘great, I’m glad I’m not the only one thinking this’ there is so much contradictory advice in woodwork but you always seem to make it so clear for me. Thanks for all you do, you’re an absolute star.