We may receive a commission when you use our affiliate links. However, this does not impact our recommendations.
When I worked as a professional cabinetmaker I was always surprised at the number of so-called professionals who would go to any length to avoid making inset doors. Most of them just won’t do it. The excuse was usually along the lines that it is too difficult and takes too long.
Nice work isn’t possible if you talk yourself out of it before you begin.
But if you simplify the problem, it comes down to making a square piece of wood fit inside a square opening, and that is a basic skill in woodworking. It shouldn’t be a terrifying experience, and with a systematic approach and a bit of practice it will become second nature. Achieving a good fit on an inset door or drawer begins long before the assembled door goes into the completed frame.
It begins with making good parts. Learn to prepare stock with square corners, straight edges and flat faces. Throw out the notion of “close enough,” and replace it with seeing how close you can get. The temptation to let something a little long or a little wide go, with the hope that it will all work out later, is strong. Little mistakes don’t work themselves out as a project nears completion; they gang up and accumulate, most often in the most visible spot they can find.
I begin fitting doors to their opening by doing some surveying. I check the corners with a large square. At this point, someone is likely to chime in with the advice to measure the diagonals of the opening to see if it is square. It’s OK to do that, but the only thing it usually proves is that you’d like to put off really fitting the door to its opening for a few more minutes.
It isn’t easy to get an accurate measurement from corner to corner, and even if the numbers are the same, there are several other conditions that will yield equal numbers but crooked corners. A short rail will create a trapezoid instead of a rectangle and slightly bowed pieces can create any number of odd shapes that will pass the corner test but still fail to fit.
One of the cruel yet effective ways that woodworking teaches us is this: You don’t know how well you have performed one step until you are halfway through the following step. If your opening isn’t right, you may not realize it until it is too late to correct. Next time around, you’ll be more careful, but this time you’ll need to do extra work. If the frame is out of whack you can still fit the door, but it will take longer and won’t look quite as nice as it could.
The same thing holds true for doors: Check them to see if the edges are straight and the assembly is square. If something is amiss, it can usually be corrected, but you need to know exactly what is wrong in order to fix it. I’m relatively confident, so I build doors to the size of the opening and ideally trim an equal amount off all four edges in fitting.
Some people will make the doors larger than the opening, but I think this encourages sloppy work, and it complicates matters when you need to decide exactly how much to trim and where you need to trim it.
Nobody is Perfect
Systematic fitting has to start somewhere, and the first decision is how large to make the gaps. As seen in the picture above, a dime or a piece of plastic laminate is a good starting point. Smaller than that is possible, but it raises the chances of something binding or sticking.
The laminate and the dime are each less than 1⁄16″ thick; standard-grade laminate is .048″ thick, and a dime is about .049″. This presents a challenge and a choice. The choice is to become comfortable working with fractions that small, or to set a lower limit of numbers you can work to.
With a set of fractional dial calipers you can easily measure small fractions. If creating nice work is your goal, it doesn’t make sense to start guessing when you’re trying to achieve a nice fit. Knowing how much to remove, and how to remove a predictable small amount, is critical.
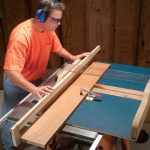
Either machines or hand tools can be used. Measure a plane shaving with calipers, and with a little division and multiplication you will know how many plane swipes it will take to remove just enough. The jointer is the tool of choice for a powered approach, and the picture at far right shows how to set up the machine to remove a predictable amount of material with each pass.
The ruler on the infeed table is 1⁄32″ thick. With a long straightedge across the outfeed table, position the infeed table until the ruler meets the bottom of the straightedge, then lock the infeed table in place. You can double-check how much is removed in one pass by measuring the width of a piece of scrap with the calipers, making a pass across the jointer and measuring again.
One Edge at a Time
All of the fitting work is fussy, and this is an area where it’s a real advantage to complete the face frame first, then fit the doors and drawers before assembling the frame and cabinet. If you put the door and drawer fitting off until after assembly, you won’t be able to work on a nice flat surface. You’ll be floating in space, trying to judge critical distances while balancing a door in mid-air.
The hinge stile is the best place to start for fitting a door. It’s usually the longest edge, and for the hinges to function, the stiles on the cabinet and the door need to match. When fitting a drawer front, start with the longest edge. It’s too late at this point to do much to the cabinet stile if it isn’t straight. Corrections to the door are far easier to make than corrections to the opening.
If the cabinet stile is bowed into the opening in the middle, you may be able to get a block plane in the opening to remove it. If it is bowed in the other direction, material must be removed in the corner – not an easy task. Tool catalogs promise that a chisel plane will work for this, but this is a clumsy tool and the chances for success are slim.
If you can get away with it, taking a slight amount off the corners of the door to match the frame is a better choice. If conditions are really bad at this point, reworking or remaking the frame might be a less painful way to cut your losses. Once again, this is another good reason to leave the face frame and cabinet separate entities as long as possible.
It’s also important to keep opposite components of the door as close to equal in width as possible. After running the hinge stile over the jointer, I compare its width to the other stile. When I trim to the finished width, I’ll leave the hinge stile alone, and remove stock from the lock stile only to keep things equal.
An Opportunity to Ruin Everything
Getting the hinge stile straight, or at least a decent match to the frame stile, is only the starting point. The door is still too large for the opening. For the power-tool woodworker, the temptation is strong to head to the saw and cut the door to length. This is the next step, but it pays to make sure of two things: that a square cut is needed and that the saw setup is correct.
I think this one operation is a good reason to invest in a sliding table for the table saw. Lacking a sliding table, having a crosscut sled or panel-cutting jig are good alternatives. Unless the door is narrow and short, the standard miter gauge likely won’t be up to the task.
I like to establish the bottom edge as the second step. This is a good time to recheck the corners of the frame and the door. If the opening is square, and the hinge stile straight, a crosscut will do. Some woodworkers will use the jointer, but care must be taken to avoid blowing out the end grain as the last stile passes over the knives.
Begin making the cut, but back the door out from the cutterhead after an inch or less. Reverse the position of the door, keeping the uncut portion flat on the infeed table until the previously cut area is on the outfeed table. Continue to feed the door, keeping it against the fence with downward pressure on the outfeed table. This tends to leave a rough cut on the end grain, so leave some extra material to be sanded or planed smooth.
If the opening isn’t quite square, the bottom of the door must be trimmed to match. If you forged ahead and made a straight cut, the door won’t fit – or if it does there will be a noticeable difference in the gaps at each side. To determine how much to remove, place the bottom end of the hinge stile in the corner of the frame and place the door across the opening. The opposite corner will either overlap the frame or show a gap.
If it overlaps, make note of the distance, and mark the edge of the lock stile. If there is a gap, that distance should be marked on the hinge stile. With one leg of a framing square, or some other straightedge, mark the bottom of the door. A pencil line will work, but clamping the straightedge and cutting in the line with the knife will give a better reference.
The knife line becomes essential if you’re using hand tools to trim the bottom edge. The same issue that causes problems with the powered jointer will also make trouble if you’re handplaning – the end grain will likely tear out as the plane exits the cut. The solution is also the same. Begin by cutting in on the widest part of the cut, working in from the end. Then work from the opposite direction until you reach the knife line.
Some woodworkers put the door in a vise or otherwise clamp it so the edge to be trimmed is horizontal. I find it awkward to balance the plane on a narrow edge, especially if the edge is far above the benchtop. I work with the edge vertical, and the door clamped flat to the bench. Other planes will work, but I prefer a low-angle block plane because it works well at cutting end grain, and it is easy to reverse it in my hand if I want to cut on the pull stroke. With either method, check frequently that the edge is square.
The table saw is also a viable option for making these odd cuts. Instead of trying to make a tiny adjustment to the angle of the fence, or if you’re using a sled with a fixed 90° fence, insert a thin shim between the corner of the door and the fence as seen in the photo on page 12, bottom right. Start with a shim that’s thinner than the gap, and make the first cut removing as little material as possible. The angle can be changed in miniscule increments by moving the shim laterally.
On Top of the Situation
The procedure for trimming the top is the same as the bottom. A shim equal in thickness to the desired gap can be placed between the bottom of the door and the top of the lower cabinet rail to better gauge how much material ought to be removed from the top. The same cautions for matching the opening and methods for making the cuts apply.
The amount removed from the top will determine the sum of the gaps at both the top and bottom of the door. It pays to check the fit as you go. Even though the door will likely be too wide for the opening, the up-and-down fit can be checked directly by holding the door at a right angle to the frame and sliding it into place.
The big advantage of using a plane for this fitting is the ability to remove controlled amounts of material in smaller increments than can be reasonably achieved with power tools. The second-best reason to use a plane is that you can arrive at a ready-to-finish edge at the same time as you reach a good fit. When using power tools, sanding the edges to remove tool marks can easily widen the gaps, or knock them out of square.
With three of the four edges complete, the last long edge can be trimmed. If the opening and the door are both square, this is simply a matter of reducing the width of the last stile. If things are off slightly, I work to get the door to fit within the opening, shim the top and bottom gaps equally, then scribe the edge of the door to the edge of the frame. A pencil can be run along the edge, marking the high and low points.
It All Hinges on This
At this point, the hinges can be set. Because we used surface-mount hinges in this project, the door was placed in the frame opening with shims wedged in place to hold the door in position. If butt hinges are used, mark the locations on both the frame and the door. Go ahead and mount the hinges.
If all goes well, the even gaps at the top, bottom and hinge stile will remain as they were before placing the hinges. If not, you will need to choose between adjusting the hinge placement or readjusting the door gaps. Readjusting the door gaps will result in making them larger than originally planned and repeating steps already taken. This is where the lessons of carefully setting hinges are learned.
With butt hinges, make the initial setting using only one screw per hinge leaf. If the door needs to be relocated up or down, a second attempt can be made, fastening the hinge with a screw in an unused hole. When the fit is good, fill the first hole with a whittled scrap of wood; then fasten the hinge using all the screws.
If the gap between the door isn’t even at the hinge stile, thin shims can be placed between the hinge leaf and the wood. Only a small adjustment can be made with this technique, as any but the thinnest shim will begin to show as a curious gap between the hinge and the wood it attaches to.
After the hinges are set, the final gap between the lock stile and the cabinet can be finished. If the gap is small, a square edge on the back stile will prevent the door from closing. Make a pencil mark on the door where the back edge of the lock stile hits the opening at both the door top and bottom. Connect these two marks with a line.
If the marks are the same distance from the edge, an adjustable square or a marking gauge can be used to place a line along the back face of the lock stile. If there is a variation, use a straightedge to connect the two marks. In an ideal world, the long edge should be square to the top and bottom edges, and the gap should be consistent. If both can’t be achieved at this point, an even gap is the better option.
If the gap was even before setting the hinges and didn’t change, a slight bevel can be planed on the back of the door. With the door flat and the back facing up, begin planing by knocking off the corner. Hold the plane away from vertical a few degrees to establish the angle.
The angle can be established by eye, comparing the gap between the lower edge of the door stile and the sole of the plane with the distance marked on the upper face of the door. As the plane strokes become wider, stop and look at the end of the door to ensure that the angle is close. Stop planing just before the bevel reaches half the thickness of the door and reattach the hinges.
The last few light strokes can be made with the door on the hinges. The edge should not come to a sharp point, as this will be likely to chip or tear at some point in the life of the door. On a 3⁄4″-thick door, the flat area from the front of the door coming back should be between 1⁄8″ and 1⁄4″ wide. WM
Here are some supplies and tools we find essential in our everyday work around the shop. We may receive a commission from sales referred by our links; however, we have carefully selected these products for their usefulness and quality.