We may receive a commission when you use our affiliate links. However, this does not impact our recommendations.
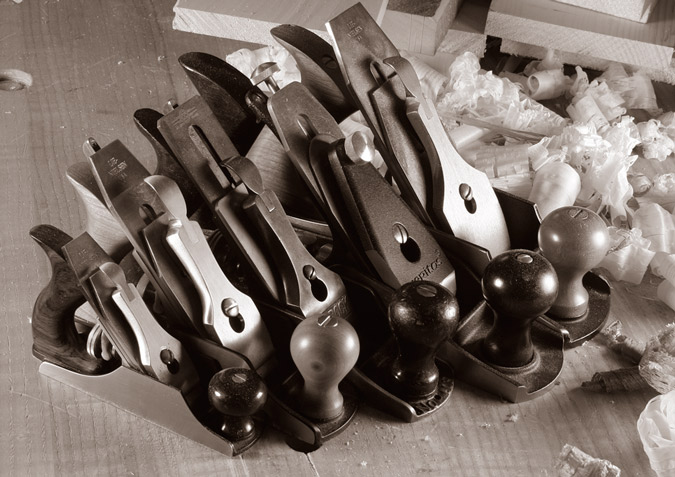
Bench planes come in almost every imaginable length from about 5″ up to 30″. How do you pick the right ones for your work? How should each plane be set up? We show you how to think for yourself when it comes to bench planes.
We rethink the Western bench plane system. All you need to know is that there are three tools, three setups, three jobs and three surfaces.
by Christopher Schwarz
excerpted from the Winter 2009 issue of Woodworking Magazine
Some days I think that every bench plane should come with a decoder ring to help the user understand how to use it. But while a magic ring might seem handy, it wouldn’t help explain all the different ways that bench planes can be adapted and used in the workshop.
The most traditional way of setting up bench planes is to use a jack plane to remove material, a jointer plane to straighten it and a smoothing plane to prepare it for finishing.
For example, the earliest English instructions we have on handplanes (from Joseph Moxon from the 17th century) indicate there are three bench planes – a fore, a jointer and a smooth plane. Sounds simple, right? But then how is it that the late legendary English craftsman Alan Peters used a No. 7 jointer for almost everything? Or that craftsman David Charlesworth uses a No. 5-1⁄2 panel plane for most tasks?
Clearly, there are lots of valid ways to work wood with your bench planes. So you have two choices: You can pick a woodworking idol and imitate what he or she does. Or you can spend a little time to really understand the system and how it can be bent to your will.
I prefer the second approach (otherwise this would be a short article). If you know bench planes like you know your home in the pitch-black dark, you’ll buy fewer tools and spend less time trying to make them work. You’ll also be able to discard the weirdo numbering and naming systems for bench planes. But before we can put those systems in the waste bin, we have to understand what we’re throwing away.
The Venerable Bench Plane Model
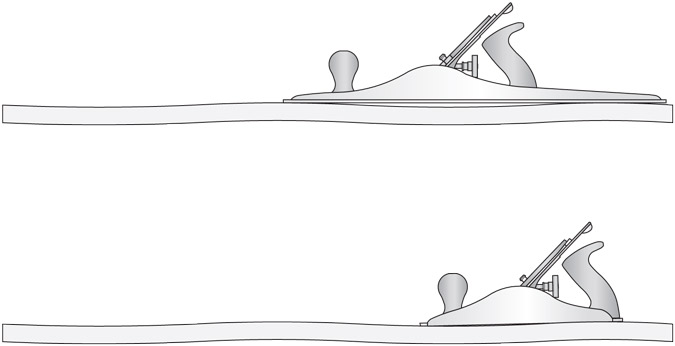
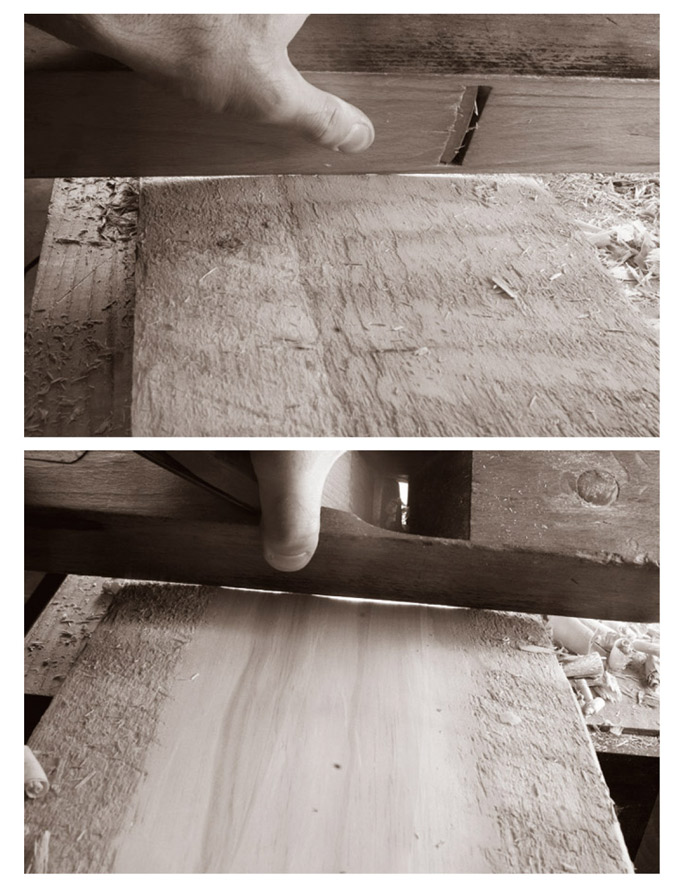
Planes “see” the wood as a series of waves. Long planes remove the peaks of the waves and try to flatten the board (top) while short planes tend to ride the peaks and valleys of boards (bottom),
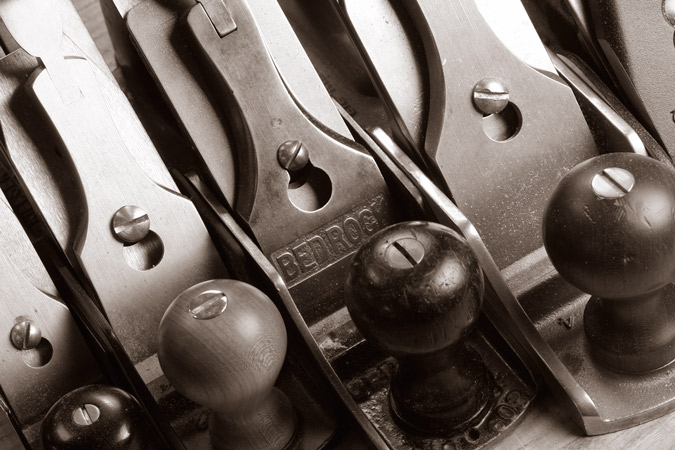
In the traditional British and American shop, there are three bench planes, each with a particular job. The first plane to touch the wood is called the fore or jack plane. It’s typically 12″ to 20″ long, and is used to hog off material. In the Stanley numbering system, this would be the No. 5 (called a jack) and the No. 6 (called a fore plane).
The plane used after the jack is the jointer, which seeks to straighten the wood. It typically is 22″ long. In the Stanley system, the Nos. 7 and 8 are both called jointer planes.
The last tool to touch the wood is the smoothing plane, which prepares your parts for finishing. Smoothing planes are typically 10″ or shorter. In Stanley’s world, this is everything between the cute No. 1 and the burly No. 4-1⁄2.
On this spray-painted board, I started planing it with a jointer plane on the right side and I started planing it with a smooth plane on the left side. You can see how the jointer plane is trying to flatten the board and the smooth plane is trying to finish it.
As you can see, it’s the length of the tool that seems to determine both its name and function. But the length of the tool is only part of the story. How each tool is set up is just as important. And these two features – the length and the setup – can be adjusted by the user to do all sorts of cool, crazy and downright dumb things.
So let’s now forget the plane numbering system and focus on their three jobs, which is far more helpful.
Strong, OK and Weak
All bench planes do three things: They remove material, they straighten the wood and they prepare it for finishing. When you set up a bench plane, what you are doing is making one of these characteristics really strong (such as its ability to remove material) and the other two characteristics weak. Here’s how it works with the traditional setup of three planes.

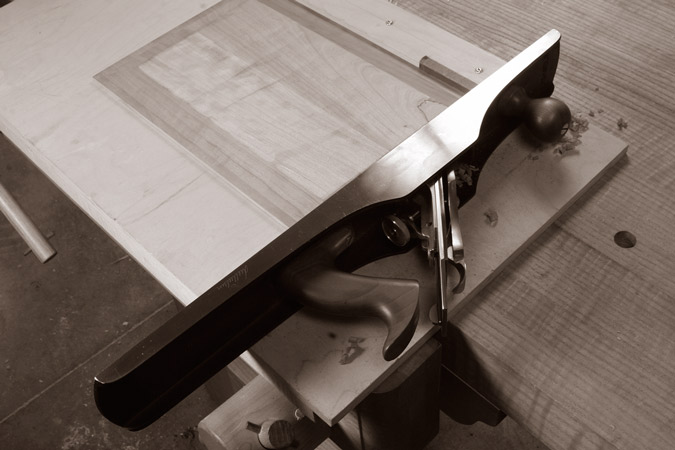
This is what the curved iron looks like in the mouth of the tool. Note how wide open the mouth is, which allows it to pass thick shavings.
■ Jack plane: The typical setup is to configure this tool so it does a great job of removing material, a passable job of straightening the wood and a terrible job of preparing it for finishing.
■ Jointer plane: Its typical job is to straighten the wood; it does OK at removing material and preparing it for finishing.
■ Smoothing plane: This tool is used to prepare the wood for finishing. It also can be useful when removing small (and controlled) amounts of material. It isn’t very good at straightening boards unless the boards are very short.
So when you are standing in your shop and trying to decide which tool to set up and use, the first thing you have to do is grab the one that is the right size for the job (you can’t change the length of your tool without a hacksaw or a welder). So let’s talk about what I call “the rule of length.”
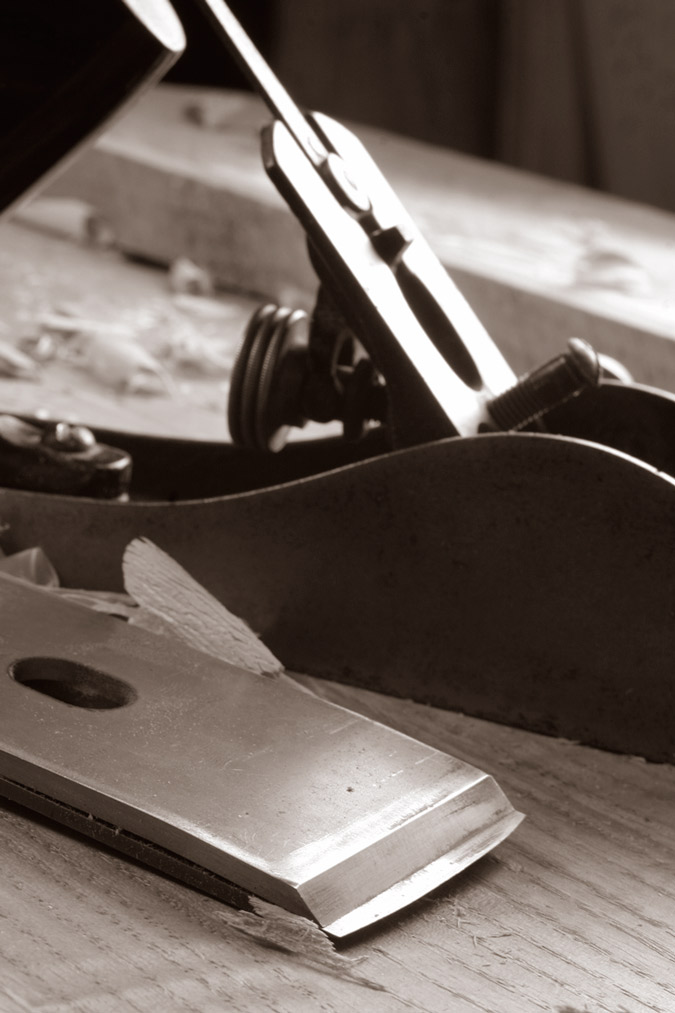
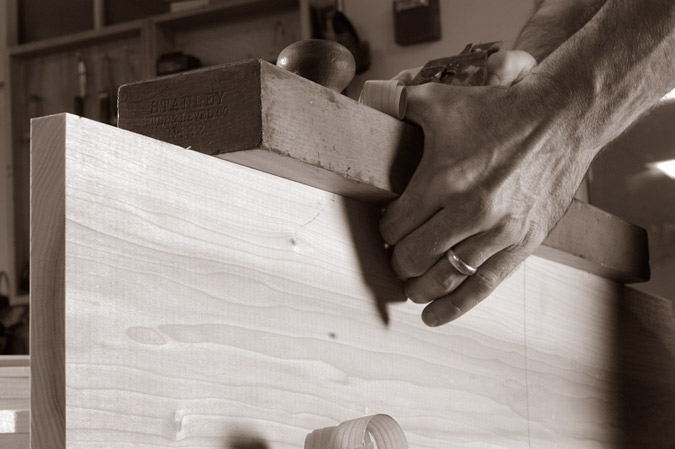
This Stanley No. 5 has a frog pitched at 45°, which makes the tool easier to push than a high-angle plane. And note the position of the breaker on the iron in the foreground. It’s backed way off.
The Rule of Length
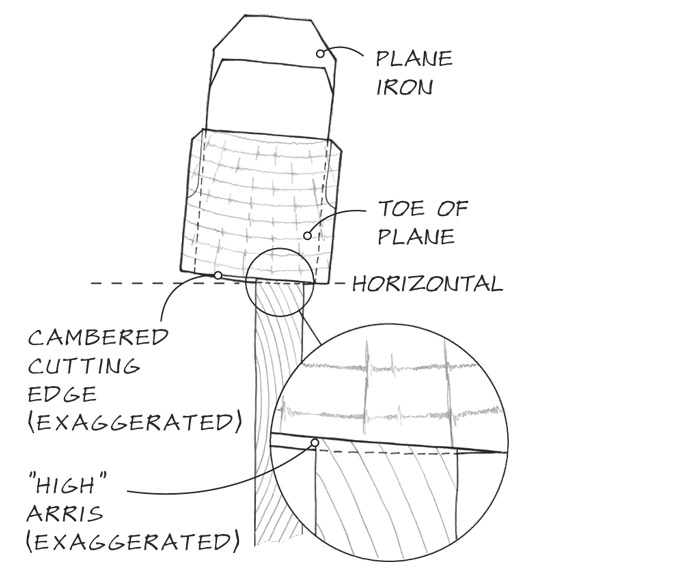
To our eyes, wood might look like a flat surface. But to a handplane, wood looks like a series of gentle waves. As a plane gets longer, it tends to skim over the tops of these waves, removing the peaks with the cutter and reducing these peaks so that they are level with the troughs between.
That is why jointer planes are long. The plane’s length creates a straight edge or face. So how do you pick which length is suitable for your work? The rule of thumb is that you can easily straighten a board that is twice as long as the handplane’s sole. So a 22″-long jointer plane can reliably straighten a 44″-long board. And because typical furniture parts max out at 48″, this makes sense.
On the other hand, as the plane’s sole becomes shorter, it tends to ride the wooden waves instead of trying to trim off the tops. So the cutter can rapidly touch the wood in both the peaks and the valleys.
That is why smoothing planes are so short. They are trying to make the wood look good at the expense of trying to straighten it. Many surfaces (typically show surfaces, such as tabletops) don’t need to be dead-nuts flat. They just have to look good. The shorter the plane, the faster you’ll get to the bottom of the troughs on a board.
When you use a plane that is of a middling length, say that of a 14″ jack plane, you can push the tool either to be good at straightening or preparing the wood for finishing. You can create an oversized smoothing plane or a shortish jointer if you please.
The Rule of Width

Long jointer planes can create ridiculously flat surfaces (flatter than machinery can create). This can be a benefit or a liability depending on what you are trying to achieve. Jointer planes are generally used diagonally. This helps remove twisting at the corners of the board.
Of course, planes come in different widths, too. Jointer planes can use irons that are 2″ to 3″ wide. Jacks can be 1-3⁄4″ to 2-3⁄8″. Smooth planes can be 2-3⁄8″ down to 1-1⁄4″. This characteristic isn’t as important as the plane’s length in my book, but it deserves mention.
Like the plane’s length, a plane’s width also affects how flat the resulting board will be and how much work it will take to get there. Wider planes usually make flatter surfaces, but it can take longer to achieve that goal. Narrower planes can get the work done faster if wielded correctly.
One more important detail about width: Wider planes are always heavier and harder to push.
One you’ve selected the right body style for the job at hand (removing material, straightening or preparing for finishing), the next step is to adjust the tool so it is suited for this job. The following is how I set up any handplane so its primary function is to either remove material, straighten the wood or prepare it for finishing.
The Setup to Remove Material
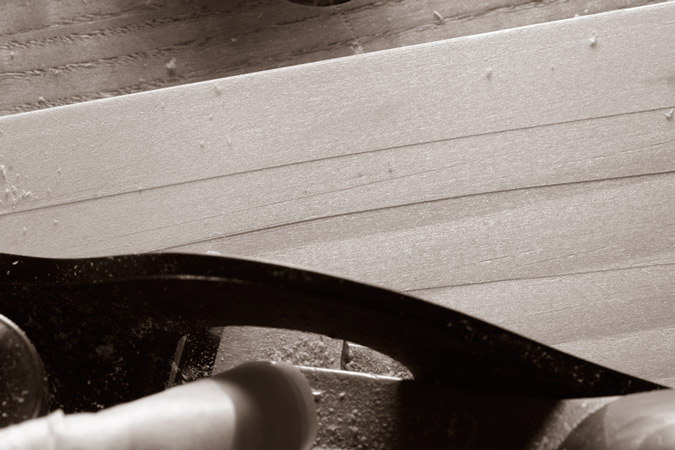
This is why I like a curved cutting edge. Here you can see the plane tracks left by a straight iron. Depending on your depth of cut, these can be an effort to remove.
The goal when you remove material is to take the absolute thickest shaving you can with the absolute least tear-out on the board. Here’s how you accomplish that: Have a cutting edge that is curved and push the plane across the grain (which is easier than planing parallel to the grain).
The tool’s cutter should have a curved edge that looks like a carving gouge. You are trying to scoop out the wood, and sharp corners will only jam up the works. How curved should the cutting edge be? I am fond of an 8″ radius – though others like a 10″ radius. This curve is created on the grinder, by the way, and refined on your sharpening stones.
Because you are trying to take a large bite of wood, you want the iron to be pitched fairly low. Anywhere from 37° to 45° is ideal for a plane that’s set up for roughing out your material. Angles that are higher than this will make the tool a bear to push (with no appreciable side-benefit). Angles lower than this cause other problems that are outside the scope of this article.
What about the chipbreaker? Back it off. Get it back behind the curve on the iron. It’s not going to do much except help deflect the shavings out of the tool (a noble function nonetheless).
The mouth of the tool: You want it as wide open as possible without interfering with the function of the handplane. With some planes, if you open the mouth all the way, the body casting of the tool will prevent the iron from seating on the frog of the tool. That’s bad. Open the mouth up so it can easily pass a gnarly shaving.
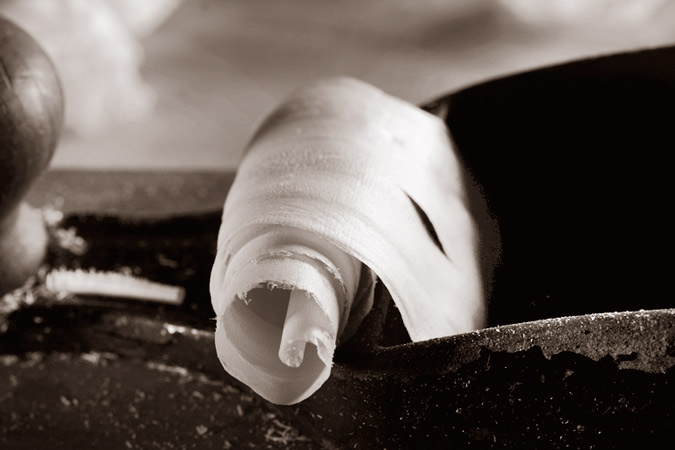
A good jointer plane shaving is like a nice ribbon in its thickness. Don’t go for gossamer shavings (you’ll be working at it forever) and don’t go for raunchy curls (you’ll wear yourself out).
How thick is gnarly? I think a good shaving for removing material is about .03″ thick (about 1⁄32″). That is 30 times thicker than a smoothing-plane shaving (and 30 times faster at removing wood).
Flatness of the handplane’s sole: If you are one of those people who obsess about the flatness of your plane’s soles, this is one place where you need to relax. Because of the rough-and-ready nature of a roughing plane, sole flatness is almost irrelevant.
In other words, don’t buy a $5,000 (or $500 or even $50) roughing plane. Go to the flea market. Buy an old vintage Stanley or wooden-bodied roughing plane. Spend your premium dollars elsewhere.
The Setup to Straighten Wood
To straighten the face or edge of a board, the most critical characteristic is the length of the tool. The longer the plane, the straighter the result. The other characteristics of the plane are flexible.
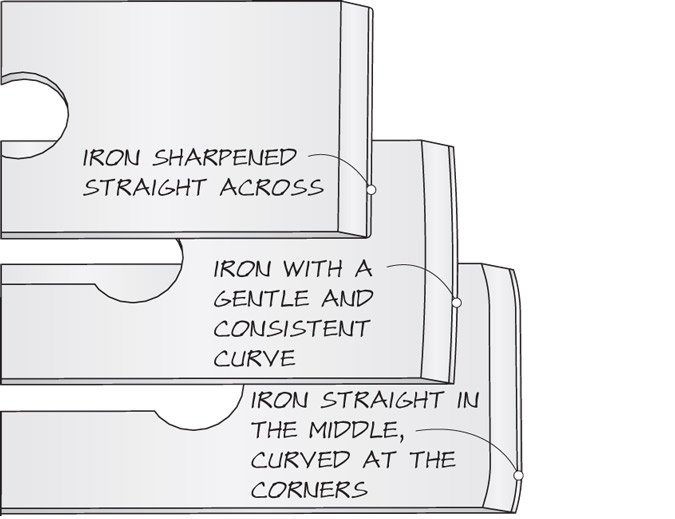
For example, when it comes to the shape of the cutting edge of the tool, woodworkers are divided. Many insist that an iron that is sharpened straight across is the way to go. After all, they say, straight irons are required for straight results. Other woodworkers, however, use a jointer plane with a shallow curve (imperceptible to the naked eye) that prevents the corners from digging into the work, allows the tool to remove material from select areas and produces a result that looks flat to a machinist’s square.
Though the iron looks like it is pitched low here, this bevel-up plane is actually set to a 62° pitch (it has a 42° microbevel on its cutter and the iron is bedded at 20°). At this high angle, tear-out doesn’t stand much of a chance.
Either approach works. Pick one that appeals to you and stick with it until you master it. Then (if you end up hating it) you can switch.
If you use a curved edge, how curved should it be? I like an edge that sweeps .008″ back at the edges of the iron. That works well.
Other considerations: The pitch of a jointer plane is flexible in my book. Most modern jointer planes have the iron pitched at 45° – called “common pitch” in American handplane parlance. This makes the tool easy to push, but it has the risk of creating some tearing.
If you look at old (really old) jointer planes, they would use high pitches – 55° or more – to control tearing in tricky material, such as mahogany. If you have problems with tear-out throughout a project, consider a high-pitch jointer to tame it at an early stage.
A high pitch will make the tool harder to push, but it might just save you some work with the smoothing plane.
When you set the chipbreaker of the jointer plane, you want to prevent the tool from clogging in use. I set the breaker 1⁄16″ back from the cutting edge and adjust it forward or back until the plane doesn’t clog. Then I forget about the breaker unless it causes problems.
The mouth of the tool: The principle here is to set the mouth so that the tool doesn’t clog when you take a typical shaving. A .008″ to .01″ mouth is ideal. Open it up a little more if needed. And how thick is a typical shaving? I can manage .004″ to .006″ thick in most woods (and thicker in softwoods).
What about the soles of the jointer planes? Jointer planes need to have fairly flat soles to work well. And metal jointer planes are difficult to true for the user. If I had to own only one nice plane, it would be a metal jointer. That’s because you can use it to true other wooden-bodied planes.
The Setup to Prepare the Wood For Finish
With smoothing planes, I think shorter is better. These tools save work because you can get to the bottom of the valleys quickly.
When you set up a plane for finishing, lots of factors become important. In my experience, I’ve found that the most important two factors are the pitch of the plane and the sharpness of the cutter. Those two variables trump the other things you can control. However, every little bit helps, so here are the details on tweaking a plane for smoothing.
If you want to get the work done quickly, select the plane with the shortest and narrowest sole possible. Early smoothing planes were 7″ to 8″ long. Modern smoothing planes have become bloated in length and width (in my opinion). These big smoothing planes have an appealing mass to be sure, but they also tend to skim over the waves of the wood and try to straighten the stuff more than necessary.
If you aren’t concerned with making wood look like a granite surface plate, choose the shorter, narrower planes.
About the pitch of the tool: I think that 45° (the common pitch) is simply not high enough for anything except softwoods and mild hardwoods. If you work with boards with reversing grain, kooky figure or exotic ports of origin, I recommend you step up to 50°, 55° or use a bevel-up plane to get yourself up to the 62° neighborhood.
 Otherwise, you’ll be scraping or sanding a lot more that you would probably like.
When you sharpen a cutter for a smooth plane, there are three common shapes for the edge:
■ A straight cutting edge with corners that have been relieved by a file or sharpening stones.
■ A curved cutting edge that sweeps back about .005″ or so at the corners.
■ A hybrid edge that begins with a curved cutting edge and is flat in the middle. This produces a wide shaving and never digs in at the corners.
All three types of edges work brilliantly. Try them all. Pick the one that suits you.
With your iron sharp, it’s time to attach the chipbreaker (if your plane has one). There is a lot of blustery rhetoric about chipbreakers. Some insist that breakers control tear-out. Others mock this notion and point to early planes that perform great and have never had a chipbreaker.
I keep my chipbreaker fairly close to the edge (about 3⁄64″), but I will readily back it off if the plane clogs even the least bit. I’m skeptical of chipbreakers. I think they cause more problems than they solve. (Someday I will write a chipbreaker epistle.)
Editor’s note: Since writing this article in 2009, Chris has rethought chipbreakers. See “Reconsidering Chipbreakers as Not Totally Evil,” “Chipbreaker-setting Trick” and “Chipbreakers: the No. 6 Way to Reduce Tear-out.”
Which brings us to the mouth of the tool. Like the chipbreaker, many woodworkers are torn about the role of the mouth. Should it be tight to control tear-out? Or does it have little control over tearing? I’ve worked a lot with the mouths of planes, and I am still on the fence.
When looking at electron microscope images of how wood fails when it is cut by a plane (yes, I need a life), it’s easy to see how a tight mouth might prevent tearing, which is when the shaving is lifted from the wood ahead of the cutting edge. However, I’ve used high-angle planes with wide-open mouths with great results.
The soles of smoothing planes need to be trued occasionally. They get dinged up and they need to be dead flat for best results. Here’s my dirt-cheap setup: belt sander paper (aluminum zirconia) stuck to a granite tile from the home center.
So what should you do? I don’t know. But here’s what I do: I close up the mouth as tight as I can and still keep the plane from clogging. Here’s my rationale: There is no downside to a tight mouth that doesn’t clog. So my mouth is .005″ wide, or a bit less.
That mouth size is ideal for clearing a shaving that is .002″ thick or thinner. Personally, I try to take the thickest shaving I can without the wood tearing. A .002″-thick shaving creates half the work than if your plane is set for a .001″-thick shaving.
However, if a .002″-thick shaving produces torn grain, I immediately back it off to see if that helps.
What about the sole of the tool? I think smoothing planes need to be flat. Even slight bumps in the sole interfere with your ability to take thin shavings consistently across the face of a board. The lucky thing is that smoothing planes are small and easier to true than any other bench plane.
Take this System and Run With it
A scrub plane (foreground) is a smoothing plane with the heart of a roughing plane. A panel plane is just a jack plane with the guts of a smoother.
Once you know what the length of a plane’s sole does to its performance, and once you know you have three basic setups to try, you can understand some planes that have vexed classification.
For example: the scrub plane. It’s the size of a smoothing plane but has a setup for removing material. What does this get you? A tool that is easier to push but doesn’t do as much to help straighten a board.
How about panel planes? These English tools are about 15″ long but they are used for fine work. In essence, they are jack planes with a smoothing plane setup. What does this get you? A tool that produces remarkably flat finished surfaces. The downside: You probably will have to take more passes with the tool to achieve those results.
And you can create your own combinations. If you build small boxes, you can set up a jack plane with a setup that emphasizes straightening the wood. That would be nice. If you need extremely accurate finished surfaces for applying moulding, you could set up a long jointer plane with a setup for preparing the wood for finishing. And if you have a lot of upper body strength, you could set up a long jointer plane to remove material. The end result would be flatter than usual.
Work the Three Surfaces
After traversing with the roughing plane I can see that I’m just following the crown of the board (top). So next I’ll plane out the middle using with-the-grain strokes to create a valley (bottom). Valleys are easy to traverse until they are flat.
So there are the three planes and three setups. It’s also convenient that there should be three surfaces to work: faces, edges and ends. Let’s begin with some tips on planing faces.
When dressing boards by hand, the first step is to plane a face flat. Secure the board on your bench. I like to start planing the heart side. In general, the heart side will be crowned in the middle and the bark side will be cupped. By putting the bark side against your benchtop you only have to shim between the board and benchtop if the wood is in wind.
Then prepare the board for traversing. Plane a quick chamfer on the far edge with a jack to reduce spelching (a.k.a. blow-out). Use the jack’s sole to check the board across its width. Look to see how cupped it is.
Now plane directly across the width of the board with your jack. See if you are removing wood from just the middle of the board’s width (which is desirable) or if you are following the crown. If you are following the crown you need to take out the middle, either with short, localized traversing strokes, or by planing with the grain right up the middle of the board. Aim to create a slight hollow or get it flat.
Now use winding sticks or a straightedge (positioned on each diagonal) to look for wind. Wind is when two corners are up and two corners are down. If the winding looks slight, you can move to the jointer plane. If it’s serious, correct the wind by working the high corners with a jack until the board reads flat with the winding sticks or straightedge.
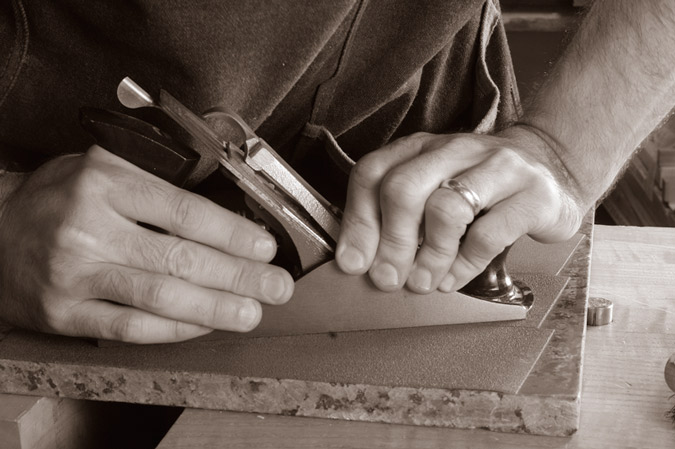
Here is the proper hand position for a jointer plane. The thumb goes right in front of the mouth. The fingers trail behind and act as a fence. Don’t grab the front knob while working edges.
Now use the jointer plane to work diagonally. Work diagonally one way, then the other to remove minor twisting. Keep working until you get consistent shavings from all points of the board. Check your work with a straightedge, the corner of the sole or winding sticks. The board should be quite flat now.
Work with the grain with the jointer plane if you like. Some people go right to the smoothing plane. This is a point of personal preference.
Finally, work with the grain with a smoothing plane. The shavings will begin as irregular. When they are regular and the board looks good, stop.
Planing the Edges
Plane one long edge dead square. Here’s how: Secure your work in the vise. Place the board so the interior face of the board (inside of the case, etc.) faces you. This is the reference (or datum) surface. It needs to be flat for joinery. Work with the grain. Choose your plane based on the condition of the board’s edge. If it’s really wavy and rough with a lot of hills, start with a jack. If it’s fairly consistent, start with the jointer.
I’m making a stopped shaving here. I’ll lift the plane up off the board when I reach the pencil mark. Hollowing out the middle of an edge makes it easier to get it straight.
To straighten the edge you need to hold the plane correctly. Your off-hand should serve as a fence. Your thumb goes on the plane’s body right in front of the mouth. Your fingers trail behind, against the work.
Try the edge with a straightedge (or a known straight edge such as the edge’s mate in a panel glue-up). Look for a hump or dip in the middle of the edge. With a hump, the straightedge will spin on the board’s edge. With a dip, the corners of the straightedge will drag. A slight hollow in the middle is OK (this is called a spring joint.) If you have a hump, remove it with localized strokes. Finish with a long pass along the entire edge.
You also can use “stopped shavings” to dress an edge. This is where you plane out the middle of the edge using stopped strokes (about 3″ in from either end). Work until the plane stops cutting. Then follow through with a stroke or two all the way along the edge to bring it into true. This is analogous to removing the middle of the face to create a slight cup, then removing the cup.
Curved edge in a Jointer
Now test the edge for truth with a try square. Place the stock of the try square against the reference face and look to see if the edge is perpendicular. Check every 12″ on long boards.
If the edge is out, you need to correct it. A curved iron can correct an edge by shifting the plane left or right on the edge of the board to remove the high edge. If you use a straight cutting edge, you can correct it with hand pressure. Lean over the high corner to remove it. Other woodworkers change the lateral adjustment of the tool. I haven’t as much luck with this technique.
With one edge and one face complete, use a panel gauge to scribe your finished width on the board. Use a jack on the opposite edge to get down near the scribe line. Then pick up the jointer and straighten it as per the above instructions.
To complete your work, scribe your finished thickness on all the edges and ends using a marking gauge. Flip to the bark side of the board and being by traversing with the jack again. You should be working on the cupped face, so this should be easier to get flat. Work with your jack until you almost hit your scribe line on your edges. Finish with the jointer and smoother like before.
Planing the Ends
Do you have a shooting board? If so, skip to the next step. If not, get your smoothing plane. Mark all the way around the board the finished length you desire. Saw to the line. Use a smoothing plane to work down to that line. To avoid spelching on the outfeed side, plane into that corner a few inches with stopped strokes. Then plane the other way. Work to the line.
On the shooting board, mass is your friend. Mass helps keep the plane in the cut and provides momentum to slice the end grain.
If you have a shooting board, use a jointer plane (or a dedicated shooting plane) to trim the ends. Here’s how: Mark the finished length you desire on the board. On the outfeed side, plane or chisel a small chamfer to stop spelching. Then plane the other direction until you work down to the line.
If you have a very irregular edge (in softer woods) you can start with a jack to remove most of the roughness. Then switch to the jointer plane.
Conclusion
So how do I use this system to choose the bench planes that I use? Well, I build pretty standard furniture – nothing too big or too minuscule. For my roughing plane, I use a vintage Stanley No. 5 that I picked up years ago for $12. For my jointer plane, I have a Lie-Nielsen No. 7 with a standard 45° frog; however, I’m considering purchasing a 50° frog for the tool.
And for my smoothing plane, I’m torn. My first love is a Stanley No. 603 Bed Rock. I love its small size, but the 45° pitch makes it suitable for mild woods only. I have a Lie-Nielsen No. 4 with a 50° frog. It’s a little bigger than I prefer, but the 50° frog is a real plus. And for woods that simply won’t behave, I have a Veritas Bevel-up Smoothing Plane that has a 62° pitch. With these three smoothing planes, I can solve any problem. I wish I could get by with only one smoothing plane, but I’m afraid that’s like eating only one potato chip: somewhat impossible. WM
 For all things handplane, get the revised edition of Christopher Schwarz’s “Handplane Essentials.”
Here are some supplies and tools we find essential in our everyday work around the shop. We may receive a commission from sales referred by our links; however, we have carefully selected these products for their usefulness and quality.