We may receive a commission when you use our affiliate links. However, this does not impact our recommendations.

The larger picture above is my Shaker Hanging Shelf design. Here you can see my Whale Tail Shelf design. My construction drawings offer details on building both designs.
These shelves are quite popular with my two best customers: my wife and my daughter. We have them hanging in several rooms of our farmhouse where they hold plates and knickknacks.
Not surprisingly, these shelves are also popular with my paying customers. While many of them may dream of buying a custom corner cupboard, sometimes what they can best afford are the hanging shelves. So these small projects make everyone happy.
For the home woodworker, these shelves are a home run. These two traditional designs look great in most homes, and the woodworking part is so simple that almost anyone should be able to build these in a weekend.
Patterns and Dados
Both of these shelves are built using the same techniques and joints. The only significant difference is that the Shaker-style unit has three shelves and the 18th century “Whale Tail” project has four shelves and a more ornate profile that looks vaguely like a whale’s tail. To me, it looks more like a goose.
Begin your project by selecting your lumber and planing it down to 1/2″ thick. Using the supplied patterns and the construction drawings, draw the profile on your side pieces and mark where the dados should go.
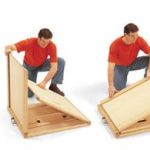
Now set up your dado stack in your table saw so it makes a 1/2″-wide cut that’s 3/16″ deep. As you can see in the photo, I made this cut using only the fence. I feel real comfortable with this cut; but if you’re not, I recommend you use your miter gauge and a stop block attached to your fence to guide the work instead.
Cut the dados and then head for the band saw.
Cutting the Details
I use a band saw to shape the sides. Begin by making several “relief” cuts along the profile of your side. These allow you to remove the waste in chunks so your blade and workpiece are easier to maneuver through the cut.
Once you’ve completed both sides, sand the edges using a drum sander that’s chucked into your drill press. I recommend you tape the two sides together using double-sided tape and sand them simultaneously. It’s faster and the sides end up identical.
Once that’s complete, fit the shelves and sides together for a dry fit. Notice anything? The square edges of the shelves don’t match the sides exactly.
Mark the shape of the sides onto the end of the shelves. Now, using a jointer with the fence beveled (or a hand plane), shape the front edge to match the side. You just want to get in the ballpark; sanding can take care of the rest of the contouring job.
Now cut the plate rail groove in the shelves. I used a router bit with a core box profile and a router table. The plate rail is 1/8″ deep and 1-5/8″ in from the back edge.
Before you assemble the unit, finish sand all the surfaces except the outside of the sides. Begin with 100-grit sandpaper and work your way up to 120, 150 and finish with 180.
Assembly and Finishing
Put a small bead of glue in each dado and put the shelves in place. Clamp the shelves between the sides and check your project to make sure it’s square by measuring diagonally from corner to corner. If the measurements are equal, nail the sides to the shelves using a few 18-gauge brads.
If your measurements aren’t equal, clamp the project diagonally from one corner to another. Clamp across the two corners that produced the longest measurement. Apply a little pressure to those corners and keep checking your diagonal measurements. When they are equal, nail the project together.
After an hour, take the project out of the clamps and sand the outside of the side pieces and putty your nail holes. Ease all the sharp edges of the project using 120-grit sandpaper. I dyed my project using a water-based aniline dye that I mixed myself from several custom colors. I recommend you use J. E. Moser’s Golden Amber Maple dye for a similar effect. It’s available from Woodworker’s Supply.
Finally, add a couple coats of your favorite top-coat finish and sand between coats. Hang your shelf using some common picture hooks, available at any home center or from the source listed in the box below. PW
Click here to download the PDF for this article.
Troy Sexton is a contributing editor for Popular Woodworking.
Here are some supplies and tools we find essential in our everyday work around the shop. We may receive a commission from sales referred by our links; however, we have carefully selected these products for their usefulness and quality.