We may receive a commission when you use our affiliate links. However, this does not impact our recommendations.
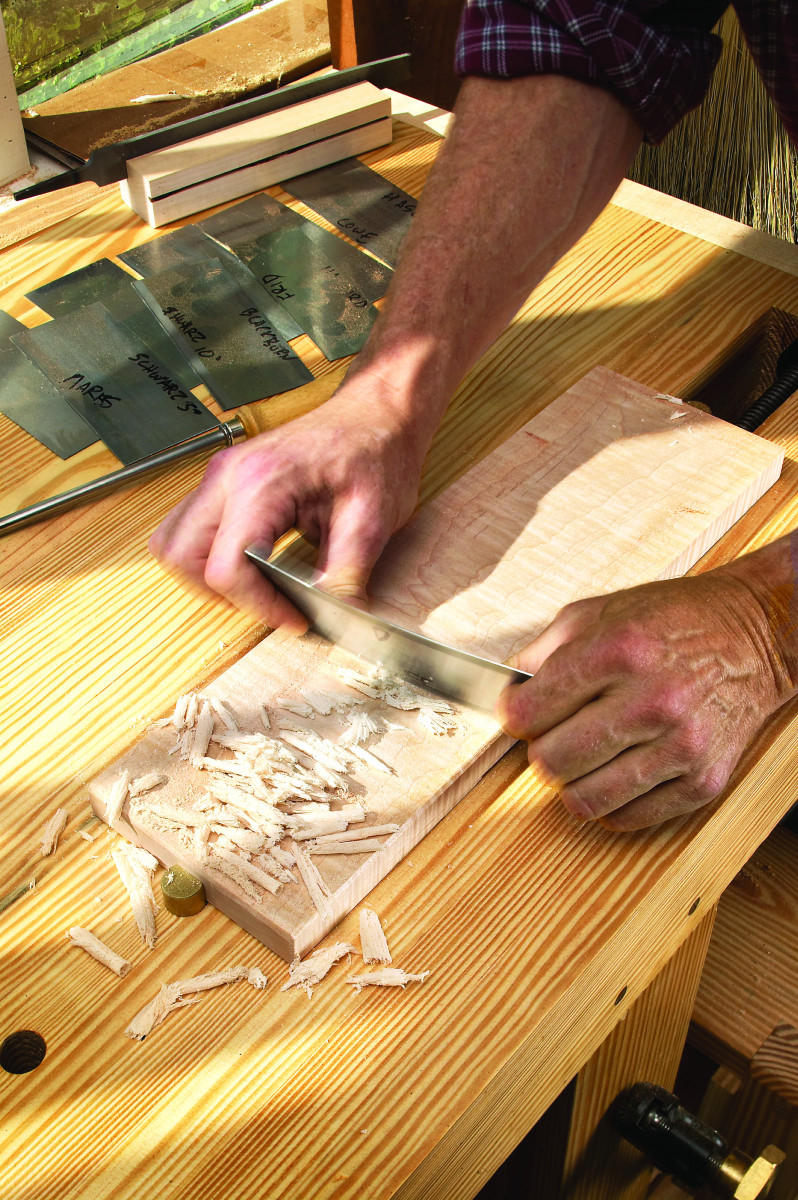
We compared 14 methods to find the fastest way to prepare this useful tool.
Editor’s note: this article originally appeared in the February 2007 issue of Popular Woodworking
Scrapers are one of the most misunderstood but useful tools in a woodshop. A scraper in its basic form is simply a piece of hardened steel with a small hook that is created by pressing on the tool’s edge with an even harder rod of steel. This tool is capable of making tear-out free cuts in hardwoods that no plane can manage.
But how to sharpen a scraper is a mysterious or confusing process for many woodworkers. One reason for the confusion is that there are many different published techniques out there, many of them offering conflicting advice.
So I compiled a list of 14 different techniques for sharpening this rectangle of steel that have been published since 1875. All of the 14 techniques basically agree that there are three steps to sharpening a scraper: Filing the edge of the tool, removing the file marks with a sharpening stone and then creating the hook (sometimes called the burr) with a hardened rod of steel, usually called a burnisher.
But none of the accounts agree on the details. Should you file the edge of the scraper with the file parallel to the edge or at an angle (and if so, what angle)? What kind of file should you use? Should you stone both the edge and faces of the tool? To what grit? And how should this be done?
Do you have to burnish the faces of the tool before turning the burr of the scraper? If you do, what angle do you use? And how should you burnish the edge to create the hook? At what angle? Do you slide the burnisher along the edge as you turn the burr?
So one weekend I tried all these techniques then compared the results. I used high-quality scrapers from Lee Valley, Bahco (formerly Sandvik) and Lie-Nielsen. All of the published techniques basically worked and created a tool that made shavings. Yet some techniques were faster, some required fewer hand skills to master and some made a hook that really grabbed the work.
After trying these techniques, applying my own training and talking to an expert on steel tooling, I think I’ve found a 15th way to sharpen the tool that doesn’t require a lot of equipment, and is fast and is easy for beginners.
Like Any Tool’s Edge
What’s important to understand is that a scraper is like any cutting tool and it responds to your sharpening efforts in the same, predictable way.
A sharp edge is the intersection of two steel surfaces (in a chisel, it’s the bevel and the face, which is sometimes called the back of the tool). Any cutting edge is at its sharpest when these two surfaces meet at the smallest point possible.
The edge becomes more durable as it gets more polished by higher grits. Polishing removes tiny scratches in the steel, and scratches are the places where the edge begins to break down and become dull.
A harder steel can also contribute to a more long-lasting edge. However, if it is too hard it can be fragile and susceptible to shock.
All these rules apply to scrapers. The cutting edge of a scraper is two surfaces: the edge and the face. The more polished those two surfaces are, the more durable and sharp the edge is. So with that principle in mind, here’s the thinking behind my scraper-sharpening technique.
Step 1: File the Edge
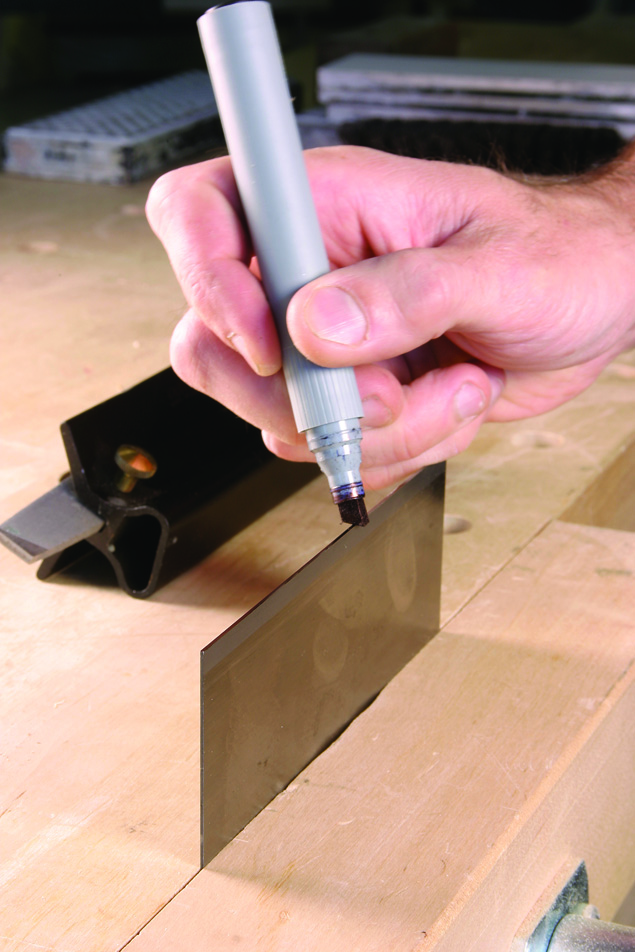
A permanent marker will help you determine if you have filed the edge sufficiently. Once the color has been removed, you are ready to stone the edge of the scraper.
The edge of the card scraper should be filed square to the tool’s faces (all the sources agree on this). You should use a fine file. Look for one with single rows of parallel teeth (this is called a single-cut file) and teeth that are fine, usually labeled “second cut” or “smooth.” Scrapers are soft and easy to file, so a coarse file will create deep scratches that are difficult to remove.
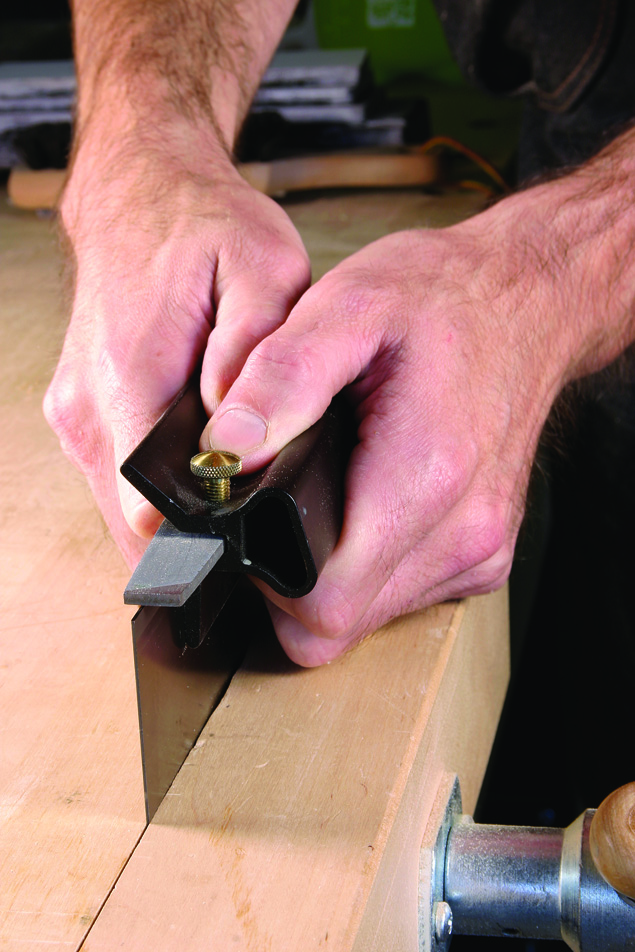
Two or three passes with a file is usually all it takes. Use only a push stroke with a file and use the fingers of both hands to keep your filing jig’s fence flat against the scraper.
Color the edge of the tool with a permanent marker. This will allow you to see where you are cutting. When the color is gone, the filing is done.
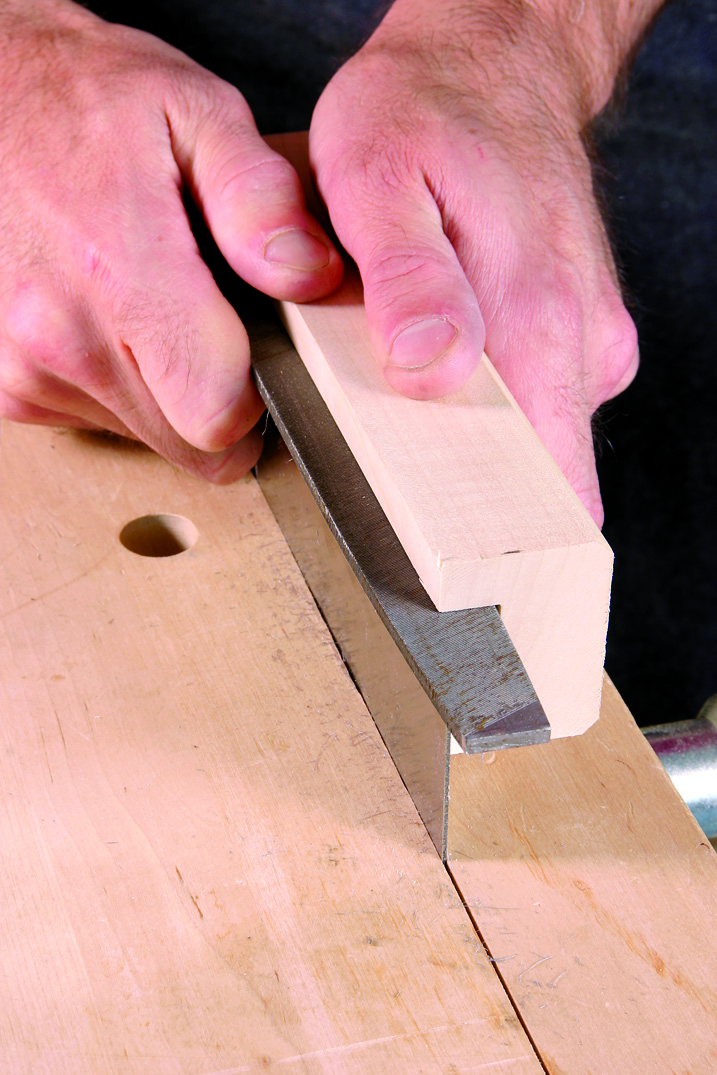
You can make a perfectly good filing jig from a scrap of hardwood as shown here. Cut a kerf in the block that allows the file to be held with a firm friction fit.
How you hold the file in use is in dispute. You can work with the file parallel to the edge, perpendicular to the edge or anywhere in between. All can result in a square edge, but there is only one technique that gives perfect results every time regardless of your skill with filing: Use a jig, either commercial or shopmade.
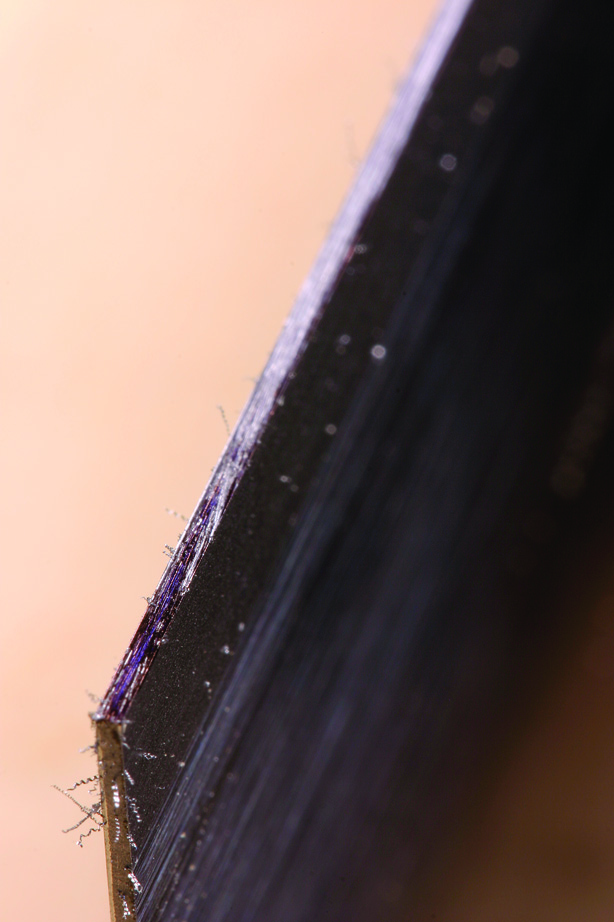
After two strokes with the file, the color is almost gone from the edge.
Veritas makes an inexpensive jig that I like. You also can purchase a vintage saw jointer, which was used to file handsaw teeth down for reshaping. Or you can cut a kerf in a block of wood to hold your file. Freehand filing is great if you are skilled at it. Most of us are not, so I recommend a jig.
Step 2: Stone the Tool
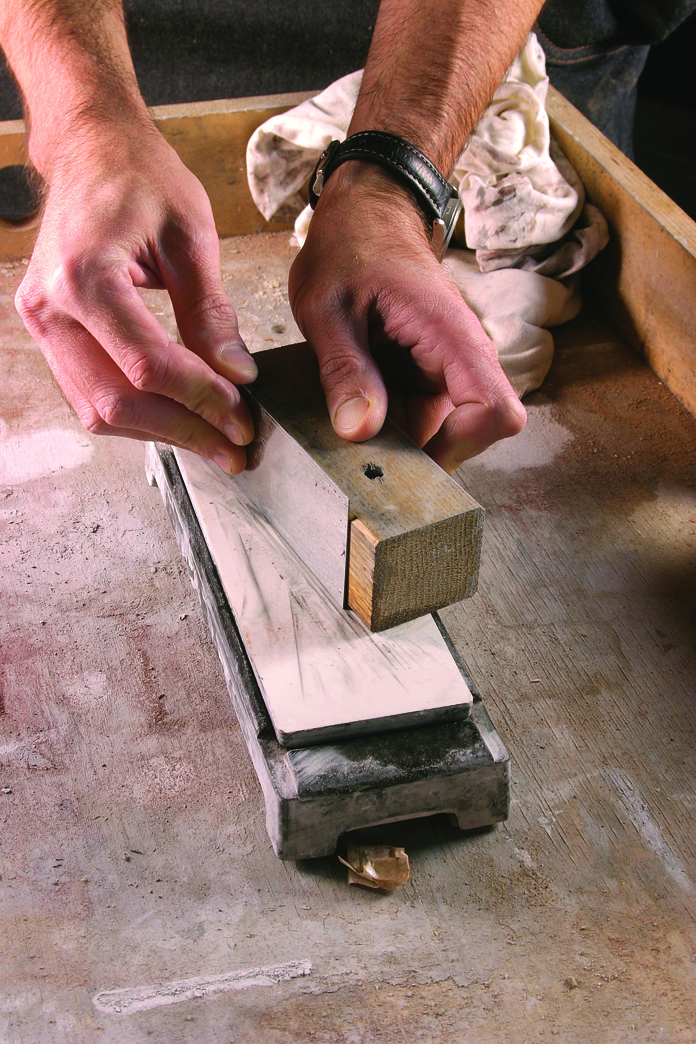
There are many ways to stone an edge. This “2″ x 2″ x 5″ block is what I prefer. You can move the block as you rub the scraper against the stone, which spreads the wear out on your stone. Alternately, with thick waterstones you can use the side of the stone and support the scraper with a block of wood.
After filing, you smooth away those scratches with a sharpening stone or two. Some sources say you have to stone only the narrow edge of the scraper. Others say you stone both the edge and the faces. Because we now know that a good edge is the intersection of two polished surfaces, you should stone both the edge and face.
How do you stone the edge? You can rub the tool on edge on your stone, but this can make it difficult to balance the tool. Some published accounts recommend sandwiching the scraper between two blocks of wood for additional support, but you’ll usually end up abrading the wooden blocks more than the tool.
Alternately, you can bow the scraper as you rub it on the stone to spread the edge out over more of the surface. This works well with flexible scrapers but is quite difficult with the thicker ones.
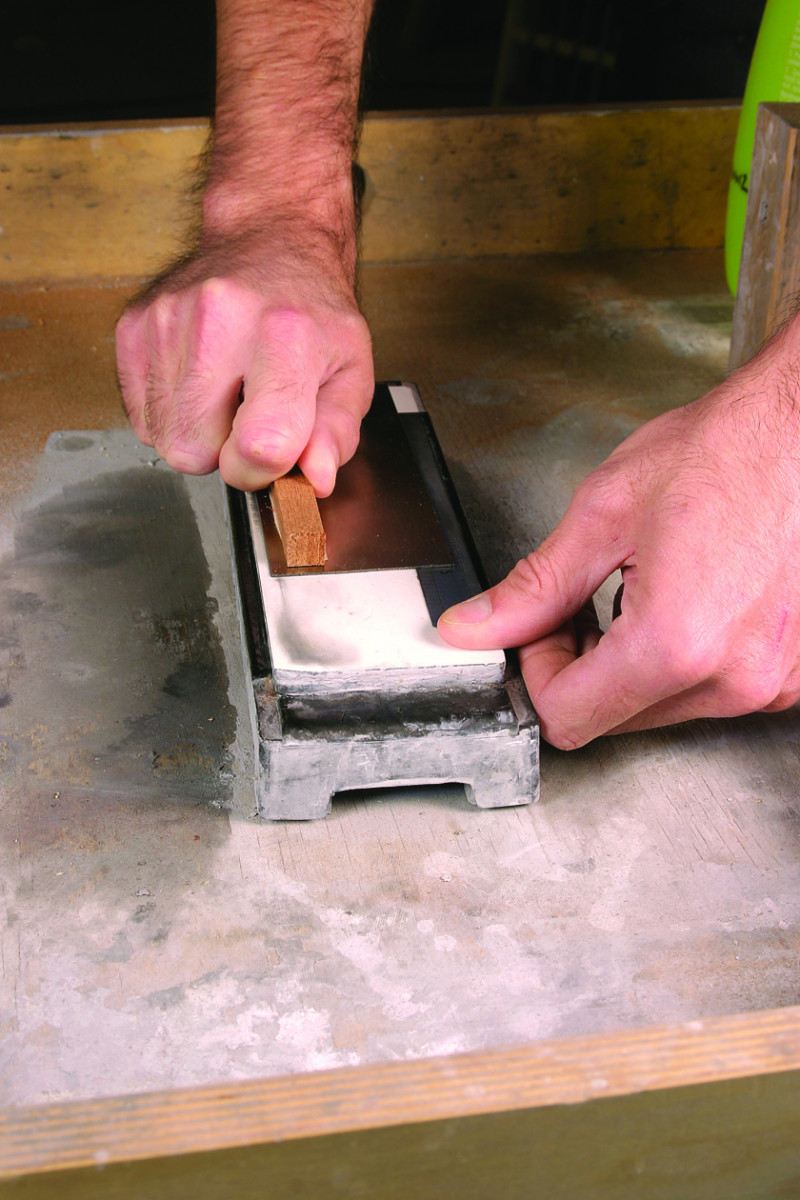
Hold the ruler with one thumb or it will slide. Use your other hand to stroke the edge against the stone. The wood block improves control.
Instead, I like to hone the edge of the scraper on the sharpening stone with a single block of wood supporting it from the side. I’ll sharpen on the face of the stone as shown at right. This is foolproof and allows you to spread the wear out across the stone’s face by moving the block of wood.
With the edge stoned, how do you stone the two faces of the tool? Here is where the real trickery begins. Every other technique that discusses this has you rub the face of the tool to and fro on the stone. This works, but it takes a while. The face of a scraper is a lot of steel to deal with. Most woodworkers do what they can on the faces and give up when they get bored. And that doesn’t cut it.
Why sharpen a bunch of steel you aren’t using? So I took a page from the playbook of David Charlesworth, a British craftsman. He sharpens the unbeveled face of a plane iron by propping up the back of the tool on a thin ruler set on the stone. This technique, called the ruler trick, sharpens only the section of steel up by the cutting edge.
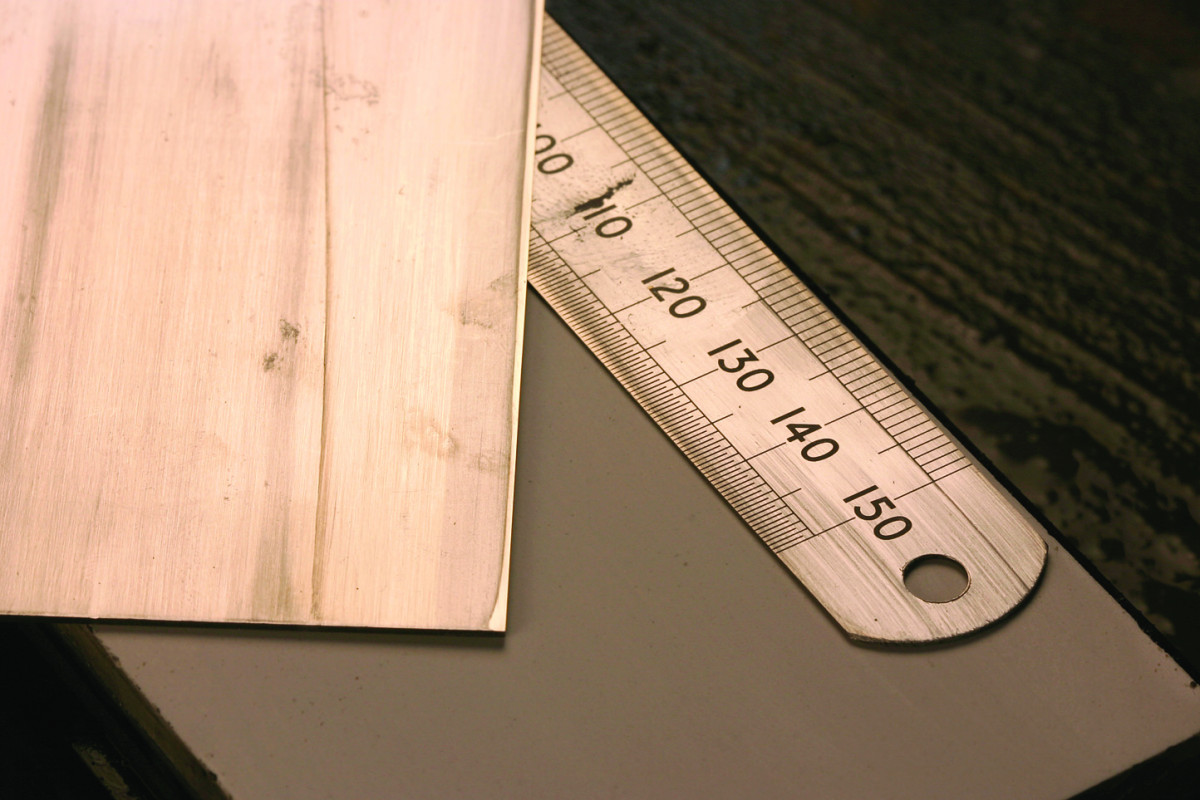
The ruler trick sharpens the scraper only at its cutting edge, saving much time and effort.
Would this work with card scrapers, I wondered? It does. And brilliantly. You sharpen only the metal up by the edge. It takes far fewer strokes. And the slight change in edge geometry has no discernible effect on the final cutting edge. Thanks David.
The other question is what grit of stones you should use. This is honestly up to you. The more polished the edge, the more durable it will be in use.
I start by marking the face with a permanent marker. First work the tool with a coarse stone, such as a #1,000-grit waterstone. Then go directly to any fine polishing stone, such as #4,000, #6,000 or #8,000 grit. Oilstones or sandpaper are fine options as well. To improve your grip on the tool, you can affix a strip of 1⁄4” x 1⁄4” x 6″ scrap to the scraper with double-stick tape. Or spread a thin layer of silicone rubber on the strip of wood and let it cure. The cured silicone makes the wood grippy (as long as it doesn’t get wet).
Step 3: Burnish the Tool
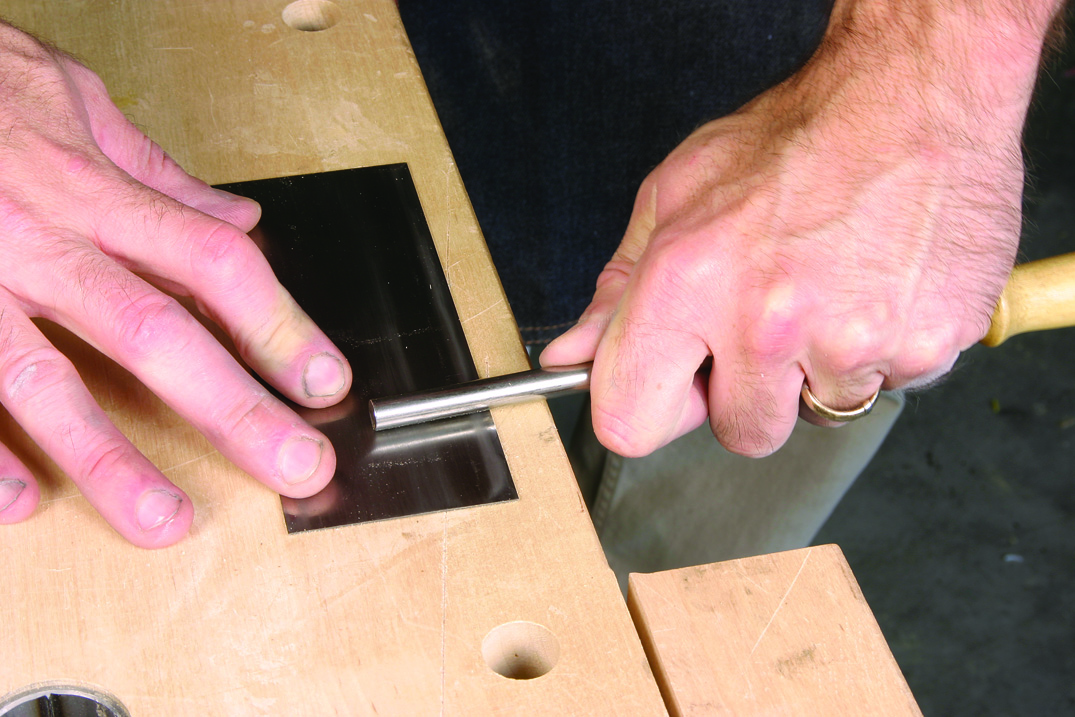
Rub your burnisher flat against the scraper five or six times. This work-hardens and consolidates the material. And it draws out the steel at the edge, making it easy to turn the hook.
Of the 14 scraper-sharpening techniques I tried, eight recommended burnishing the flat face of the scraper before burnishing the edge to turn the hook/burr. The explanations for why you burnish the flat face of the tool were varied: To soften the metal, to harden the metal, to consolidate the metal, or to warp the metal over the edge so you can turn it into a burr.
So I did what any mind-muddled journalist does: I called an expert. Ron Hock runs Hock Tools and sells a wide variety of replacement plane irons.
Here’s what Hock concluded: Burnishing the flat face of a card scraper does two things: It work-hardens the metal by compressing the crystal structure of the steel. The burnisher is harder than the scraper. Burnishers will typically be of a Rockwell hardness (Rc) of 58 to 60. Modern scrapers are typically Rc 48 to 53. The harder burnisher will compress the steel of the softer scraper, making the steel harder and probably more durable in use. Burnishing the face is especially useful with old scrapers, which have a Rockwell hardness that is lower, more like in the mid-40s, Hock said. (Scrapers were typically made from old saw blades in the early days.)
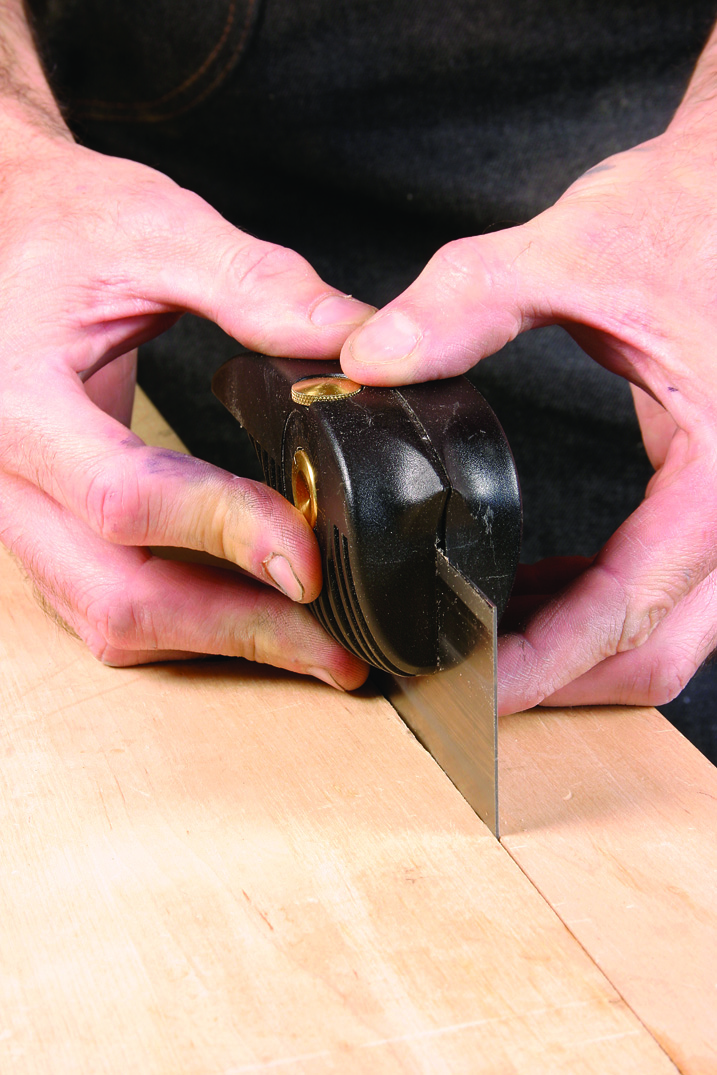
A jig such as the Veritas Variable Burnisher allows you to turn a hook with little chance for error. If you are having difficulty with burnishing freehand, this is an excellent option.
The other thing that the burnisher does is to draw the steel off of the face of the scraper. Essentially, it moves the metal so the steel makes a small point where the face meets the edge. Why is this important? It makes the scraper’s burr much easier to turn when you burnish the edge of the tool. You can turn the burr in fewer strokes and without much downward pressure on the tool.
Hock’s points about steel fit in perfectly with my experience during the 13 years I’ve sharpened card scrapers. Must you burnish the face to get a burr? No. But if you don’t burnish the face, the burr is more difficult to turn, and you must use more pressure or more strokes. Using more strokes or pressure can introduce error and create an irregular burr.
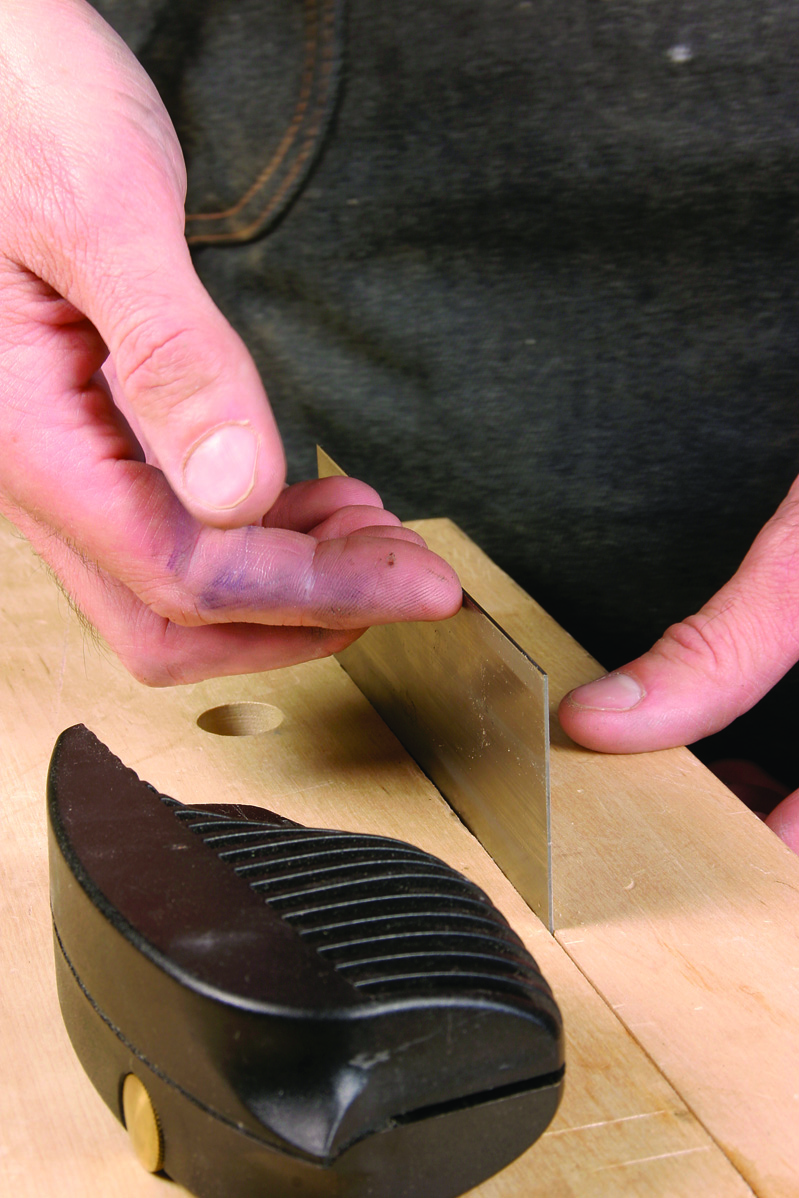
After three passes with the burnisher using mild downward pressure, feel the edge for a hook as shown. It should feel like a tiny lip that your fingernail could almost grab.
Point two: Burnishing the face creates (in my experience) a burr that lasts longer. Hock suggests that this is because the steel has been work-hardened by the burnisher before turning.
Once you burnish the face, you have to turn the hook with the burnisher by running the burnisher across the edge. Like with all things with card scrapers, there is debate. At what angle should the burnisher be held against the edge: 0°, 5°, 10°, 15°?
Should you use light pressure? Heavy pressure? How many times should you draw the burnisher across the edge? Some accounts say you burnish first at 0° and then burnish again at a slight angle. (I’ve done it this way for years. It works, but so does skipping the step. See what works for you.)
I have always been stymied by the question of the final hook angle, so I tried a little experiment and prepared a scraper with four different hooks (5°, 7°, 10° and 15°) made using the Veritas Variable Burnisher. Then I gave the scraper to Senior Editor Bob Lang and asked him to use it as I watched, and we then discussed the different working characteristics of the four hooks.
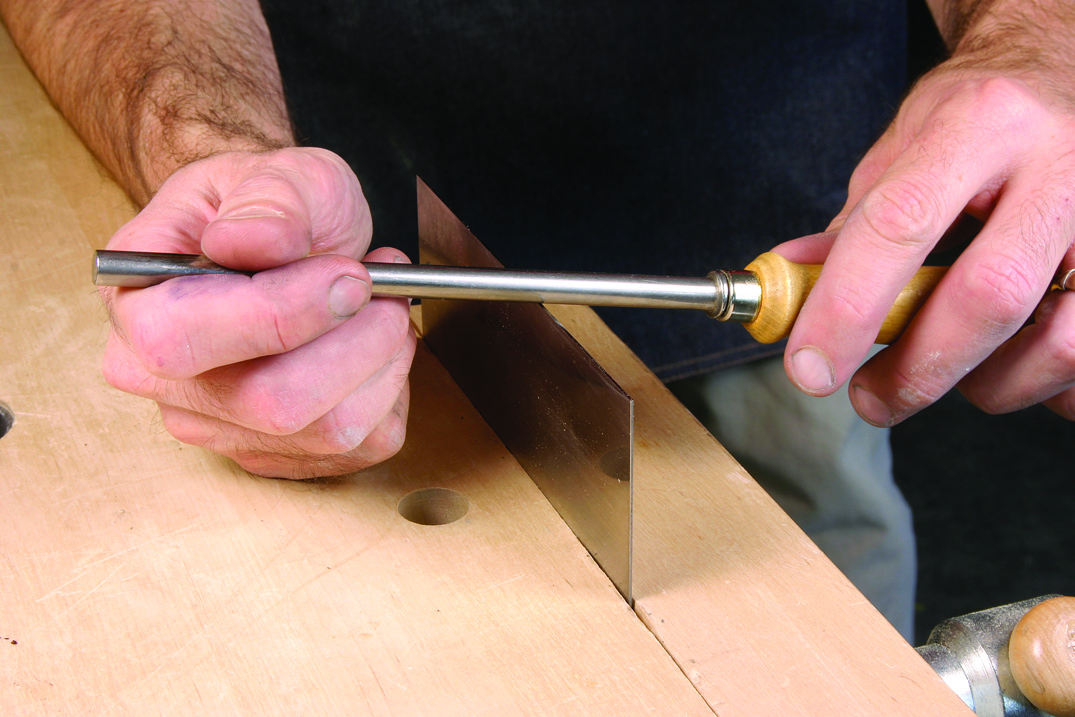
Burnishing freehand is tricky for some and a cakewalk for others. Here’s a tip: Rest one hand on the bench to control the angle of burnishing. Use the other hand to draw the burnisher along the edge of the scraper. This usually helps increase your control.
The conventional wisdom is that the steeper the hook, the more aggressive the tool (15° is supposed to be for removing paint; 0° is supposed to be for marquetry). But the truth is, we could get excellent results with all the edges. You could get the wispiest shavings with a 15° hook if you used light pressure. In fact, the only scraper that seemed to perform significantly different is one that I prepared with no hook. That one took only light shavings.
So how much pressure should you use when burnishing? I use pressure that is similar to when you “spread butter on bread,” an apt description by woodworking author Graham Blackburn.
Should you use one stoke? Two strokes? More? I stroke the edge until I can feel a burr. Then I stop. This takes two or three strokes.
I again recommend a jig for the burnishing, especially if you’re a beginner or aren’t able to stay in practice with your burnishing. I’d never used a jig until a couple years ago, and I’d never had problems with freehand burnishing either (but I sharpen a lot). The jig gives you speed and consistency. You don’t have to think about it, you just do it. And errors are rare.
Most sources recommend adding a drop of oil to the edge before burnishing to prevent galling. What’s galling? That’s when you force metal parts together (screw threads are a common example) and there is so much friction that the high points heat up and cause tiny welds on the high points that then break off, making the corner feel rough. I’ve done this, but I had to try to do it to make it happen. I oil the edge because it makes the burnisher slide sweetly.
Using the Scraper
To begin scraping, I flex the card scraper just a bit at the center and hold it at a angle to the work that’s usually between 60° to 65° to the surface. I adjust my wrists until the scraper starts to cut shavings. If you are getting dust instead, adjust your angle first. Then check your hook to see if it is still there. A hook feels like a lip on the edge.
Scrapers are great for removing tear-out, but you do have to be careful not to create a depression that will show up after finishing. When you work a small area, it’s best to then blend in that low spot with the area around by working the wood around your problem area with the scraper as well.
Scrapers are subtle tools and are capable of a great number of tasks. In fact, there are even more uses for a scraper than there are ways to sharpen it – and that’s saying something.
Suggested Supplies
Lee Valley
Lie-Nielsen Toolworks
Woodcraft
Here are some supplies and tools we find essential in our everyday work around the shop. We may receive a commission from sales referred by our links; however, we have carefully selected these products for their usefulness and quality.


