We may receive a commission when you use our affiliate links. However, this does not impact our recommendations.
Zero-Clearance Inserts
Make ‘em by the bunch and you’ll save a bundle.
By Tim Johnson
Zero-clearance throat inserts are the best simple upgrade you can make to your table saw. They’ll make your saw safer and give you better cutting results with less hassle. A zero-clearance insert minimizes the size of the blade opening. Raising the blade through the specially made insert blank reduces the opening to the exact size of the blade’s kerf.
When you see the difference that zero clearance makes, you’ll want to have a dedicated insert for each sawing operation you do—regular cuts, thin kerf cuts, dado cuts (one for each width!) and even angled cuts. Keep extra blanks on hand, and you’re always ready to replace a worn-out insert. (With repeated use, the zero-clearance slots get wider and less effective).
Don’t let the low cost fool you. These $5 inserts are stable and flat, with dense cores and durable surfaces. Like the $20 commercial versions, they can be leveled and adjusted for a perfect fit. They include retaining pins to keep them in place and finger holes so they’re easy to remove.
Our inserts for ripping and crosscutting are designed to be used with your saw’s splitter and blade guard. Store-bought blanks lack this important safety feature. A $50 investment buys enough material to make nine blanks—enough to last you a long time.
Zero Clearance All the Time
We’ve tailored these inserts for three different sawing operations. Inserts for ripping and crosscutting have dadoes underneath to accommodate 10″ diameter blades. They also have slots for the splitter and blade guard assembly. Inserts for bevel cuts have even wider dadoes underneath. Inserts for dadoes have no alterations and are the easiest to make.
These 3-3/4″ wide inserts fit the throat openings in most contractor’s and cabinet saws, but are too thick to use with benchtop saws. Measure your saw before you begin, to make sure the width is correct. Besides your table saw, the only other tools you’ll need are a drill press, an edge-guide-equipped router and a hand-held drill.
Better than Store-Bought
Aftermarket insert blanks are available for about $20 apiece. If you make them yourself, they’ll cost less than $5 each. The trick is to make a bunch of them at once.
At a full-service lumberyard, buy one 25″ x 48″ sheet of plastic laminate and one 4×8 sheet of tempered hardboard. You’ll only need a 2×4 section of tempered hardboard, but most lumberyards only sell it as full sheets. Tempered hardboard is more dense and much stiffer than regular hardboard, so it makes better core material for the inserts. You’ll also need carpenter’s wood glue, a box of 1/2″ 6-32 flat-head (Phillips) machine screws and a couple of 8″ x 16″ concrete blocks.
Throat-Plate Woes
The throat plate, or insert, that came with your saw is fine for general work, but it does create some problems.
This offcuts get stuck, forcing you to stop everything to remove them.The stock throat plate has a wide opening because it’s designed for both angled and vertical cuts.
The bottom edge tears out, especially when you crosscut plywood, because the stock throat plate’s wide slot leaves it unsupported.
Kickback potential. Stock one-size-fits-all throat plates for cutting dadoes have enormous openings that make it impossible to process short or narrow pieces.
Zero-Clearance Solution
Zero-clearance inserts improve cut quality and make your saw safer to use.
Zero-clearance slots are no wider than the blade, so off- cuts can’t get stuck and tear-out is dramatically reduced. Another benefit:You can use the saw kerf to line up your cuts.
Zero-clearance is safer A perfectly sized opening won’t allow the workpiece to sag, catch and kick back.
Four-Ply Construction
Cut both the hardboard and plastic laminate into nine pieces, all 15-7/8″ long. Keep the hardboard pieces as wide as possible at 7-7/8″ Cut the plastic laminate pieces 8-1/4″ wide (Fig. A).
Stack the pieces in four four-layer sandwiches. You’ll have single leftover pieces of hardboard and plastic laminate. Cut these two pieces in half, lengthwise, and stack the four pieces to make a single “half-sandwich.” Before gluing, scuff-sand both faces of the hardboard pieces. This quick sanding flattens any ridges and dulls the shiny surfaces so the glue will adhere.
While gluing each four-layer sandwiched blank, keep the hardboard cores centered inside the edges of the plastic laminate. Use cauls and concrete blocks as clamps.
1. Laminate the blanks on the flattest surface in your shop. After scuff-sanding the hardboard, carefully stack the four pieces, spreading glue on all the interior surfaces as you go. Press the stack under cement blocks, making sure the pieces stay aligned.
After gluing, cut each blank in half to yield two blanks that are the same width as your saw’s stock metal throat plate. The plastic-laminate faces are wide enough to give you a little cushion, but you won’t have much left over, because most throat plates are 3-3/4-in. wide. Trim the single half-sandwich blank to the same width. Square the ends of all nine blanks, leaving them slightly long.
2. Saw the blanks in half. Then trim each half-sized blank to the same width as your saw’s stock throat plate.
A “master” insert blank serves as a setup tool and routing template for making a pile of inserts all at once.
Dedicate one insert as a template for routing your blanks to size. Use the same blank as a setup tool, by recording layout marks on it Fig. B). Every insert has four holes for the leveling screws and a finger hole. Inserts for use with a 10-in. blade require clearance dadoes and splitter slots.
Once you’ve routed both ends of the master insert, test-fit it in your saw. It should drop in easily, with just a bit of front-to-back and side-to-side play.
3. Trace the stock throat plate’s profile, including the blade and splitter slots, while holding it centered on a blank and flush at the front.Then mark the locations of the leveling
screws.
4. Locate the blade-clearance dado, splitter slot and finger hole on the master blank, using your measurements from Fig. B. Measurement “X” indicates the centerline of the blade clearance dado and splitter slot.“Y” allows you to mark the dado’s start and stop locations, which extend 2-in. fore and 3-in. aft.“Y” also locates the finger hole.
5. Rout the master blank, using the stock metal throat plate as a pattern. Hold them together with double-faced tape and clamp them securely to your bench before routing. Avoid the retaining pin and slot. After routing the front, pull the stock insert off, flip it end-for-end and remount it. Use the smooth front end of the stock insert to rout both ends of your master blank.
Anatomy of a general-use insert. This is a view of the bottom of a basic insert, showing the blade clearance dado, which allows the insert to clear the blade when it is fully lowered, two sets of screws for making the insert flush with the table and snugly fitting in the saw, a slot for the splitter, and a retaining pin, which anchors the insert in the throat.
Inserts for Everyday Use
The vast majority of table saw cuts employ a standard 10-in. blade set at 90 degrees. Making zero-clearance inserts for this setup is relatively simple.
All marks are made on the bottom side of the blank. Mark all your blanks, so you don’t get confused and drill or rout on the wrong side. Drilling a bunch of blanks is easier if you equip your drill press with a fence and stop blocks. If you have a plunge router, you don’t have to drill start and stop holes for the clearance dado. Countersink the 3/32-in.-diameter holes for the leveling screws a bit at the bottom and halfway through from the top. Drill the 3/4-in.-diameter finger hole from both sides, too, to keep it from blowing out.
Rout the clearance dado. The start hole is oversized, so you can turn the router on after it’s in place.
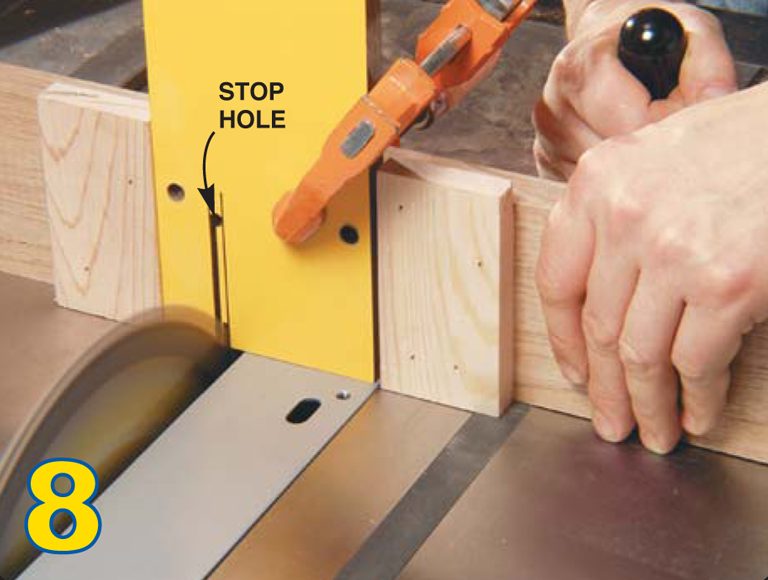
To saw the splitter slot, set the blade height at the center of the stop hole and use guidelines drawn from the hole’s edges to locate the stop blocks.
6. Drill start and stop holes for routing the clearance dado. Drill the smaller stop hole for the splitter slot from the same fence setting, and go all the way through.
7. Rout clearance dadoes using an edge guide. Center the bit on the guideline.
8. Saw the splitter slots, using stop blocks pinned to an auxiliary fence.
Most stock inserts have a retaining pin in the back. Installing wooden pins is simple.
Adjustment screws added to the side and front of each insert allow you to remove virtually all of the side-to-side and front-to-back play. After removing the play and leveling the insert, you’re ready to cut the zero-clearance kerf.
9. Install retaining pins to keep the inserts from lifting out of the throat. Glue a piece of maple into a saw kerf, using the pin on your stock insert for location. Plane or sand it flush.
10. Clamp the edge while drilling holes for the adjustment screws, or you may split the hardboard core.
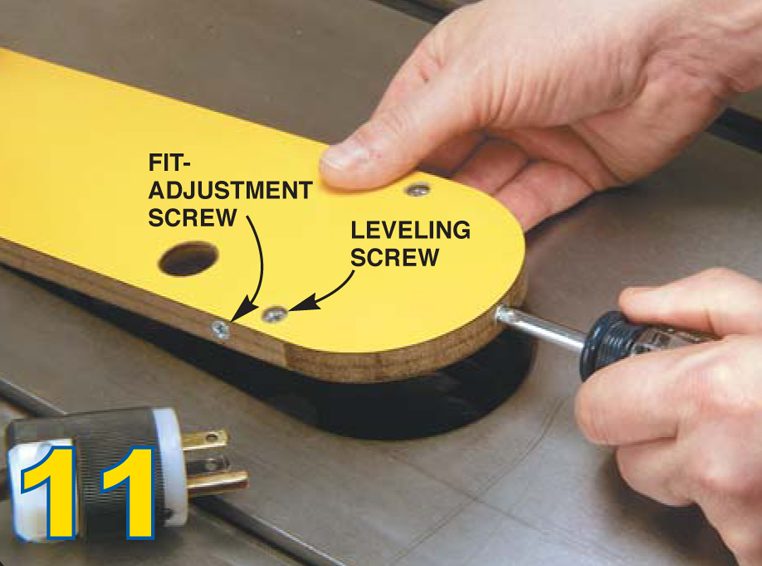
11. Get a perfect fit from side-to-side and front-to-back with edge-mounted adjustment screws, two on the side and one at the front. Countersunk leveling screws keep the insert flush to the table surface.
12. Hold the insert in place when you raise the blade. Clamp a board to the fence, flush to the insert and positioned so only the blade’s outer face is exposed. Lock the fence, start
the saw and raise the blade to the desired height.
Modifications for a Shallow Throat
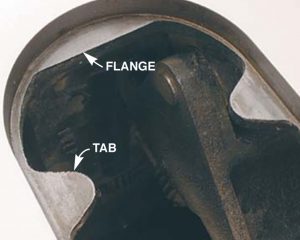
Some table saws have thin throat plates, which require simple modifications to the inserts we show.To tell if your saw requires shallow inserts, measure its throat recess (Fig. D). If the depth is less than 1/2 in., you’ll have to make your inserts thinner. Rabbeting the edges is the quickest way, although you could also drill recesses for the tabs with a Forstner bit. Make the rabbets slightly wider than the length of the tabs.You may have to use shorter adjustment screws, depending on the depth of the throat recess.
Figures
Fig. A: Cutting Diagram for Laminated Blank Stock (makes 9 inserts)
Fig. B: Measure the Blade Location
Measure from the edge of the throat opening to the center of the blade (X). Then measure from the center of the saw arbor to the front of the opening (Y).
Fig. C: Inserts Require a Clearance Dado
Inserts require a clearance dado underneath because a 10-in. blade only barely retracts below the table. Measure the distance “Z,” and use it when cutting the clearance dado in the bottom of the insert.
Fig. D: Determine the Throat’s Recess By Measuring from the Tabs
This story originally appeared in American Woodworker September 2002, issue #95.
Popularwoodworking.com is a participant in the Amazon Services LLC Associates Program, an affiliate advertising program designed to provide a means for sites to earn advertising fees by advertising and linking to Amazon.com and affiliated websites.
Here are some supplies and tools we find essential in our everyday work around the shop. We may receive a commission from sales referred by our links; however, we have carefully selected these products for their usefulness and quality.


The tempered hardboard at the big box stores is actually 3/16″. Where do you find actual 1/4″ tempered hardboard?