


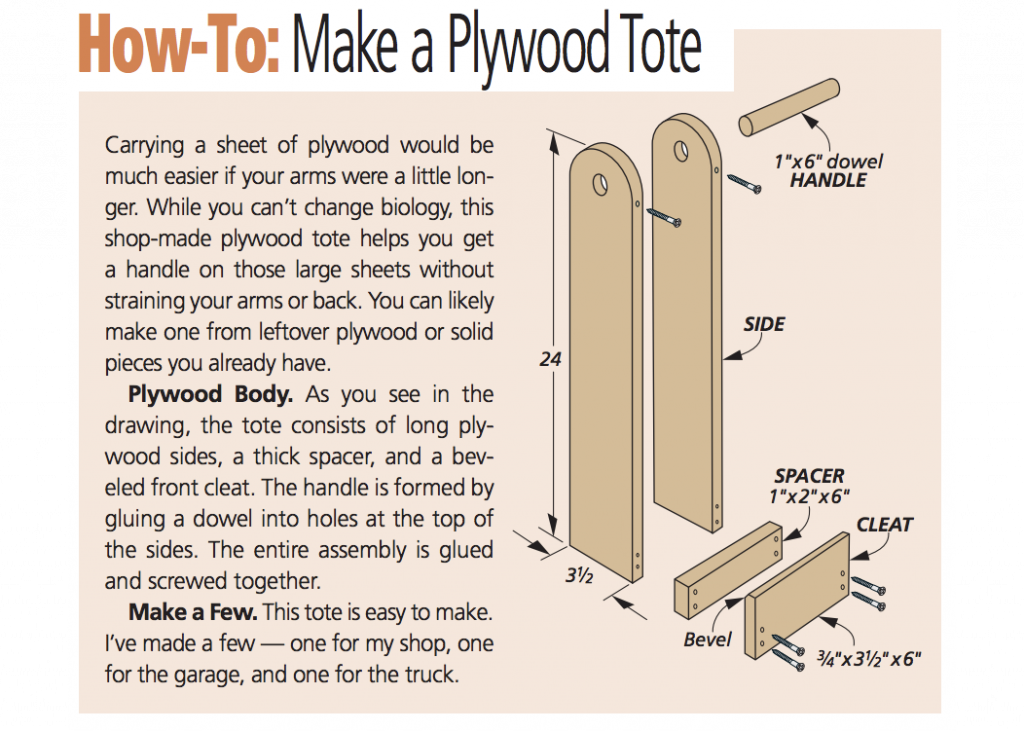
We may receive a commission when you use our affiliate links. However, this does not impact our recommendations.
Article sponsored by Woodpeckers.
![]()
Working with plywood is always an adventure. The large size of the sheets isn’t easy to handle in my small shop. This means that I’m often left wrestling these sheets in the garage and breaking them down there. But, just because you’re working with large sheets doesn’t mean that you have to sacrifice accuracy. By following some simple steps, you can ensure that handling and working with large sheets is easy and enjoyable.
Accurate Layout
Before we talk about what steps you can take for accurate plywood parts, you have to get the plywood into your shop or garage. For a simple shop-made tool to help you manage the large sheets, take a look at photo above and the box below.
Cutting accurate parts, especially out of sheet goods, starts with a good foundation. And here, that foundation consists of accurate layout lines.
No matter how talented a woodworker you are, your layout lines are only as accurate as your layout tools. Investing in a high-quality set of accurate layout tools for large plywood sheets will help the entire building process go much more smoothly.
Quick & dirty layout. The simplest form of layout that you can use with large sheets, and one that I often use for quick cuts, is to simply measure out multiple marks along the sheet. Then, you can line up a straightedge, or woodworking ruler such as the Woodpeckers version shown above, with a pair of the marks and use a pencil to mark the layout lines. This form of layout line works well for a quick mark, but you’re limited to the length of the straightedge. Or you have to continually slide the straightedge and connect your layout lines, risking a wavy line as a result.
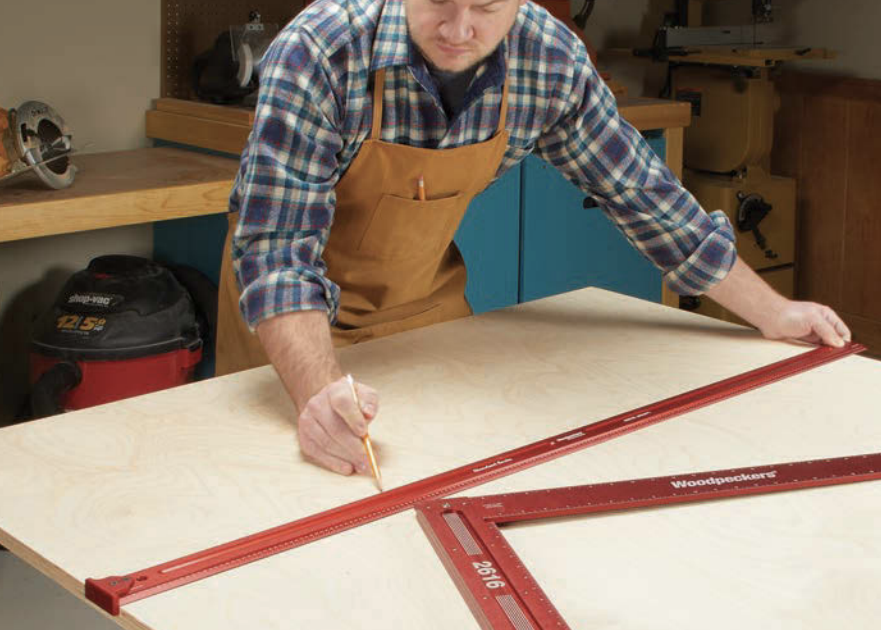
Layout Rules. For the ultimate in sheet good layout, you’d be hard pressed to beat a quality long steel or aluminum rule. You may be familiar with inexpensive and flimsy aluminum versions that are used for laying out and cutting drywall. Because we’re shooting for precise layout marks, it’s worth the time (and expense) to invest in a quality rule. That way, you can trust that the lines you’re marking are accurate and straight. In addition, some higher end models will have accessories you can add on, such as the hook stop shown on the model above (forming a small foot at the end of the rule).
Dedicated square. As you can imagine, most woodworking squares, such as a combination square, are too small to be useful when laying out sheet goods. When you’re working with plywood, it’s best to have a square sized for sheet goods, such as the one seen above. The precision square from Woodpeckers Tools is designed to be the perfect size for most sheet good applications. Not only can you use it to check square (hint — not all plywood comes from the manufacturer square), but you can also use it to mark reliable layout lines.
Smooth, accurate cuts
After measuring and marking your lines, you’re now tasked with making accurate cuts to match those lines. Here, there are two options that I turn to, depending on the application.
Trusty table saw. When working with smaller size sheets, my table saw is the quickest way for me to cut parts to size. It’s already set up in my shop, and if the sheet isn’t full-size, it’s easy enough to get into the shop to cut it. The trick here is to support the workpiece as you make the cut.
One thing that I like to do with large sheets can be seen in the drawing below. This involves supporting the workpiece before, during, and after the cut. An outfeed table is nice if you have the room for it. However, your workbench can double as an outfeed table. You might just have to stack a couple of spacer blocks on the bench to bring the work surface up to the same height to help support the workpiece as it comes off the saw.
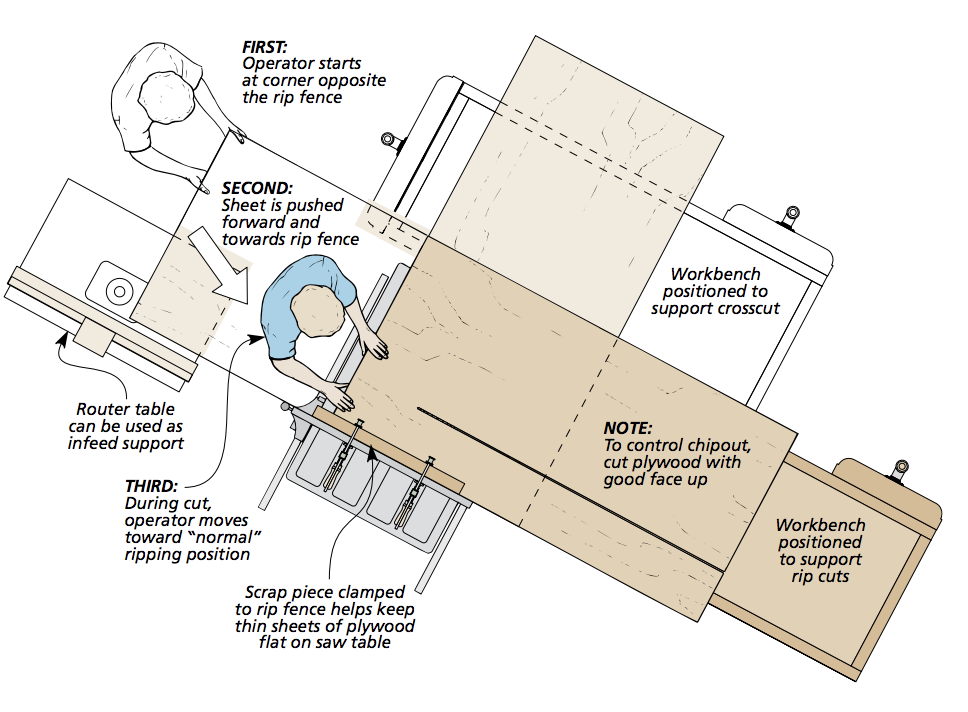
As far as the infeed side goes, I’ve found that my router table works well here. The key here is to hold the workpiece up while you turn the saw on and get in a steady position to make the cuts.
Track saw. As much as I love and appreciate my table saw, when dealing with full sheets, my go-to is a track saw. The one I have in my shop is one I made — it’s simply a hardboard base and a fence to guide my circular saw. But, recently, commercially made track saws have gained a lot of attention and are much more popular. What I like about a track saw is that you can lay the sheet on a piece of sacrificial sheet of foam insulation to make the cuts. Then, you simply align the track to your layout mark and cut through the plywood and just barely into the foam to break the sheet down. Just make sure that you’re aligning the cutting guide to keep the kerf on the waste side of the cut.
Parallel guides. If there’s one drawback to track saws, I would say that it’s fairly easy to position the track so that it’s slightly out of alignment, resulting in a cut that isn’t parallel to the edge. However, most saw tracks come equipped with a T-track along one edge and this is the perfect spot to attach a set of parallel guides, as in the below photo. The parallel guides, like the name implies, keep the saw track parallel to the reference edge of the workpiece. They work by providing a fence along the lower edge to register off the edge of the plywood sheet. You can simply dial the guides to the width of the cut that you’d like to make and place the track on your sheet, sliding it until the guides touch the edge of the sheet.
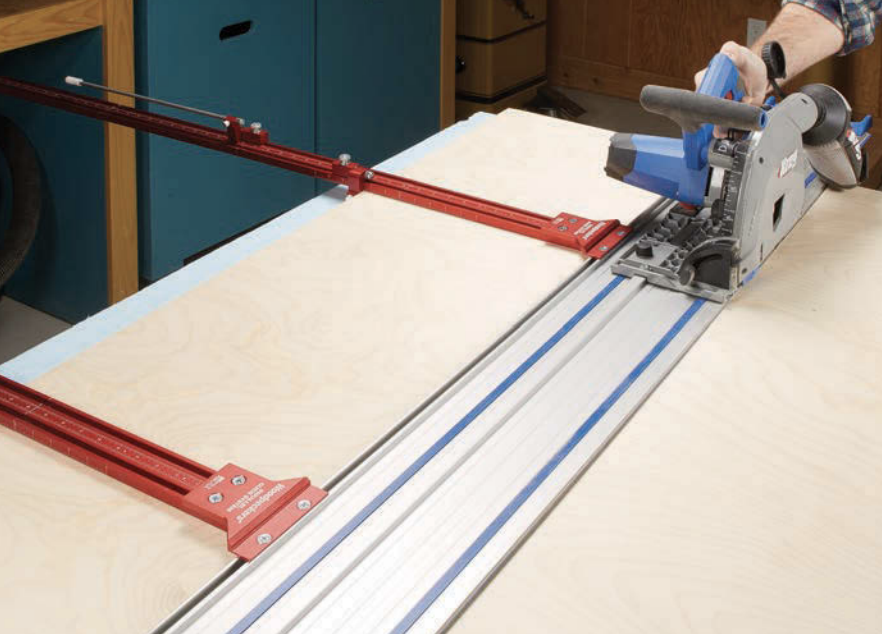
A track saw makes breaking down plywood sheets a non-issue. Paired with a quality set of parallel guides, such as the Woodpeckers version shown above, the track saw can cut parts to size with high levels of accuracy.
What I like about this system (combined with a track saw) is that the resulting cut is accurate, repeatable, and pretty much chip free. If you choose to use a shop-made guide for your circular saw, you’ll want to take some precautions to avoid getting chipout during your cut.
Assembly
With the parts of your project laid out and accurately cut, you’re ready to bring your project all together. If you rush through the assembly process, your perfectly cut parts will mean nothing once the glue is dry and your assembly is skewed.
A look at glue. The first thing that I do when I’m ready to assemble a project is to choose my glue. For most plywood cases, there’s going to be multiple parts that have to come together, and they’re often large. That means I want to give myself some good open time and choose a glue that’s going to allow me to take my time with out fear of it tacking up too quickly. For large assemblies, my choice is Titebond III. For simplier assemblies my normal glue (Titebond II) works well.
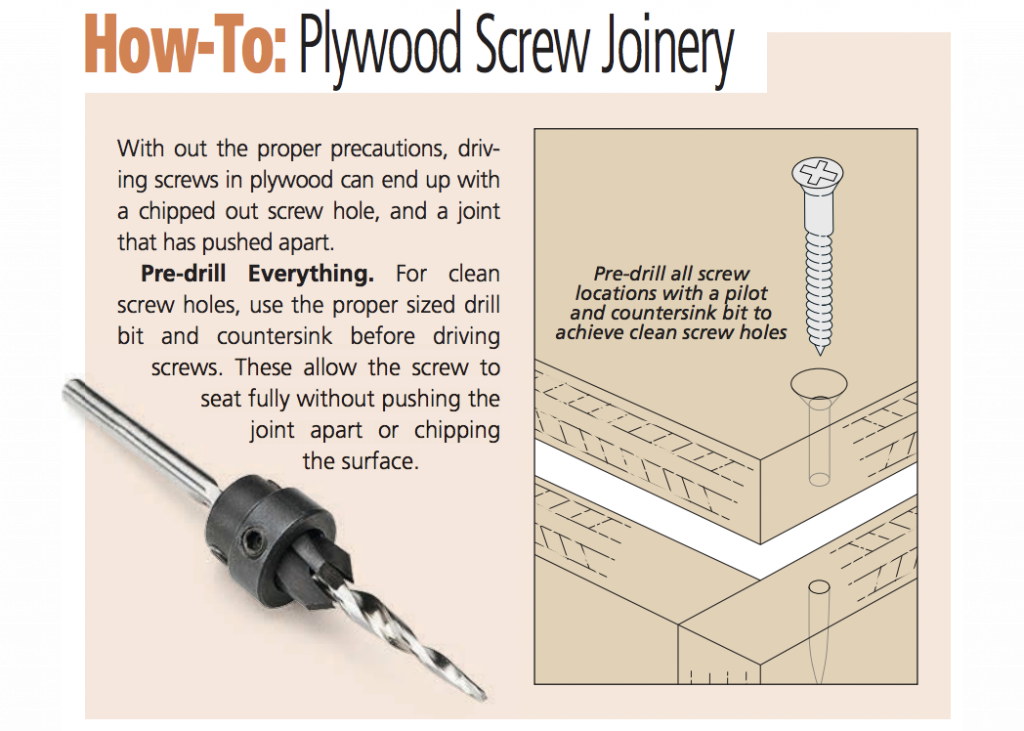
Clean Screw Holes. Now that you’ve chosen your glue, take a few minutes to address and mark the screw locations. What I mean is lay out your screw locations, and also pre-drill them. There’s nothing worse than driving a screw home and seeing the plywood split as the screw snugs down. For some tips on making proper screw holes, check out the box below.
All the clamps. The final check on my pre-assembly checklist is to make sure that I have all of the clamps that I need to pull the parts together. I’ll even go as far as to run through the assembly process before spreading glue (referred to as a dry assembly). I’ll put the clamps in place and make sure everything fits well and that I won’t be left fumbling for an additional clamp or two as I’m trying to hold the parts in place. Once the clamps are at attention, I’m ready to glue up the parts
Corner clamps First. When the project starts to come together, the first thing I clamp up is the corner using corner squares, like the set from Woodpeckers, seen below. These hold the entire case square while I continue to add clamps. The nice thing about these squares is they can be clamped on either the inside or the outside corners — whichever makes most sense for the application at hand.
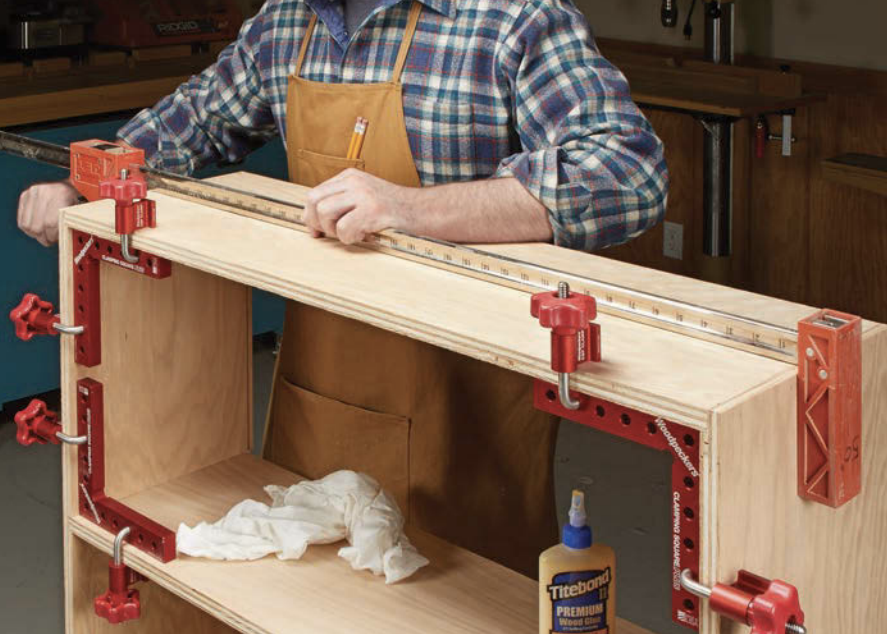
Square Glue Up. Once corner clamps have been applied, guaranteeing a square assembly, you can work around the case adding additional clamps. I’ll often leave the clamps in place until the glue is dry, even if there are screws holding everything together.
After the corners are clamped square, I will continue to add clamps along the joints to make sure everything is pulled snug. Just not overly tight to prevent stressing the panels.
If the case is getting screwed together, now’s the time to drive the screws in. Even though the screws secure the joints, I’ll sometimes leave the clamps on for a couple of hours, just for good measure.
While as a woodworker, solid wood holds a certain sweet spot in my heart, plywood is a great material to work with. It’s relatively inexpensive and it’s more stable than hardwood. It makes constructing large cases quick and easy. So, the next time that you need to use plywood in your shop, keep some of these ideas in mind. If you do, you’ll find that you will end up with parts that are laid out accurately, cut square, and assembled without any headache.
A special thanks to WoodPeckers for supplying the tools shown in this article. This article was originally published in the Plywood Shop Projects Book.
Here are some supplies and tools we find essential in our everyday work around the shop. We may receive a commission from sales referred by our links; however, we have carefully selected these products for their usefulness and quality.


I really enjoyed your article. There is one major issue, however. Clearly the author has a much better income than I do. I could no more afford to purchase all those fancy Woodpecker, Bessy, and Kreg helpers than fly. How about giving some tips using materials the average woodworker might have or be able to procure at a more reasonable price-point at his/her local box store.