We may receive a commission when you use our affiliate links. However, this does not impact our recommendations.
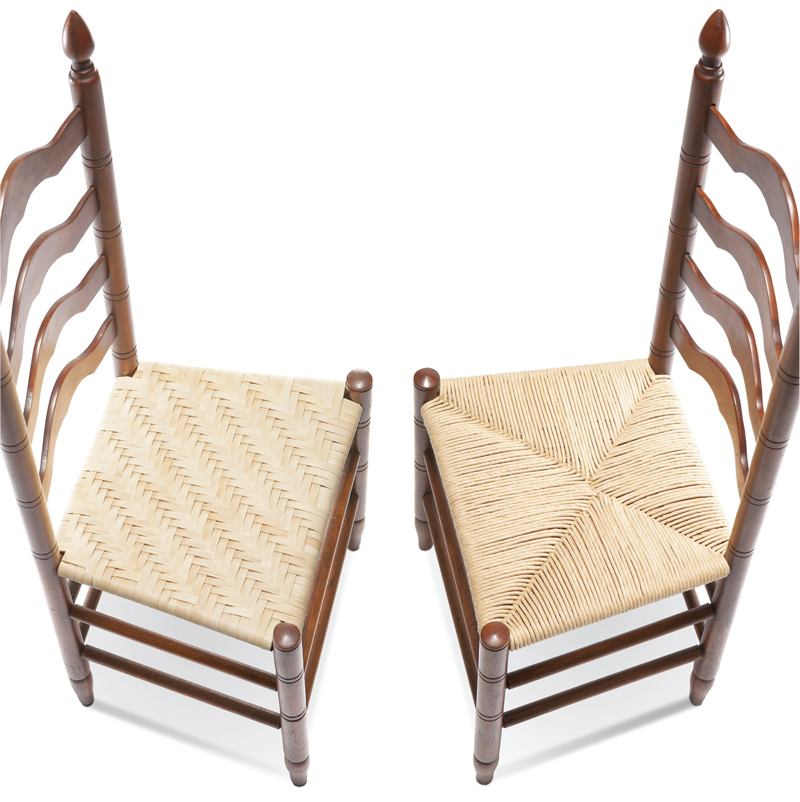
Weave Traditional Chair Seats
Traditional techniques and modern materials produce attractive, durable results.
by Tim Johnson
Visit any antique or second-hand furniture store and you’ll find great old chairs—such as these solid cherry ladderbacks—that are bargain priced because their woven seats have worn out. In fact, any chair with round rails or dowels used to form the seat frame can have a splint or a rush seat installed.
The choice is mainly an aesthetic one. Splint seats (above left) are created by weaving together flat lengths of wood that have been soaked in water to make them pliable. Rush seats (above right) are installed by wrapping twisted strands of fiber around each corner of a chair in a continuous loop. Both seats take about the same amount of time to install and the cost for materials is similar. With proper use and occasional maintenance, both seats can provide ten or more years of service.
I find installing these seats satisfying, quiet work. Yes, it takes time, but the techniques aren’t difficult and mastering them connects you to an ancient craft.
How to weave a splint seatTraditionally, splints were split by hand from native hardwoods such A uniform creamy-white color, flat reed splint comes in different Flat reed splints should be soaked in hot water for at least twenty |
Click any image to view a larger version. Splint seats are created by weaving together flat lengths of wood that have been soaked in water to make them pliable. |
A uniform creamy-white color, flat reed splint comes in different widths and is machined to uniform thickness. Flat oval reed splint is also available. It has a rounded top surface. |
1. Chair seats are usually wider at the front, so the first step is to establish a rectangular seat area. Mark the front rail while holding a square against the back rail, with its corner against the back leg. |
2. Nail the first splint to the back rail. Draw it over the rail and forward around the front rail at your reference mark. Take out the slack, wrap the splint back around the back rail and draw it forward again. Continue this process to wrap the entire length of splint. |
3. Connect new lengths of splint on the bottom. Use a spring clamp to keep the wrapped splint under tension. Overlap the previous length by about 6 in. and staple all along the overlap. Orient the staples crown-side-out. |
4. Keep wrapping splint front-to back until you reach the opposite reference reference mark on the front rail. Cut the splint and staple it to the adjacent underside loop. This layer, now completed, is called the warp. |
5. Weaving is the next step. Experiment with different patterns, using short splints. Simply alter the over-under counts between the weave and warp splints. We’ll proceed with the diagonal “herringbone” pattern. |
6. Establish the back edge. Weave a length of splint, called a “weaver,” across the warp, using a 3-under, 3-over pattern that’s centered, so the weaver passes under the same number of warp splints at both ends. Cut the ends flush. |
7. To create the diagonal pattern, shift the 3-under, 3-over pattern by one warp splint with each new row: Here, the back weaver started “2-under,” so this weaver starts “3-under.” On the next row, the weaver will start “1-over.” |
8. Wrap the weaver around the rail and weave it across the seat’s bottom, using the same pattern as on the top. Secure the next weaver by overlapping the end of the first weaver by 6 to 8 inches and weaving it in. |
9. When the seat is about half finished, fill in the corners by weaving in additional warp splints. Lock them in place on the top by looping their ends around weaver splints and drawing out the slack. On the bottom, just weave them in. |
10. Completing the last few rows is challenging, because the seat becomes more taut as you weave. A table knife spreads the warp and helps to guide the splint. |
How to weave a rush seat
Natural rush strands are made from cattail leaves. Fiber rush, made Fiber rush comes in a variety of colors and diameter sizes. The Make fiber rush more pliable before use by misting it with water |
Rush seats are installed by wrapping twisted |
Natural rush strands are made from cattail leaves. Fiber rush, made from kraft paper (think grocery store bags), is an economical substitute that’s more widely available than natural rush and much easier to use. |
1. Chair seats are usually wider at the front, so the first step is to establish a rectangular seat area. Mark the front rail while holding a square against the back rail, with its corner against the back leg. |
2. Rush seats are woven by repeating one wrapping pattern. Starting from the left rail, draw the rush strand over and around the front rail. Continue up, over and around the left rail, turning 90 degrees and crossing over the strand. Draw the strand to the top of the right rail and repeat the pattern. It’s that simple. |
3. Create the rectangular seat area by filling the front corners, using short, individual strands wrapped around both front legs and tacked to the side rails. Each successive strand builds the seat toward the center. |
4. Once the rectangular seat area is established, wrapping begins in earnest. Tack a long strand to the left rail and begin a continuous counter-clockwise loop that wraps around all four corners.
|
5. Tie in new strands on the underside of the seat, using a square knot. Always keep the strands taut. |
6. As you wrap each corner, it’s important to keep the rush strands at right angles and to straighten the diagonal line formed by the crossover joints. Pinching each crossover joint makes the job easier by compressing the strands. |
7. Press the rush strands to the corners to fill gaps and keep uniform spacing. Fiber rush comes in different sizes. Larger sizes build the seat faster, but they’re harder to pinch and press, so a few gaps are likely to remain. |
8. When the seat is about two-thirds complete, fill the space between the top and bottom strands to add support. Install two or three layers of cardboard that’s been cut to fit inside the seat’s four triangular-shaped sections. |
9. When the seat area is wider than it is deep, the final wrapping goes front to back, through the ever-shrinking hole in the middle of the seat. If the seat is deeper than wide, the wrapping goes side to side. |
10. Tack the last strand to the bottom rail. Unravel the end and stuff it under the strands on either side
Source(Note: This information may have changed since the story's original publication date.) The Caning Shop, caningshop.com, 800-544-3373, Flat Reed Splint, 11/64” to 1” widths; Fiber Rush, 4/32”-dia. to 7/32”-dia., kraft brown or golden brown.
This story originally appeared in American Woodworker September 2008, issue #137. |
Here are some supplies and tools we find essential in our everyday work around the shop. We may receive a commission from sales referred by our links; however, we have carefully selected these products for their usefulness and quality.