We may receive a commission when you use our affiliate links. However, this does not impact our recommendations.
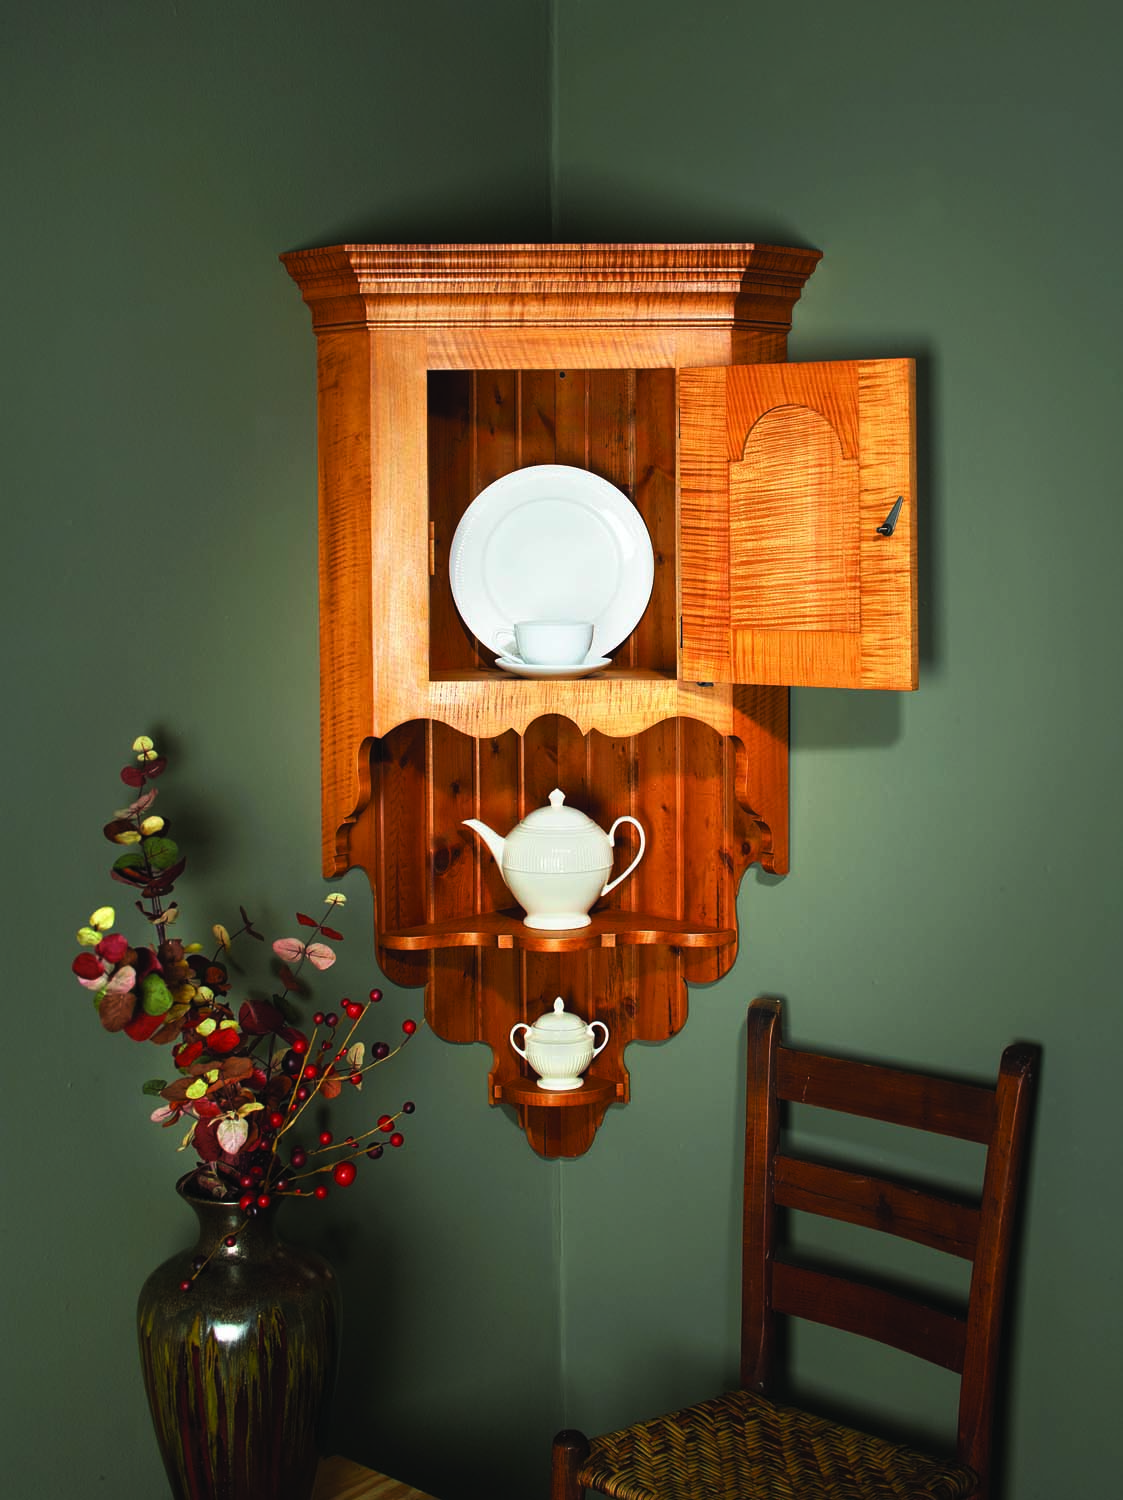
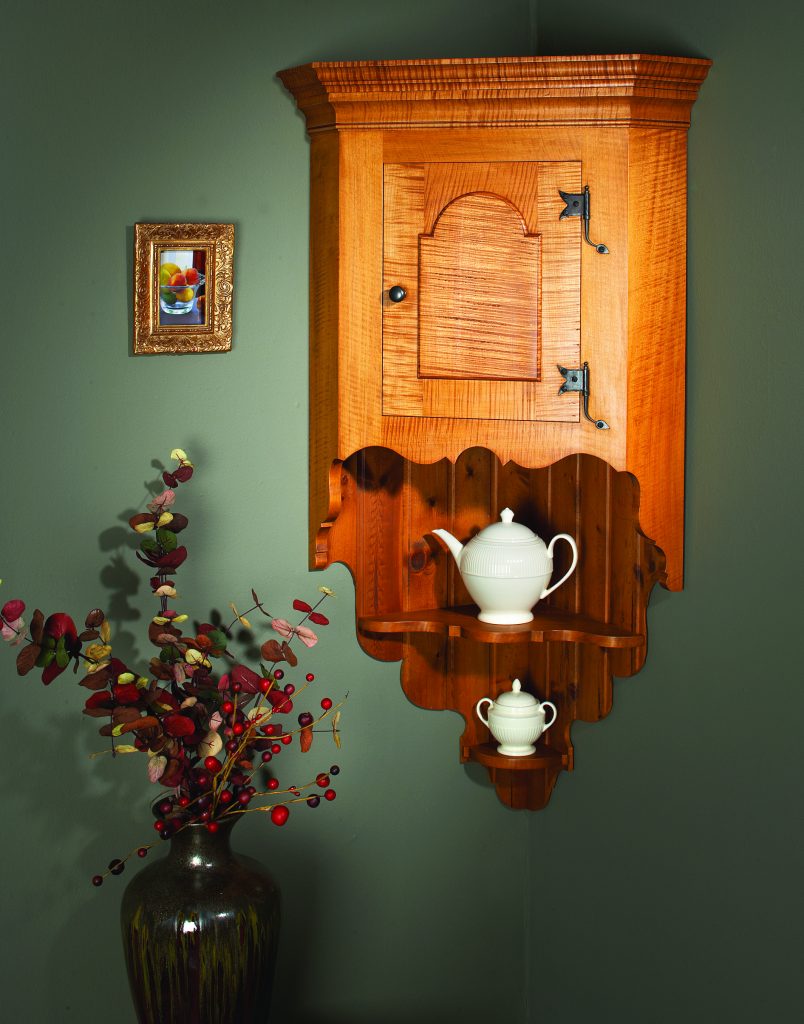
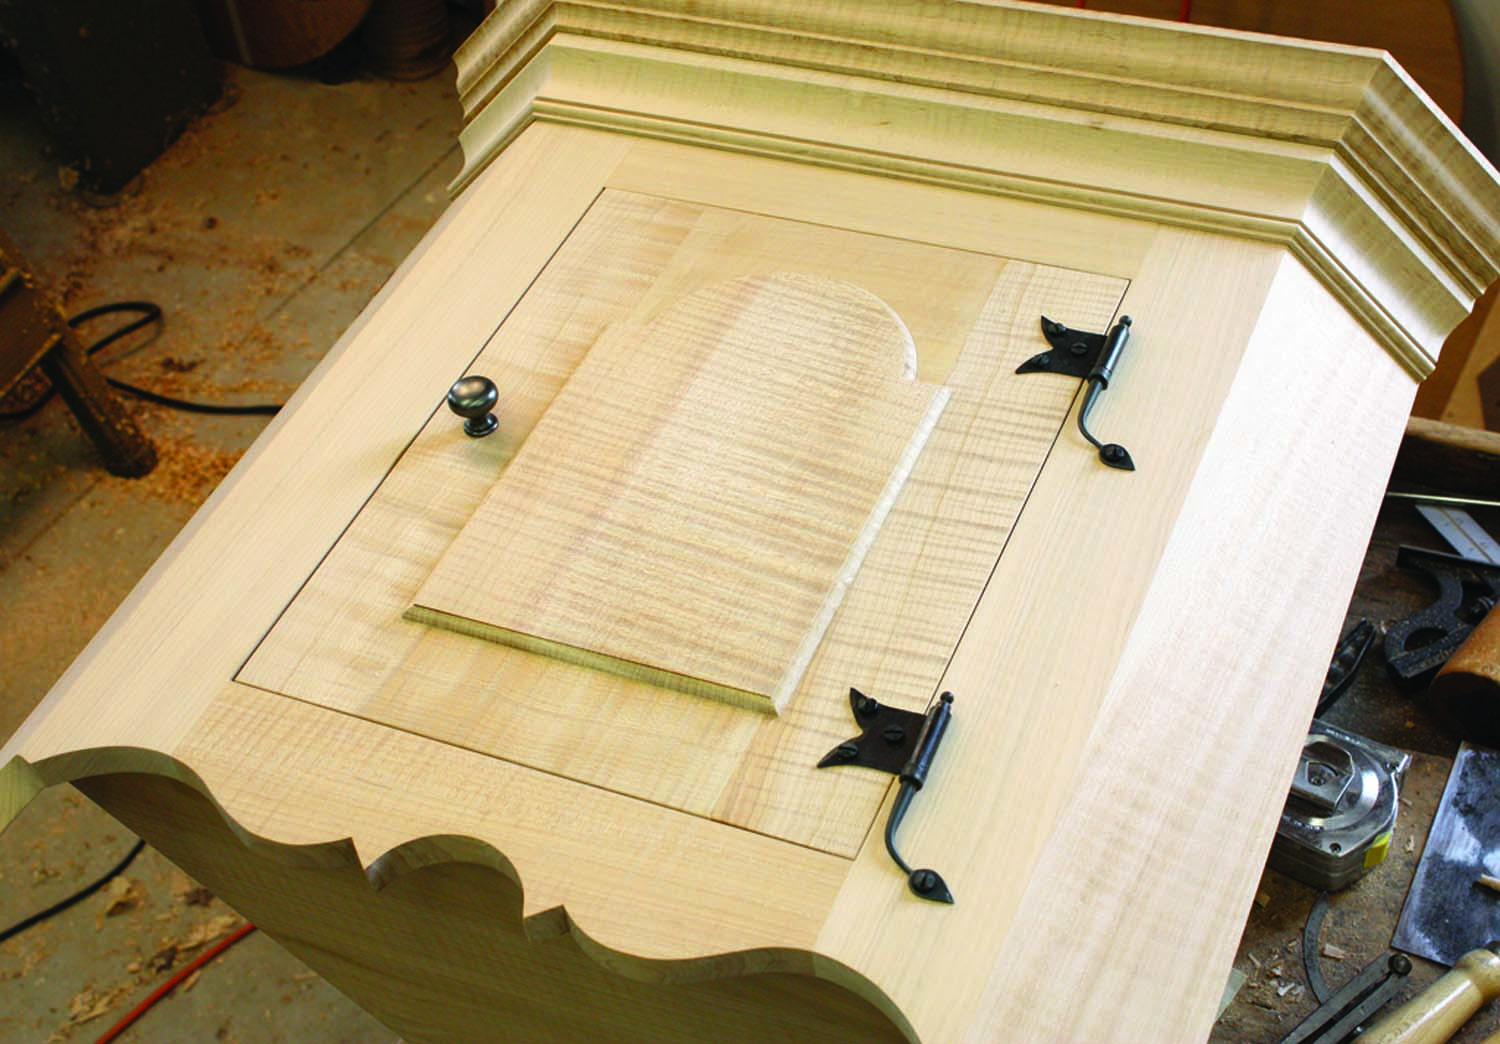
Handsome corner storage. This hanging corner cupboard marries design features from a number of 18th-century examples – and it’s easier to build than it looks.
Scrollwork and a tombstone panel door add a stylish challenge.
A 7′-tall corner cabinet is impressive, but can be a daunting project for someone with little shop time. Traditional corner cupboards require a commitment – not just of time and resources, but of space in one’s home.
Because the eye is drawn to the intersection of two planes (walls), however, the corner of a room is the perfect location to show off a prize piece of furniture. A small hanging cupboard is a logical compromise and has several advantages: It can be just as dramatic as its larger cousin and its dimensions are easily changed to fit in just about any corner.
We may receive a commission when you use our affiliate links. However, this does not impact our recommendations.
While the project shown here is my own design, variations of this form were built during the 18th century, some having one, two or three pendant shelves, a door with multiple panels and sometimes even a drawer below the door.
This is a good beginner project because it presents angles other than 90° and can be built in a relatively short period of time, and usually of scrap material at hand. It also provides experience in tombstone panel door construction, multiple-piece crown moulding fabrication, vector clamping and the cutting and fairing of scrolled edges. The scrollwork on the apron, back and shelves is easily altered for changes in dimensions and aesthetics.
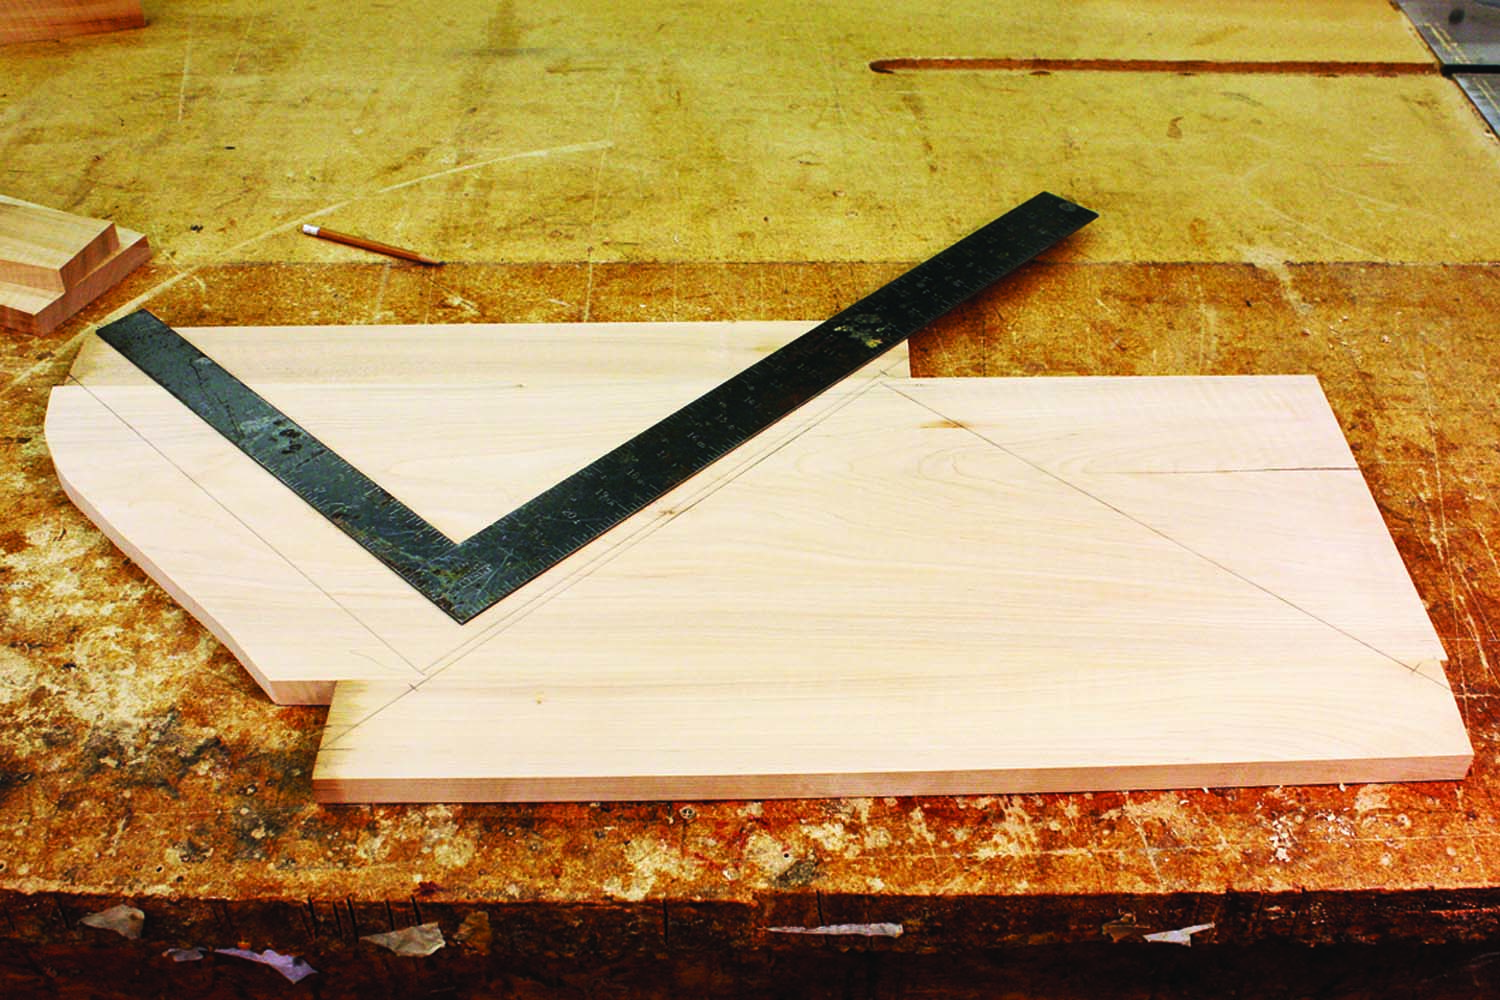
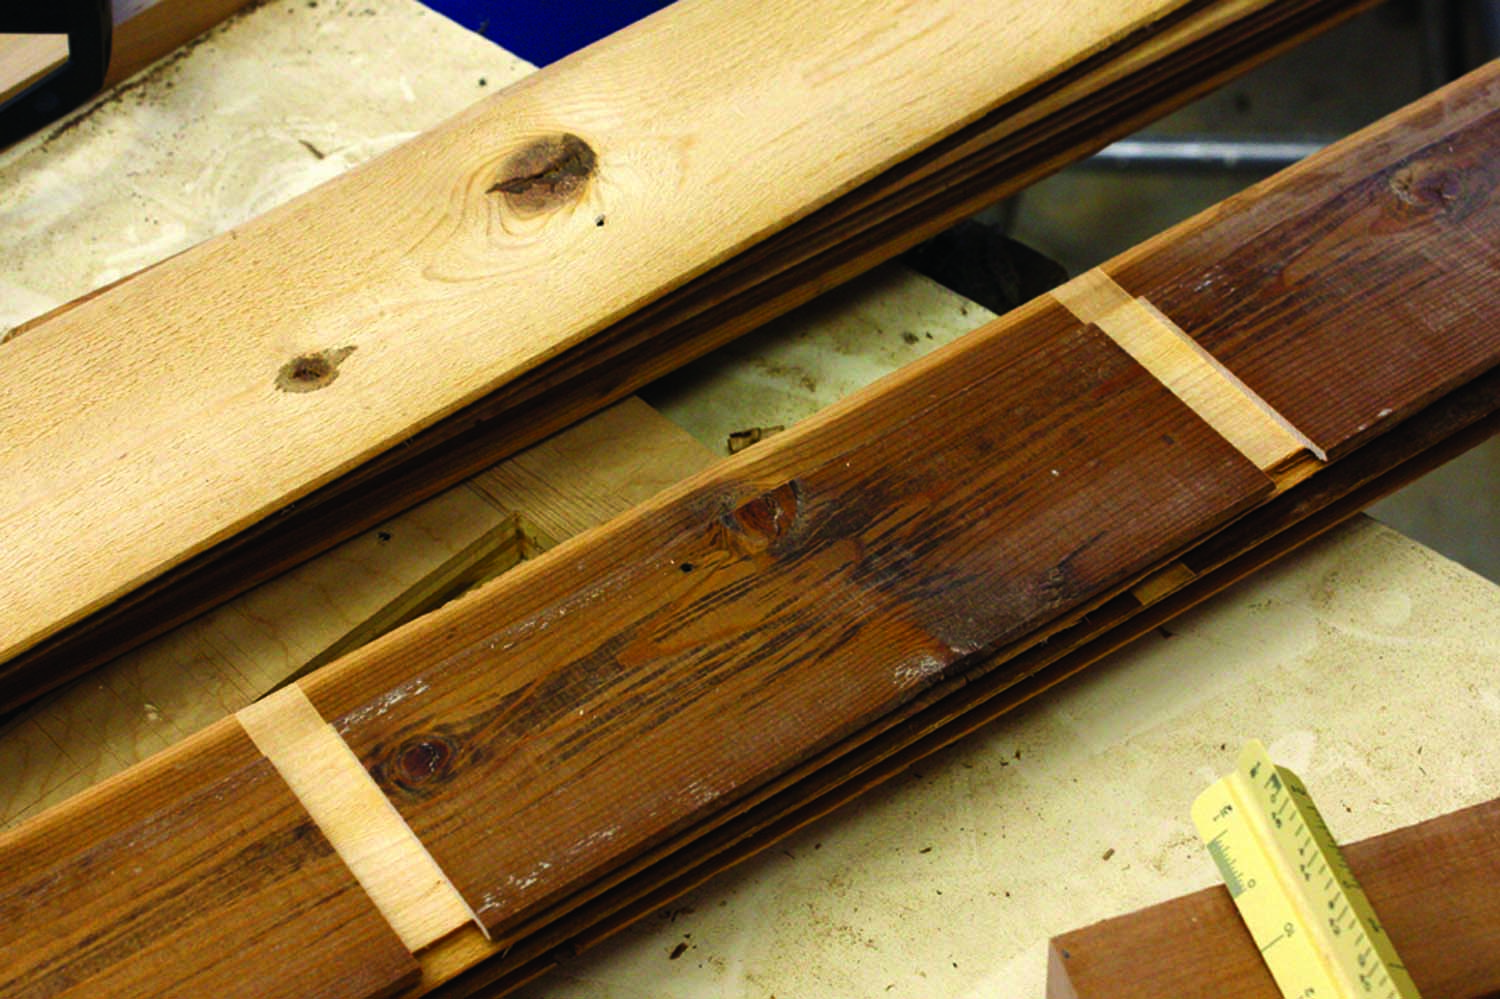
Nested for efficiency. The top and bottom of the cabinet can be laid out on the same board with minimal waste. Note that defects have been avoided. Strips have been glued to the front edge of each part to yield the desired width.
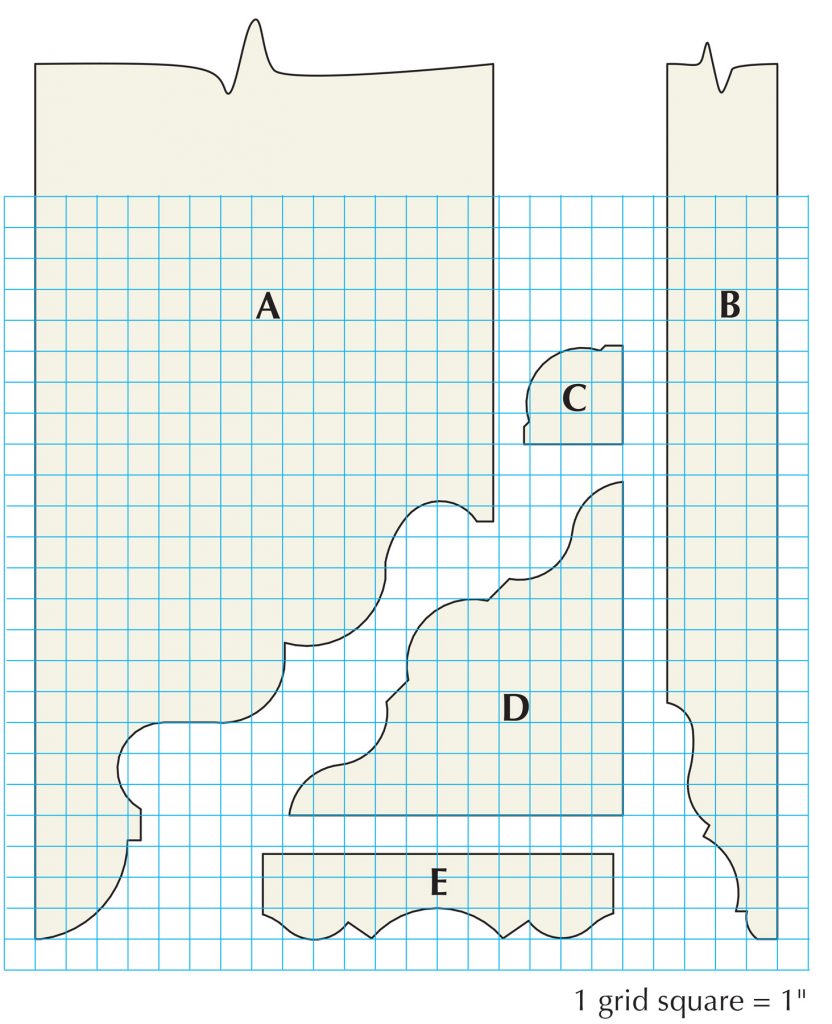
Although this cabinet is an amalgam of details seen on other similar pieces, I borrowed some of the scroll elements from the aprons of tables and case pieces. These elements consist of three basic parts – arcs, fillets and ogees (or cyma curves). Arcs give a feeling of lightness to a piece because they require the removal of material. They can also repeat curve shapes, such as a tombstone panel, used elsewhere on a piece. Ogees serve to keep the eye in motion as it traces the serpentine outline. Arranged back-to-back, ogees lend a sense of symmetry where there would otherwise be none. Fillets provide beginning and ending points for the other two elements and are useful when a change in direction is needed. When used in concert, these elements can add visual excitement to an otherwise mundane piece. By scaling or stretching the various elements, virtually any two points can be bridged with decorative scrollwork.
The Drawing
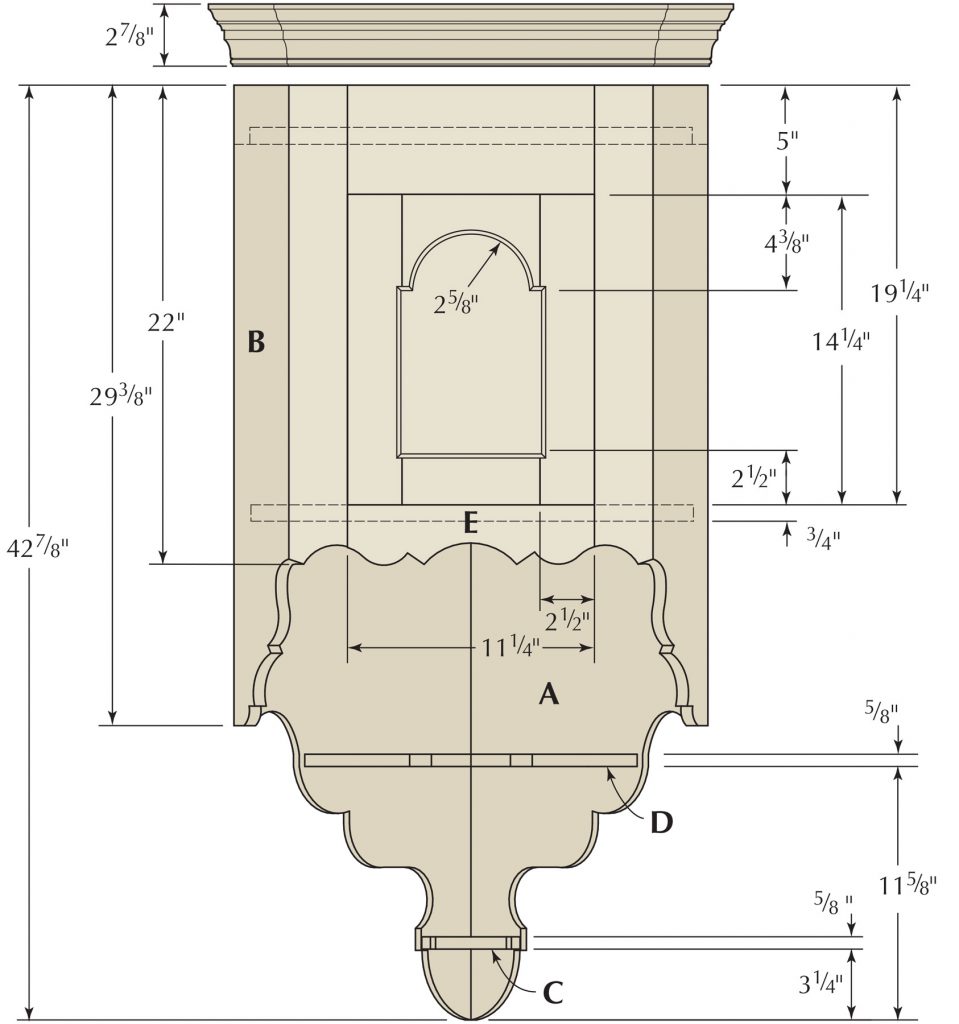
This project is centered to a large extent on the cabinet top and bottom, with subsequent dimensions and cuts being taken directly from the work itself. Corner cabinets can present challenges when drawn because the “front” of the cabinet is not parallel to the wall to which it is mounted.
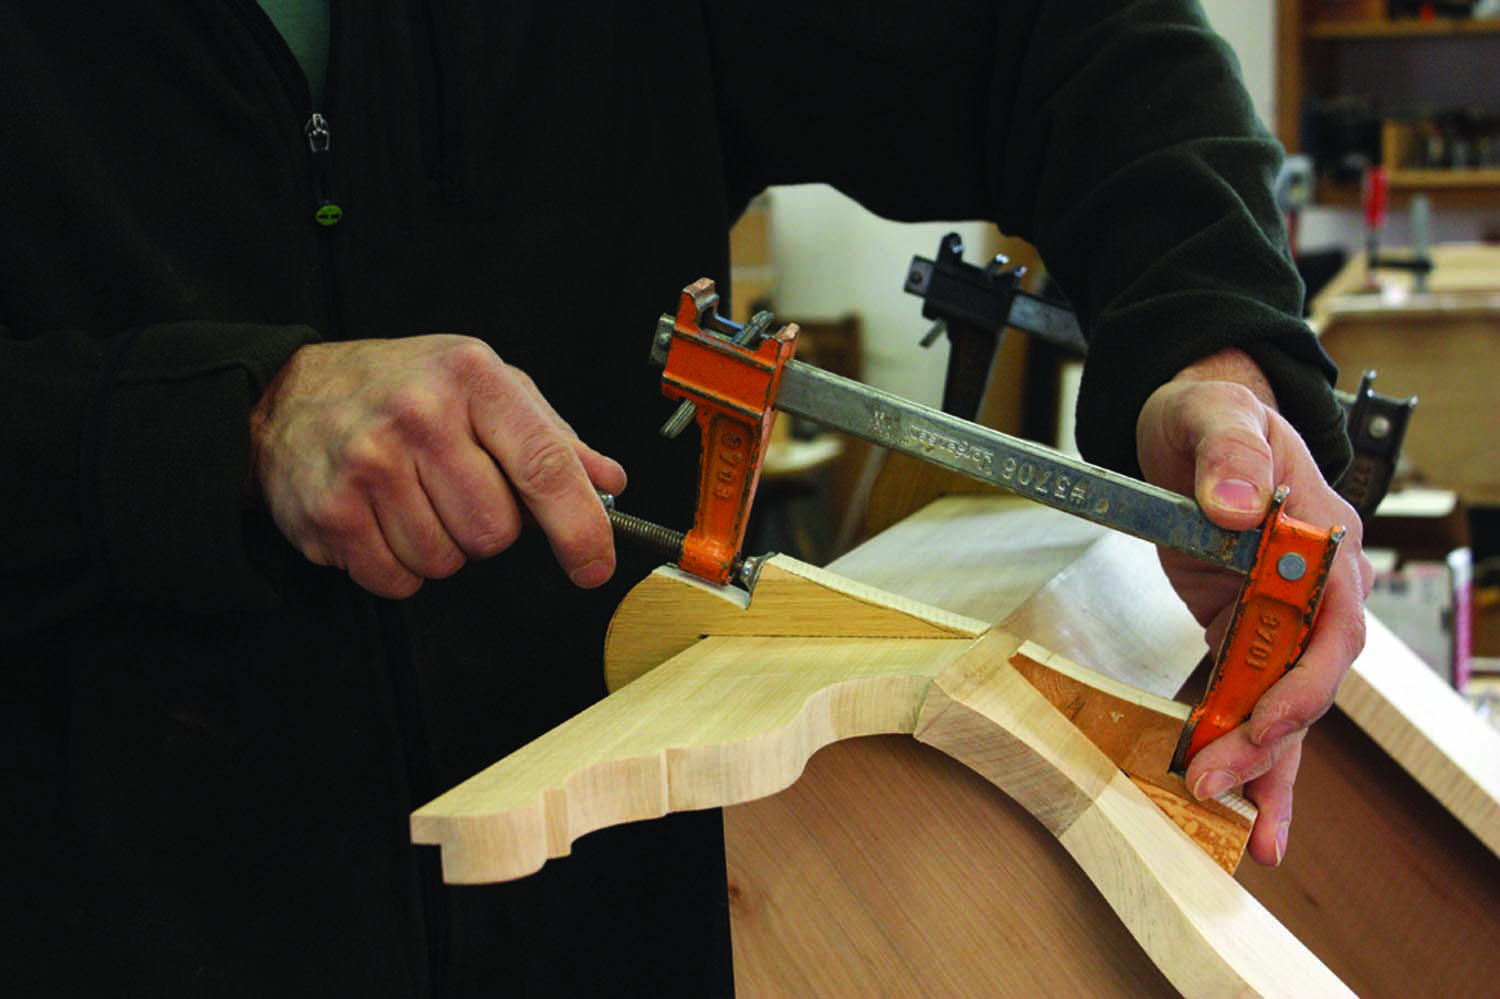
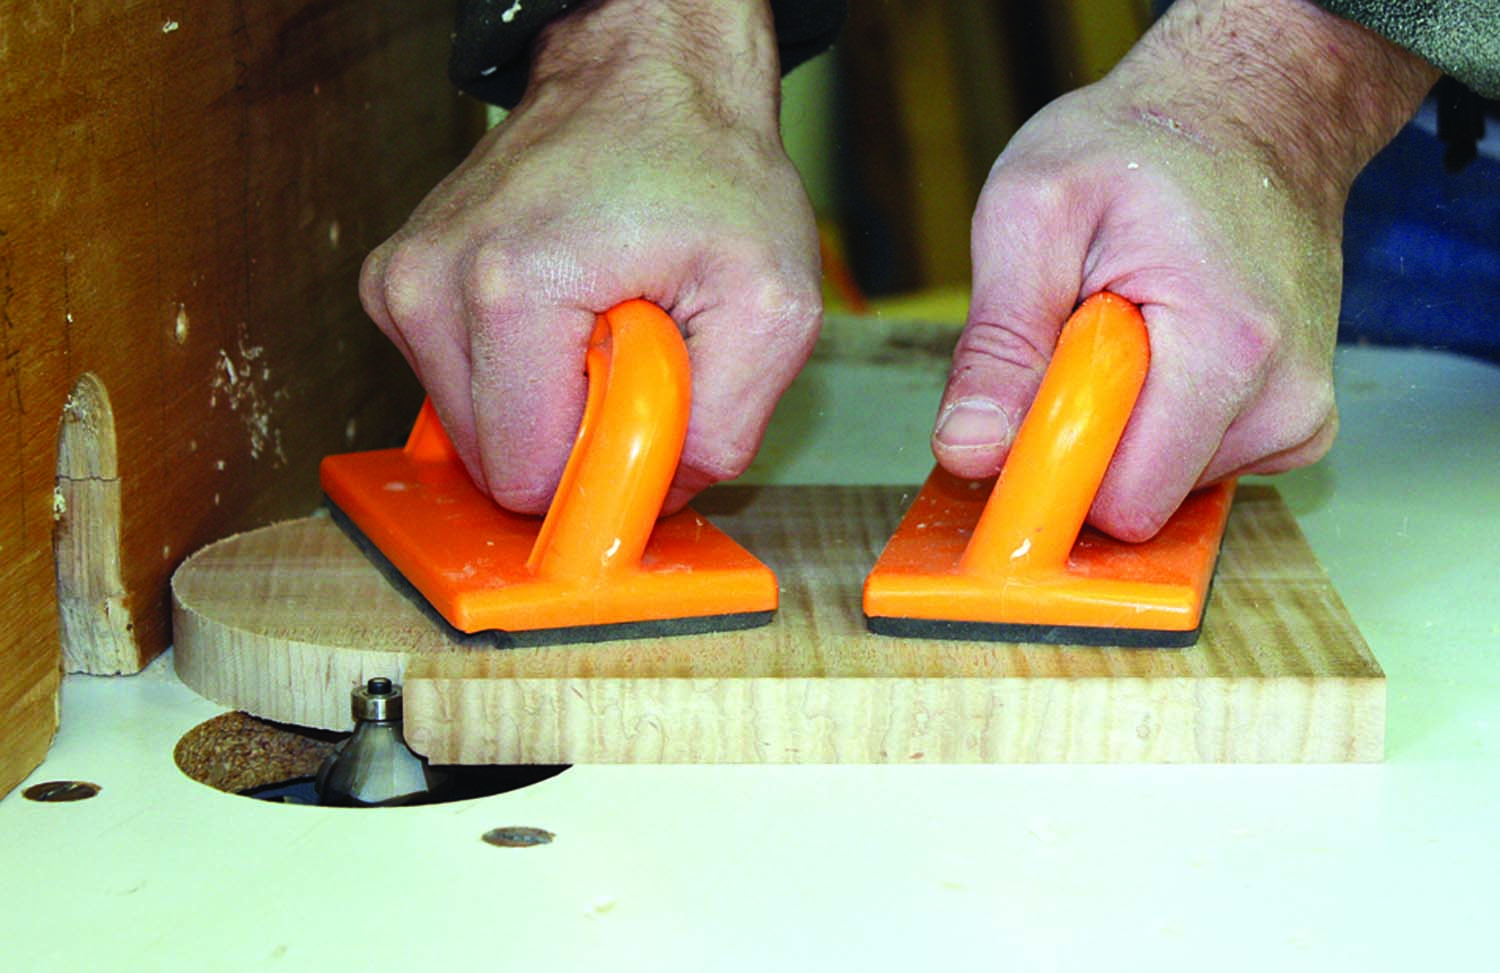
Angled clamping made easy. These cauls hook over the edges of the face frame and return, applying pressure right where it is needed.
Regardless of the elevation, any element that angles away from the plane of the drawing is necessarily foreshortened and therefore inaccurate when pulling dimensions or profiles. Also note that while the shelves are drawn as having a 90° back corner, I actually make the angle a degree or two greater due to slightly obtuse inside corners typical of both old and new home construction. This makes it more likely that the front sides of the cabinet and cornice will be tight to the wall on either side when the cabinet is installed.

A shimwitted solution. The back corners of both the top and bottom are planed slightly obtuse as evidenced by the Formica samples. When the cabinet is hung, this back-cut will decrease the likelihood that an overly generous amount of plaster will hold the edges of the cabinet away from the wall.
The boards for the back may be of the same species as the cabinet or can be stained or painted secondary wood to complement the cabinet.
The Case
With the exception of the back, the two pendant shelves and the crown, all the stock is 3⁄4“ thick. I begin by cutting my stock to rough length and marking the parts.
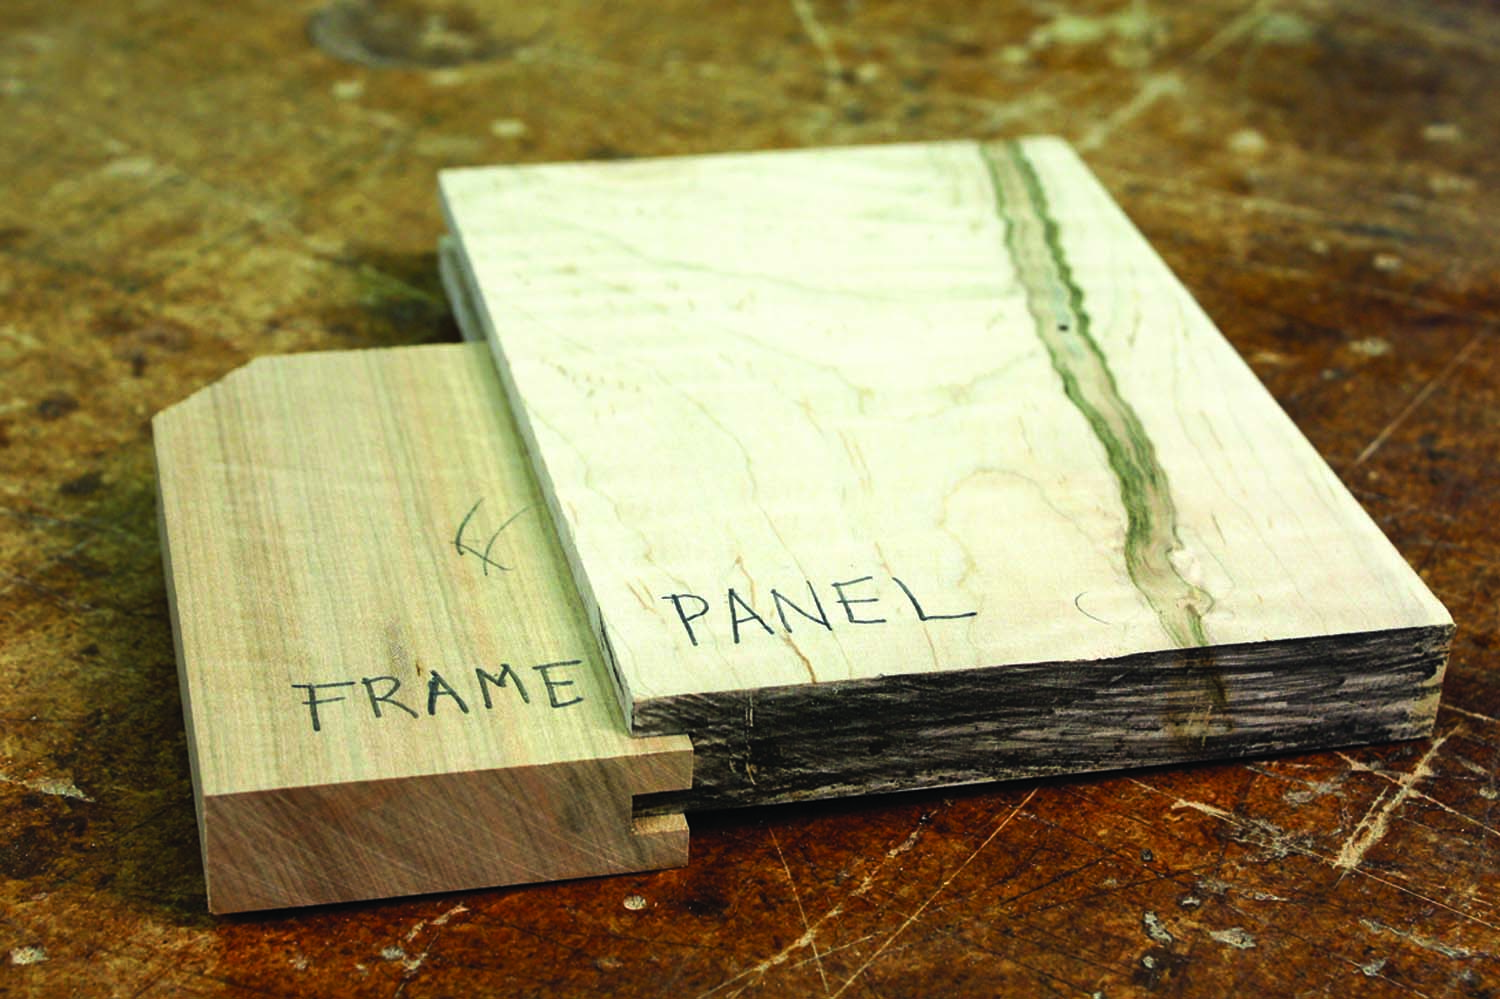
A proud panel. This mockup of the door panel construction shows how the panel is held in the door frame groove yet overlays the face of the door.

It’s OK to cut corners. The left and right tips of the cabinet top and bottom are cut off at 135°, measured from the front edge.
The cabinet is built around its top and bottom, so I cut the two triangular pieces that will become the top and bottom. These pieces are nested on the stock that may be glued-up for this if necessary. After cutting the top and bottom, I clamp them together to ensure that they will be identical, then plane away a small amount of material at the back corner. I mark a centerline on the front edge and measure from this line the location of the return cuts, so the left and right points of each triangle are cut 135° to the front edge.
Pieces for the face frame and returns are then cut to length. For efficiency, I cut the rails and stiles for the inset door at the same time. The rails of both the face frame and the door are joined to their respective stiles with 1″-long tenons (the tenon in the bottom rail, and its mortise, must be adjusted to fit the curved profile). I set the door parts aside, and cut and glue-up the joinery of the face frame.
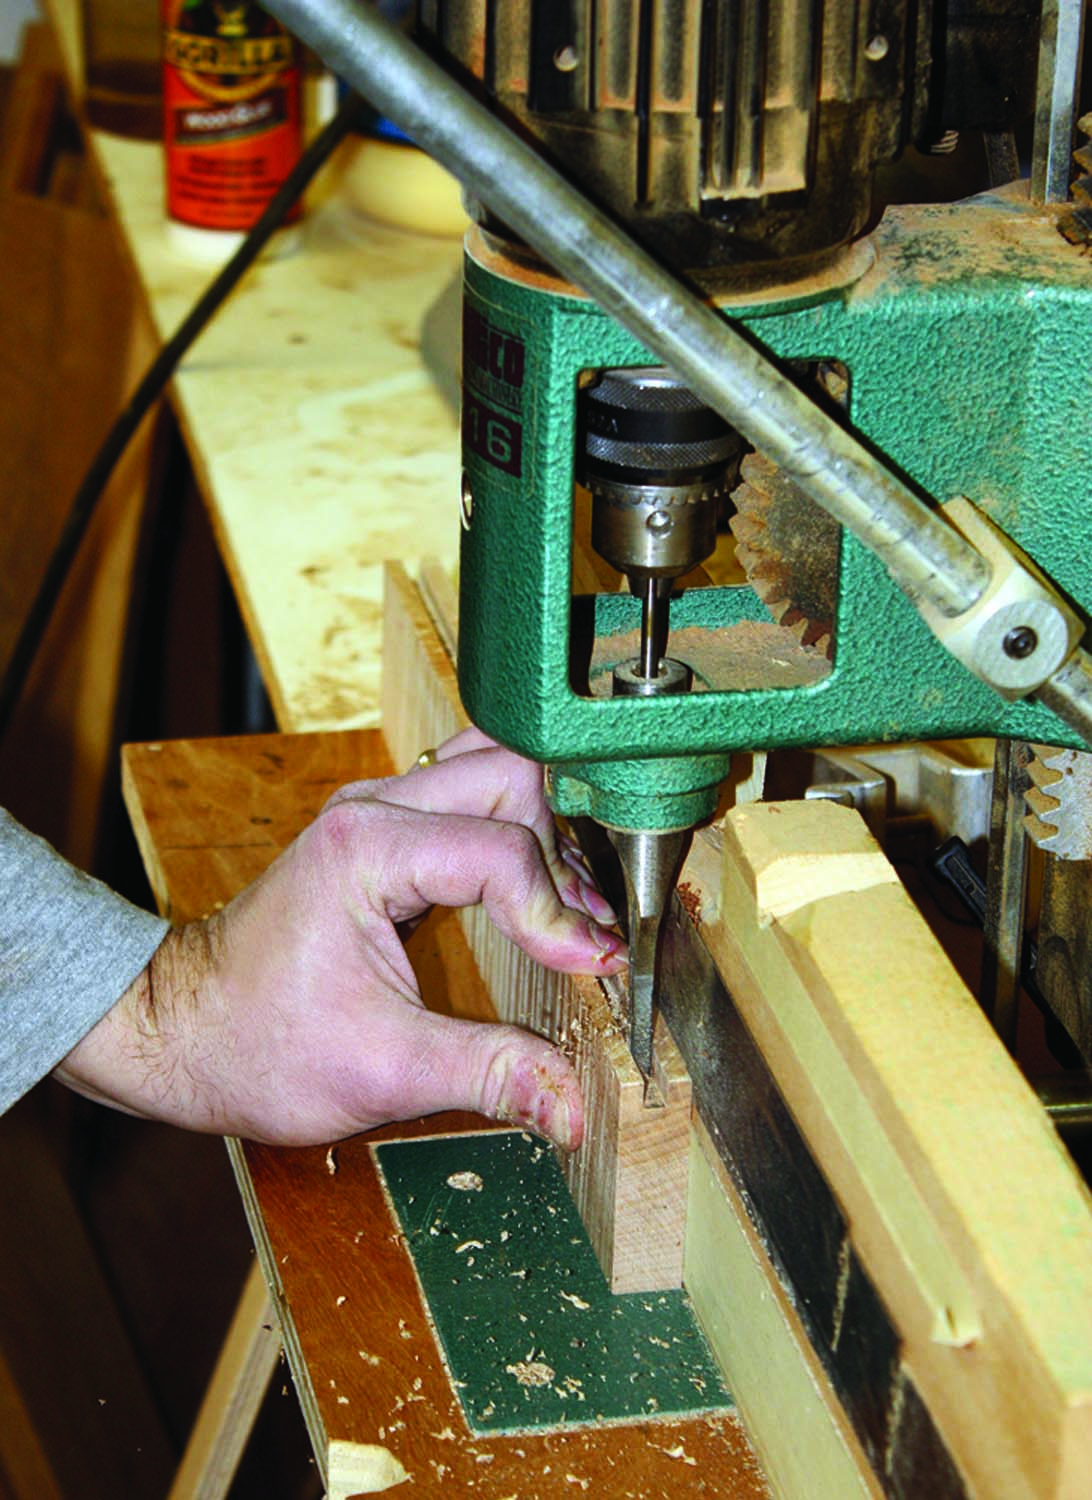
Joinery preparation. The mortises for the 1″ door tenons are located at the bottom of the groove and completed with a mortiser.

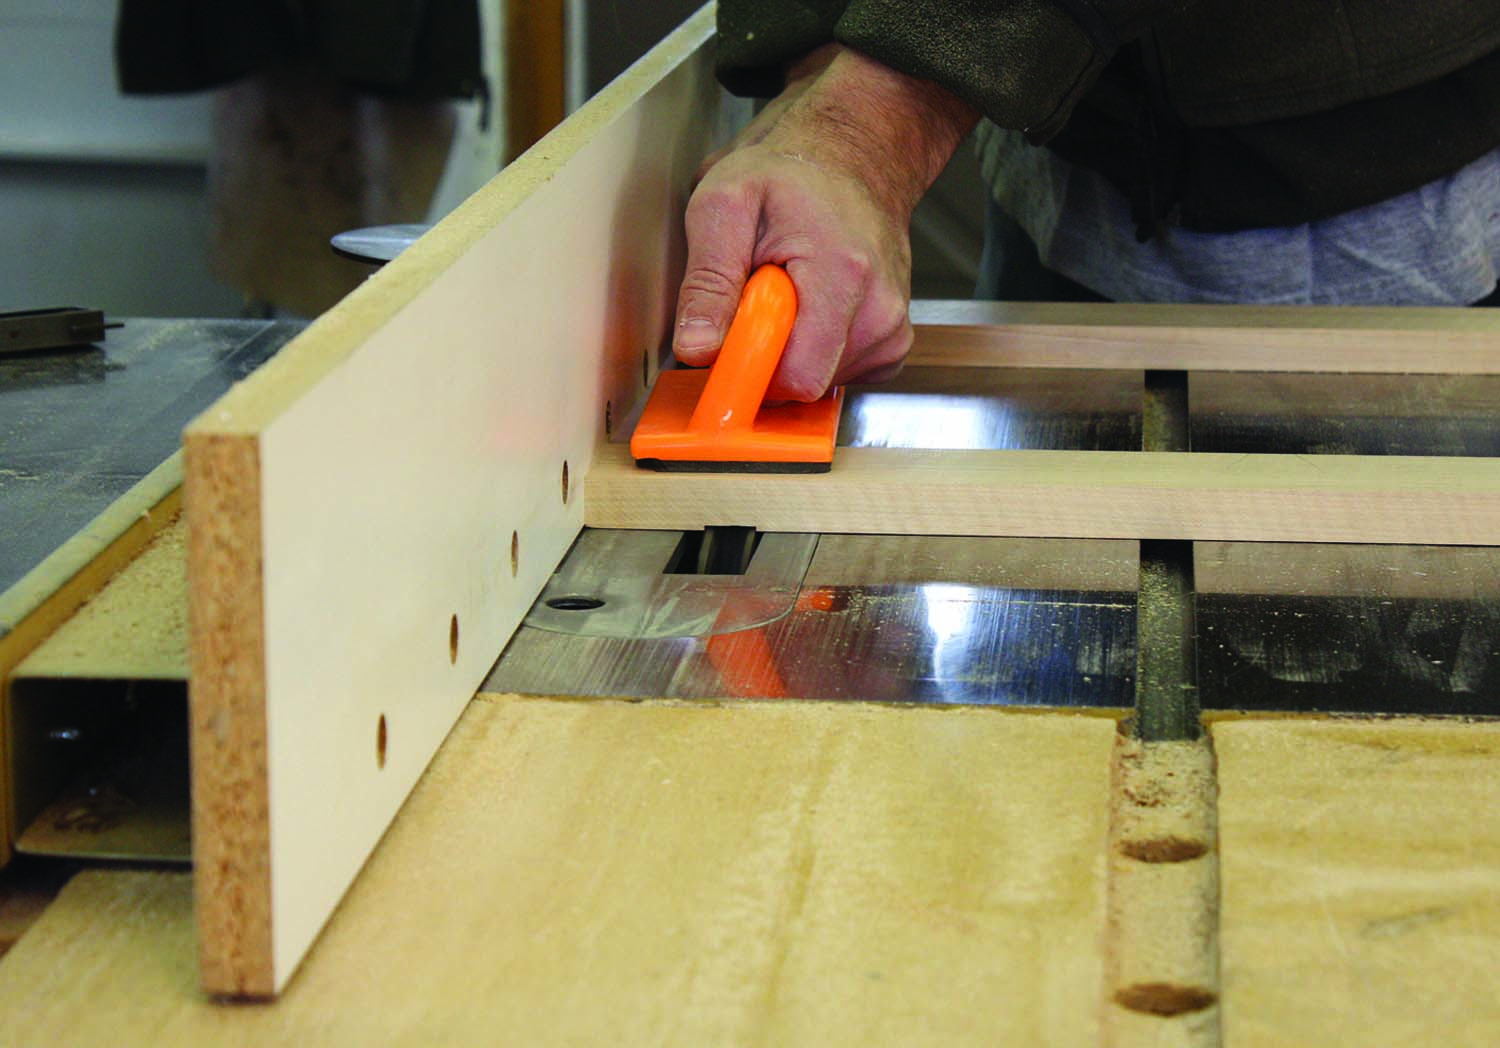
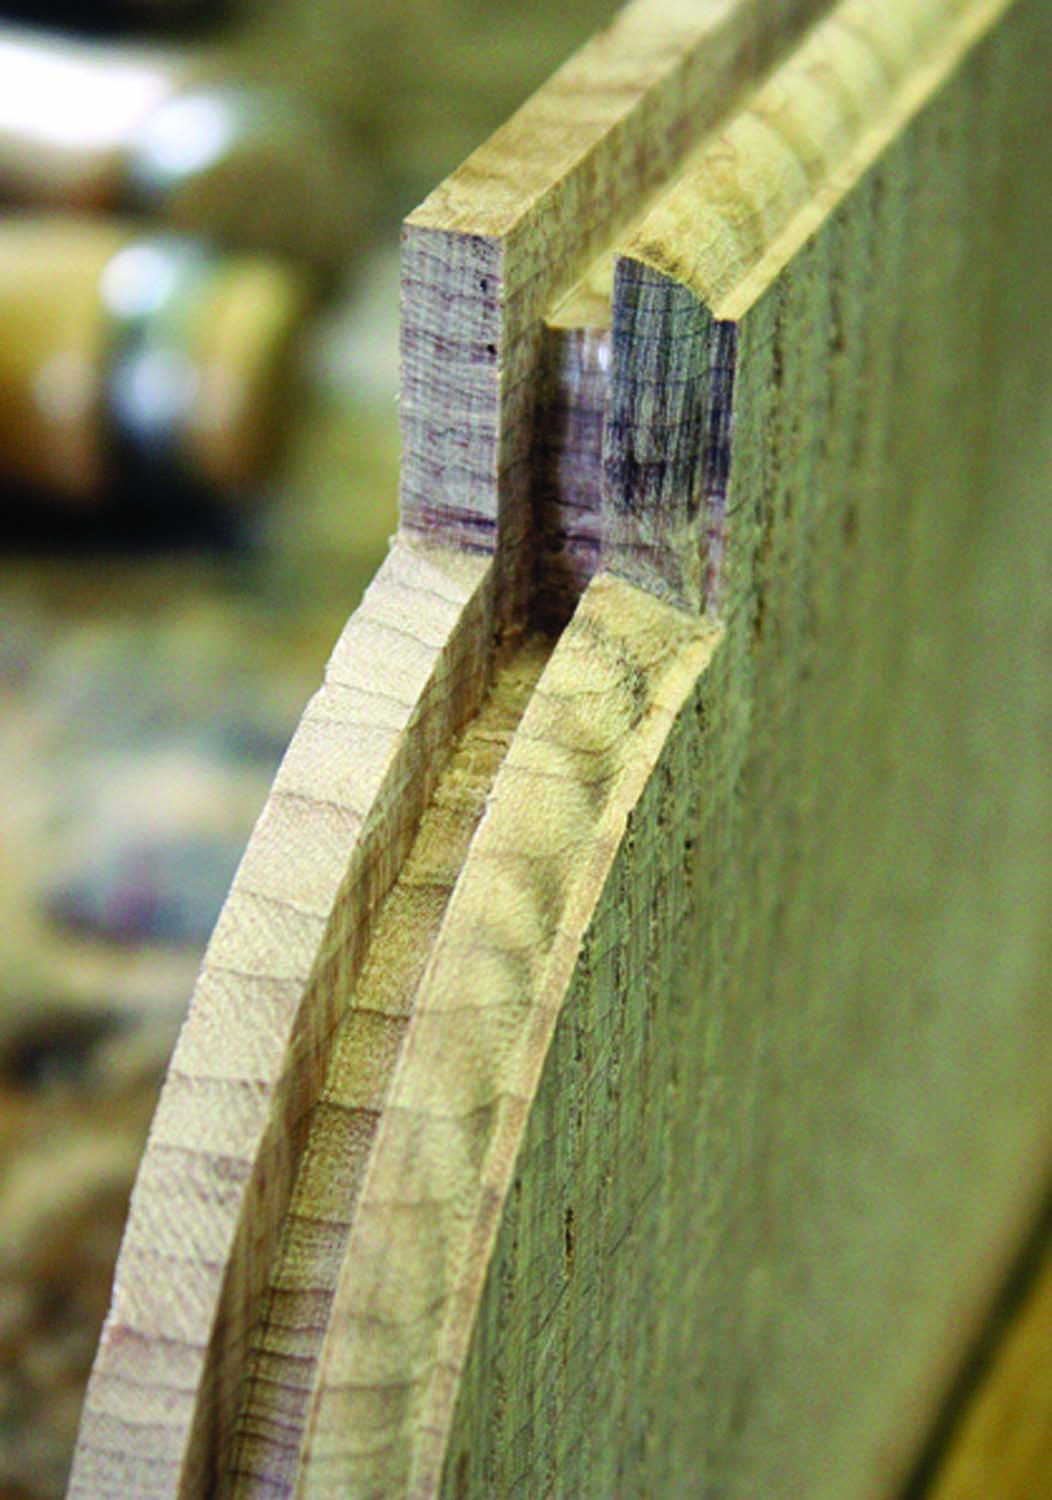
A careful layout. The cabinet top and bottom are centered left to right in the dados then each corner is marked at the bottom of the dado. The sides of the face frame are then mitered away from these layout lines. The top and bottom can now be glued in place.
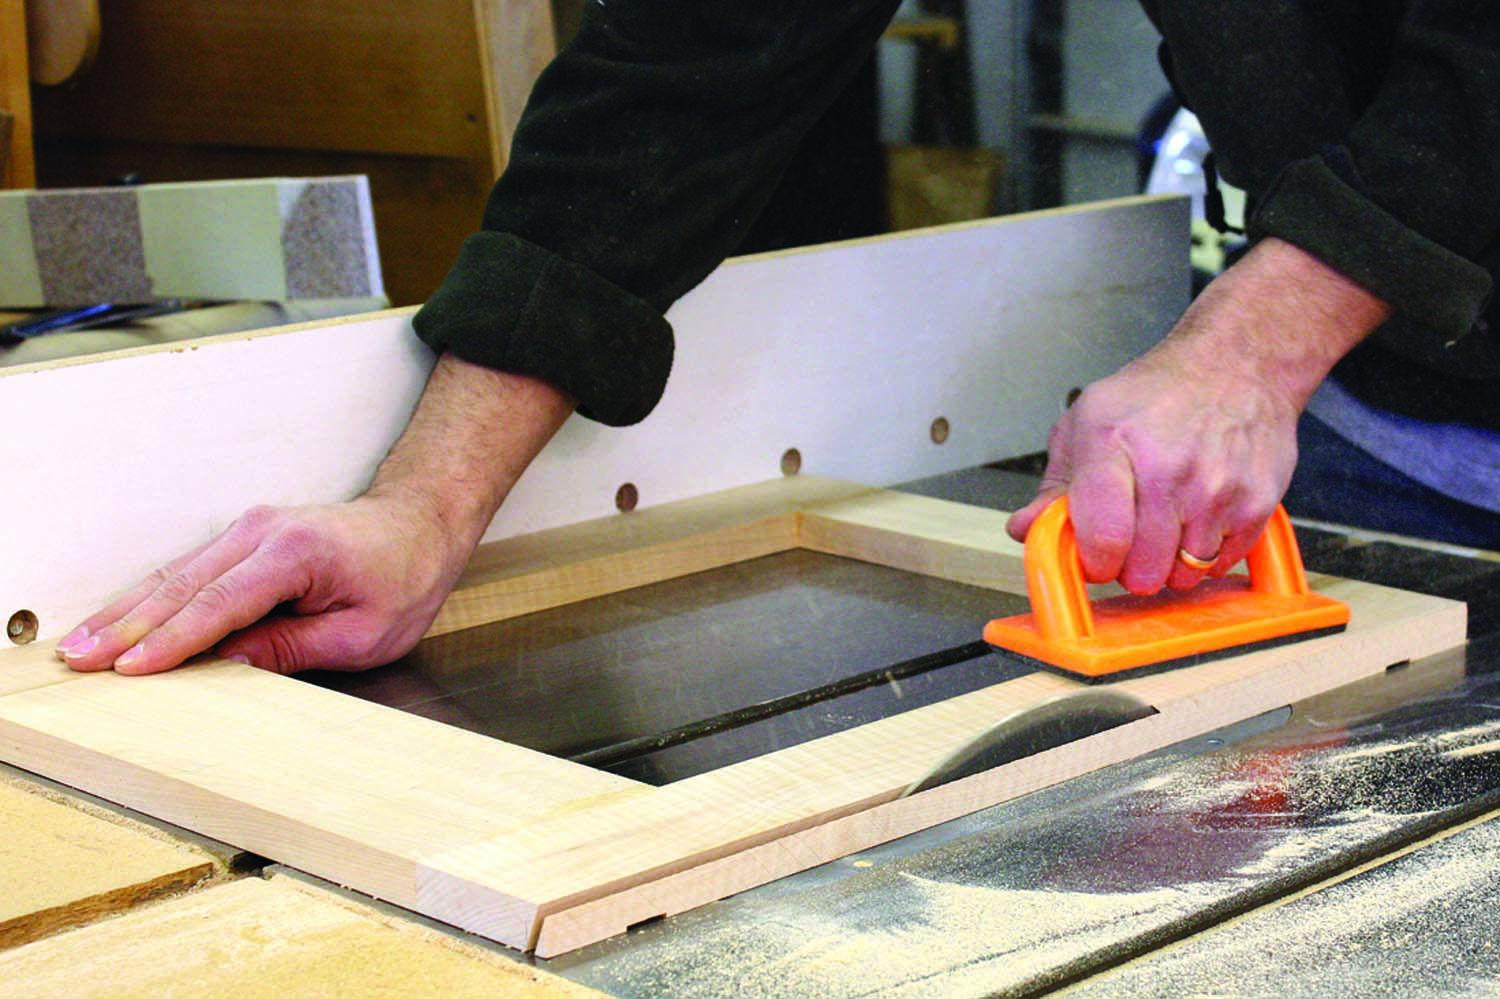 After the frame is dry, I make a shallow 1⁄16“-deep x 3⁄4“-wide dado on the inside of the face frame – as well as on the returns – in order to index them to the top and bottom of the cabinet. With the top centered in the dado, I make a mark at the bottom of the dado on the right and left sides. I then set the table saw to make a 22.5° cut and carefully rip to the lines that I made. Because these lines are face down on the table saw, it is best to either sneak up on the final width or transfer the cutlines to the end of the face frame.
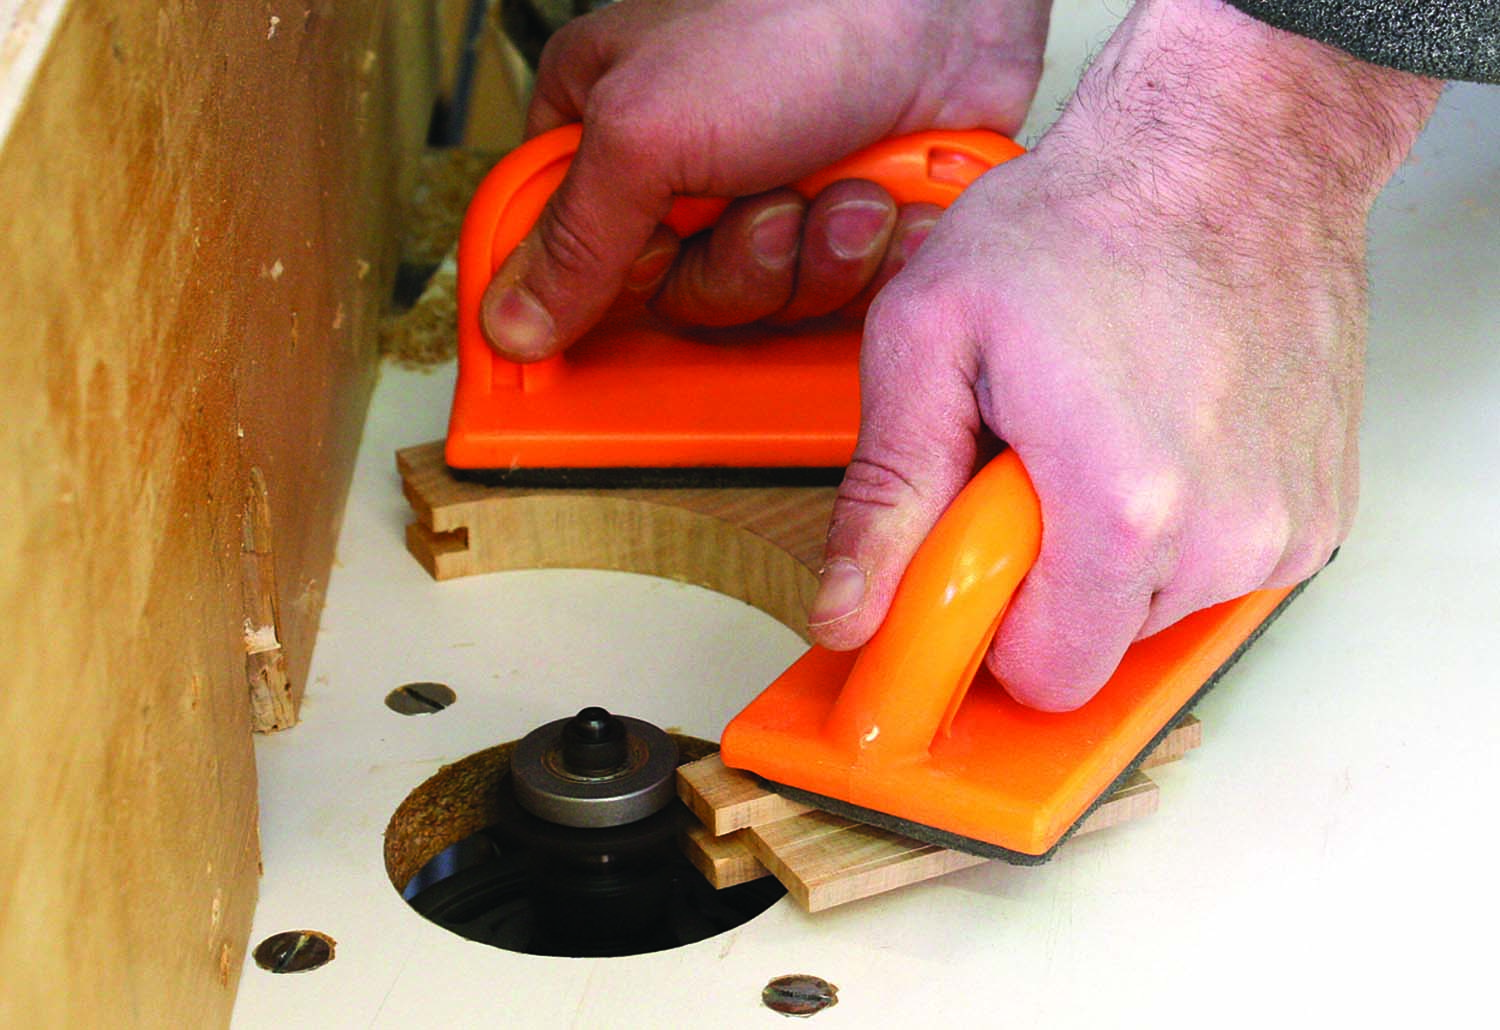
Caul me. A V-notch cut into a scrap makes a perfect caul for clamping the odd-shaped top and bottom.
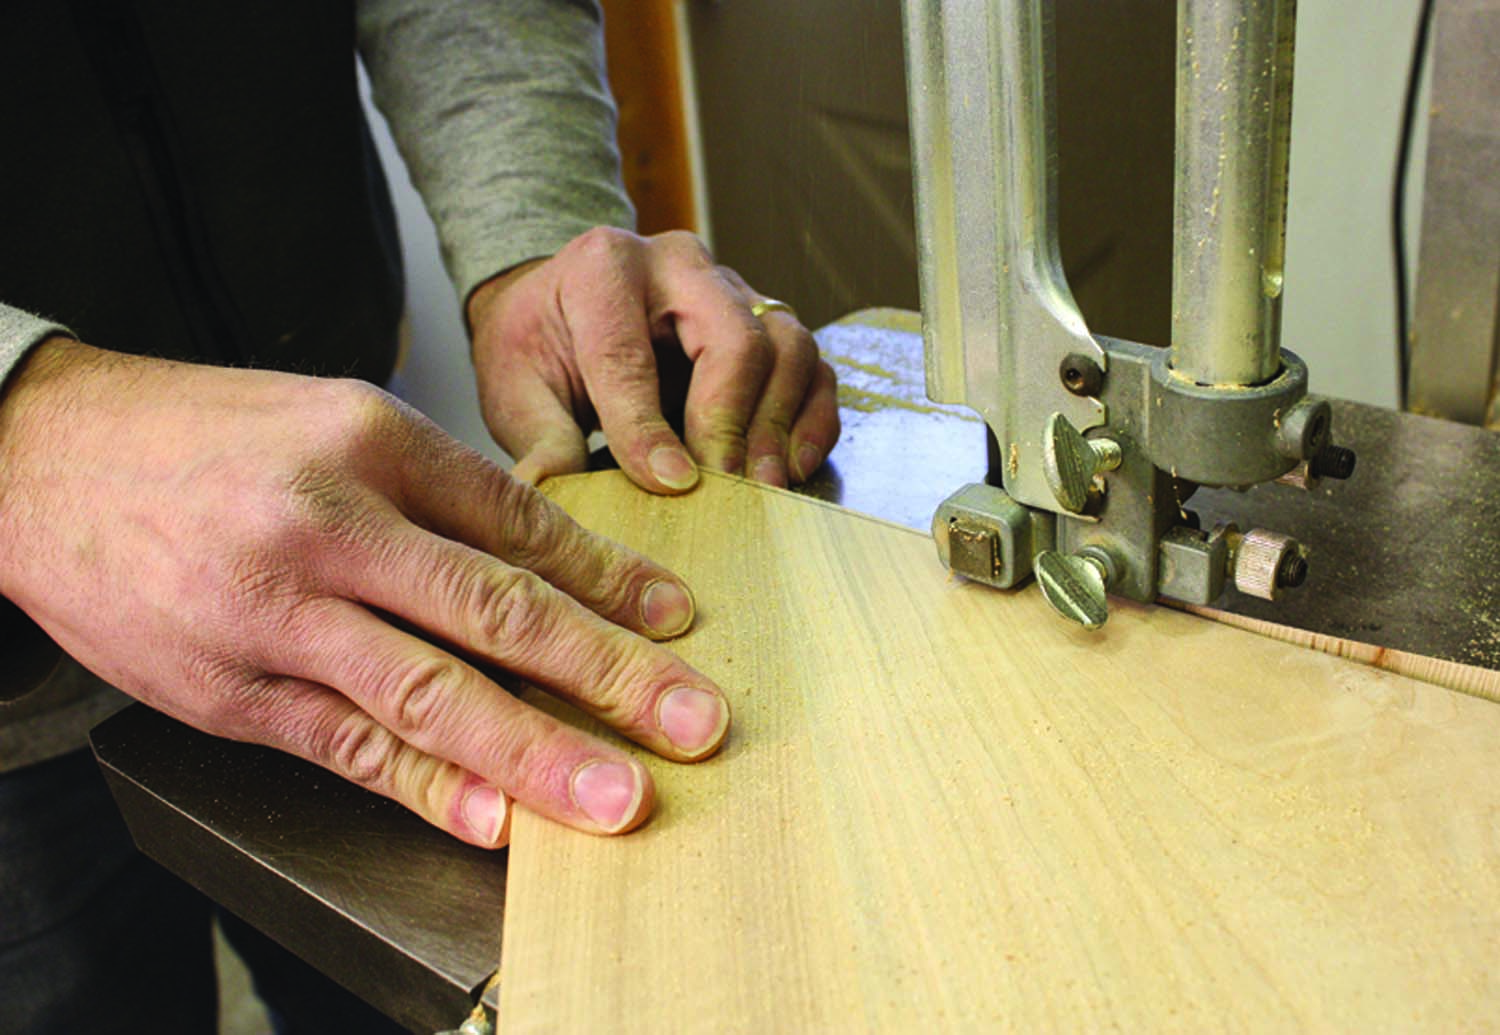
Walking a thin grey line. The top and bottom are cut out at the band saw, keeping as closely as possible to the layout lines.
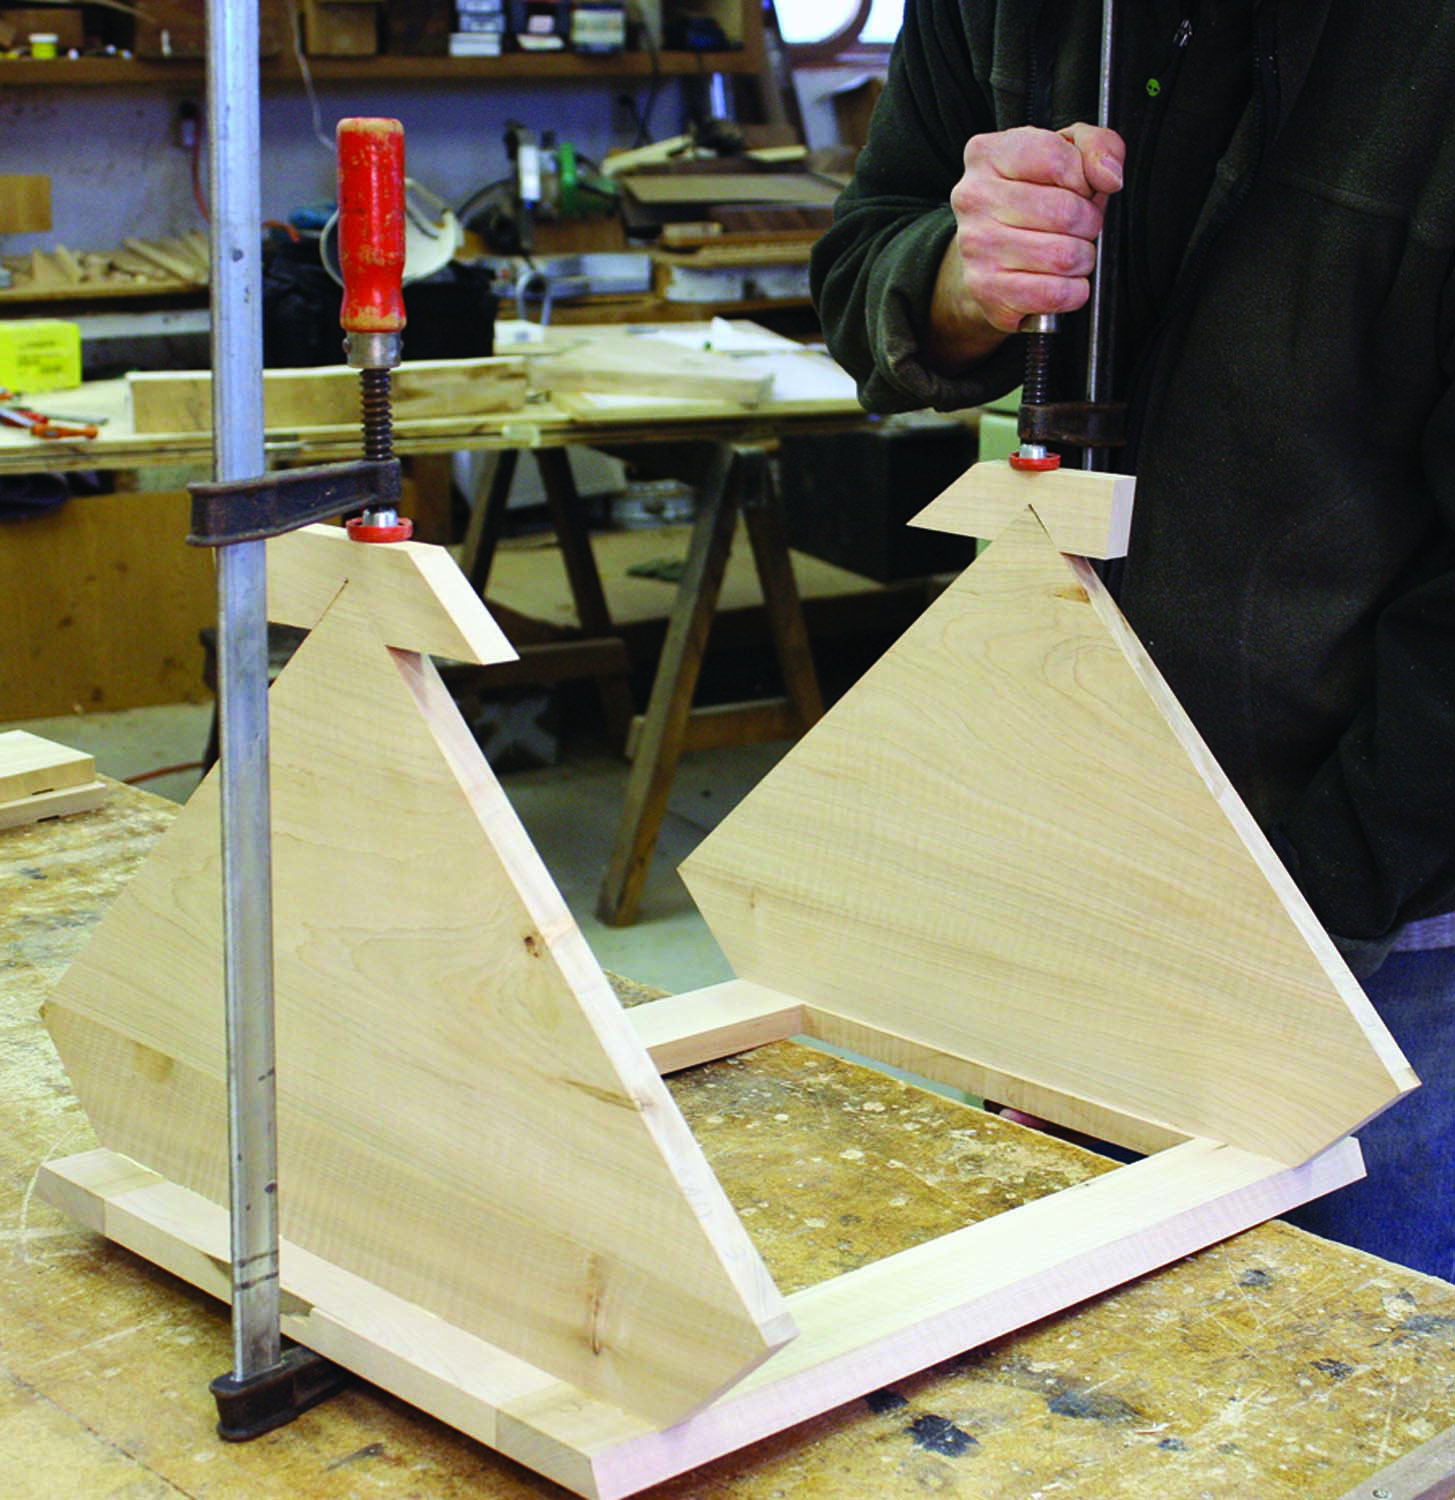
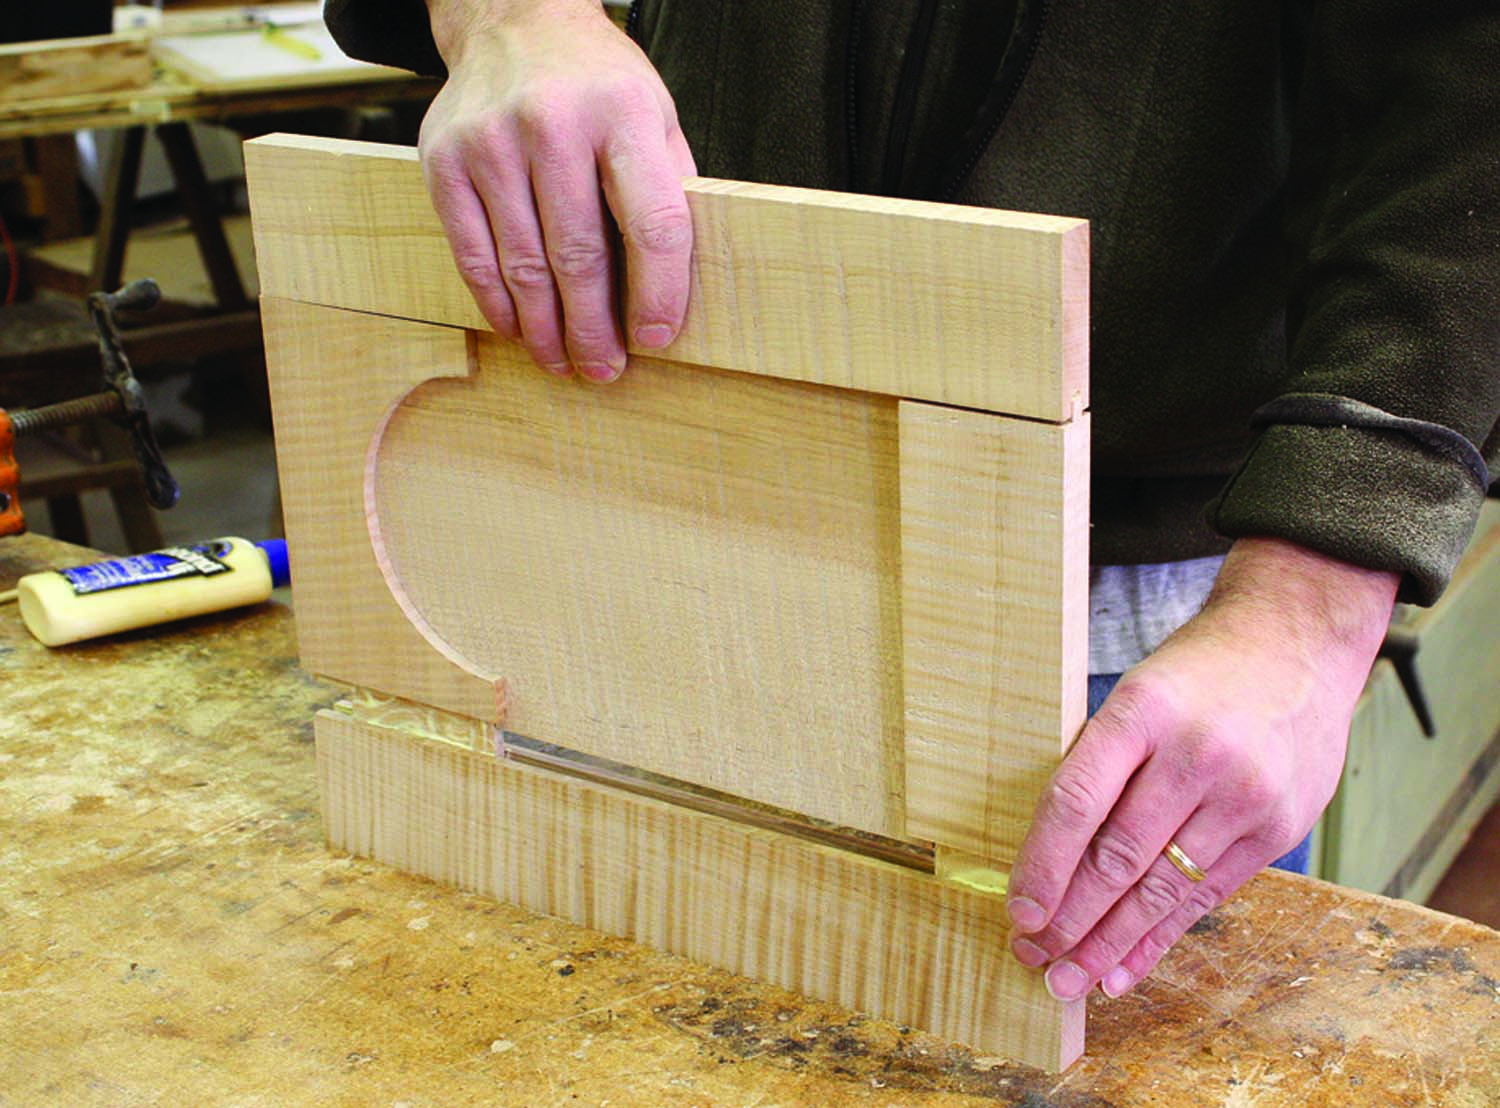
The decorative scrolled apron of the face frame is laid out, cut at the band saw and cleaned up with files and sandpaper. When cutting this profile, the areas where the scroll meets the miters are left uncut and are faired to the returns later. I then glue the cabinet top and bottom to the face frame. The returns can now be ripped at 22.5° to match the angle of the face frame, rabbeted for the back, and the scrollwork cut on the lower front edge. The returns are glued with the help of cauls that fit over the front frame stiles and the returns, allowing for vector clamping of the mitered joint. I then glue a door stop to the inside of the face frame. The stop should overhang the door opening by no more than 1⁄4“.
The Door
Planning for assembly. A shallow dado is made at the inside top and bottom of the face frame, as well as on both returns in order to facilitate layout of the mitered joint and its subsequent assembly.
With the shell of the case assembled, I can now make the door. The tombstone panel is based on one from a Pennsylvania piece. It differs from a standard raised panel in that it overlays the front face of the door frame. The back edge of the panel is housed in a dado, like its raised cousin.

Arch madness. The radius of the arc of the top door stile is 5⁄16″ less than the radius of the panel arc. Note that the tenons have not yet been haunched.
I begin by cutting a 1⁄4“-wide x 5⁄16“-deep groove for the panel, located 1⁄4“ from the front of the rails and stiles. For the joinery, I use haunched mortise-and-tenon joints. The mortise is cut with a 1⁄4” hollow chisel mortiser centered in the stile groove then cleaned up with a chisel. I cut the corresponding tenon with a dado set. After cutting the joinery, I dry-assemble the door.
I then prepare a door panel blank on which the width is 1⁄8“ less than the distance between the groove bottoms of the left and right stiles. I lay out and cut the tombstone shape, rout a 1⁄4“-radius bead on the front with a 1⁄16” fillet, and carve the inside corner of the bead where the arch meets the flat at the top of the panel.
A tight curve. The groove for the inside edge of the upper door stile is cut with the same slot cutter used on the tombstone panel.
Go on, bead it. A 1⁄4″ roundover bit is used to rout the bead and fillet on the tombstone panel.
The radius of the arch of the top door rail is 5⁄16“ smaller than the panel arch. Both the concave and convex arches are band sawn and faired with files and sandpaper. I then groove the three straight sides of the panel at the table saw so that the beaded edge of the panel fits tightly to the face of the door. Care is taken to achieve a proper fit – the bead should appear to terminate at the door frame, but should not be too snug.
It’s an inside job. Because neither the roundover bit nor the slot cutter used to rout the groove around the panel arch is capable of cutting an inside corner, both of these areas must be finished by hand.
The grooves in the arched top rail and in the tombstone portion of the panel are cut at the router table with a 1⁄4“-wide slot cutter. Because the slot cutter leaves material, the inside corner at the bottom of the panel dado must be chopped out with a 1⁄4“ chisel. The door and panel are dry-assembled to check the fit. Both the panel and frame are sanded prior to glue-up.
When the glue has dried, the door is fit to the opening in preparation for hardware. Rattail hinges help to give the piece a period feel, although butterfly or butt hinges may also be used. I chose a knob that, when rotated, locks the door with an interior metal finger. The hinges and knob are installed but removed prior to finishing.
Easy hardware. This was my first experience with this style hinge. I was pleasantly surprised that there is relatively little play though my door reveals are about 1⁄16″.
The Cornice
Don’t sweat the glue-up. Because everything has been dry-assembled more than once, glue-up should go smoothly. Just remember to avoid too much adhesive squeeze-out on the face. It is difficult to clean up around the panel, which should not be glued to the door frame.
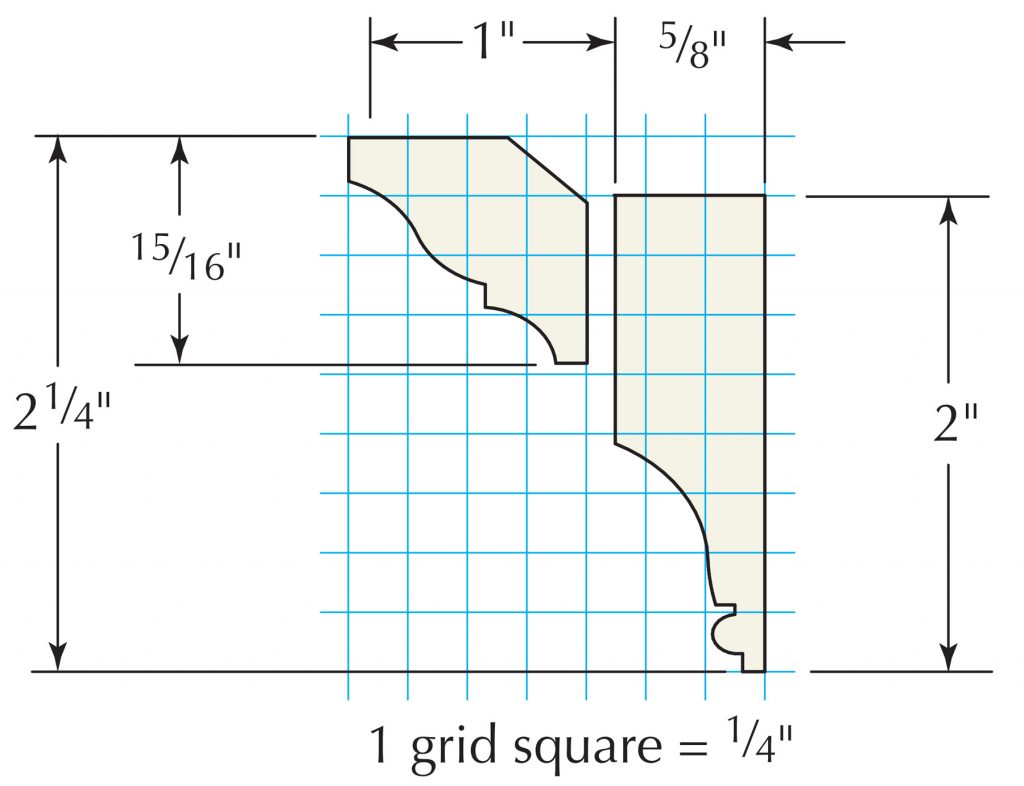
The cornice of the cabinet is made of two pieces: a crown and a congé, or elongated cove. The crown profile, a standard ogee with cove, is cut using a stock router bit. The congé is cut on the table saw using an angled feed to take advantage of the arc of a 71⁄4“-diameter blade. Most of the waste is cut away before setting up the saw for the cove cut. The resultant surface is scraped and sanded smooth. A small bead (1⁄4“ diameter) with a 1⁄8“ fillet below is routed at the bottom of the cove. Once all of the mouldings have been prepared, they are mitered and installed with glue and nails. I find it easier to install the front moulding first, then fit the returns to it.
The Back & Pendant Shelves
The 44″-long x 5⁄16“-thick shiplapped back boards can be of primary or secondary wood. For this project, I am using white pine wainscoting that I had on hand, but I’ve also used random-width primary wood on a similar cabinet made of walnut. The backboards have a 3⁄32“-deep dado to house the 5⁄8“-thick pendant shelves. The front edge of each shelf has a decorative profile that echoes the scrollwork on the apron of the cabinet above.
The back itself also has a scrolled outline. This profile should be laid out so any cuts do not completely sever a piece of the back that is needed to complete the profile below it. By locating vertical scrolled elements below the back of each shelf, the front edges of the shelves will avoid unnecessary shaping.
All of the scroll cuts are done on the band saw then filed to remove sawmarks. A few passes with #120-grit sandpaper are then needed to remove the file marks. Before the back is nailed to the cabinet, I finish all the parts. It is much easier to finish the inside of the cabinet now than after everything is assembled.
The Finish
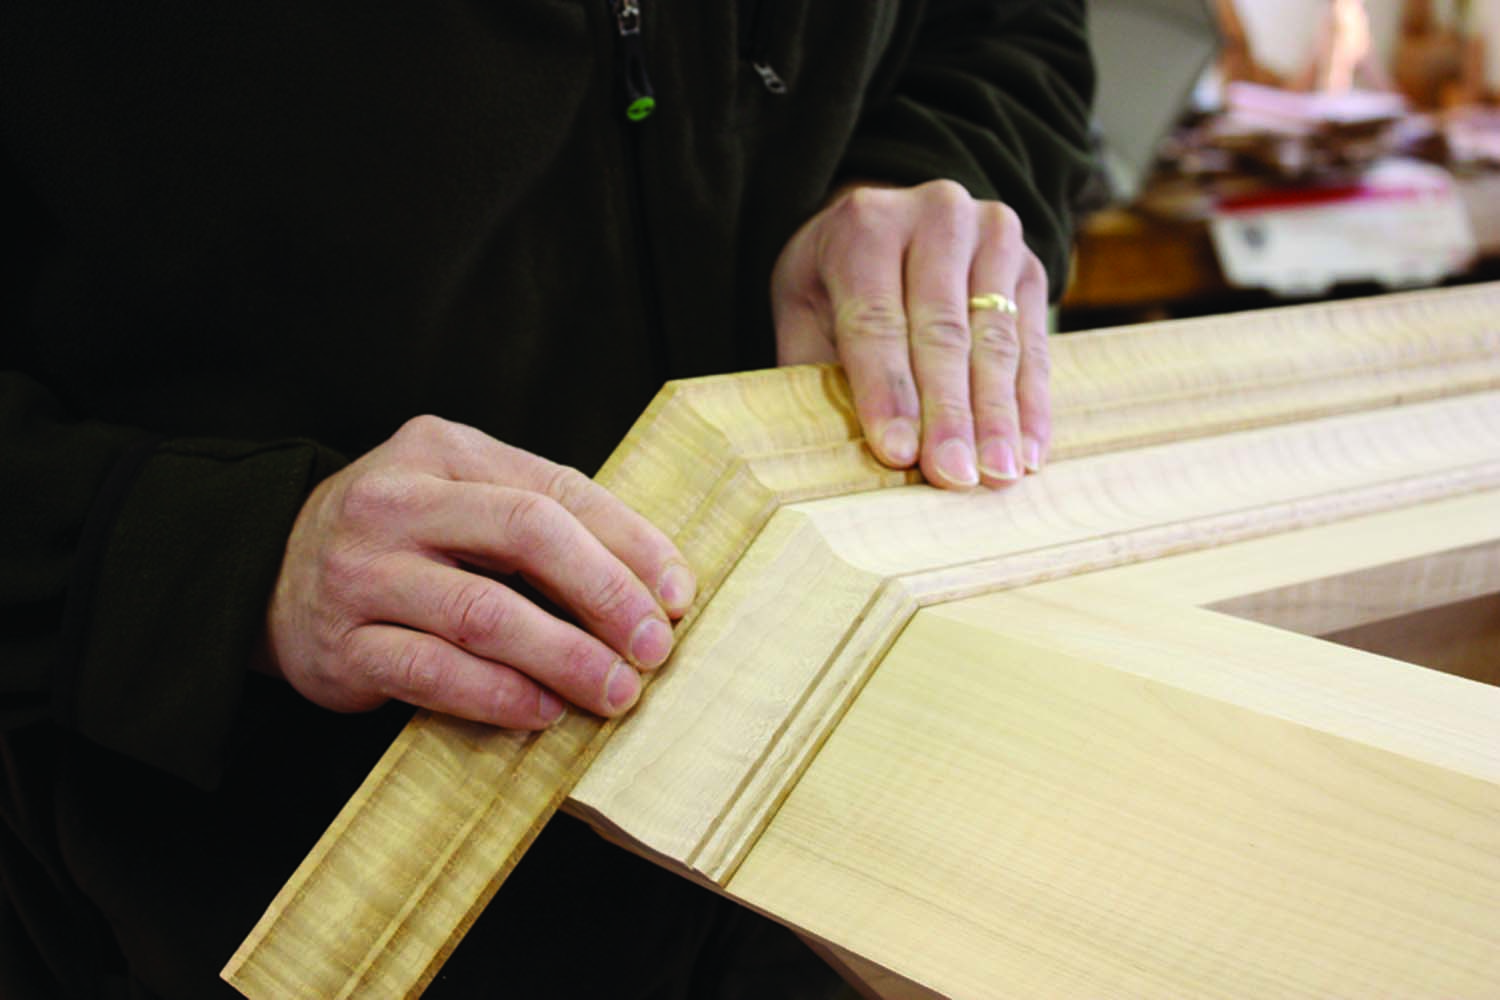
Many happy returns. When running mouldings around a cabinet, it is easier to begin at the front. Install the center piece first, then fit the returns to it.
The figure of curly maple is really emphasized when it has been stained with aniline dye, but I find most maple dyes result in an unrealistic yellow hue. I create my own shade of “antique maple” by mixing J.E. Moser’s powders. I use three teaspoons of Honey Amber Maple and one teaspoon of American Walnut per quart of water. Although I often spray dye on larger pieces, for a small project like this, I simply rag it on. After the dye has dried, I apply three coats of Waterlox original formula, lightly sanding between coats with a fine sanding sponge to achieve a satin finish. I then apply dark paste wax to highlight the mouldings and tombstone panel, further giving the piece a worn appearance.
Completing the Cabinet
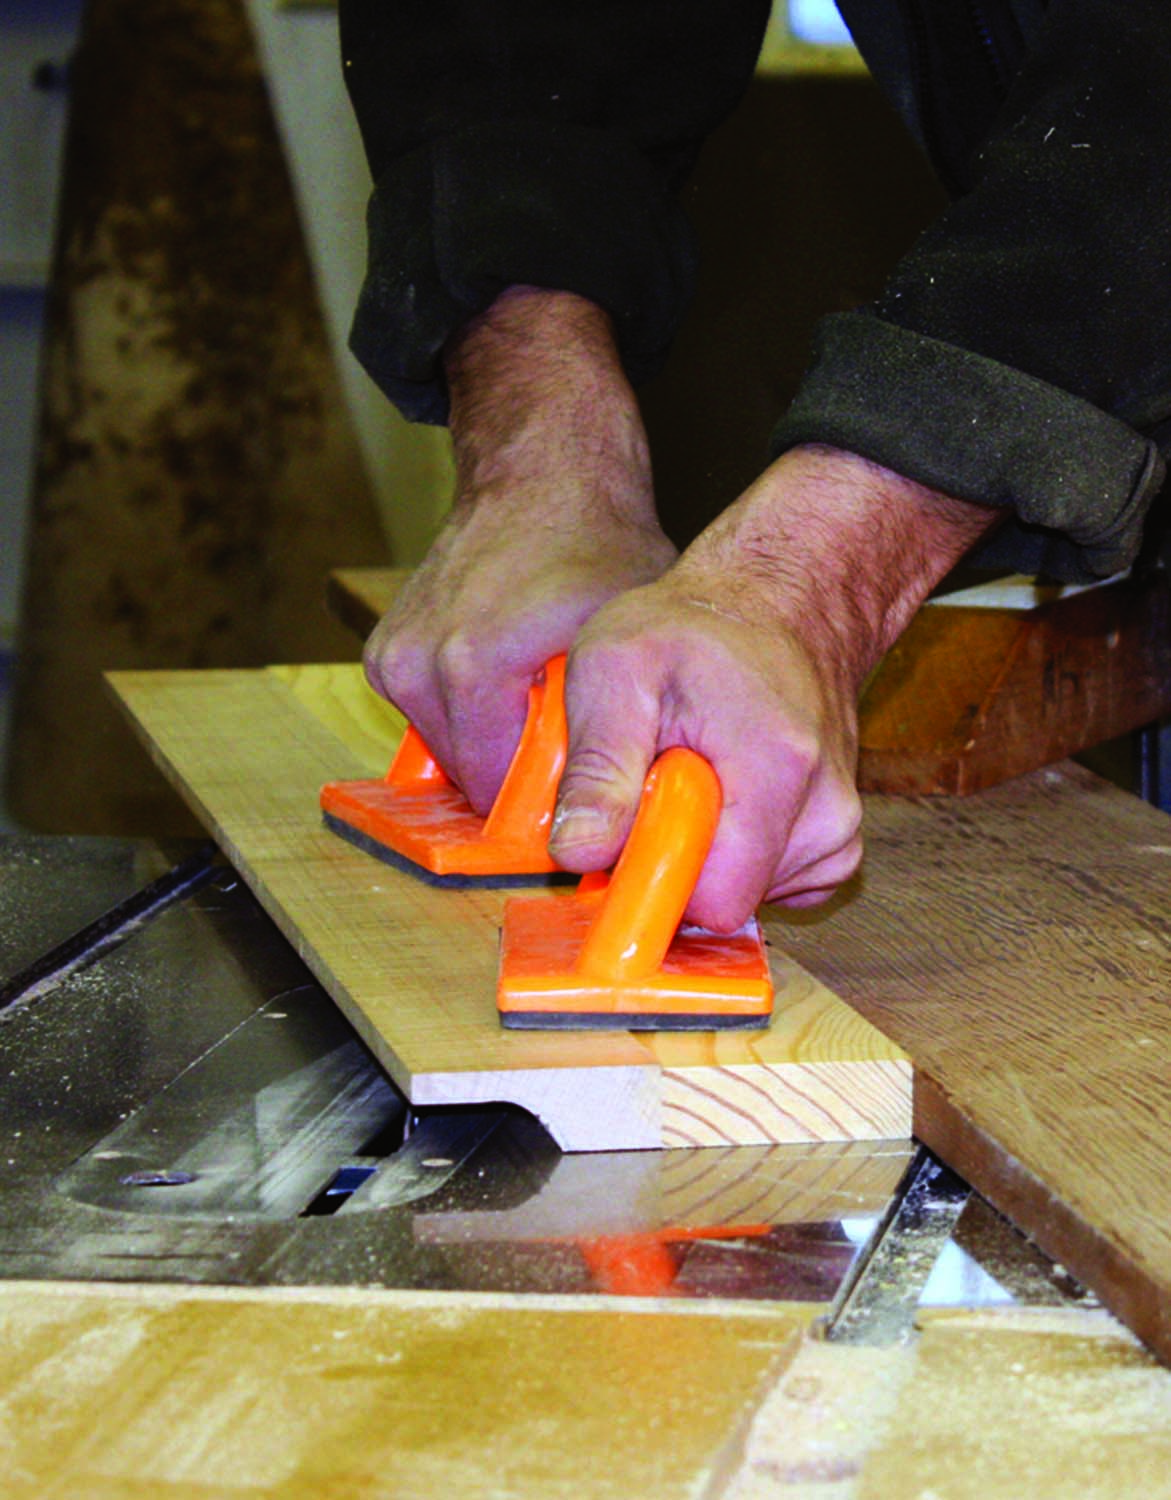
A covert operation? After removing most of the waste, a cove is cut on the table saw. Care must be taken to ensure that the fence is properly secured and that the workpiece is held tight to the fence during the feed.
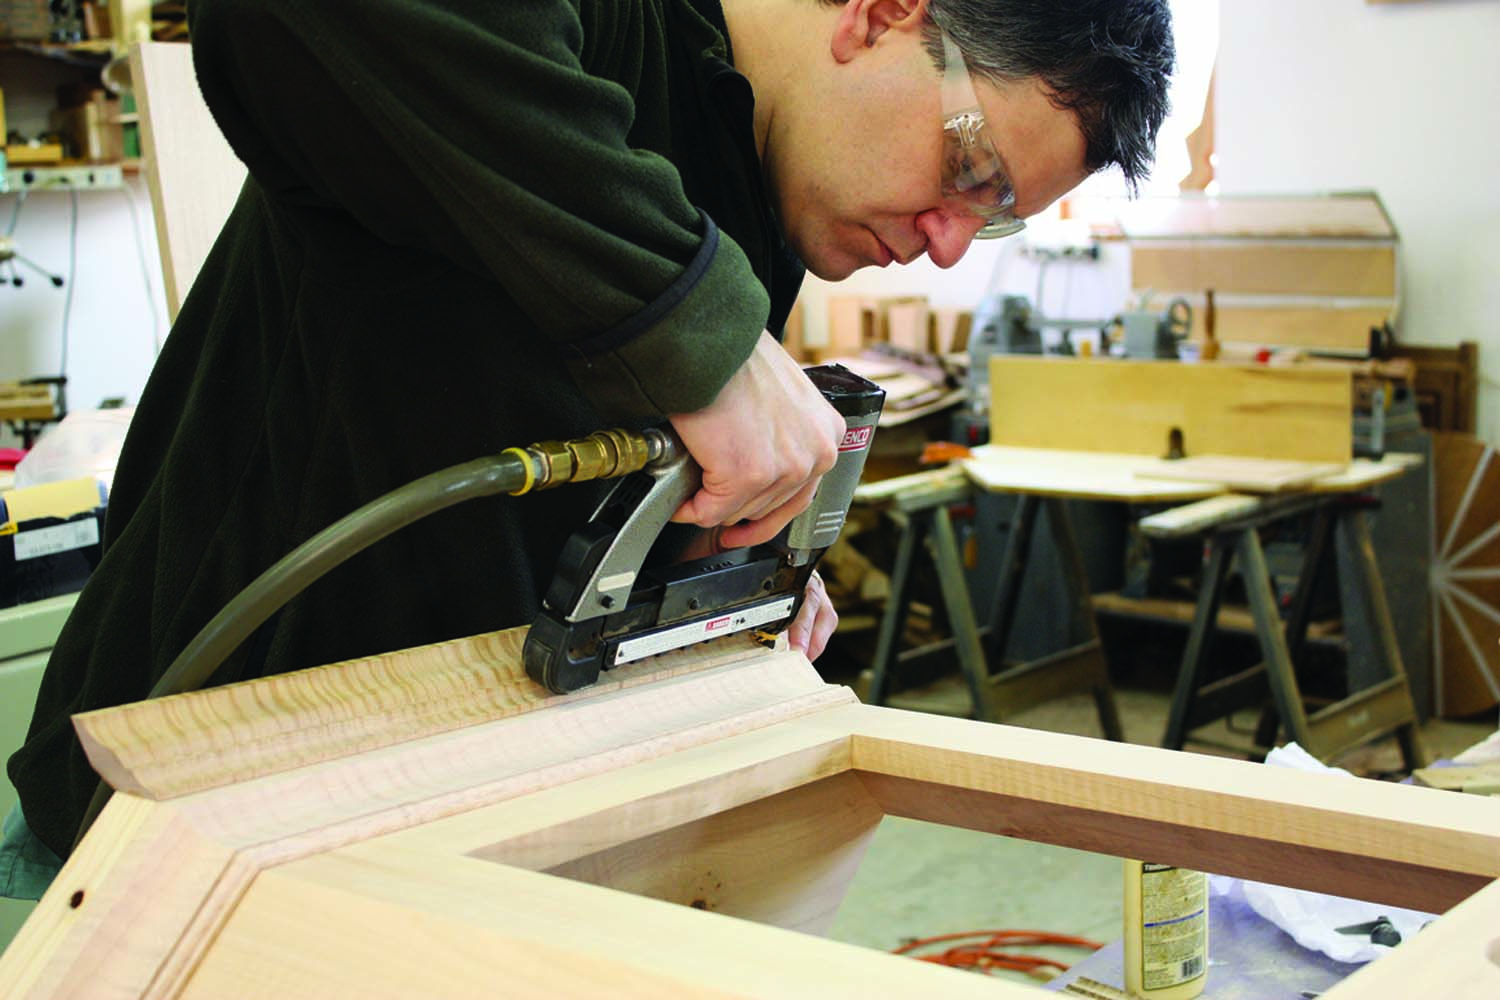
The build-up. When installing a stepped or built-up moulding, run each layer entirely before beginning the next. Note that the pine carrier strip of the congé is capped by the crown. Expensive primary wood can thus be conserved.
Strength in numbers. The backboards support the pendant shelves, keep the cabinet from racking, and carry its weight when attached to the wall. Here 5⁄8″-wide dados are cut for the pendant shelves.
The pieces for the back are glued and nailed to the pendant shelves beginning at the inside corner. With the back and pendant shelves assembled, this entire assembly is nailed to the back of the cabinet. To protect the finish, I do this with the cabinet face down on a thick pad or moving blanket and allow the cornice to hang over the edge of the bench. The door hardware is then re-installed and the cabinet is ready to be hung.
The finished hanging cupboard with pendant shelves is a real eye-catcher in any room and the form is ideal for the beginner and seasoned woodworker alike. While the project shown here has many bells and whistles – a tombstone panel, a two-piece cornice and scrollwork on the apron, returns, back and shelves – it can easily be streamlined to suit the craftsperson who has limited shop time or is still acquiring new skills. I encourage you to push the form even further.

Mark Arnold is a graduate of North Bennet Street School and the owner of Boston Woodworking Co., Ltd. (bostonwoodworking.com) in Sunbury, Ohio.
Here are some supplies and tools we find essential in our everyday work around the shop. We may receive a commission from sales referred by our links; however, we have carefully selected these products for their usefulness and quality.