We may receive a commission when you use our affiliate links. However, this does not impact our recommendations.
Editor’s note: This article ran in the October 2011 issue of PWM and we are resurfacing it because John is clearing out some bins of blanks in a warehouse sale on his site. I’ve included part of the article here and the build is detailed in the PDF of the issue. This is not a sponsored post, we just wanted to share a great article that paired with his sale that opens up tomorrow, January 15th at 9 am PST.
By John Economaki
Make the square that launched Bridge City with tools found in most home shops.
From 1977-1983 I made my living as a studio furniture designer and maker. In addition to making furniture, I found most of the hand tools available at the time so uninspiring and inconsistent with the craftsmanship values I was trying to impart in my furniture, that I made my own.
The roots of my personal “homemade” try square, however, go back to the fall of 1973 and my first days as a rookie woodshop teacher. Amongst the supplies ordered by my predecessor were a dozen Stanley try squares. Several of them were so visibly off I remember asking myself, “What do you call a square that is not square?” The answer I like best today: paint can opener.
Consequently, the first project fo my 9th-grade students was pragmatic – they were to make their own try squares. The design was centered on available materials – a local veneer mill had donated all its solid Brazilian rosewood shorts to the school, and the adjacent metal shop had brass strips sitting around. So those became the materials for the square. The design was quickly revealed as flawed; too many students were splitting the handles while seating the rivets. My original design was modified to add a brass rivet seat, and that did the trick. Little did I know that 10 years later, in 1983, that exact square would launch a new company named Bridge City Tool Works.
Later in the fall, a vice principal asked me if we had any projects to represent the Industrial Arts program for Back-to-School-Night. I asked for a student volunteer and about 20 students enthusiastically responded with polished try squares. We arranged them in an arc on a glass shelf in the display case in the main hall. Beside each square was the maker’s name.
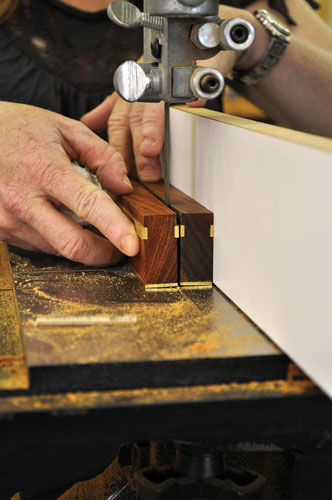
Taps fix it. This block of wood in a vise is great way to persuade the blade to where it belongs. A couple light taps usually does the trick.
That little display completely gobsmacked the parents, students, most of the faculty and the administrators. Nobody could believe such quality and beauty could be accomplished in a “shop class.” It was an awesome experience for the kids and enrollment in the program took off overnight. Quality work became the theme of all subsequent projects.
Teacher, Maker, Toolmaker
I quit my teaching job in 1978 and became a full-time furniture designer and maker. In the late 1970s I had a “lunch hunch” that a couple of the tools I had designed and made would be of interest to others – visitors to my shop almost always commented on them. So, in the summer months when my shop was unbearably hot, I would do small runs of my try square and a scratch awl, and place them on consignment at the Contemporary Crafts Gallery in Portland, Ore. It was nice to get a check in the mail every now and then.
Unfortunately, I took better care of my tools than I did of my body. I rarely wore a dust mask, and in early 1983 I woke up with double pneumonia and was informed that it was caused by a hyper-allergic reaction to wood dust. My days as a furniture maker were over – as in overnight.
I thought high-quality tools might be of interest to woodworkers but all of the major mail-order companies at the time were adamant that Americans would not pay for quality. Consequently, the TS-2 Master Try Square and the SA-2 Scratch Awl were introduced to the woodworking community in the November/December 1983 issue of Fine Woodworking. I had spent every penny in the bank on that ad to find out that the mail-order companies were only partly correct.
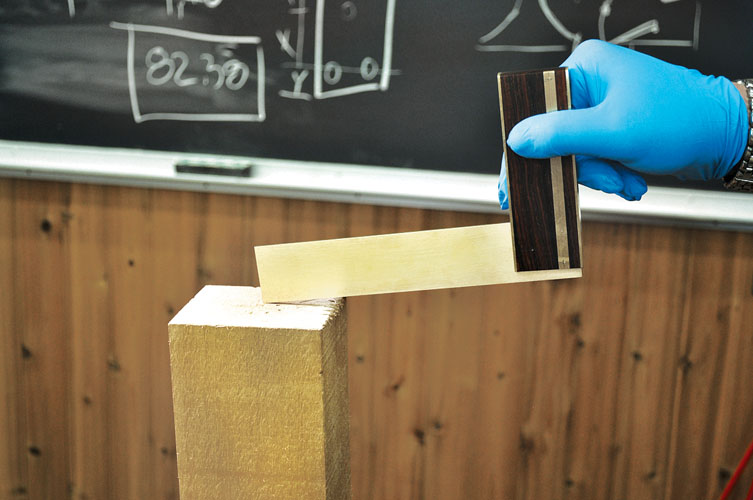
Two at a time. Note the orientation of the brass wear face and the rivet seats in this image. It is difficult to find 1⁄16″ x 1⁄4″ 360 brass, but 1⁄4″ x 1⁄4″ is readily available. This can be beneficial when making more than one handle at a time. Multiple handles can share a length of 1⁄4″ x 1⁄4″ brass and be separated on a band saw with a metal-cutting blade. After sawing, both faces of the handle need to be flush sanded on either a horizontal or vertical belt sander – #120 grit is ideal. Never allow the brass to get too hot to the touch. Handles can also be flattened by drawfiling with a mill file. The square’s second wear face will be attached after the handle is slotted.
There is an elegance and soul to the TS-2 try square, and I am thrilled to be able to share how to make it with you. During the past four decades we have produced tens of thousands of TS-2 try squares and it is my hope you can find the time and inspiration to create a version for your shop. I believe it is one of the most rewarding weekend projects you will ever make and with a little care, will become an heirloom that will inspire future woodworkers in your family for multiple generations.
Design Philosophy
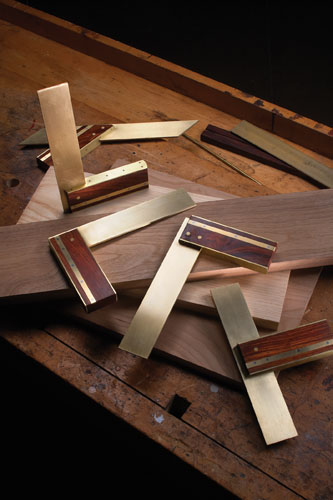
A try square is a simple tool that is candidly two “straight edges” affixed at 90° to each other. And when both components are parallel, both the inside surfaces of the square and the outside edges can be used as references. In addition, the inside square and the outside square are perfectly offset from each other, which means you can use the inside of the handle as a reference and scribe a line using either the inside or outside of the blade. Few woodworkers understand that a traditional wooden-handled try square (where just the inside face of the handle is brass) is an inside square only. You use the outside square at your own risk.
Over the years I have been involved in many discussions about what makes a “great tool.” On one hand you have proponents who lament that any effort (read cost) that does not contribute to the obvious function is waste at best, and arrogance at worst.
Consider this: Most of the tools in your workshop sit and do nothing most of the time. I believe there is another function for these “do nothing” tools (besides the obvious) that is equally important. That function is to inspire. While they are sitting and doing nothing, tools can inspire you to give your best effort 100 percent of the time. This is accomplished by their beauty, craftsmanship and soul – making it difficult for you to justify quick or shabby work.
In short, quality is contagious.
Read the rest of the article and get the full build here.
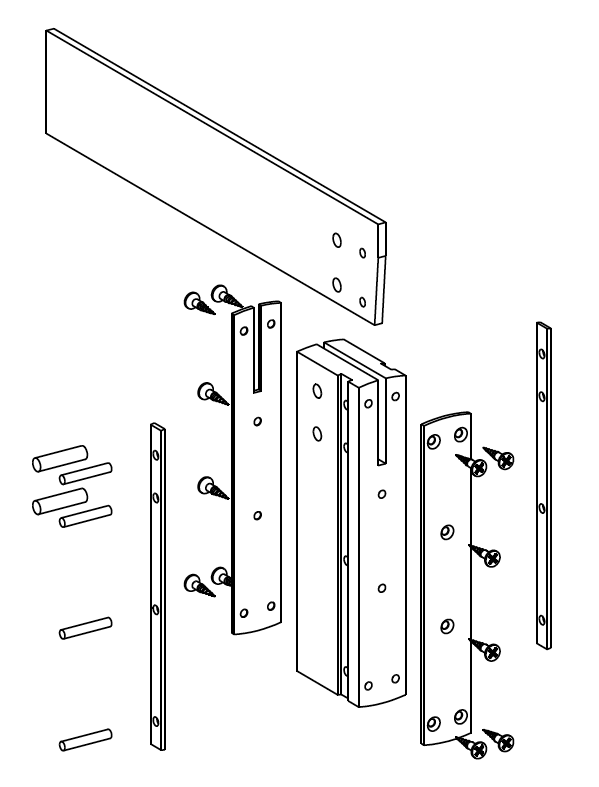
Supplies
1 Handle blank, wood of your choice, L = 6″, W = 1.5″, T = .75″; edges and faces parallel to each other, all corners and ends square.
1 Blade, 360 brass bar,1⁄8” x 11⁄2“, L = 7.9385” (715⁄16“)
2 Wear faces, 360 brass bar, 1⁄16” x 1″, L = 6″
2 Rivet seats: 360 brass bar,1⁄16” x 1⁄4“, L = 6”
2 Brass rivets: 360 brass round,3⁄16” diameter x 1″
4 Steel rivets: drill rod,1⁄8” diameter
12 Brass wood screws, #4 x3⁄8” Phillips (McMaster-Carr #92114A108)
Non-ferrous table saw blade, or chop saw blade with a kerf less than 0.120″
Ball-peen hammer
Center punch
Scratch awl/marking knife
Drill press or drilling jig
Mill file
Cyanoacrylate adhesive (slow set)
Contact cement
#120-, #180-, #220-,#320- and #400-grit abrasive paper
Scotch-Brite pad (maroon)
Paste wax
82° countersink (chatter free)
Safety glasses and face shield
Here are some supplies and tools we find essential in our everyday work around the shop. We may receive a commission from sales referred by our links; however, we have carefully selected these products for their usefulness and quality.