


We may receive a commission when you use our affiliate links. However, this does not impact our recommendations.

Remember Lincoln Logs? When I was a kid, my friends and I spent hours building cabins and forts with them. Lincoln Logs locked together, one on top of another, just like the real deal. They were my first introduction to wood joinery. While playing with them, I must have learned something that stuck with me years later, when I became a cabinetmaker.

Three identical frames, shaped like an “F”, have arms with angled notches that lock together like a puzzle.
The parts of this table lock together, too—without any glue or fasteners—but in a most unusual way. The table is triangular, and all of the Lincoln Log-style notches are set at a compound angle. The table is composed of three identical frames shaped like an “F”. They’re very easy to build. Once you cut out the pieces, you’ll make all the joints on the tablesaw.

Taken apart, the table breaks down into three flat pieces. Each piece is composed of two arms and a leg.
One small warning: Follow the directions closely. All of the pieces look alike, so it’s easy to get mixed up and make a mistake. I’ve figured out a system that should be foolproof (famous last words!), but even so, I recommend that you build a table with some cheap wood first just to get the hang of it.

Fig. 01. Exploded View
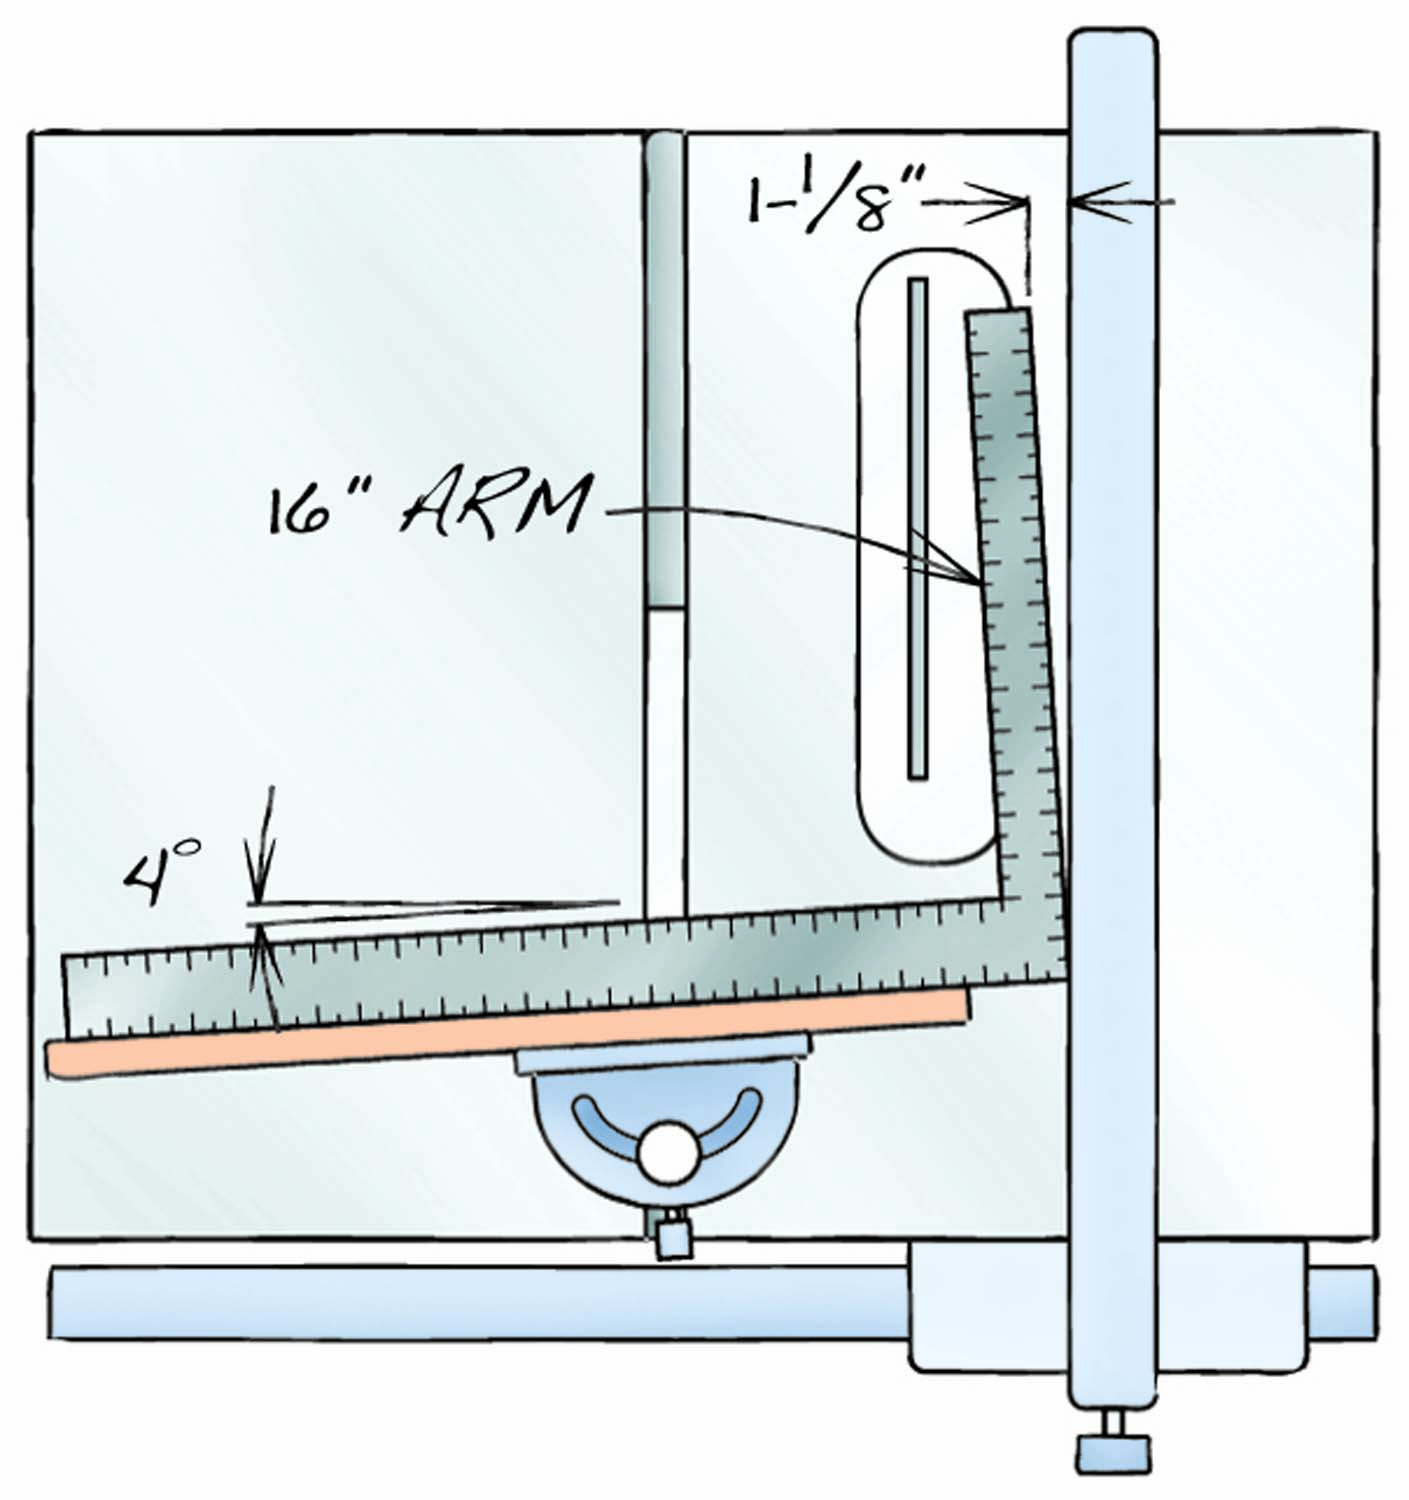
Fig. 02. Tablesaw Setup for 4° Cuts
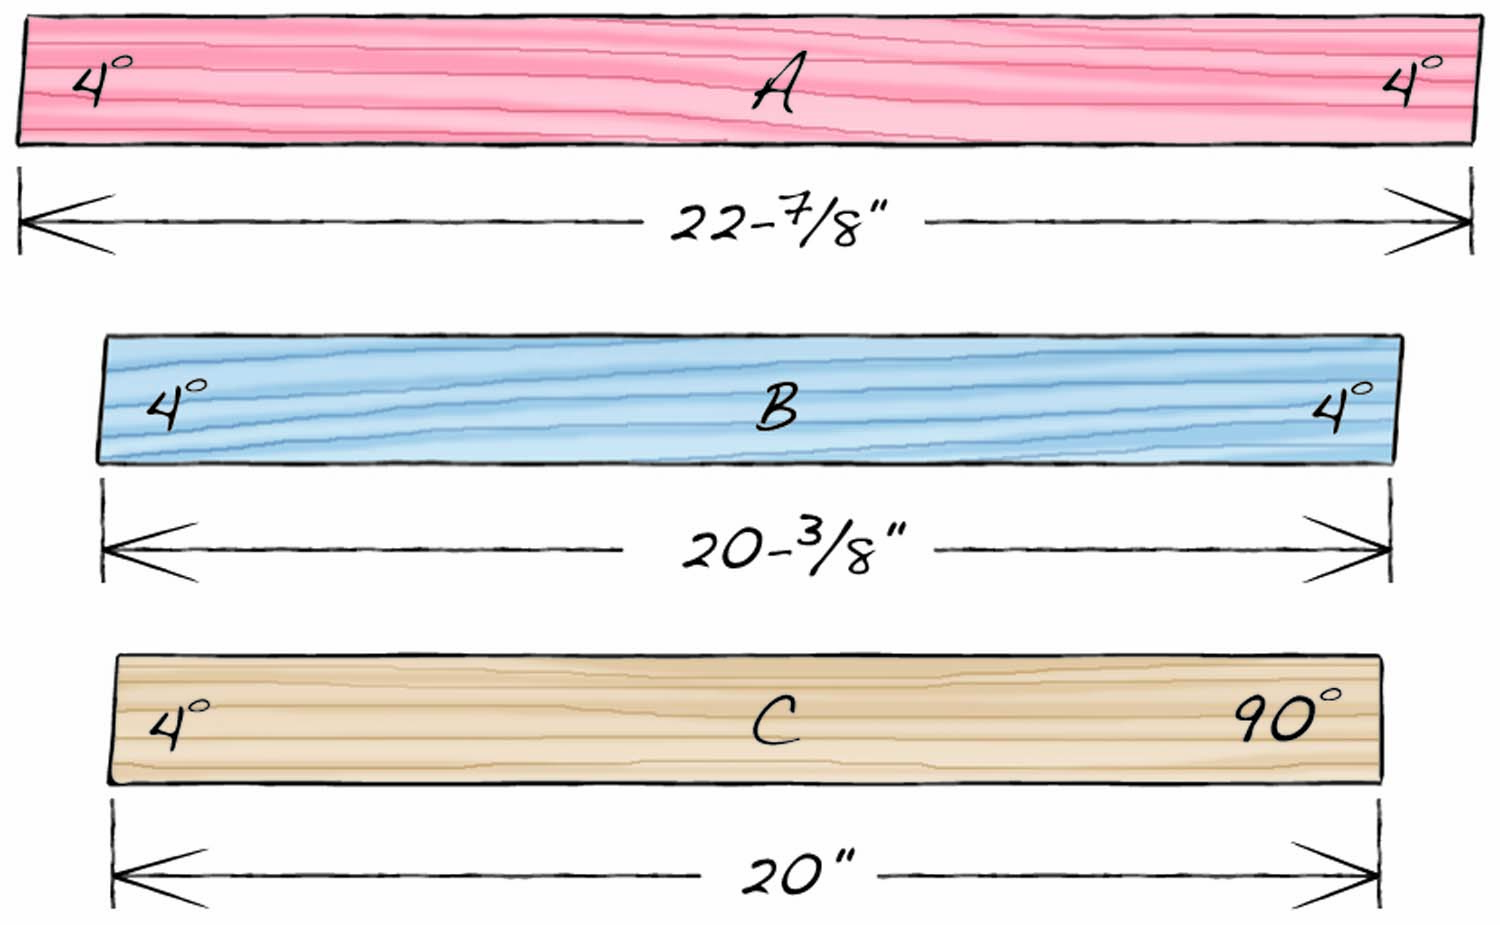
Fig. 03. End Cuts
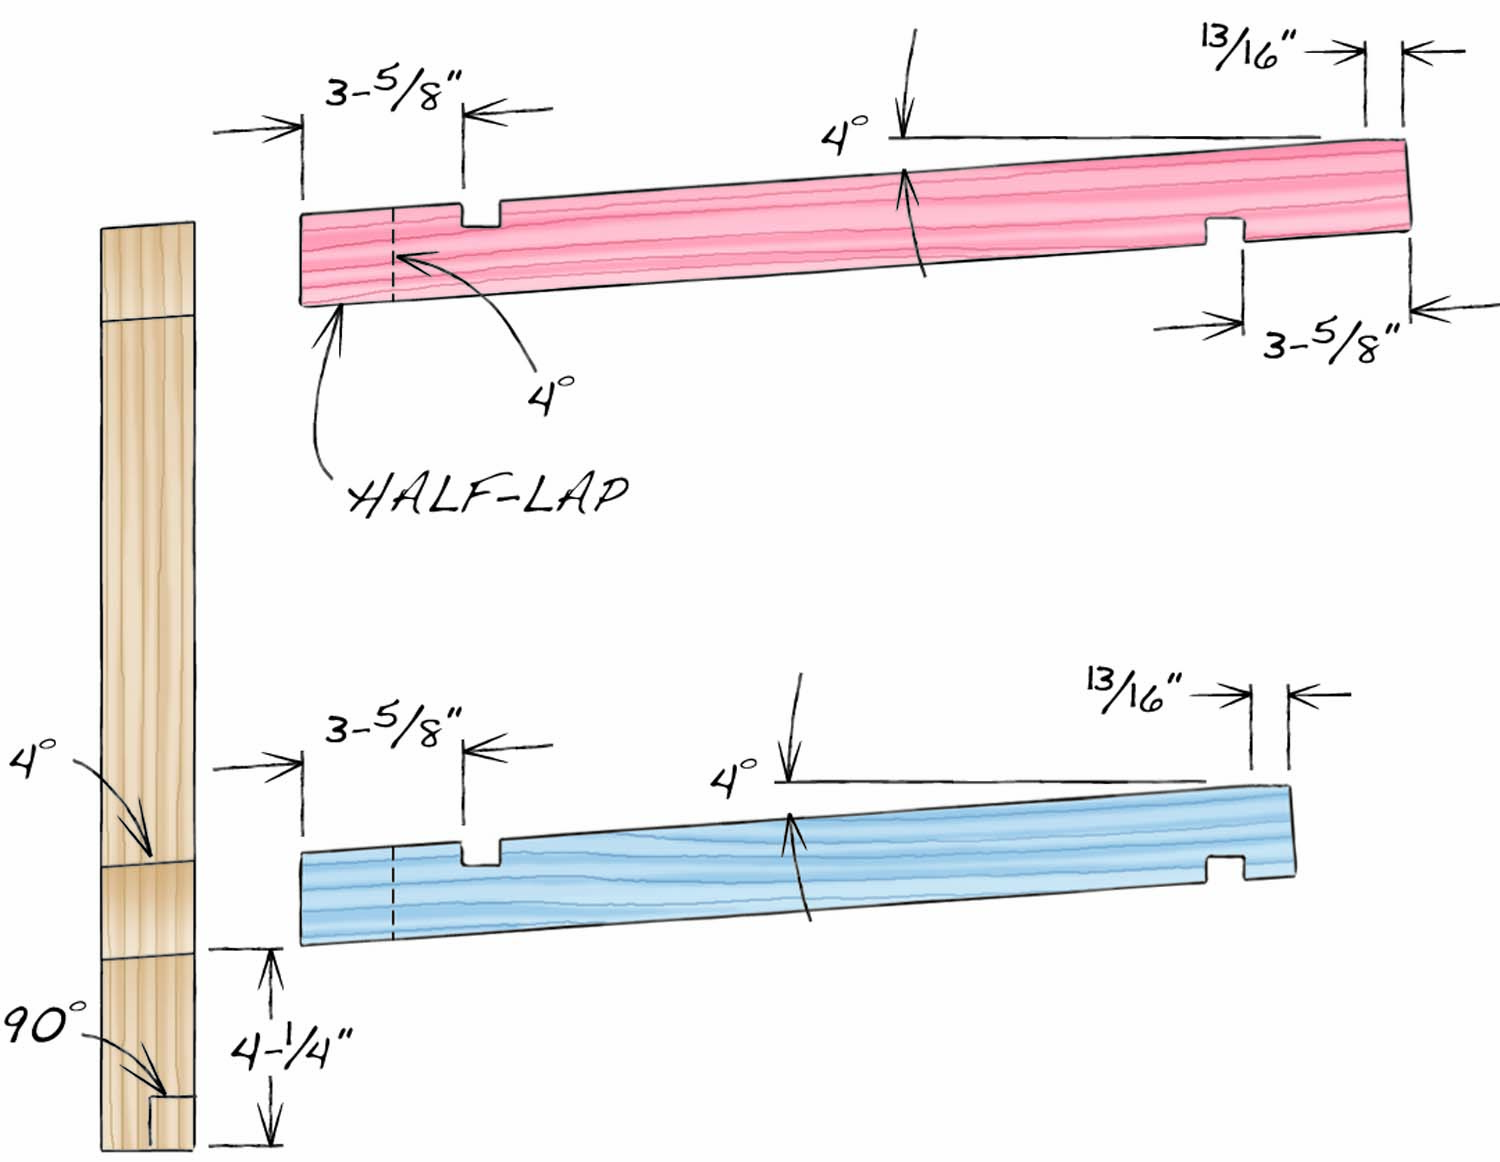
Fig. 04. Frame Details
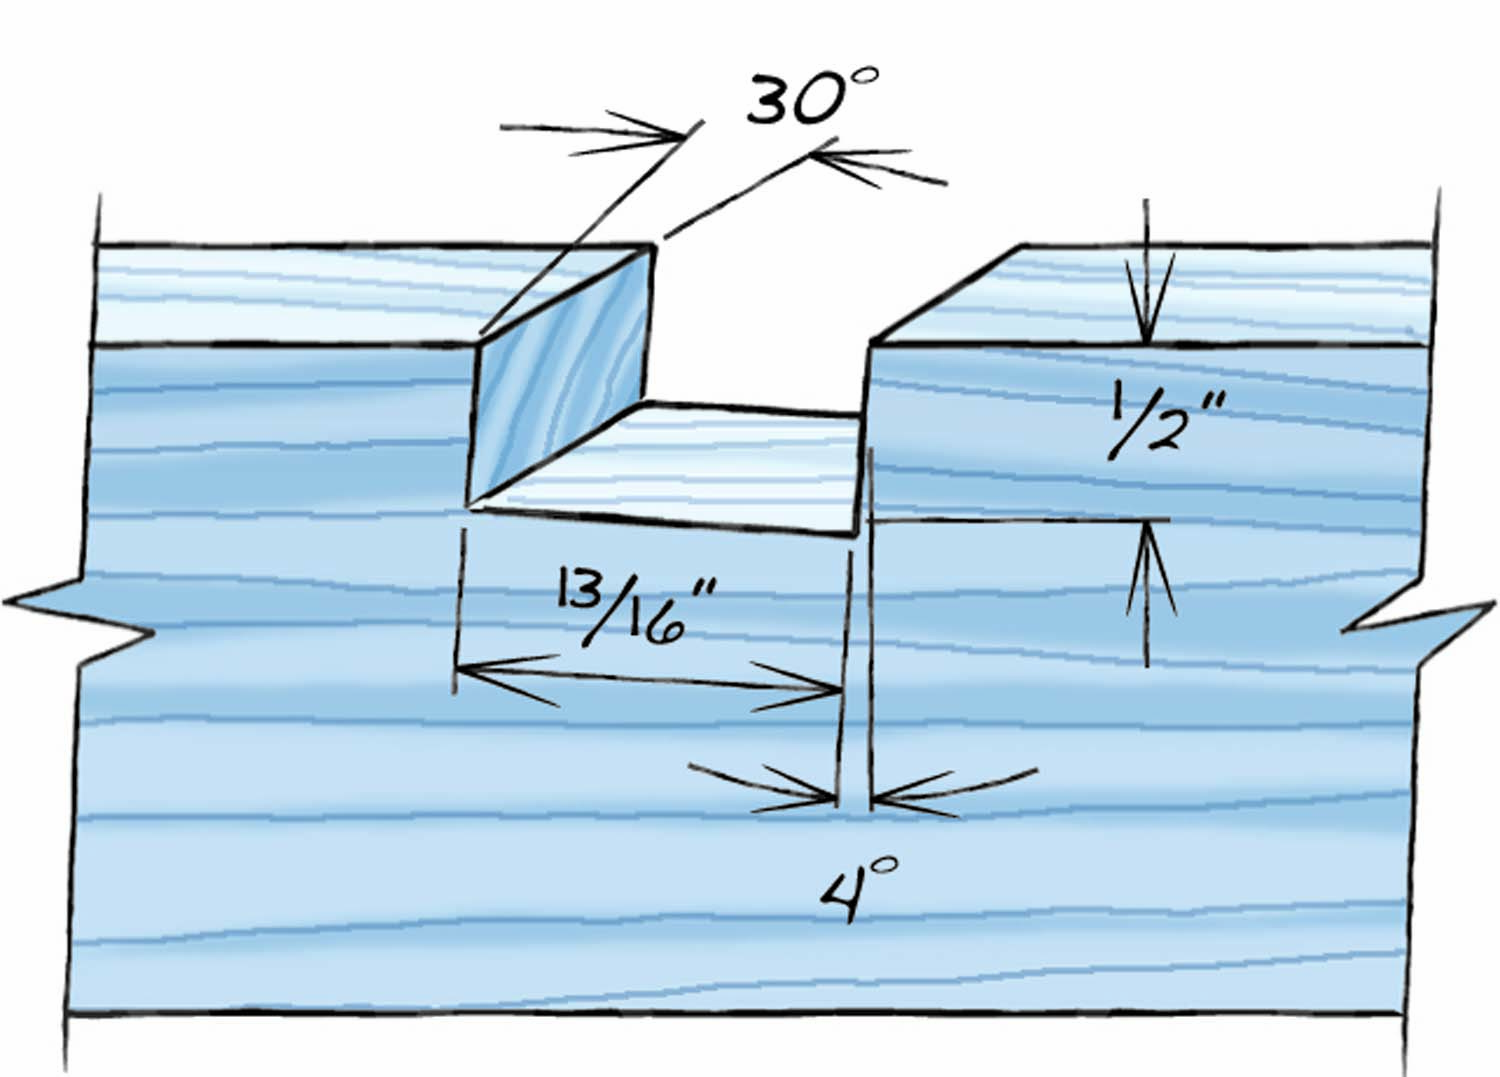
Fig. 05. Notch Details
Cutting List
|
Summer Table |
|||
|
Overall Dimensions: 30″ Dia. x 20-3/8″ H |
|||
|
Part |
Name |
Qty. |
Th x W x L |
|
A |
Top arm |
3 |
3/4″ x 2″ x 24″ (a) |
|
B |
Bottom arm |
3 |
3/4″ x 2″ x 22″ (a) |
|
C |
Leg |
3 |
3/4″ x 2″ x 20″ |
|
D |
Top |
1 |
3/8″ x 30″ dia. |
|
E |
Shelf |
1 |
3/8″ x 20″ dia. |
|
Note: (a) Rough length. See Fig. 02 for final length. |
|||
Cut all the Parts
Begin by milling the wood for the top arms (A), bottom arms (B) and legs (C). All of these pieces are 3/4″ thick, so you could use boards from a lumberyard or home center that have already been planed down to this size. (Face-frame material is ideal.) Cut all of the pieces about 1″ extra-long, then joint and rip them to the finished width (see Cutting List).
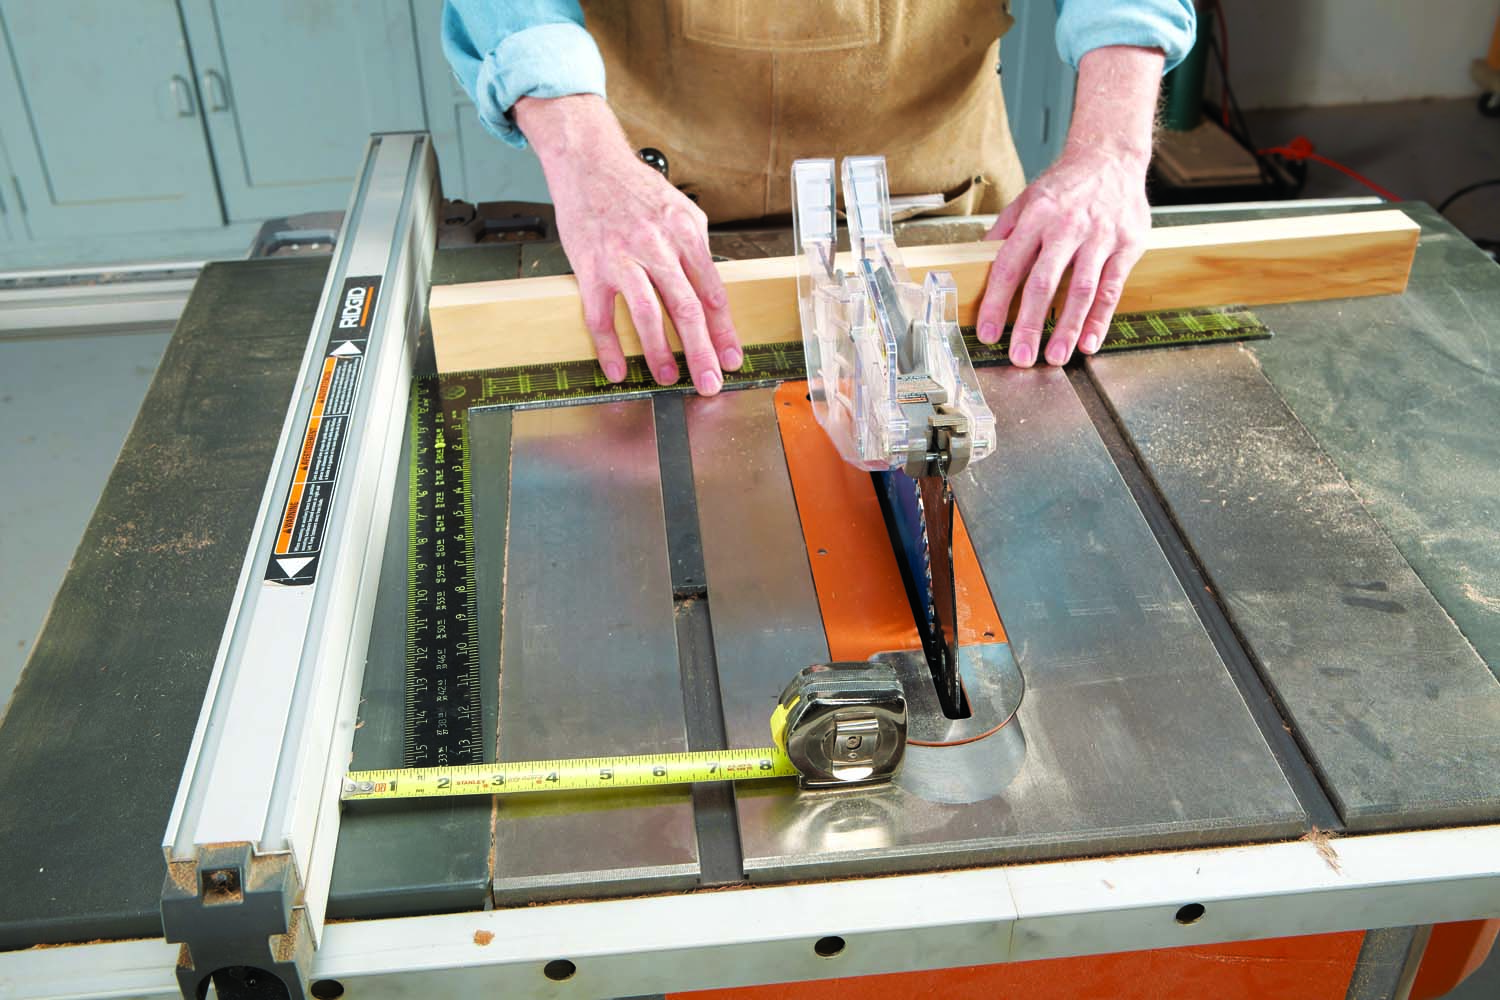
Photo 1. Adjust your miter gauge to 4°. Use a framing square and a ruler to hit this angle right on the money.
All of the arms slope at 4° (Fig. 01), an angle that will come up a number of times while you’re building the table. For the next step, fasten a fence that’s about 30″ long to your tablesaw’s miter gauge, then use a framing square and a ruler to set the miter gauge at 4° (Photo 1 and Fig. 02). You’ll need to reset the miter gauge to 30° later on, and then return it to 4°, so the square-and-ruler method has a lot going for it: It’s very easy to repeat.

Photo 2. Cut the ends of the arms and legs at 4°. When trimming the pieces to final length, use a stop block that is also cut at 4°. This ensures that the pieces are oriented the correct way.
Cut one end of the top arms, bottom arms and legs at 4°. (Use a fine-toothed crosscut blade to minimize sanding later on—these ends will show.) In addition, cut 4° ends on two 3/4″ x 2″ x 4″ stop blocks and one 1-3/4″ x 1-3/4″ x 4″ stop block. Use the large stop block to trim the top and bottom arms to final length (Photo 2 and Fig. 03). Pay close attention to which way the angles go—the arms should look like a parallelogram when you’re done. Reset the miter gauge to 90° and trim the legs to final length.
Cut the Notches
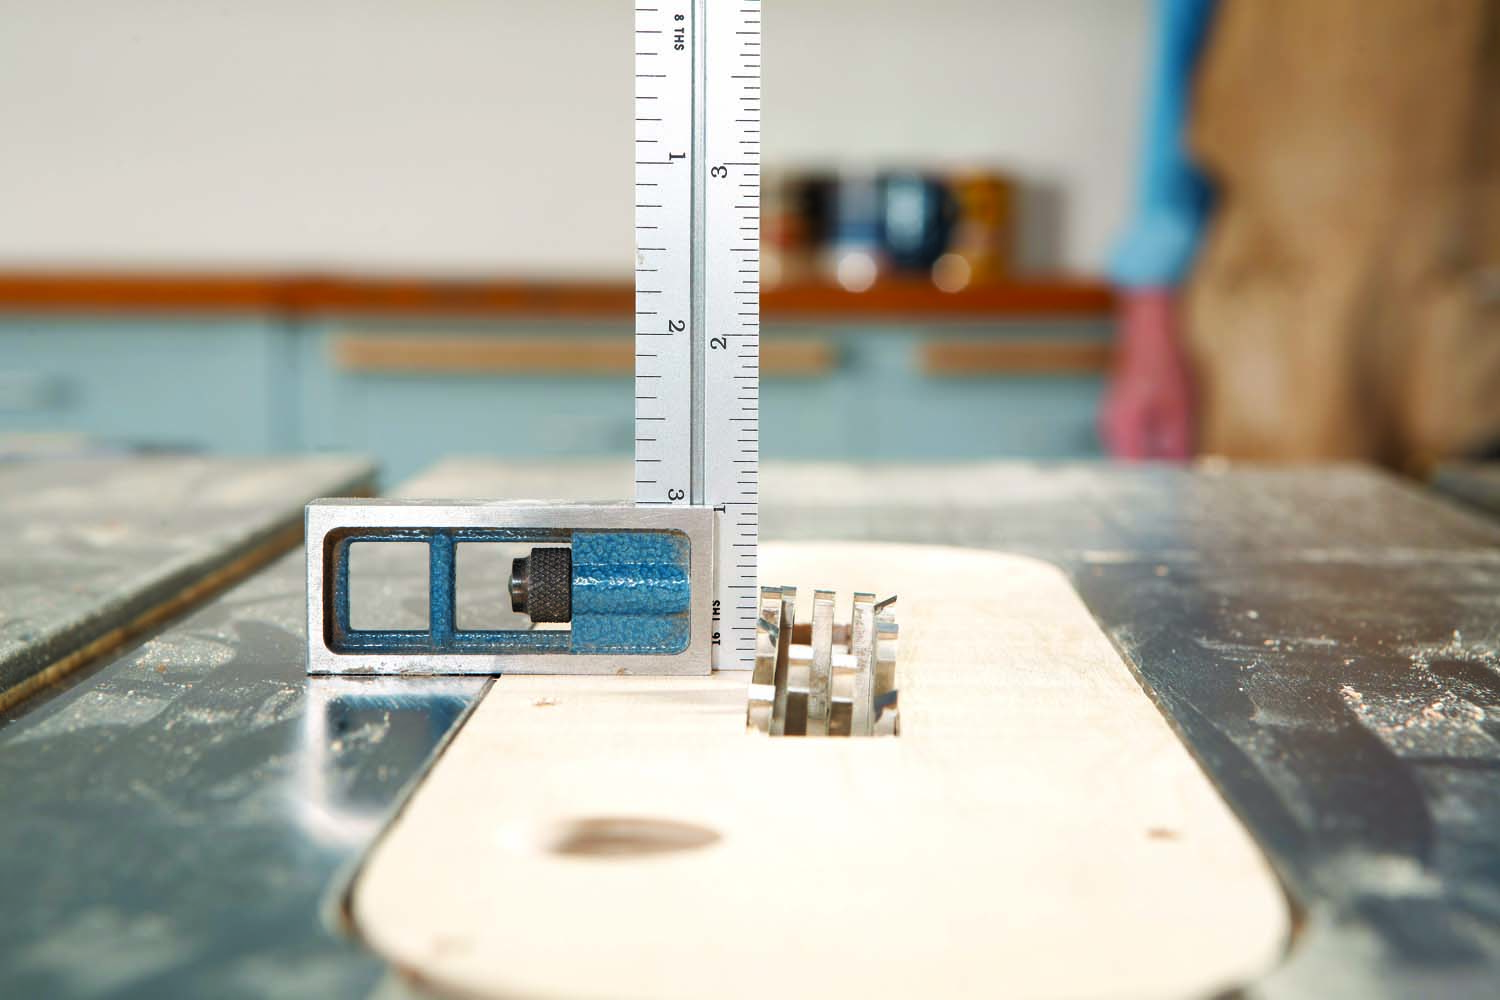
Photo 3. Install a dado set in your saw and tilt it to 4°. Raise it to make a cut 1/2″ deep.
Next, you’ll cut the notches that enable the three parts of the table to lock together. For ease of assembly, these notches must be 1/16″ wider than the thickness of the arms (3/4″). Assemble a 13/16″ dado set on your saw’s arbor. (If you don’t have a 1/16″ chipper, add shims that add up to 1/16″.) Tilt the dado set to 4° and raise it to cut 1/2″ deep (Photo 3 and Fig. 05). Adjust your miter gauge to 30° (Photo 4). Note that I’m using a left-tilt saw; if your saw tilts to the right, set your miter gauge in the opposite direction.
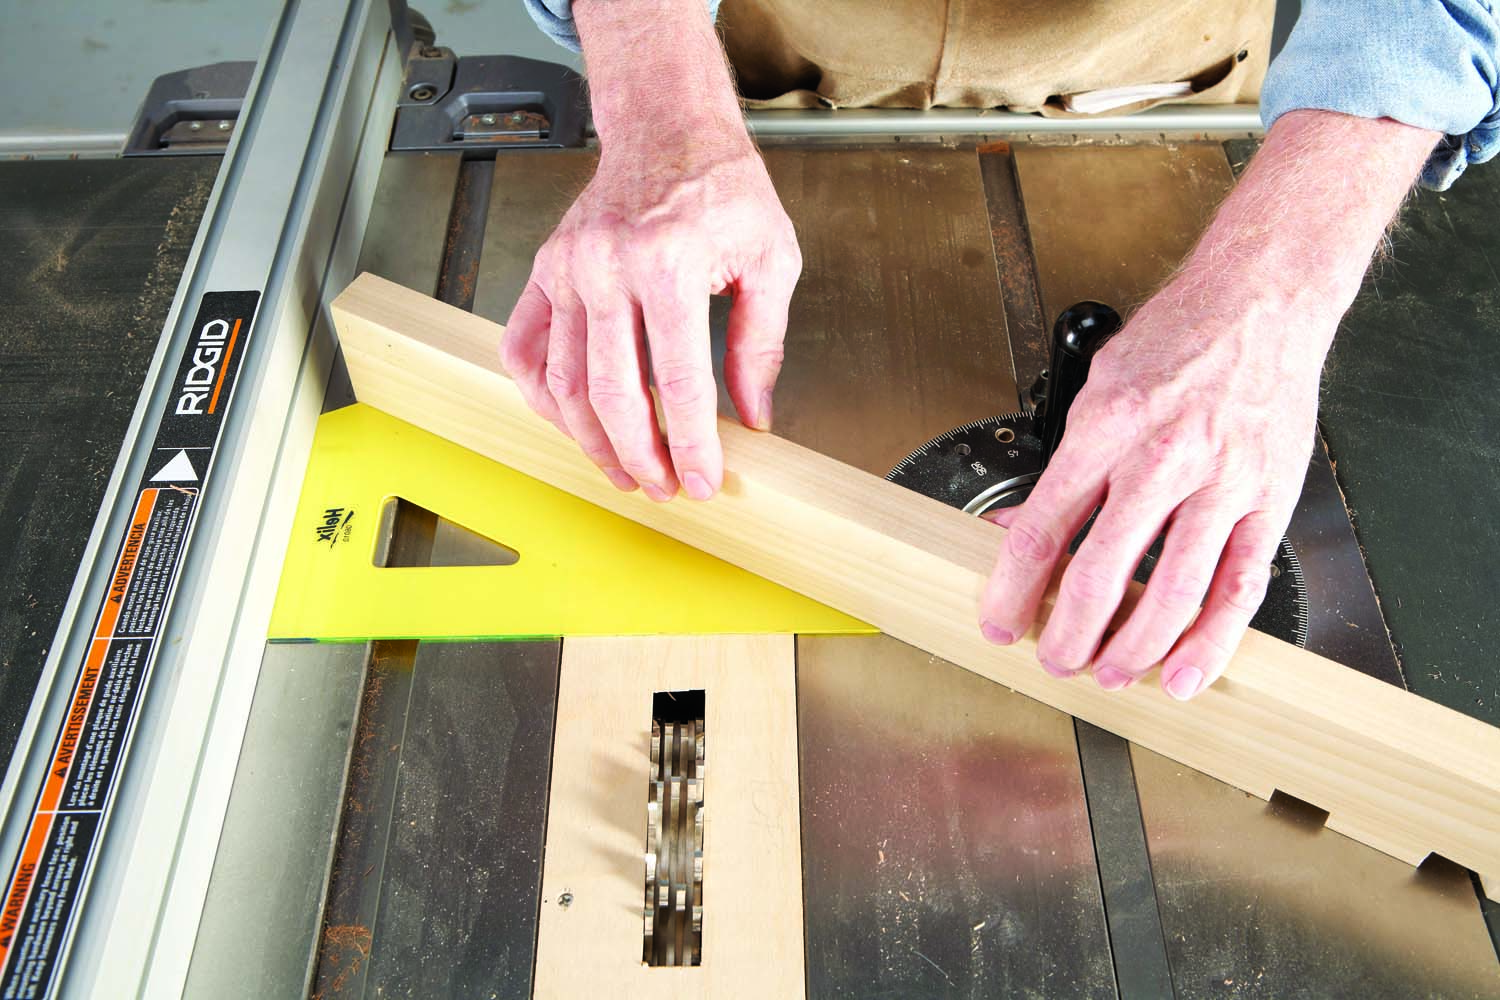
Photo 4. Adjust the miter gauge to 30°. This angle is easy to establish with a 30-60-90 drafting triangle.
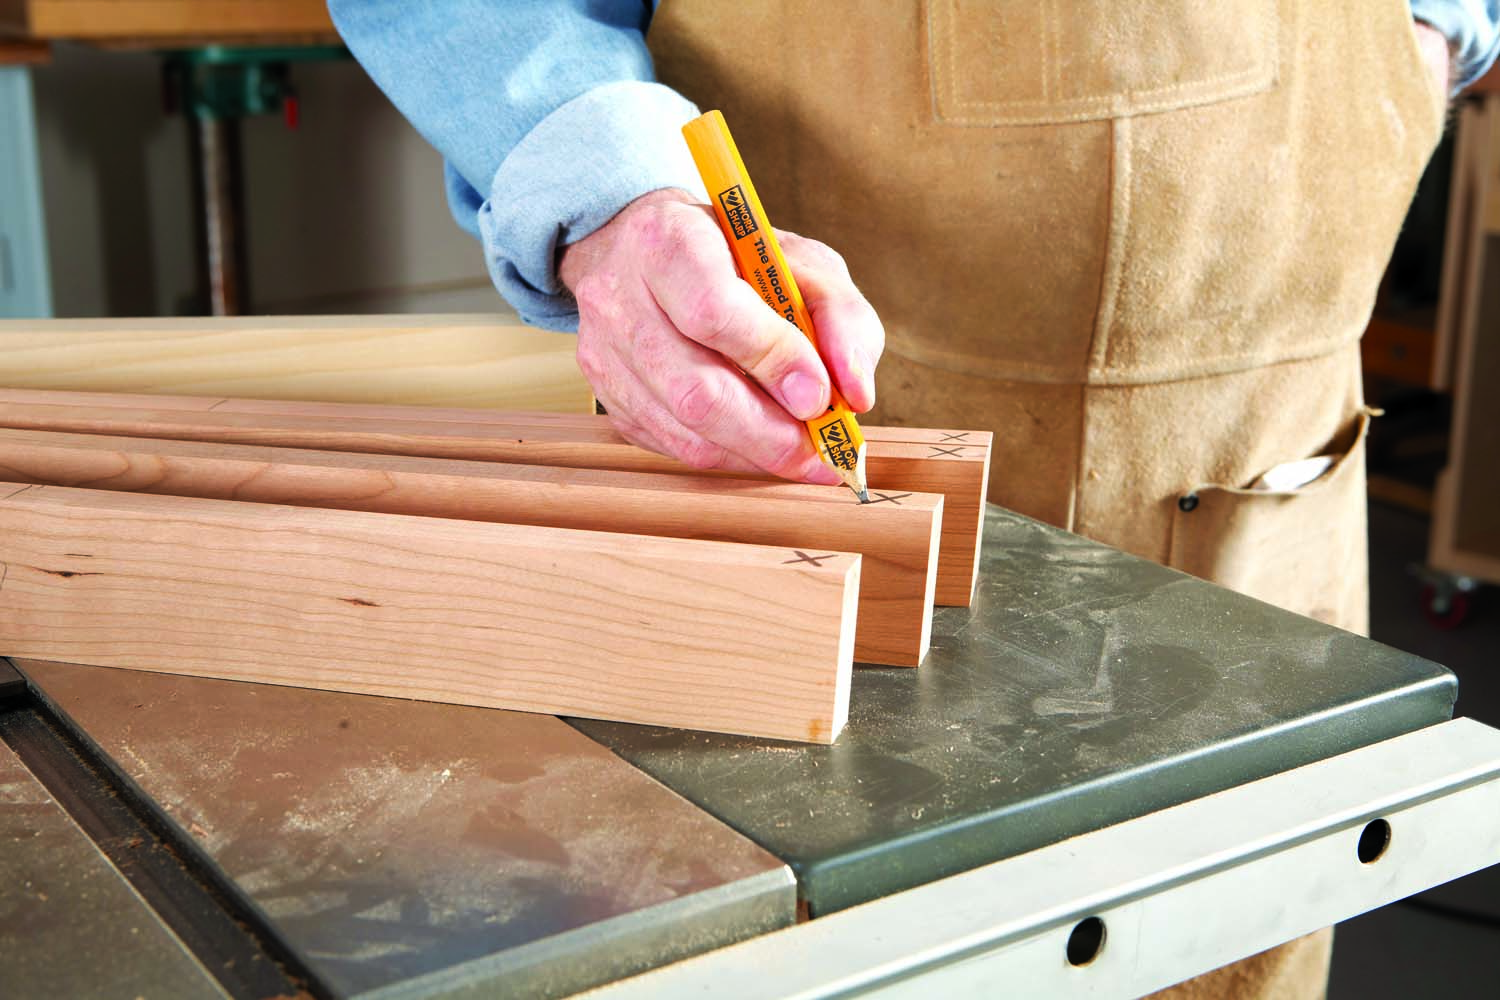
Photo 5. Mark the forward-leaning ends of all the arms. Keep track of which way these marks go in the steps ahead.
At this point, it’s a good idea to mark your pieces so you won’t cut a notch in the wrong place (Photo 5).
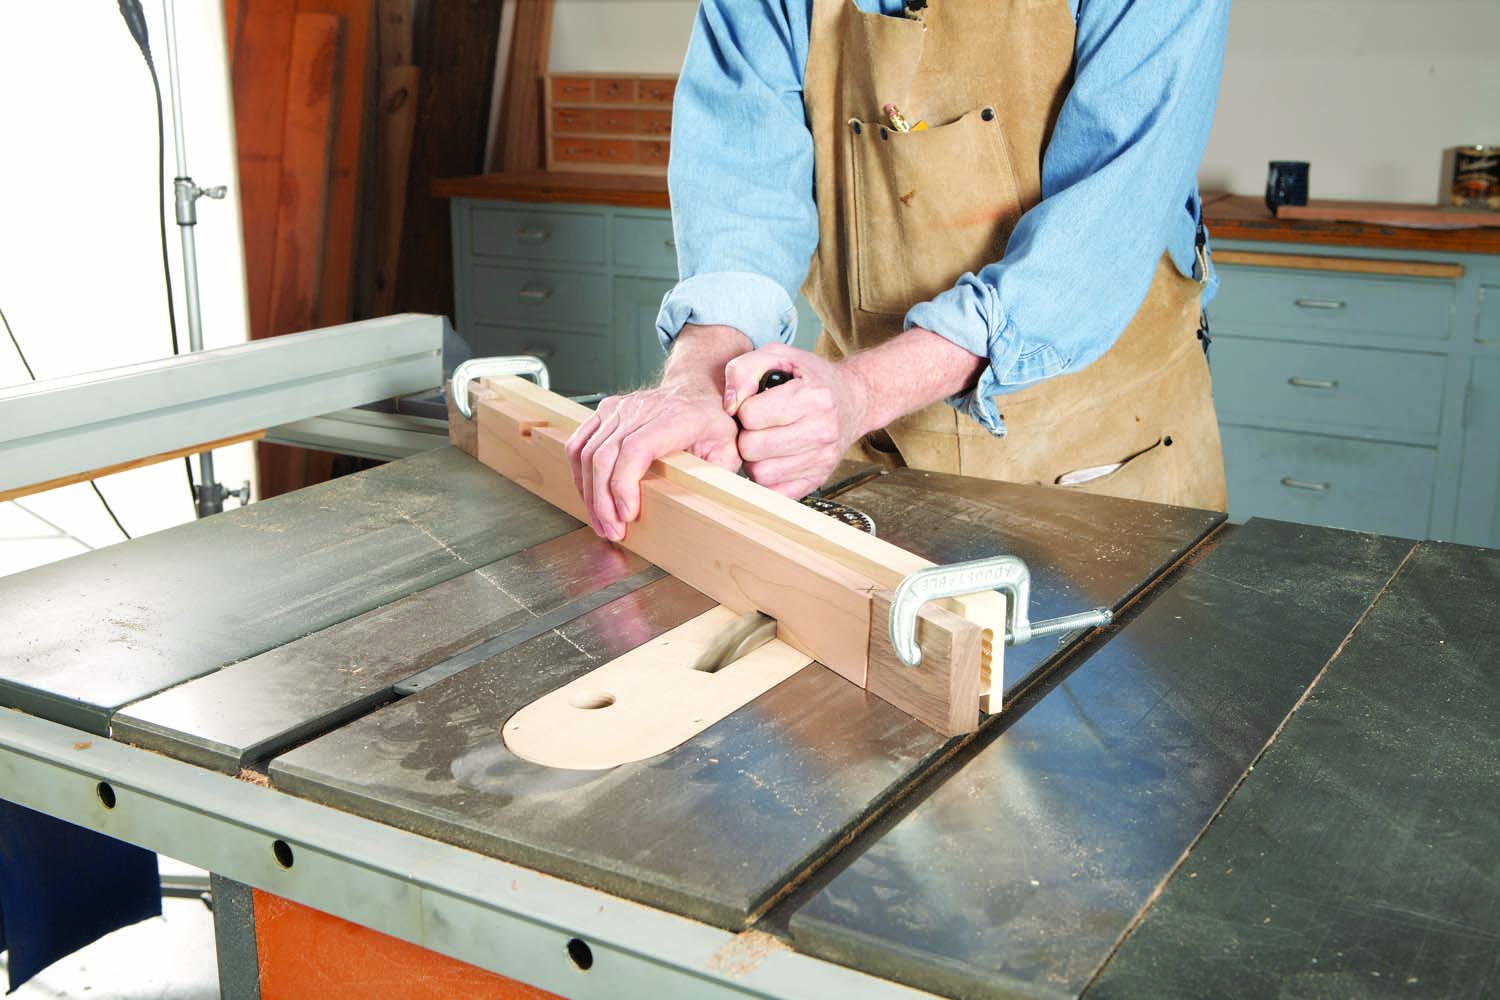
Photo 6. Saw two notches in the top arms. Trap the arm between two angled stop blocks. After cutting one notch, flip the arm around to cut the second notch.
Draw a notch on one of the top arms (Fig. 04). It doesn’t matter which end of the arm you mark, because both of the notches on the top arm are the same distance from each end. Position the arm on the miter gauge, then clamp angled stop blocks at both ends of the arm, trapping it. Saw the notch. Flip the arm around so it fits between the stop blocks again and saw a second notch (Photo 6). There’s only one way the arm will fit between the blocks, so you can’t make a mistake.
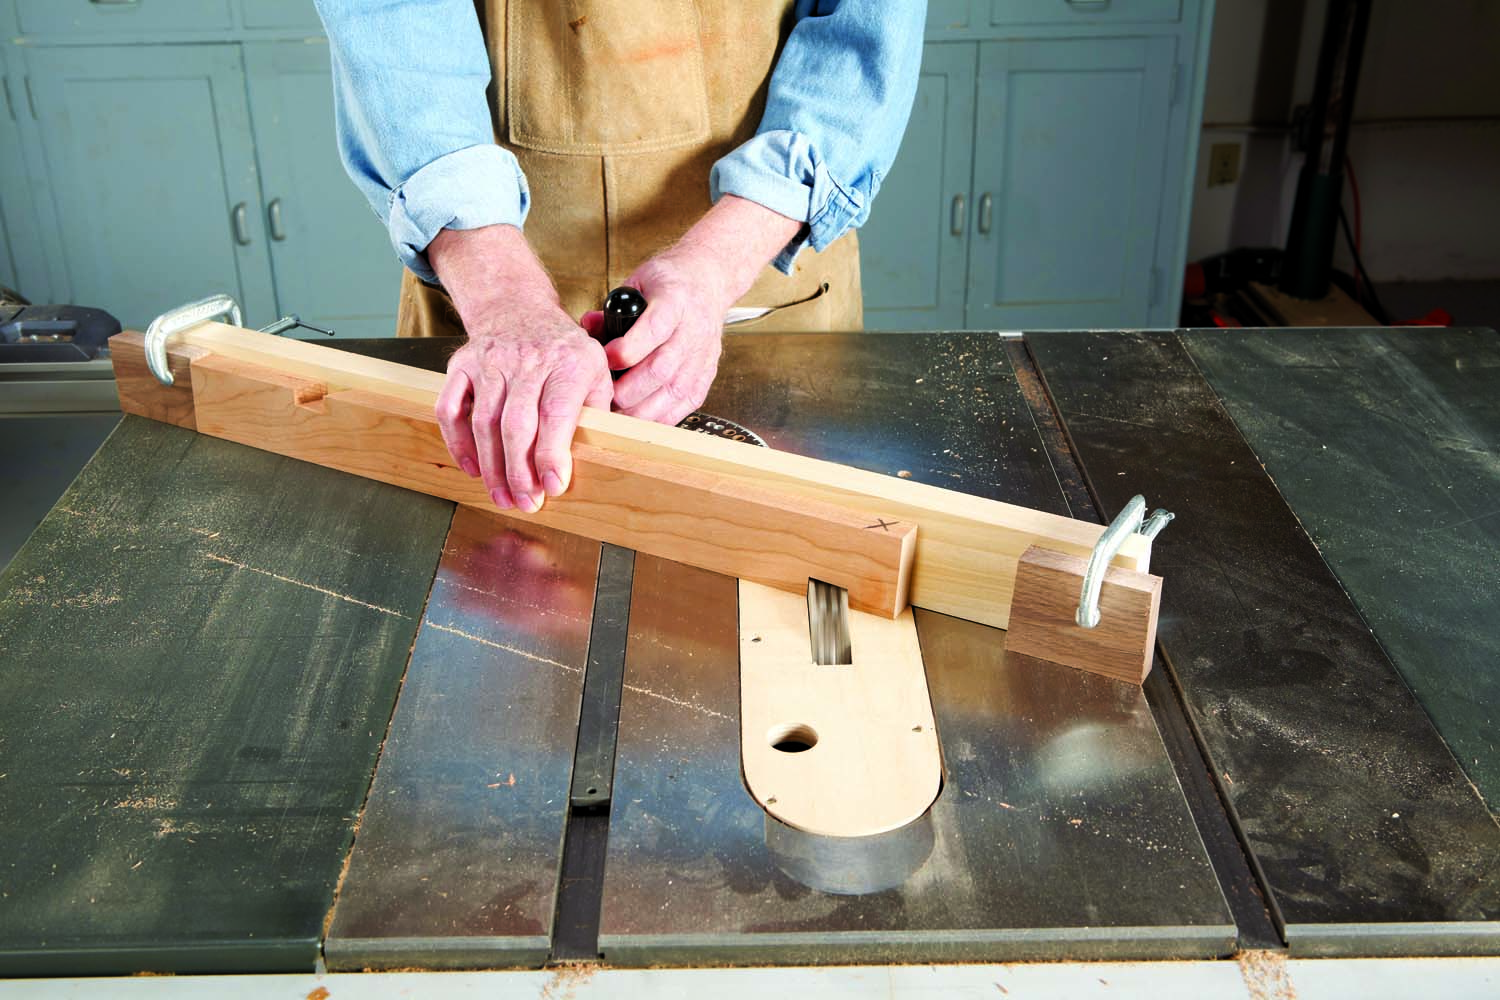
Photo 7. Cut similar notches in the bottom arms. Leave the stop blocks in the same position. Cut the first notch with the arm butted up against the front block; cut the second notch with the arm butted up against the rear block.
The procedure for the lower arm is a bit different. Leave the stop blocks where they are. Butt one end of the arm against the forward stop block and make a cut. Flip the piece around, butt the same end against the rear stop block and make the second cut (Photo 7). This method ensures that the distance between the notches is the same on both the top and bottom arms, even though the arms are different lengths.
Make Half-Lap Joints

Photo 8. Make half-lap joints in the ends of both arms. Here, the dado blades are reset to 90°; the miter gauge is reset to 4°.
Return the dado set to 90°. Lower its height to 3/8″. Use the square-and-ruler method to adjust the miter gauge back to 4°. Clamp the large angled stop block to the fence in order to make a dado that’s exactly 2″ wide—the width of the legs. Cut half-laps in the ends of all the arms (Photo 8).
Using a test piece, fine-tune the height of the dado set so that the half-lap joints will come out perfectly flush. Without moving the stop block or re-adjusting the miter gauge, cut half-laps in the top ends of the legs. Once you’re done with these cuts, remove the stop block.
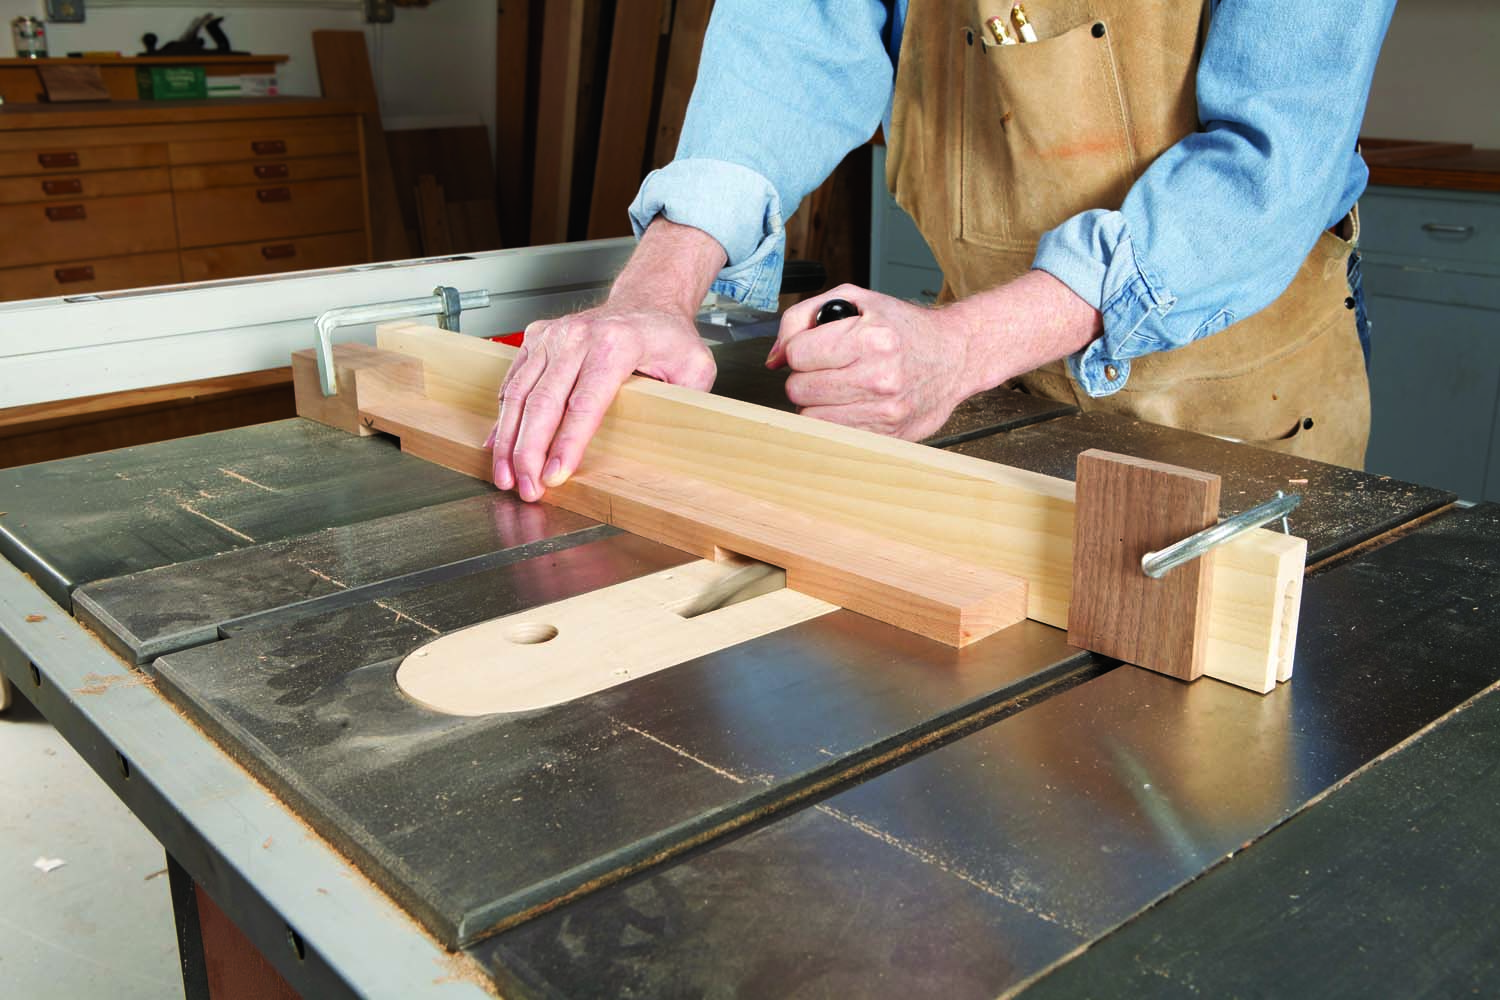
Photo 9. Cut mating half-lap joints in the legs. Use two stop blocks to determine the width of the lower joint.
Mark the location of the lower half-lap on one of the legs (Fig. 04). Set up two stop blocks to make this cut. Place the large angled block against the top of the leg and a square block against the bottom of the leg (Photo 9). Adjust the blocks to make a cut that’s about 1/32″ too narrow. Cut a half-lap in one of the legs, then adjust one of the stop blocks to widen the cut until it’s just right. Cut all three legs.
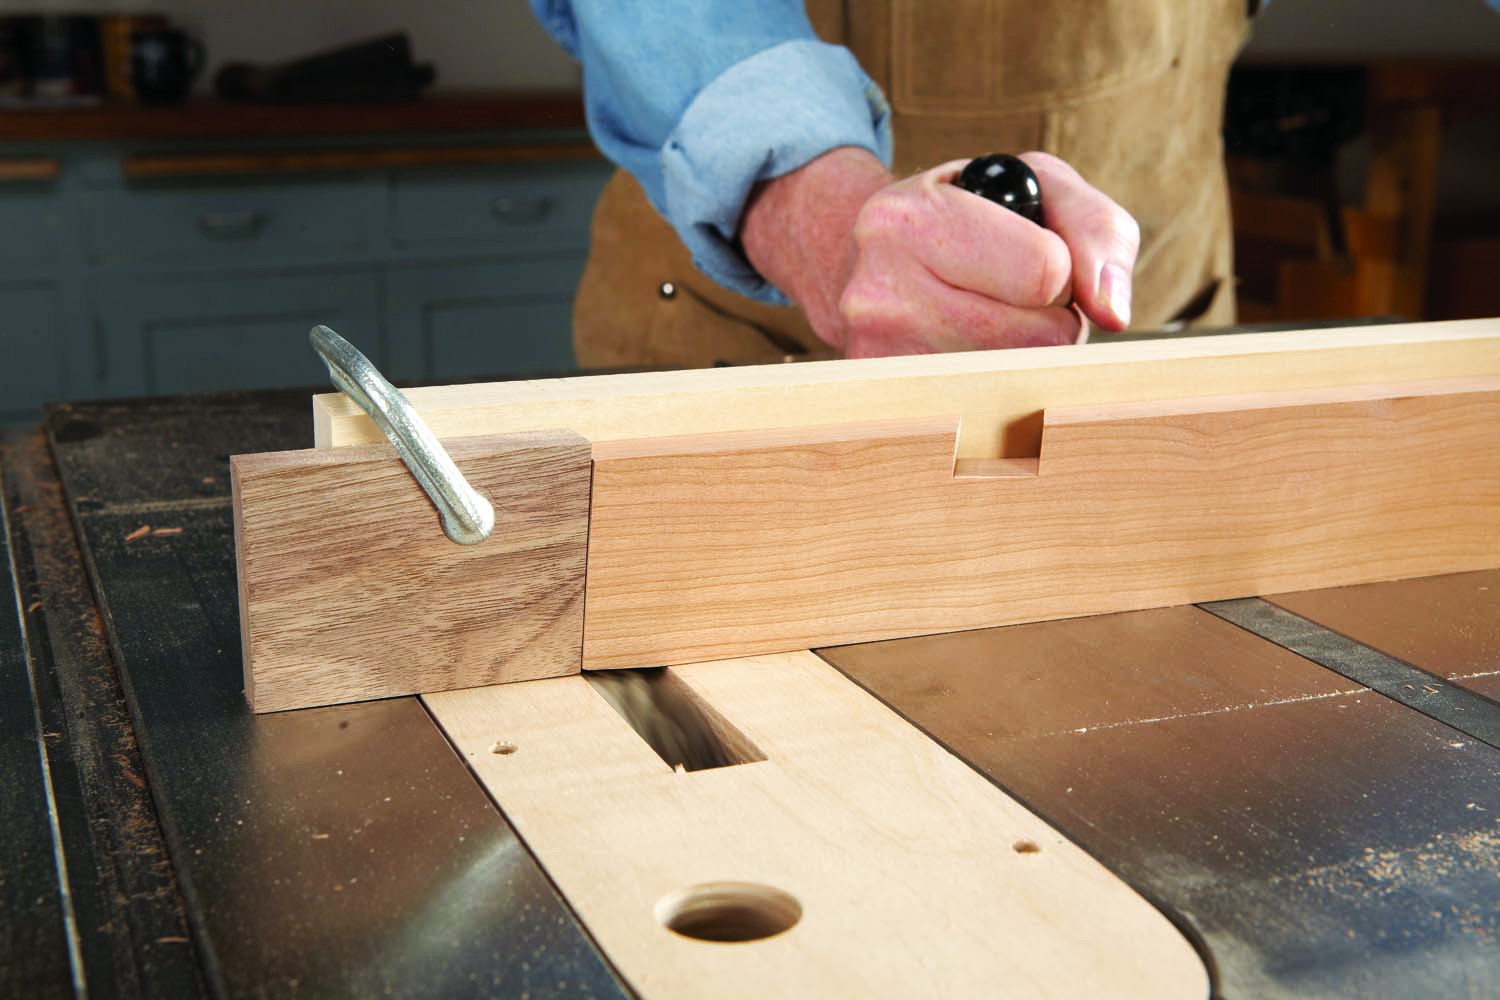
Photo 10. Saw a 4° bevel on the ends of the arms. This creates flat spots to support the glass top and shelf.
You’re just about done on the tablesaw. There’s only one more operation—sawing a 4° taper on the top ends of the arms, where they support the glass. The easiest way to do this is with your dado set (Photo 10). Tilt the dado set to 4° and adjust the miter gauge to 90°. Lower the dado set so it will cut a flat spot about 13/16″ wide—the exact dimension isn’t important. Saw the ends of all the top and bottom arms.
Assembly
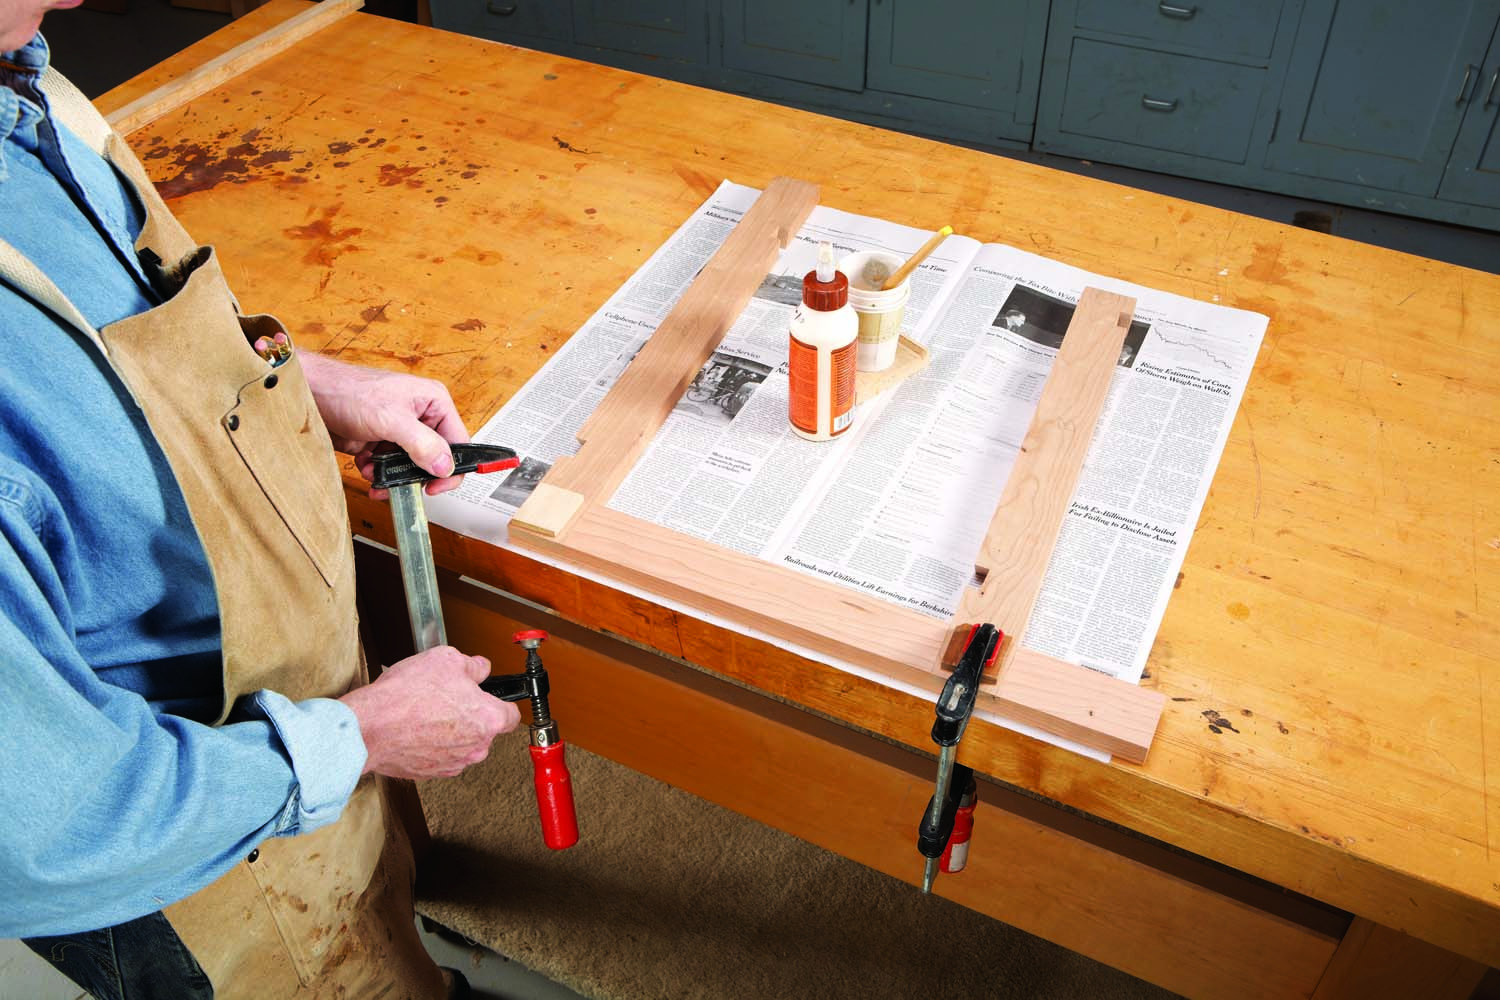
Photo 11. Glue the arms to the legs. Make sure the pieces are oriented the correct way—the arms of the “F” should incline up, not down.
Glue the arms to the legs (Photo 11). When the glue dries, draw pencil lines across both sides of the half-lap joints. Sand each assembly until all the pencil lines disappear (Photo 12). Plane or file the end grain of the half-lap joints flush with the surrounding wood.
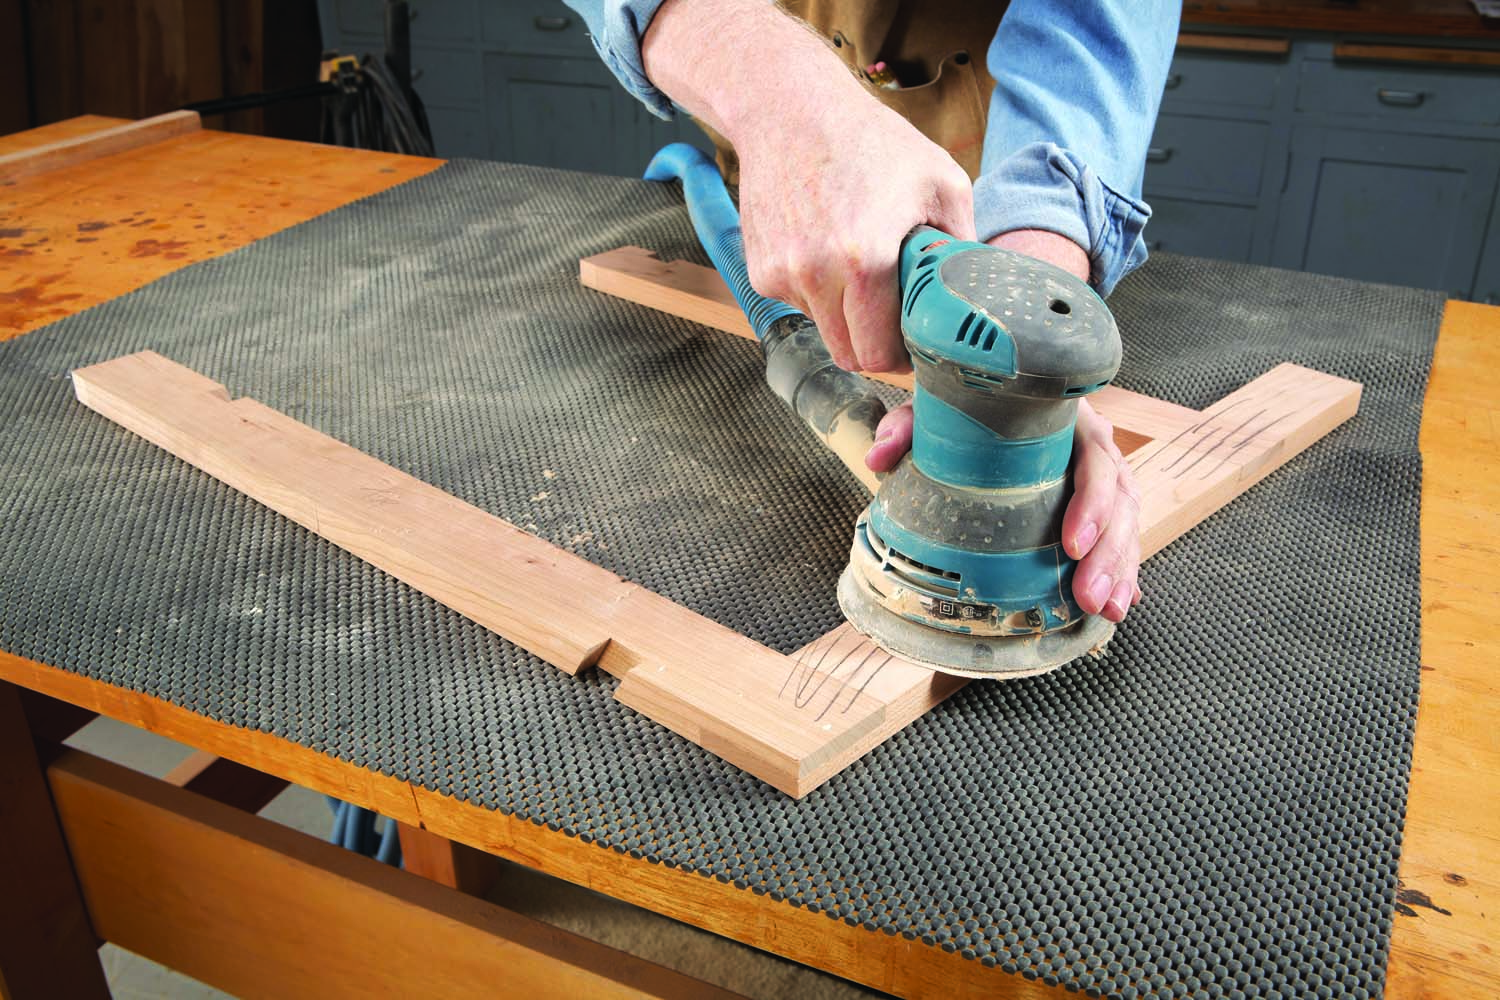
Photo 12. Sand the joints even. Draw pencil lines across the joints and sand until all the marks are gone—this ensures that the surfaces are flush.
Using a 1/8″ roundover bit, soften all the edges of the legs and arms (Photo 13). Avoid routing into the notches; soften their edges by hand, using a file and sandpaper.
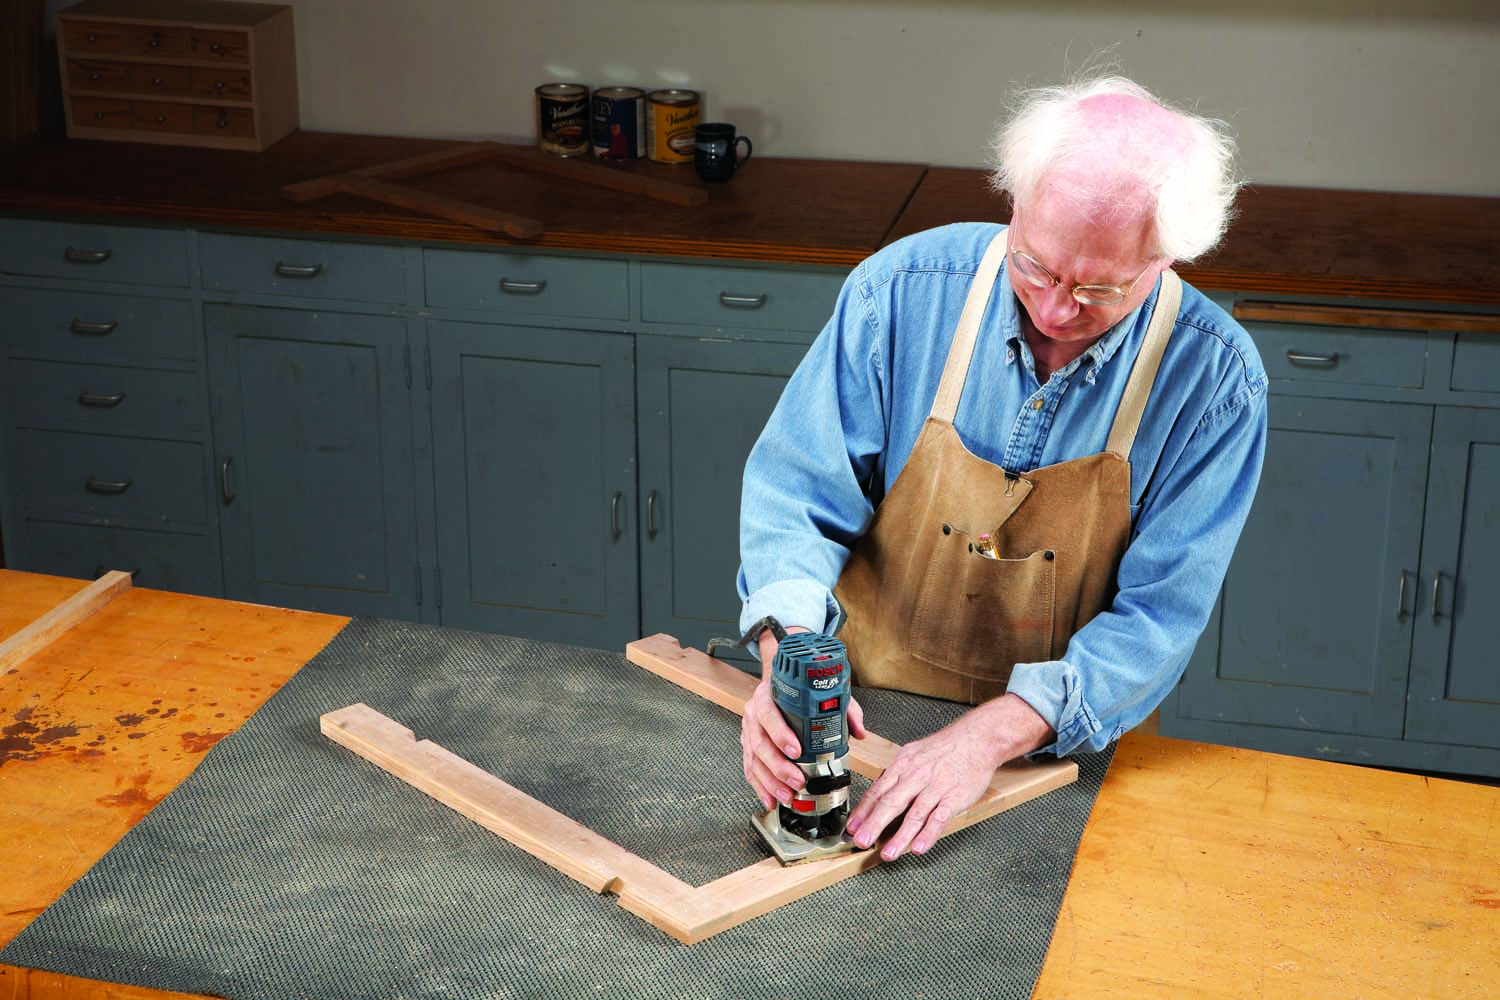
Photo 13. Round over all edges with a trim router. That’s about it—the table is ready to assemble!
If your table will have to brave the elements, finish it with an exterior polyurethane. I bought glass tops for my table at a local Pier 1 store; you can order them online from Pier 1 or have a local glass supplier make them up for you.
To assemble the table, first lock two of the frames together. At this point, there will be plenty of play in the joints, so the pieces can swing like a hinge. Insert the third piece, but keep it swung open. Finally, lock the last pairs of notches together, one at a time. This will require a small amount of force as the pieces snap together, but that’s good. The tension you’ll feel turns the assembly into a rigid unit.
Bio
 Redge Estell has been a woodworker since the early seventies in various cabinet shops, fixture, and exhibit companies in New Mexico, Colorado and Minnesota. He now designs and builds furniture and art in his home studio in Corrales, New Mexico
Here are some supplies and tools we find essential in our everyday work around the shop. We may receive a commission from sales referred by our links; however, we have carefully selected these products for their usefulness and quality.


