We may receive a commission when you use our affiliate links. However, this does not impact our recommendations.
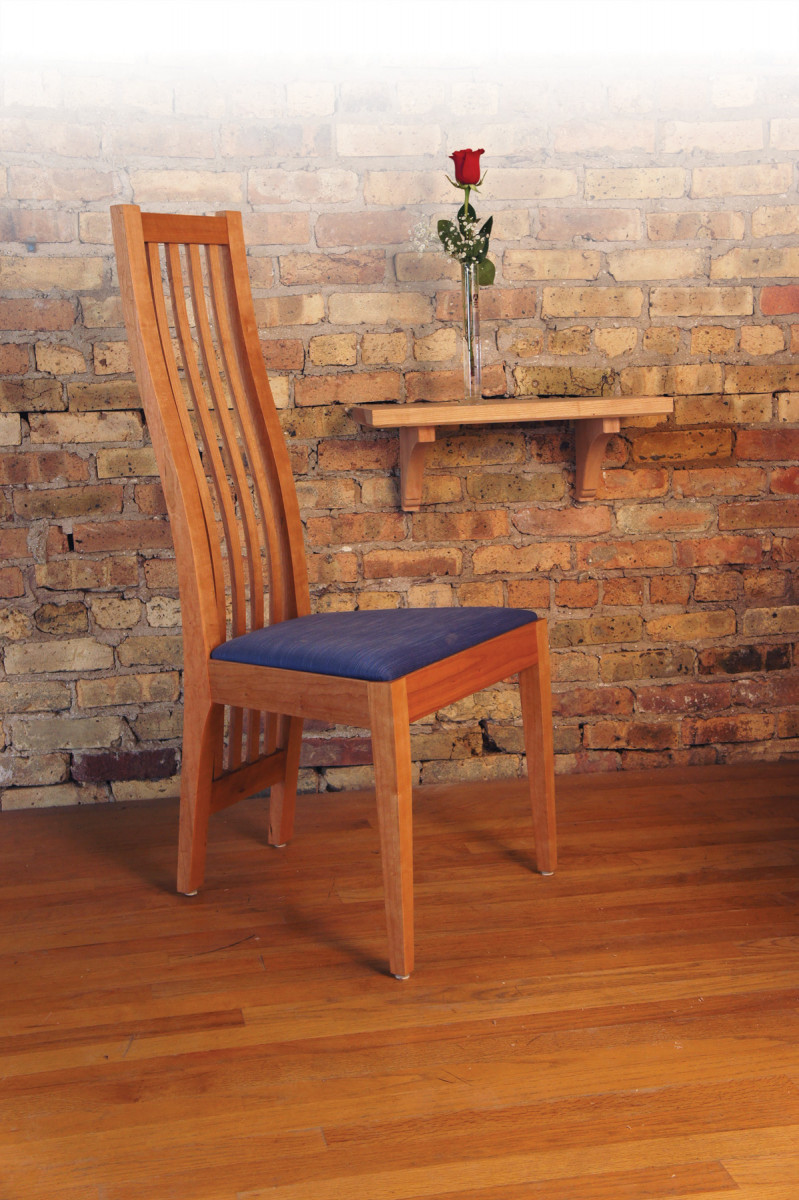
I’ve always found making something simple yet refined to be more work than it seems. I suspect that the slat-back chair doesn’t exactly look simple to build if you’re not a chairmaker. But it is relatively simple in the world of chairs, and it is a great entry into chairmaking. It covers all of the basic issues: curves, angles, comfort and structure.
In its refinement, though, it goes well beyond the basics, and gets into some sophisticated joinery that adds considerably to the strength of the chair. This is also a very comfortable chair, which is neither basic nor at all common. And it is a chair that has great presence, especially around a dining table. Simplicity. Comfort. Presence. Not a bad combination.
Pattern Recognition
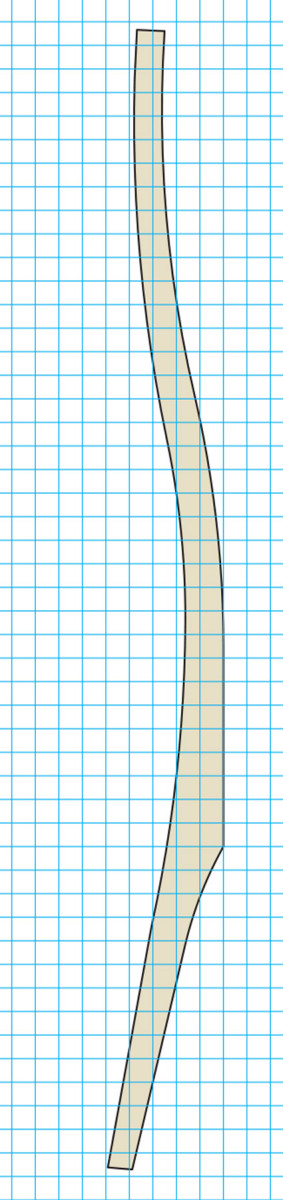
Leg Pattern One square = 1″
I don’t build my chairs from plans. Instead, I rely on patterns. They define the shape of the legs, and I make sure to include information for all of the joinery that will be cut in the legs. Even though I’ve provided plans here, it still makes sense to begin by making your own patterns.
I use 1⁄4” plywood for most of my patterns, but there are also advantages to working with 1⁄8” clear plastic. With the latter, you can see the grain as you trace the leg shapes onto your wood. But 1⁄4” plywood is always available in my shop, and it can be smoothed out easily with a handplane (I actually keep a garage-sale block plane handy for use as a plywood plane). You’ll want to spend time smoothing the edges of the pattern as well as you can, because any problems will be transmitted down the line to the actual work.
Once your rear leg pattern is cut, spend a few moments on the joinery layout, and mark out the two side-to-side and the one front-to-back mortises on the pattern.
Shapely Legs
Now use your pattern to lay out the rear legs. Try to orient the grain direction so that it flows with the overall shape of the leg. A tendency toward short grain is inevitable, but avoid any situation where the grain will run out across the leg in less than 41⁄2” or 5″.
Saw out your legs, being careful to stay just outside the layout lines. Keeping too much distance from the lines does have its penalty; you’ll spend more time on the smoothing. Stay as close as you can comfortably and consistently cut.
You could use a router template and a flush-trim-bit setup to start the smoothing process, but I usually start right in with hand tools. Routing will sometimes blow out wood as you cut against the grain when cutting the curves. Even if you manage to avoid that, there will still be plenty of smoothing to do afterward to get rid of the machine marks. So I simply try to cut well at the band saw, and proceed directly to smoothing.
Start with the easy stuff and plane the straight sections on the legs. Then move on to the convex curves, which you should be able to fair and smooth using a block plane or a No. 2 bench plane. Planing curves may take a little practice if you haven’t done it before, but it is a great technique for both fairing and smoothing, and it makes quick work of a fairly difficult task.
Finally, smooth out the concave curves with either a straight or curved-sole spokeshave (depending on the curve of the leg). If you have a compass plane, that is also an excellent choice.
You’ll find that the transitions between concave and convex curves, as well as the grain direction changes in the hollows of a concave curve, pose the greatest challenges. A scraper can work wonders in these problem areas, but be aware that a scraper does not fair out the curve – it just smooths out the roughness. Don’t shy away from sanding, either. A curved sanding block (made from a leg offcut) can do a terrific job on a leg that is proving difficult to smooth.
For now, leave alone the flat section where the side rails will join with the legs. Flattening this part of the legs is best done just before the mortises are cut for the side rails. And you need to complete more of the chair to determine the exact angle for these mortises.
The mortises for the lower back rail are on a straight section of the leg, but aren’t parallel to either the front or back of the leg. They run along the centerline of the leg. Cutting them now is a little more work, but it will make dealing with the slats later much easier. You can use a plunge router with a pair of centering pins to cut this mortise, or make up a wedge that you can clamp to the outside of the leg as a guide for routing with a fence (or with a mortising machine).
The upper back rail (the crest rail) is located on a slight curve, and runs tangent to that curve. Here, it will help to make a simple jig to control the mortise positions in the back legs. With this jig, cutting the mortises is as simple as cutting them on a straight section.
Now prepare the stock for the front legs and the rails on the rest of the chair.
While you’re cutting mortises, you can do the front rail mortises in the front legs. Then, cut and fit the tenons for the front rails and the upper and lower back rails.
This will give you the actual widths for the front and the back assemblies of the chair, which you’ll use to determine the side rail angle. This is the angle we’ll use for the remaining mortises in the front and back legs.
Angled Mortises
Work from center. Draw a centerline off which to locate the mortises for the lower back rail. I use a router with centering pins for the cuts.
There are many challenging aspects to building a chair, but dealing with the angled joinery ranks right at the top. And this joinery is a little more complex than some. I’ve opted to go with angled mortises and straight tenons with angled shoulders for this chair.
I’ve made these chairs with regular, right-angled through-mortises and angled tenons in the past, but the wedged through-tenon between the back legs and side rails loosened up on a few occasions. With angled mortises, and the rail at the back of the seat screwed to the side rails, this joint gets significant additional reinforcement.
Crest rail. A simple jig to guide a router fence makes quick work of the mortises for the upper back rail.
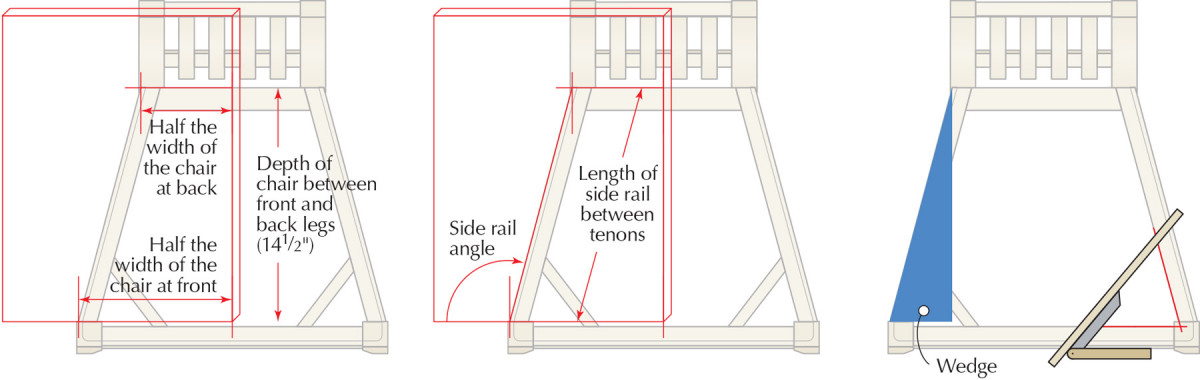
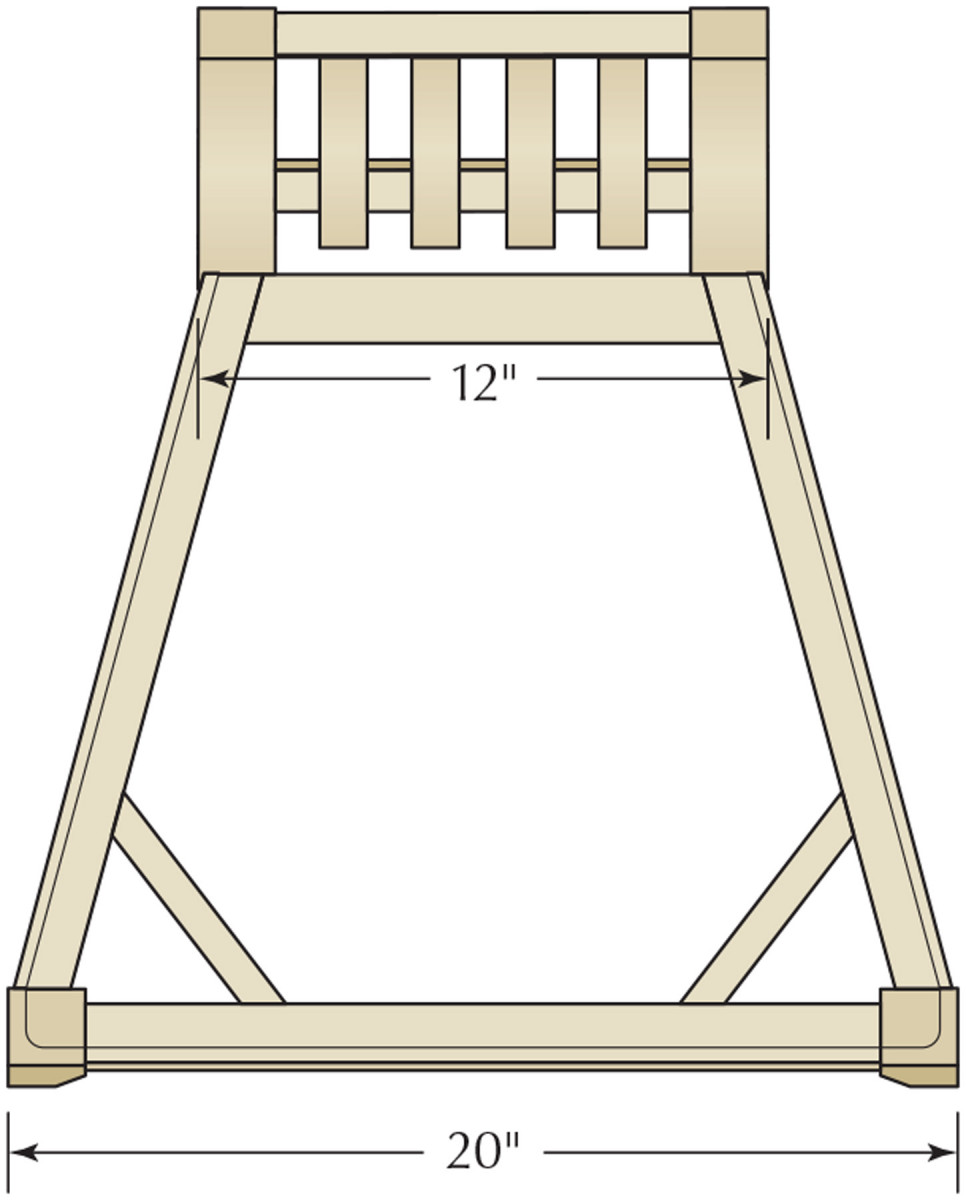
Getting a handle on this complex joinery is mostly a question of maintaining a methodical approach. Start by working out the angle for the side rails with a full-size drawing of the plan view of the chair between the legs .
Note that I’m not giving you the angle (or the length of the rail). As a chairmaker, it is better to work that out for yourself from a drawing.
This angle will then work for the side-rail mortises in both the front and rear legs. Save your drawing (I usually do it on a piece of plywood and set it aside). You’ll need it later to determine the length of the side rails.
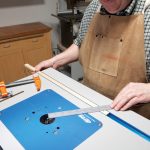
There are many ways to actually cut the angled mortises. The simplest approach is to hold the leg at the appropriate angle, then cut however you would cut a straight mortise. This might mean making a pair of wedges (glue some sandpaper to the faces for a solid grip) for positioning the leg in a slot mortiser or hollow-chisel mortiser, or tilting the worksurface to the desired angle on a machine that has this capability. Or, you can build my router mortising jig (see “Shop-Made Mortise Jig” at right); it accommodates both angled and straight mortises, and has the advantage of allowing you to rout the flat for the side rail on the rear leg as well.
Create the 90° flat for the side rail on both of your rear legs before cutting the through-mortises. To do this, use your leg pattern to set three positioning stops to locate the legs precisely on the vertical face of the jig, aligning the flat on the pattern with the top of the hinged plywood face. Screw two of the stops to the plywood to register the front edge of the leg near the top and the bottom, and another stop to register the very bottom of the leg. This will ensure that all of the legs line up perfectly where it matters. Then rout the flat surface true, with a 1⁄2” straight bit or upcut spiral.
Multi jig. This simple jig guides a router fence to make quick work of the flats, and of the mortises for the side rails.
Now set the mortising jig to the desired angle with a wedge screwed into place to secure it to the jig. Install a 1⁄2“-diameter 4″(overall) straight bit.
Set up the router with a fence and auxiliary wood fence that will slide smoothly (without any slop) in your jig’s wooden track. Then, set the fence so that the cut will be 1⁄8” from the outside face of the leg.
Set stops on the top of the jig to limit the router’s travel to create a 21⁄2“-long mortise.
Now plunge rout the mortise in very small increments, no more than 1⁄16” at a time. This will keep the router from overworking and vibrating excessively, which would give you a larger mortise.
This setup will only work for one of the legs for the chair, because the legs are symmetrical, not identical. For the opposite leg, you’ll have to flip the legs end-for-end in the jig, and re-set the stops. If, however, you’re making multiples, cut the mortises for all the like legs before resetting for the other side.
The angled mortises in the front legs are easy once you’ve set up for the backs. Simply rout the 3⁄8” angled mortises to roughly 13⁄16” deep (measured on the shallower side of the mortise). Don’t forget that here, as with the back legs, the right and left legs are symmetrical, but require a mirror-image set up.
Once you’ve cut the mortises, you can move on to tapering the front legs. What I do here is not at all standard.
Taper the two front-facing sides of the legs first, down to 1″ at the bottom. This looks better to my eye than the usual taper on the inside (rear-facing) sides. The two sides of the front legs that face each other get a taper that starts about 31⁄4” down from the top of the leg, and once again tapers down to 1″ at the bottom. Leave the flat area around the mortise untouched.
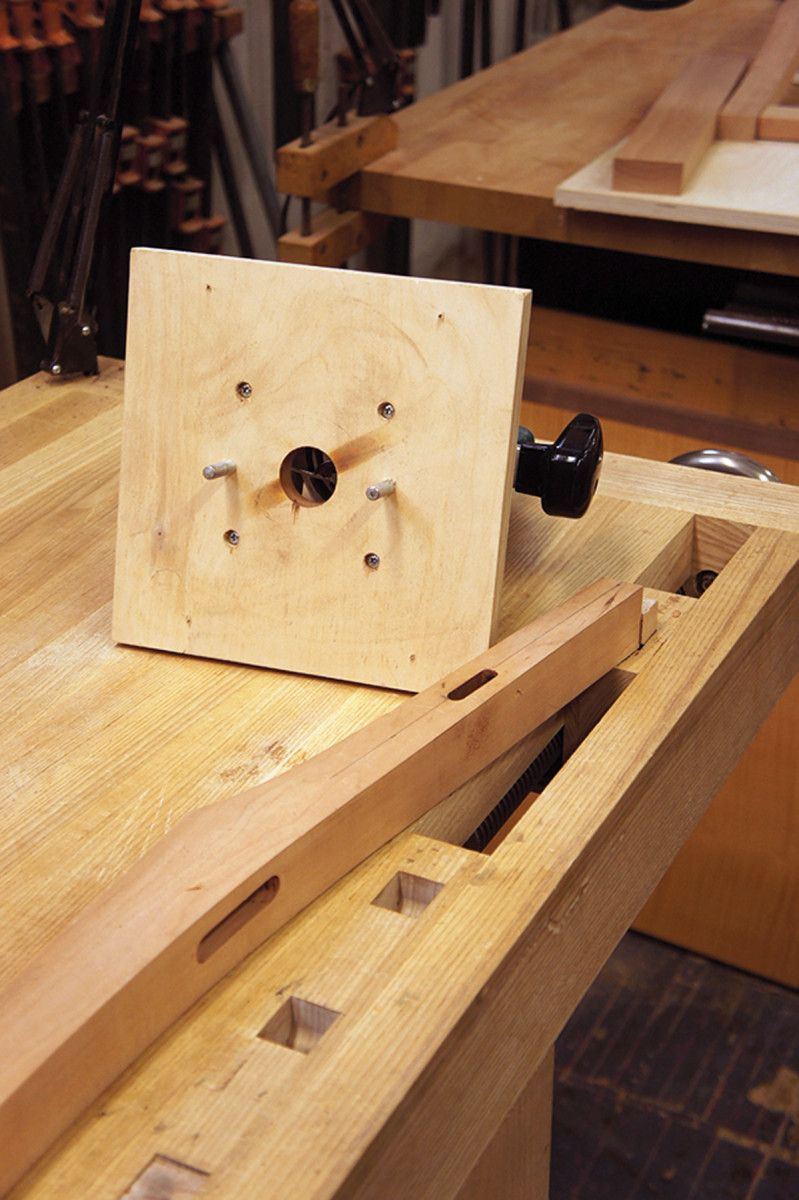
Shop-Made Mortising Jig
Vertical face hinged at both ends to platform. Position router stops by aligning router bit with layout lines for chair leg mortise
If you don’t have a good method for cutting the angled mortises, or, for that matter, straight mortises, this jig is not a lot of trouble to build, and can do both types of mortise and cut the flat for the side rail on the rear legs as well.
The jig allows you to hold the work in position on the vertical face while you rout. The router fence works with the track on the jig to limit the router’s motion to back and forth, and the stops on the top of the jig are set to limit where and how far the router travels back and forth.
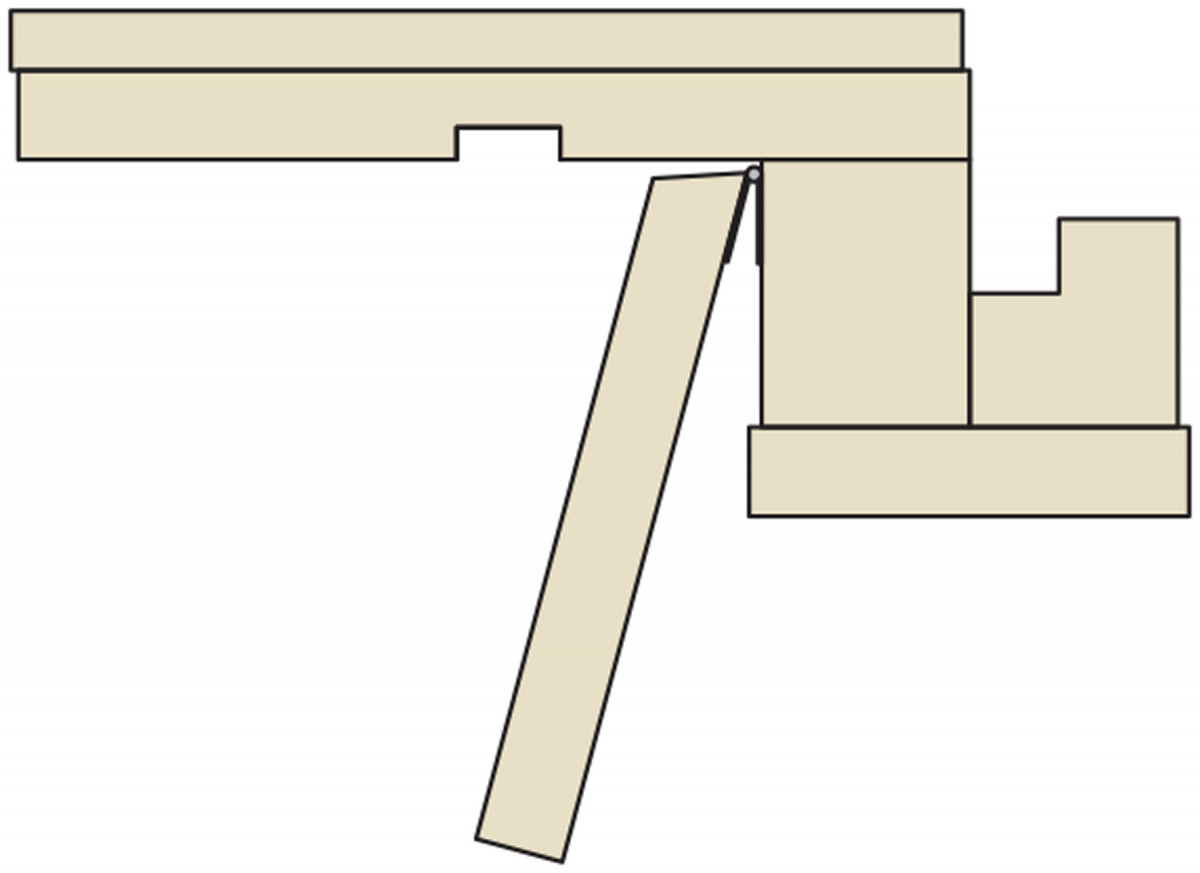 The vertical face is hinged to allow for the angled mortises we need on this chair. You can screw a wedge with the angle determined through your full-scale drawing behind the vertical face to directly transfer that angle to the jig.
The top (horizontal) surface of the jig with the large rectangular cut-out allows you to support the router fully as you mortise, but also allows you to cut the flat for the side rail on the back legs. Use the router without the fence for this operation. The underside of this horizontal surface has a dado running along its length. The sole purpose of this is to make room for the leg as you angle the vertical surface of the jig.
— JM
Side Rail Tenons
The side rails start out easily enough. After dimensioning the material (see the cutlist for sizes), cut 2″straight tenons however you usually cut your tenons.
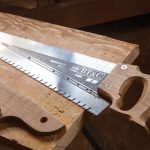
Angling the shoulders gets a little more complicated, though. There are ways to start this process and at least score the shoulders on some machines using a wedge, but this is actually much simpler as handwork. You can simply scribe the angles and cut to your lines. But the easiest way to deal with these shoulders is to use a tenoning frame and chairmaker’s saw. (I wrote about how to make this appliance and saw in the February 2014 issue (#209) of Popular Woodworking Magazine).
Use the wedge from the mortising jig, or make up one to the side-rail angle you determined with your full-scale drawing, then simply saw your shoulders all the way around the rail. Remove the wood up to the angled shoulders with a handsaw and router plane. Round the ends of the tenons if necessary to fit routed mortises, or leave them square if you’ve used a hollow-chisel mortiser.
The length of the side rail is as important as the angle, so you need to work through finding this length methodically. Start by cutting the tenons on the backs of the side rails, then cut and fit the angled shoulders. Now measure the length of the angled line you drew to determine the angle of the side rails. Because the layout of this line is based on the distance between the front and back legs on the chair, it should give you an accurate measurement (if you transferred the angle accurately). Measure this distance on the outside face of the side rail, then mark the angled shoulder location.

Angled shoulders. A “chairmaker’s saw” makes quick work of cutting accurate angled shoulders.
Before you move on to cutting anything, double-check to be sure that this distance is correct. Dry-assemble the back legs and rails with the side rails, and the front legs and rail. Now hold the front leg assembly up to the shoulder marks on your side rails to see where the rails will intersect the front legs.
There should be a 1⁄16” reveal between the side rails and the front legs. If things don’t line up properly, move the front assembly in or out parallel to the back until you find the proper place, then re-mark your angled shoulders.
 Add enough length for your tenon and cut the rail to size. Now you can cut a straight tenon on the end sized to fit the leg mortise, and set up to cut the angled shoulders along the marked line.
Cut the beveled ends of the seat-back rail on the table saw, either using a wedge (the same one from the mortising jig) or by angling the blade. Check the fit carefully, then drill pocket holes on the inside face of the rail for attaching to the side rails. There’s no need to install this rail now.
This completes the joinery for the chair’s frame.
Determining the Side Rail Angle & Corner Block Layout
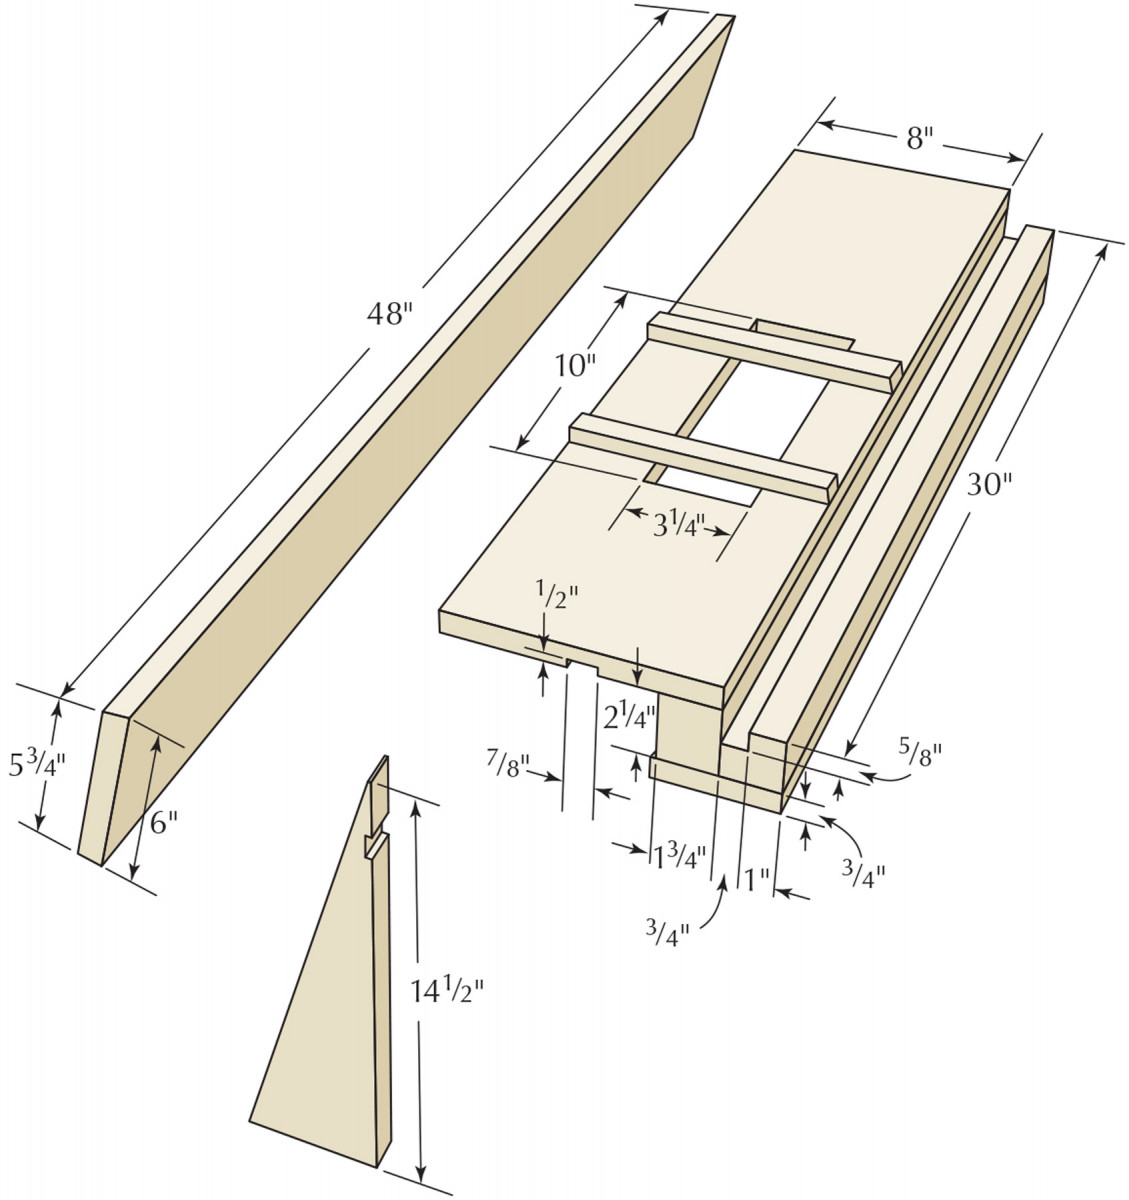
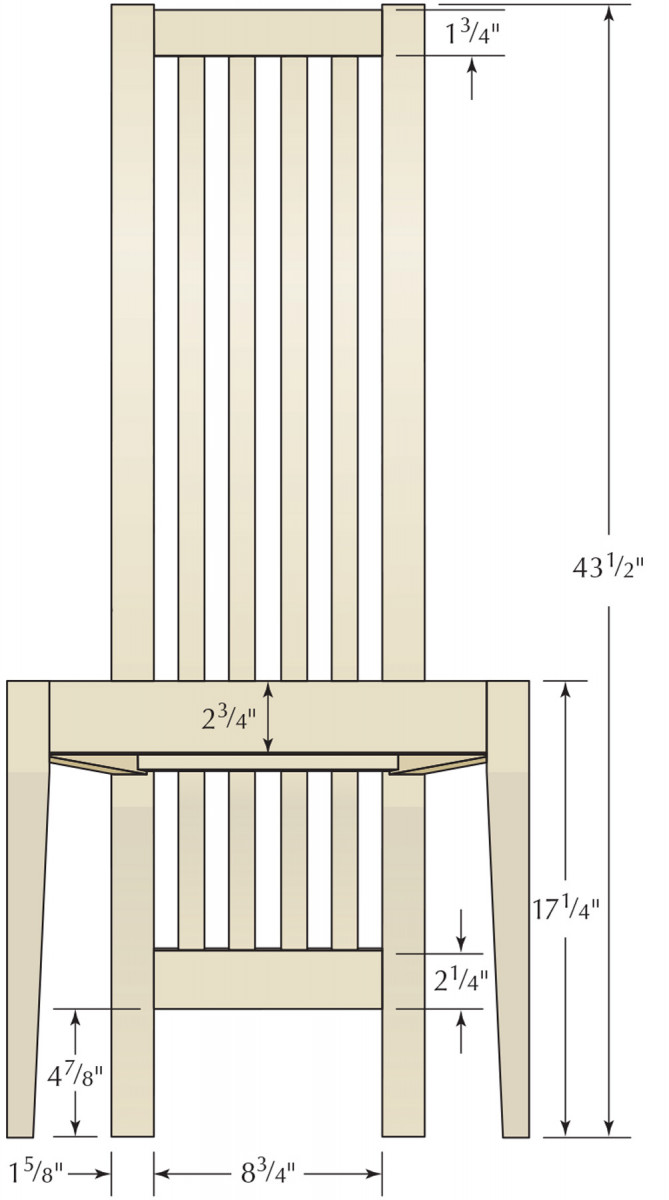
 Slat-back Chair Cut List
No.ItemDimensions (inches)MaterialComments
t w l
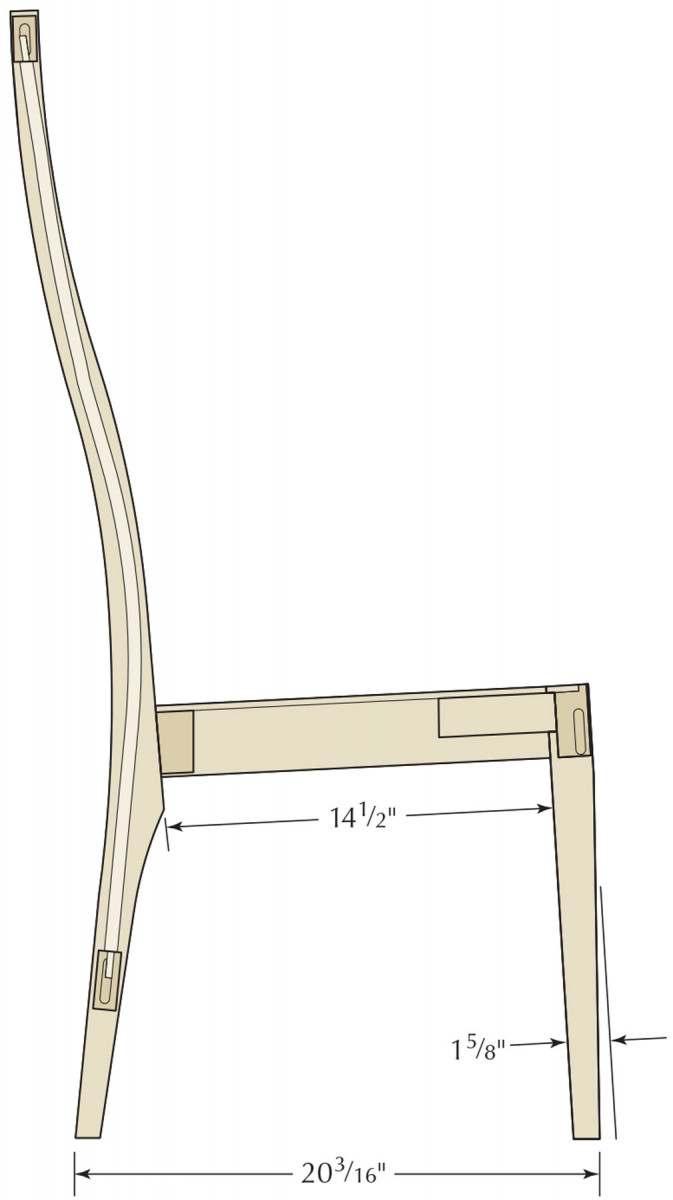
❏ 2 Back legs 15⁄8 41⁄246Cherry
❏ 2 Front legs 15⁄8 15⁄8 171⁄4Cherry
❏ 3 Front & side rails 11⁄4 23⁄4 20 Cherry Rough lengths
❏ 1 Lower back rail 7⁄8 21⁄4 12 Cherry Rough length
❏ 1 Crest rail 7⁄8 13⁄412Cherry
❏ 1 Seat back rail 11⁄2 23⁄812Cherry
❏ Slat stock 11⁄4 6 42 Cherry For 4 slats
❏ Corner blocks 11⁄4 23⁄8 12 Hardwood 2 pieces from stock
❏ 1 Seat 3⁄82020Plywood
Section
Plan
Elevation
Curve Creation
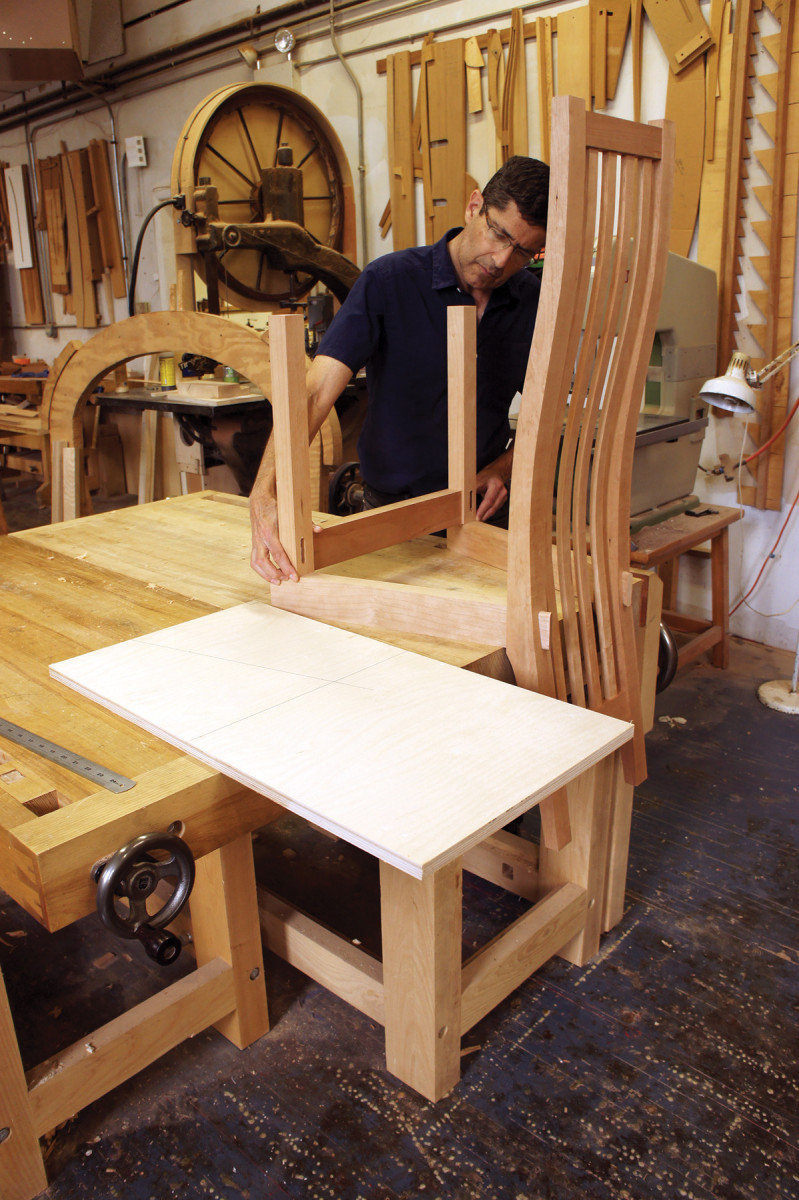
Trust, but verify. It’s best to double-check your measurements by doing a dry-fit of the back legs and rails, then showing the dry-fit front-leg assembly to the side rails.
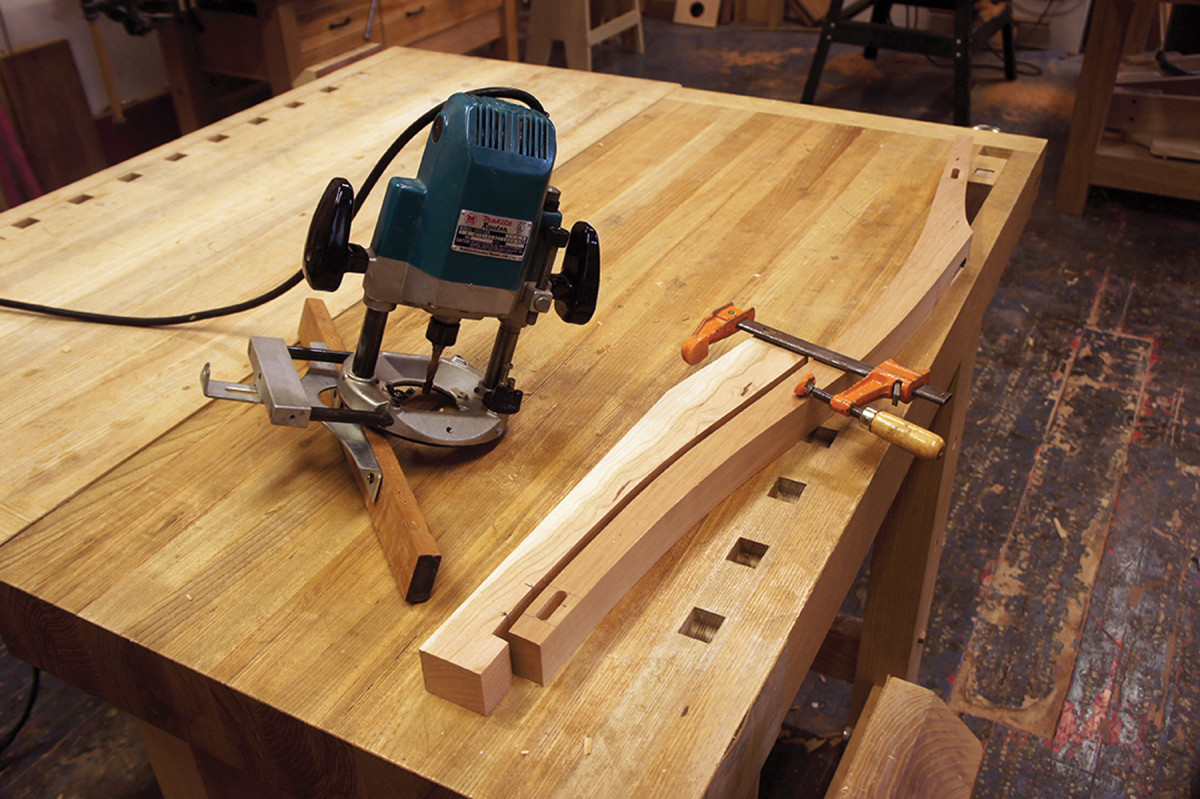
The slats, which form the chair’s back and run almost to the floor, are laminated for strength; cutting them out of solid stock would invariably lead to short-grain sections that would be very fragile. Lamination is the best approach.
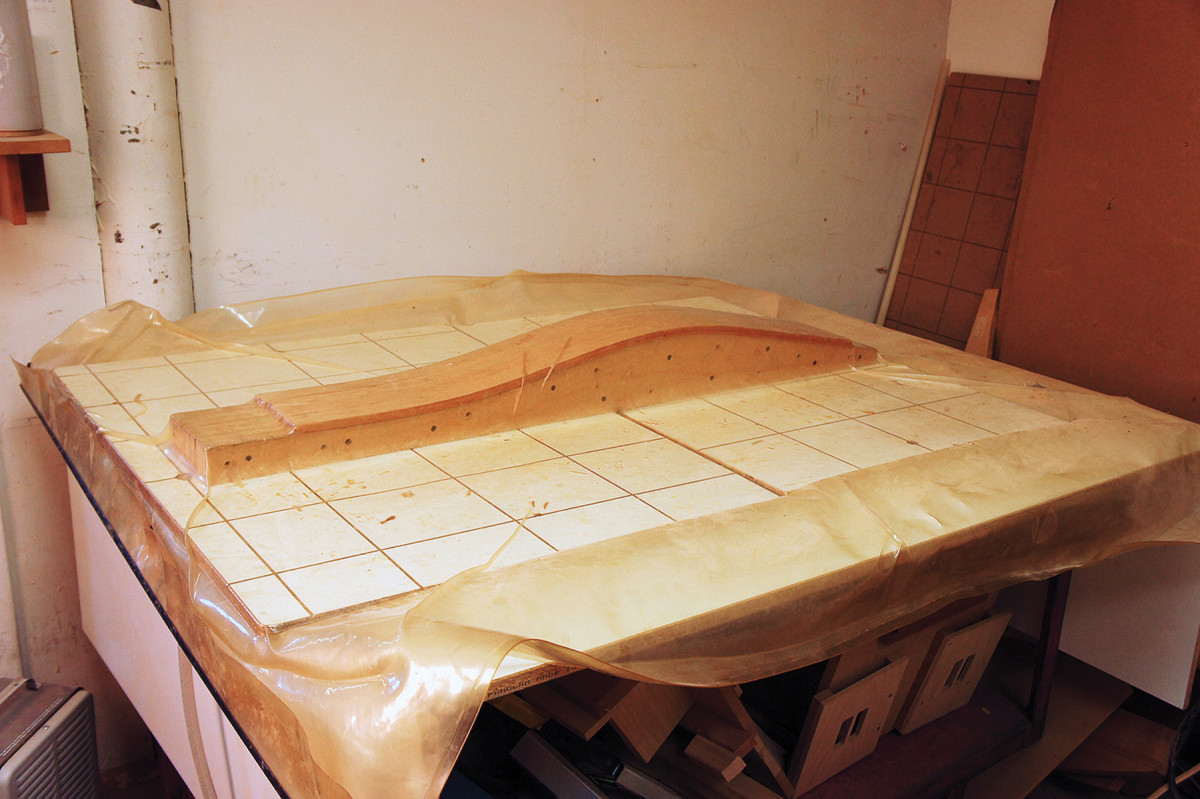
Begin by making a lamination form and caul (though you can skip the caul and make a wider form capable of gluing up four or more slats at once if you have a vacuum press). Enlarge the form shape from the Slat Form Pattern (above center) and copy it onto a piece of 3⁄4” plywood or MDF roughly 61⁄2” x 48″ (41⁄2” x 48″ if you don’t need the caul). Cut out the form on the band saw, then smooth carefully to your line. Now trace this curve onto a second layer of plywood, and cut this one out as well. Glue and screw the two layers together, flush-trim the new layer to the smoothed curve, then sand the two smooth.
If you’re making a form for a vacuum press, you should repeat this process until your form is at least 51⁄4” wide (seven layers). If you’ll be clamping your laminations, it’s time to switch over to making the caul.
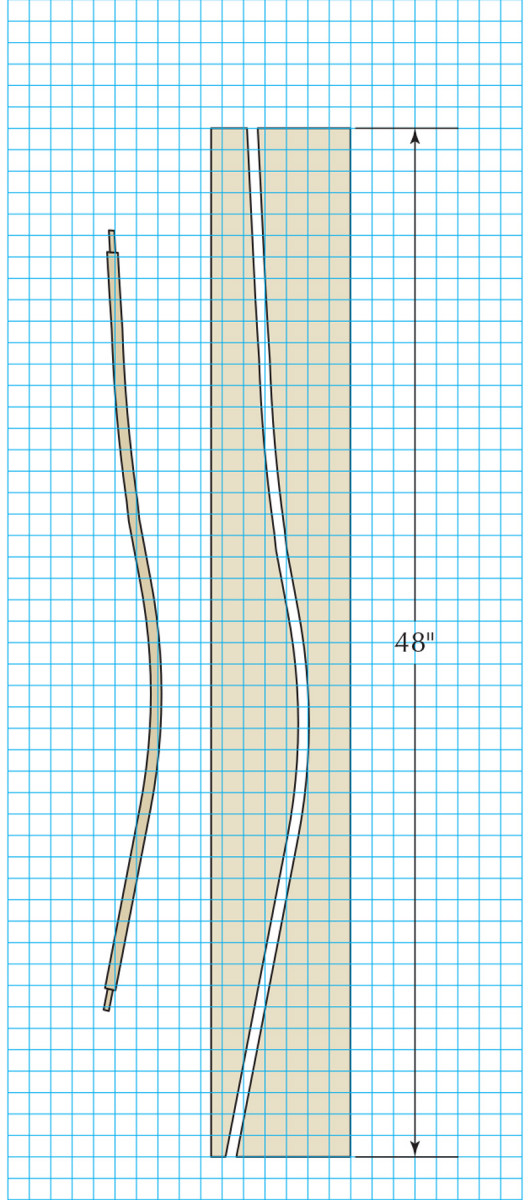
Slat Form Pattern One square = 1″
You can use the wood left over from cutting the form to make the caul, but you can’t just use it as-is. Instead, you’ll need to create the caul shape by offsetting 1⁄2” from the form. The easiest way to do this is to use a small disc with a hole in the center exactly 1⁄2” away from the edge of the disc. An adjustable hole saw (also known as a fly cutter) set in the drill press works well to make this disc. Sets of these offset discs are also available for sale (Lee Valley). You can then insert a pencil into the hole in the disc, roll the disc along the curve of the form, and draw the exact shape of the form. Cut this out, smooth to the line, and duplicate a second layer as you did for the form.
Now mark a reference line across the bottom of the form 5″ up from the end. This line will help you locate the lumbar curve in the right place on the chair. Because this reference line does not include the tenon in the lower back rail, you need to be sure to locate your slat laminae at least 1″ below the line when you glue up. Wax your form and caul thoroughly, or add a layer of plastic packing tape to the clamping surfaces so you don’t glue your slats to the form.
Cut Lamination Strips
Thin rips. To safely cut these 1⁄8″ lamination strips, cut to the outside of the blade and use a featherboard to help hold the stock in place just before it contacts the blade.
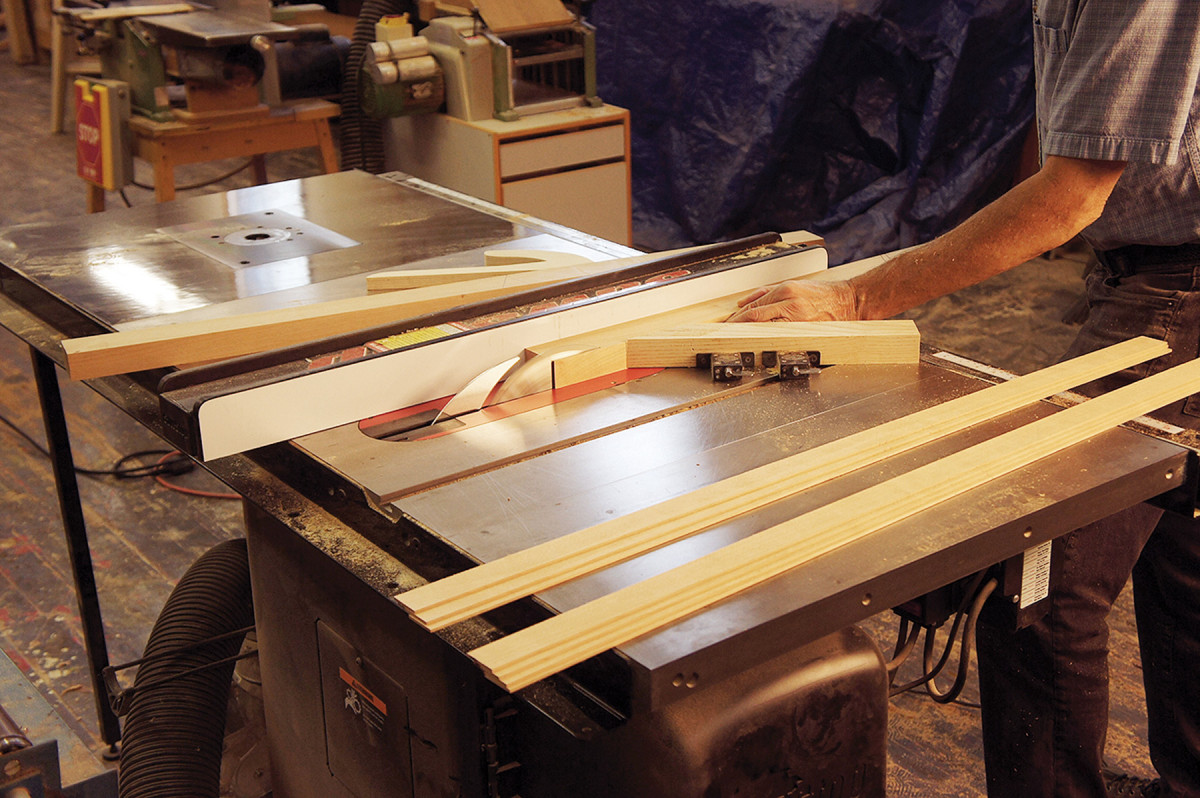
Select a flat-sawn 11⁄4” x 6″ x 40″ board from which to cut the lamination strips. Rip the board into two pieces of identical width, then mark two distinctly different layout triangles on the faces of these boards.
Now set up your table saw for ripping 1⁄8” strips – but it’s not safe to simply set the fence to 1⁄8” and rip; you’ll likely experience some nasty kick-back if you try. Instead, set the rip fence to take off 1⁄8” to the outside of the blade. You’ll get cleaner results and be safer if you set a featherboard just ahead of the blade to help hold the stock against the fence. Don’t let the featherboard press the strip against the blade or it will cause trouble.
Rip both your boards at the same setting, pushing the boards through with a push stick. Set the strips aside, starting a separate pile for the strips from each board. Then reset the fence. Add 1⁄8” (the desired thickness of the strips) to the exact thickness of the blade to determine how much to move the blade each time.
Rip the next pair of strips, add the strips to the appropriate pile, and repeat until you’ve got the 16 strips you need. Do not attempt to rip strips out of a board narrower than 1⁄2“.
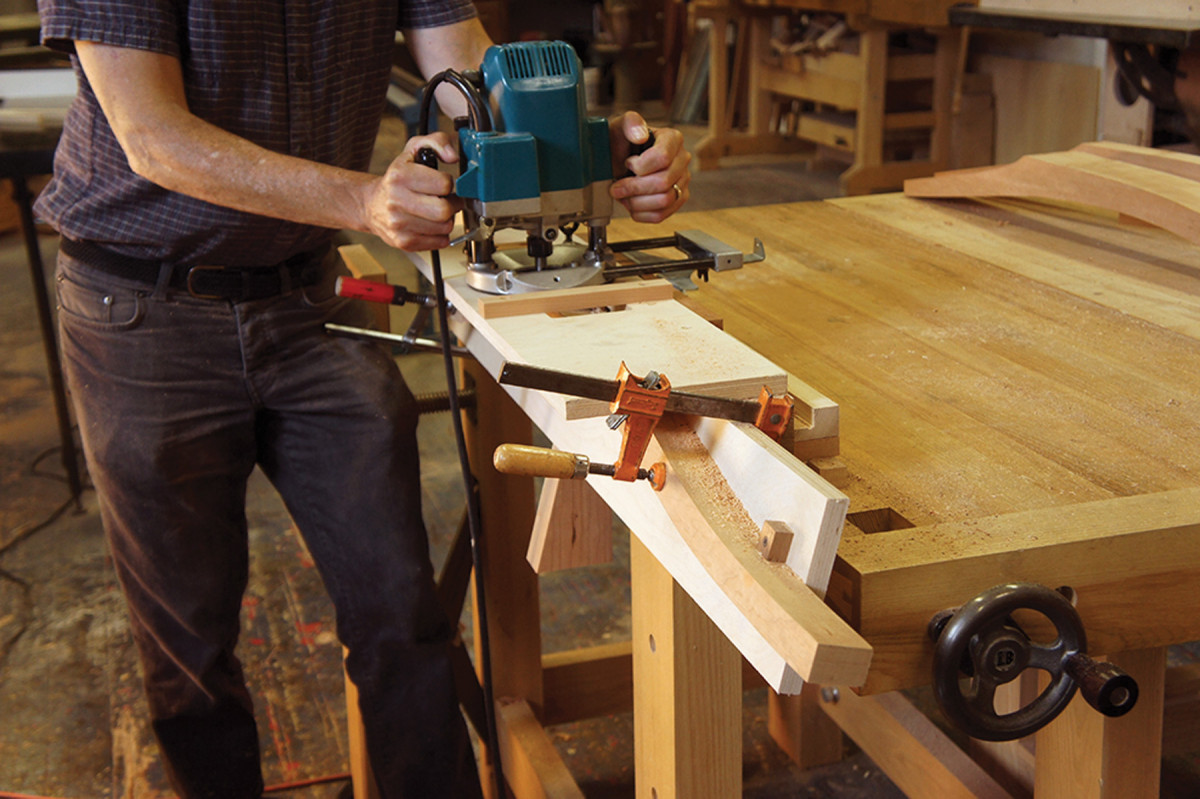
Slat Glue-up
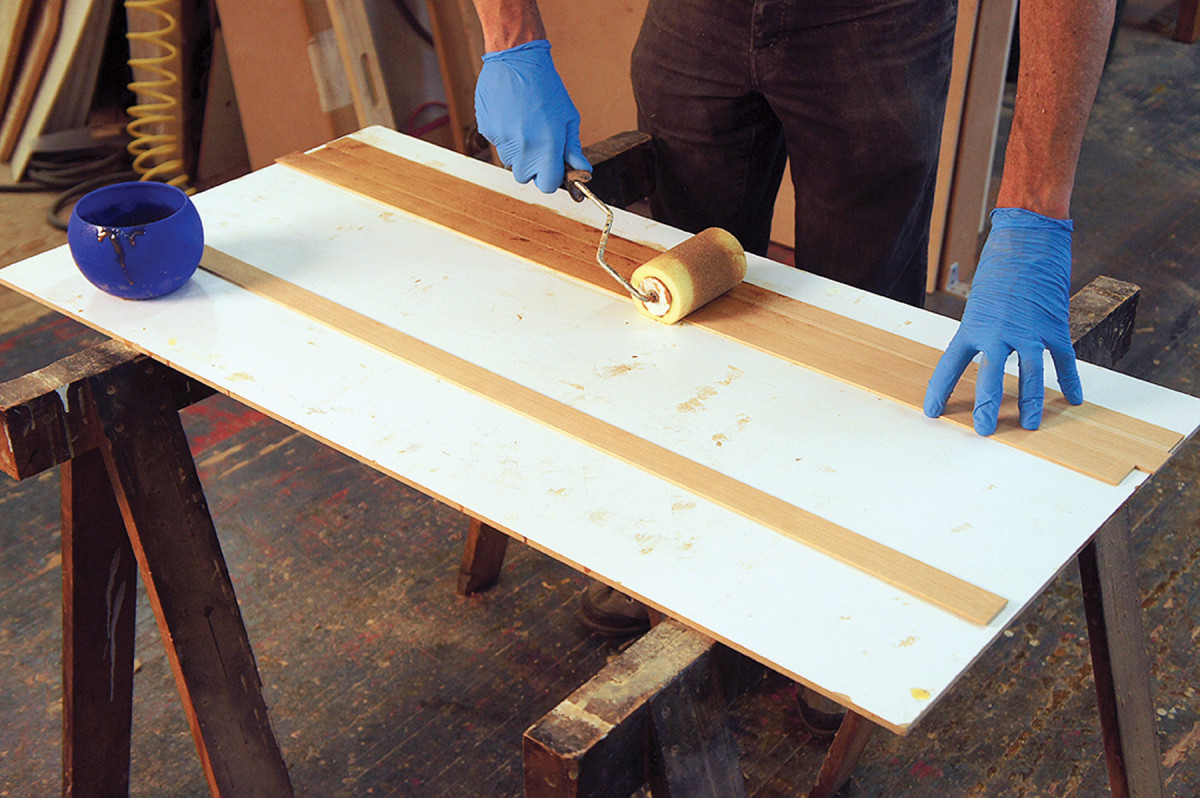
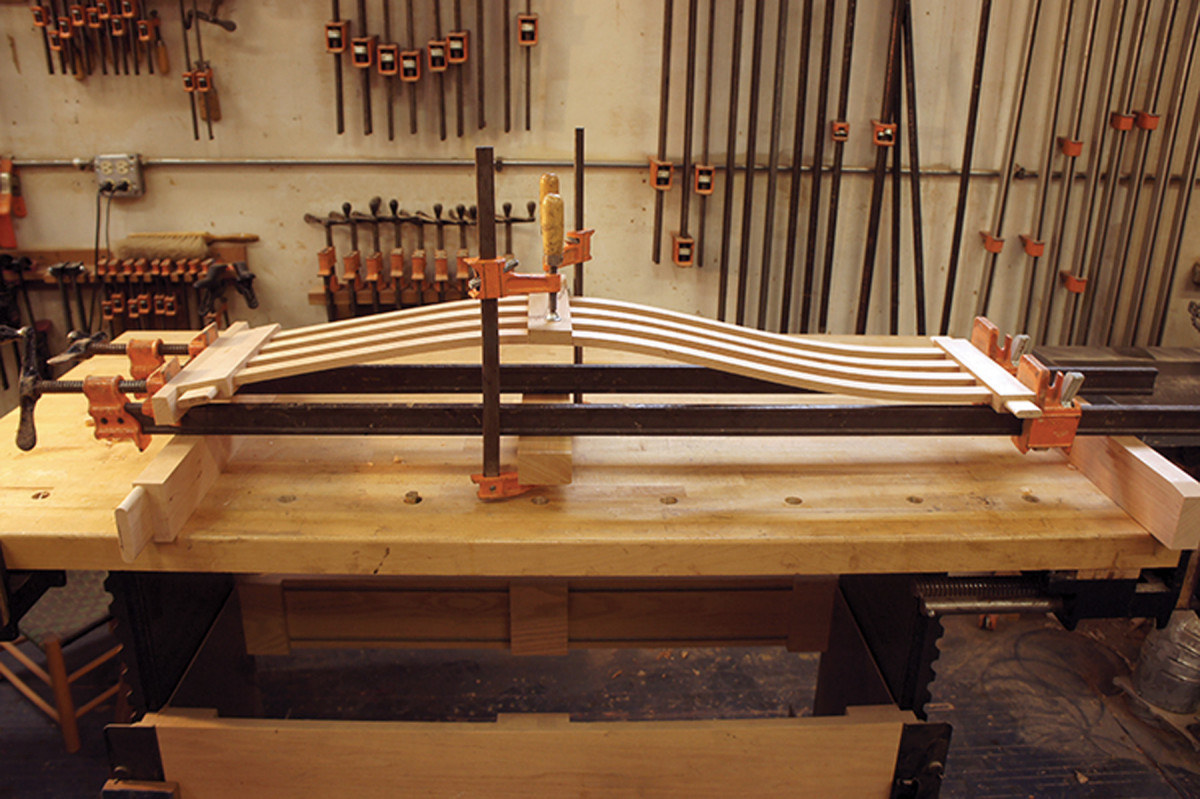
Roll away. I find it easy and efficient to apply glue with a roller three strips at once before placing the fourth strip of each back slat atop the sandwich. Stack up the three glued strips and add the fourth strip of the set. Place the bundle between the form and caul and clamp up, spacing your clamps about every 6″ and placing clamps alternately on the top and bottom.
I use plastic resin glue when I have laminations of this sort to do. The glue forms a very hard and rigid bond that allows for little, if any, spring-back. Mix up the glue according to the directions, and spread it on three of the strips using a foam paint roller.
Stack the three glued strips, add the fourth strip, then place the slat in the form (see images at right).
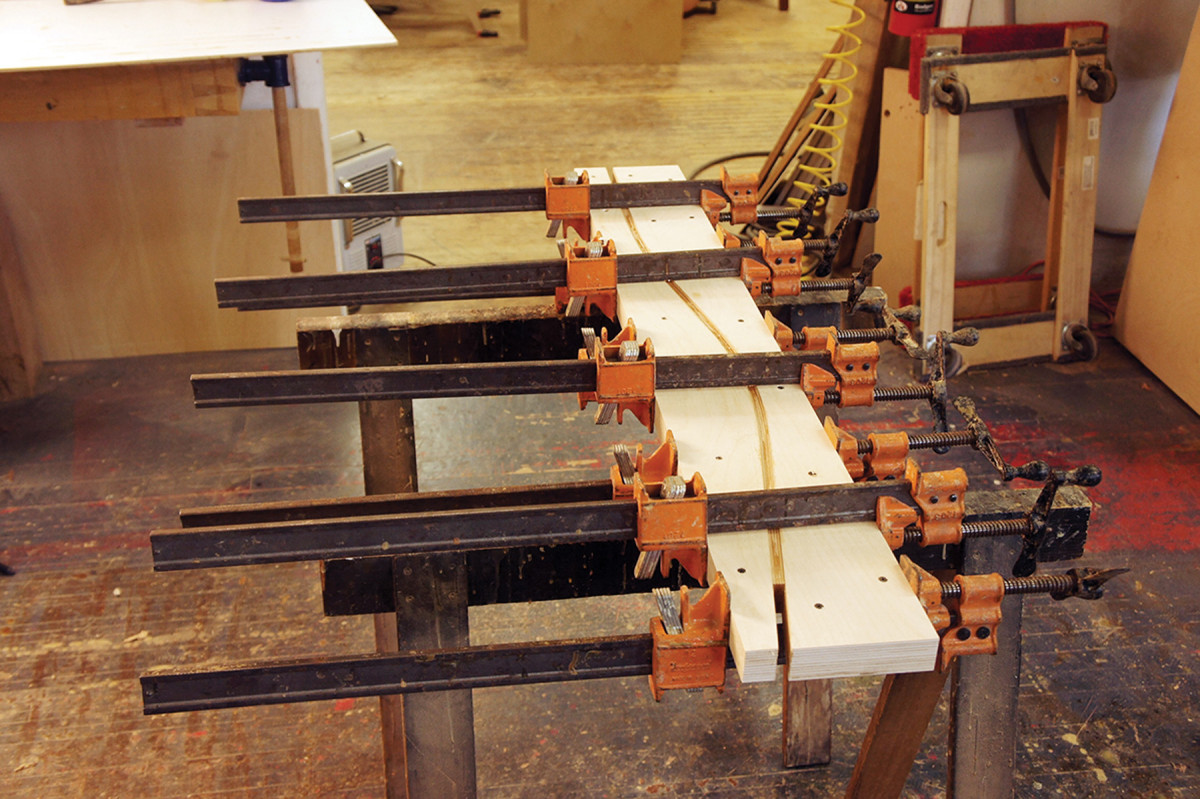
Pressed into shape. The bending form and caul capture the laminations as the glue dries. Place clamps alternating top and bottom every 6″, then let the glue dry for at least 12 hours.
Leave the lamination clamped up for at least 12 hours, maintaining a temperature of at least 70° F. (I use a cheap electric blanket to keep the glue-up warm in the winter.) Then remove the slat and repeat. In a vacuum press on a wider form, you should be able to glue up all four slats at once.
The only decent way to clean up these slats is to run the edge over your jointer (exercise great care; the slat is narrow) and then through your planer. The glue will not be kind to your knives. Clean up the slats to 15⁄16” wide. Then plane, scrape or sand every face.
Slat Mortises
Sucked into shape. If you have a vacuum press, make an at-least 51⁄4″-wide form and you can glue up all four laminated slats at once.
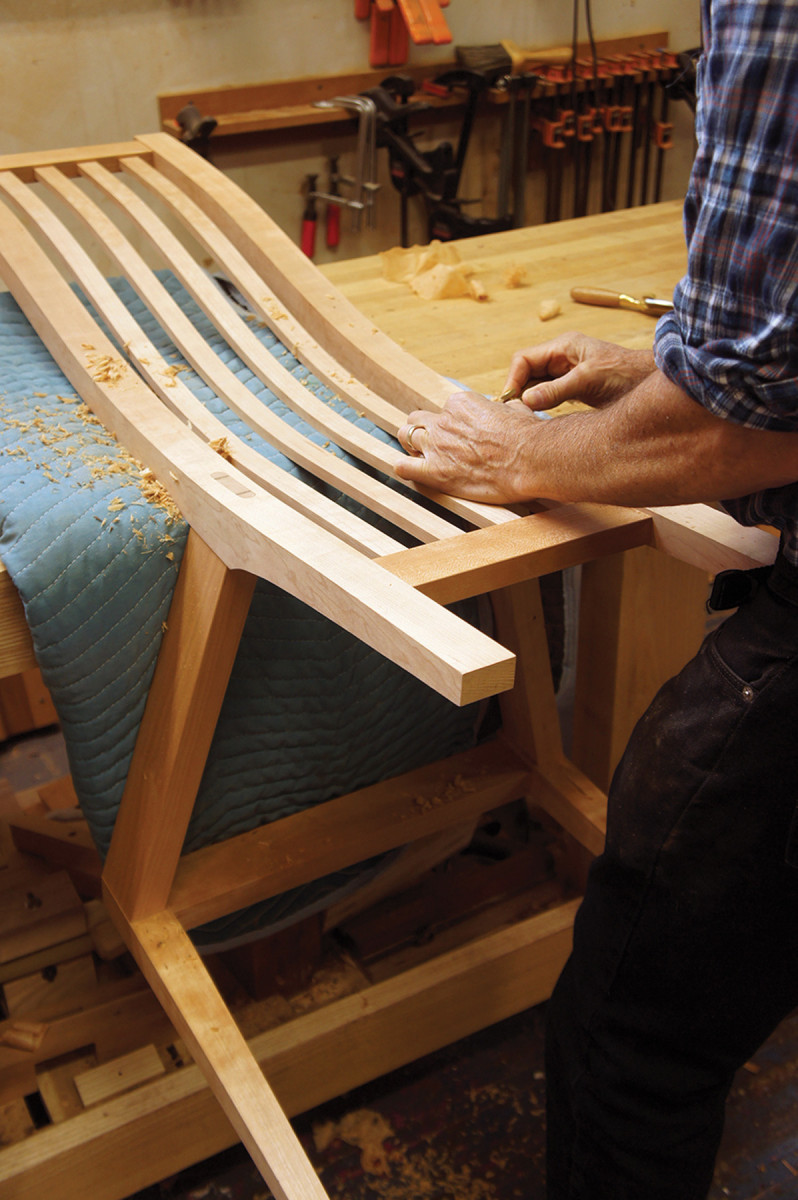
It is stronger (and a little easier) to mortise the rails for the whole slat than it is to cut tenons on the ends of the slats, then cut smaller mortises. You’ll have to be careful, though, to avoid leaving gaps around the slats where they go into the rails. It helps if you can cut the mortises slightly undersized, then plane the slats to fit.
Lay out the mortise locations centered in the width of both the top and bottom rails, then cut them. If you rout the mortises, you’ll need to carefully pare the corners square. (If you use a hollow-chisel mortiser, you may also need to pare the edges clean.)
The curve of the slats should be roughly aligned with the curve of the rear legs. The 5″ mark on the bending form should help you to position them correctly. Be sure to add whatever length you need for the insertion of the slats into the lower rail mortises.
You’ll need to insert the lower back and crest rails into one of the legs to determine the overall length for the slats. They should fit to the bottom of the mortises. Be sure that each of the slats is cut in the same way so the shapes match when installed; it can be confusing because the curve is not quite symmetrical.
Fit each slat to its mortise, and mark each for location as soon as each is ready.
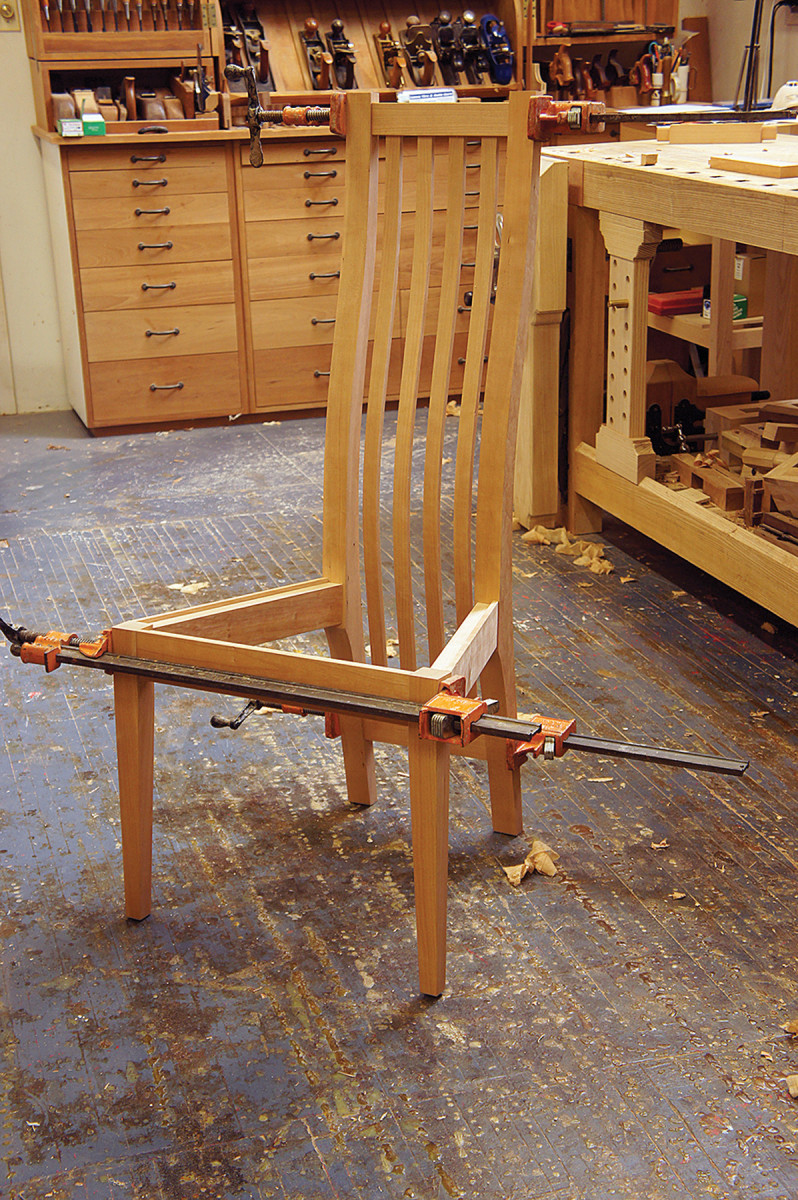
Dry-assemble the chair to ensure everything fits, and make adjustments as necessary. Mark where the side rail tenons come through the back legs and cut off the excess, leaving 1⁄16” to 1⁄8” beyond the marks. You’ll flush this off after you glue up the chair.
Before you can glue up the chair, you need to rabbet the tops of the front and side rails for the seat blank. The front rail is easy, and can be done on the table saw. But you’ll need to avoid cutting into the tenons on the back of the side rails. Use a router table for this, or make stopped cuts on the table saw, then follow up with handwork to clean up the uncut parts of the rabbets.
Finally, cut kerfs in the ends of the rear side-rail tenons for the wedges, and make up a bunch of wedges.
Chair Assembly
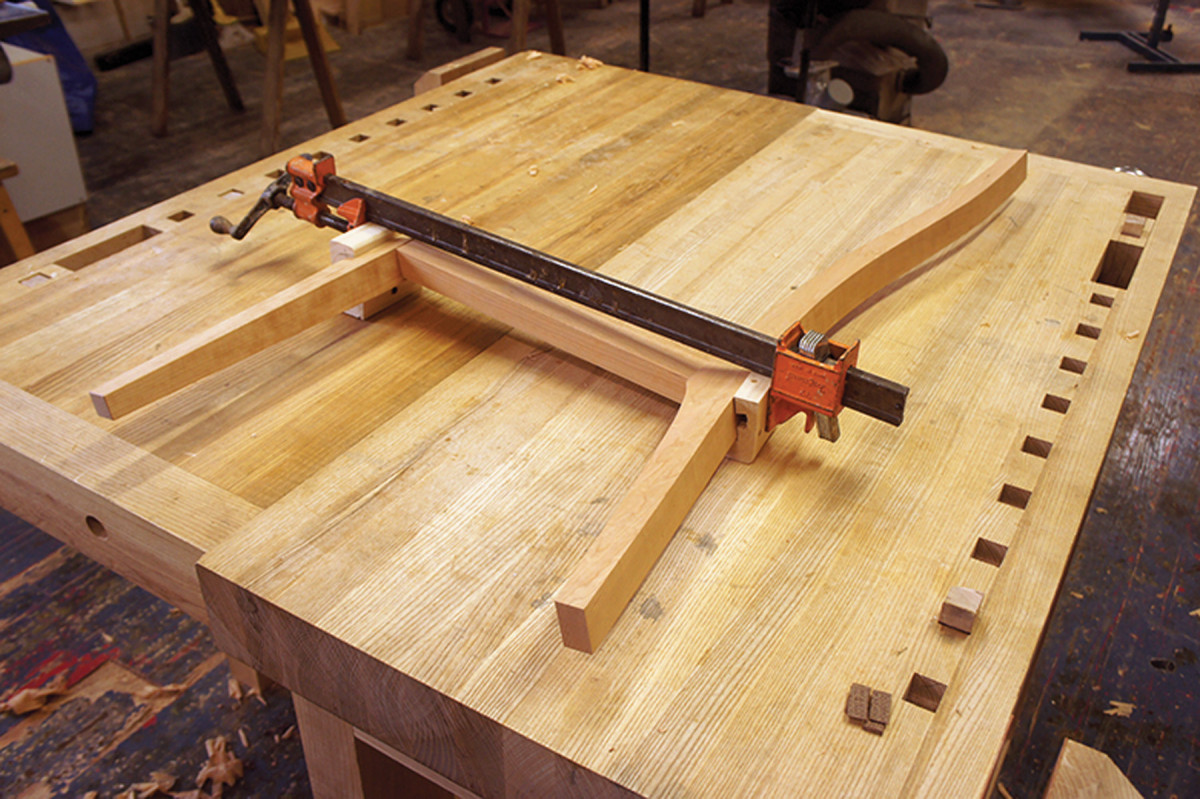
Glue-up help. Make a set of cauls to cradle the leg-to-side-rail subassemblies. They’ll allow you to place the clamps without marring the wood.
Complicated glue-ups are no fun at all – and this chair is pretty complicated. So gluing up in stages makes sense. Working on manageable subassemblies takes most of the stress out of the process, as well as many of the clamps.
The angled mortises make it very difficult to fit the side rails into place if the front and back are already together. It is possible, but it will be nerve-wracking (don’t ask me how I know this). It makes much more sense to glue the front and back legs to each of the side rails first. You’ll need to make up a set of cauls to clamp this subassembly together effectively and without marring the legs.
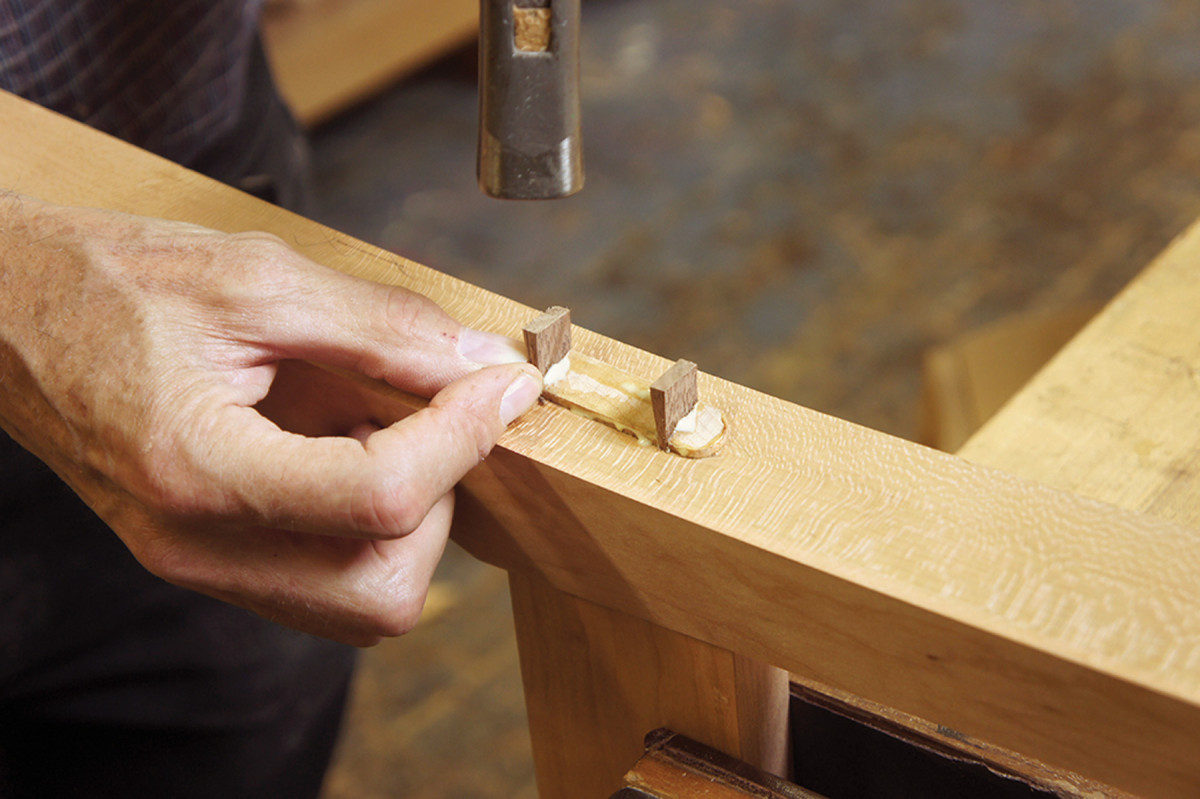
Listen carefully. The sound of your tapping will change to a duller tone when you’ve got the wedges in all the way.
You’ll also want to get your wedges for the tenons, and have a small hammer ready.
Spread enough glue in the mortises to wet the side walls, but not so much that the glue drips and pools at the bottom of the mortise. Then, spread glue very lightly on the tenons (it should look like you wiped off the glue you applied) and insert them into the mortises. Put your cauls in place and clamp up tight.
Wait a minute for the glue to tack up, and then remove the clamps and clamp the rail in a vise. Spread some glue on your wedges and carefully tap them in until they are fully seated.
Then put your cauls and clamps back on and let the side assembly sit until the glue is set.
Reclamp. With the wedges seated, put the sub assembly back in clamps and wait for the glue to dry.
The back rails and slats are next. This time, spread glue very lightly just in the mortises; don’t put glue on the ends of the slats. You don’t want glue squeezing out all over the place, and in any event, these joints are completely captured. If the slats don’t seat all the way, you can clamp from the top to the bottom rail to pull things tight.
Make an angled caul for the lower back rail. You’ll also need to clamp a block across the top of the slats and another block below the clamps that spans them to prevent clamp pressure from simply bending the slats, as shown in the picture below at bottom. (Once the slats are fully seated, you should no longer need any of these clamps.)
Clamp the back. Note the angled caul for the lower back rail, as well as the two cauls at the apex of the bend. The clamps there keep the slats in proper alignment.
Check the fit of the back slat and rail assembly in the back legs. If your slat lengths were off a little bit, you’ll find that the tenons on the rails no longer line up with the mortises in the legs. You can take just a little bit off the tenons on the rails to compensate.
The final assembly requires only three clamps: one for the clamping the front legs to the front rail, and one each across the back legs at the crest rail and lower back rail. Spread glue in the mortises and lightly on the tenons, put the chair together and clamp. Leave the chair in clamps to dry fully.
Finishing Touches
Almost there. With the subassemblies dry, the chair can be clamped together.
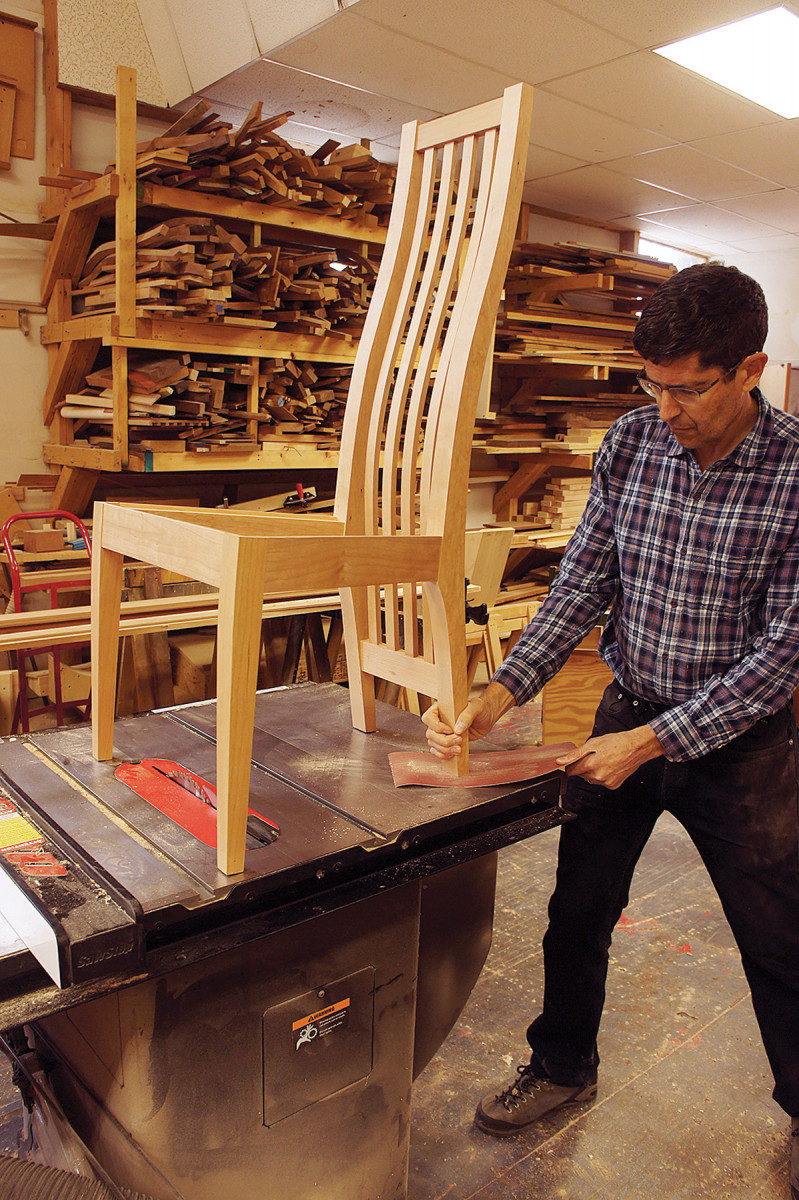
It seems like you’re about done at this point, though there are plenty of little details that still need to be taken care of. But it’s worth taking a moment to savor what’s happened thus far. You might even want to find a scrap of plywood big enough to use as a temporary seat and try out your chair. But then it’s back to work.
Once the clamps are all off, you’ll need to deal with the through-tenons of the side rails. Saw off the wedges, but keep clear of the leg surface. You can clean the tenon up further with a combination of spokeshave, scraper and sandpaper.
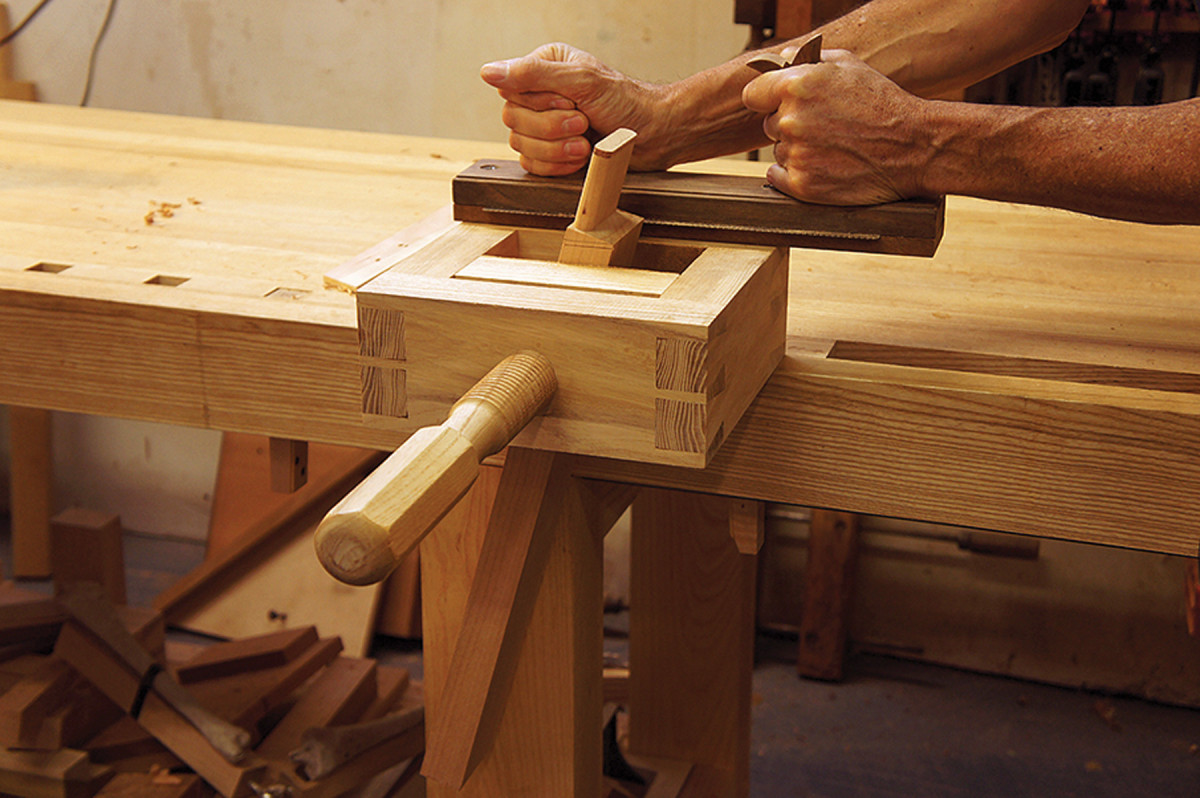
Next up is cutting away the inside of the tops of the front legs to complete the recess for the slip seat. Rout away the bulk of the wood using a trim router with a 1⁄4” straight bit, and finish up with chisels and a gouge for the curved corner. If you’re building a set of chairs, you might want to make a pattern, clamp it in place and use that to guide your router so the seat recesses all match.
Screw the seat-back rail into place.
Careful now. Avoid marring the leg surface as you flush the wedges.
The front of the chair needs corner blocks. To determine their exact angle, extend the lines of the inside edges of the rails until they intersect, as shown in the third illustration on page 30. Then measure with a ruler or a set of dividers about 6″ out along both of the rails. Hold a straightedge up to these marks, then set this angle on a bevel gauge. Set your table saw blade to this angle, and cut your corner blocks using a miter gauge. A fence that extends across the blade will help make this a safer cut.
Then drill countersunk pilot holes for four screws that will attach each corner block to the rails. Drill a 3⁄16” hole through from the top to the bottom edge, which you’ll use for bolting the seat onto the chair. Counterbore this hole from the bottom of the corner block with a 1⁄2” drill for the washer and bolt head. (I usually don’t attach the corner blocks until after applying finish to the chair; it’s just easier to finish when they’re not in the way.)
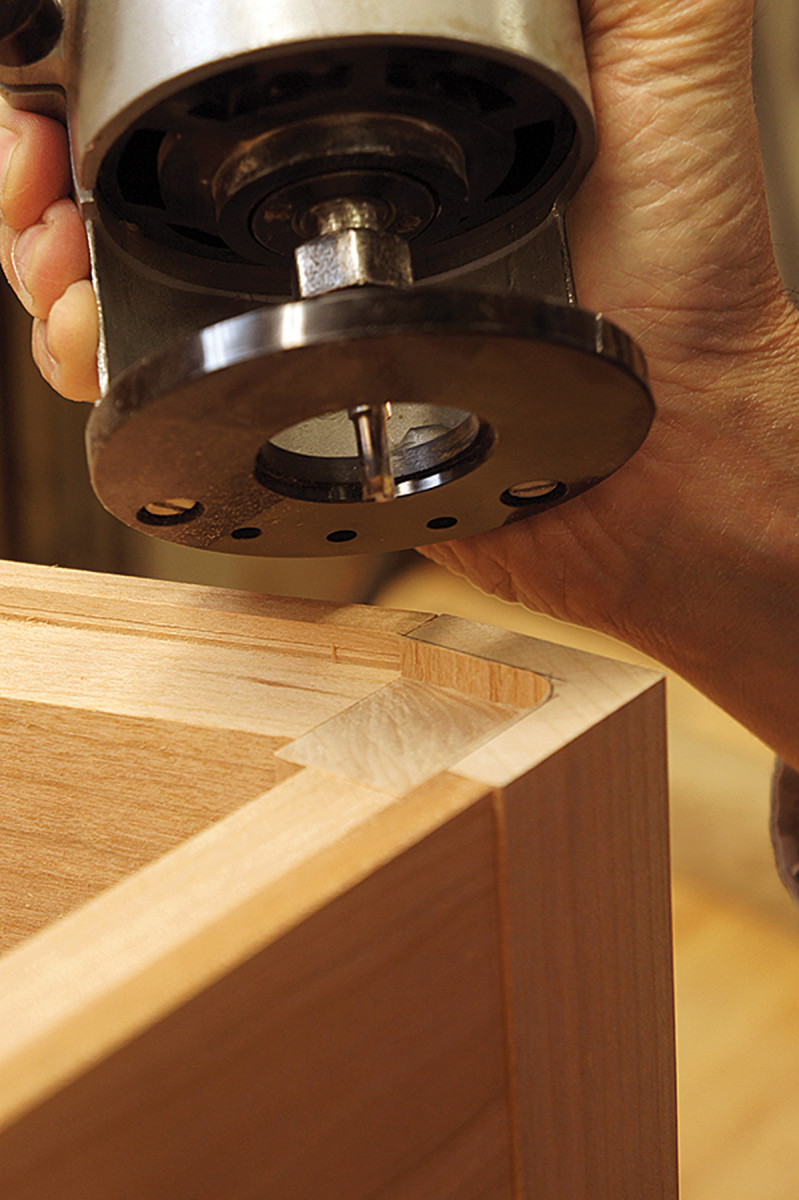
Seat recess. A trim router with a 1⁄4″ straight bit makes quick work of the bulk of seat recess waste atop the legs.
The slip seat is a piece of 3⁄8” plywood (don’t use MDF here). Cut the front-to-back dimension first. You want to leave roughly 3⁄32” of space (this will vary based on the thickness of your upholstery fabric) between the seat blank and the lip of the seat rails and back legs.
Clamp the still-oversized blank to the top of the chair, and trace around the outside of the side rails. Then offset this line in the thickness of the lip on the side rail plus 3⁄32“. Cut to this line, then check the fit of the seat blank in the chair. Adjust the curve at the front corners to leave an even gap there as well. Once you’ve made one seat blank, you should just be able to duplicate it for the rest of a set.
Once again, place the seat blank in position and clamp in place. Drill up through the holes in the front corner blocks. Remove the seat blank and pound #8-32 T-nuts into the top holes on the top of the seat.
On the level. If your legs are close to level, simply rub the longest one over rough sandpaper to adjust it to perfection.
Set the chair frame on a flat surface – I use the table saw – and check to see if the legs sit flat on the table. If you’ve got just a little bit of correcting to do, take a sheet of heavy-duty sandpaper and place it under one of the longer legs. Hold the leg with one hand and pull the sandpaper out from under the leg with the other. Check the results and repeat as necessary.
If things are really off, you should shim the chair level then scribe around the legs using a small spacer block and a knife. Then cut the legs off to your lines.
Chamfer the bottom corners of the legs, then hammer in some glides. The glides will protect both the bottom of the legs and your floor from damage.
If you’re comfortable upholstering the seat yourself, go for it. I prefer to leave that to an expert, and simply bring my chair, seat blank and fabric to a local upholsterer and ask for a thin layer of dense foam, another layer of softer foam, and a layer of cotton batting over the top.
Now it’s time to have seat and enjoy your comfortable and stylish new chair.
Plan: Download a free SketchUp model of the slat-back chair.
Here are some supplies and tools we find essential in our everyday work around the shop. We may receive a commission from sales referred by our links; however, we have carefully selected these products for their usefulness and quality.