We may receive a commission when you use our affiliate links. However, this does not impact our recommendations.
 As much as this piece is a homage to Shaker design, it is also quietly a love letter to both hand tools and shared shops.
Project #2113 • Skill Level: Intermediate • Time: 10 • Days Cost: $500
Online extras: Glue-Up Tips for The Shaker Sewing Table • Cutlist and Layout PDF
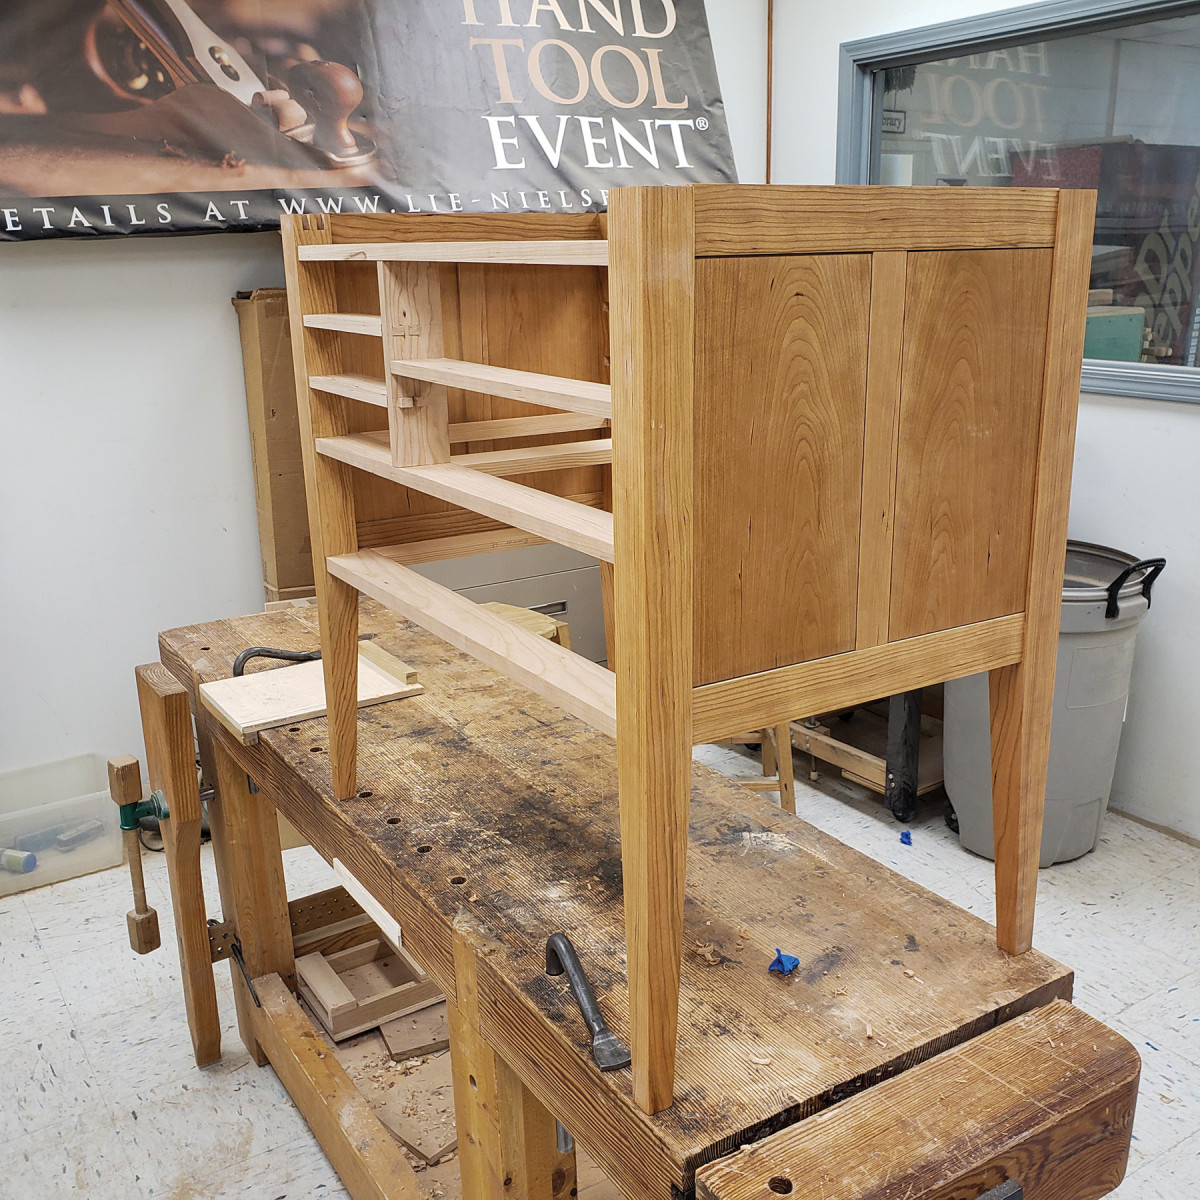
I work in the Kansas City Woodworker’s Guild, a shared shop with a fleet of Sawstops, bandsaws, jointers, planers, drill presses, mortising machines, wide-belt sanders, lathes, a panel saw, router tables, CNC machines, and innumerable handheld power tools. The entire lot of equipment would rival any commercial shop (all for the low membership due of about $100/year!). For me, the most stunning feature is the hand tool cabinet containing all of the Lie-Nielsen hand planes and saws in production, even the special joinery planes. I’d trade all the machines (except maybe the bandsaw) for that cabinet. The cabinet is the bench room, a space designated specifically for hand work and separate from the machine area.
The swipe of a plane, the shush of a saw, the tapping of a chisel. I find happiness in these quiet, pleasing sounds of work at the bench, where sawdust gathers in soft piles and shavings thinner than paper roll along the floor. I find happiness in my tools that facilitate the desire to do good work by their very existence. Far away from the buzzing, shouting, and biting machines of the shop, this calm setting has, at its heart, an intuited expectation of precision and craft, leaving my head clear and ready to do work worth putting my name on.
I prefer to work as far from machines as I can. Most of the time, it’s too loud, dusty, and distressing for me to justify setting up and using a machine across the shop when there’s a beautiful handsaw right there. Besides, as I mentioned, the guild is a shared shop which can, on busy days, mean a line to get to the chop saw or one of the jointers.
If my reservations about working in a shared shop sound a little harsh, it’s only because they easily illuminate the virtues of hand tool work. In truth, there is a great sense of camaraderie among the guild members. The shop is volunteer operated and hosts members from across the skill spectrum. The members are friendly and helpful, especially during large, multi-person glue-ups. I’ve learned almost everything I know by just being at the guild, asking a question or two, and watching how others might approach situations similar to my own projects.
Being a guild member has also introduced me to all sorts of styles and methods I might not have learned about otherwise. Before joining the guild, Shaker was just a style of kitchen cabinet to me, but thanks to my friend Dave (a foreman at the guild and absolute expert on American Colonial, Shaker, Amish, Mennonite, and vernacular furniture), it has become my favorite style to emulate. This piece takes Shaker sewing counters as its inspiration but cleans up the lines around the frame and panels, reduces the size of the pulls, and adds a little flair to the drawer fronts with tiger maple and rosewood. So while it maintains its Shaker soul, it’s updated, a little more spacious, and a perfect project to pay respects to my greatest influence.
Layout and Cut List
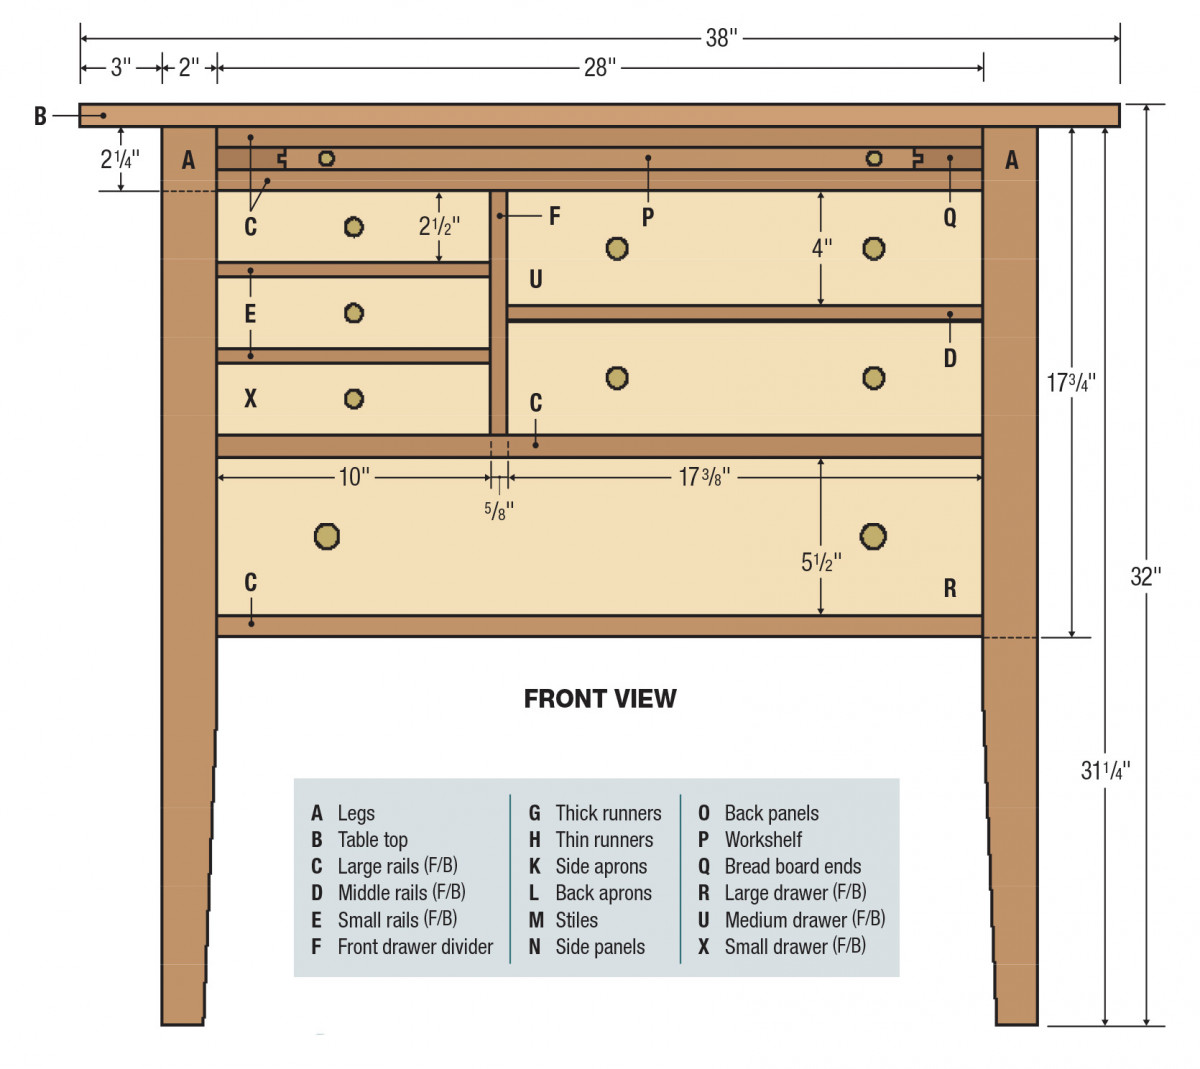
 No. Item Dimensions (inches) Materials/Comments
T w l
4 A Legs 2 x 2 x 31 1/4 Cherry
1 B Table top 3/4 x 22 x 38 Cherry
7 C Large rails (F/B) 3/4 x 2 1/2 x 29 1/2 (4 cherry fronts, 3 fir backs)
2 D Middle rails (F/B) 1/2 x 2 1/2 x 18 3/4 (1 cherry front, 1 fir back)
4 E Small rails (F/B) 1/2 x 2 1/2 x 11 3/8 (2 cherry fronts, 2 fir backs)
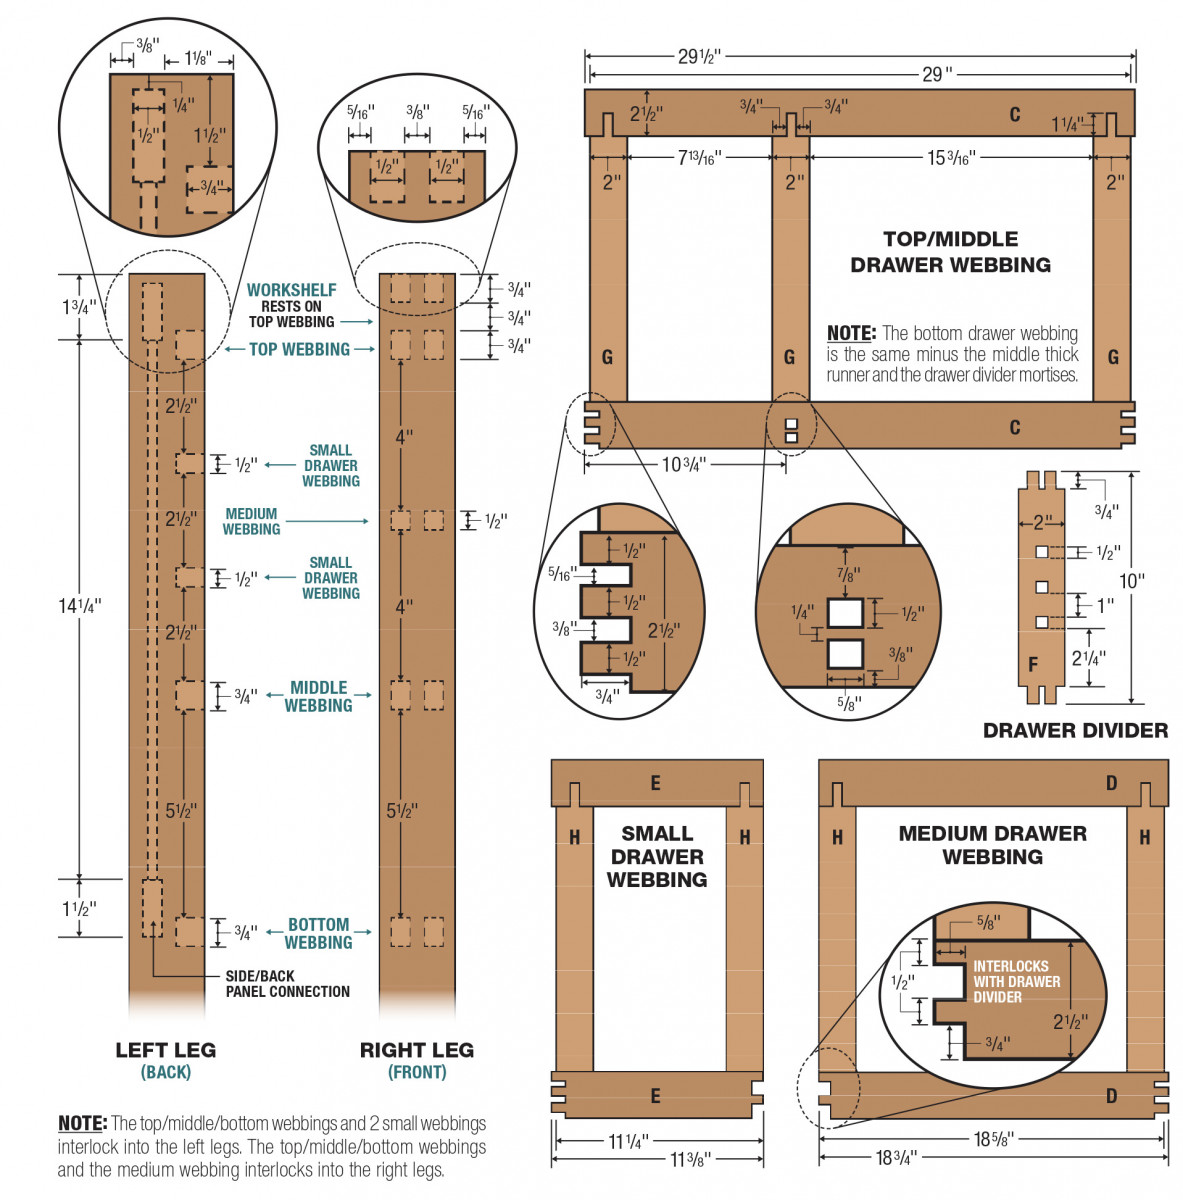
1 F Front drawer divider 5/8 x 2 x 10 Cherry
8 G Thick runners* 3/4 x 2 x 15 1/2 Fir
6 H Thin runners* 1/2 x 2 x 15 1/2 Fir
2 I Workshelf guides ** 1/2 x 5/8 x 16 Fir
11 J Drawer guides ** 1/2 x 5/8 x 16 Fir
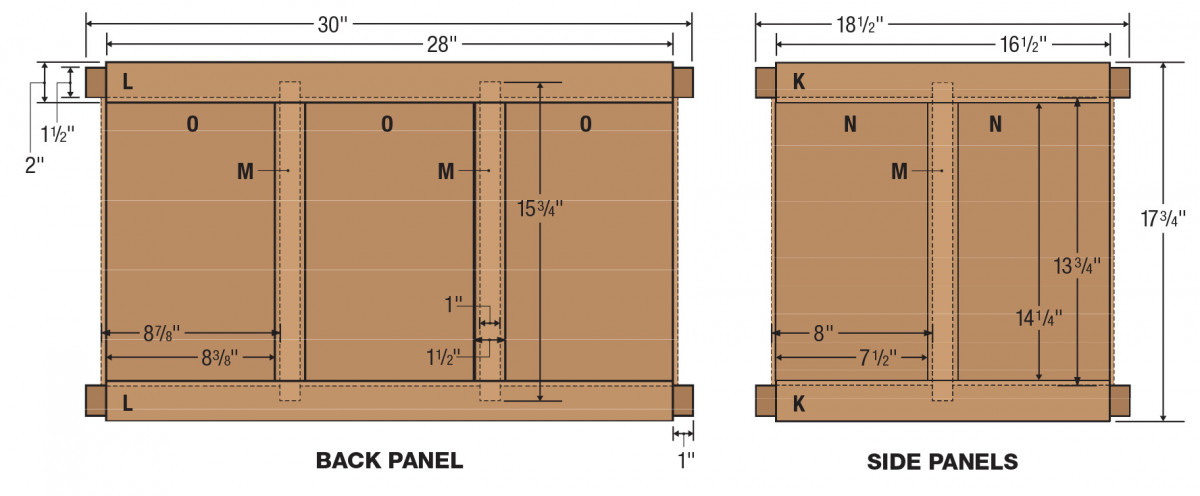
4 K Side aprons 3/4 x 2 x 18 1/2 Cherry (2 for each side)
2 L Back aprons 3/4 x 2 x 30 Cherry
4 M Stiles 3/4 x 1 1/2 x 15 3/4 Chery (1 for each side, 2 for back)
4 N Side panels 1/2 x 8 x 14 1/4 Figured cherry (2 for each side)
3 O Back panels 1/2 x 8 7/8 x 14 1/4 Figured cherry
Workshelf and Drawers
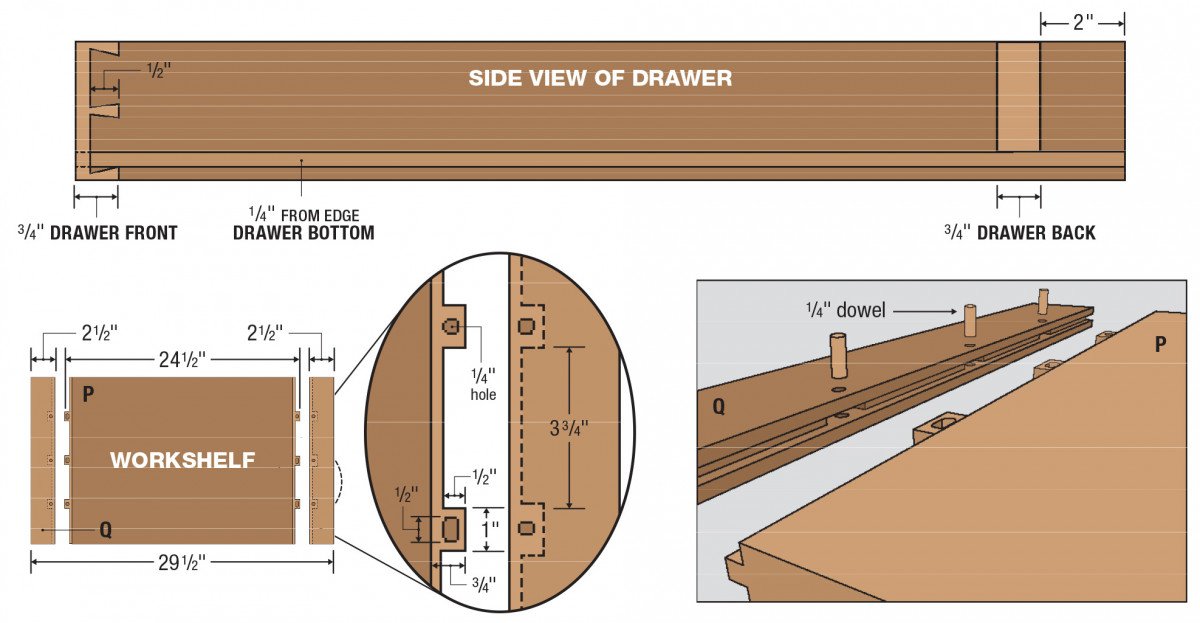
1 P Workshelf 3/4 x 18 x 24 1/2 Cherry
2 Q Bread board ends 3/4 x 2 1/2 x 18 Cherry
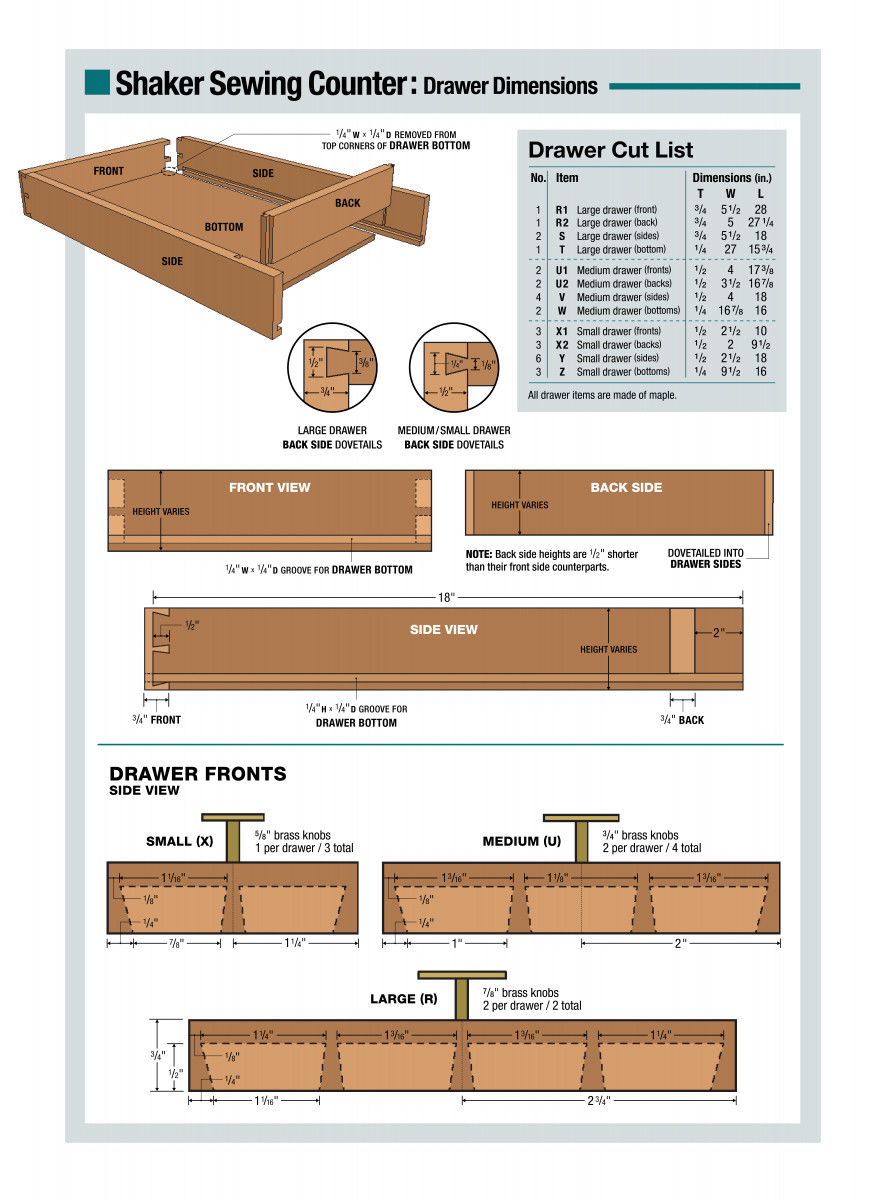
2 R Large drawer (F/B) 3/4 x 5 1/2 x 28 Maple
2 S Large drawer (sides) 3/4 x 5 1/2 x 18 Maple
1 T Large drawer (bottom) 1/4 x 27 x 15 1/2 Maple
4 U Medium drawer (F/B) 3/4 x 4 x 17 3/8 Maple
4 V Medium drawer (sides) 1/2 x 4 x 18 Maple
2 W Medium drawer (bottoms) 1/4 x 16 7/8 x 16 Maple
6 X Small drawer (F/B) 3/4 x 2 1/2 x 10 Maple
6 Y Small drawer (sides) 1/2 x 2 1/2 x 18 Maple
3 Z Small drawer (bottoms) 1/4 x 9 x 15 3/4 Maple
*Use thick runners (G) with large rails (C) to create large drawer webbings. Use thin runners (H) with medium rails (D) & small rails (E) to create small and medium drawer webbings.
**Rub-joint workshelf and drawer guides (I/J) flush to the slots.
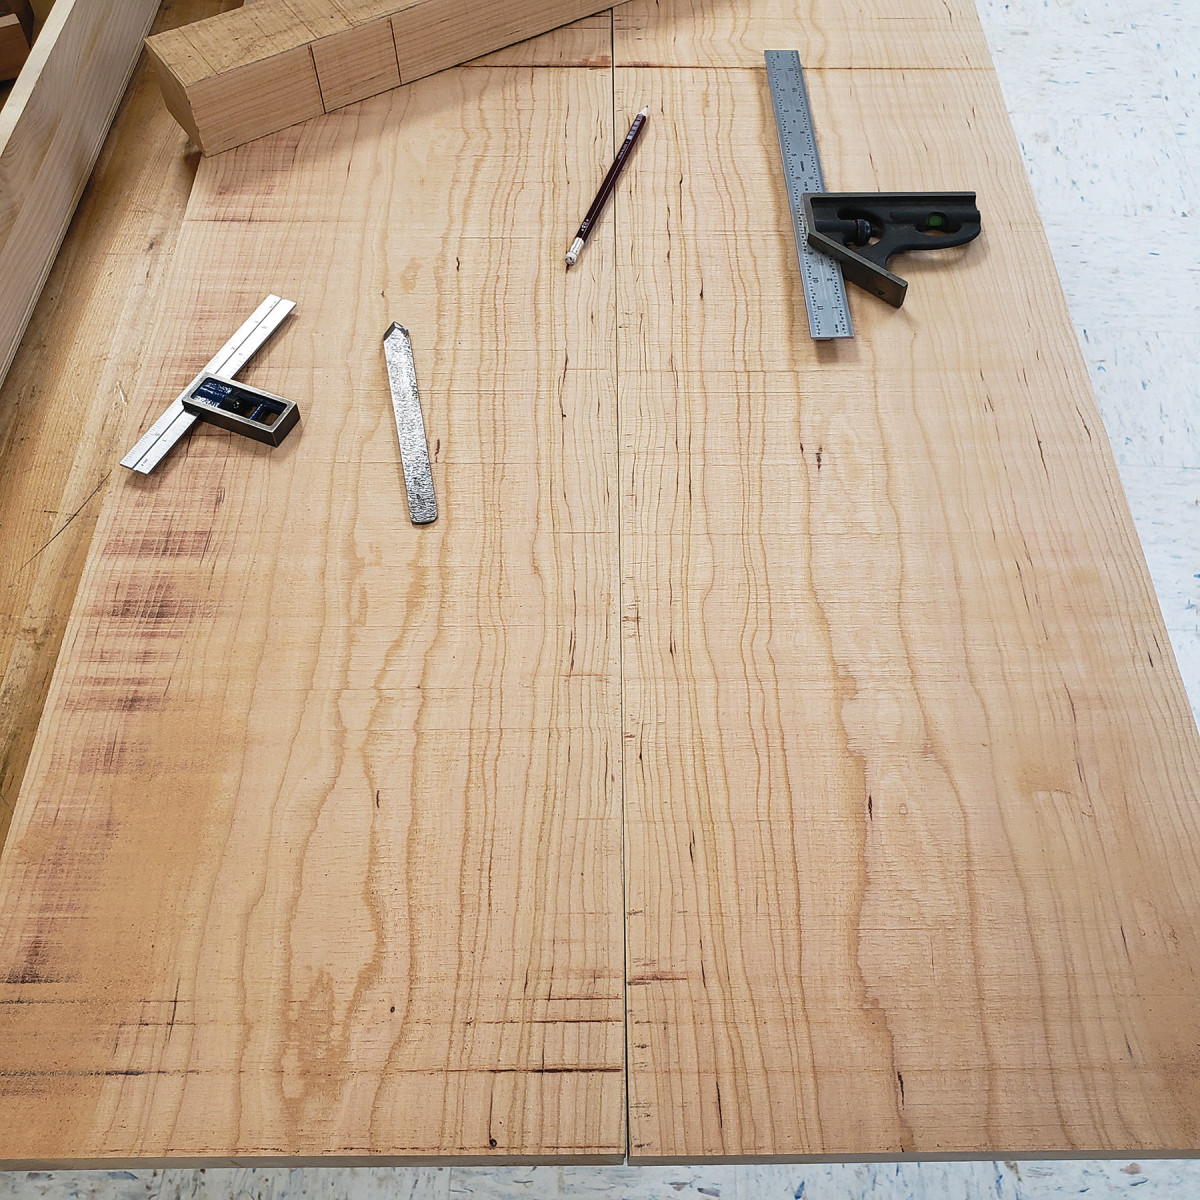
Bookmatching for tops works best with tight, straight grain. Continuous grain helps create a seamless appearance.
Choosing Stock
After I have all my lumber cut to rough dimensions, I start with the top and the legs because these are the pieces with the largest dimensions and must be selected based on both appearance and grain for a good layout. If possible, I book-match stock for my tops. With the legs, I pull knot-free stock from the edges of my board where the end grain is diagonal to ensure straight grain all the way down the leg and on all four faces (rift sawn). If you’re milling the drawer lumber at the same time, it’s worth noting that nice straight grain is excellent drawer side material, but depending on the wood you’re using, it isn’t always necessary. Maple is stable enough that you can use regular flat-sawn stock but try to at least select visually pleasing grain patterns and definitely avoid knots, voids, checks, and other defects.
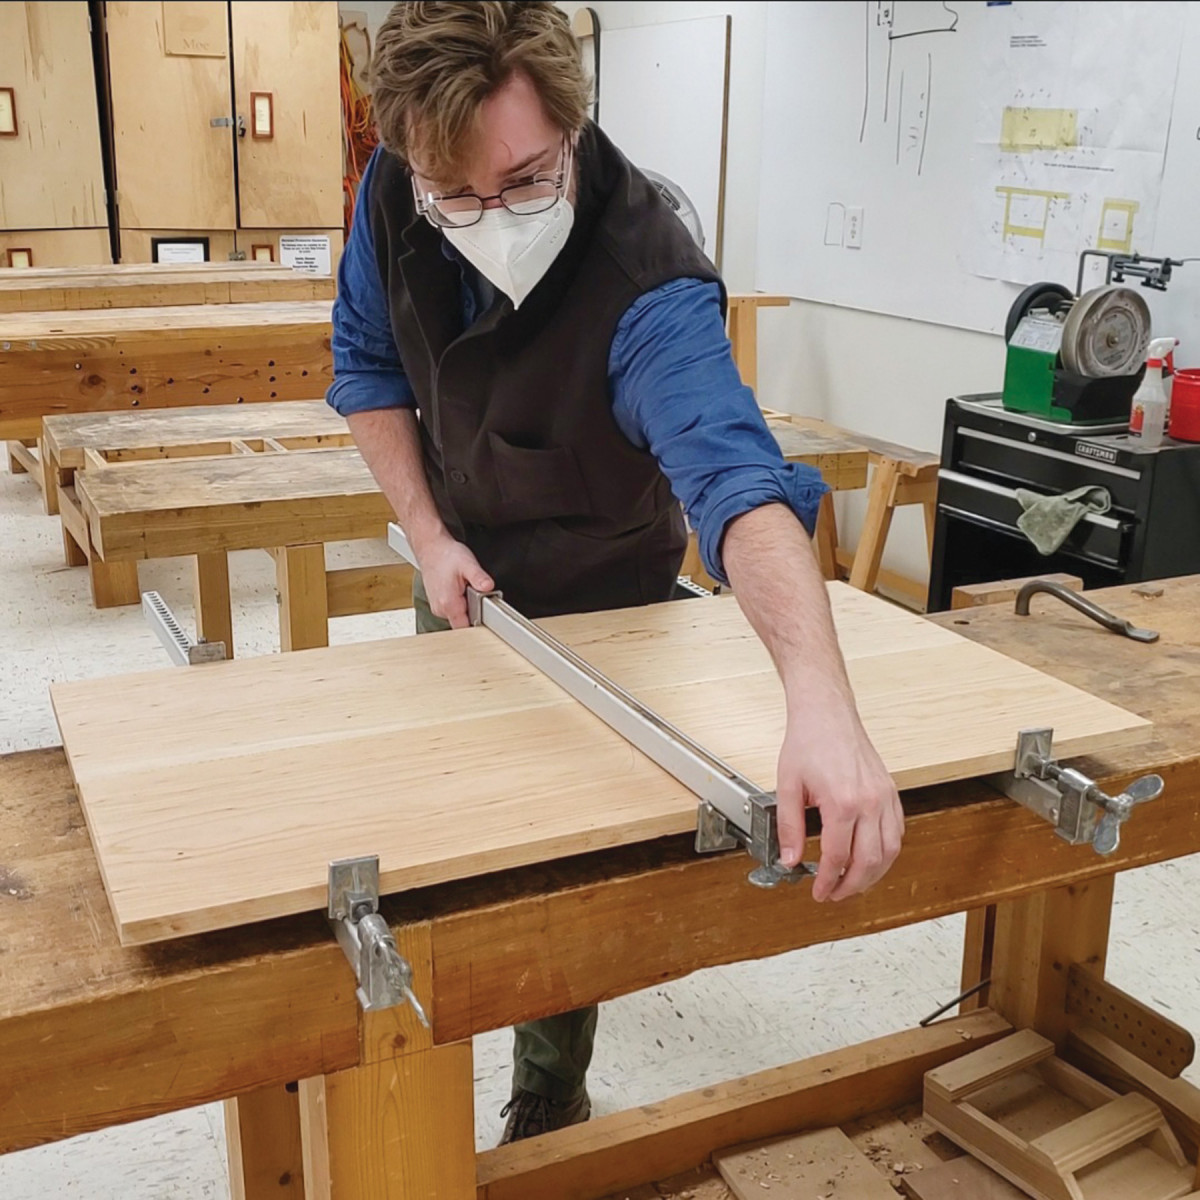
Glue up the spring joint using even pressure.
Spring Joint
Having selected my stock, I glue up the panels that make the top and the work shelf. I avoid using dominos or biscuits because I find them unnecessary. In order to achieve a nice, gap-free panel, I use a spring joint, which is really just an edge joint that has a very shallow hollow in the center of the stock. I fold my two pieces with their faces against each other and the joining edges flush, then plane one or two swipes across the whole surface to remove any machine marks. Taking very thin shaving, I make two or three short, stopped passes in the center, then I make two more passes extending both before and past the center, and maybe one more full-length pass. This ensures that the ends of the spring joint will have no gaps, and the clamping pressure and glue will close the very slim gap in the middle. These panels are left a little thick and set aside for later.
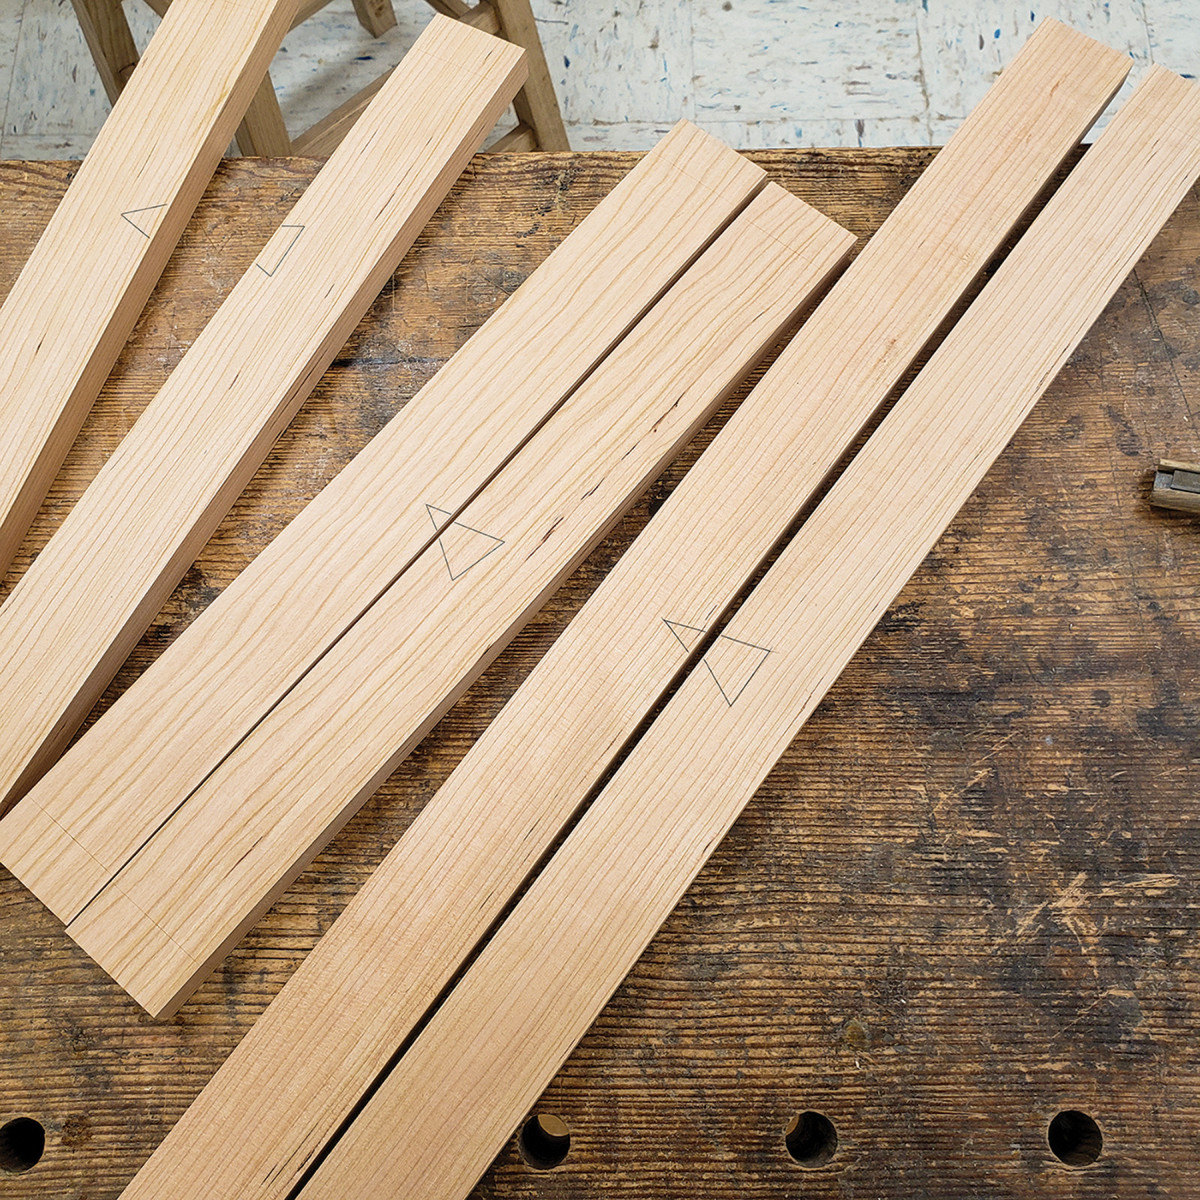
Reference faces are marked using a carpenter’s triangle.
Leg Joinery
Next, I prepare the legs for the joinery. This cabinet uses frame and panel construction. On both the sides and the back of the legs, there are mortises for the aprons and grooves running between them. The grooves house the tongues of the panels. I lay out all my mortises from the reference surface, which in this case is the top of the leg and the outside faces. This ensures that the joinery will all line up. This is more important than getting perfectly accurate measurements. In fact, when it comes to hand tool work, I often will only get my measurements right for the frame of a piece and then adjust all measurements accordingly. Since I’m not working with machines and batch-producing components, each piece will have some variation away from the ideal perfect measurements of the plan. I account for this by transferring layout lines rather than measuring them. Or, I take measurements for pieces as I go, such as the drawer construction (though I aim for the drawers to be a certain size after I glue up the case I simply take the sizes from their pockets). This, I think, is a great expedite to a process that doesn’t allow for batch work. Measurements are guides and nothing more.
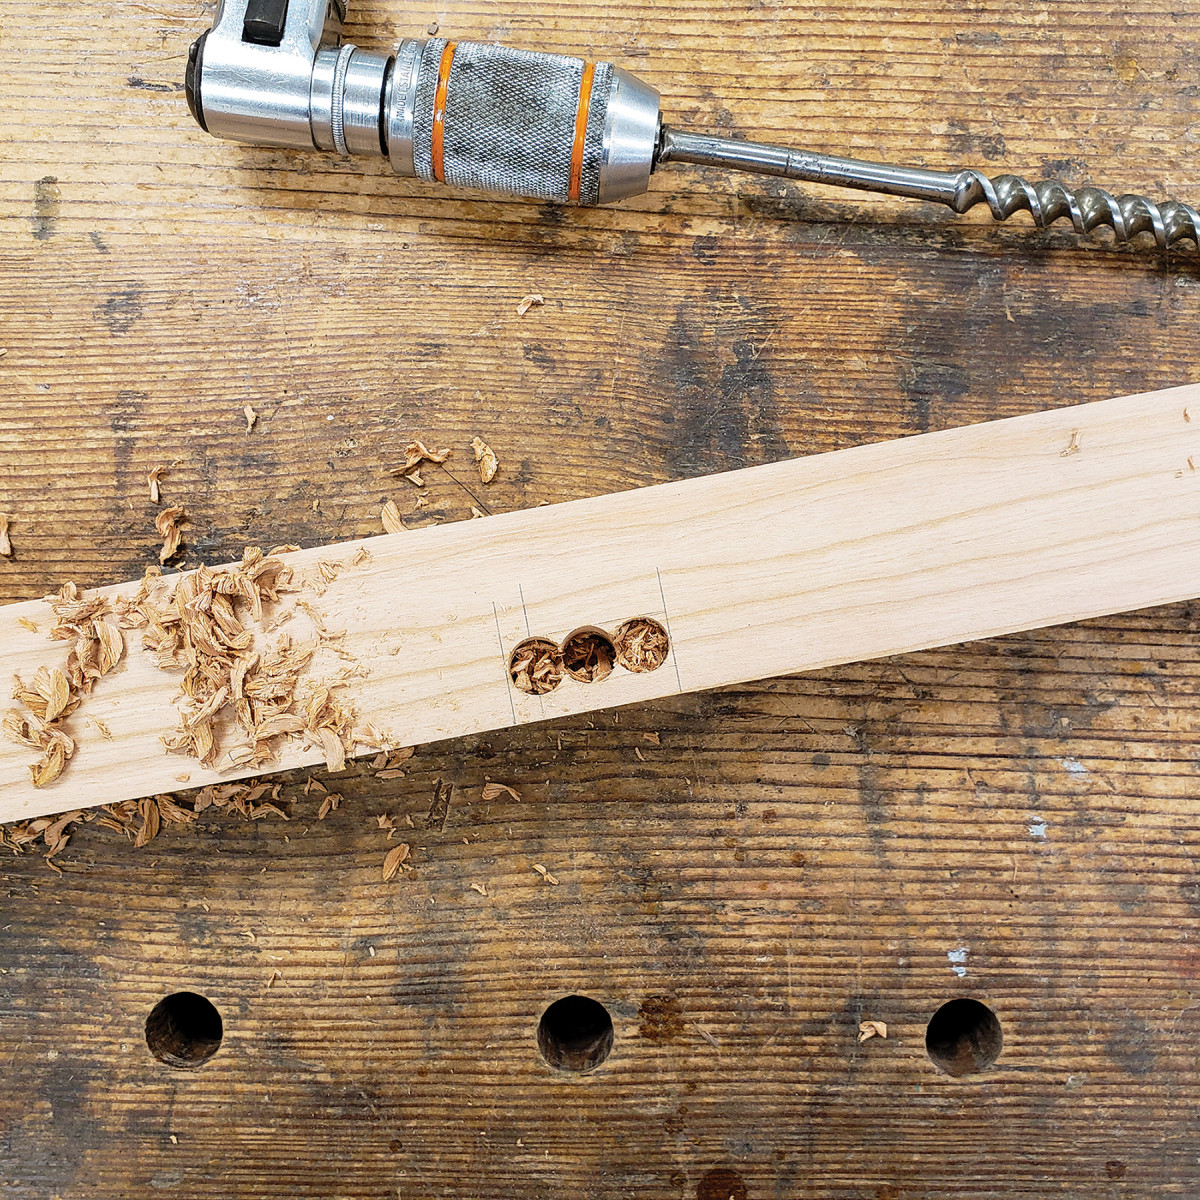
Remove most of the waste with a slightly undersized auger bit.
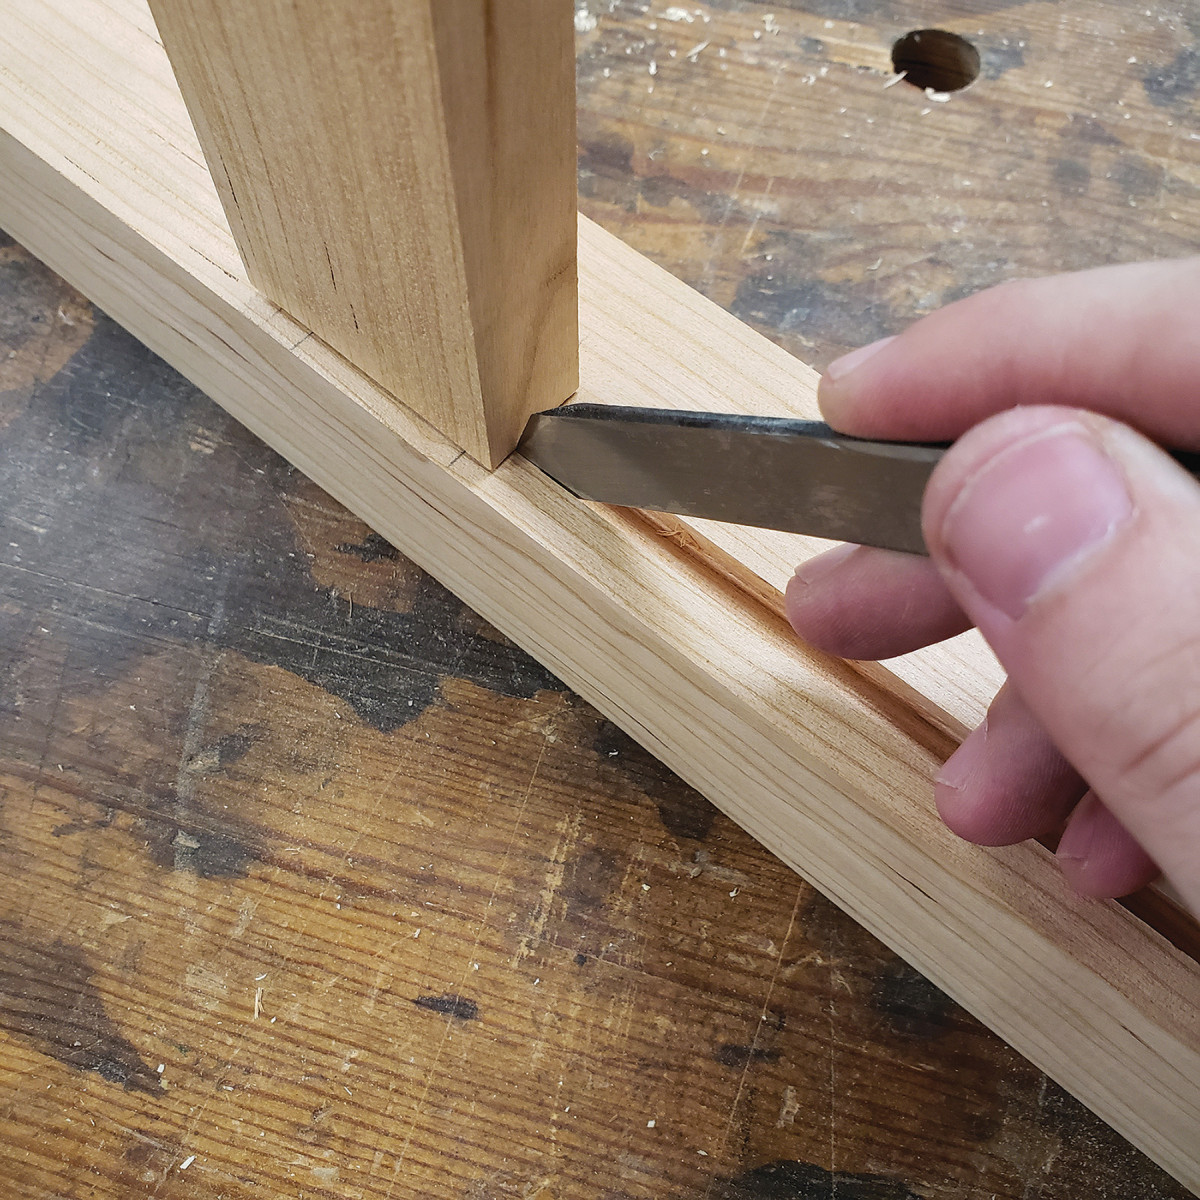
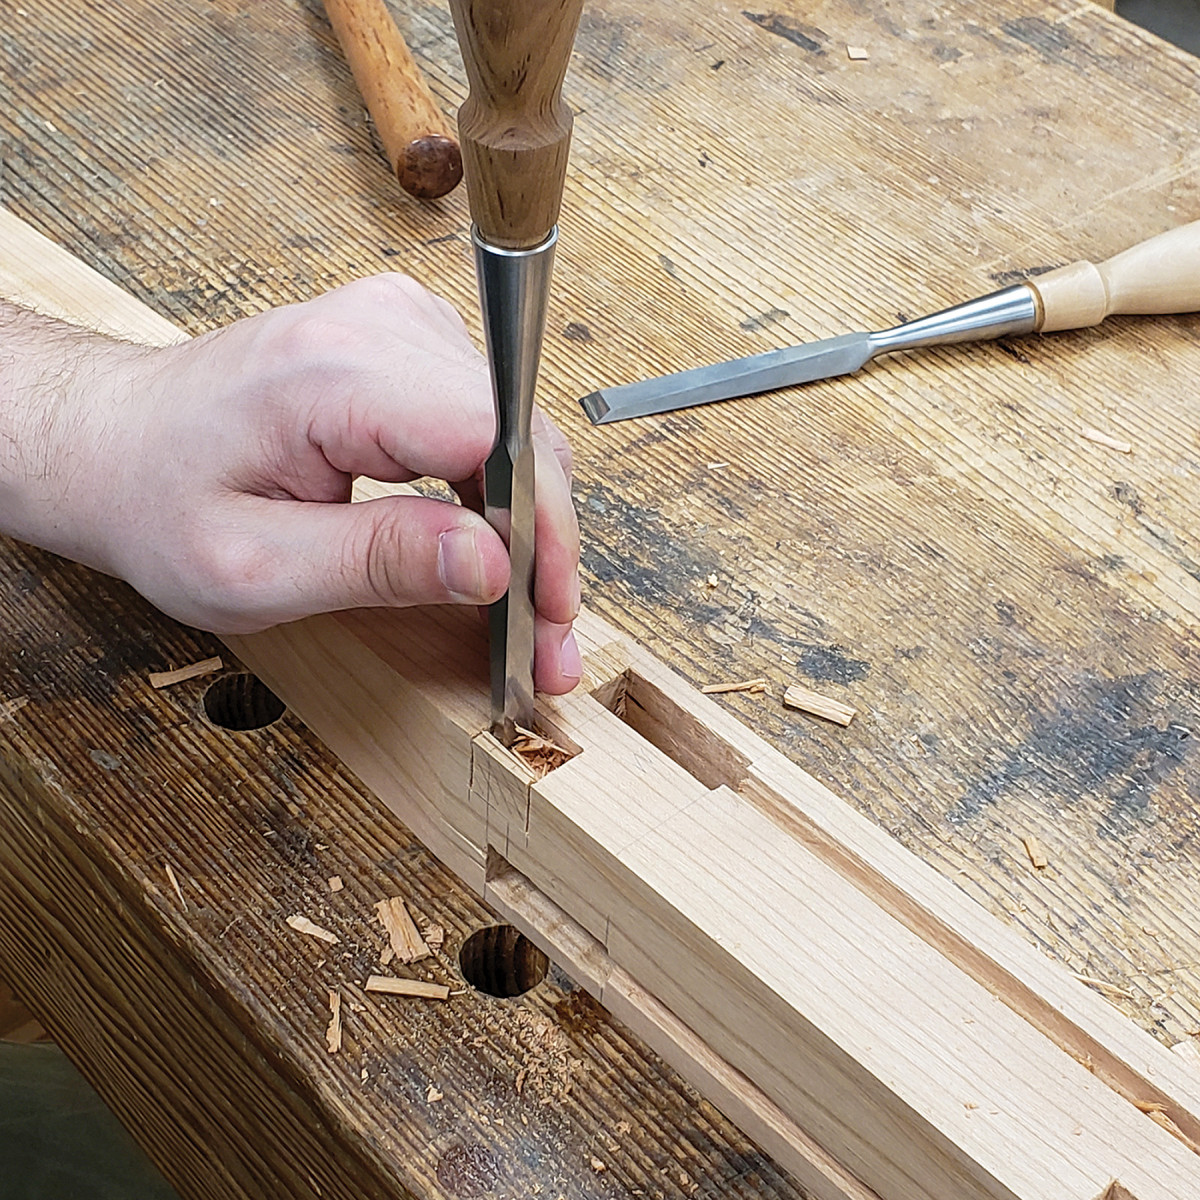
Using a brace and bit with a Sharpie mark for a depth stop, I drill holes to remove most of the waste from the leg mortises. I don’t have to drill perfectly perpendicular because I use a slightly undersized bit and then I square everything lines with a chisel. If you don’t trust yourself, you can set a square on the leg next to your bit to check. If you want to make your joints by hand but don’t have a brace and set of auger bits, you can either use a mortise chisel for the whole process or a drill press and then use a chisel to make everything square.
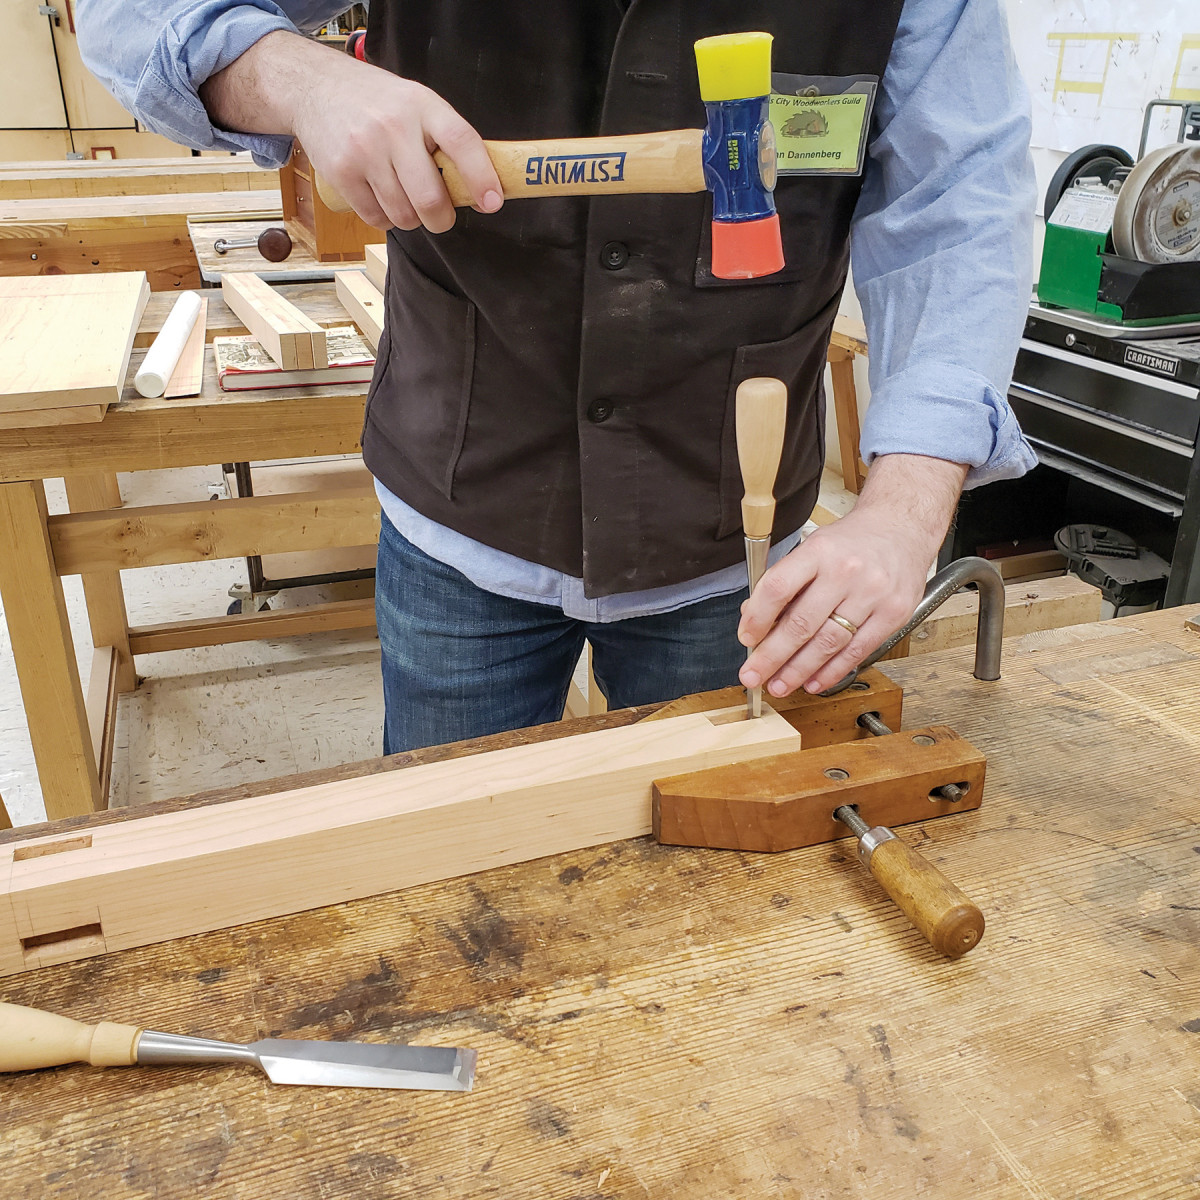
Chisel to your scribe lines.
The mortises for the front of the piece will house the drawer rails. I use double mortises to increase the glue surface since the rail tenons are smaller than the apron tenons.
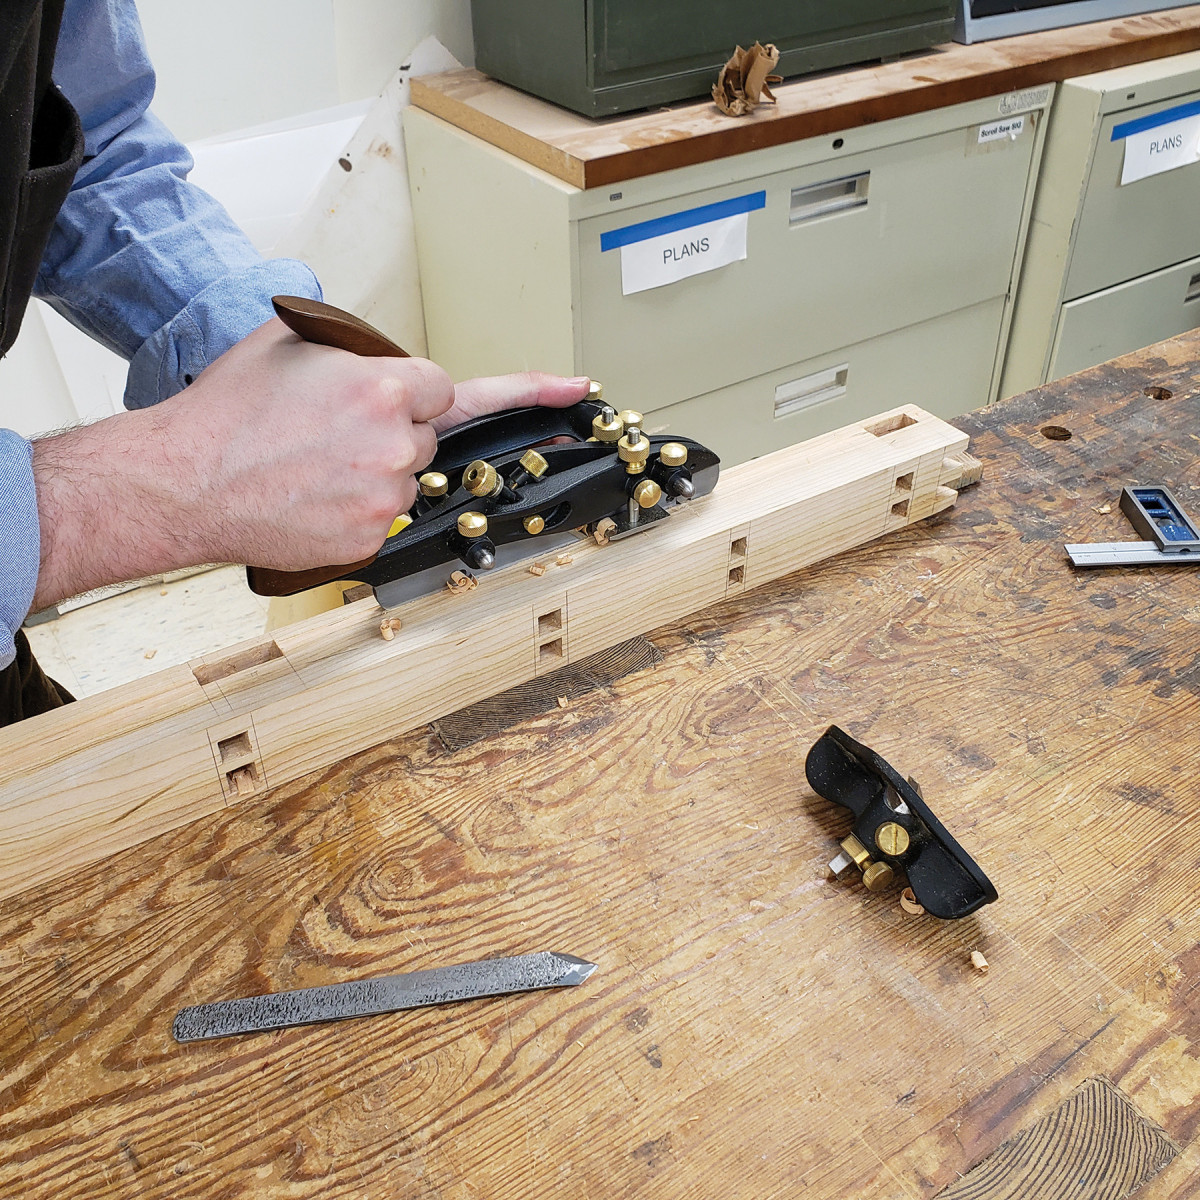
Plow the stopped grooves for the panels.
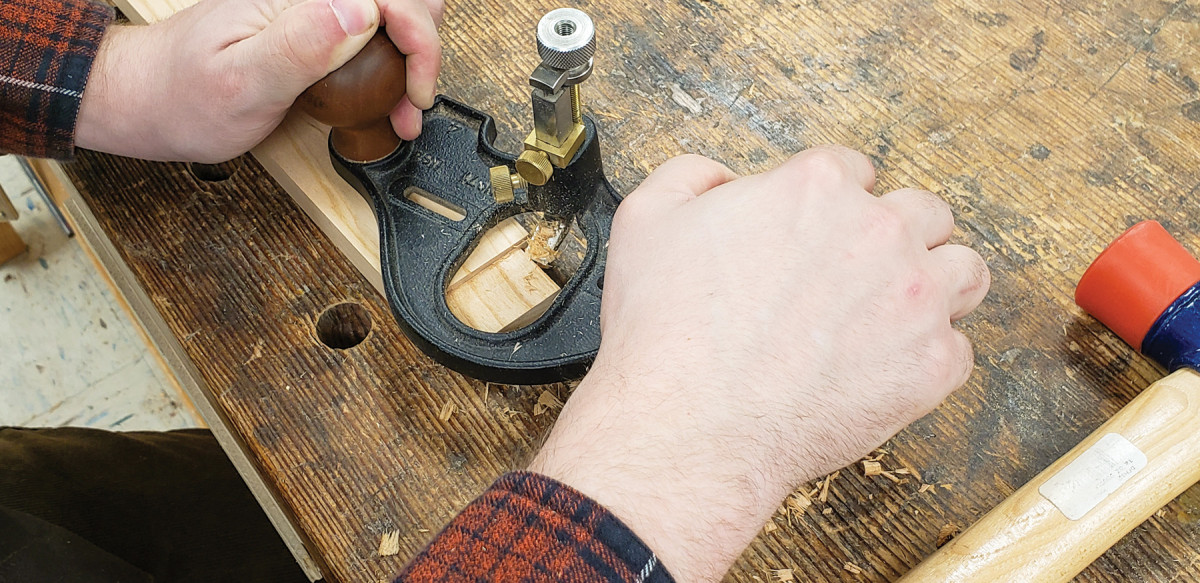
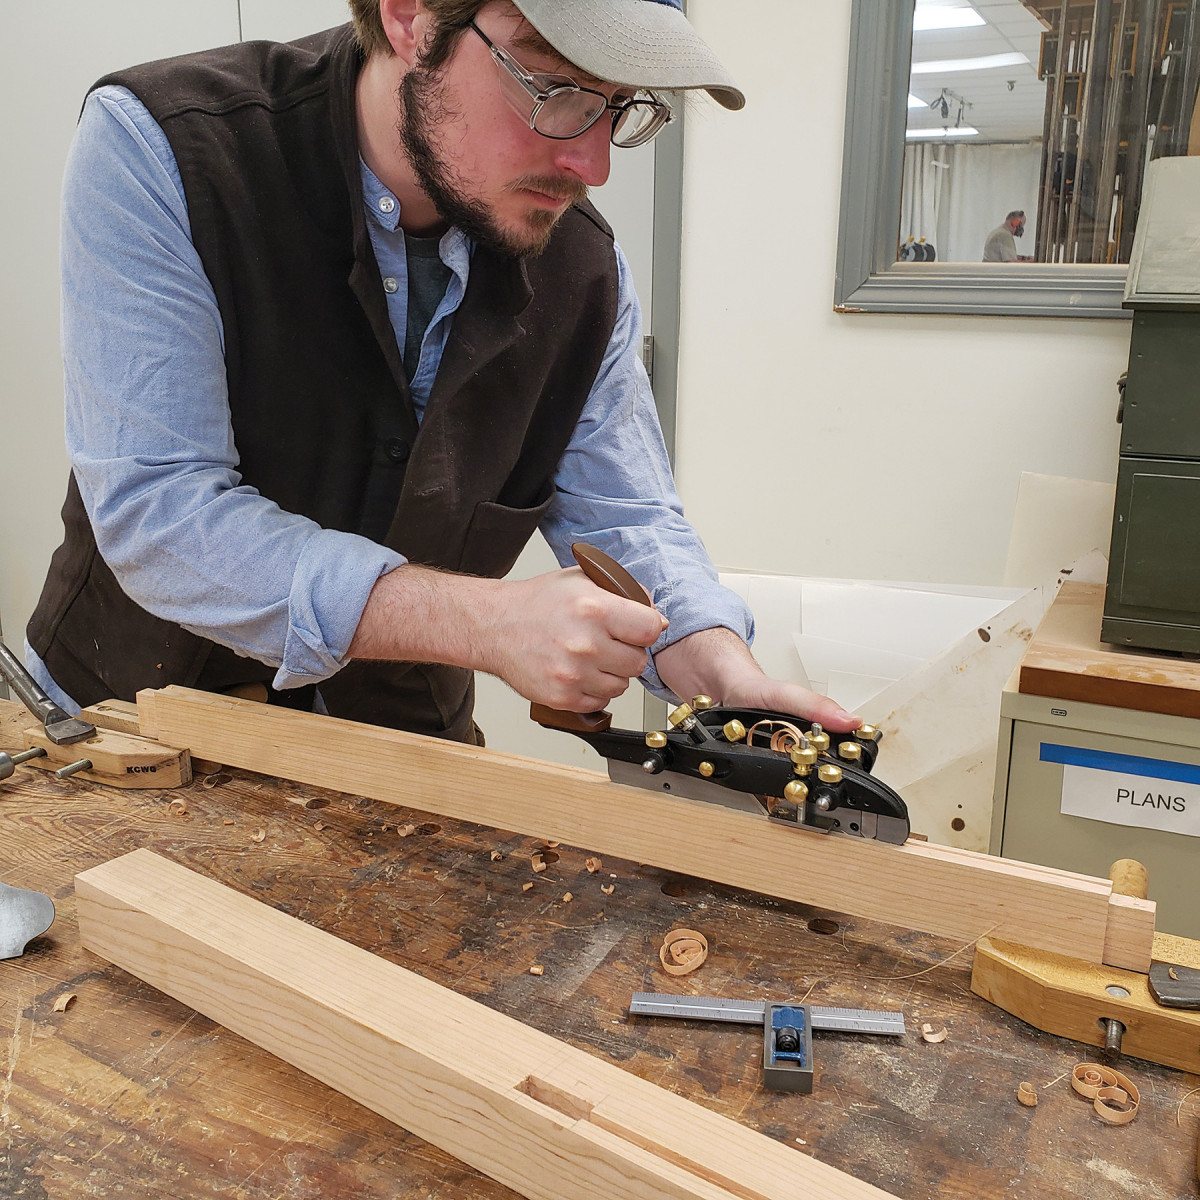
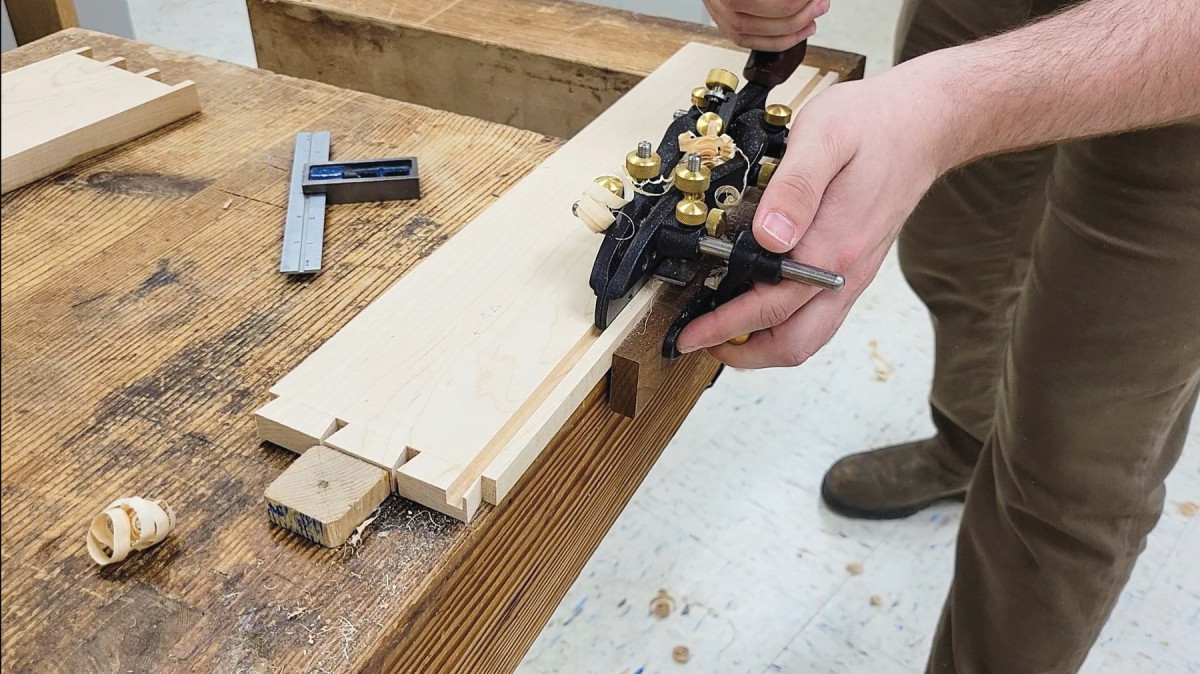
To finish the leg joinery, I plow stopped grooves between the frame mortises. I start with my combination plane just to get the groove established. If I kept up like this, I would have a bowed bottom groove since the skates of the plane are lifted by the leg beyond the mortise. To finish the groove, I use a router plane. Unfortunately, the guild’s router planes don’t have fences, or else I would just use the router plane for the entire groove. If you have a router plane with a fence, I highly recommend that method instead. Otherwise, there are some plow planes with relatively short noses that you could use. Of course, you could use a power router with a fence or a router table.
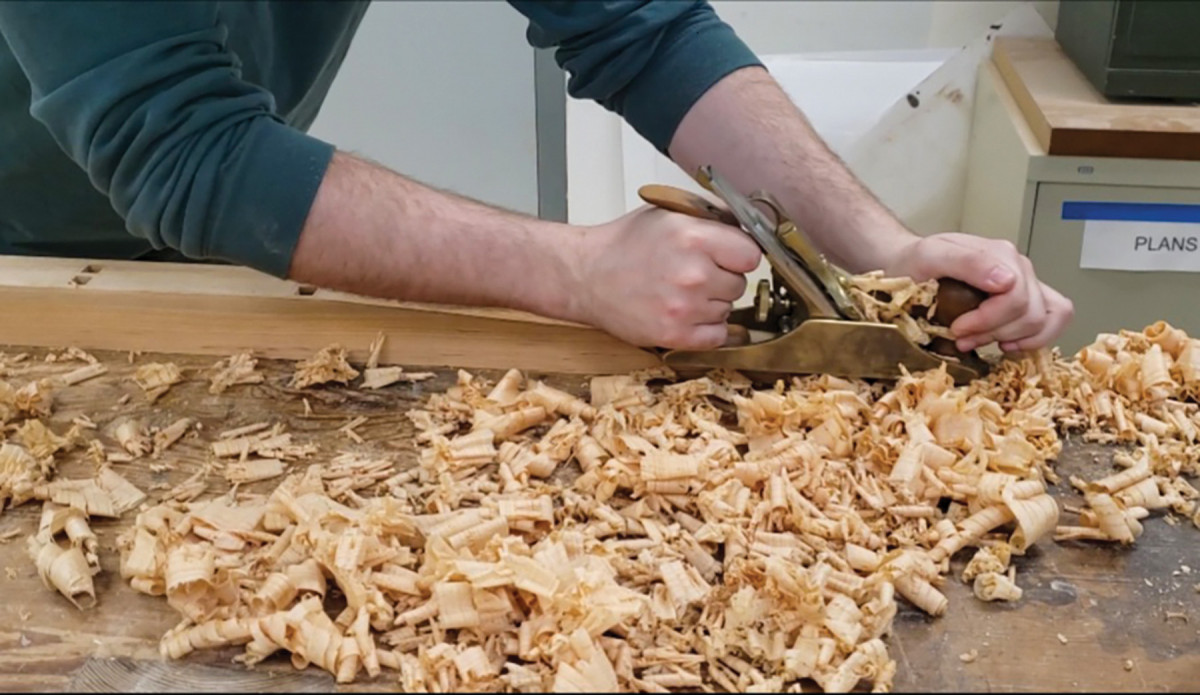
Begin at the base of the leg. As you’re planning, start cuts further up the leg until you’ve created a line parallel to your taper layout. Then plane to your marked line.
The legs are tapered on the inside faces. I use a hand plane to add that taper. I first lay out the angle as well as the starting point. Then I remove the material at the foot by slowly planing, moving up the leg as the angle is achieved. If this sounds time-consuming or if you don’t trust yourself to get the angle started, you can remove most of the waste at the bandsaw or at the table saw with a tapering jig, then finish it with a hand plane. But I must say, nice long shavings from a sharp plane are the best part of hand tool work!
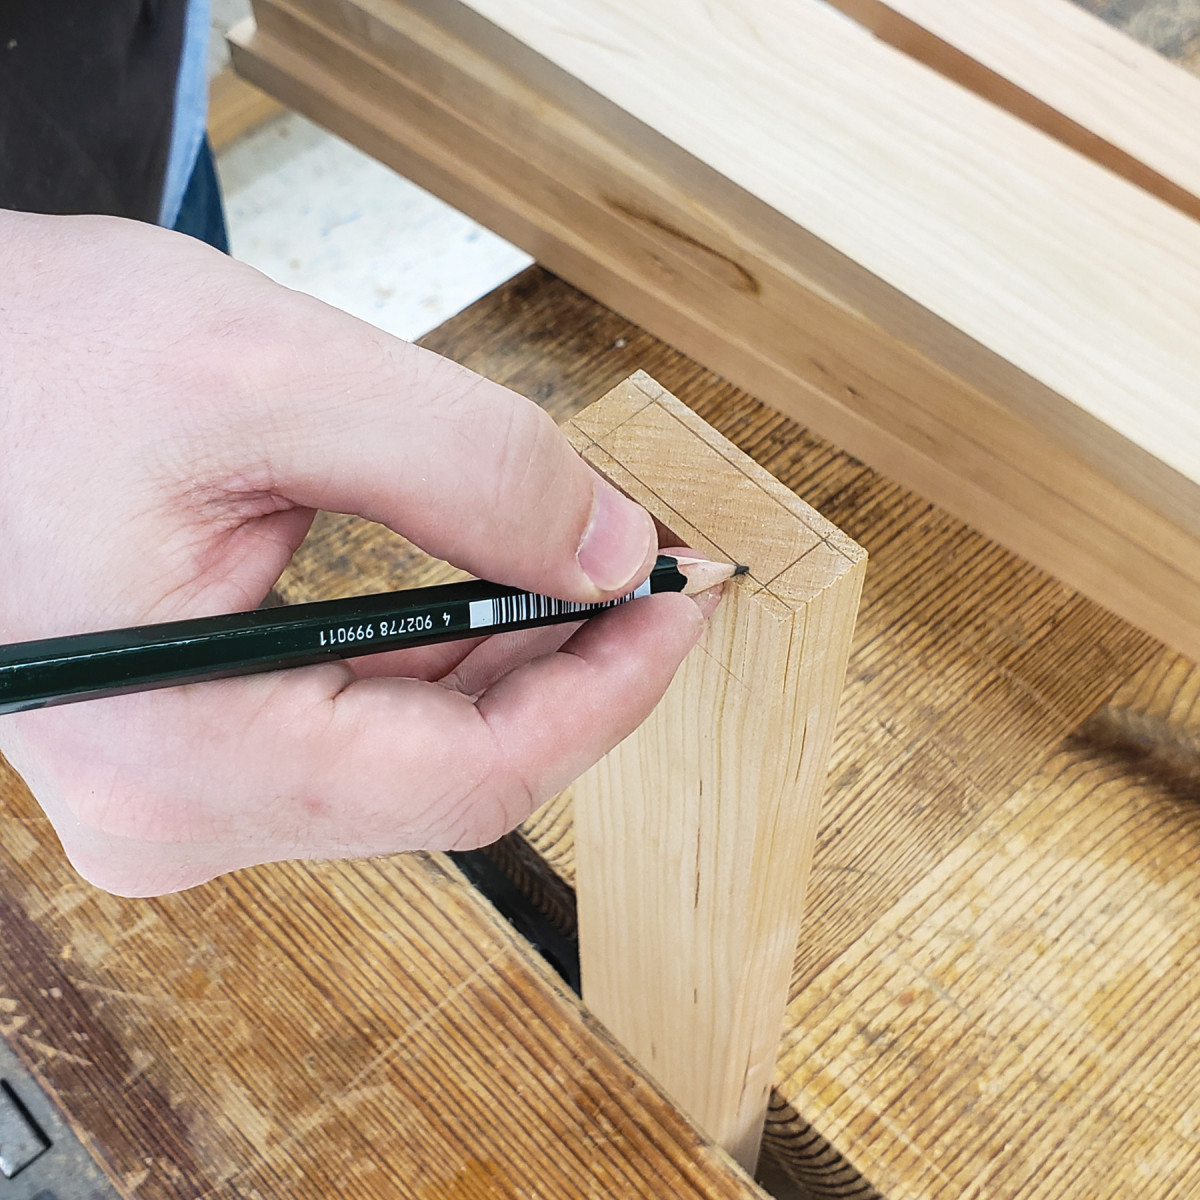
Fill knife lines with pencil lead for better visibility.
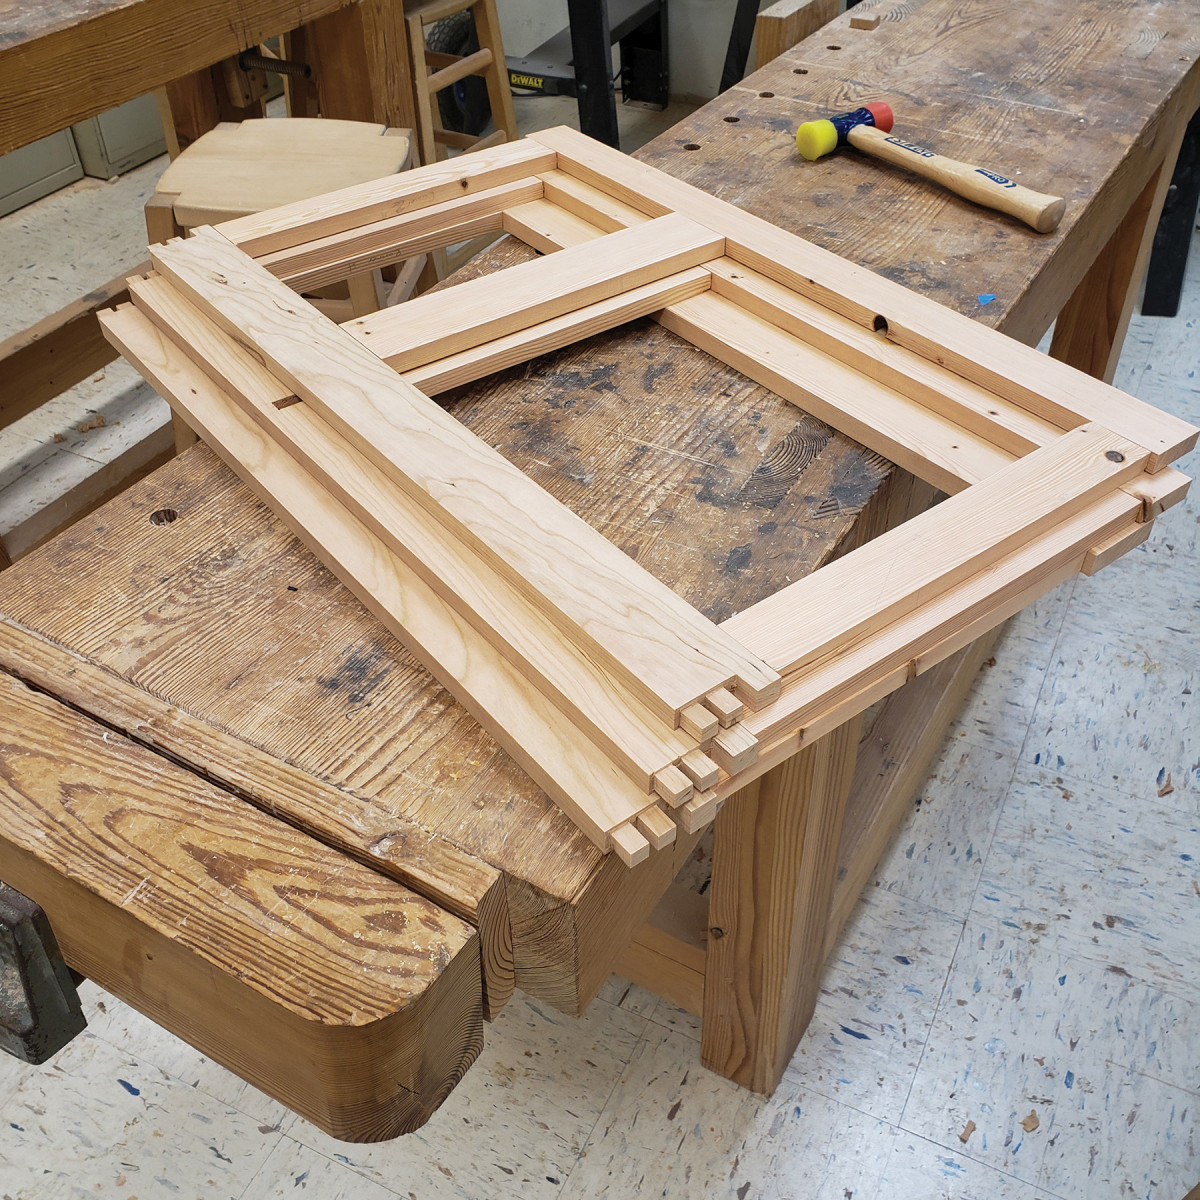
Frame and Panel Joinery
The rails are the next part. I tenon and groove the rails for the back and sides. A handsaw removes most of the waste from the tenons, but I clean up the tenon cheeks to the layout lines with a router plane. A shoulder plane works here as well, but I find my hand wanders a little and I can end up with tapered tenons. Using the router plane with lots of pressure on the handle over the rail face allows you to dial in the fit and keep the cheeks perfectly parallel to the rail faces. After checking the fit, I transfer the groove layout with a knife to make sure they line up. Then I groove the rails with the combination plane. If you have a dado stack, you could cut the 1/4“ groove there since it goes all the way across the rail. The stiles are made similarly to the rails but with shorter tenons. They fit into shallow mortises cut in the grooves of the rails. Both edges of the stiles are grooved.
Saw lines for the tenon cheeks.
Use a bench hook to remove the cheek waste.
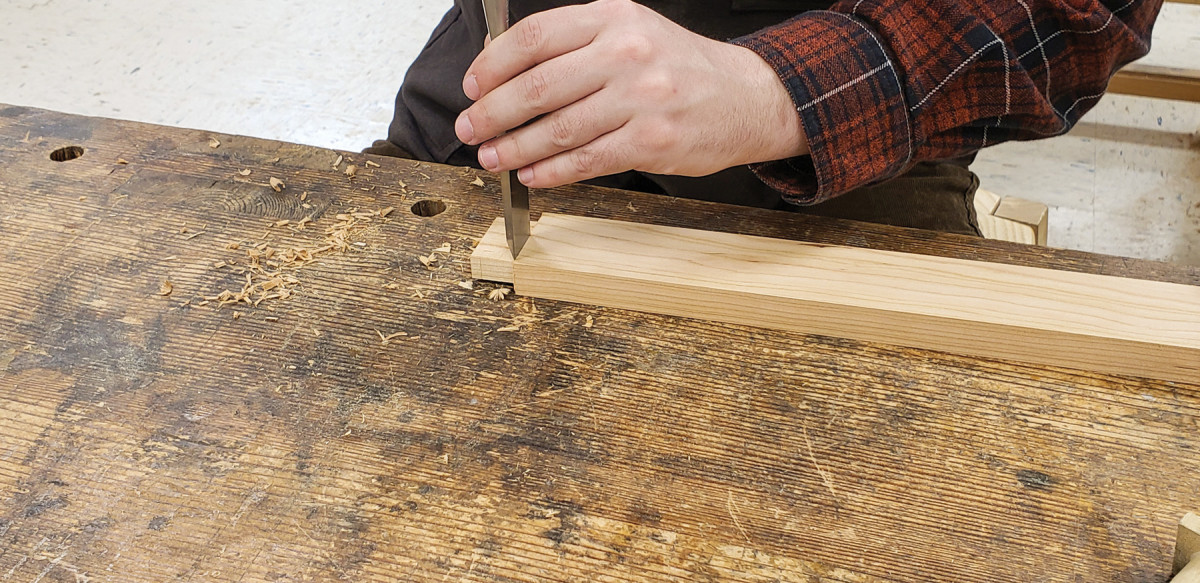
Chisel to scribe line for a tight fit.
Use a router plane to make the cheeks parallel to the faces of the rail.
With the tenon fit to the mortise, transfer the groove location to the inside edge of the rail.
The panels in this frame and panel construction are an opportunity for experimentation if you like. You could pick a complimentary wood for the frame. Or, if you’re like me, you could add different woods to the front. Since that is my plan, I decided to add a shadow gap along the edge of the panels. It’s a nice, refined look without the formality of a raised panel with a defined field. To achieve this, it’s a matter of adjusting the fence on the combination plane to cut the tongue a fraction longer than the groove is deep. I left a 1/16“ gap, so the rabbet of the panel is 5/16“ wide to fit 1/4“ into the groove with the gap left over. You may have to finesse these gaps. I use a block plane to remove any excess tongue width and shorten the gap.
Plow grooves all the way across.
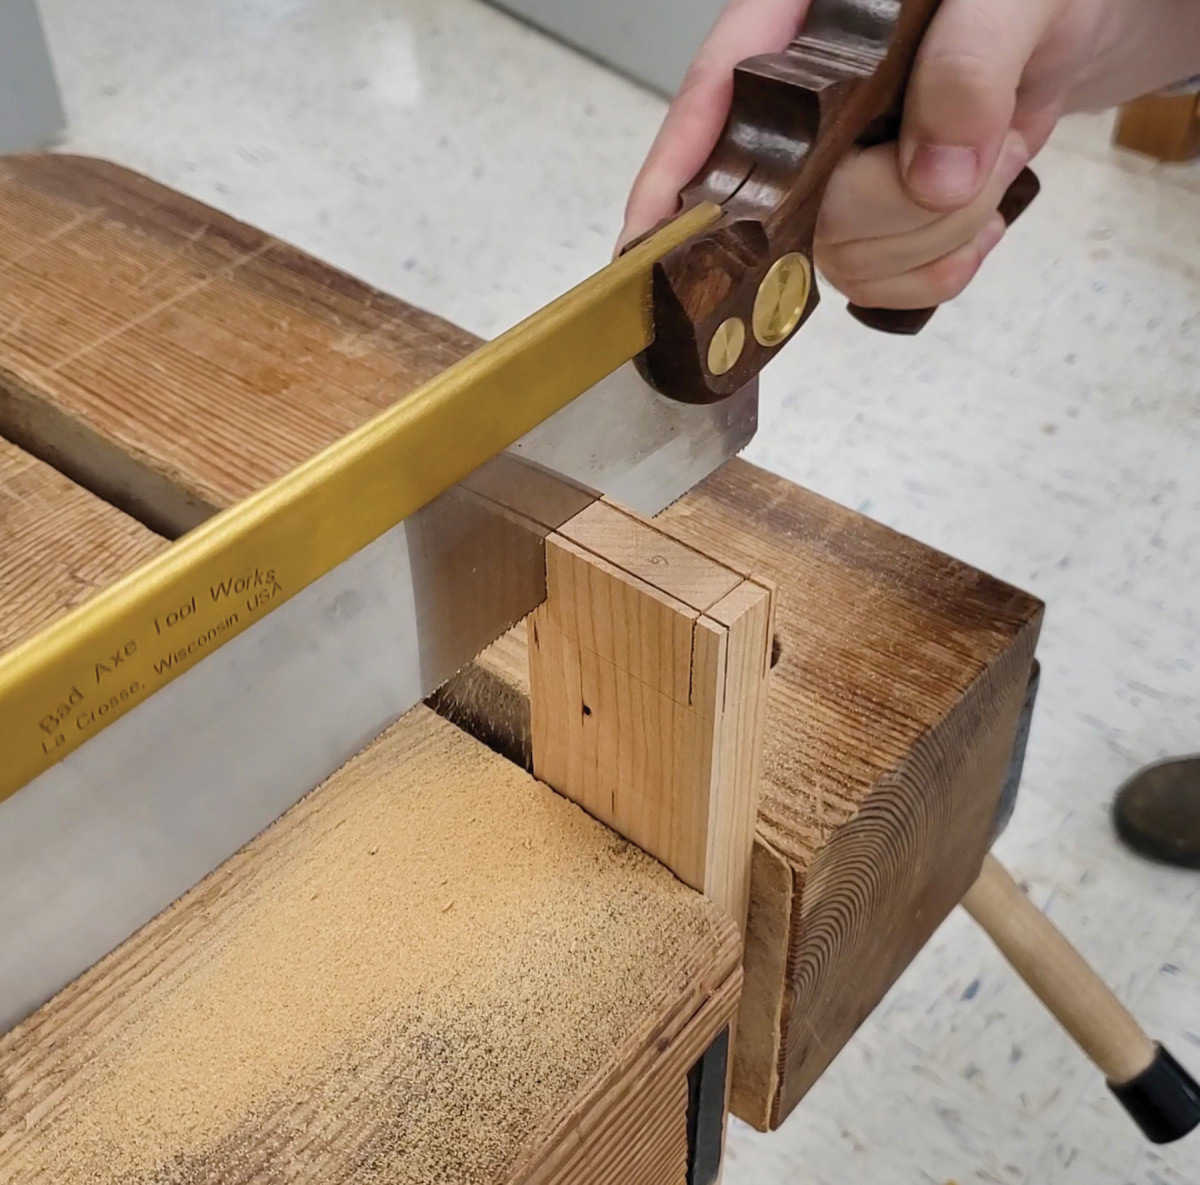
The front rails are a little different. The top rail connects to the top of the legs with half-blind dovetails. This locks the sides into position and helps prevent racking.
Cut the half-blind dovetails for the top rail.
With the case semi-constructed, transfer the layout to the tops of the front legs.
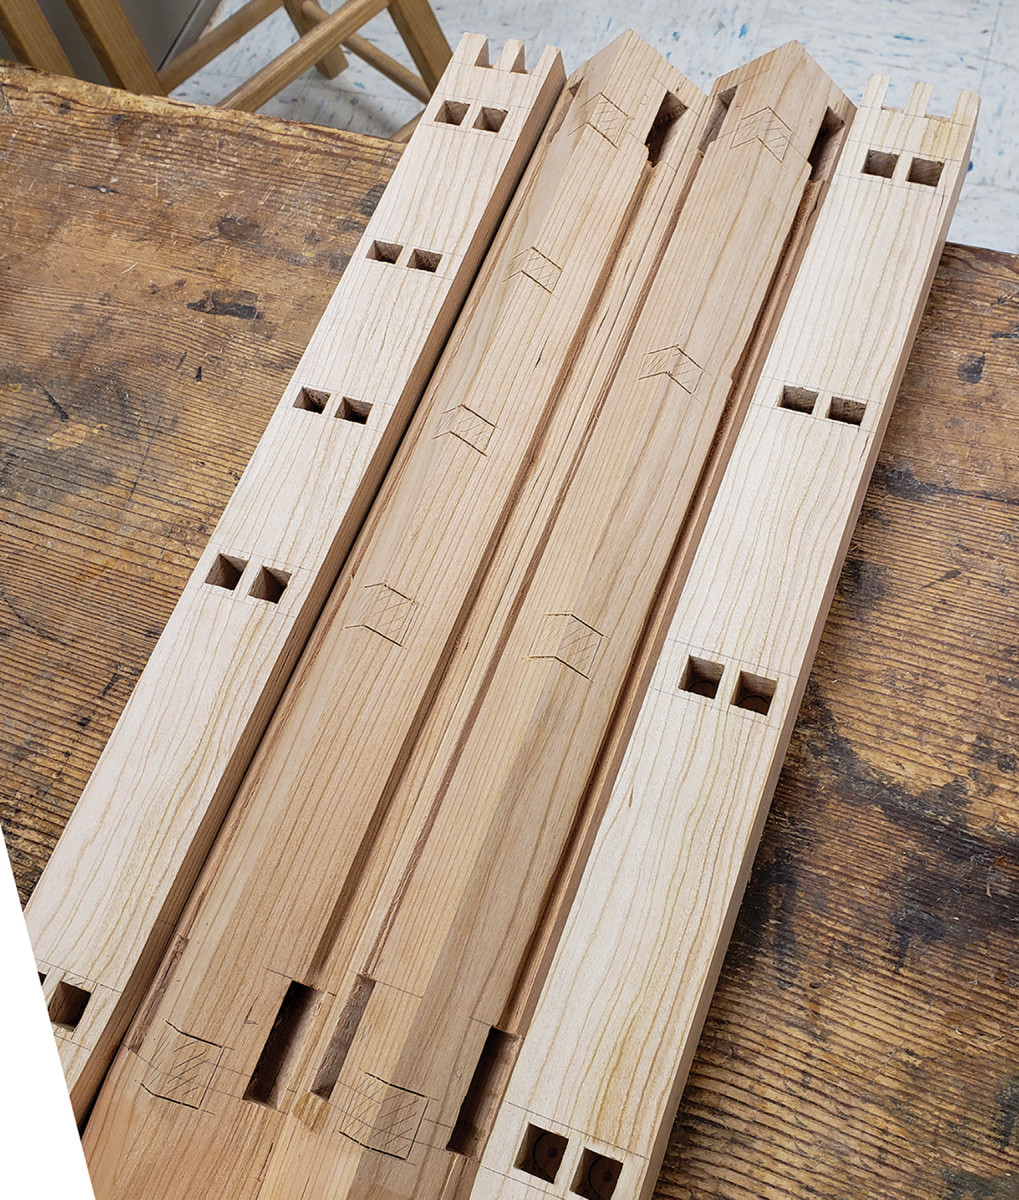
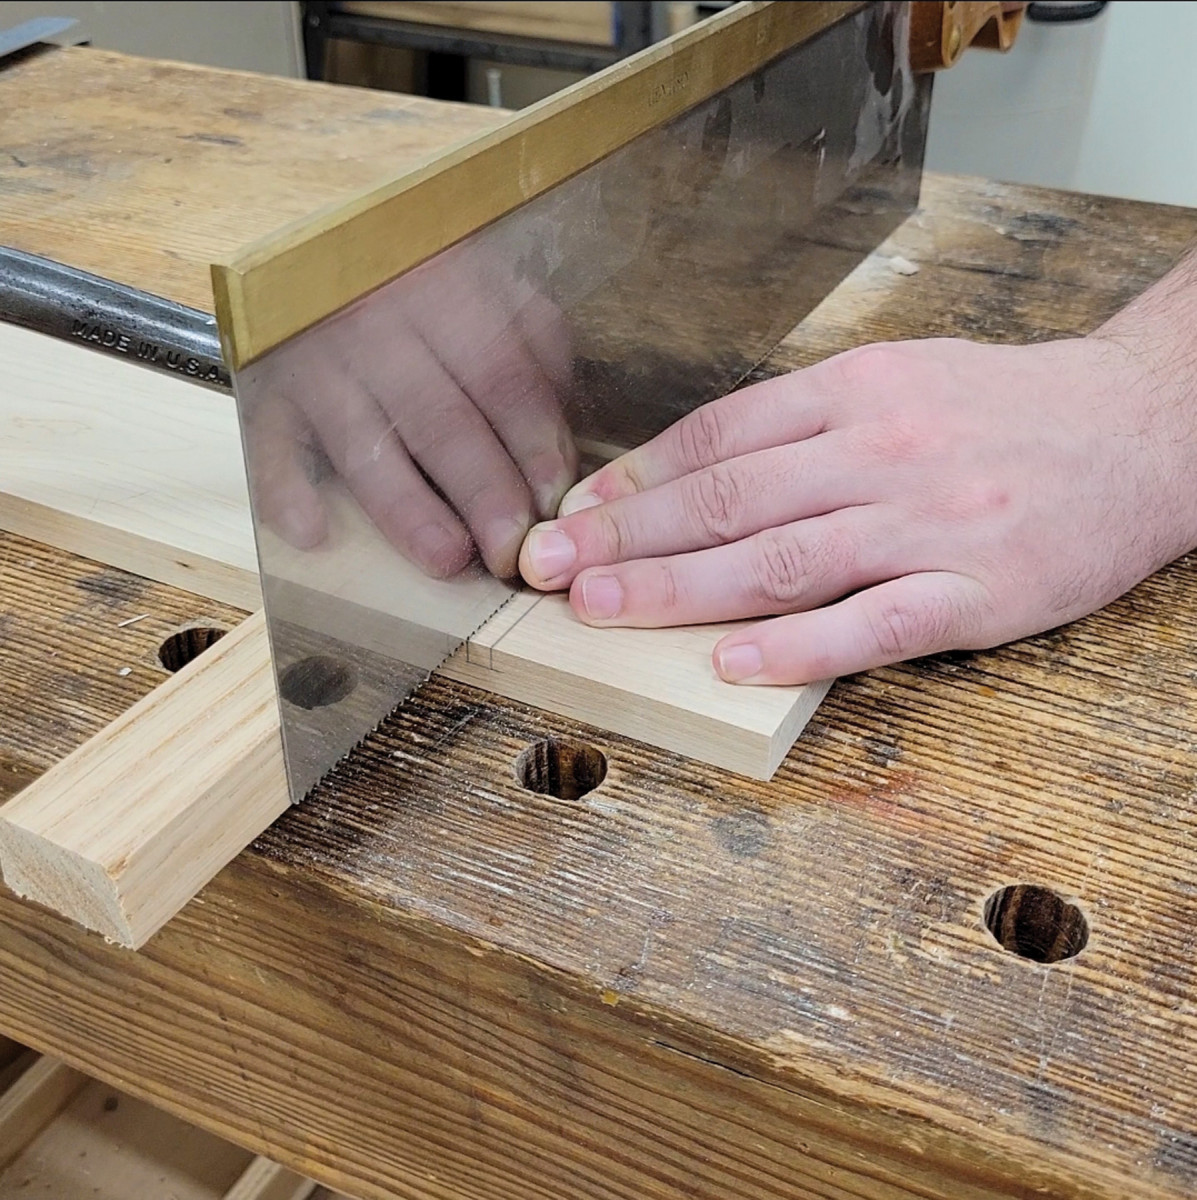
Meanwhile, the drawer rails are a little thicker than their double tenons, but they have fingers that wrap around the legs and will house the drawer webbing. So, when sizing the double tenons, I use a pairing chisel instead of a saw and remove waste to the layout line. A router plane works as well, but not a table saw. The blade would cut into the finger in the back. Careful work at a router table should suffice but consider this an excellent point to practice your pairing skills!
Saw the double tenons.
Remove the waste from between the tenons.
Deepen the scribe line.
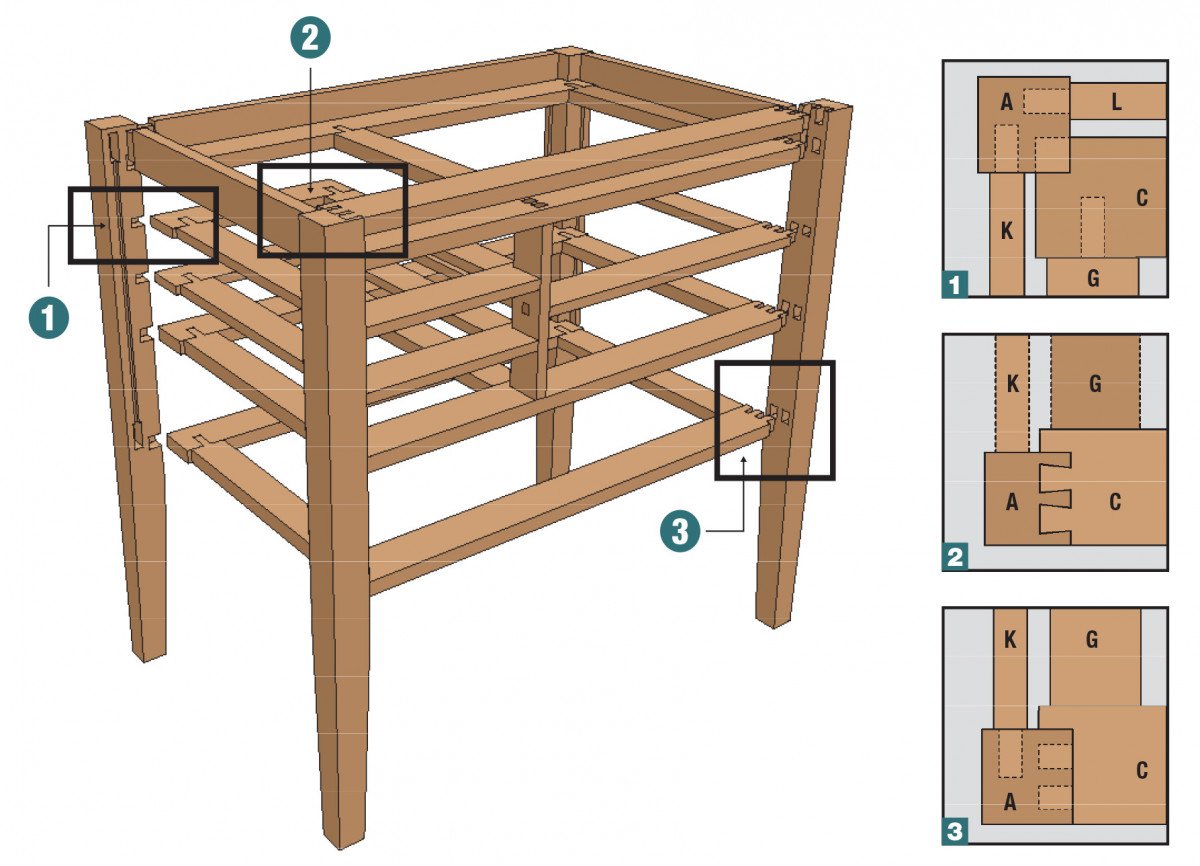
Drawer Webbing
Now it’s time to pull out your secondary woods. Depending on where you are in the world, your seconds may be pine, fir, poplar, or any other inexpensive wood. If you don’t mind the extra cost and weight, maple works well and is stable. I generally recommend poplar. It’s easy to work, light, cheap, and relatively stable. I’m using fir here, but I have promised myself it’s the last time, as it splinters so easily.
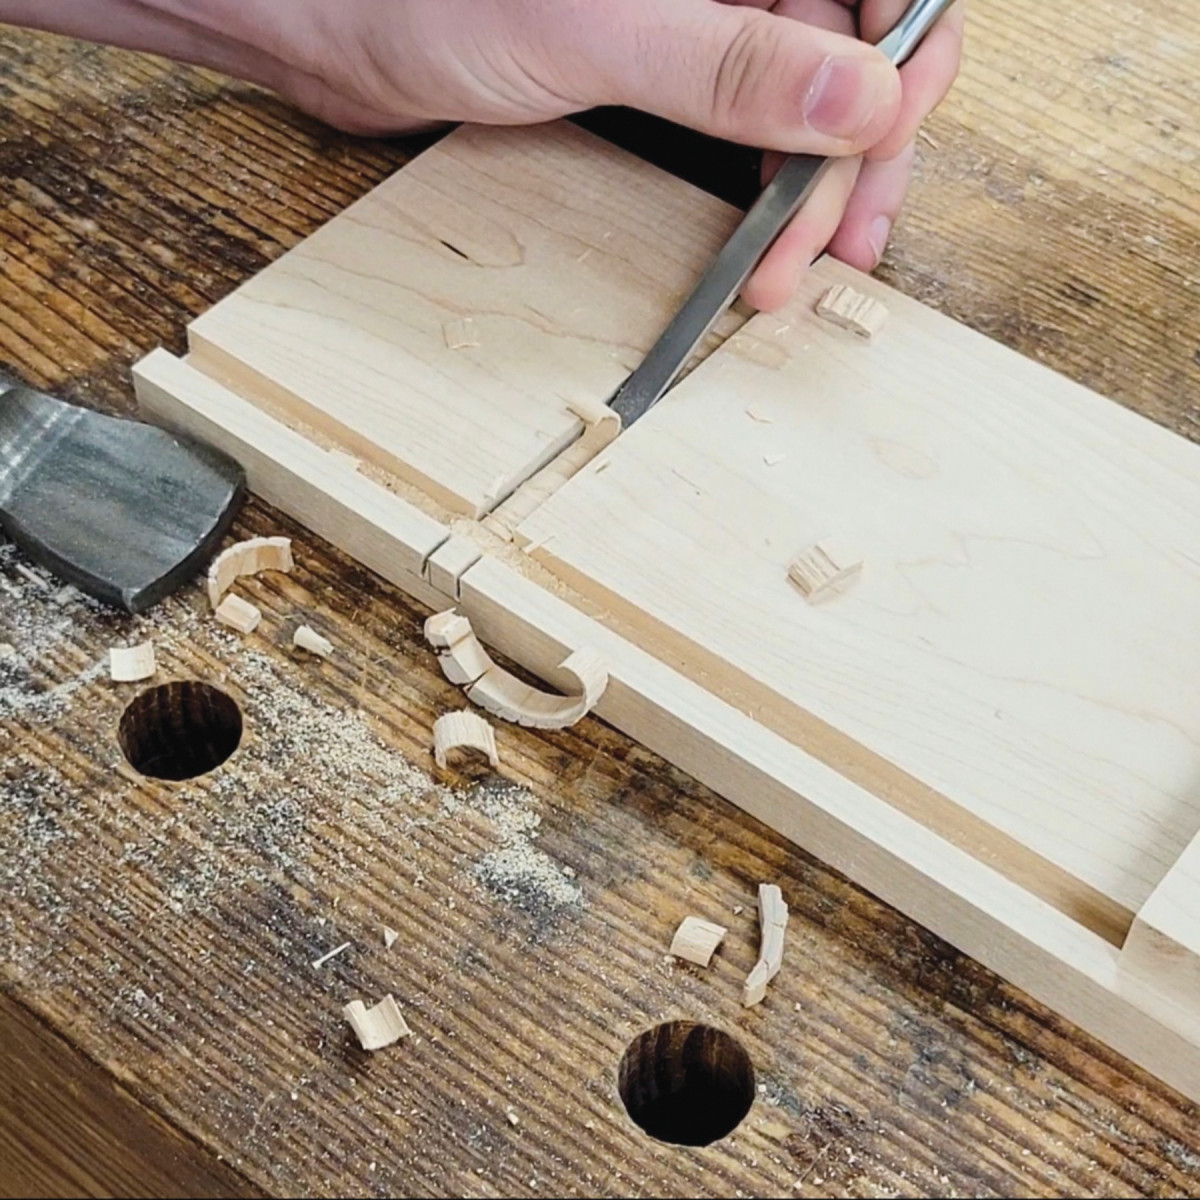
Pare waste to fit the tenons.
The drawer webbing is simple mortise and tenon construction. There are two places that differ and need some careful layout. The middle divider is dadoed into place from the back (it will be locked there by the middle runners), and it houses three sets of through mortises. In the back of the case, the divider is dadoed into place similarly, but I cut dadoes in its sides to house the incoming drawer runners allowing them to telescope with seasonal changes. Through dadoes are easy.
Drawer webbing is fully assembled and ready to go.
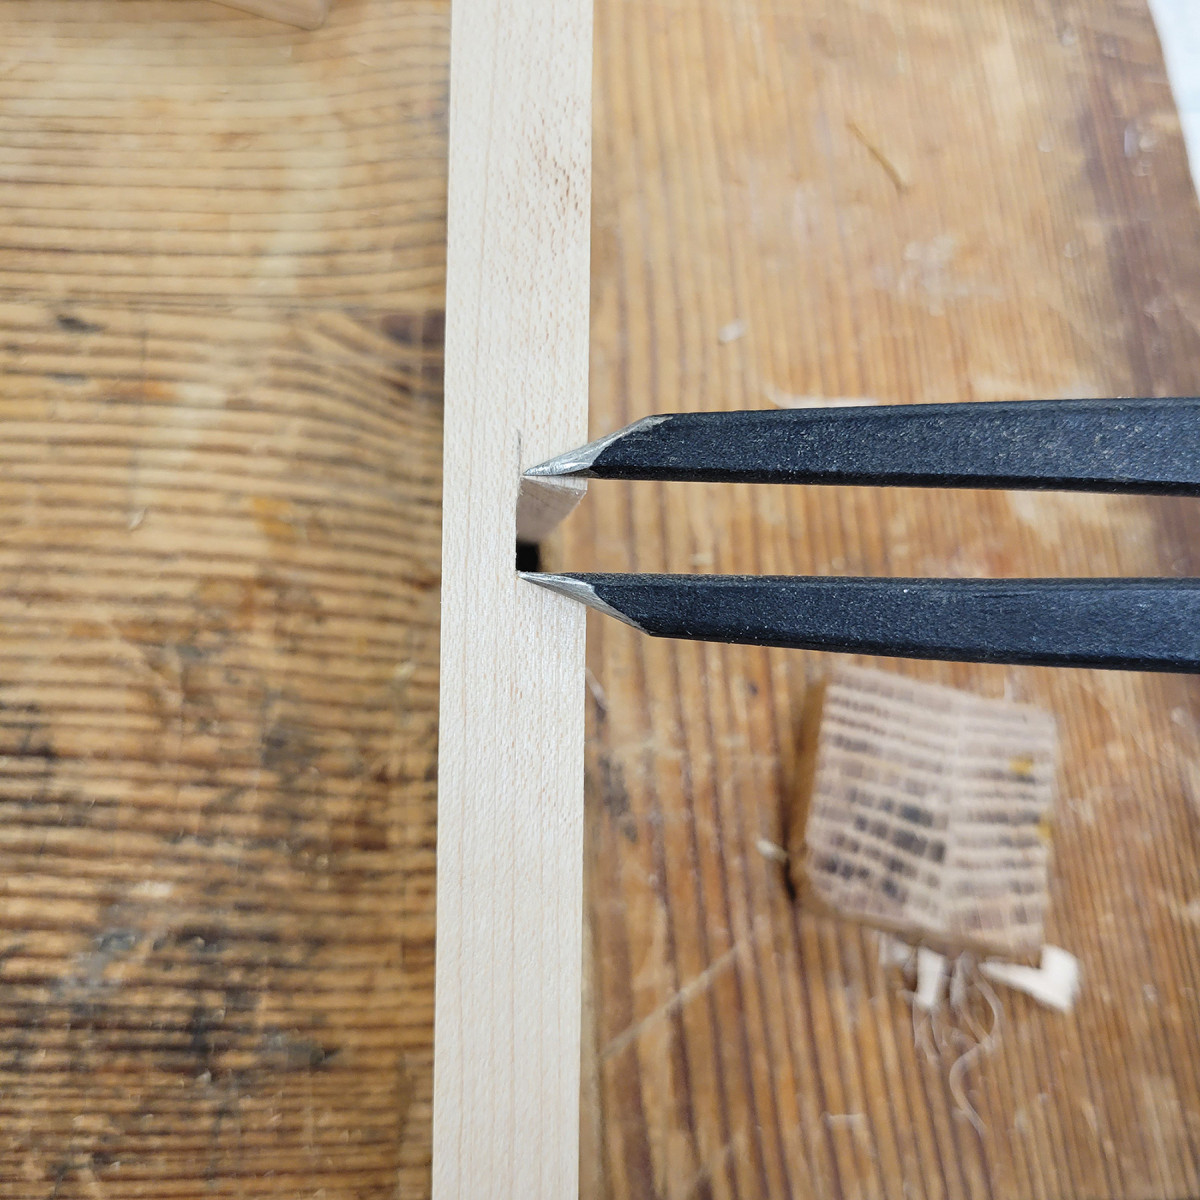
Layout for the notches is made easy by transferring the marks from the front leg.
It’s all about sawing down to the bottom of the trench and then cleaning out the waste with a chisel and a router plane. A stopped dado requires careful sawing and chopping with a chisel before switching to the router plane. The back legs get notches cut into their inside corners to house the drawer webbing. I lay these out by simply transferring the front leg mortises across to the back legs.
Establishing knife lines in the notch layout makes chopping out smooth and easy.
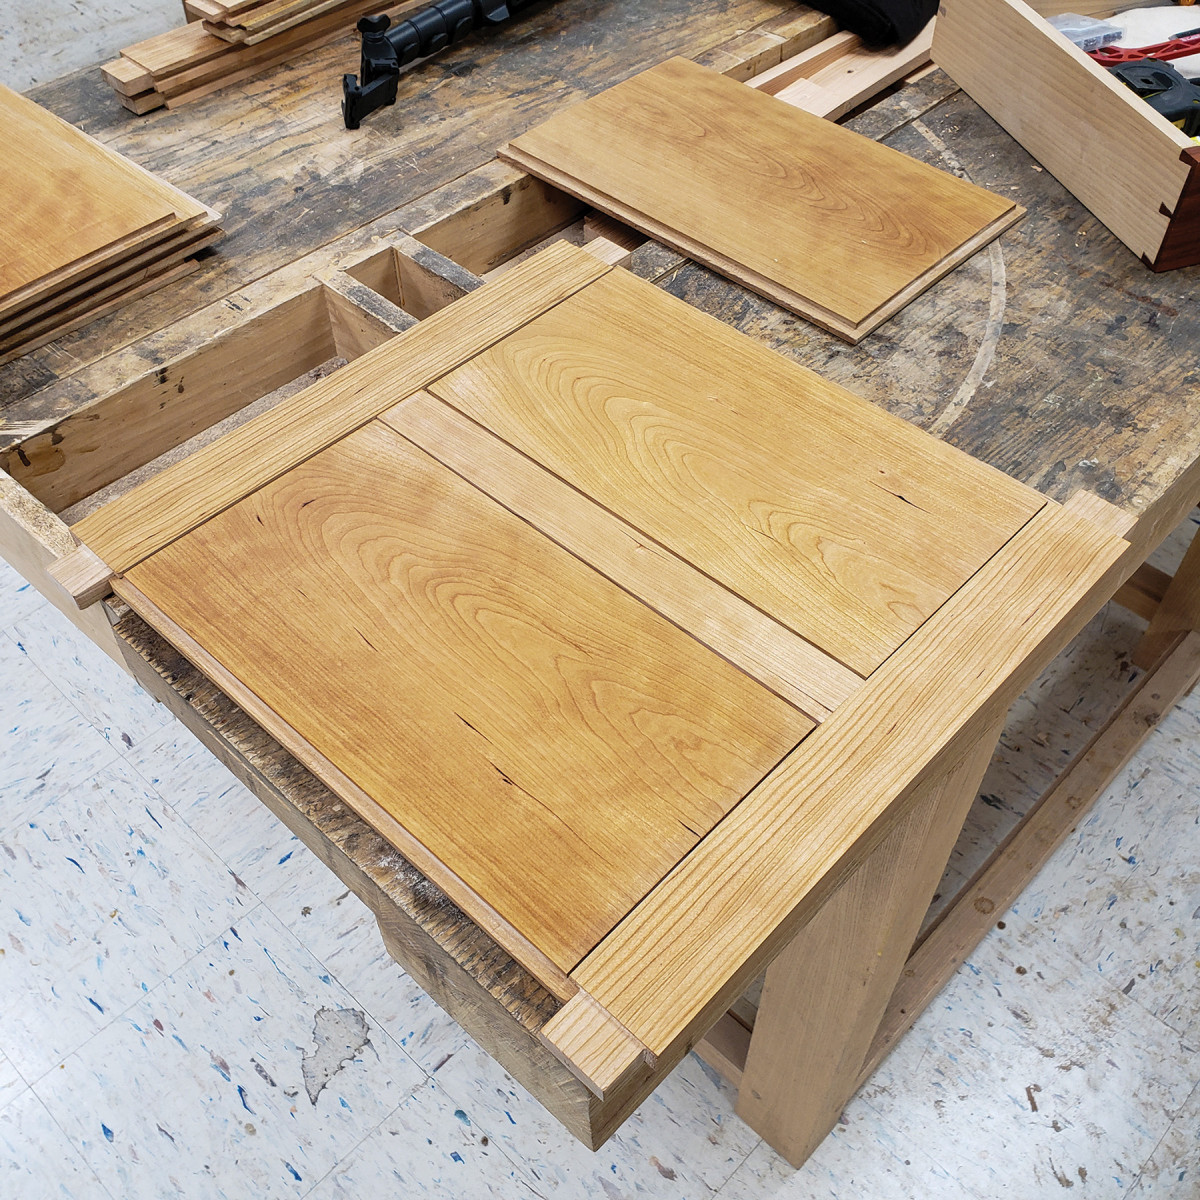
Table Top
Now you can grab the panel that will be the top and smooth it flat. I added a chamfer to the top the old-fashioned way—by drawing a 45° line at the corners and, using a low-angle jack plane, plane to the line. Start with the end grain so that any chip out at the end will be removed when chamfering the edge grain. Once I’ve got it nice and consistent all the way around, I sand the end grain up to 400 to help ensure it gets sealed up with the finish. I finish the top in a few coats of shellac and then a few coats of furniture wax. This is my go-to finish. It’s reversible, reparable, non-toxic, and traditional.
Prefinishing components, such as this side assembly, not only makes it easier to get a good finish, but also makes squeeze out easier to remove. The glue doesn’t stick to the finished surfaces.
Glue-Up
Get more glue-up hints here
Preparation for glue-up involves installing the fasteners for the top, drilling pilot holes in the top rail, prefinishing the case components and ensuring the drawer webbing is level and fits well. Attaching the top was the trickiest part of the design. The work shelf placement prevents most forms of buttons so metal fasteners were the best option. I highly recommend using very short fasteners, like figure-8 fasteners so that you can fit your screwdriver between the apron side and the drawer runner. Place them at regular intervals along the sides and back, trace their shapes into the top of the aprons, and remove the waste. Go ahead and install them to the aprons.
The front rail has no space to fit screws and a screwdriver, so it will need to be attached to the top before glue-up. At four equal distances, I drilled holes through the rail and counter-sunk them on the bottom to allow the screws to sit well inside the rail and not scratch the work shelf. Next, I dry fit the case (minus a few of the rails) and get the top rail hammered into its dovetail housing. Then, I positioned the top to its final place and with a center punch marked all the pilot holes for the front rail and the figure-8 fasteners. With that done, I screwed the top rail into the bottom of the table top. Essentially, the top is now just a rail with a large growth over it and it will be hammered into place during glue-up as normal but without having to worry over driving the screws.
Shown here is the initial case glue-up with just the major drawer webbing. This allows you to position the top and mark the place for 4 countersunk screws.
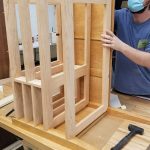
This is the trickiest part of the glue up, but that doesn’t mean the rest is easy. Though everything is straightforward to put together, it helps to have a friend around. I start by assembling and gluing up the sides of the case and leave them to dry overnight. Meanwhile, I glue the webbing into the front rails but leave the back rails friction fit to allow for telescoping.
Once these are set, I insert all the rails, webbing, back aprons, and panels into one side of the case as seen in Photo 27, add glue to the remaining tenons (not the webbing that fits into the notches) and ask a friendly guild member to help me fit the opposite side. With two sets of eyes and hands at work, we ensure everything is fit snug and then hammer it all home before driving the top rail (with the top attached) into the dovetails. I set clamps spanning the rails and back aprons.
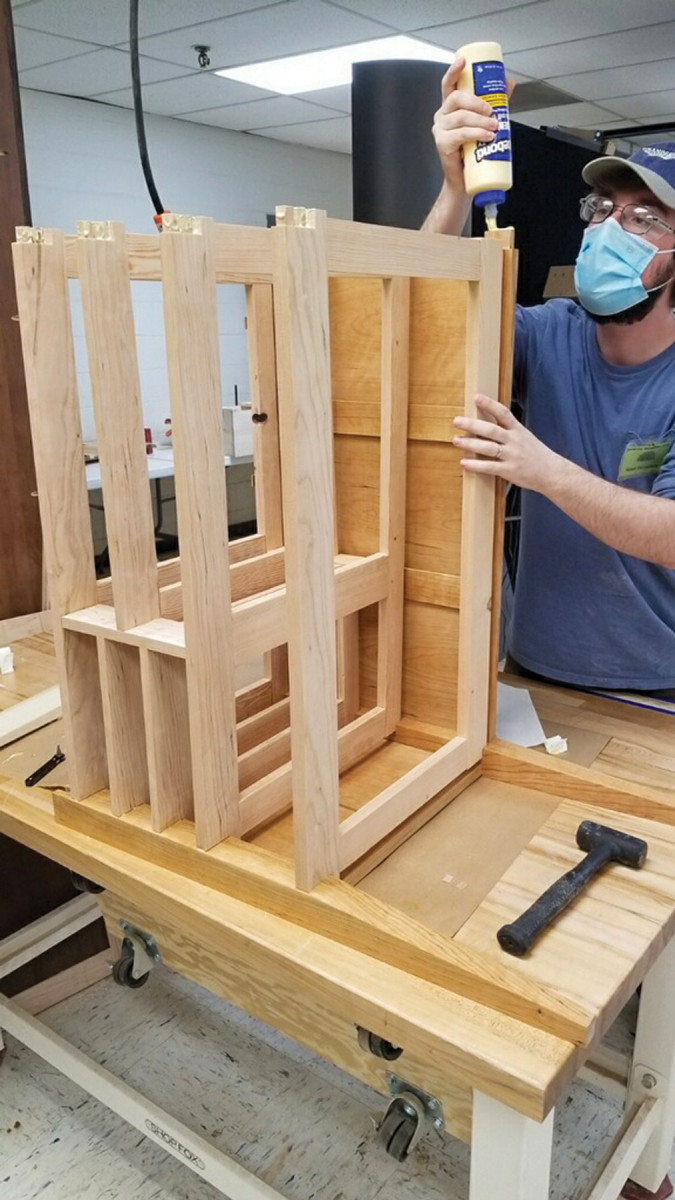
Luckily, at the guild, I can enlist help from others while gluing up large components.
Lastly, with the cabinet set upside down, I finagle my way to the figure-8 fasteners and with a special ratchet screwdriver for tight spaces, I drive the screws that hold the top in place. It took me three complete dry fits to ensure that everything was just right. It may be fussy, but with so many points of contact, it’s necessary. The worst thing is spread glue and running into a snag. Don’t forget to thank your friends for their help!
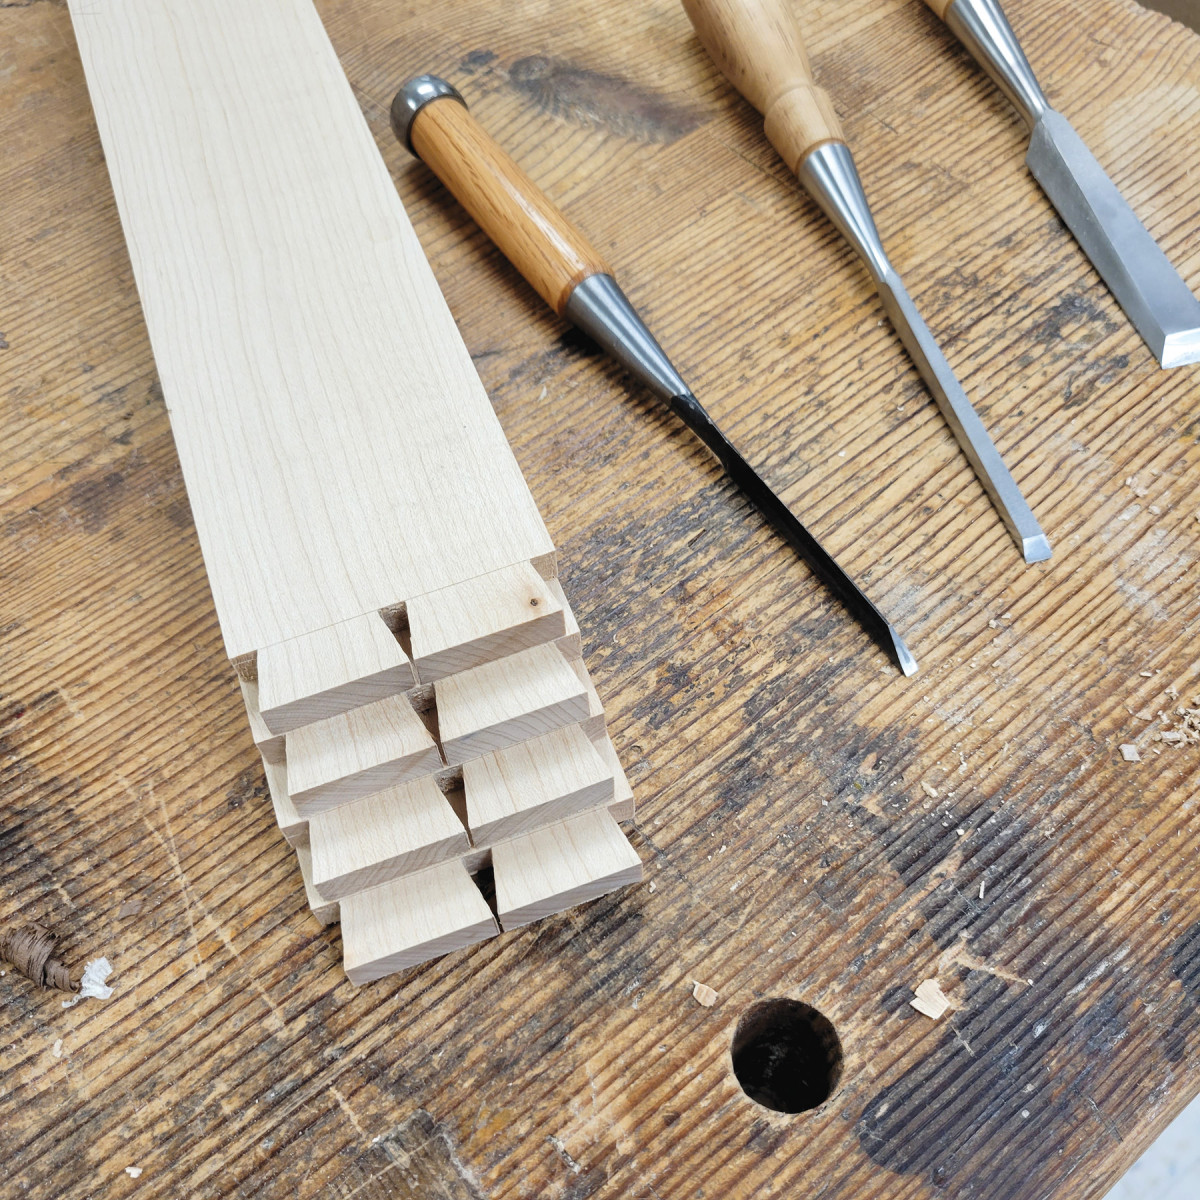
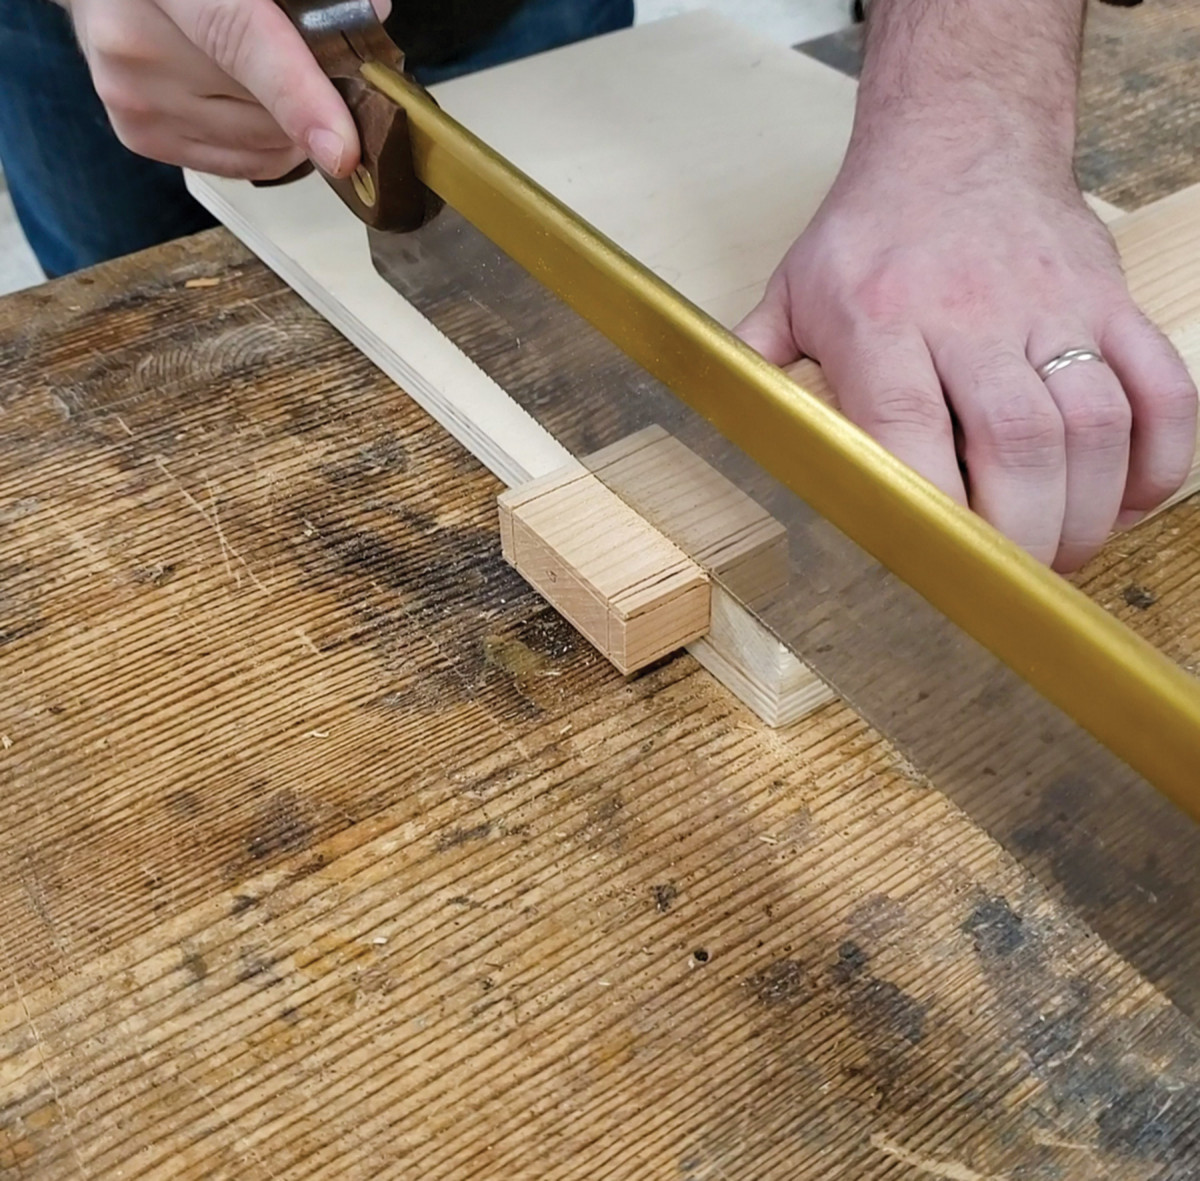
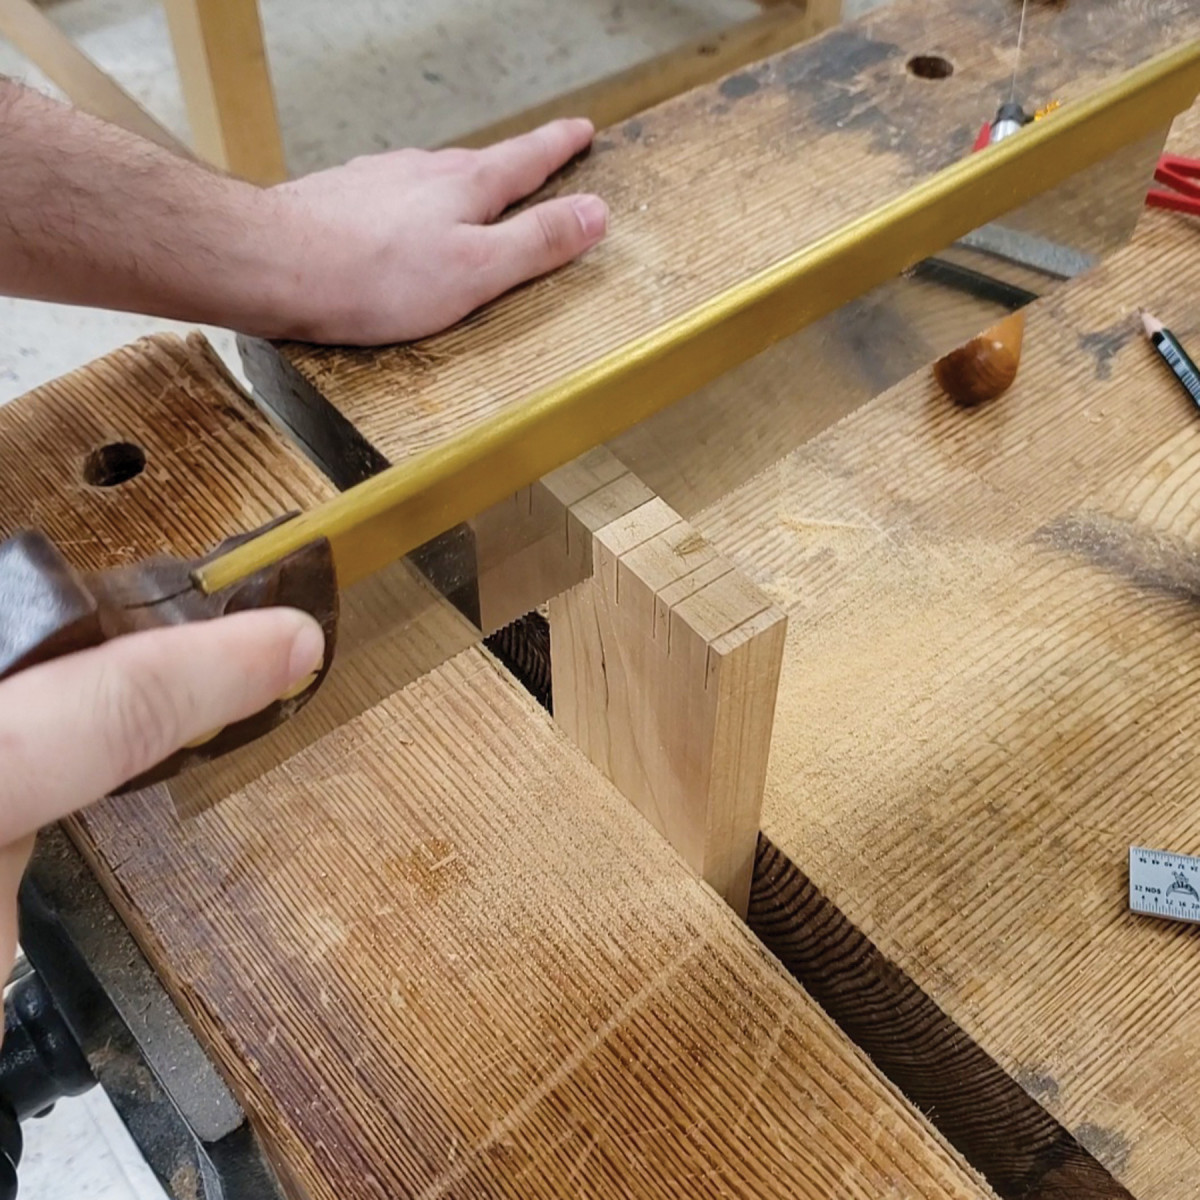
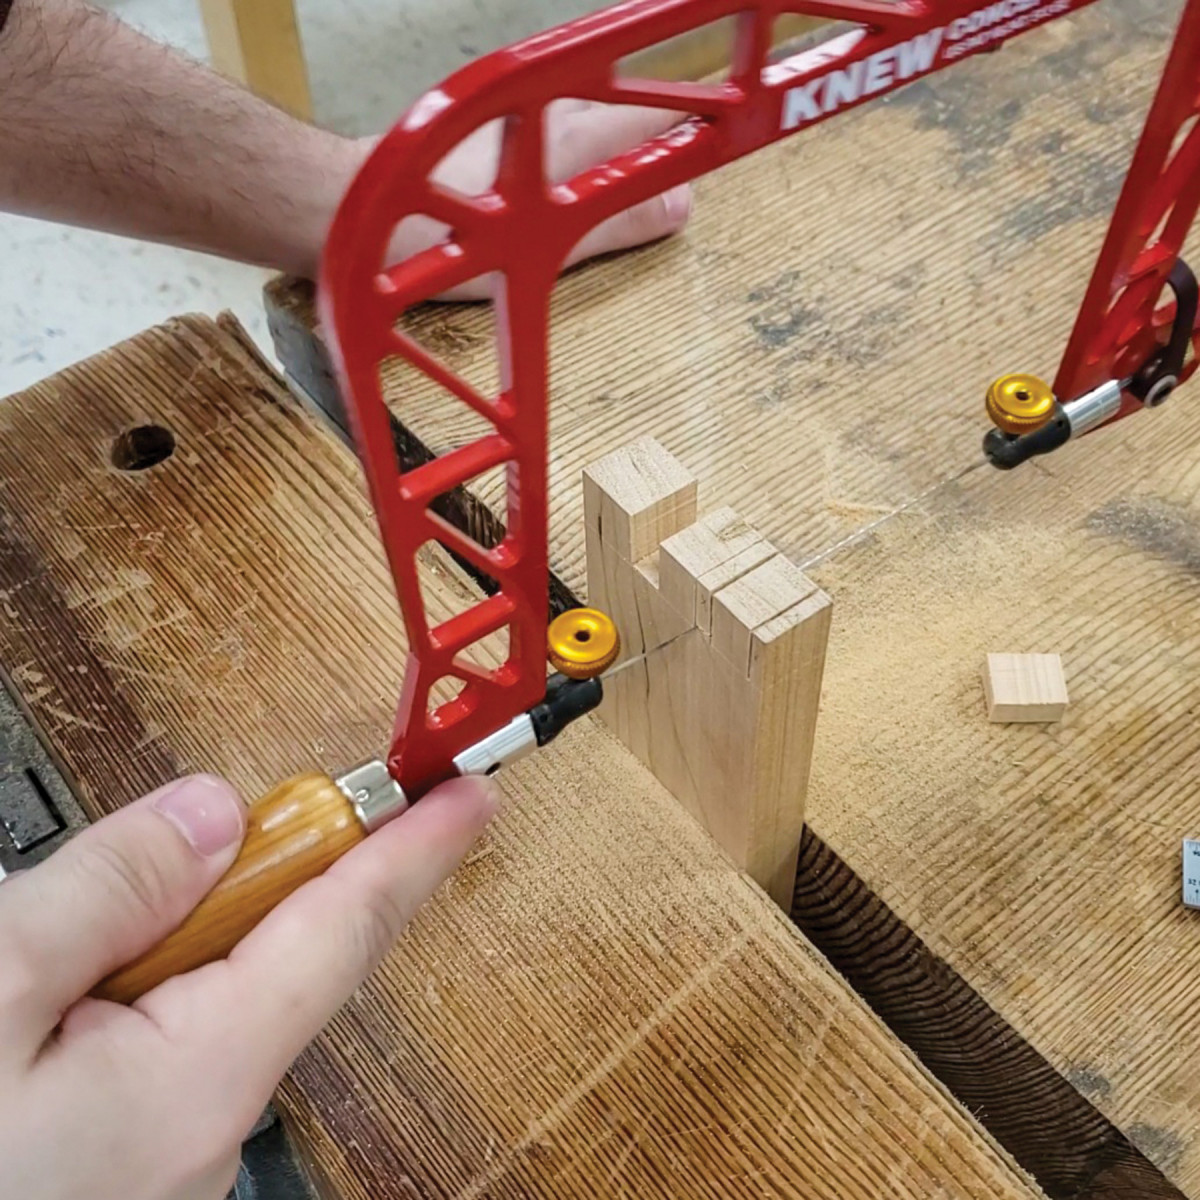
With so many articles on dovetails, I will say only two tips. One, it is easier to gang-cut the tails when working with narrow stock.
Secondly, I tilt my boards to make my cut more perpendicular to the floor, helping me keep my kerf straight.
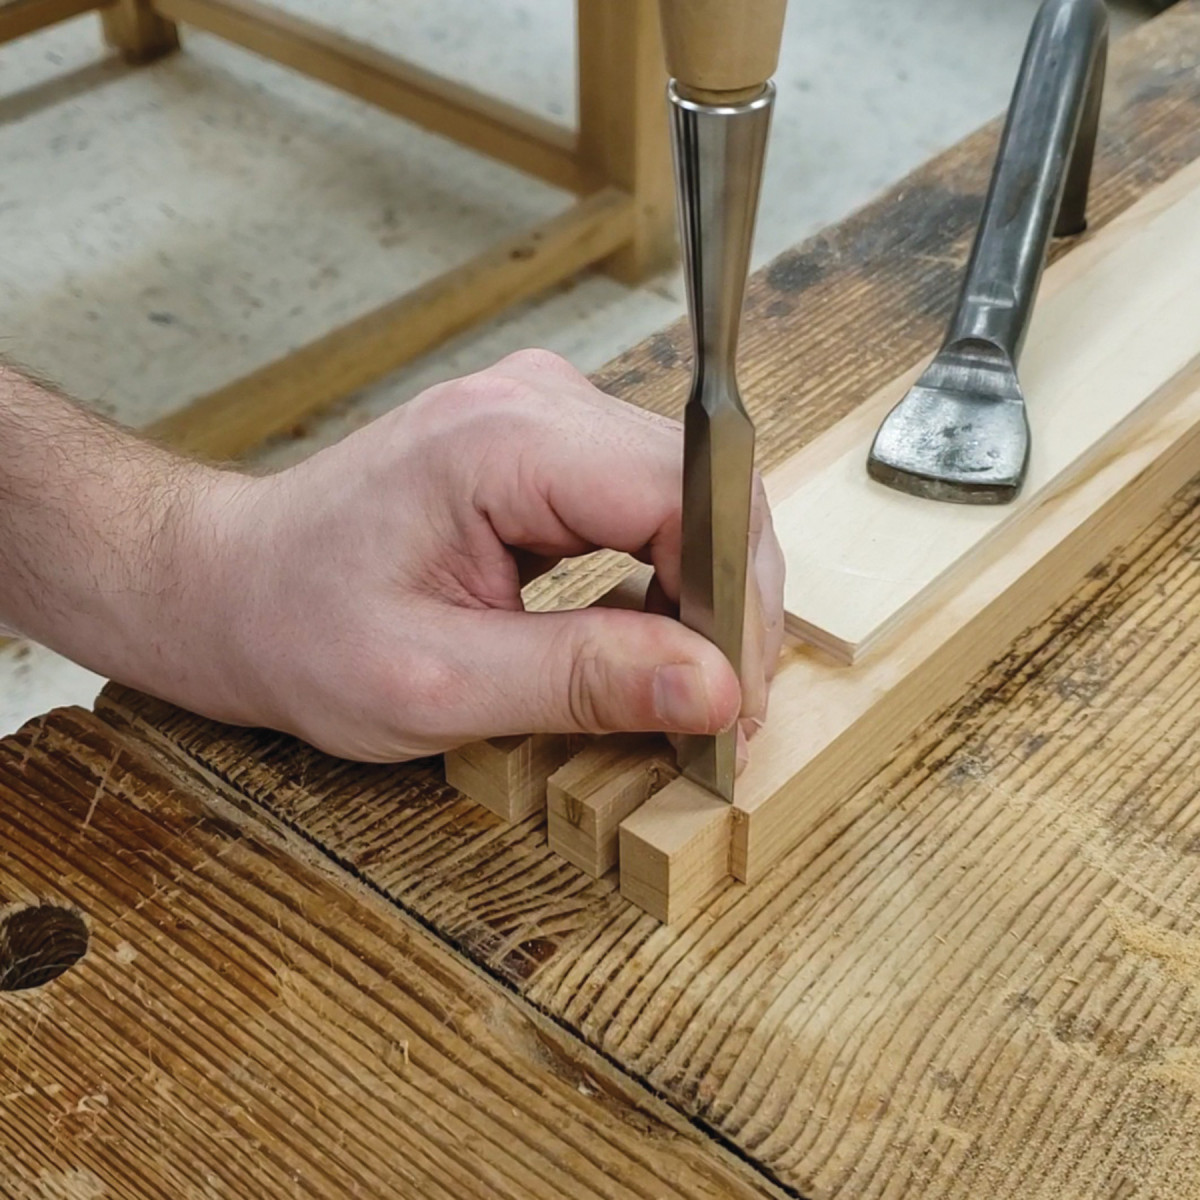
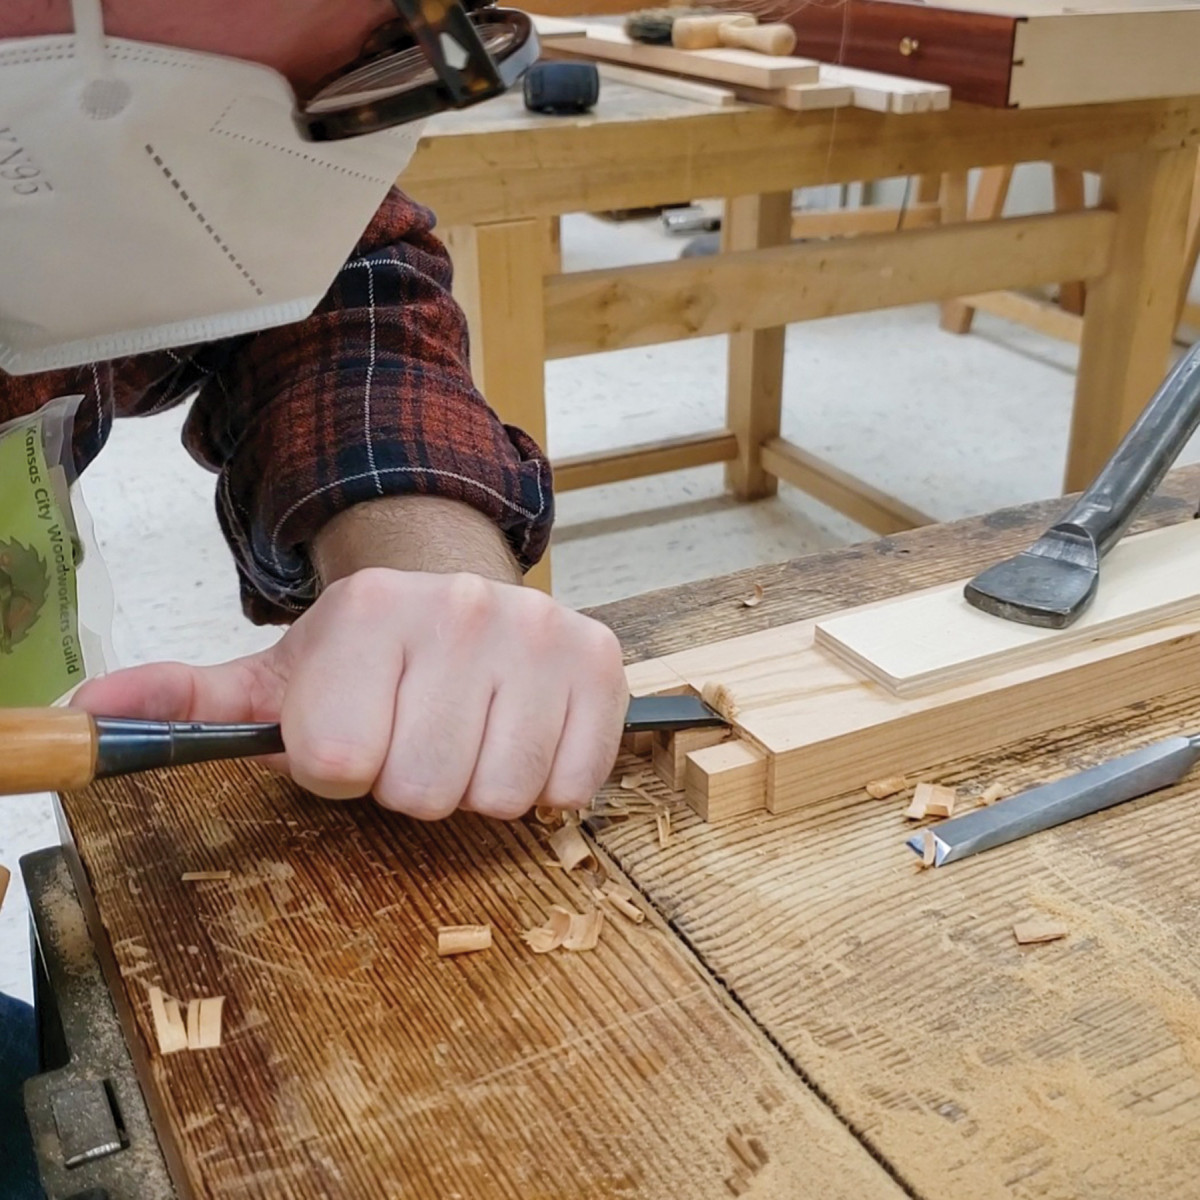
Drawer Construction
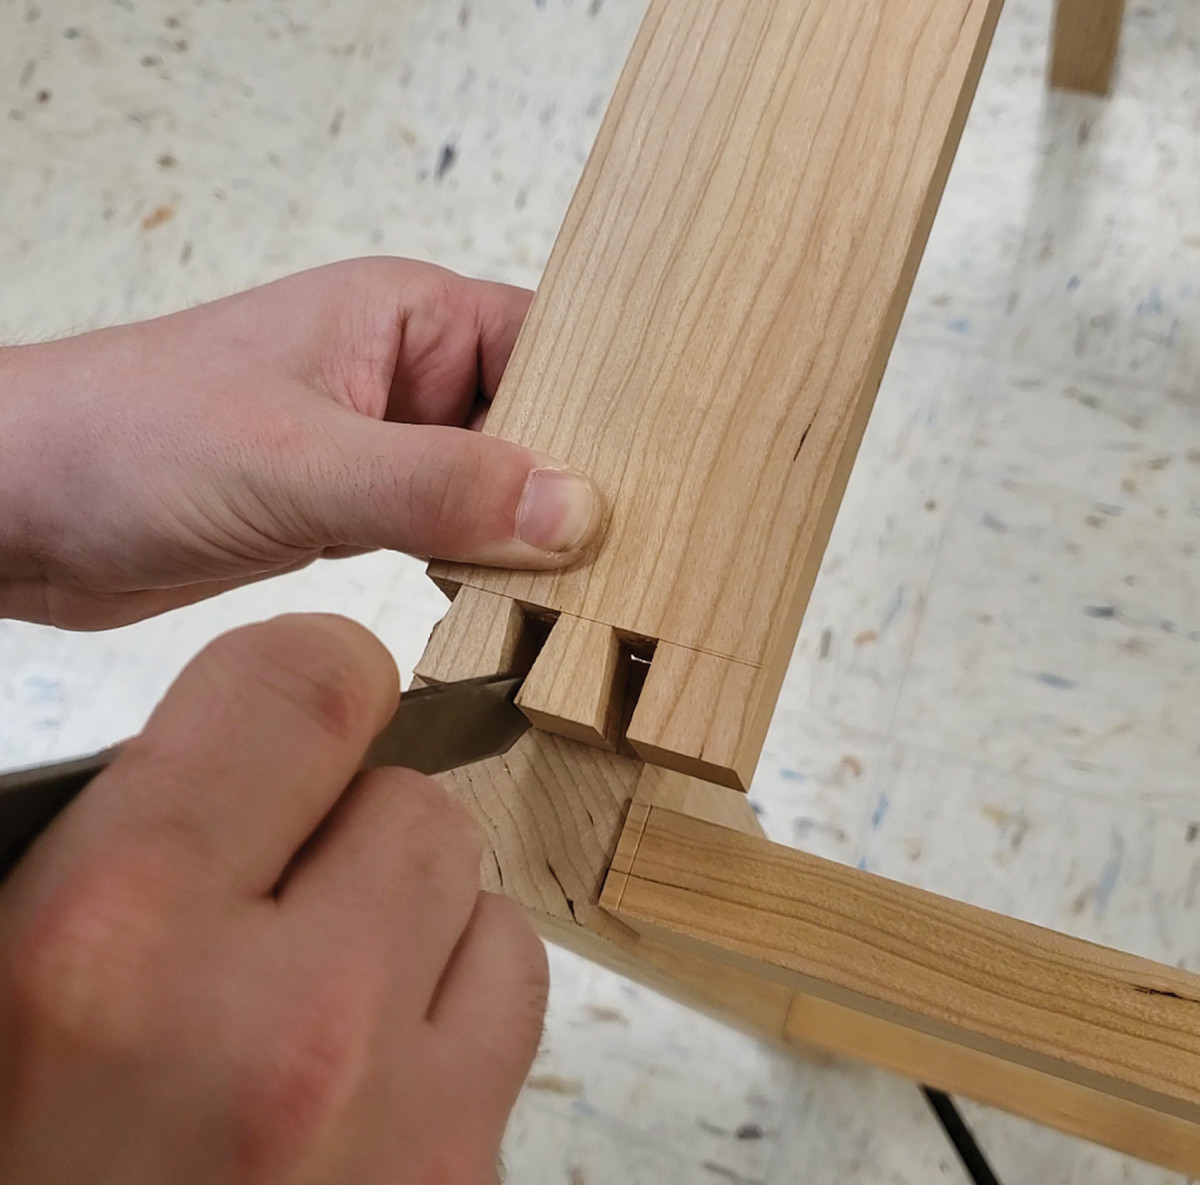
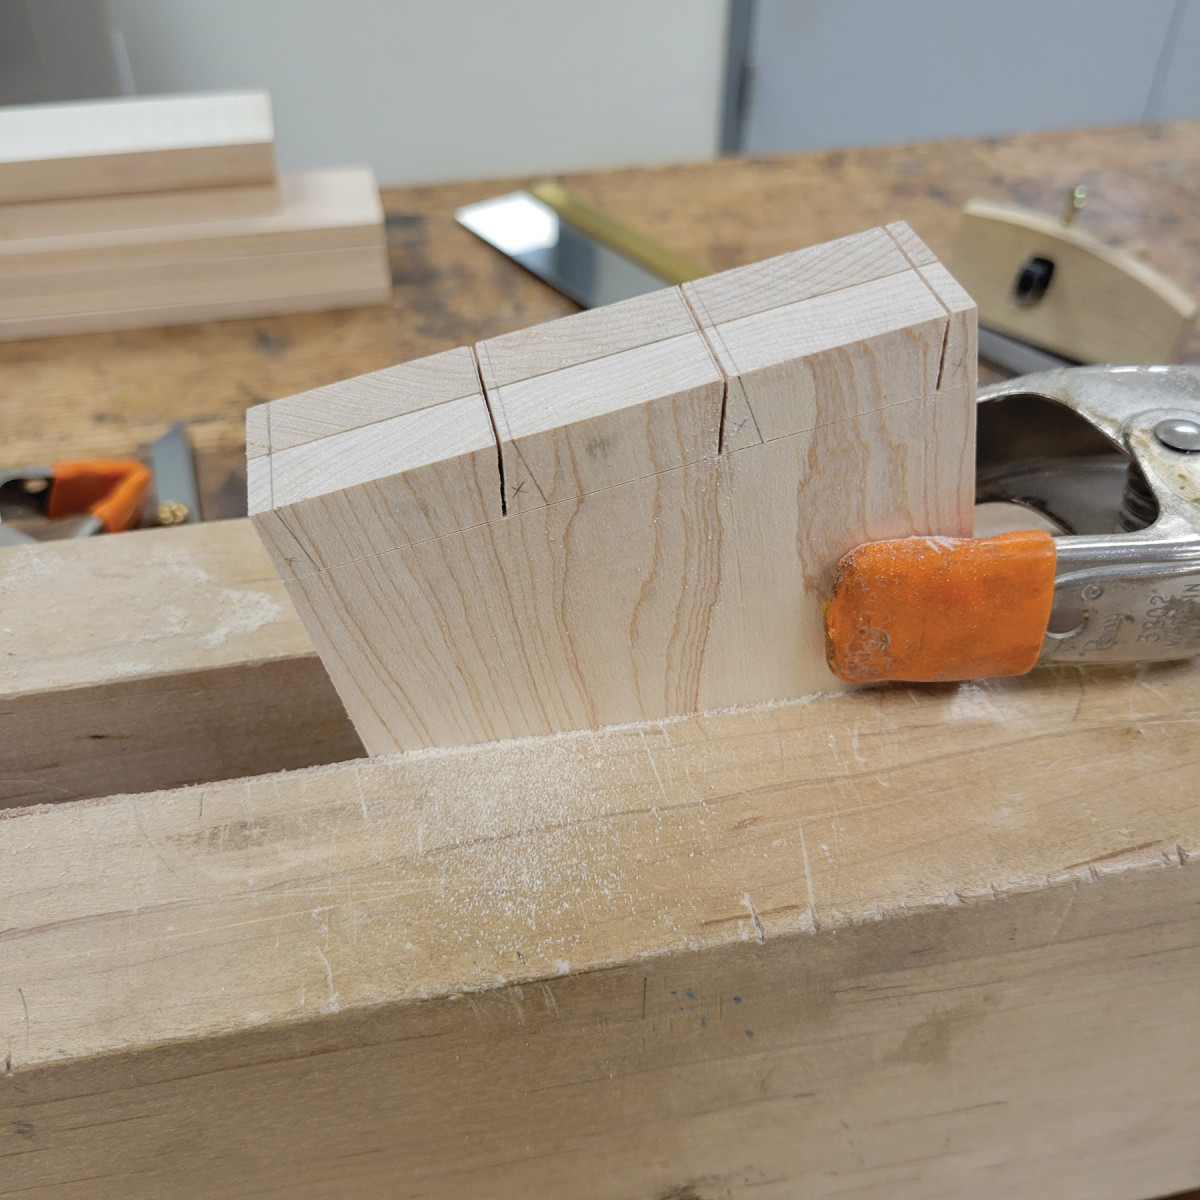
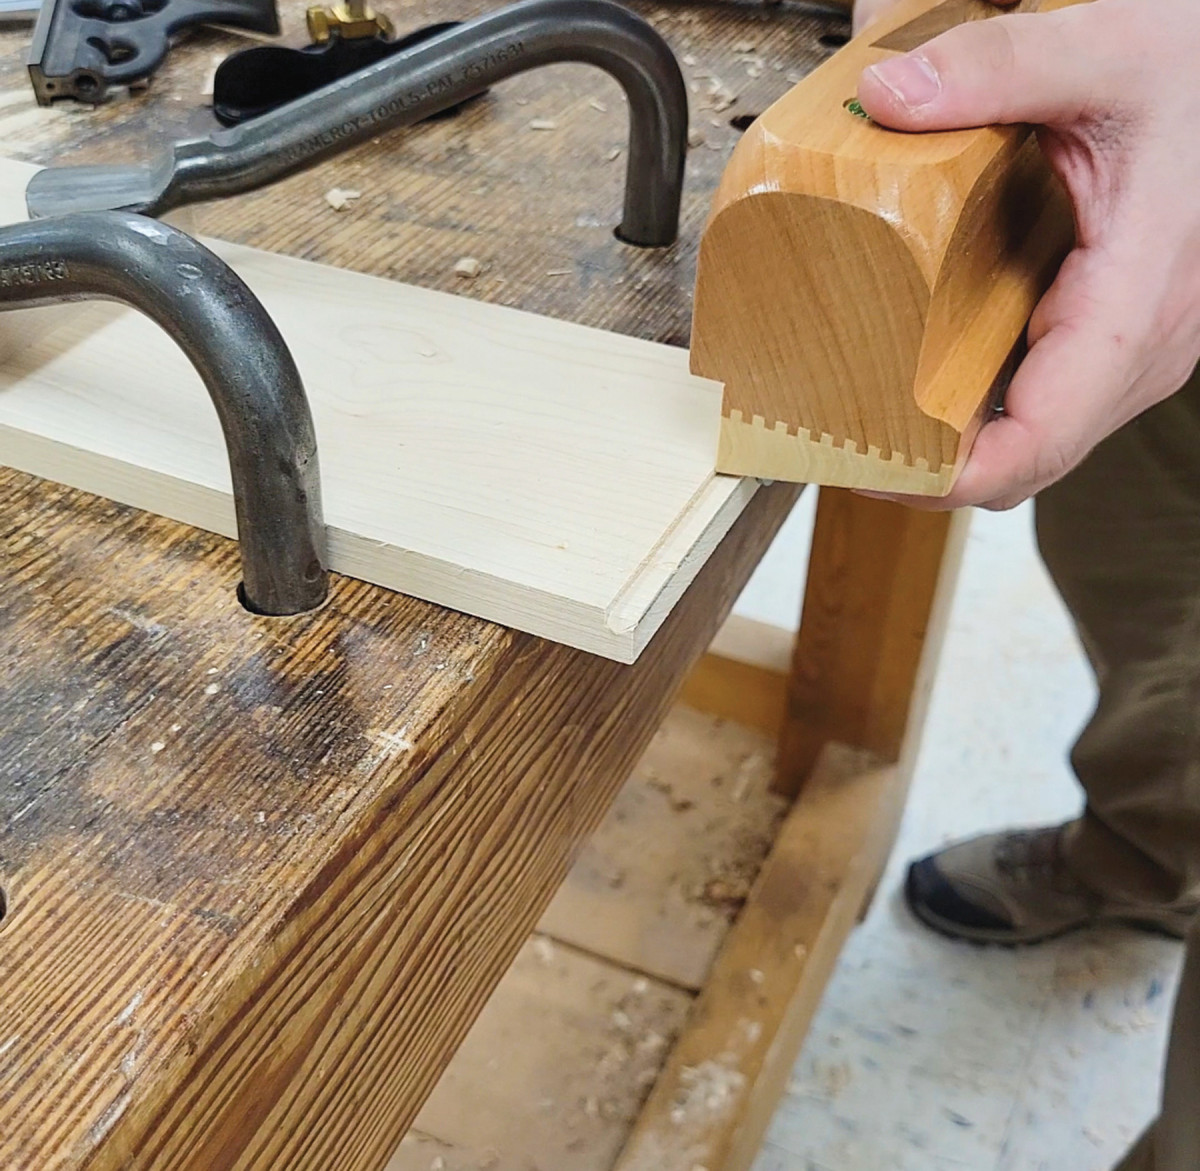
The drawers are simple half-blind dovetails for the front, allowing the groove that holds the bottoms to be hidden from view. While laying out, I make sure to leave the sides a little proud of the drawer face so that I can plane them flush when cleaning up the joint. Also, when you select the orientation of your side boards, be sure the grain is best suited for this planning direction otherwise you’ll get tear-out. Even worse, it will force you to plane toward the drawer fronts and risk chipping it.
Using an angled guide, cut the walls of the sliding dovetail.
Chisel out the waste.
Transfer the trench thickness to the end of the back board.
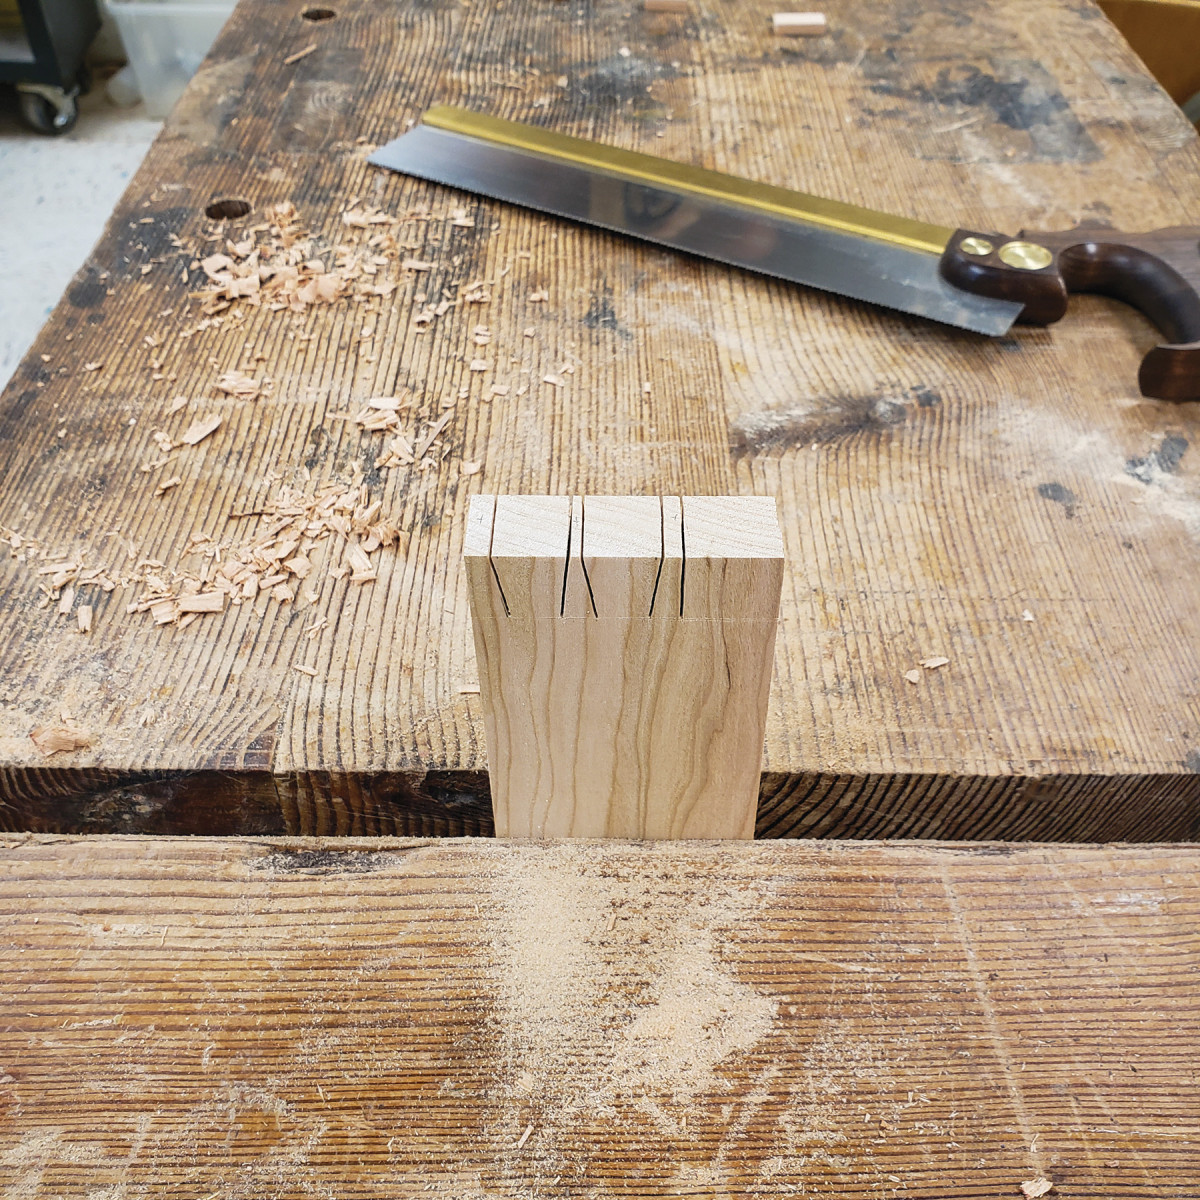
I use a sliding, half-dovetail joint to connect the back of the drawers. This allows for the sides of the drawers to extend beyond the back so that the finished drawer can be fully extended. The back is cut narrower than the sides, so the bottom panel can slide under it into its groove. Cutting a sliding dovetail is as easy as cutting a dado. I have a strip of scrap that has one side ripped to 80° in order to match the angle on my dovetail plane. I cut one wall of the dado at 90°. I then use the strip as a guide and run my tenon saw at that angle. Next, I transfer the thickness of the dado to the back and plane away until it slides into place. I recommend sawing a small cut along the gauge line at the back of the planning path so that you don’t have chipout.
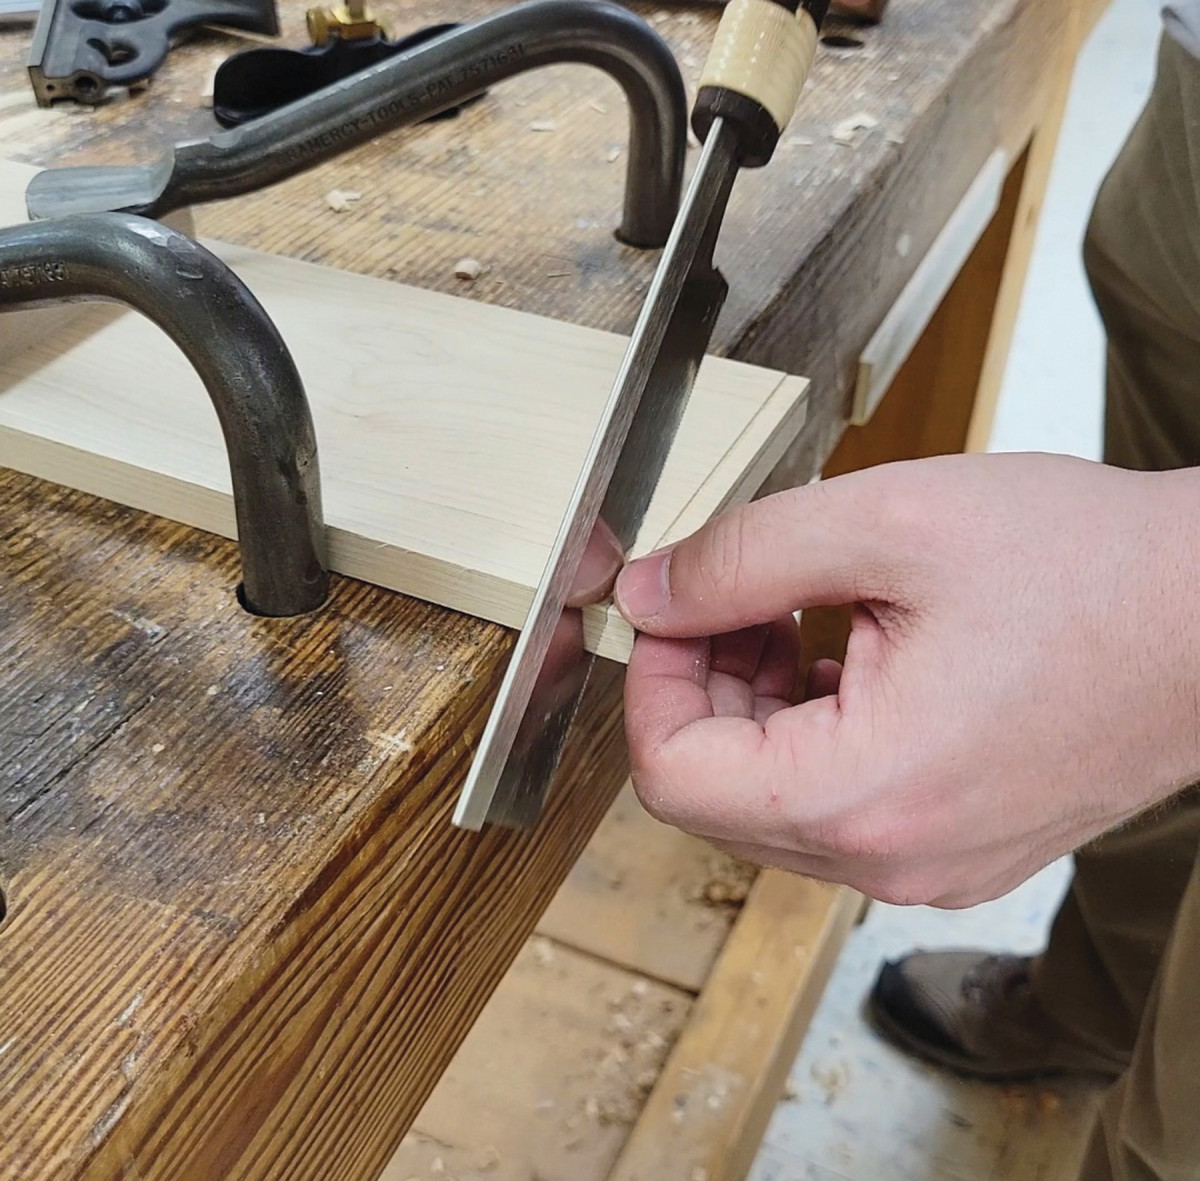
Sever fibers at the end of dovetail.
Plane to the transferred line.
Groove for the bottom.
Work Shelf
Lastly, the work shelf is a simple panel with breadboard ends. Layout for this is similar to laying out dovetails or finger joints, but first, I cut a groove in the ends and create a large tenon in the board. Next, lay out three smaller tenons and cut away the waste. Transfer their locations and chop corresponding mortises in the ends, leaving them a little wide in the middle and back. When drilling for the pegs, I chose to make the front tenon fixed instead of the middle one. This directs all seasonal movement toward the back of the case—same as the fasteners for the table top.
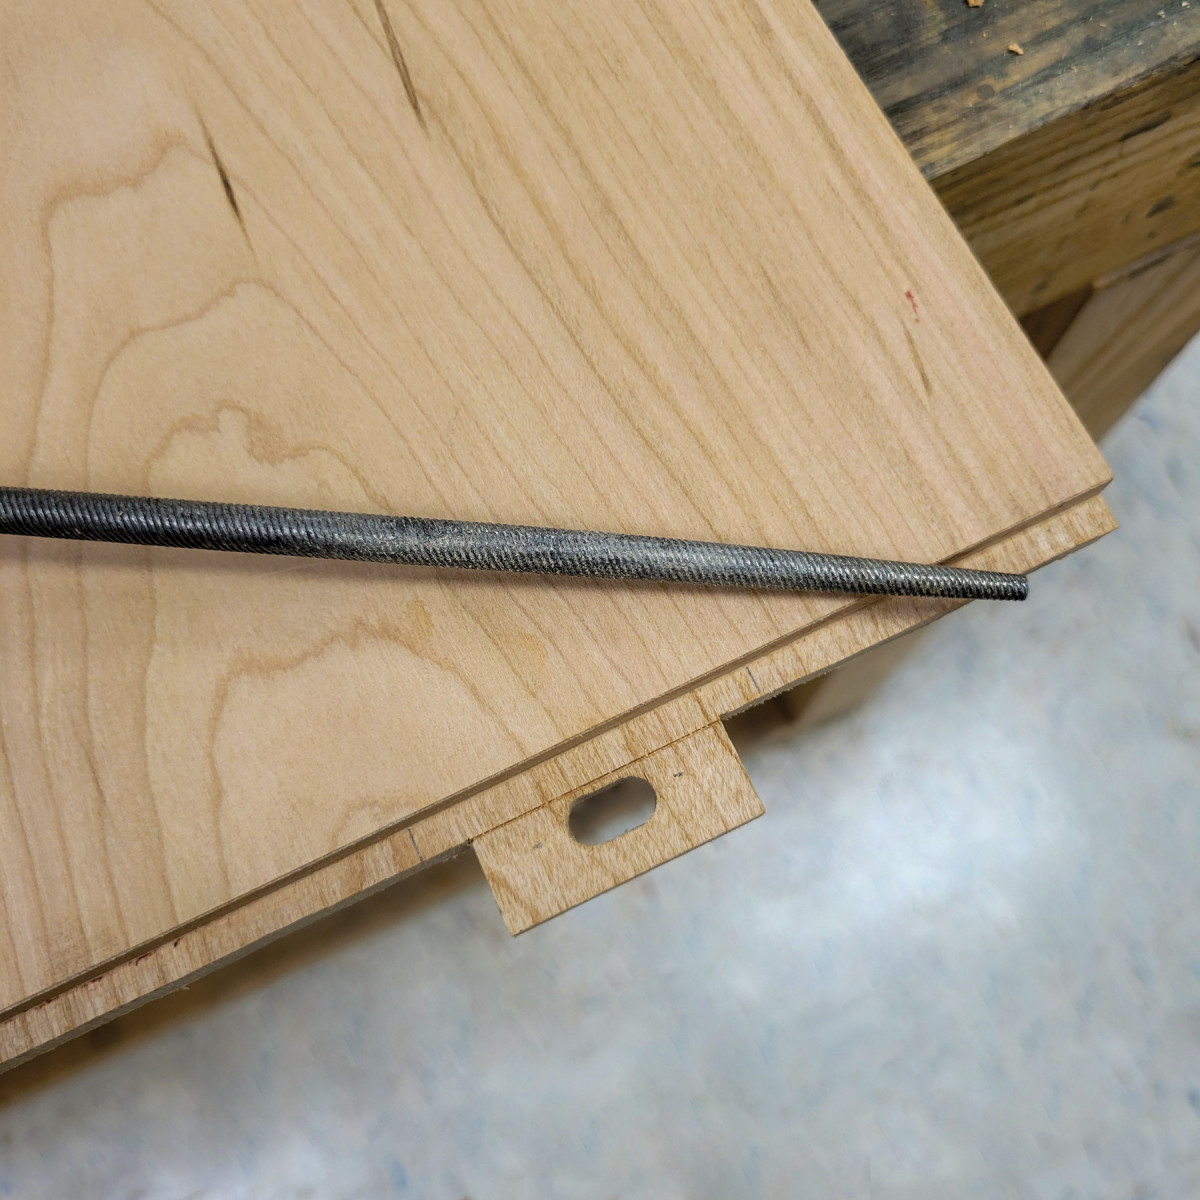
Using a round file, elongate the hole in the middle and back tenon.
Having played around with ways to wedge the workshelf as it nears full extension, I’ve decided to leave it floating with no stops or wedges so that if the shelf is damaged, it will be easy to remove and repair it. If you want, you could screw a narrow stop into the bottom of the worksurface after it has been inserted past the front rail. Of course, the drawers will have to be removed to access the stop, but it’s at least reversible and prevents pulling the worksurface all the way out.
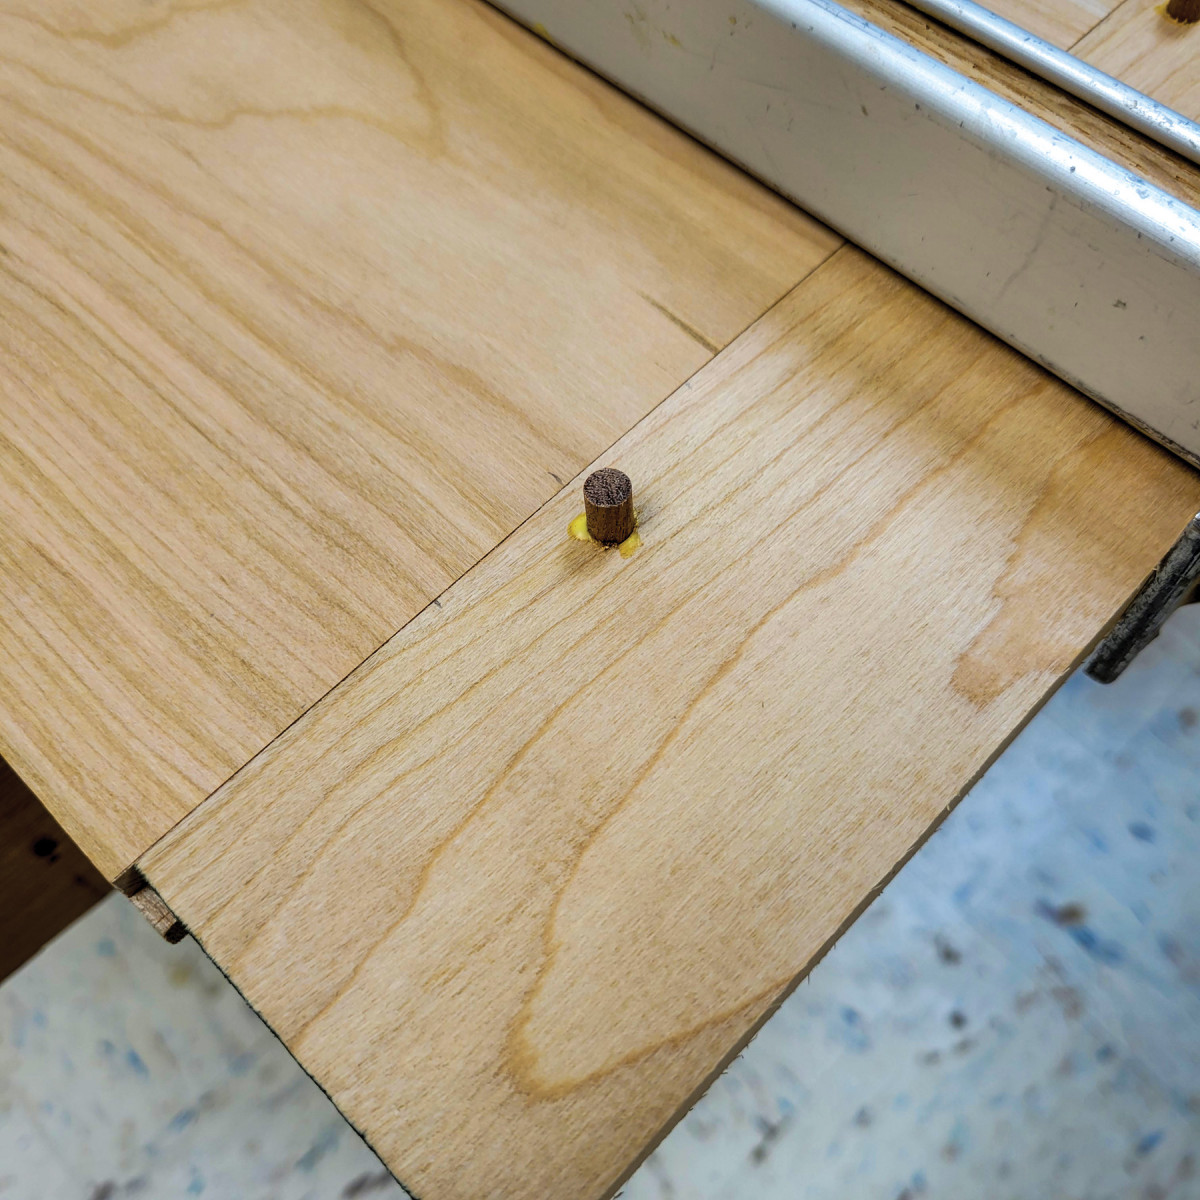
Remove the excess dowel with the flush-cut saw.
Finish
All that’s left is to install the drawer guides and stops. I do this with hide glue and a rub joint, so no clamps are necessary. Then fit the drawers, finish with wax, and install the pulls. For pulls, I went with top-notch knobs from Horton Brasses. Whatever you choose, just make sure to graduate them with the drawer sizes.
A few coats of shellac and then a coat of wax gives everything a soft shine while making all the drawers run smoothly.
I generally finish parts of the piece as they get glued up. It makes mopping up squeeze-out easier, and I don’t have little blotches in the nooks and corners of a piece. I use shellac and wax for most furniture. After the first coat of shellac, I sand and then use a Scotch-Brite pad to remove bumps after subsequent coats. If you anticipate the higher amount of wear, I like Tried and True varnish or General Finishes Arm-R-Seal. I hand-rub all finishes since I don’t have a spray booth, and I avoid polyurethanes as in my experience, they add a plasticky look to a piece. No matter what finish you choose, I am sure you will love your new sewing counter as much as I do!
Here are some supplies and tools we find essential in our everyday work around the shop. We may receive a commission from sales referred by our links; however, we have carefully selected these products for their usefulness and quality.