We may receive a commission when you use our affiliate links. However, this does not impact our recommendations.
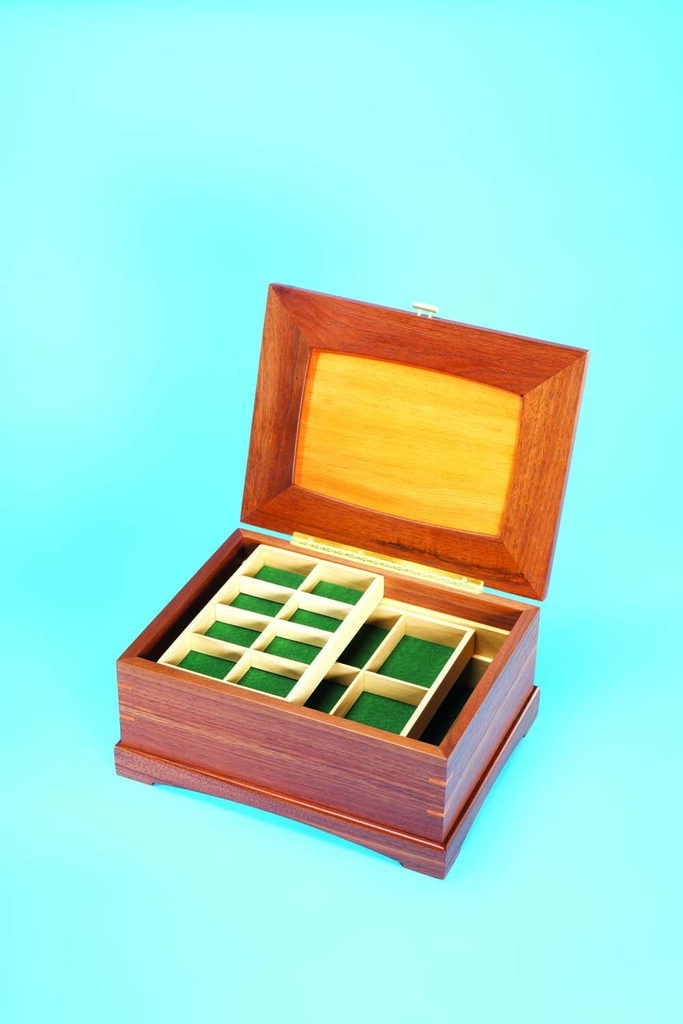
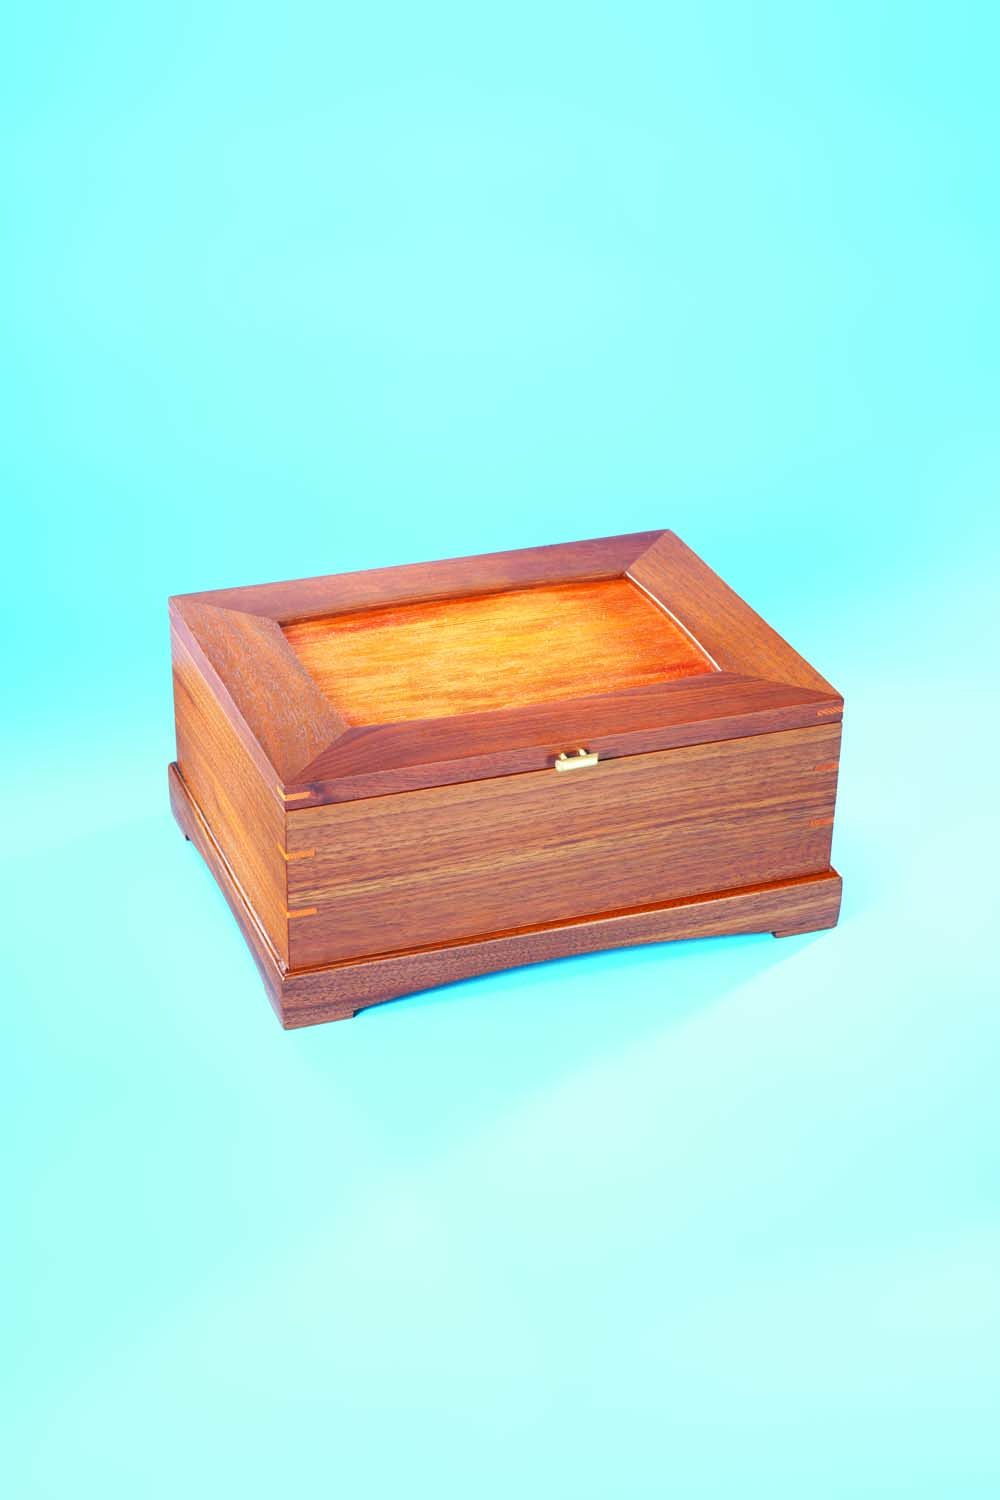 Clean lines and graceful curves are just the beginning. This jewelry box also features mitered corners, decorative keys, a textured panel and a distinctive brass handle. Inside, sliding trays with multiple compartments help to effectively use the space and keep things organized.
The joinery is straightforward—if you can cut and fit miter joints you can build this box. I’ll show you how to build a simple sled to cut the slots for the keys, how to texture the fir panel and how to make the brass handle. You’ll need a tablesaw, a planer, a router table and a drill press.
One thing you won’t need is a lot of wood. I used walnut, poplar and quartersawn fir left over from other projects to build the box shown here. If you’re a scrap hoarder like I am, you can probably build this box for next to nothing. Just use whatever stock you have on hand. Keep in mind that using a single board for the box ensures a pleasant flow of grain and color.
 Glue up the box
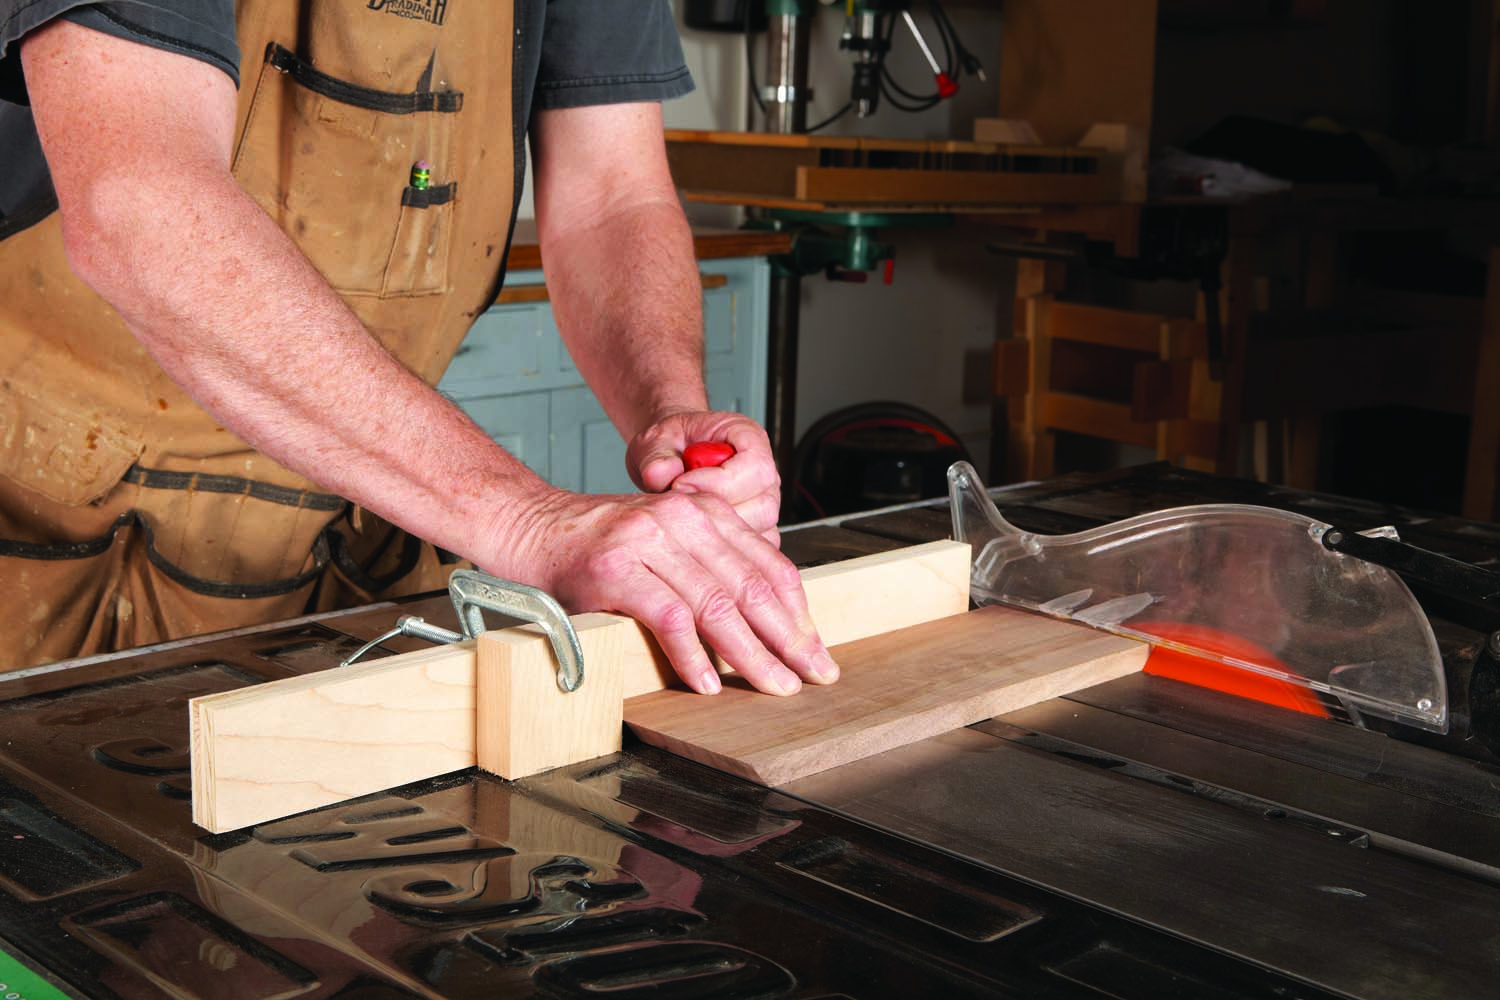
Photo 1. Miter the box front, back and sides. Cut the miters on one end of each piece. Then clamp on a stop block to cut the pieces to final length.
Start by milling the box sides and ends (A,B, Fig. A). Cut each part slightly long and trim it to final length when cutting the miters. Cut the miters on the tablesaw using a miter gauge with a fence (Photo 1). Tilt the blade to 45° and miter one end of each piece. Then clamp a stop block on the fence to miter the other end and establish the final length. Cut both sides from the same setting to ensure they’re identical in length. Then reposition the stop block and cut both ends.

Photo 2. Glue the box together after mitering the sides and ends. Tip: Band clamps pull miter joints tight because they apply even pressure on all four corners. They also keep the parts from shifting.
Glue the box together (Photo 2). It’s best to tack the corners with one or two 23-gauge pin nails to keep the parts together while you position the band clamps. The tiny holes left by 23-gauge pins are easy to disguise with putty or a wax pencil.
TIP: If you don’t already own a 23-gauge pin nailer, consider getting one. This tool is so useful I consider it a woodworker’s best friend.
Assemble the lid
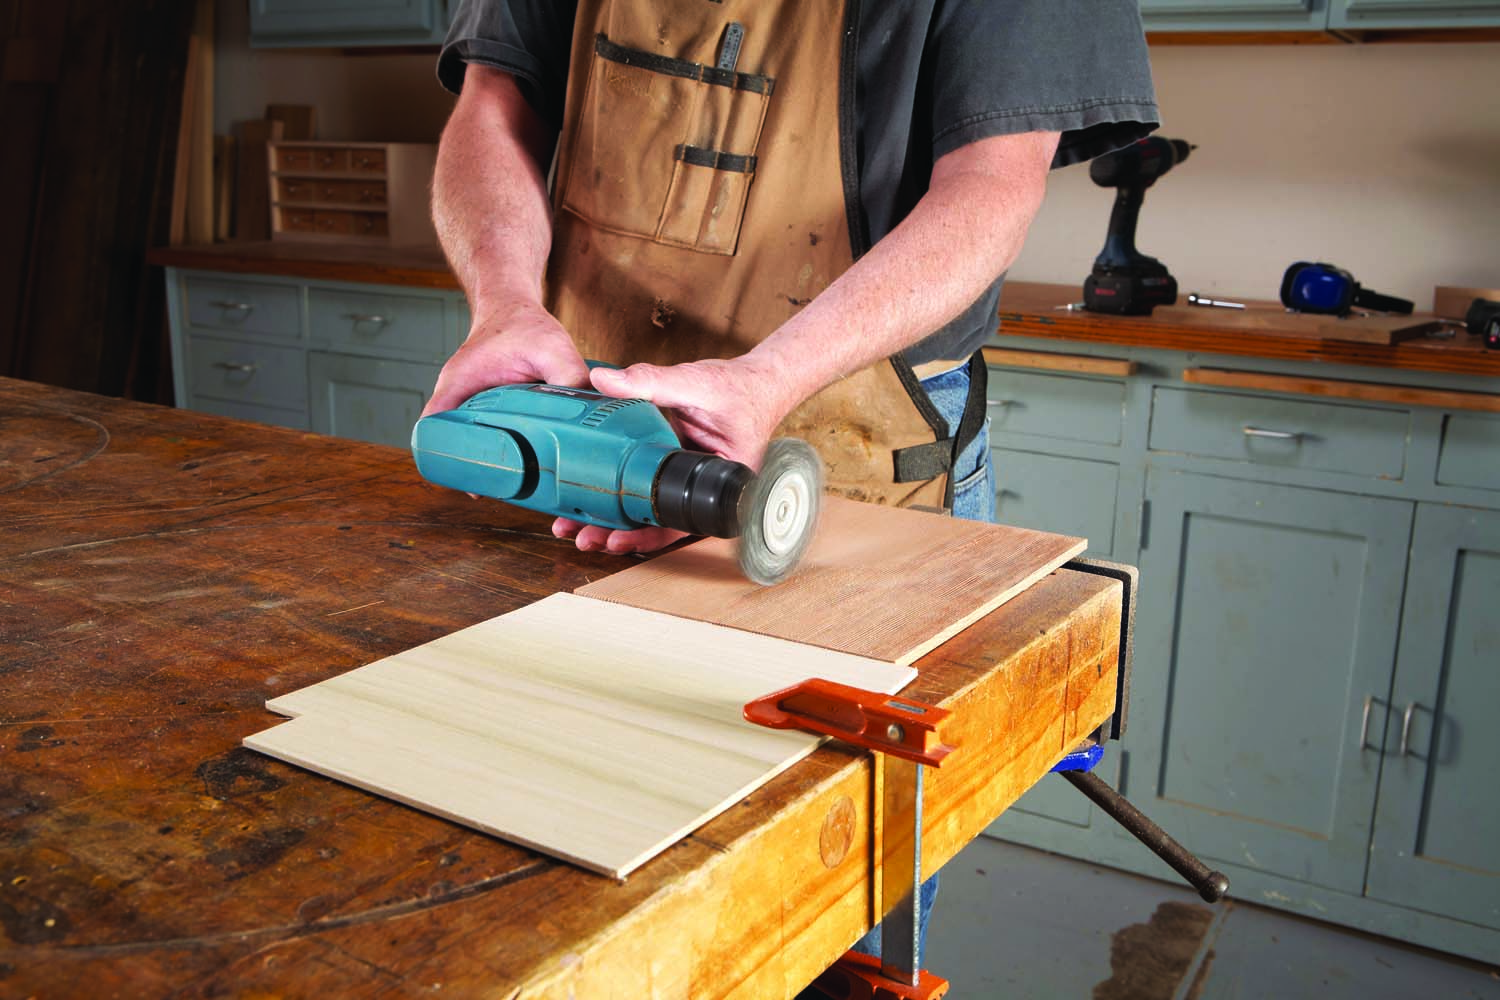
Photo 3. Add interest by texturing the lid’s fir panel. Grinding away the fir’s soft earlywood leaves its hard latewood standing proud, creating a weathered or sandblasted texture.
Build the frame-and-panel lid while the glued-up box dries. Start by milling the panel (C) to thickness and cutting it to final dimensions. I used straight-grained fir, which has very hard latewood and very soft earlywood, so I decided to have some fun with a wire brush (Photo 3). Apply light pressure and move back and forth with the grain. Keep the brush moving; pausing in one spot could ruin the panel.
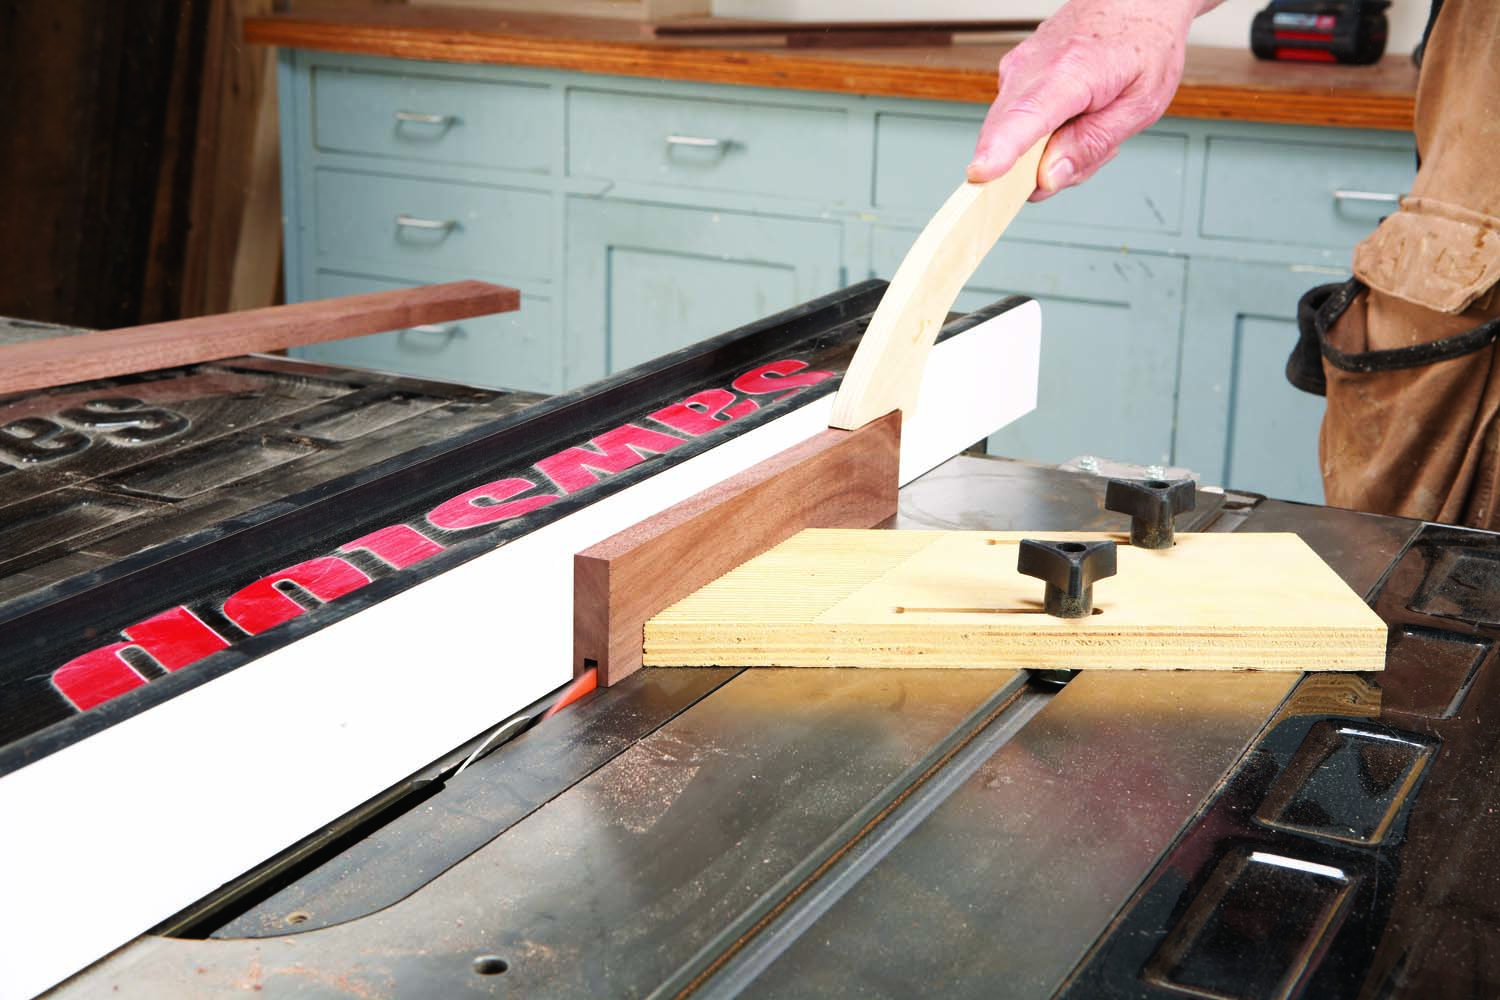
Photo 4. Cut grooves for the center panel in the lid front, back and side pieces. You’ll have to make two passes to make the grooves wide enough.
Mill the lid’s sides and ends (D, E) oversize in length. Then use the tablesaw to cut grooves for the panel on the inside edge of each piece (Photo 4). To center the grooves, set the rip fence to offset the blade a tiny bit from center; then make two passes with each piece; one with each face against the fence. Adjust the fence as necessary to dial in the width the match the panel’s thickness.
Miter the lid’s sides and ends, leaving them just a bit long, so the lid will be slightly larger than the box. This allows wiggle room to flush the lid with the box after the hinge is installed.
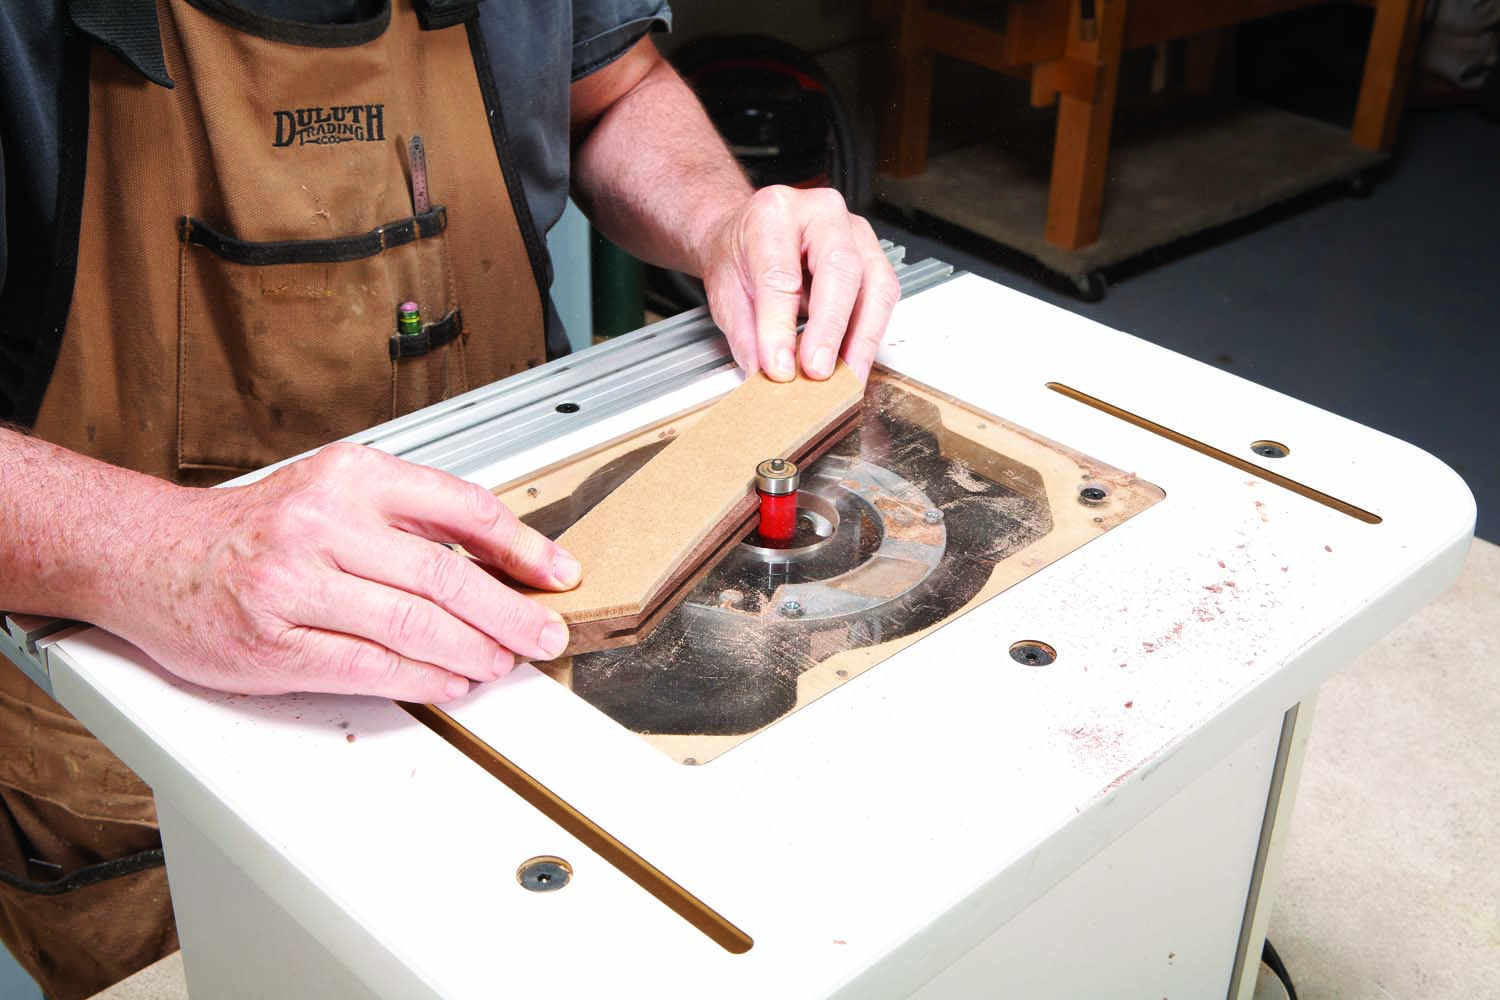
Photo 5. Rout arches on the lid frame and base molding pieces using a template and a flush-trim bit. TIP: Fasten each template to the back of the appropriate piece with double-faced tape.
Next, make a pair of templates for routing the arches on the inside edges of the lid frame (Fig. B). Cut and miter one piece of 1/4″ MDF to match the sides and another piece to match the ends. Then draw the appropriate arch on each piece, using a thin strip of wood that’s bent around a nail pinned at the high point of the arch. Cut the arch and sand it smooth to complete each template. Then attach the appropriate template to the backside of the frame piece and use a flush-trim bit to rout the arc (Photo 5).
Dry-fit the lid to make sure the panel fits and the miters are tight. Then glue the lid together.
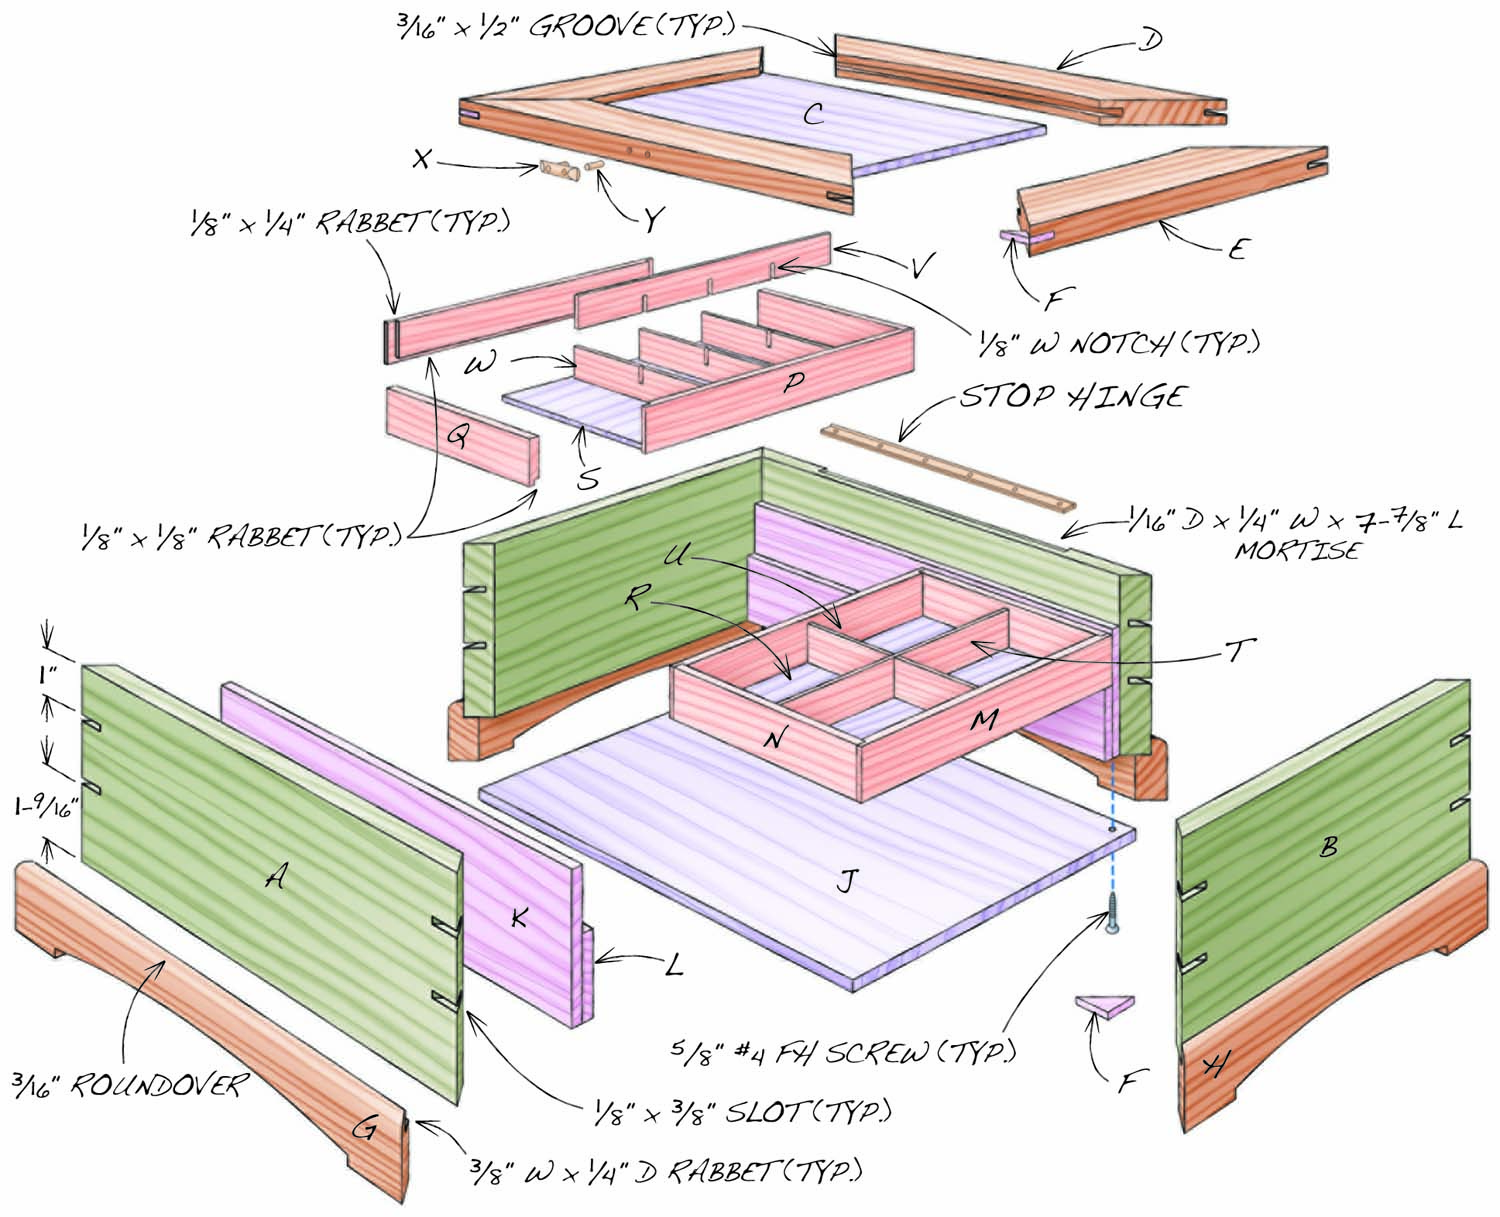
Fig. A. Exploded View
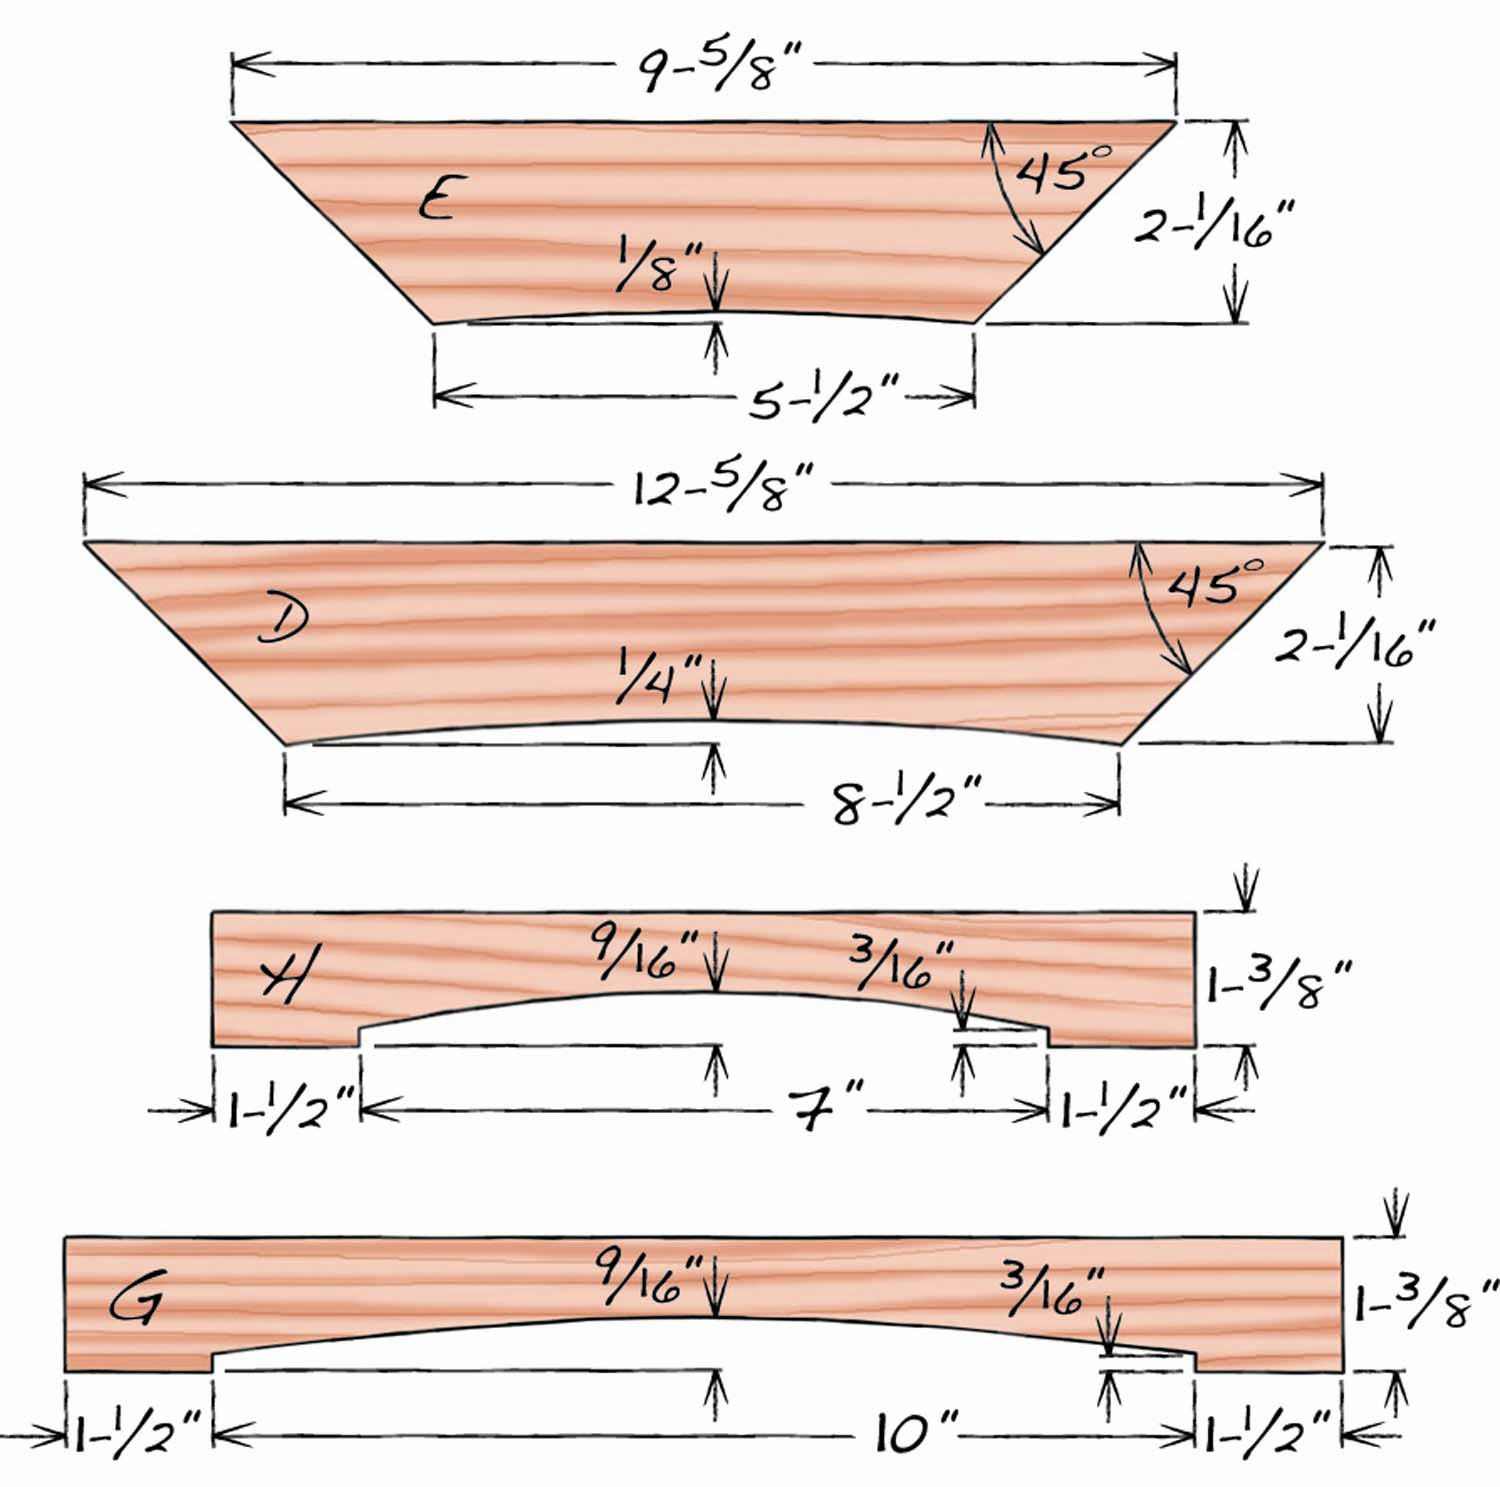
Fig. B. Templates
Cutting List
|
Walnut Jewelry Box Overall Dimensions: 5-9/16″ H x 10″ W x 13″ L |
||||
|
PART # |
NAME |
QTY |
MATERIAL |
Th x W x L |
|
A |
Box side |
2 |
Walnut |
1/2” x 4” x 12-1/2” (a) |
|
B |
Box end |
2 |
Walnut |
1/2” x 4” x 9-1/2” ( a) |
|
C |
Lid panel |
1 |
Fir |
3/16” x 6-7/16” x 9-7/16” |
|
D |
Lid side |
2 |
Walnut |
9/16” x 2-1/16” x 12-5/8″ (a, b) |
|
E |
Lid end |
2 |
Walnut |
9/16” x 2-1/16” x 9-5/8” (a, b) |
|
F |
Key |
12 |
Walnut or fir |
1/8” x 1/2” x 1” |
|
G |
Base side |
2 |
Walnut |
1/2” x 1-3/8” x 13” (a) |
|
H |
Base end |
2 |
Walnut |
1/2” x 1-3/8” x 10” (a) |
|
J |
Box bottom |
1 |
Plywood |
1/4” x 9” x 12” |
|
K |
Upper tray support |
2 |
Poplar |
1/4” x 2-7/8” x 11-1/2” |
|
L |
Lower tray support |
2 |
Poplar |
1/4” x 1-5/8” x 11-1/2” |
|
M |
Lower tray side |
2 |
Poplar |
1/4” x 1-1/8” x 8” |
|
N |
Lower tray end |
2 |
Poplar |
1/4” x 1-1/8” x 5-1/2” |
|
P |
Upper tray side |
2 |
Poplar |
1/4” x 1” x 8-1/2” |
|
Q |
Upper tray end |
2 |
Poplar |
1/4” x 1” x 5” d |
|
R |
Lower tray bottom |
1 |
Poplar |
1/8” x 5-1/2” x 7-3/4” |
|
S |
Upper tray bottom |
1 |
Poplar |
1/8” x 5” x 8-1/4” |
|
T |
Lower tray center divider |
1 |
Poplar |
1/8” x 7/8” x 7-1/2” (c) |
|
U |
Lower tray divider |
1 |
Poplar |
1/8” x 7/8” x 5-1/4” (c) |
|
V |
Upper tray center divider |
1 |
Poplar |
1/8” x 3/4” x 8” (c) |
|
W |
Upper tray divider |
3 |
Poplar |
1/8” x 3/4” x 4-3/4” (c) |
|
X |
Handle bar |
1 |
Brass rod |
1/4” x 1” |
|
Y |
Handle stem |
2 |
Brass rod |
1/8” x 3/4” |
|
Notes a) Both ends mitered. b) Oversize in width and length. Trim the lid to match the box after assembly. (c) Cut 1/8″ x half-width notches to assemble dividers. |
||||
Cut slots for keys
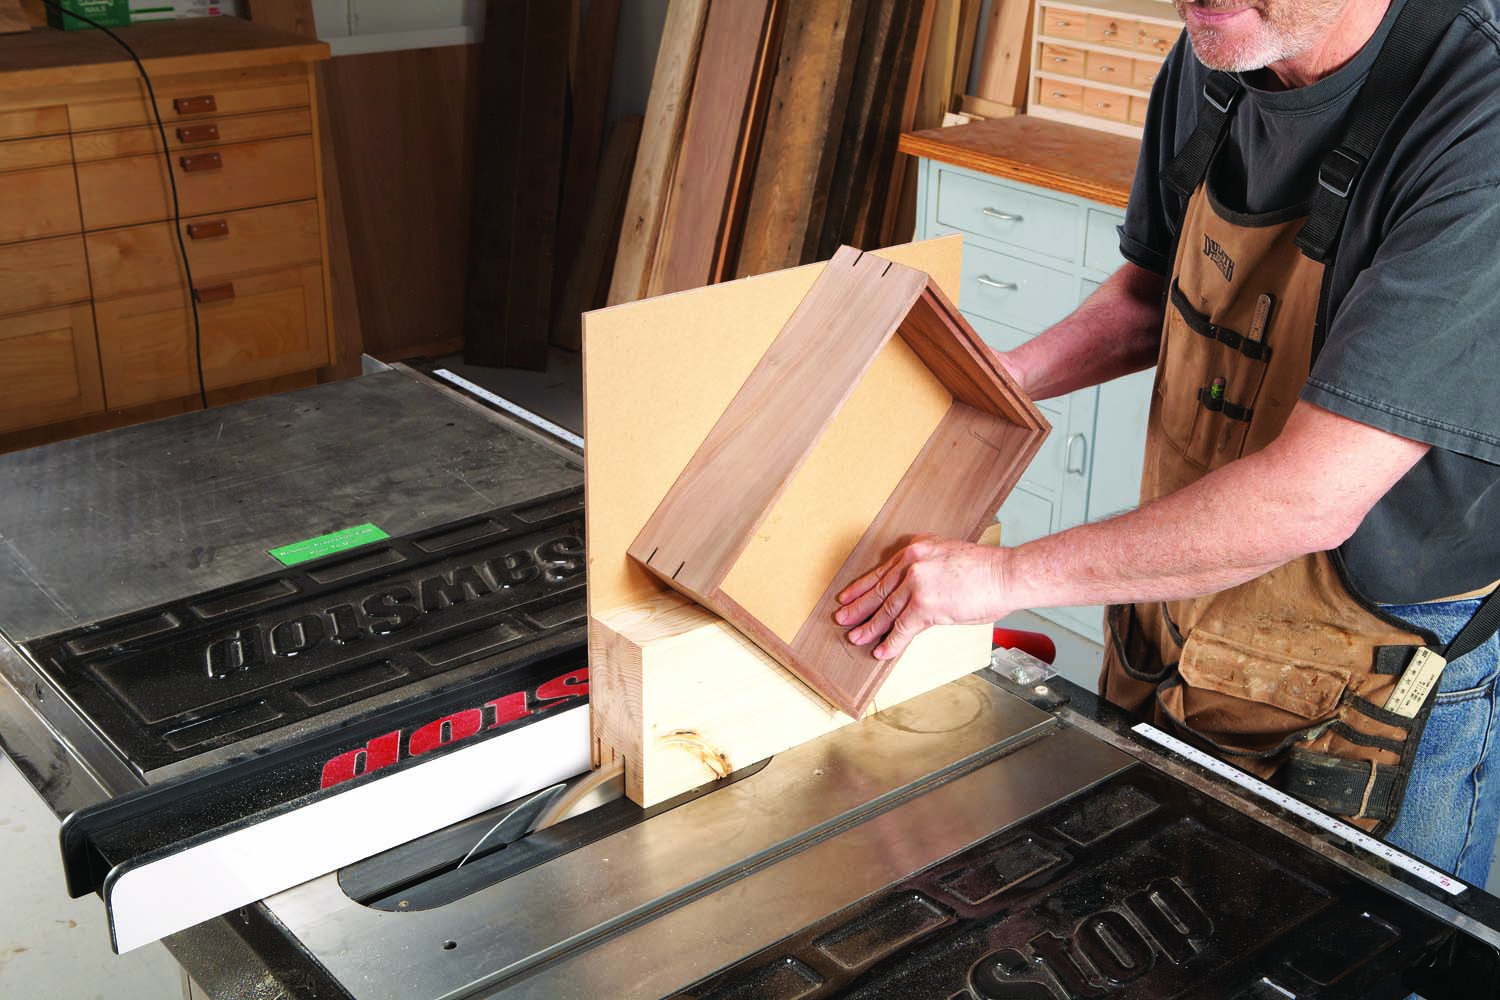
Photo 6. Tip: Use a sled to cut slots for keys across each corner. The sled houses the blade during the cut. Keep your hands away from where the blade exits at the back.
Decorative keys (F) glued in slots cut across the corners also reinforce the miter joints in both the box and the lid. To cut the slots, you’ll need to build a sled made from 2×6 stock and 1/4″ MDF (Photo 6). Bandsaw a 90° V-slot in a block made by gluing together a pair of 2x6s. Leave an inch of stock at the bottom. Attach the block to the MDF backer board and you’re ready to cut the slots.
Create even spacing between the three slots on each corner. Start with the box. Raise the blade to cut a 3/8″ deep slot. Then set the fence to cut slots 1″ from the top of the box. (Make sure to include the thickness of the sled’s backer board; use scrap that’s the same width as the box to test the cut.) Position the box in the sled with its top edge against the backer board and cut the first slot. Then rotate the box to cut slots across the other three corners.
Next, turn the box around so its bottom edge is against the sled’s backer board. Reposition the fence as necessary and cut another series of slots 1-9/16″ from the bottom of the box. Install the lid in the sled and set the fence to center the slots on its edge. Then follow the same procedure to cut a slot in each corner.
Rip 1/8″ strips of fir or walnut for the keys and glue them into the slots. After the glue has dried, cut off the excess and then sand the keys flush.
Make base molding
Cut the base molding pieces (G,H) from a long blank. Start by routing a 3/16″ roundover and a 1/4″ wide x 3/8″ deep rabbet on the top edge of the blank. Then cut the molding pieces (a little long) and miter them to fit the box.
Make templates to rout the arches, as for the lid (Fig. B). These templates are different, because the base has feet. After routing, you’ll have to square the corner between the foot and the arch with a chisel. Glue the base molding onto the box. Then cut the box bottom (J) to size. It fits inside the assembled base molding and bears against the bottom edge of the box sides. Set the bottom aside; it will be installed later, after the finish has been applied.
Divide the trays
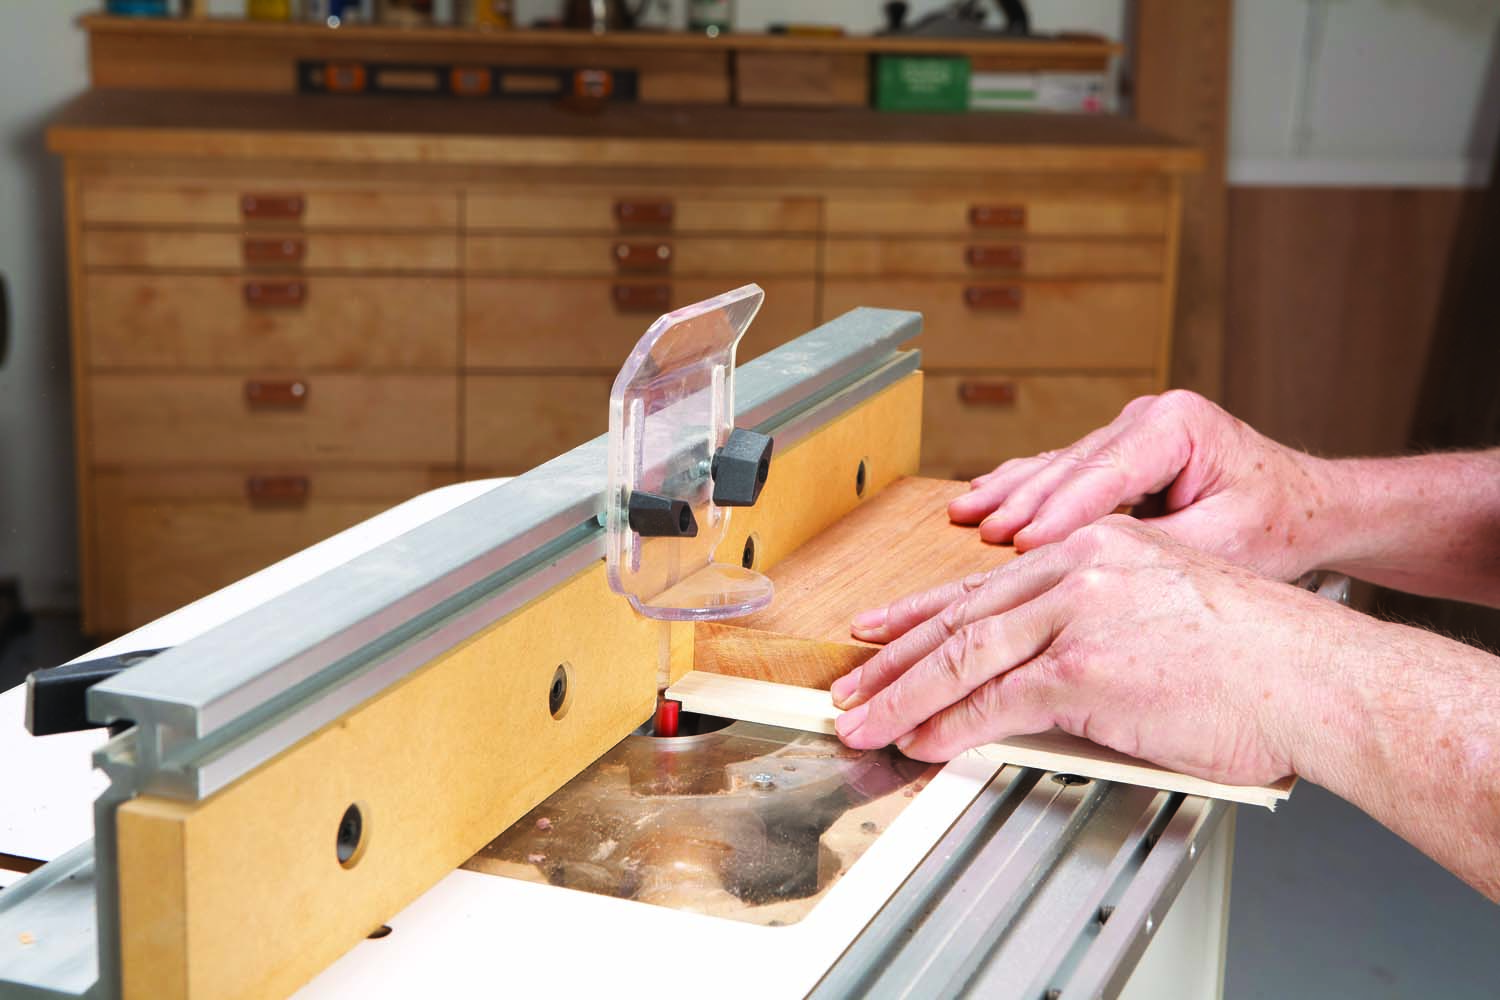
Photo 7. Rout rabbets on the tray ends. Tip: Use a 2×4 push block with a squared end to prevent tear out and keep the stock square against the fence.
Mill stock for the upper and lower tray supports (K, L) and install them in the box, flush with the bottom. Then mill stock (or use 1/4″ plywood; see Sources) for the tray sides and ends (M-Q). Next, cut 1/8″ rabbets in all the bottom edges and 1/4″ rabbets on both ends of each end piece (Photo 7). Assemble the trays with glue and 23-gauge pin nails. Mill stock (or use 1/8″ plywood; see Sources) for the bottoms (R, S) Cut them to fit and set them aside. Cut and fit the tray dividers (T-W). To create individual compartments in each tray, cut saw-kerf notches so you can lock the dividers together (Photo 8). It’s easy to vary the compartments—simply adjust the notch locations and add or eliminate dividers.

Photo 8. Notch the edges of the tray dividers so you can assemble them to form grids that friction-fit each tray and divide it into smaller compartments.
Rout hinge mortises
The lid mounts on the box with a single stop hinge (see Sources). Use a straight bit and a router table with a fence to rout the hinge mortises. Adjust the bit’s height to set the depth of the mortise; position the fence to set its width. Install stop blocks on the fence to define the ends of the mortise—cut the slot a little short on both ends and use a chisel for final fitting.
To rout the mortise in the box, turn it upside down and orient its back against the fence. To rout the mortise in the lid, lay it on the router table top-face up, with it’s back edge against the fence.
Install the hinge and check the top’s alignment with the box. Then use a block plane to trim the edges flush. It’s best to use a sanding block at the lid’s corners, as planing can chip out the keys.
Craft the handle
Rather than buying a generic handle for the lid, why not make a great-looking one from 1/4″ and 1/8″ brass rod (available at home centers and hardware stores). Brass is easy to work. You can cut it (using a hacksaw, of course), sand it, file it, drill it and polish it.
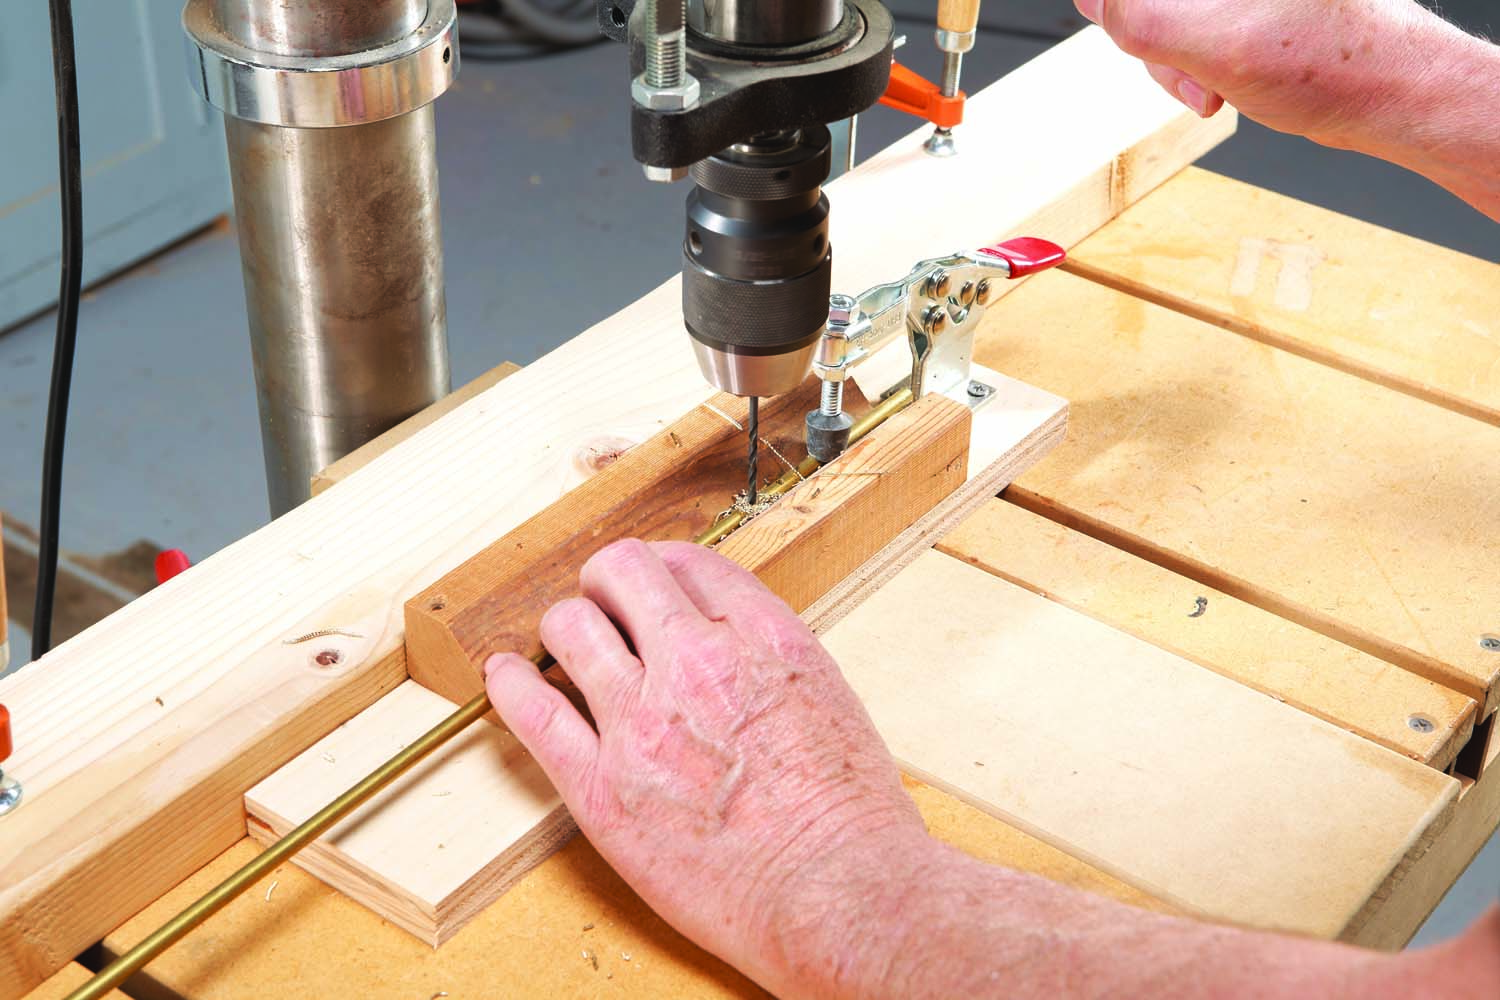
Photo 9. Fashion a distinctive handle from brass rod. First, drill two holes through 1/4″ rod. Tip: Use a V-block and a clamp to secure the rod and keep the holes aligned.
Start with the handle bar (X). Drill a pair of 1/8″ dia. holes all the way through the 1/4″ rod (Photo 9). Drill at slow speed (600 RPM), use light pressure and frequently back out of the cut to clear the shavings. Make sure your bit is sharp. In fact, just buy a new one. It’s cheap insurance.
Remove the drilled rod from the V-block and sand it smooth with 320-grit, then 600-grit and finally 1500-grit. You can stop at 600-grit if you like the brushed satin look or go past 1500-grit for an even higher polish. Cut the bar to length.
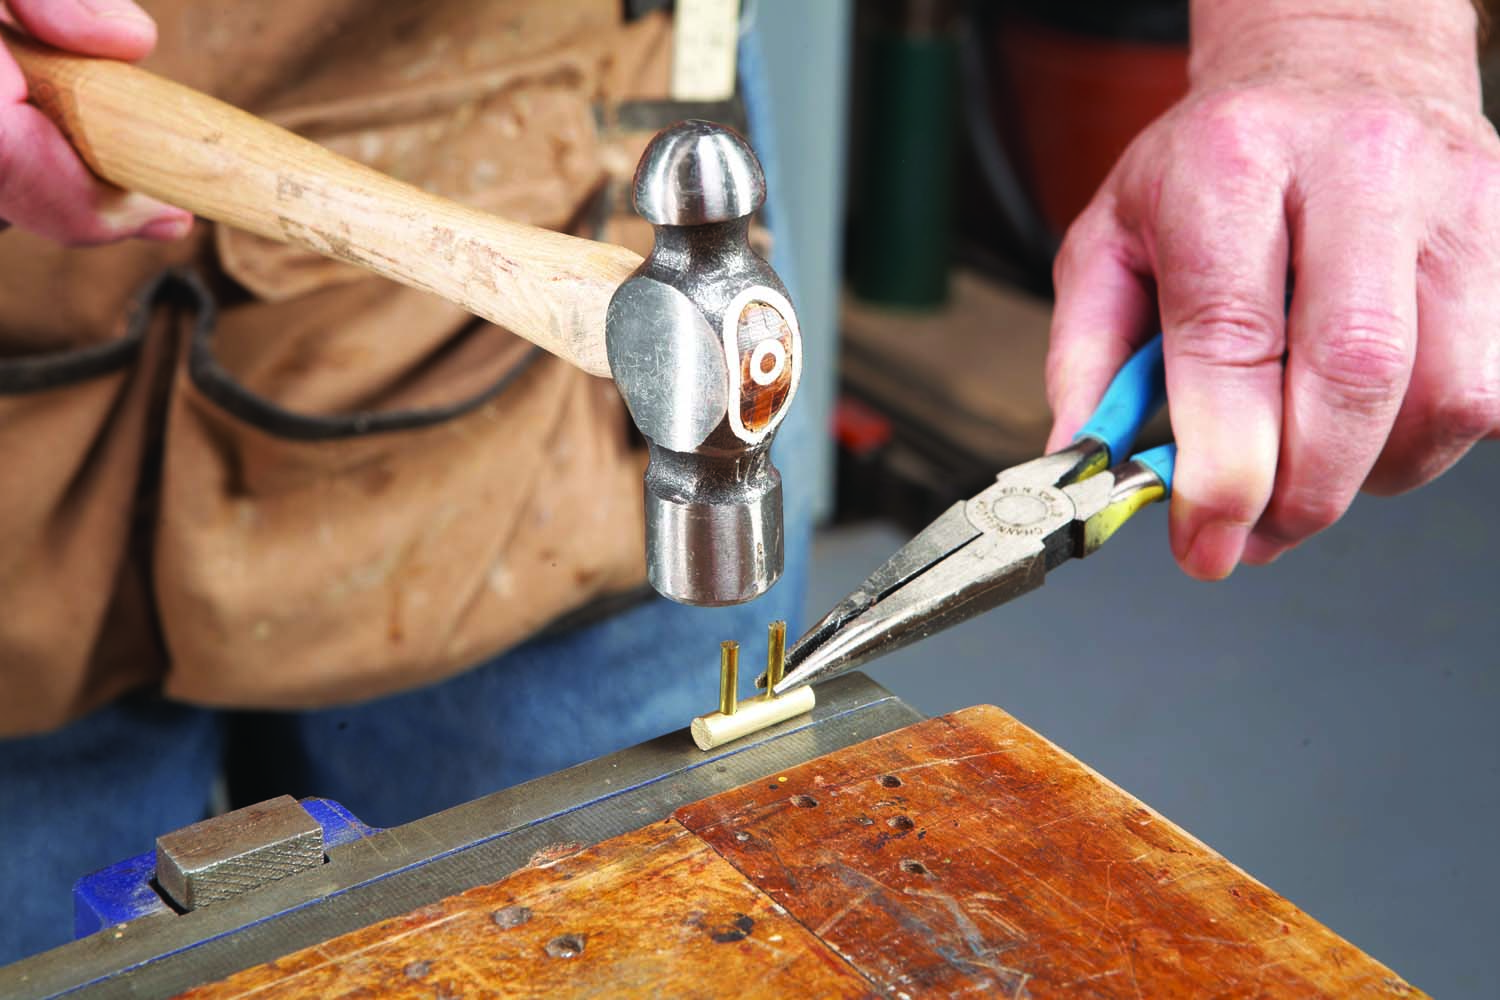
Photo 10. Peen 1/8″ brass rod stems to the handle on a hard surface such as a bench vise.
Cut the stems (Y) from 1/8″ brass rod and get them started into the holes in the bar. Then position the assembly on a hard metal surface, such as an anvil or the edge of a bench vise, and tap the stems into the bar until they bottom out on the vise (Photo 10). Then give each stem a couple sharp blows—this is called “peening.” Peening mushrooms the end of each stem and locks it in the hole. Note: Easy does it. Don’t peen so hard that you bend the stem.
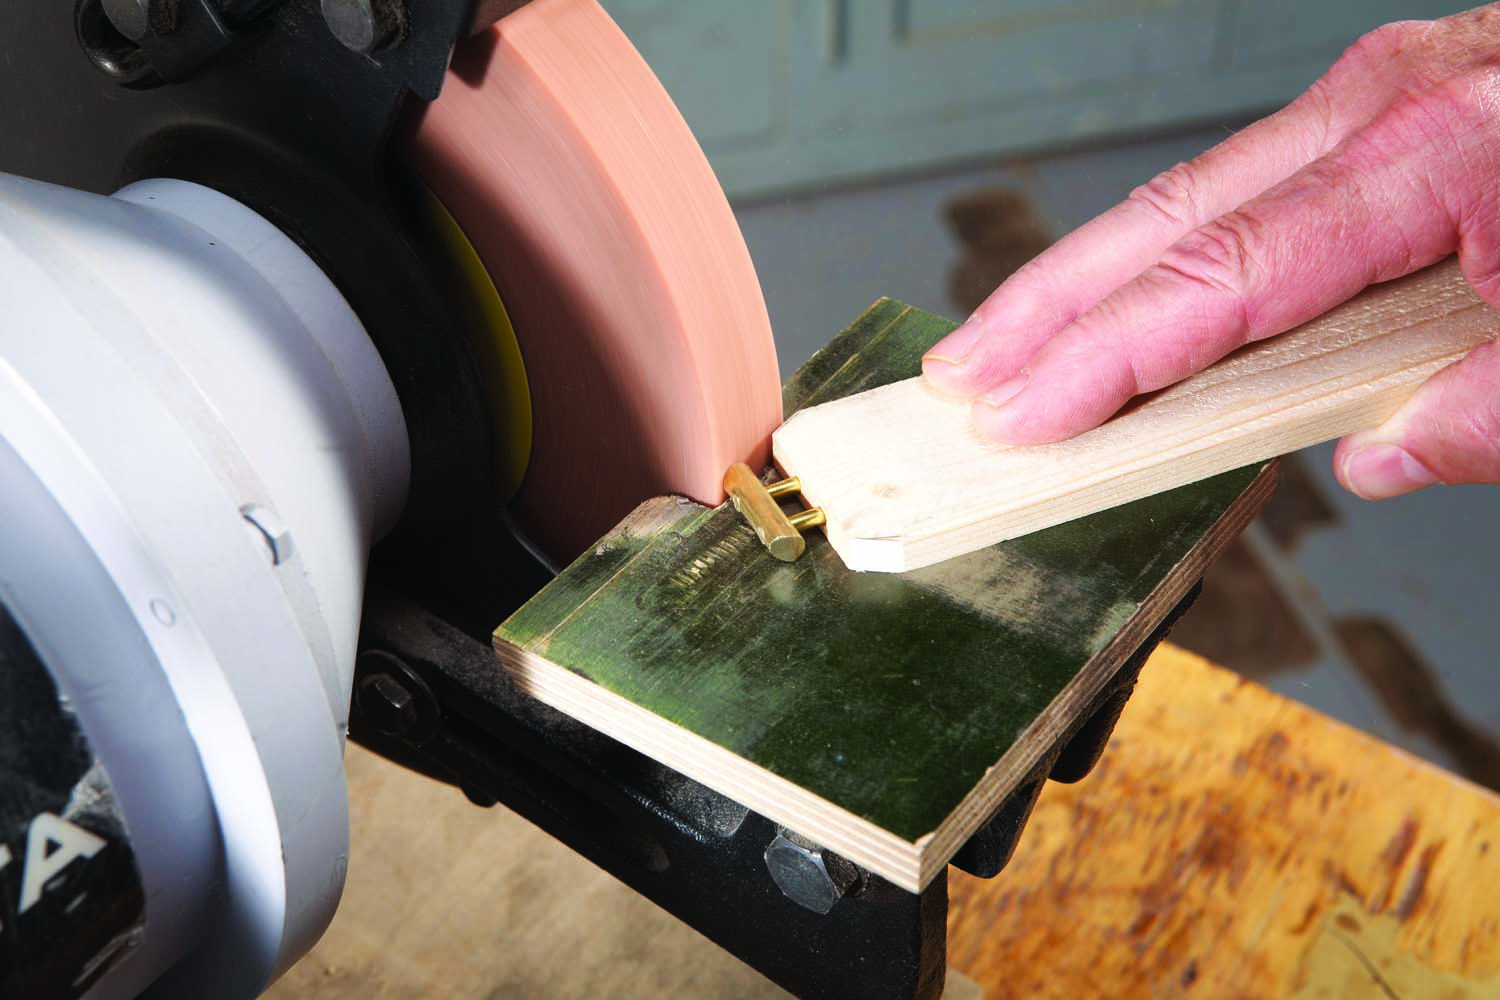
Photo 11. Bevel the ends of the handle after installing it in a 5/16″ scrap piece with holes drilled in the end. The 30° bevels on the corners help to position the lift for grinding.
Complete the handle by beveling the ends of the bar. I made a simple jig to hold the handle on the grinder (Photo 11). After grinding, polish the handle as necessary and set it aside.
Finish with a flourish
Sand all the parts to 220-grit and then apply your favorite finish. I used garnet shellac to enhance the color of the walnut and the rough texture of the fir.
Drill 1/8″ dia. holes in the lid and insert the handle. A couple light taps with a block of wood should securely seat it, but you can also use a bit of epoxy.
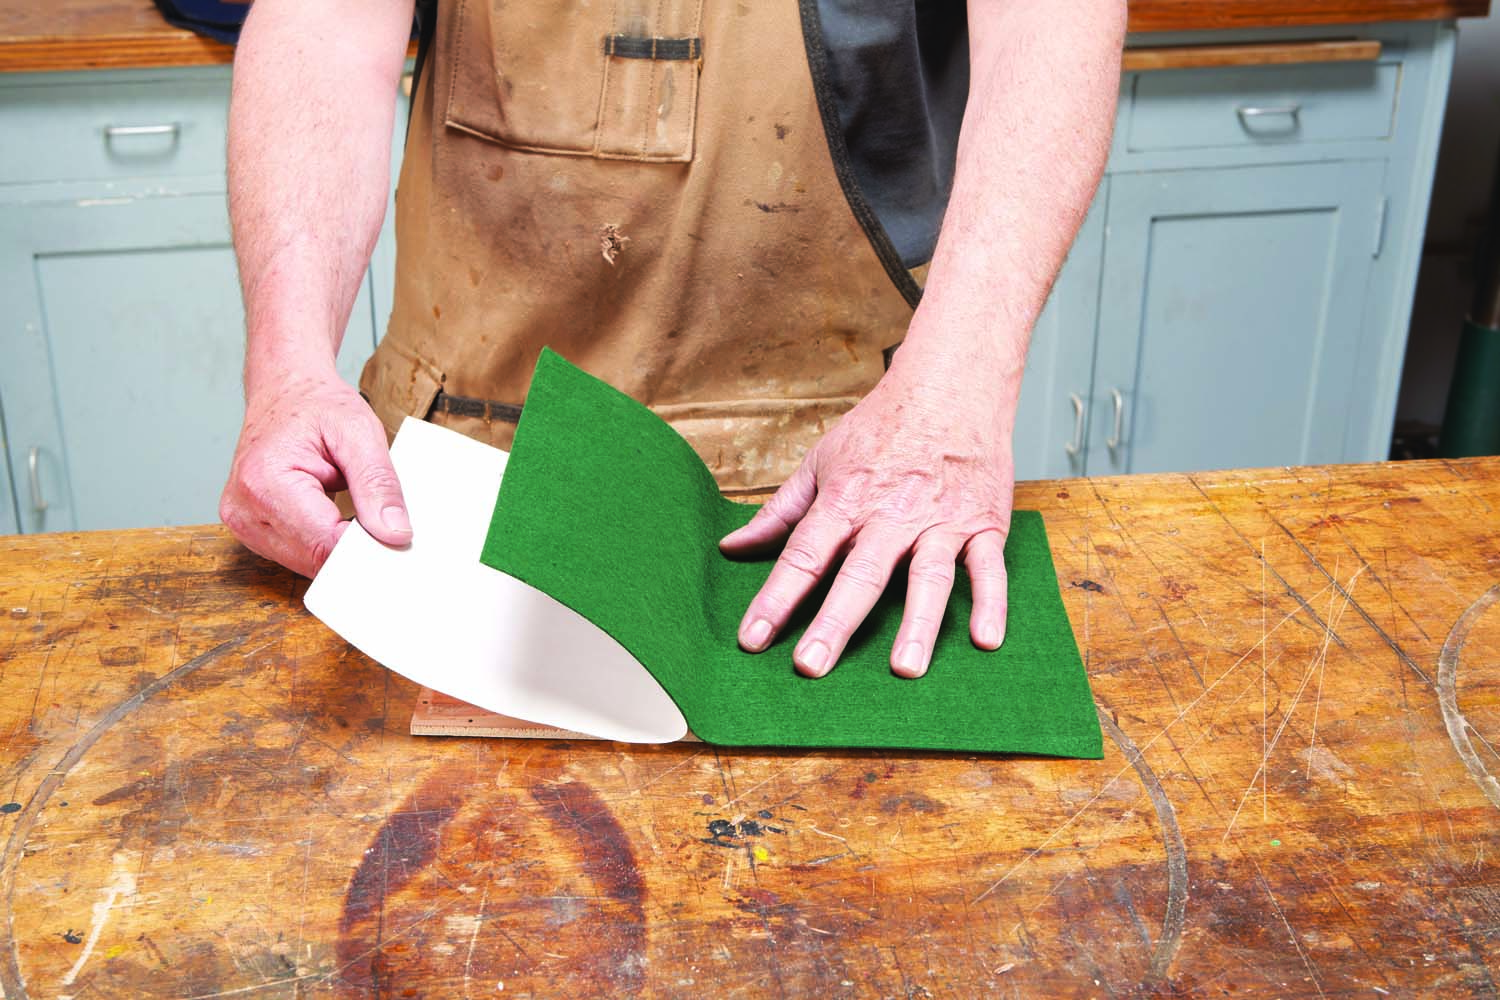
Photo 12. Press PSA-backed felt onto the box and tray bottoms. Position the felt carefully—when the adhesive makes contact, there’s no turning back.
Apply PSA felt lining to the box and tray bottoms. It’s easy to apply. Just be sure to carefully position the felt before you press it in place, as the adhesive is very strong. Cut the felt slightly oversize, peel of the first inch or so of backing and position the felt over the bottom. Press down the felt and pull away the protective sheet as you continue to adhere the felt across the entire bottom (Photo 12). If you misalign the felt, use mineral spirits to soften the bond and remove any adhesive residue. Let the spirits evaporate and try again. To cut the felt flush, turn each bottom piece felt-face down on a suitable cutting surface and use a utility knife with a sharp blade. Use 5/8″ x #4 screws to fasten the box bottom and 3/8″ x #1 screws to fasten the tray bottoms.
Bio
David Munkittrick is a professional woodworker and author living in River Falls, Wisc.
Here are some supplies and tools we find essential in our everyday work around the shop. We may receive a commission from sales referred by our links; however, we have carefully selected these products for their usefulness and quality.