We may receive a commission when you use our affiliate links. However, this does not impact our recommendations.
Learn how to make compound-angle dovetails building this handy stool and portable tool box.
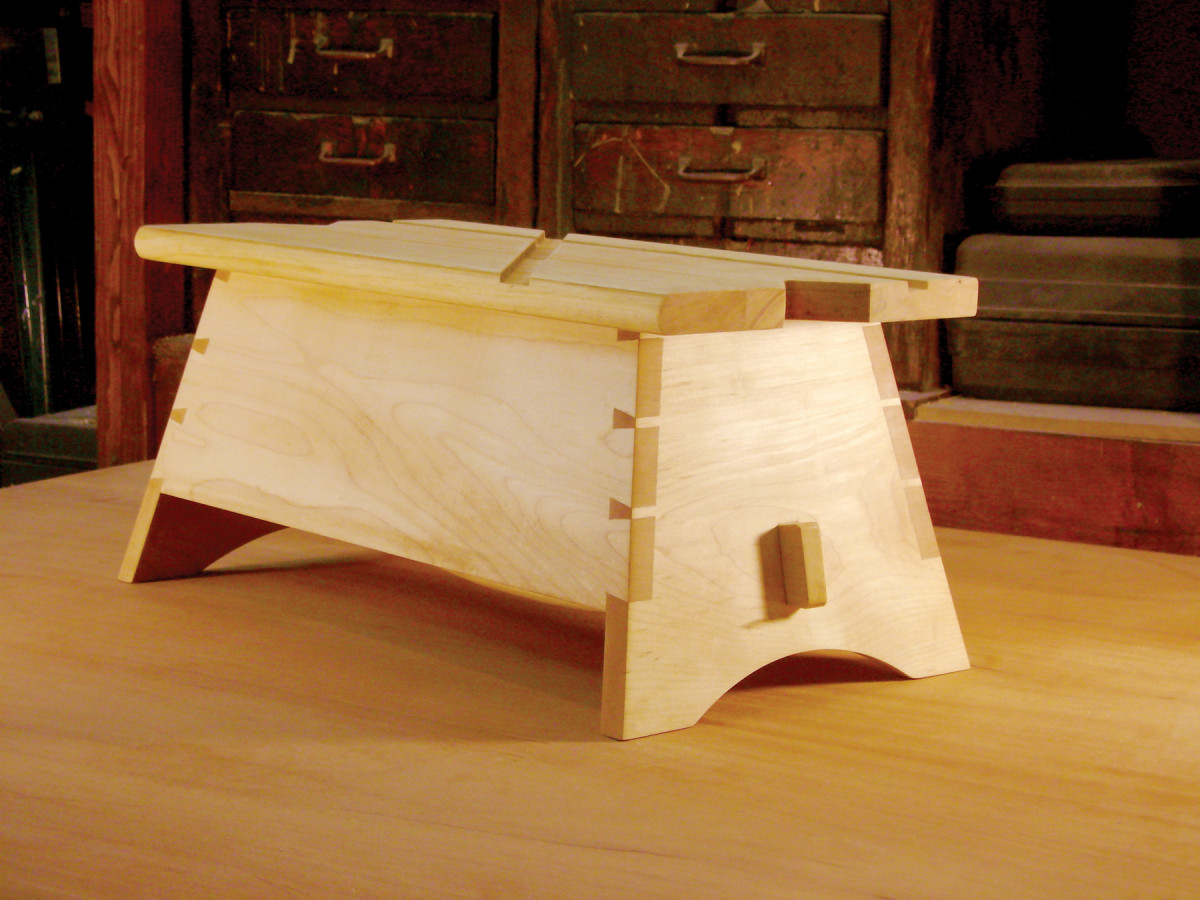
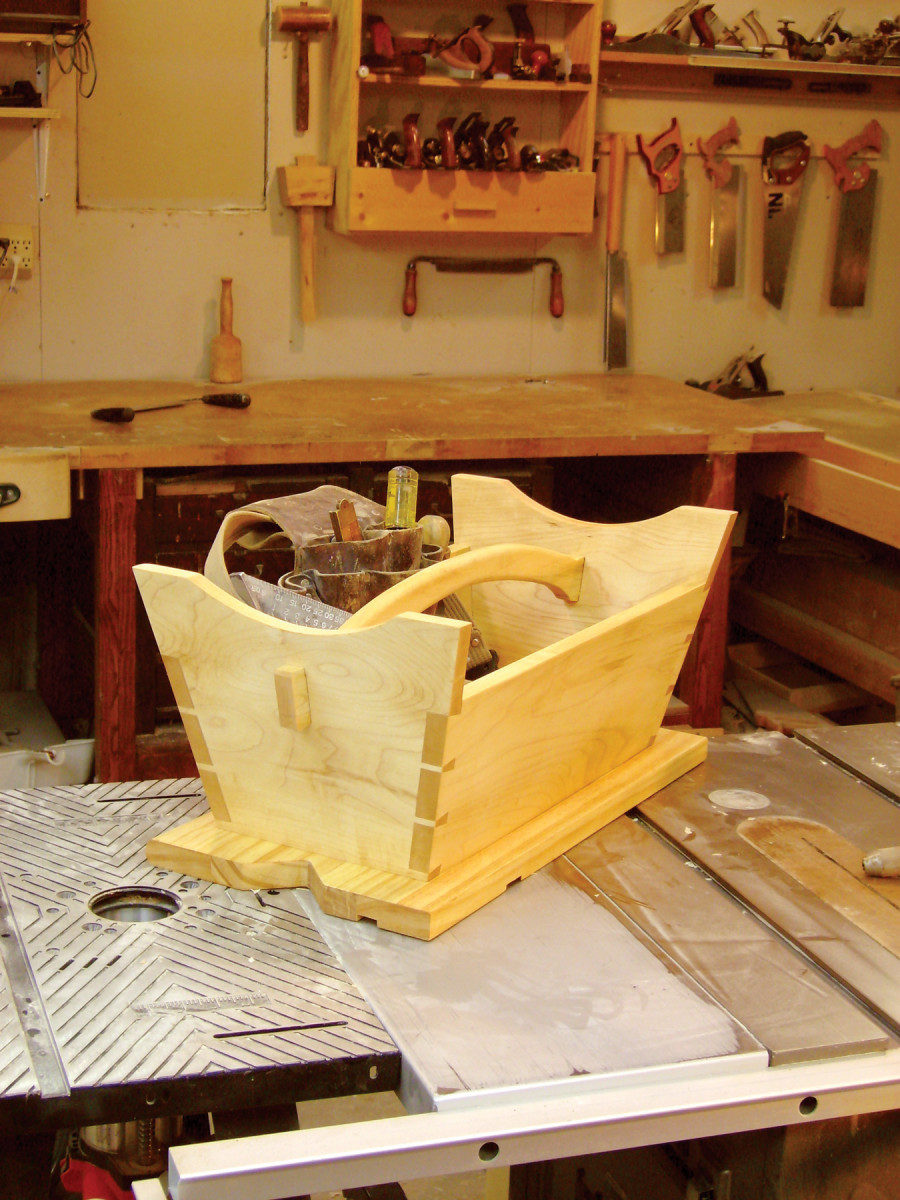
For my job as a trim carpenter and furnituremaker, I’ve always needed a sturdy stool to stand on. I’ve also wanted to make a nice box for carrying my tools and a small workbench for cutting molding. While perched on an overturned bucket one day, I thought, “Why not combine all three?” The StepBox was born.
The StepBox has splayed sides for stability, ample room for my tools, and grooves and notches in the top for holding pieces of molding and drilling holes.
Building the StepBox gave me an opportunity to learn how to make a challenging joint: the compound-angle dovetail. While I could have merely screwed the parts together, I wanted a stronger joint. Dovetails are definitely the way to go. When I stand on the stool, the joints actually tighten. This project is built to last!
Chad’s StepBox Cut List
Overall Dimensions: 10-1/2″ H x 22″ L x 12-1/2″ D
|
Part |
Name |
Qty. |
Material |
Th x W x L |
|
A |
Top |
1 |
5/4 Pine |
1″ x 11-1/2″ x 22″ |
|
B |
Side |
2 |
Maple |
3/4″ x 7-1/4″ x 20-3/4″ |
|
C |
End |
2 |
Maple |
3/4″ x 10″ x 12-1/2″ |
|
D |
Handle |
1 |
Maple |
3/4″ x 3-1/4″ x 22-3/4″ (a) |
|
E |
Wedge |
2 |
Maple |
3/4″ x 3/4″ x 2-3/4″ (a) |
|
F |
Cleat |
2 |
Maple |
3/4″ x 1-1/4″ x 7-1/2″ |
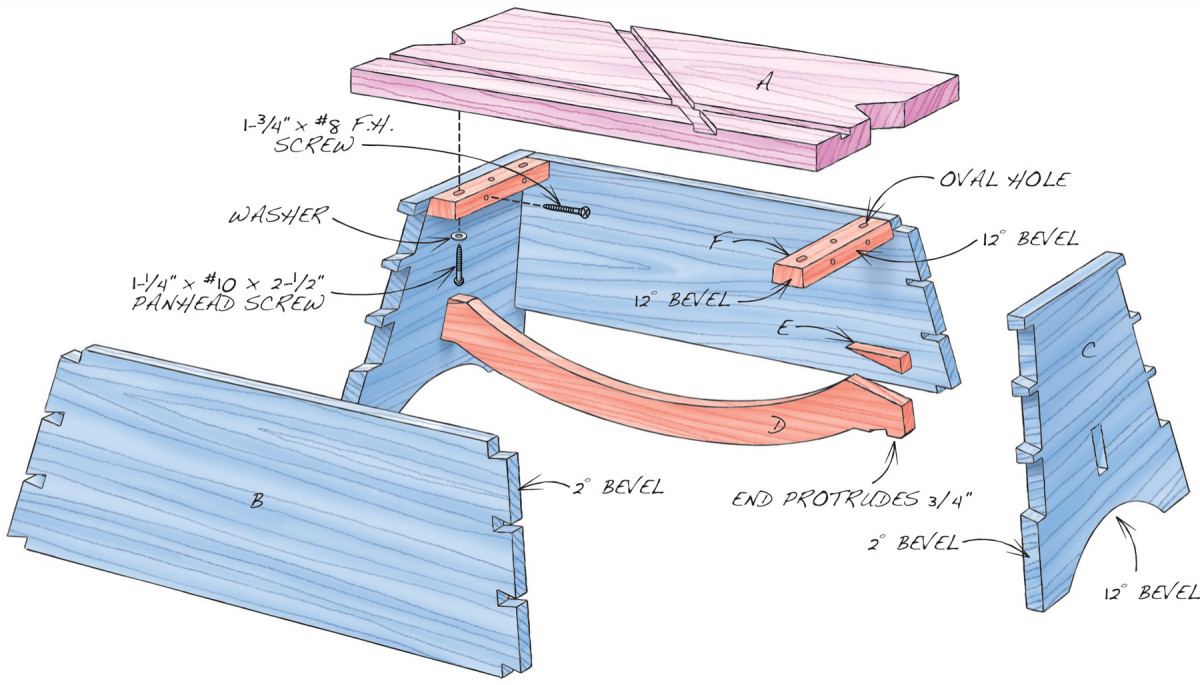
Fig. A) Exploded View
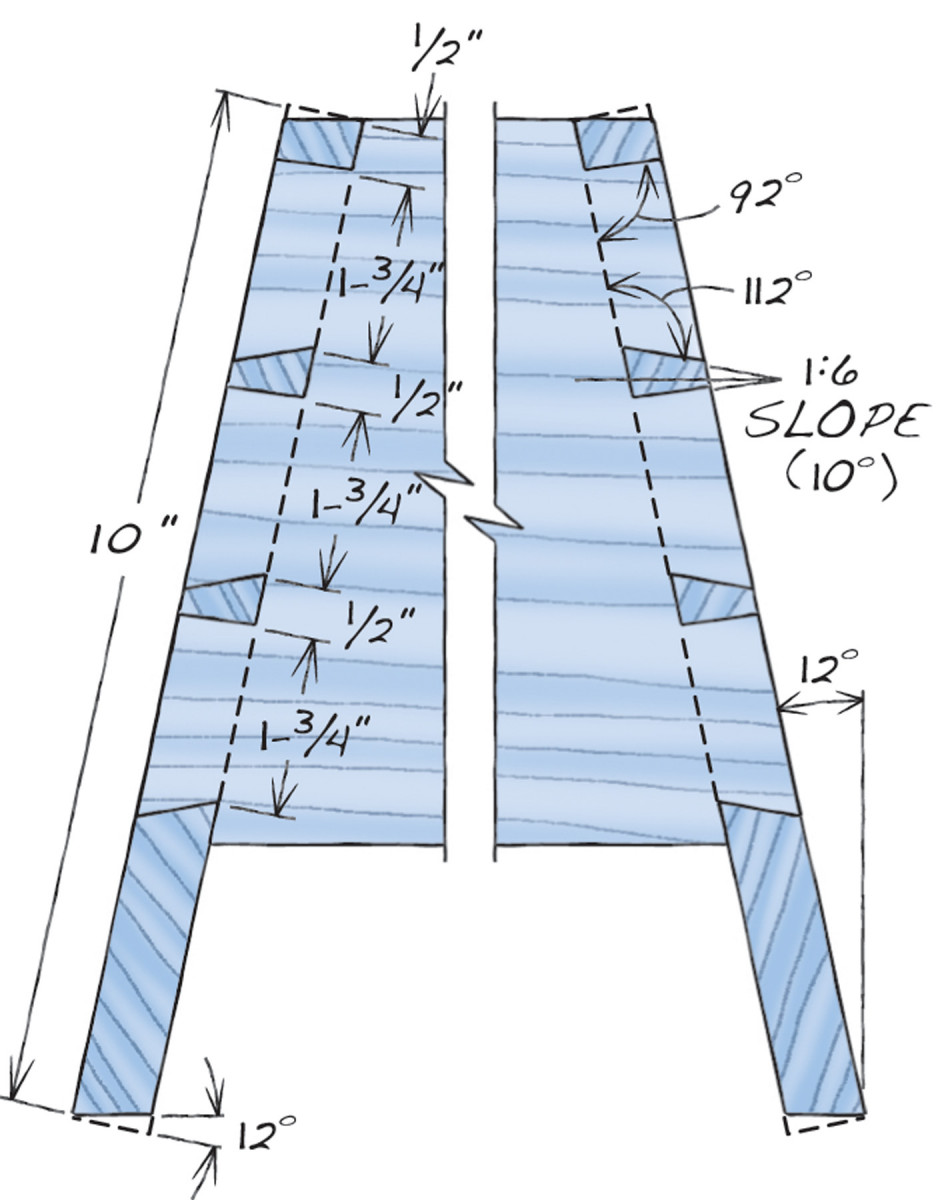
Fig. B) Pin Layout
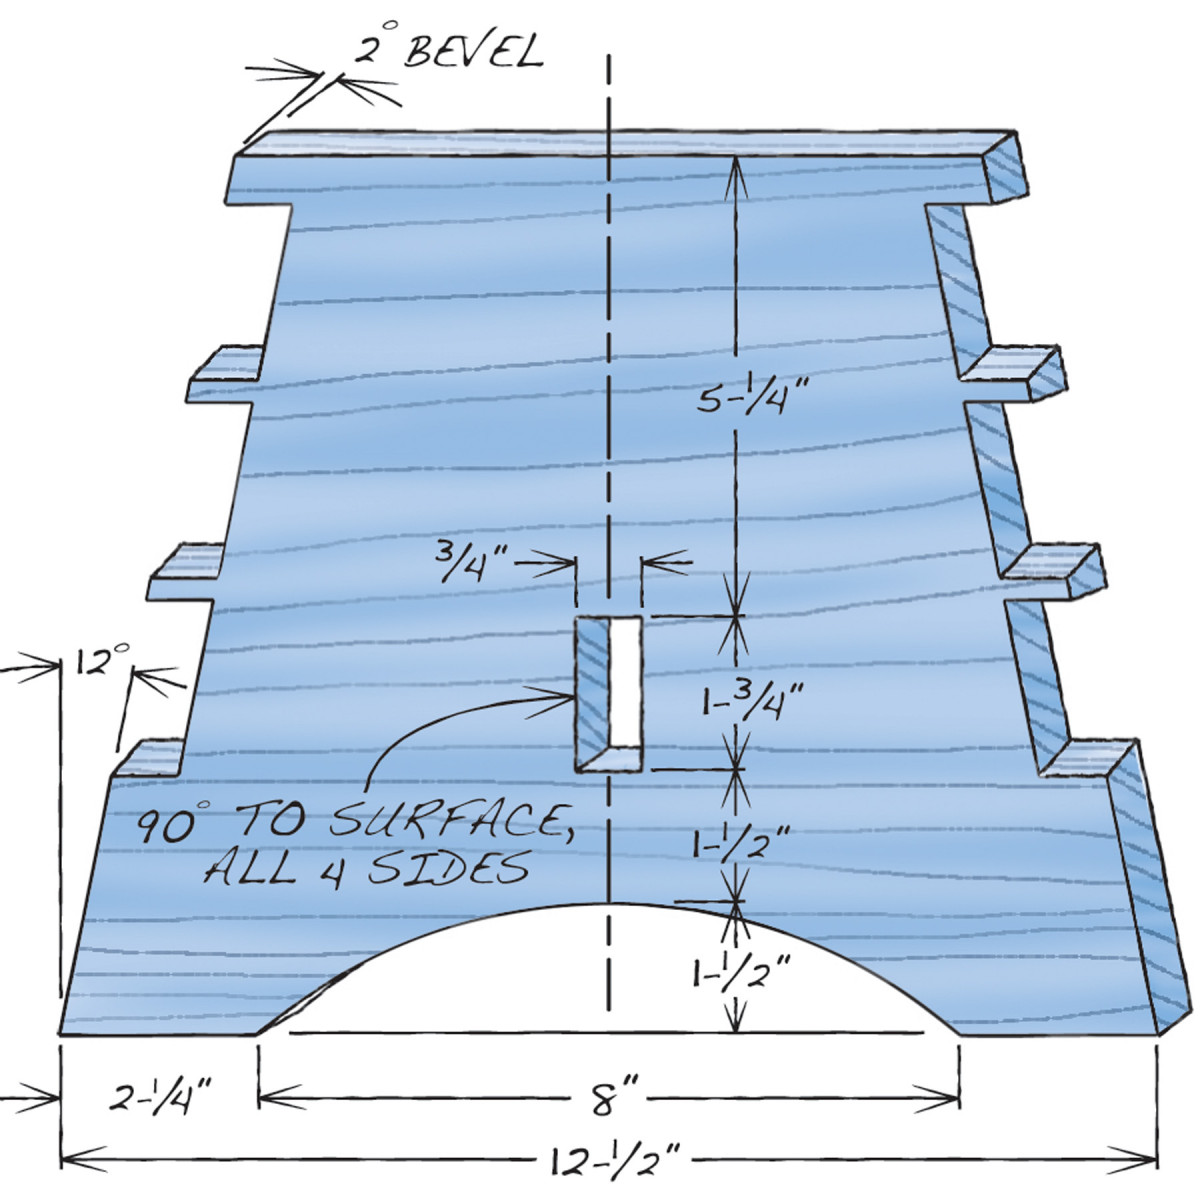
Fig. C) End View
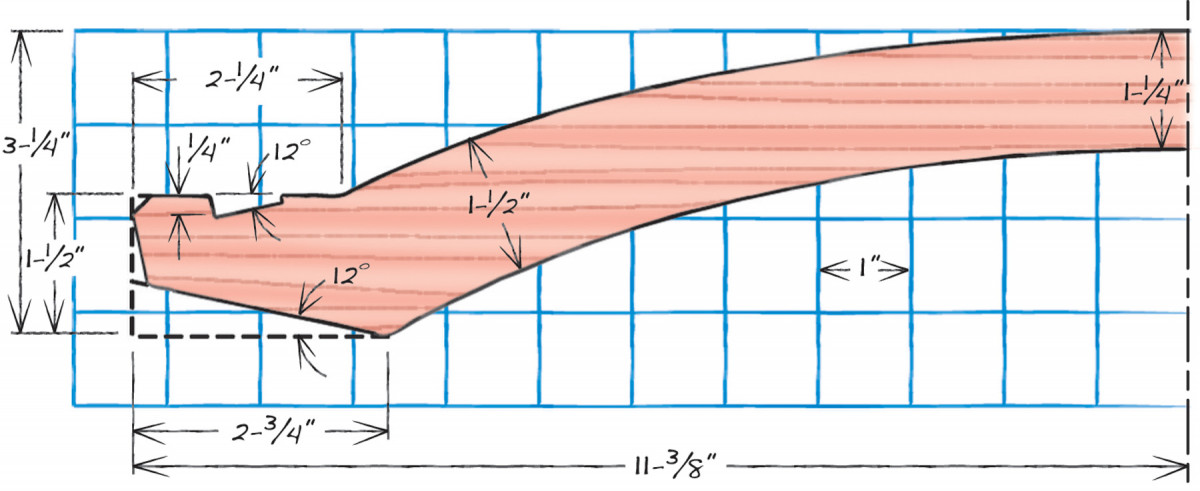
Fig. E) Handle and Wedge
Compound-Angle Butt Joints: The Setup Block
Most Butt joints are easy to make. A box with four square sides only requires 90° cuts, right? But if the sides slope, like a pyramid, these pieces have to be cut at a compound angle.
Take my StepBox, for example. All four pieces of the base splay outward at the same angle—12°. Their ends are cut with a 12° miter and a 2° bevel.
Let’s say you wanted to make a box with a 20° splay. Obviously, the bevel angle would be different—but how would you figure out what it is?
Well, you don’t have to consult a chart. For a 20° splay, you just have to make a 20° setup block. And for a 12° splay, you’d make a 12° block. Following the steps below, you can make a setup block to give you the correct bevel for any compound-angle butt joint.
Make the block from a squared-up 2×4, or from any piece of wood that’s at least 1-1/2″ thick and about 12″ long. I make my setup block by gluing up three pieces of 3/4″ plywood. With plywood, I don’t have to joint or plane the block, and I create a lip that helps orient the block through the cutting process.
To make the block, cut one piece of plywood 3″ x 12″. Cut two pieces 2 – 1/2″ x 12″. Glue them together in a stack. The sides and ends of the three pieces don’t have to be perfectly aligned; close is good enough.
Step 1. Rip the setup block at the angle that the sides of the box will splay. In this step and the ones that follow, note which way the block’s lip faces.
The next steps depend on whether your saw’s blade tilts left (away from the fence) or right (toward the fence). In the photos, I’m using a left-tilt saw.
Step 2. Crosscut one end of the block. Leave the blade tilted at the same angle as Step1. The miter gauge is set at 90°. Once the block is cut, you’re ready to set up your saw for cutting compound-angle butt joints.
• For a left-tilt saw: Tilt your tablesaw blade to the splay angle of your project. Rip the block, running its lip against the fence (Step 1). Next, crosscut the block (Step 2). Finally, turn your miter gauge counterclockwise to the splay angle. Rotate the block 90° and butt its end up to the blade (Step 3). Tilt the blade to match the angle of the block. This will be the bevel angle for the compound cut.
Step 3. Set the miter gauge to the splay angle. Rotate the setup block 90° and place the freshly-cut end of the block against the blade. Tilt the blade until it matches the block’s angle—this is the bevel angle of the compound cut.
• For a right-tilt saw: Tilt your tablesaw blade to the splay angle of your project. Place the saw’s fence on the left side of the blade. Rip the block, as in Step 1 above, running the lip against the fence. Next, place the miter gauge in the left miter slot. With the lip in front, as in Step 2 above, crosscut the block. Finally, turn your miter gauge clockwise to the splay angle. As in Step 3 above, rotate the setup block 90°, so the lip is up, and butt the end of the block to the blade. Tilt the blade to match the angle of the block.
Materials
I made the base and handle of my StepBox from 3/4″ hard maple. As you know, this wood is very strong. It can easily take my weight and more when I stand on the stool. Maple is also a good choice for dovetailing. Pencil lines are easy to see, and it cuts and pares cleanly, without splintering. But because it’s so hard, I have to keep my saw and chisels extra-sharp.
I made the top from a 1″ thick stair tread. It’s Southern yellow pine—a tough wood, like maple, but not as heavy. The top must withstand a lot of wear and tear (I may even drill into it occasionally), so I used a piece of wood that would be easy and inexpensive to replace.
The challenge
The StepBox’s base splays 12° in both directions. It won’t tip over, even when I stand with my feet right on the edge. The splay also makes it easier to fish out tools from the box and drop them back inside.
Creating this splay is quite interesting: You must cut the ends of all four base pieces at a compound angle. You might think that merely mitering the pieces at 12° would do the trick. It doesn’t. In order for all four pieces to butt together, you must bevel their ends at 2° as well.
These compound angles can make your head spin. But you won’t go wrong if you follow my technique. Even so, I strongly suggest that you make a complete base from scrap wood first, to familiarize yourself with each step, before cutting into your expensive maple.
Cut the compound angles
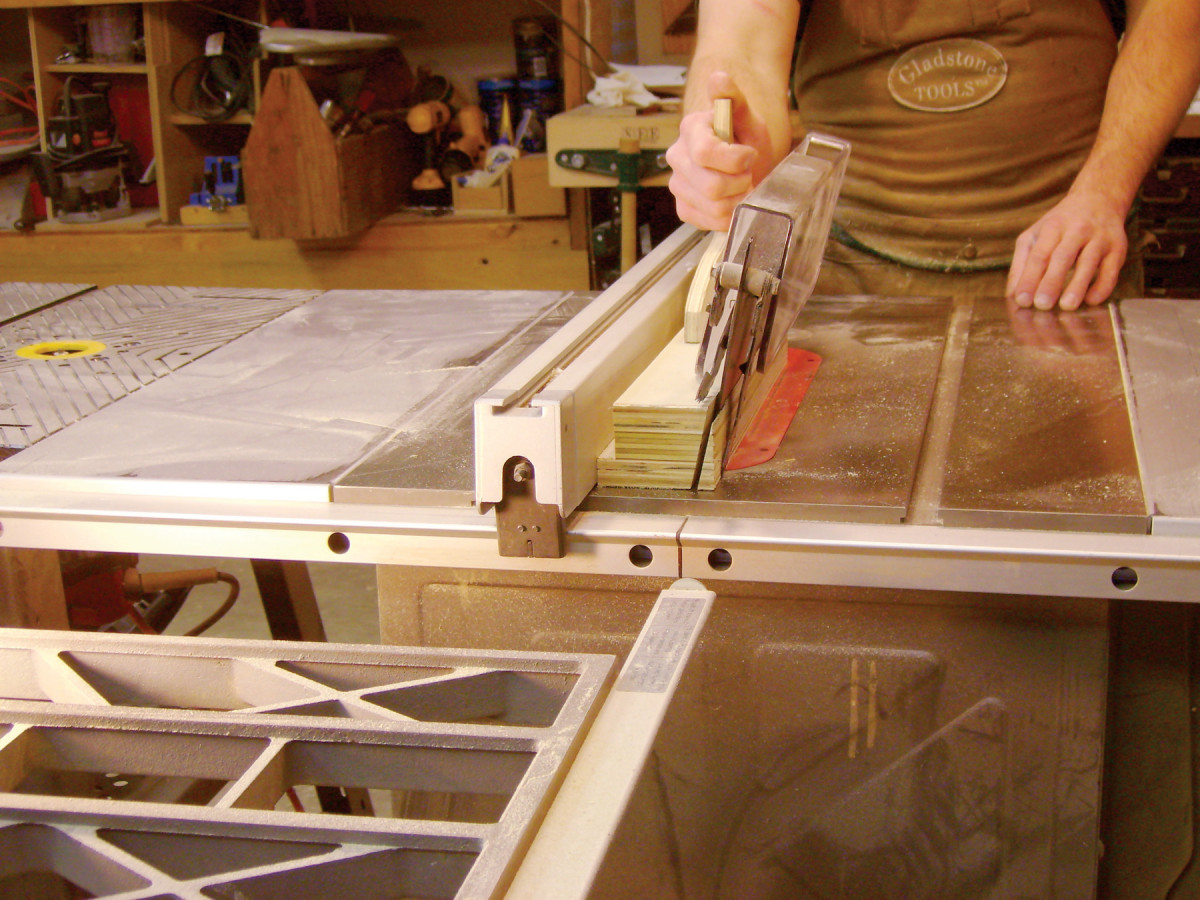
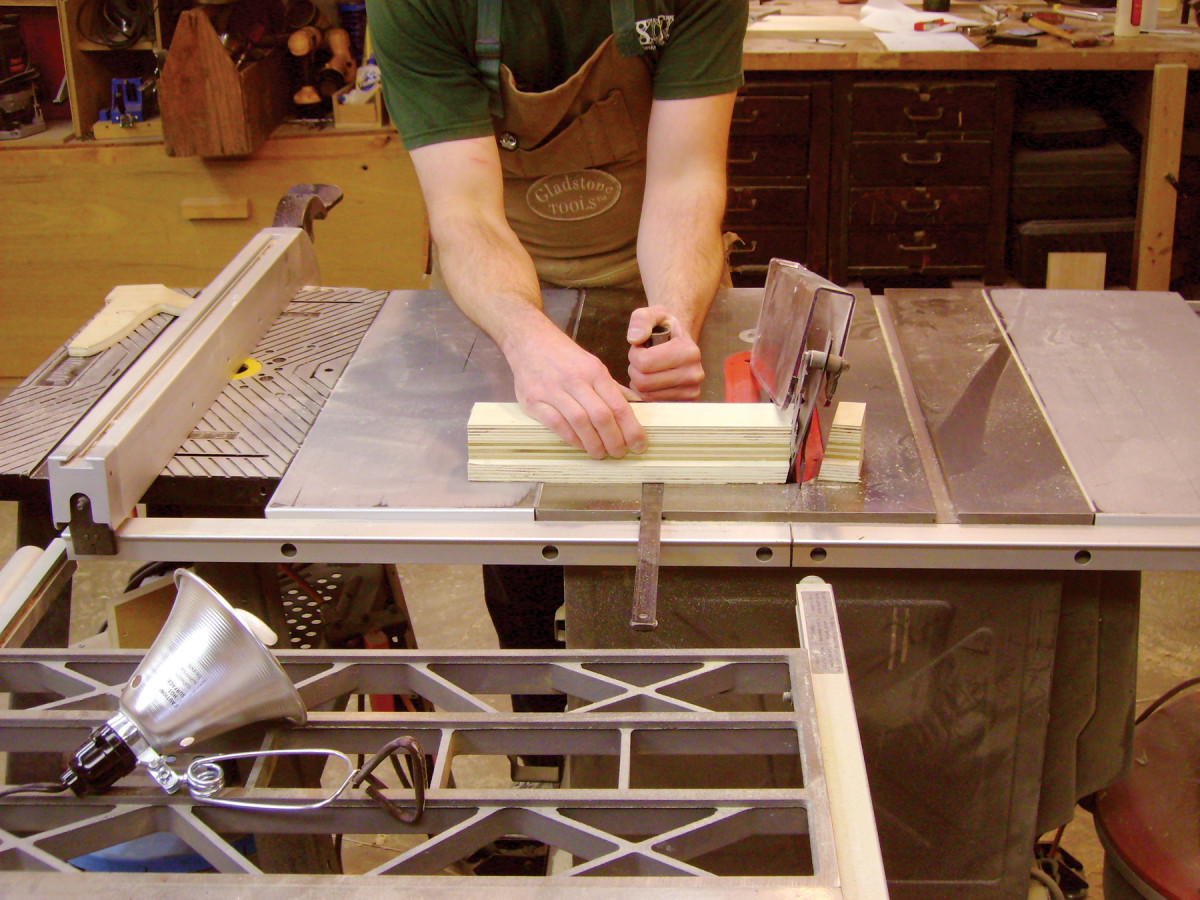
1. Rip 12° bevels on the long edges of the side and end pieces. Note that both edges are beveled, and that the bevels lean the same way.
Joint and plane the sides (B) and ends (C) to final thickness. Crosscut them about 1″ extra-long and rip them about 1/4″ extra-wide. Tilt the blade of your tablesaw to 12° and rip one long edge of each piece. Flip each piece over and rip it to final width (Photo 1). I clamped a board to my fence so the bevel didn’t get trapped under the fence.
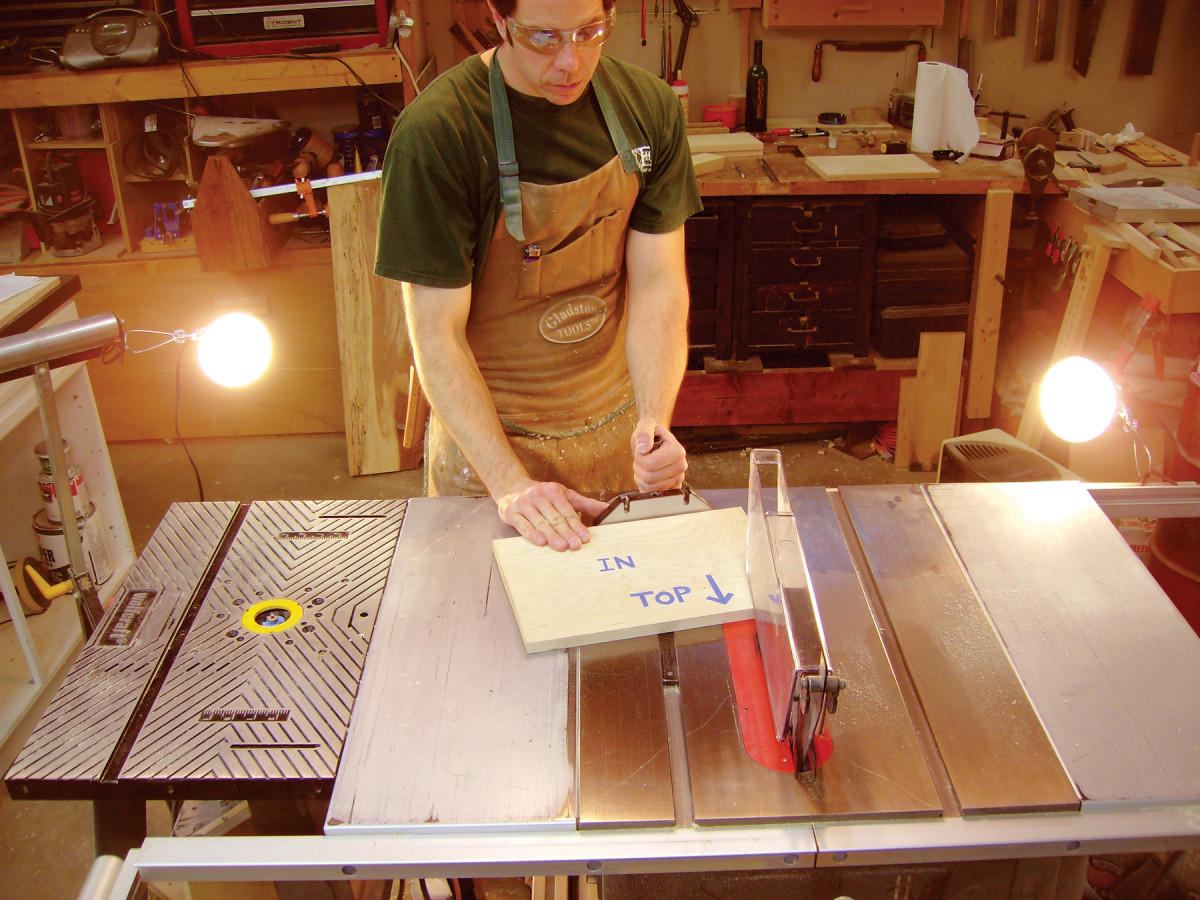
Mark your pieces well. Stand each board on edge, long side down, so you can clearly see which way it leans. Think of the board as one face of a pyramid with its top cut off, as shown in Fig. A. Using a carpenter’s pencil, write Top—In and Top—Out in big, bold letters on both sides of each piece.
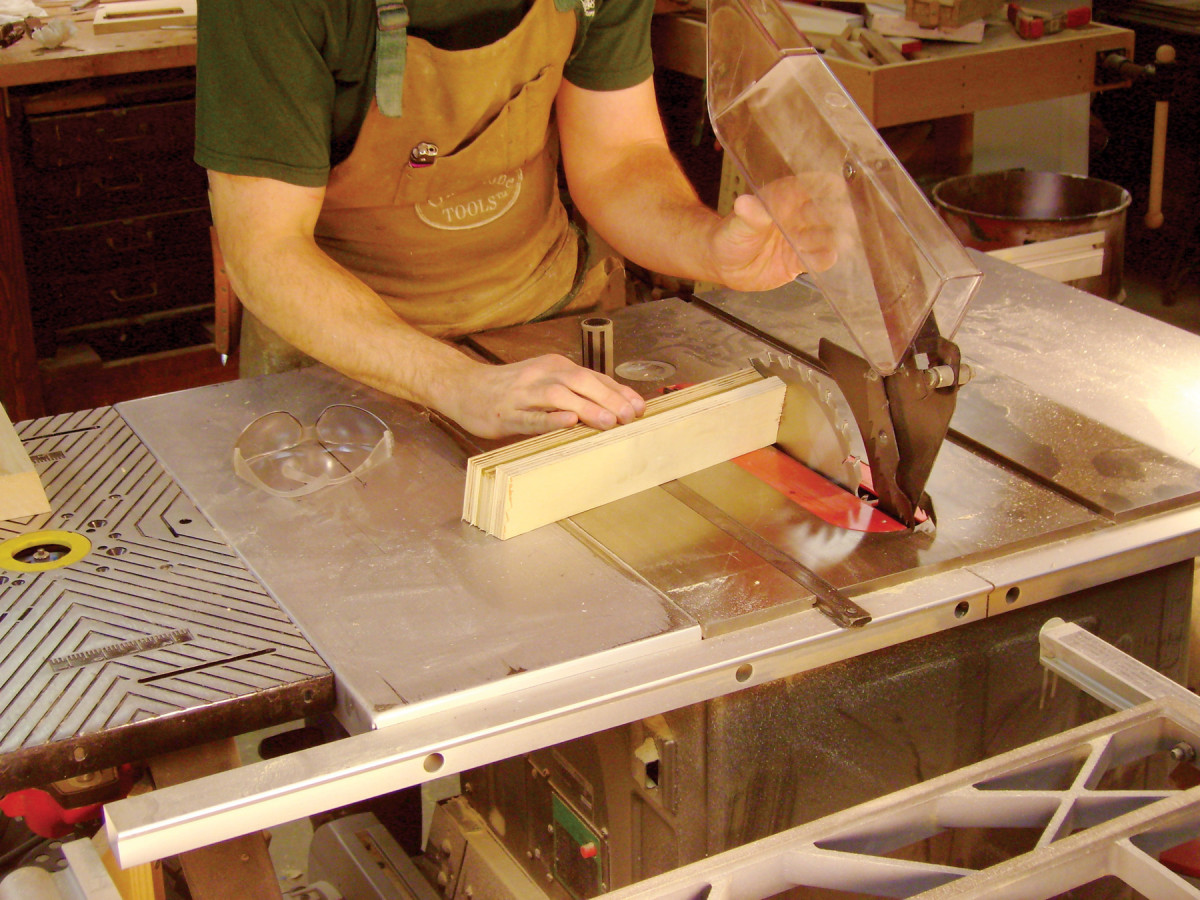
2. Saw an angled end on each piece. This is a compound cut: The miter gauge is set at 12°; the blade is tilted to 2°. (See “Compound-Angle Butt Joints”, next page.) The inside surface of the board must be facing up.
Get ready to make the first cut on the end of each board. The procedure to follow depends on which way your sawblade tilts:

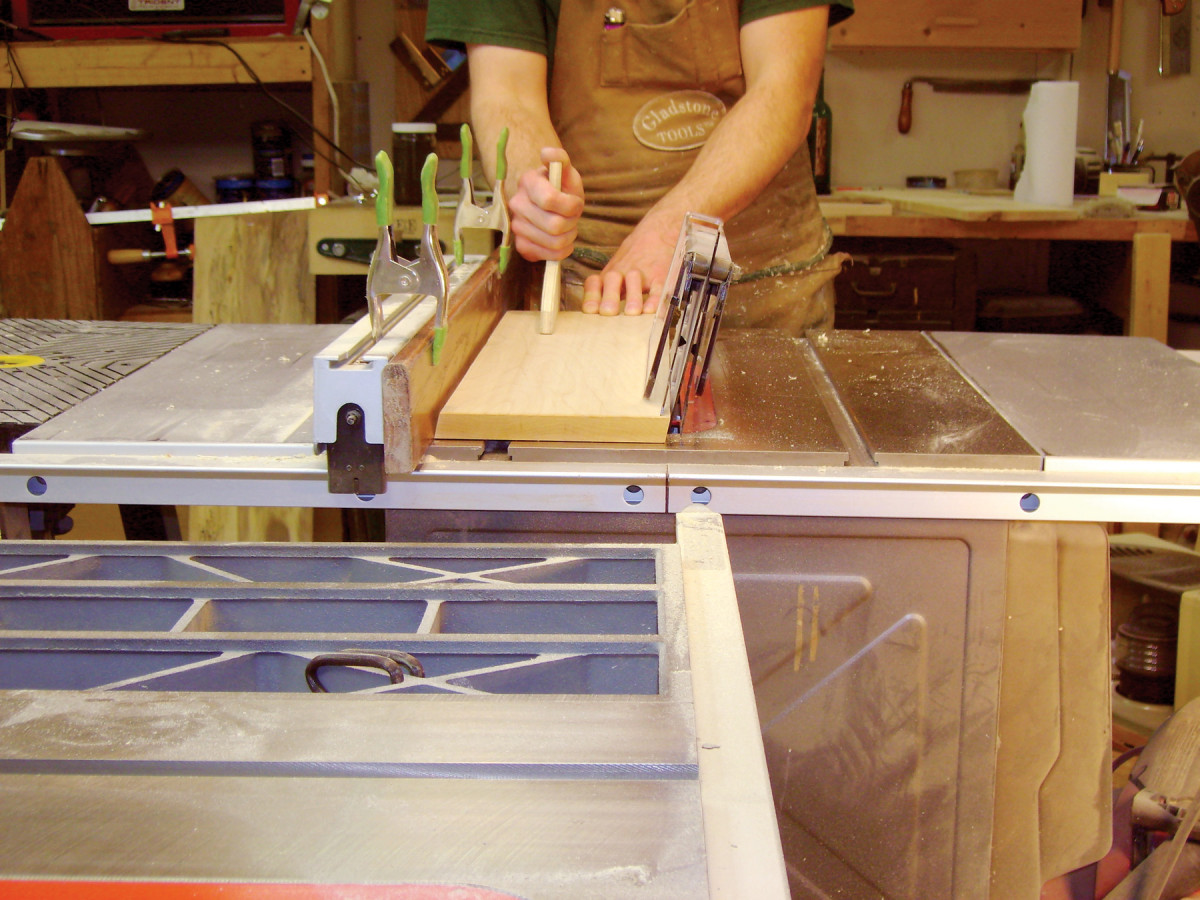
3. Make the second cut on the other side of the blade. Leave the miter gauge and blade at the same settings, but flip over the workpiece, so the outside surface is facing up.
• For a left-tilt saw: Place your miter gauge in the right-hand slot. Rotate its head counterclockwise to make a 12° cut (Photo 2). (Depending on how your gauge is marked, the reading will be 12° or 78°.) Tilt the blade to 2°. Place each board so the In side faces up and the Top edge faces away from you. Cut the end. Repeat this process for each board. To cut the opposite ends, move the miter gauge to the other side of the blade (Photo 3). Fasten a fence to the miter gauge, so you can screw or clamp a stop block to it. (You’ll need the stop block to ensure that matching pieces are cut the same length.) Flip over each board so the Out side faces up and the Top edge butts against the miter gauge. Make the cuts.
• For a right-tilt saw: Place your miter gauge in the right-hand slot. Rotate its head clockwise to make a 12° cut (the opposite direction from the one shown in Photo 2). Tilt the blade 2°. Place each board so the Out side faces up and the Top edge butts against the miter gauge. Make the cut. For the second cut, move the miter gauge to the left-hand slot. Flip each board so the In side faces up, and Top edge faces away from you.
Cut the dovetails
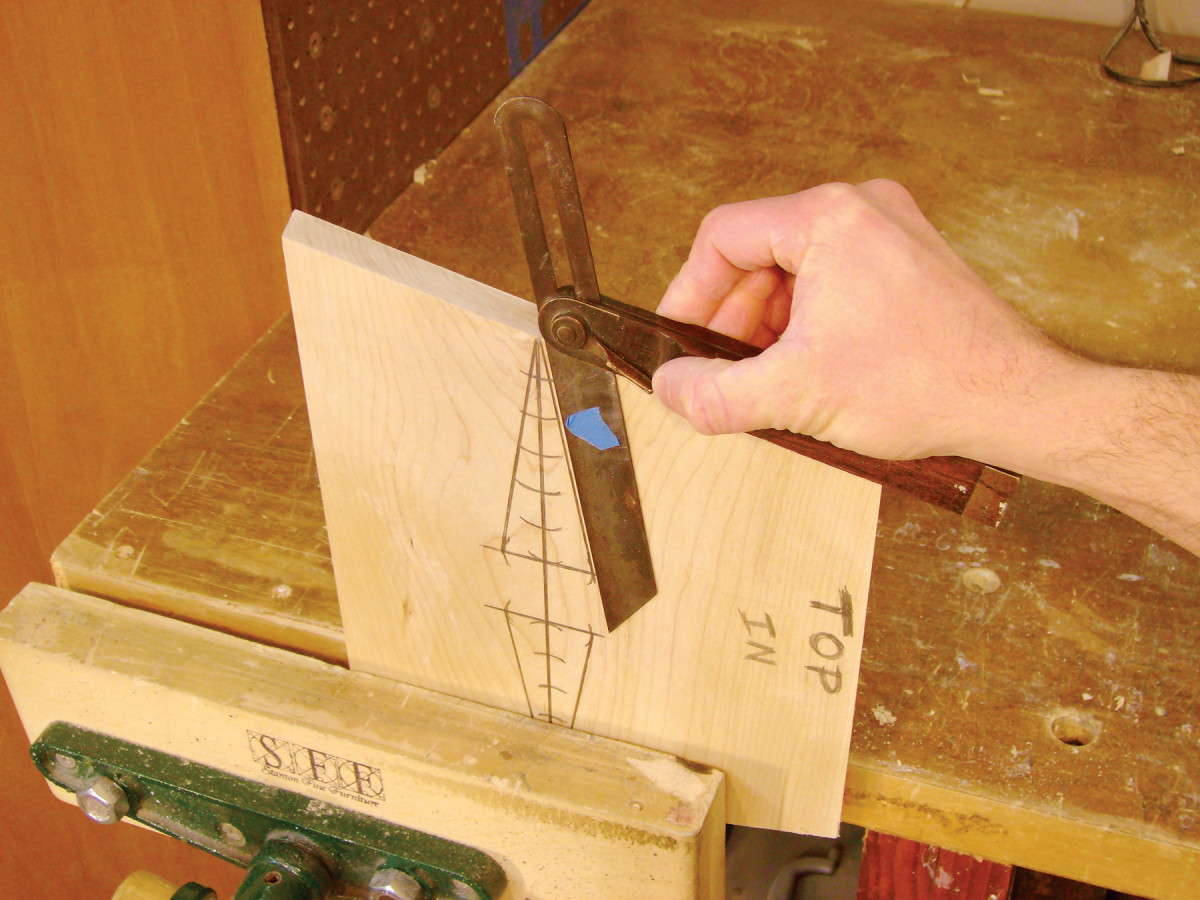
4. Lay out the dovetails. Start with the pins. First, draw a large triangle on the board that indicates the pitch of the dovetails. Set your sliding bevel directly from the triangle.
If you thought the angles are tricky so far, just wait! Laying out these dovetails can make your eyes go crossed—the angles just don’t look right when you first draw them. Fortunately, I used a foolproof system for drawing the dovetails. Let me quickly show you how it works, and then we’ll move on.
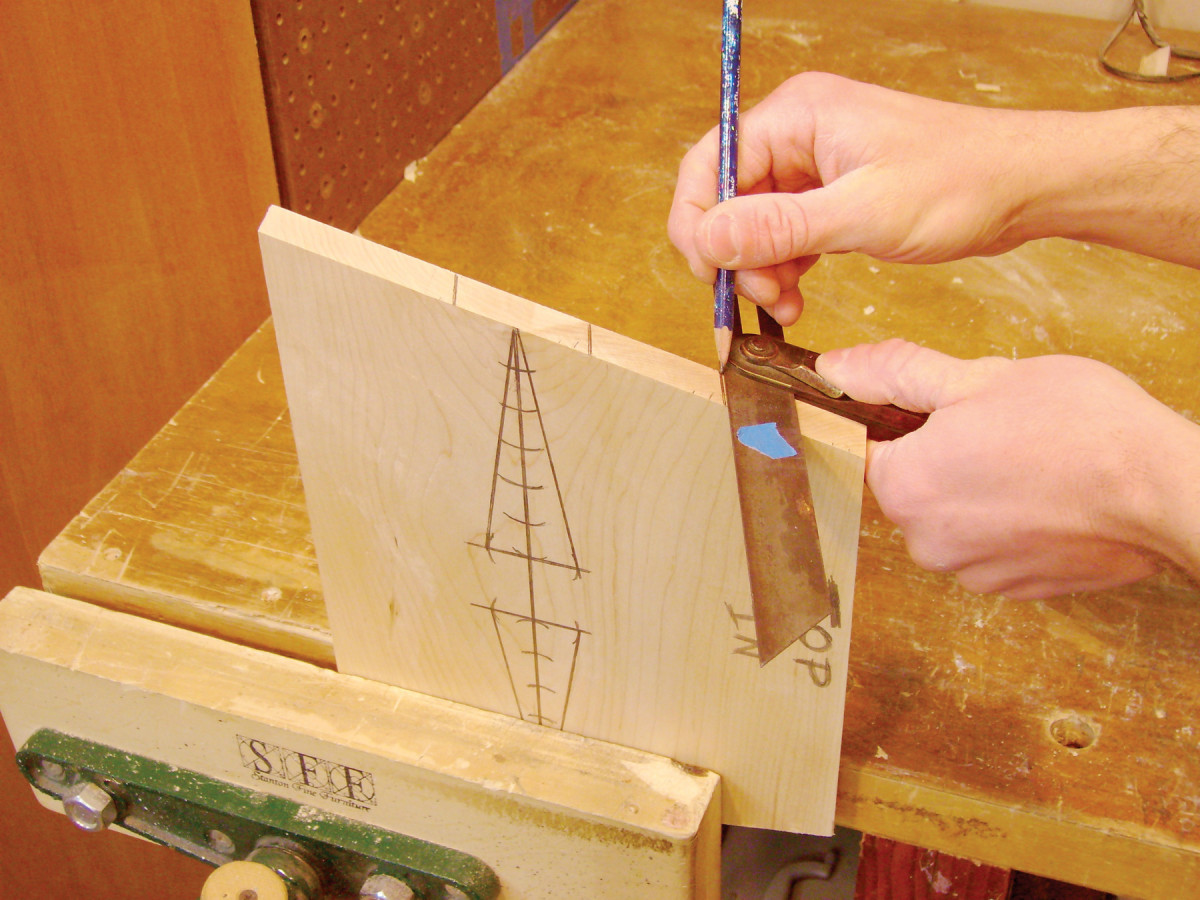
5. Transfer this angle to the end of the board. The right side of the triangle shows the correct angle for the right sides of the pins.
Lay out the pins first (Fig. B). Draw a pair of large triangles on the inside face of each end board. The long sides of the triangle represent the pitch of the dovetails (in this case, the familiar 1:6 ratio). Place a sliding bevel on the face of the board and set it to match the right side of the triangle (Photo 4). Place the square on the end of the board and draw the right side of each pin (Photo 5).
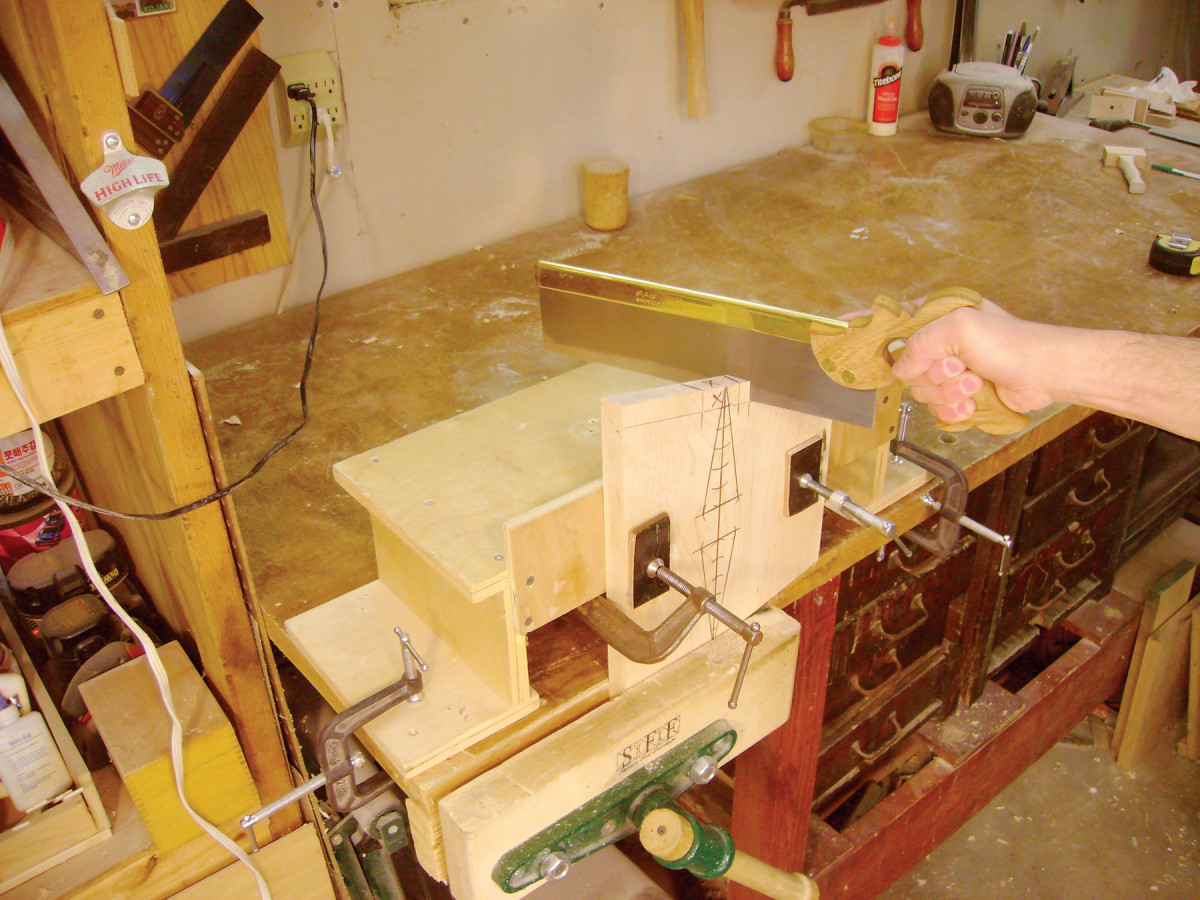
6. Saw the pins. This is a bit trickier than sawing standard dovetails. Every cut is a compound angle—it leans two ways. I use an auxiliary support to raise the workpiece and to keep it from chattering.
Reset the sliding bevel to the left side of the triangle to draw the left side of each pin. That’s the gist of it.

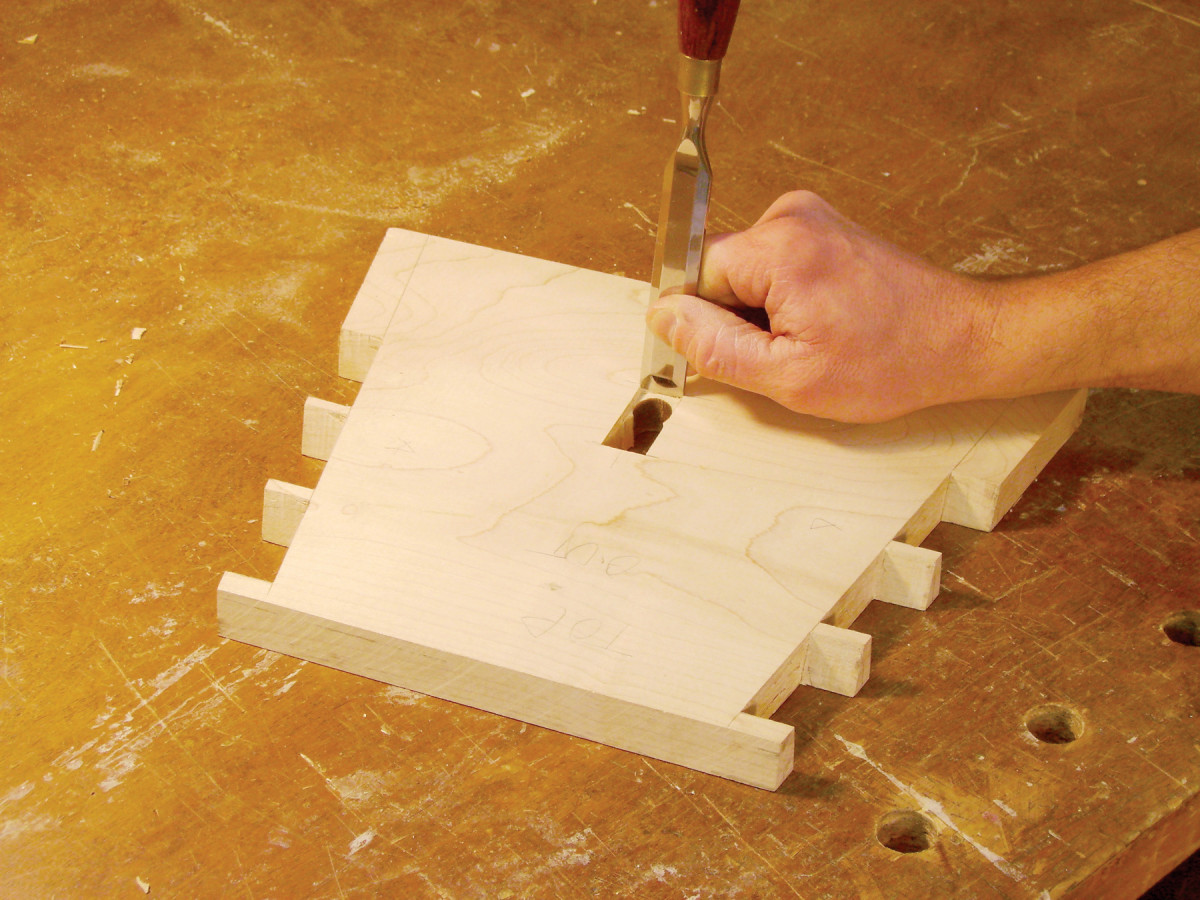
7. Draw around the pins to mark the tails. Sawing and chopping out the tails is no different than making standard tails, but once again, these will all be compound angles.
If you’ve made through dovetails before, the rest is pretty standard. I won’t claim it’s easy—just familiar. You saw and chop the pins (Photo 6), then lay out, saw and chop the tails (Photo 7). Accurate layout is the key to the whole process.
Mortises and arches
Before assembling the base, drill and chop mortises for the handle (D, Fig. C). Although the base has a 12° splay, the top and bottom walls of the mortises don’t lean at 12°—they’re square to the faces of the end pieces. Use a pencil to lay out the mortises on both sides of each piece. Outline the perimeter of the mortise with a knife or chisel.
8. Drill and chop mortises for the handle. There are no compound angles here—all sides of the mortise are square to the surface.
Using a wide chisel, pare to these scribed lines to establish a shallow shoulder all the way around the mortise. Do this on both the front and back sides of the workpiece. Use a 5/8″ Forstner bit in a drill press to remove most of the waste, then finish the mortise by hand (Photo 8).
There’s one more task before assembly: Cut arches on the bottom side of both ends. The arches form four feet. They give the stool more stability on an uneven surface than if the ends were left straight. Draw the arches on the Out face of each end piece. Tilt your bandsaw table 12° and cut the arches. Sand them smooth. These surfaces should look good, since they’ll face up when you tote the StepBox around.
Glue the base

9. Glue the base. Use triangular blocks to prevent the clamps from slipping or digging into the wood.
Make four gluing blocks, tapered at 12° (Photo 9). It may be tempting to use the offcuts from the base pieces, but their grain runs the short way. They could easily crack and break, and that would be really bad news during a glue-up.
Make the blocks from a soft wood, such as pine, with the grain going the long way. Why use a soft wood? If the pins stick out a bit, they’ll crush into the wood, allowing the block to continue pushing against the tails—where you want the pressure.
Glue a thick piece of paper onto the face of each block. The paper will absorb the glue squeeze-out and prevent the blocks from adhering to the base.
Glue and clamp the base. Plane, scrape or sand the dovetails so they’re flush.
Make the handle

10. Insert a partially-sawn handle into one mortise, then pass it on through the second mortise. The ends of the handle are cut extra-long for now.
Saw out the handle (D, Fig. E), leaving it 1″ or so extra-long on both ends. (Note that the drawing shows it cut to final length.) Don’t saw out the notches on each end of the handle yet—you’ll mark their locations directly from the base.
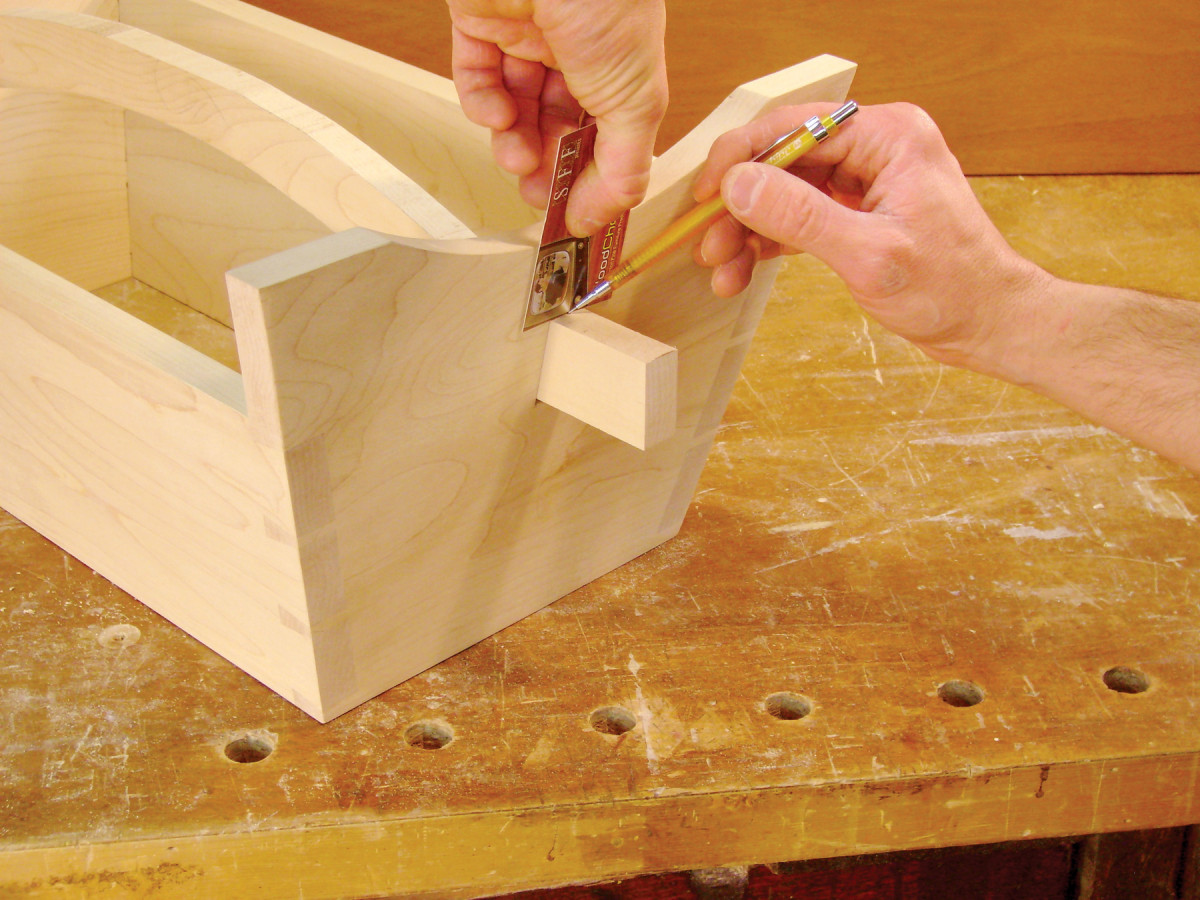
11. Draw a line across each end of the handle. This line marks the outside shoulder of a notch you’ll cut in the handle. Use a shim behind the pencil to compensate for the splay of the end pieces. Pull out the handle.
Slide the handle into the base (Photo 10). Draw a line across the top side of each end, using a business card as a shim (Photo 11). This shim deserves some explanation. Let’s say you just drew the line for each notch flush up against the base. After cutting the notches, you’d find that the distance between them would be too short. You have to allow the extra distance caused by the splay of the base, and that’s where the shim comes in.
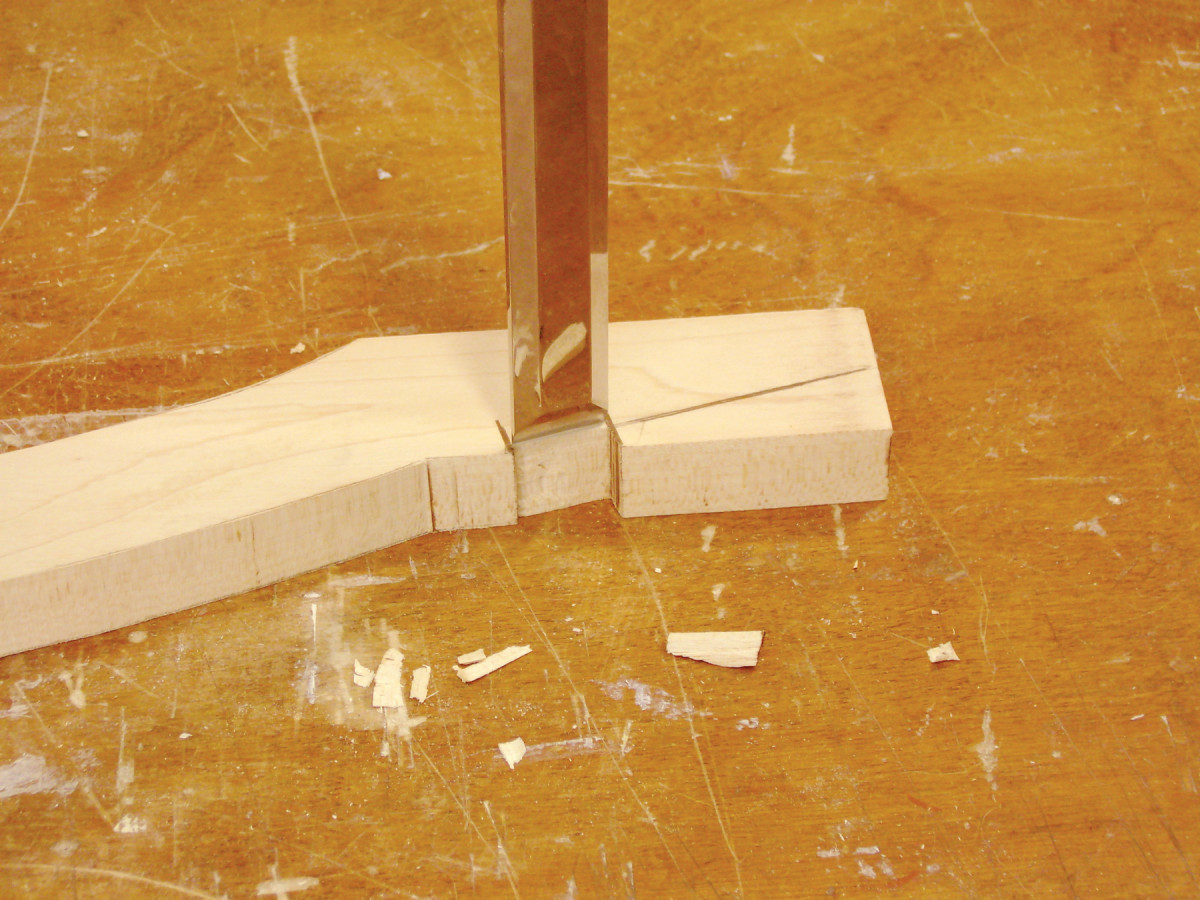 Withdraw the handle and saw and chop the notches (Photo 12). Stick the handle back in the base and test the fit of the joints. Adjust as necessary. When all is well, remove the handle and round over the section between the notches with a spokeshave. Test how it feels in your hands, and make it rounder or slimmer to suit.
Prepare two 12° wedges (E) for locking in the handle. Make them extra-long, so they’ll be easier to make and install.
Brush glue on the handle’s notches and slide the handle in place. Apply glue to the wedges and lightly tap them in place (Photo 13). After the glue is dry, cut the handle and wedges so they protrude 3/4″ beyond the end pieces. Soften their edges with a file and sandpaper.
Add the top
Cut the top (A) to final size. Cut both grooves in the top using a dado set in your tablesaw (Fig. D). Use a miter gauge and fence for making the 45° groove. To make the notches, first drill a hole for each one, then cut the notches on the bandsaw.
Make the cleats (F) that will be used to fasten the top. Note that the outer holes in the cleats are oval (Fig. A). This allows the top to shrink and swell without cracking. Glue the cleats to the base.
Apply finish to the base and top, then fasten the top to the base (Photo 14).
Here are some supplies and tools we find essential in our everyday work around the shop. We may receive a commission from sales referred by our links; however, we have carefully selected these products for their usefulness and quality.