


We may receive a commission when you use our affiliate links. However, this does not impact our recommendations.
 The other night I was polishing the back of my favorite chisel I never use. I pondered my reflection in the shimmering metal, and wondered if I could get it shiny enough to enable time travel. I seemed to be getting close because I felt such a strong connection to woodworkers of days gone by. As I finished with the #64,000-grit stone and began prepping the lark’s tongue strop (pricey but worth it) my cat came rolling up on his vintage motorcycle. I remembered how he had nearly been killed by the falling of an ancient tree, and I admired the way his fur stood on end from the wind, and the sheer exuberance and freedom that represented. I thought, “yes, life is like that, it goes round and round like the wheels of the motorcycle, like the pad on a random orbit sander, like the popcorn burning in the microwave, like the spinning in my head . . .” Wait a minute! Get me some fresh air!

Sorry about that folks, I had to walk through a cloud of something weird on my way past all the other cubes to get from the shop to my desk, and it seems to have affected me for a moment. Deep breath. And another one. OK, I think I can write now. Unusual as it may seem, this blog post is about how to make a tool to make woodworking easier and more accurate. It’s quick, doesn’t cost much, works really well, and I promise, there will be no deep thinking or philosophical rambling in the description. I do however, reserve the right to use big words, and slip in a phrase every now and then to make you wonder if maybe I’m English.
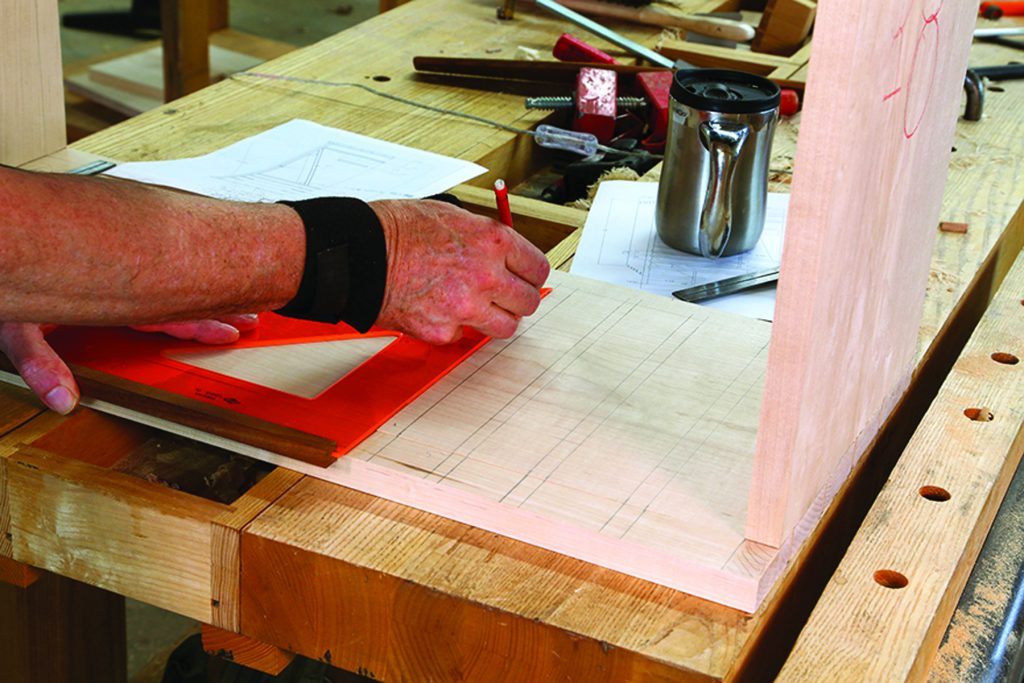
What do you use when you need a big square for layout work? A rafter or framing square will work, but they are awkward to use and not the most accurate devices. A combination square (like I wrote about in the June 2011 issue) is good for small work, but the reference surface and straightedge can be too small for laying out a cabinet. Drafting squares are an alternative; they aren’t expensive, they come in sizes up to 18” and are very precise. The trouble is, they were designed to be held against the edge of a T-square, so they lack a built-in reference.

The answer, as it does in about 90 percent of woodworking, comes from the scrap bin. Look in the “too small to use but too nice to throw away” department for a nice straight-grained piece of hardwood. I used a piece of walnut, about 3/8″ square. After making sure it was nice and straight, and trimming it to length, I used a thin-kerf rip blade in the table saw to make a groove about half the thickness, down the middle of the stick. This size groove was just a trifle bigger than the thickness of the square, so I used some Gorilla Glue to bond the plastic to the wood. I put a couple of spring clamps on to keep the expanding glue from pushing the square out of the bottom of the groove.
When the glue was dry, I trimmed the foam-out off with a chisel, and took the square for a test drive. I’ve been using this for about five years now, and highly recommend it. It’s accurate, lays flat on the work, and doesn’t get out of whack. The only things to worry about when you make one are to get the wood as straight as you can, and keep of the depth of the groove consistent. I used a zero-clearance insert on the saw, and kept steady downward pressure on the wood as I milled the groove. I’ll write about the thin stock pusher I used for that task soon. It rides along the rip fence and lets you make small stuff safely. I daresay this bespoke gem works a treat.
You can get a drafting square at most large office or art supply stores. If there isn’t one in your neighborhood, you can find them online.
Here are some supplies and tools we find essential in our everyday work around the shop. We may receive a commission from sales referred by our links; however, we have carefully selected these products for their usefulness and quality.


My hat is off to Bob for making me laugh out loud. Way better than any WW tip I’ve read recently.
I hope the new book is as entertaining.
Truth be told that by making the ‘holder’ so accurately (and you need to) you’re already making the base of a right triangle. Seems to me you just go ahead and make the rest of it and forget the drafting square. Another alternative, frankly much easier, is just to glue a nice, trued up piece of stable stock to the drafting square using five minute epoxy. Granted, you won’t have a double-lipped square but this is much easier to do – you use the presumed accuracy of the base leg of the drafting square to register the wooden piece you’re gluing on. The whole bit of running a groove with a table saw is a nonstarter for me. Mainly because I don’t have one. I can sure square up an offcut by hand though. No problem. And I do have some epoxy.
Think about it.
“Dissembling harlot, thou art false in all!”
Bob, you really got to start laying off the mushrooms Dude!
Cats can’t ride standard motorcycles – they don’t have enough weight to balance it.
Cats ride trikes!
By the way – I got my large STEEL layout square from Grizzly. It’s awesome for marquetry work as well. Cost a little more than the plastic but as long as I don’t drop it or accidentally push it off the bench – should last a life time.
Great stuff. What kind of bike was your cat riding?
This, from someone who just published an article on the application of the principles of Tai Chi Chuan to woodworking. 😉
-Steve
“I shall cut out your tongue.”
“‘Tis no matter, I shall speak as much wit as thou afterwards.”