


We may receive a commission when you use our affiliate links. However, this does not impact our recommendations.
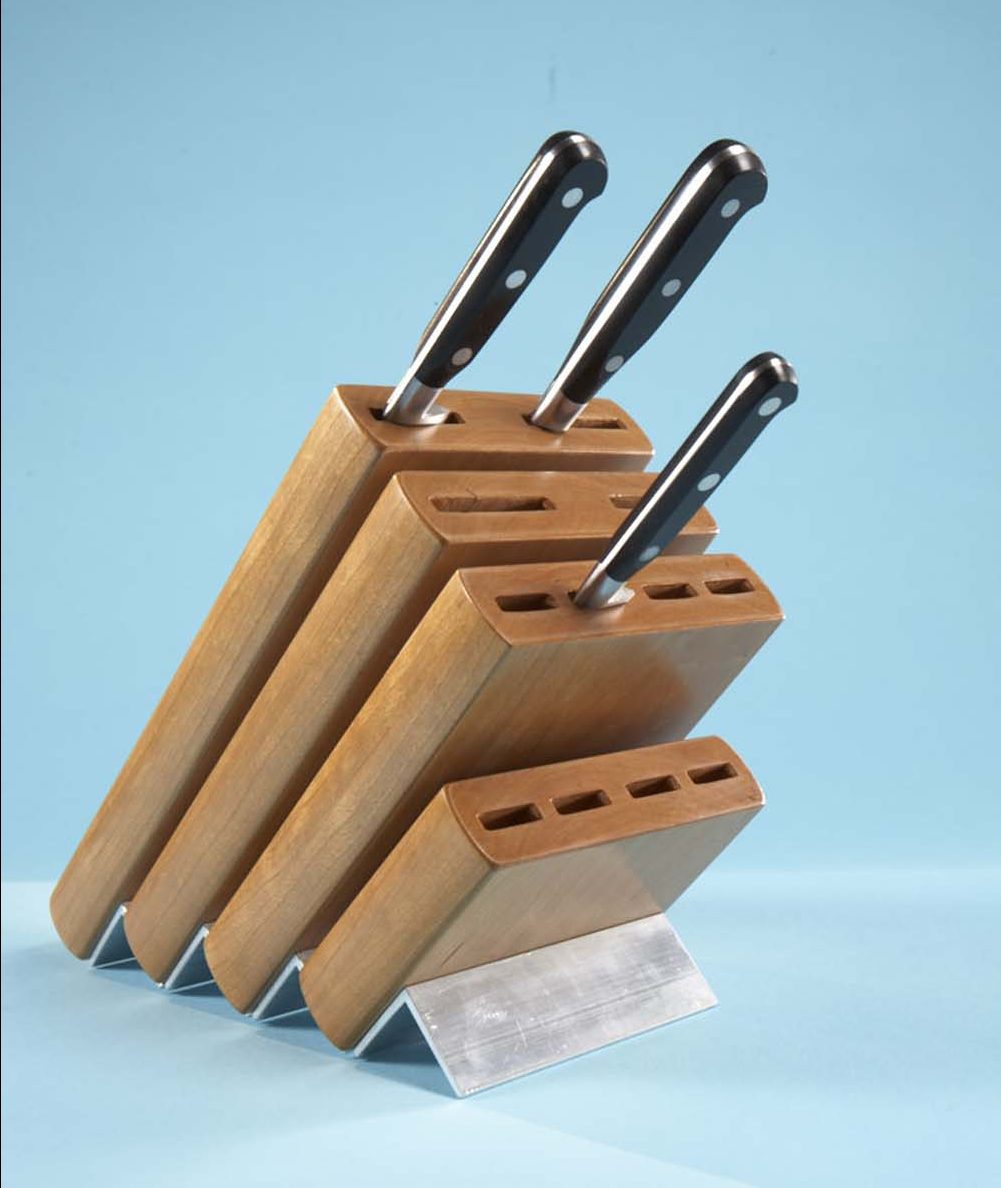
A knife block is one of the most convenient—and safest—devices to store kitchen knives. Most knife blocks are large chunks of wood composed of a dozen or more pieces laminated together. Here’s one that’s much easier to make.
Before you start, take stock of your set of knives. Measure their width and length and make sure they’ll fit in this block’s slots, without bottoming out. Adjust the lengths of the block’s sections if necessary.
Matching Grain
Although you can make this knife block from various bits of scrap, the best way to achieve a uniform appearance is to make it from a single board about 6″ wide and 8′ long. The pieces you’ll be working with are only 5/8″ thick, so you may start with a board that’s already been planed 3/4″ thick or use rough lumber.
Each part of the knife block looks like it’s made from one piece of wood, doesn’t it? Well, it’s not. Each one is made from two pieces glued together—two pieces that are artfully arranged, that is. You can’t achieve this effect by randomly taking pieces from a board and gluing them up, of course. So, what’s the trick?
The secret is to “slip match” each part (Fig. 02). Basically, you take one long piece and crosscut it in half, then slip one piece on top of the other. This way, both the end grain and the side grain will match as closely as possible. If you start with a board that has very uniform grain, the glue joints will be almost impossible to see.
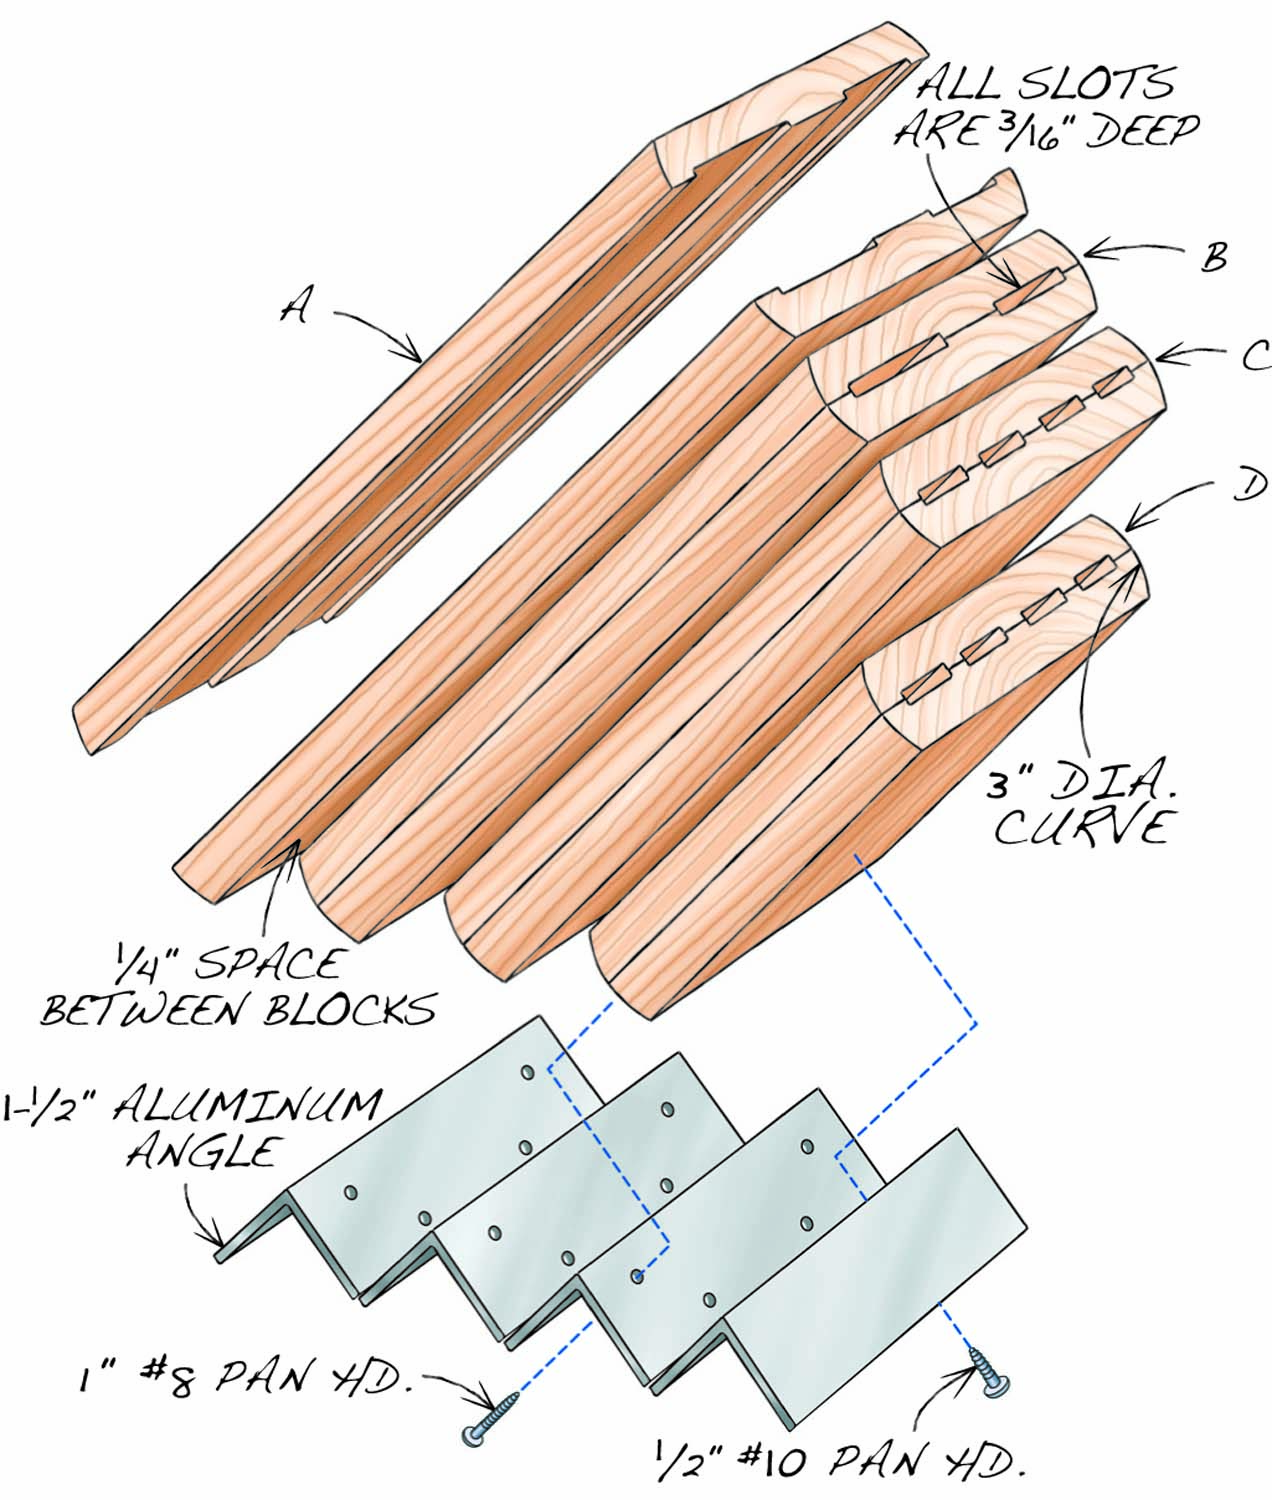
Fig. 01. Exploded View
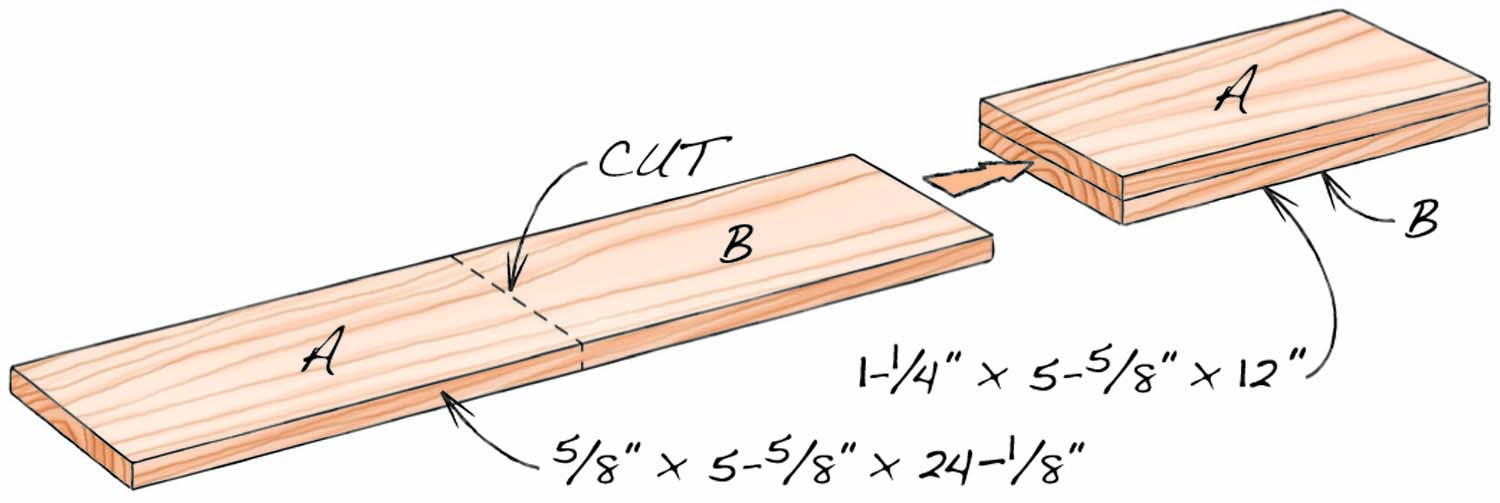
Fig. 02. How to Match Grain
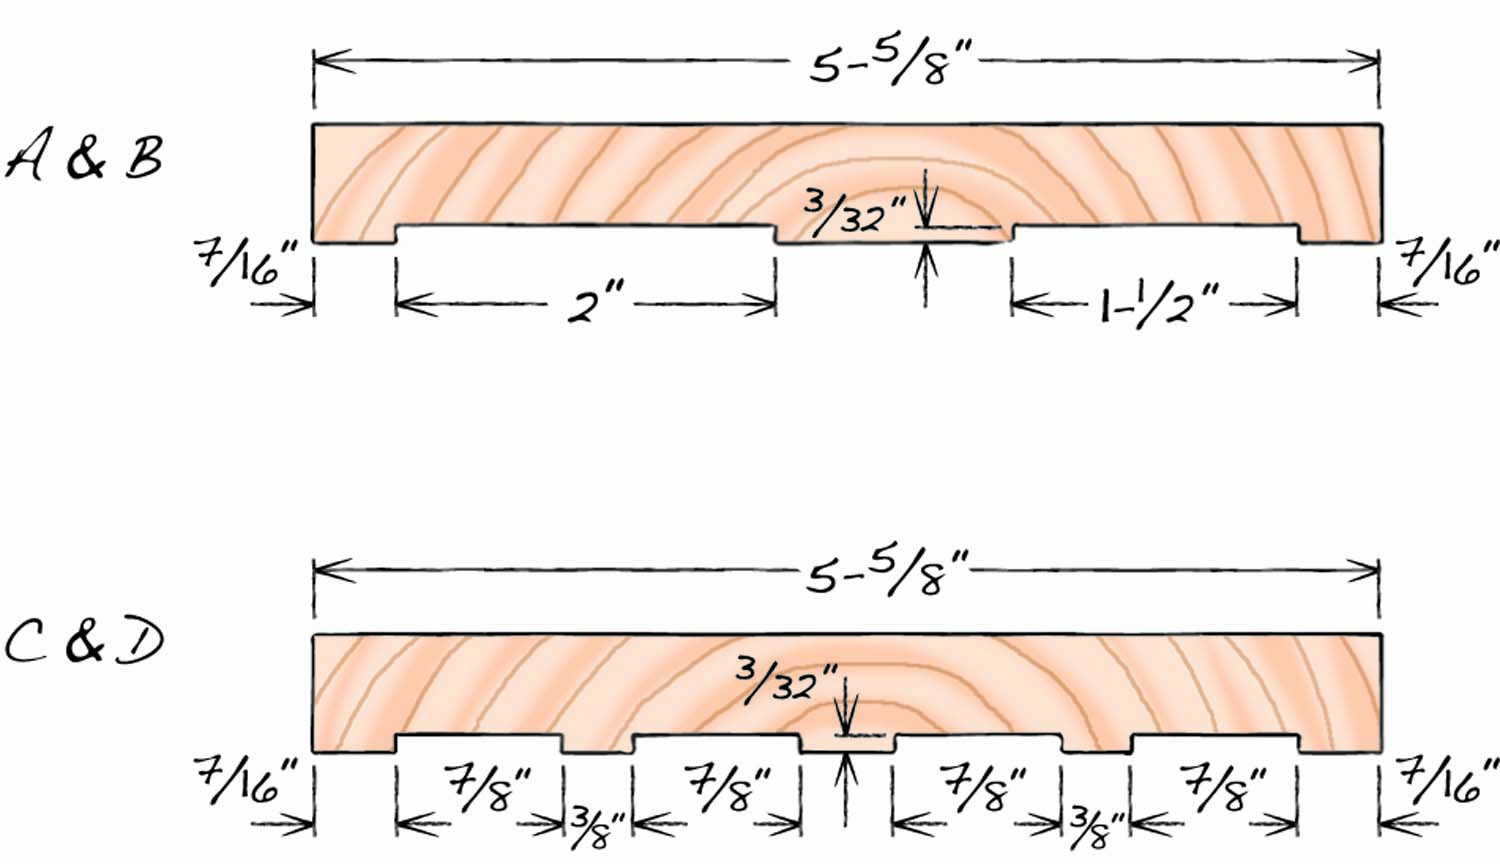
Fig. 03. Groove Layout
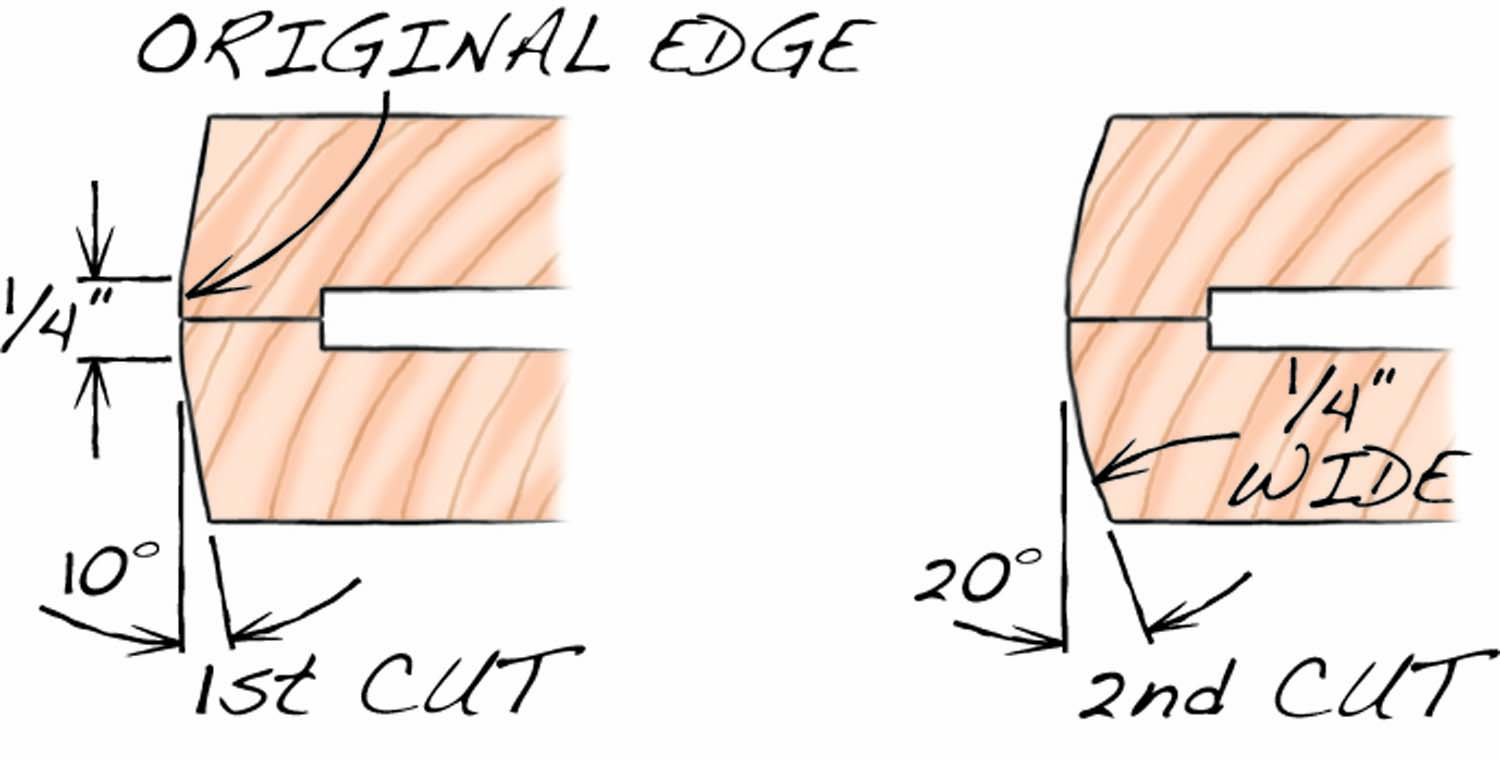
Fig. 04. Saw Cuts on Block Sides
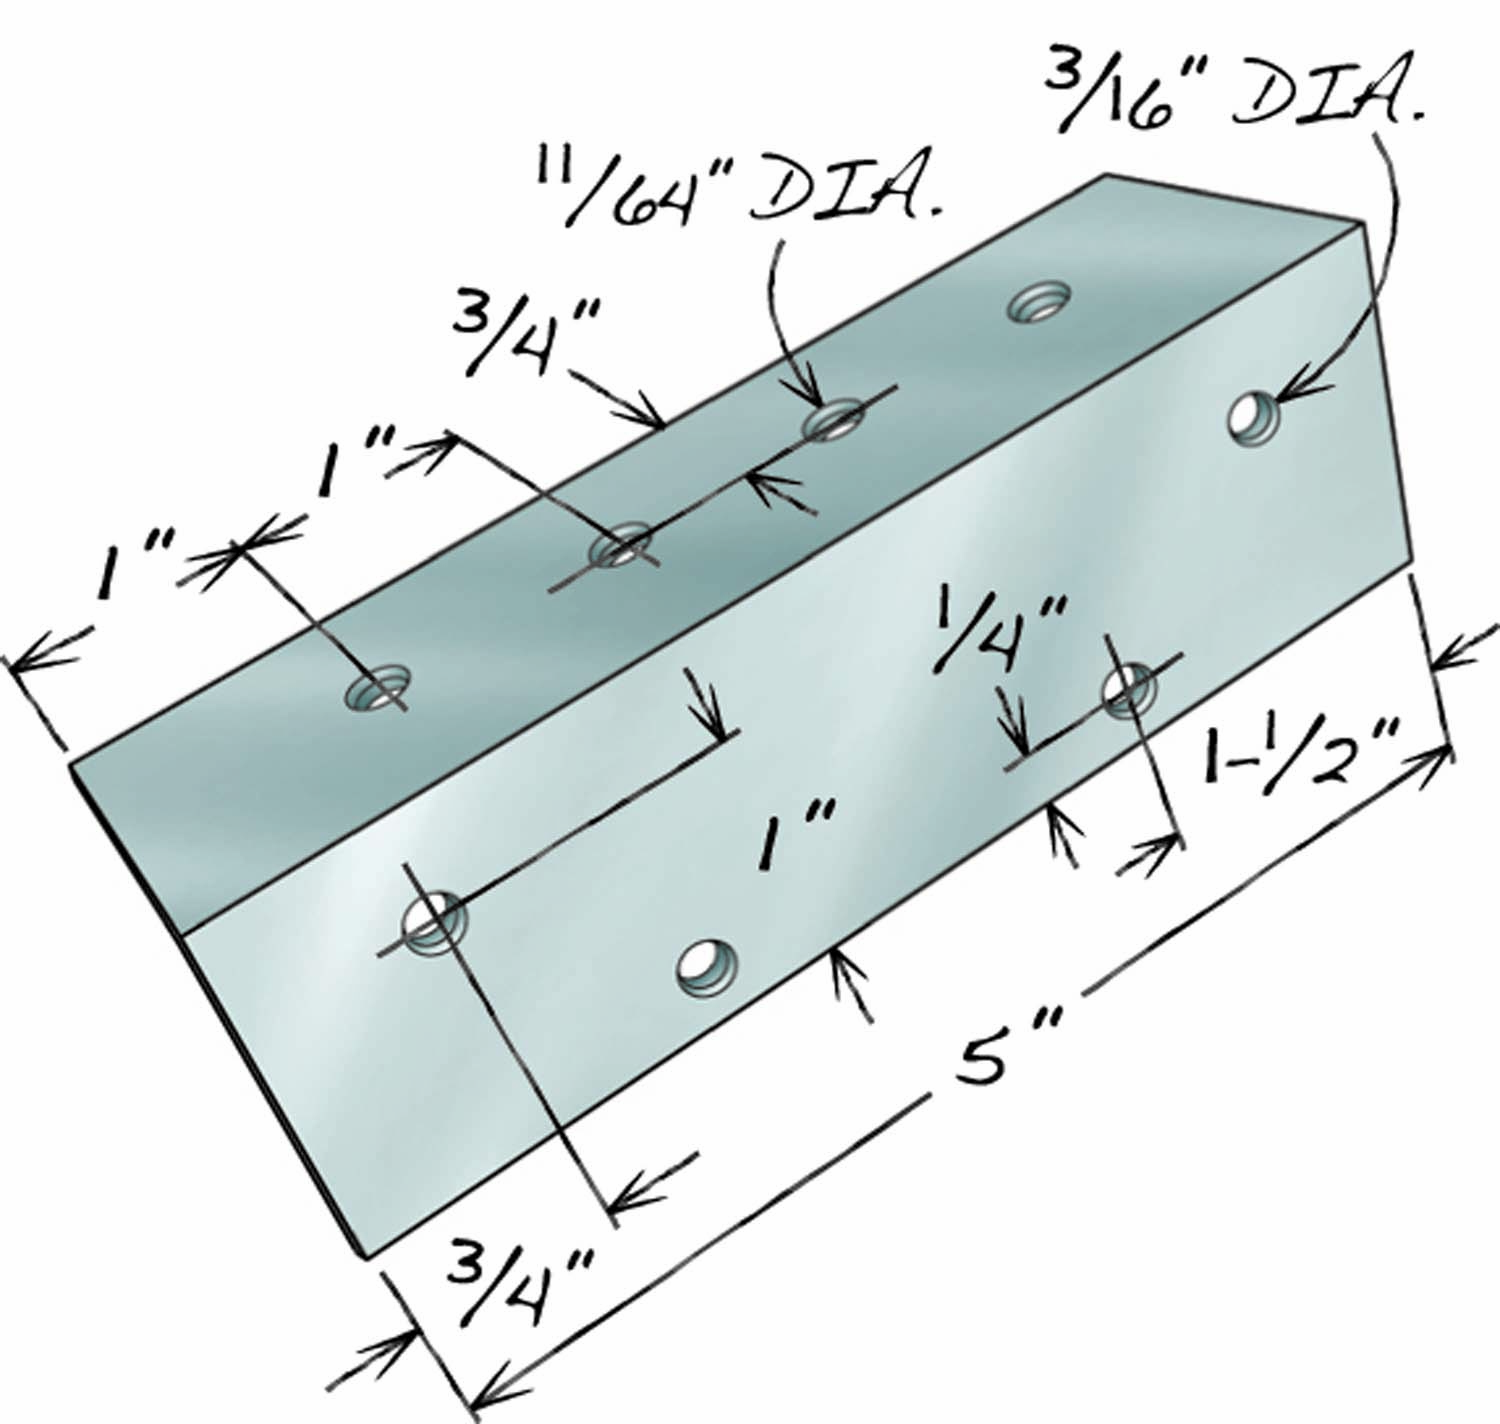
Fig. 05. Aluminum Angle Hole Patterns
Cutting List
|
Knife Block |
||
|
Overall dimensions: 8-1/2″ H x 5-1/2″ W x 10-1/2″ D |
||
|
Name |
Qty. |
Th x W x L |
|
Block A |
1 |
1-1/4″ x 5-1/2″ x 10-1/2″ |
|
Block B |
1 |
1-1/4″ x 5-1/2″ x 9″ |
|
Block C |
1 |
1-1/4″ x 5-1/2″ x 7-1/2″ |
|
Block D |
1 |
1-1/4″ x 5-1/2″ x 4″ |
|
1/8″ Aluminum angle |
4 |
1-1/2″ x 1-1/2″ x 5″ |
|
Note: To make all the blocks, start with 3 pieces of 5/8″ x 5-5/8″ x 24-1/8″ stock. Cut each piece in half to make the two sides of each block. Cut blocks C and D from one piece. |
||
Groove the Pieces
Start by cutting your board into three pieces 24″ long. If you’re using 1″ thick wood, plane all of the pieces down to 3/4″ thick and set them aside for a week or so. (It’s very important that your final stock be as flat as possible, so give the wood time to warp if it wants to.) Crosscut these pieces in half, making six pieces 12″ long. Carefully mark the ends of these pieces so you’ll be able to slip match them in pairs later on. Joint and plane all pieces to 5/8″ thick. (To avoid snipe, butt the boards end to end when you run them through the planer. Begin and end the “train” with scrap pieces.) Joint and rip the pieces 5-5/8″ long.
Reassemble the pieces into three pairs. Two of these pairs will be used to make the upper two sections of the knife block. The remaining pair will be cut in half, later on, to make the two lower sections of the block.
Mark the outside faces and adjoining sides of all these pairs, so you’ll know exactly how to orient each piece on the router table in the next step.
Set up a 3/4″ straight bit in your router table to make a groove that’s 3/32″ deep. Position the fence 7/16″ away from the bit and cut grooves on both sides of the inside faces of all six pieces (Fig. 03).
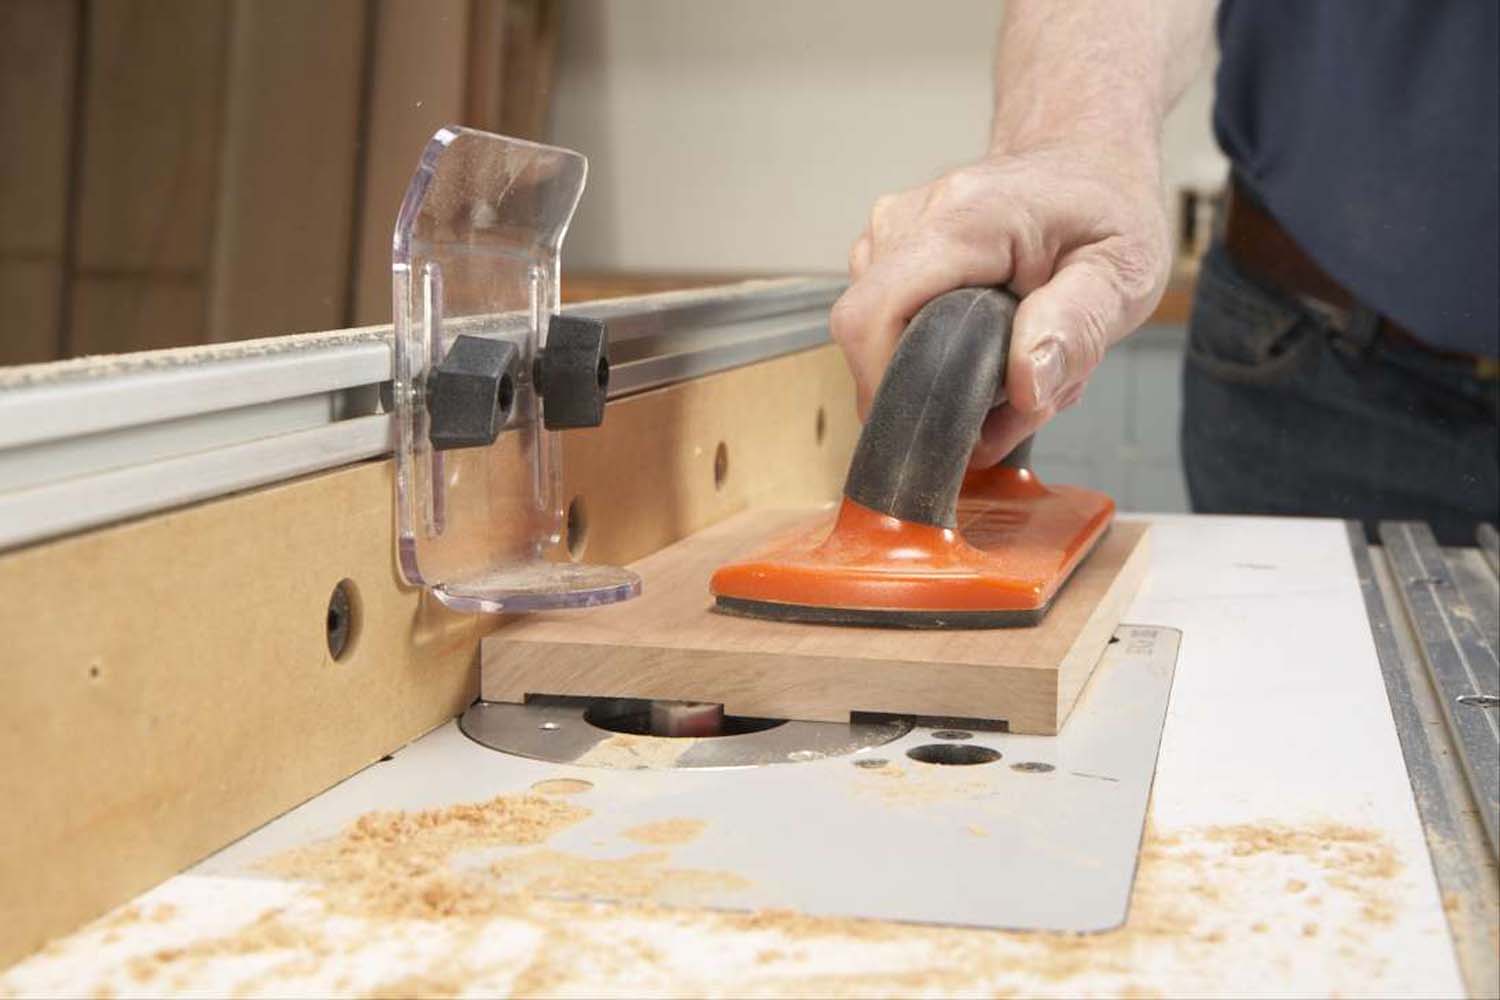
Photo 1. Each section of the knife block is made from two pieces of wood. Rout shallow grooves in each of these pieces to make slots for the knives.
Select the two pairs of pieces that will become the upper sections of the knife block. Move the fence an additional 3/4″ away from the bit and rout the grooves again, making them wider. This completes the narrow set of grooves; to make the wider set, move the fence an additional 1/2″ away from the bit (Photo 1). Pay close attention to how you orient these pieces when you rout them, so the grooves match when you reassemble the pieces into pairs.
Finish routing grooves in the remaining pair of pieces—each groove is 7/8″ wide, which will require two passes.
Glue and Shape
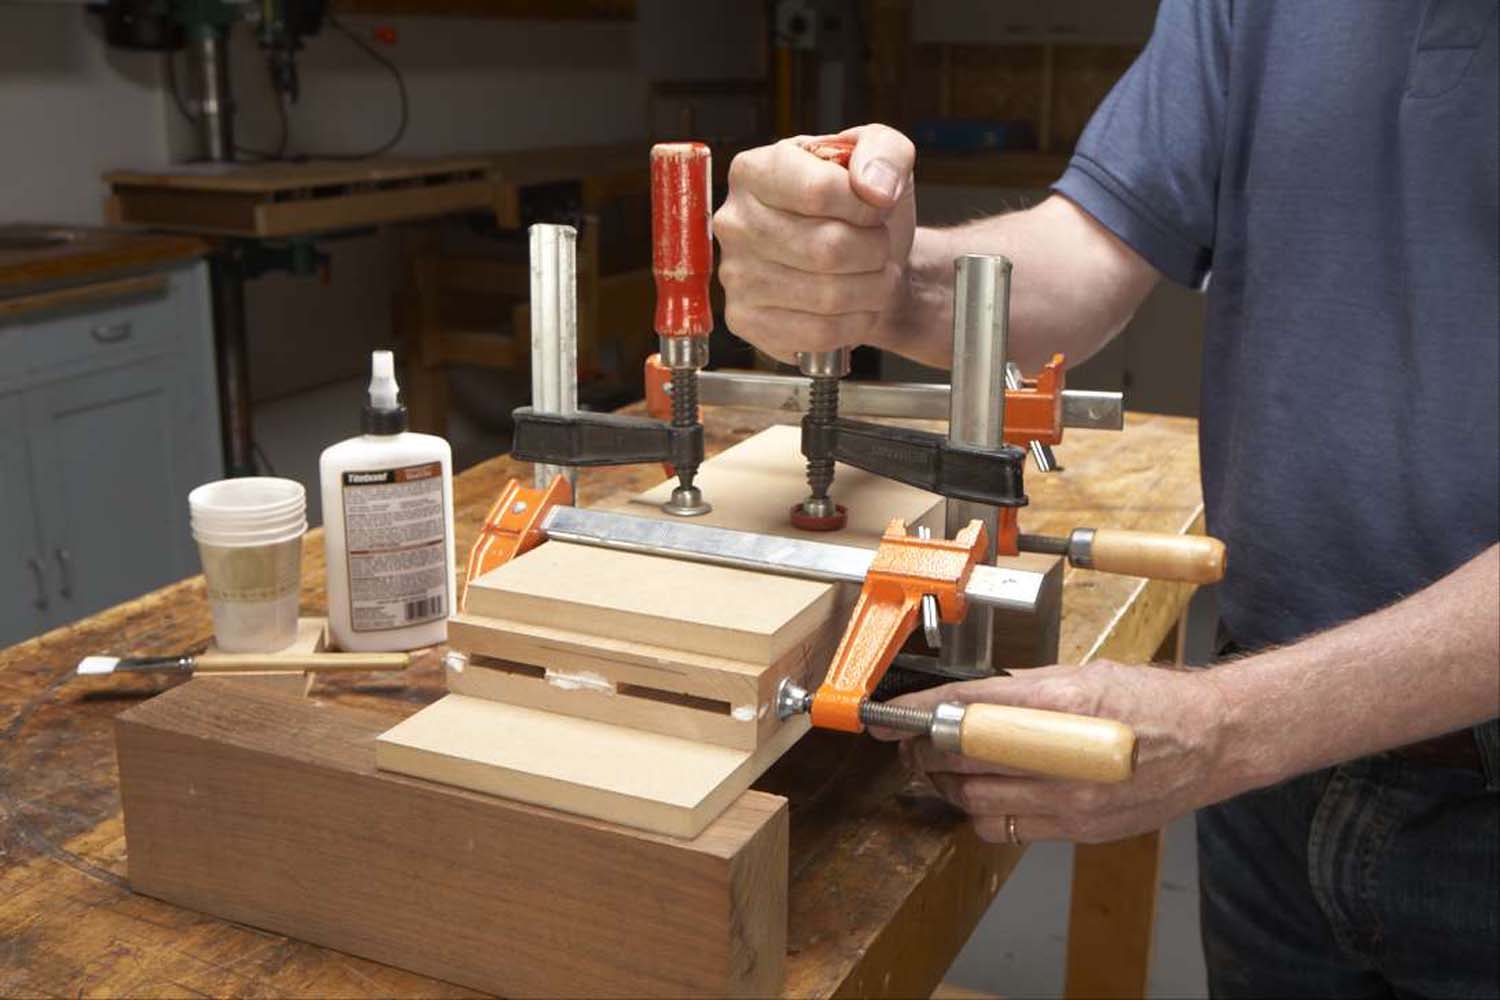
Photo 2. Glue two similar pieces together to make each section. Note that the end grain curves in the same direction on both pieces. This helps create the illusion that this is a single block of wood.
Glue the pairs together (Photo 2). Place flat boards above and below the pieces to help distribute clamping pressure and avoid denting the wood. Clamp across the pieces first to make their edges flush, then use six clamps top and bottom.
The sides of the glued-up blocks must be straight, square and parallel before you round them. Set your jointer to take a 1/32″ deep cut, then make two passes down one side of each block. Rip the pieces 5-1/2″ wide.
Photo 3. Saw the sides of the blocks at two different angles to begin forming a curve.
Tilt the saw blade 10° and make two small bevels cut along each side (Fig. 04). (If you have a right-tilt saw, place the fence on the left side of the blade, so the blade tilts away from the fence.) Be sure that the center 1/4″ of the piece remains uncut. Just turn the piece around to cut the opposite sides—there’s no need to reset the fence. Next, tilt the saw blade 20° and repeat the operation (Photo 3). This time, be sure that the portion taken away is 1/4″ wide. When you’re done, each side will have five equal facets that are 1/4″ wide.
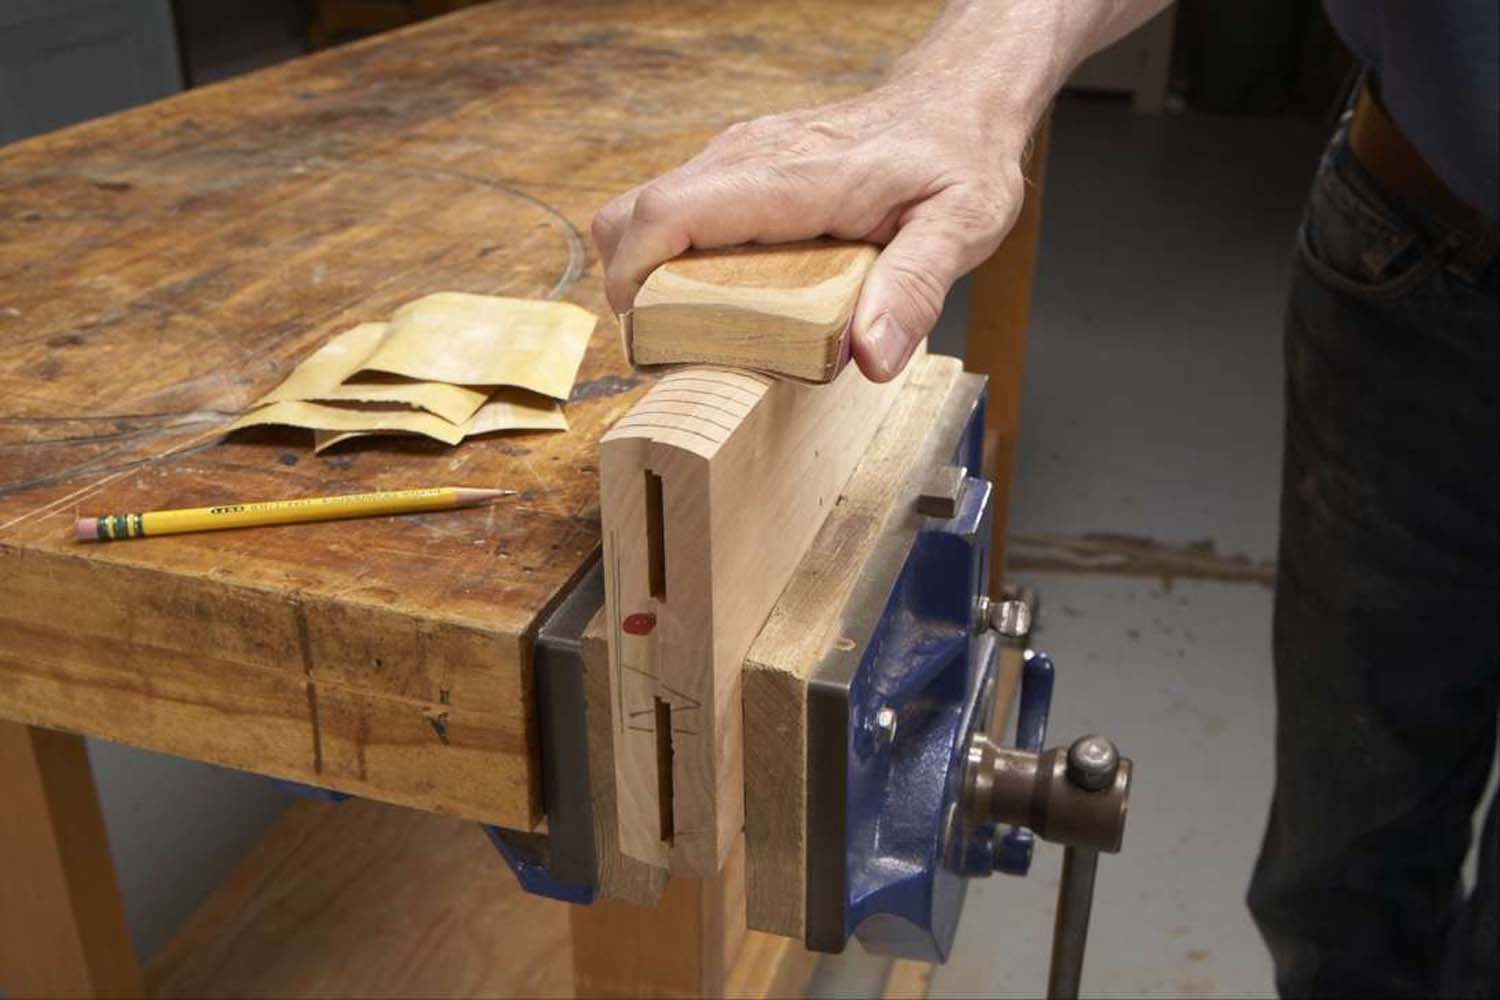
Photo 4. Sand each side with a curved sanding block. Keep sanding until all the pencil marks are gone—this indicates that all the flat areas are now curved.
Starting with 80 grit paper, sand the sides into a smooth curve (Photo 4). A curved-bottom cork block with a fairly large radius works best.
Cut the pieces to final length. Sand their ends and faces, then apply a finish.
Add the Base Pieces
The base of the knife block is made from 1-1/2″ aluminum angle, which is available at many home centers. Use a hacksaw with a 32 tpi blade to cut the angle into four pieces 5″ long. File or sand their ends smooth.
Use a drill press and a fence to drill screw holes in each piece (Fig 05). Note that three of these pieces are identical; the fourth piece, the one that goes in front, has no holes on the side that faces out.
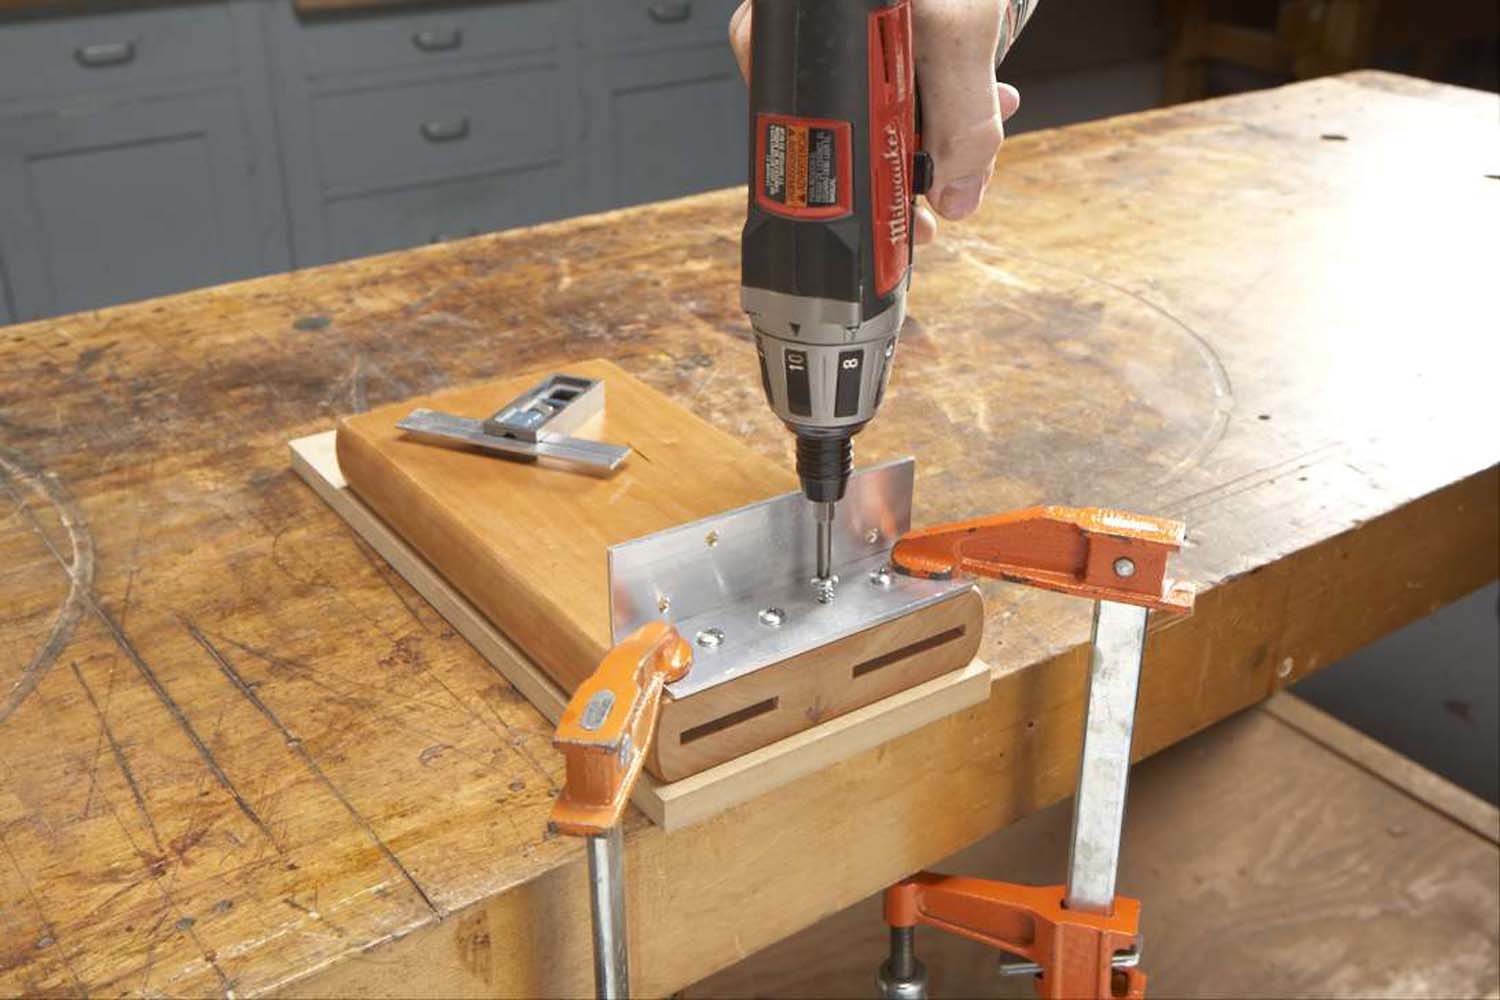
Photo 5. Make the knife block’s stand from short pieces of aluminum angle. Each angle must be precisely flush with the end of each block. Drill pilot holes with a self-centering bit to ensure that the angle doesn’t shift when you run in the screws.
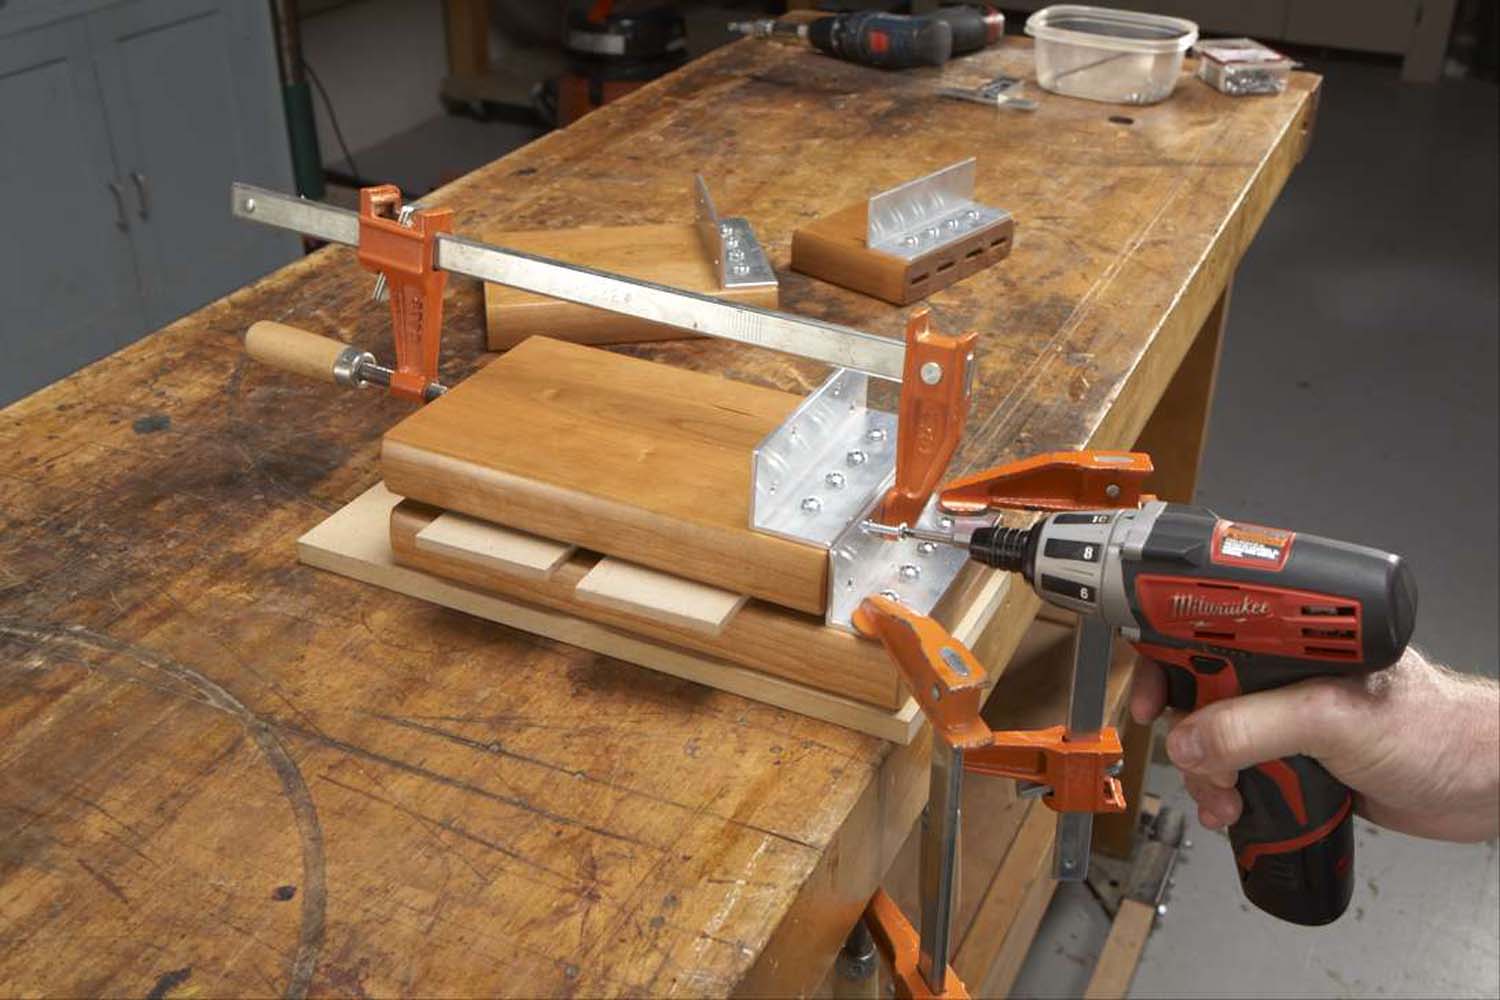
Photo 6. Fasten each angle to the end of a block. The spacers between the blocks must be exactly the right thickness in order for all the angles to align, so they sit flat when the knife block is upright.
Align each angle exactly even with the end of each block, then drill pilot holes and fasten the angles to the blocks (Photo 5). To fasten the blocks together, stack them one piece at a time, with spacers in between (Photo 6). The thickness of the spacers is critical: plane them so the thickness of a block plus a spacer equals 1-1/2″, the width of the angle.
Here are some supplies and tools we find essential in our everyday work around the shop. We may receive a commission from sales referred by our links; however, we have carefully selected these products for their usefulness and quality.


