


We may receive a commission when you use our affiliate links. However, this does not impact our recommendations.
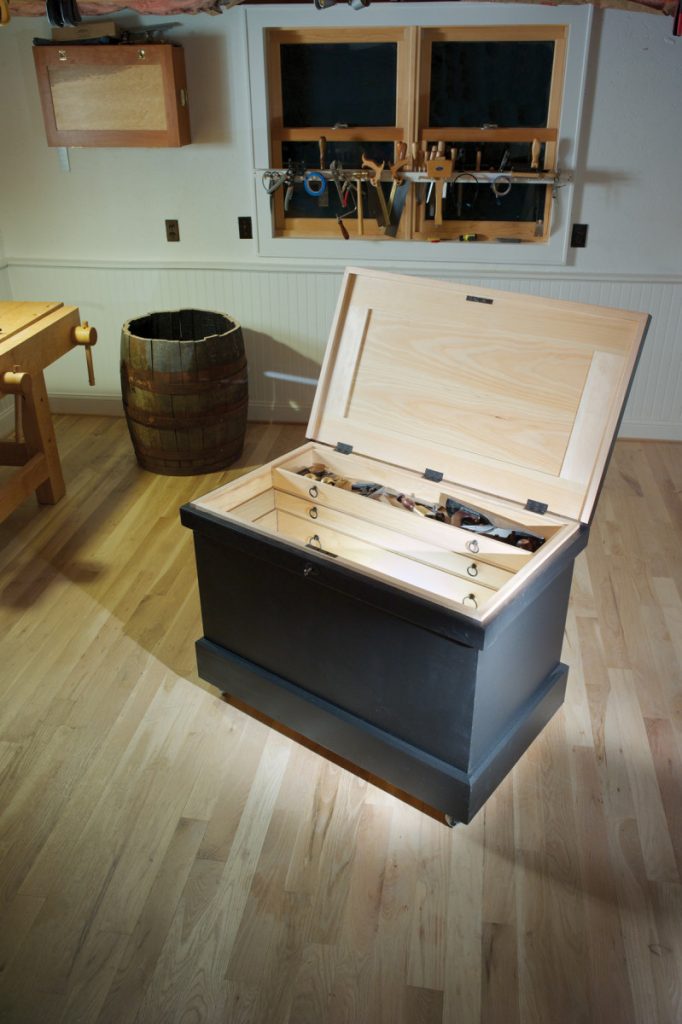
A box chock-full of tradition. This tool chest, which was designed from time-tested examples, holds every hand tool you need, protects those tools from dust, and keeps everything just one hand motion away.
Don’t reinvent the wheel when storing your tools. A proper chest is still the best.
When I tell people that I’ve worked out of a traditional tool chest for 15 years, they look at me as if I’m someone who has not yet discovered the joys of indoor plumbing.
They say, “Haven’t you tried a wall cabinet? Or built storage below your workbench? Why not a series of open shelves next to your bench?”
The truth is that I’ve tried all those methods yet I still return to my tool chest. It holds every hand tool a woodworker could want. It protects the tools from dust (which contains salt and encourages rust). And I can get to every tool in the chest with only one hand motion.
In other words, it’s tidy, protective and efficient. What more could you want?
The objections that most woodworkers have to tool chests are generated by people who have never worked out of a chest or who have worked out of a modern chest.
You see, most new chests that I’ve encountered are all wrong. They are usually too small to be useful. Most of these mini-chests were built in woodworking classes and needed to be transported home easily – hence their squat stature.
And the interiors of these modern chests are poorly divided. Either the woodworker has French-fitted every tool into a space, which is inflexible, or he or she has almost no way of dividing up the chest, so the tools are piled at the bottom.
For the last couple years I have studied many ancient chests. And what I found was surprising. Old chests are quite similar in size and in the way their interiors are divided. The other thing that is surprising is how plain most old chests are – inside and out.
Most of the tool chests we see in books are the fancy ones, on which some enterprising soul spent months adding veneer and inlay to the interior. These kinds of chests are rare in the wild. Old chests usually have three compartments in the bottom for planes and saws and three sliding trays above for the remaining tools. No inlay. No banding.
As I studied these old chests, I started developing 12 rules that describe their size and construction. While not all old chests follow all these rules, the best chests obey the majority of them.
Rule No. 1: As Long as Your Tool Plus Some
The sizes of woodworking tool chests are fairly standard – between 35″ and 43″. This range allows the chest to hold full-size handsaws, which have a 26″ blade, plus another 5″ of wooden tote. Ripsaws can have an even longer blade, up to 30″. Plus you need to get your hand in there to grab the tote of your longest saw. In addition to long saws, the chest needs to hold a jointer plane. While metal planes top out at about 24″ long, wooden-bodied planes can be as much as 30″ long.
Rule No. 2: Tall Enough to Make a Human Tripod
The long of it. My 24″-long jointer plane is the biggest plane I own. So I made sure that it would fit in the bottom of my chest and could be easily removed.
Short tool chests are difficult to use. They are about 14″ to 16″ high, and when you put them on the floor, it is painful to bend over to fetch a tool. So you put them on top of your workbench or table saw. Now the toolbox is taking up valuable space.
Traditional toolboxes are usually about 22″ to 27″ high. Those heights are ideal for the human form. The rim of the tool chest is below the pivot point of your waist. So you bend over and place your off-hand on the rim of the chest to stabilize yourself as you use your dominant hand to shift trays around. Your off-hand becomes the third leg of a human tripod.
Rule No. 3: A Depth to Match Your Reach
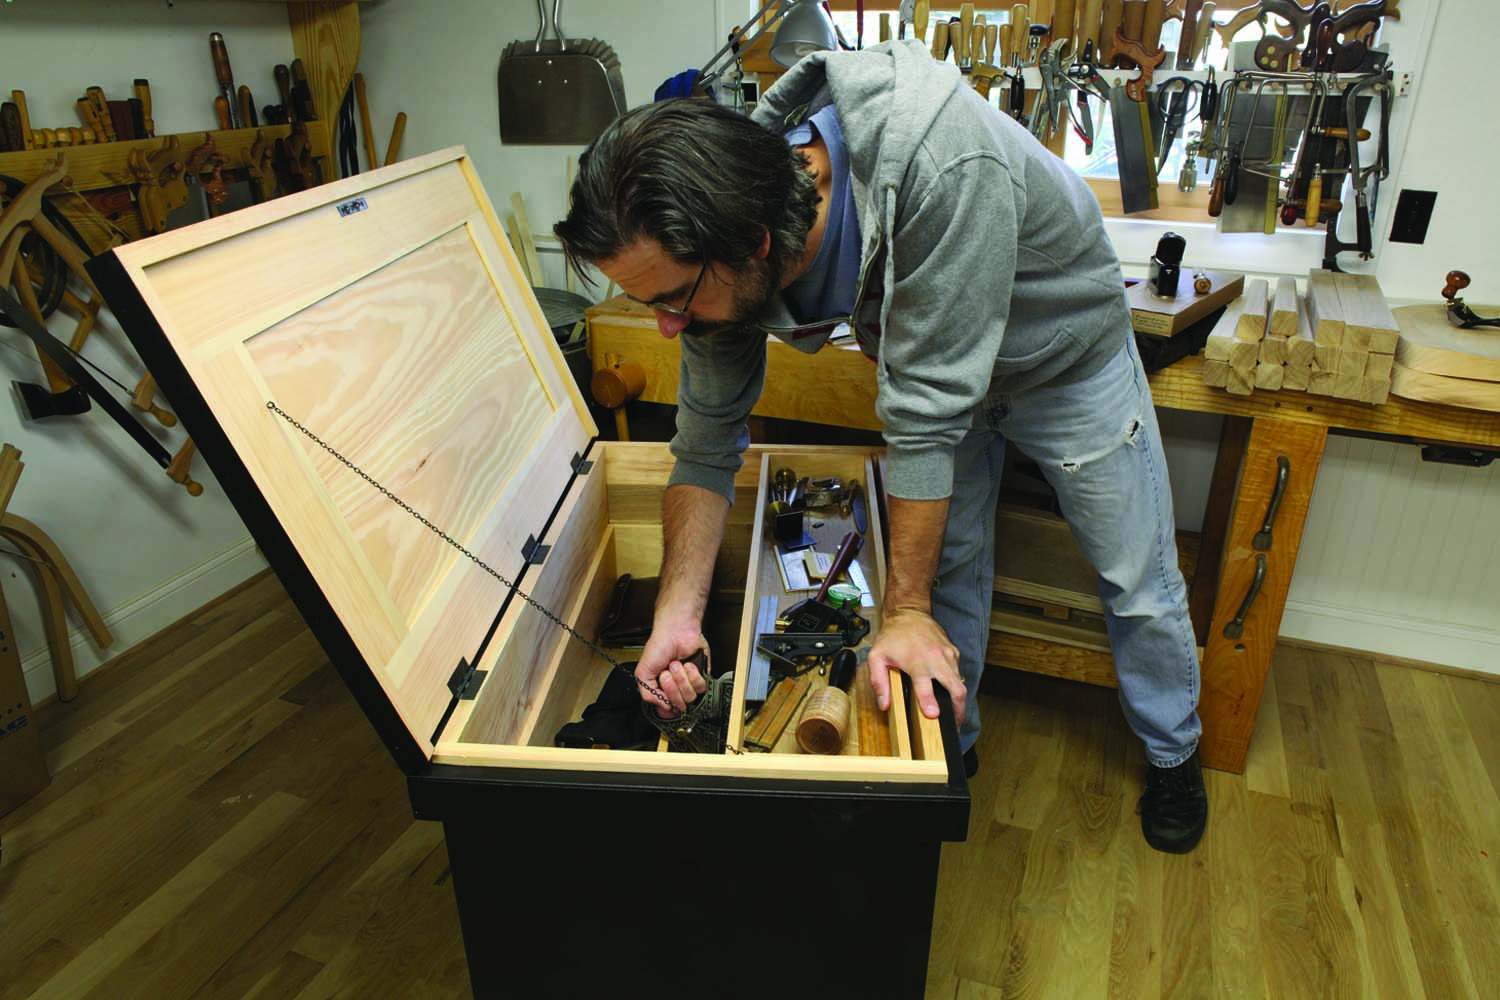
Put your right hand in. Secure your body against the rim of the chest with your off-hand. Root around for the tool you need with your dominant hand. No deep-knee bends are necessary.
The depth of the chest is usually about the same dimension as its height. This makes sense for a lot of reasons. For one, it looks nice. A square profile is a pleasing form. But it also makes practical sense. A shallow tool chest wouldn’t be as stable, especially with its lid open. A deeper chest would be a pain to use. Imagine a 36″-deep chest. Your arms would have a heck of a time fetching tools in the back.
Rule No. 4: Reduce the Weight; Increase the Joinery
 One of the guiding principles of chest construction is to make the chest both lightweight, to make it easier to move, and strong, because the chest might take a beating on a voyage.
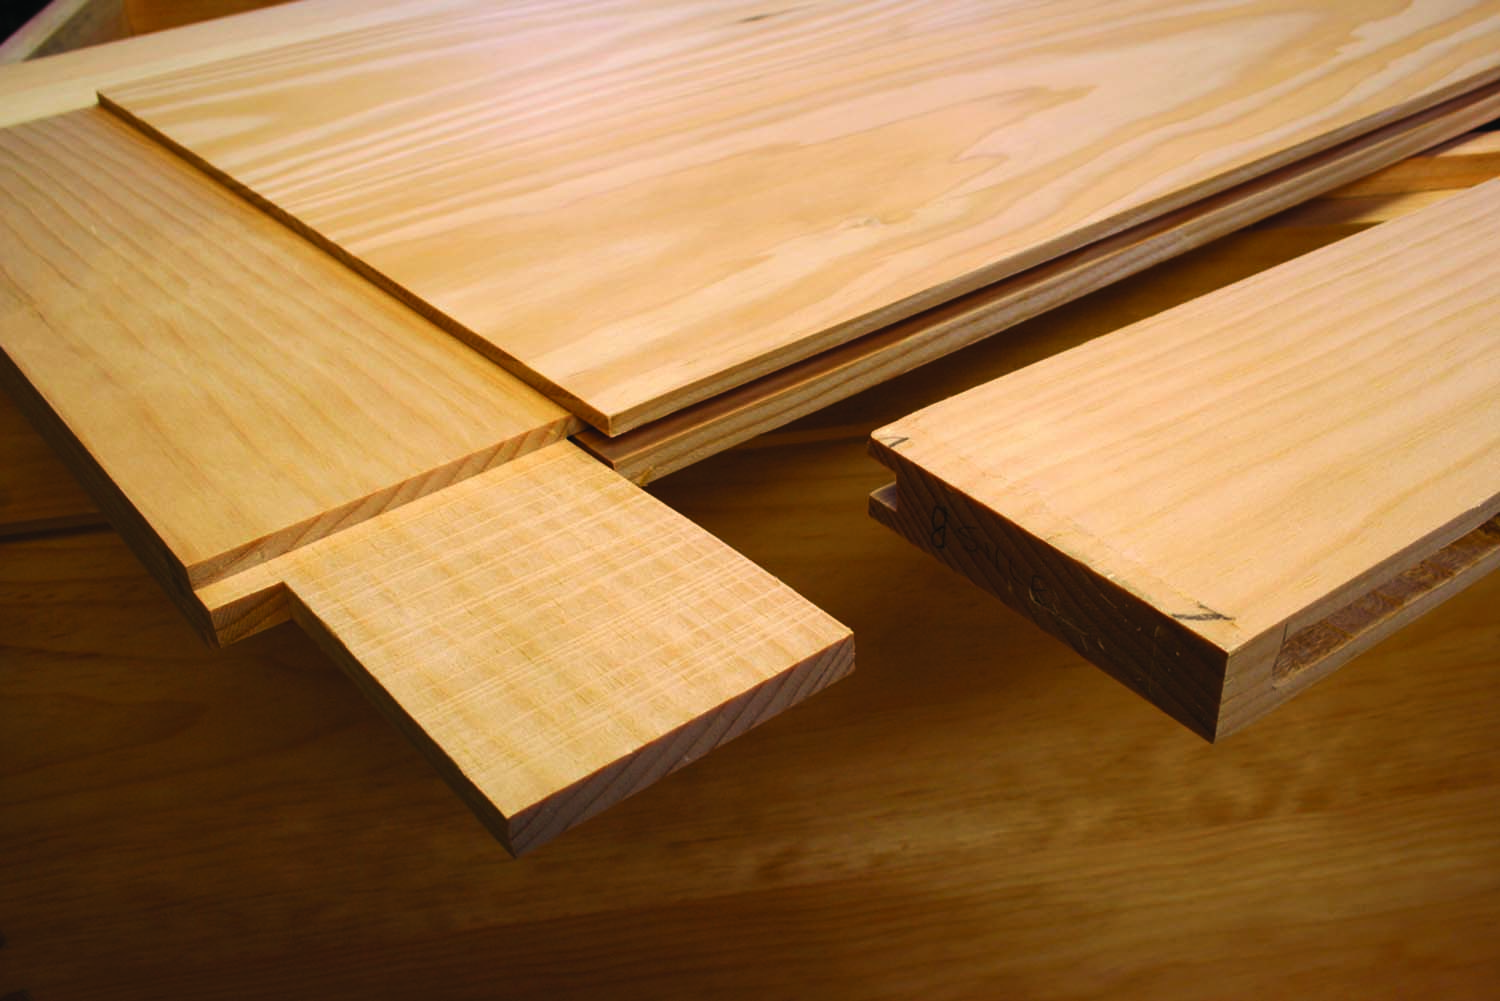
Lightweight woods aren’t typically as strong as heavy woods. So here’s what you do: Use a lightweight wood such as pine. But join the corners using a bombproof joint: through-dovetails. Use this lightweight wood with dovetails for every component of the chest, except for the parts that endure friction. Soft and lightweight woods are easily worn away if they rub constantly against other parts.
Rule No. 5: Make a Thick Shell
Light but strong. If you use pine for your shell (and you should), then you should beef up the thickness a bit. I like 7⁄8″ – some people go for the full inch.
Let’s talk about the four walls of the chest. That’s where material selection and construction begins. Old woodworking books are specific about the material for the shell: the clearest pine possible, free of knots and sapwood.
Most tool chests have shells made from pine that is between 7⁄8″ and 1″ thick. Early furniture was more likely to have thicker structural components, so a 3⁄4″-thick shell would be unusual.
So why not make the shell out of 1-1⁄2″ material? You could, but dovetailing those corners would be a major pain because your material is so thick – you’d probably have to use a tenon saw to cut the dovetails. And I don’t think the extra-thick material would add meaningful strength. Chests made from 7⁄8″ material stand up just fine for a couple hundred years.
Rule No. 6: The Bottom Should Be Nailed. But Why?
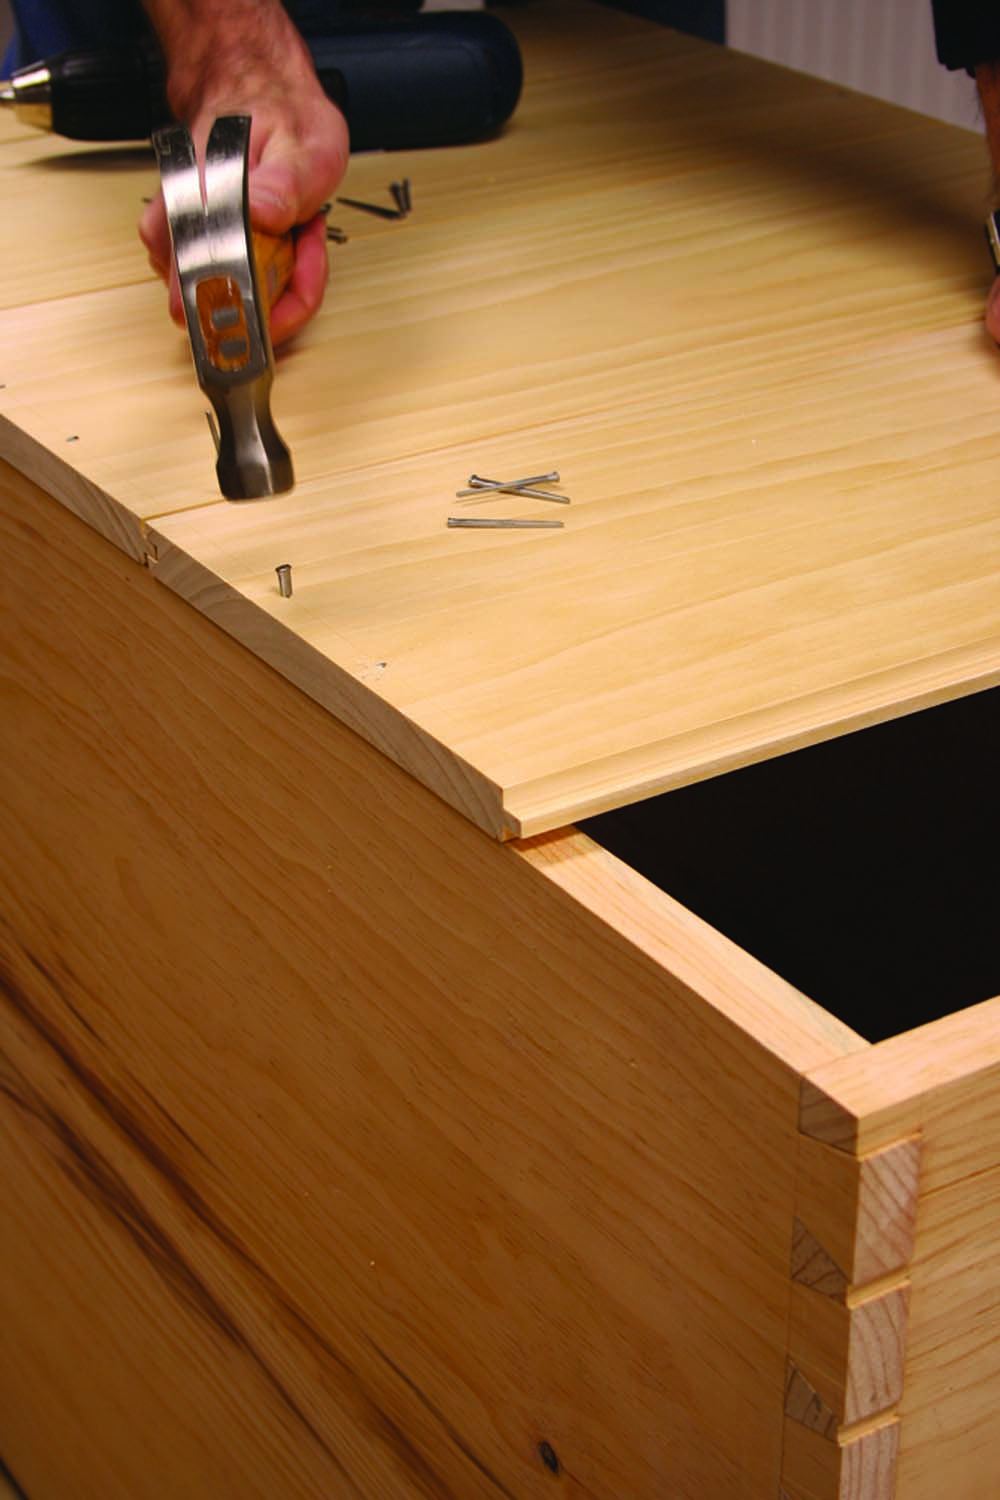
Fixable. By securing the bottom with nails instead of a fancier joint, you are making the chest easier to repair in the future. Bottom boards can rot.
So after all this talk about dovetails, it might seem odd that I recommend tonguing and grooving the chest’s bottom boards and nailing them on. Why not put in a solid bottom that’s captured in a groove?
A single solid-panel bottom will move a lot compared to five or six individual bottom boards, which will share the seasonal expansion and contraction. So if you use a solid-panel bottom you must leave a sizable gap for the panel to swell and shrink in the groove in the shell, which isn’t ideal. You want everything to be as tight as possible.
There are other good reasons to use individual boards secured by nails. If the bottom gets damaged, replacing one cracked board is easier than replacing an entire panel, no matter how the bottom is attached. And replacing one nailed-on board is easier than replacing a board secured in a groove.
Rule No. 7: Skirts, Dust Seals & Miters
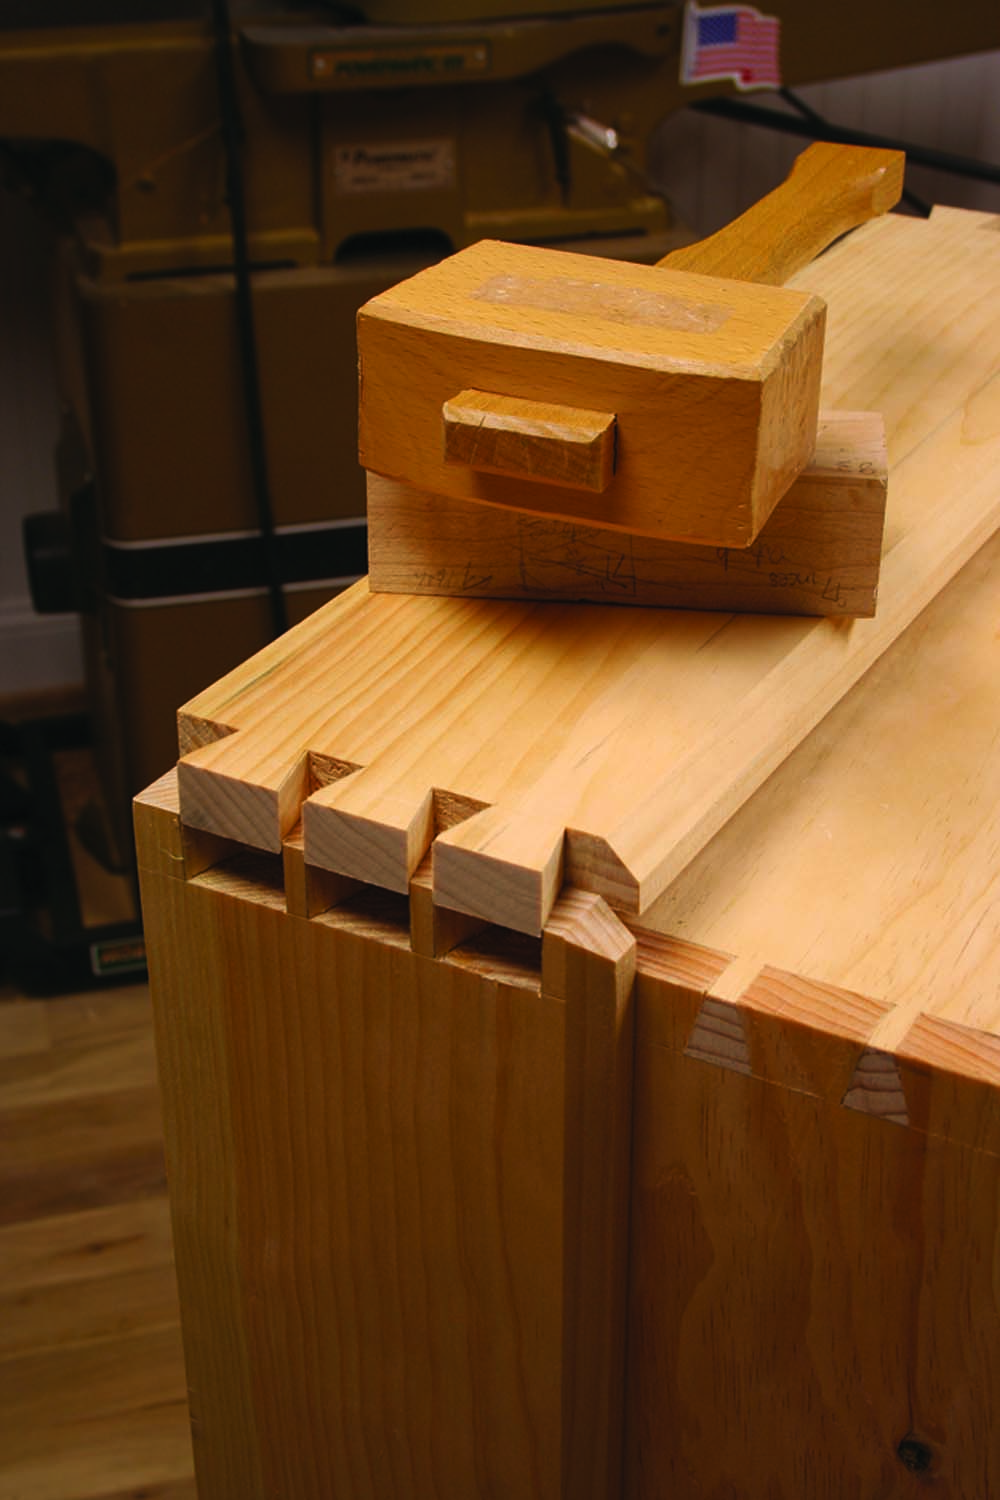
Not mitered. Dovetail your skirt and dust seal to the shell to ensure they stick around. Literally.
The chest’s skirt and dust seal are nearly as prone to damage as the chest’s bottom. They are the first line of defense when the chest is slid onto a truck or rammed by machinery.
The skirt and dust seal (the skirt near the top rim of the shell) should be bulletproof. Simple miters will not do.
Dovetail the corners of your skirt and dust seal. Yes, it’s a pain to fit everything around the shell. But a dovetailed skirt and seal will last forever. Their corners will never open. So the exterior of your chest will look as sturdy in 100 years as the day you built it.
Rule No. 8: Don’t Blow it on the Lid
There are several ways to make a lid. Some work great. Some are temporary.
The best solution is to build the lid as a frame-and-panel assembly. This confines almost all the wood movement to the panel, which floats harmlessly in the middle of the rails and stiles.
Rule No. 9: Divide the Bottom Layer
Better lid. A frame-and-panel lid with a raised panel is about as robust as you can get without adding lots of weight.
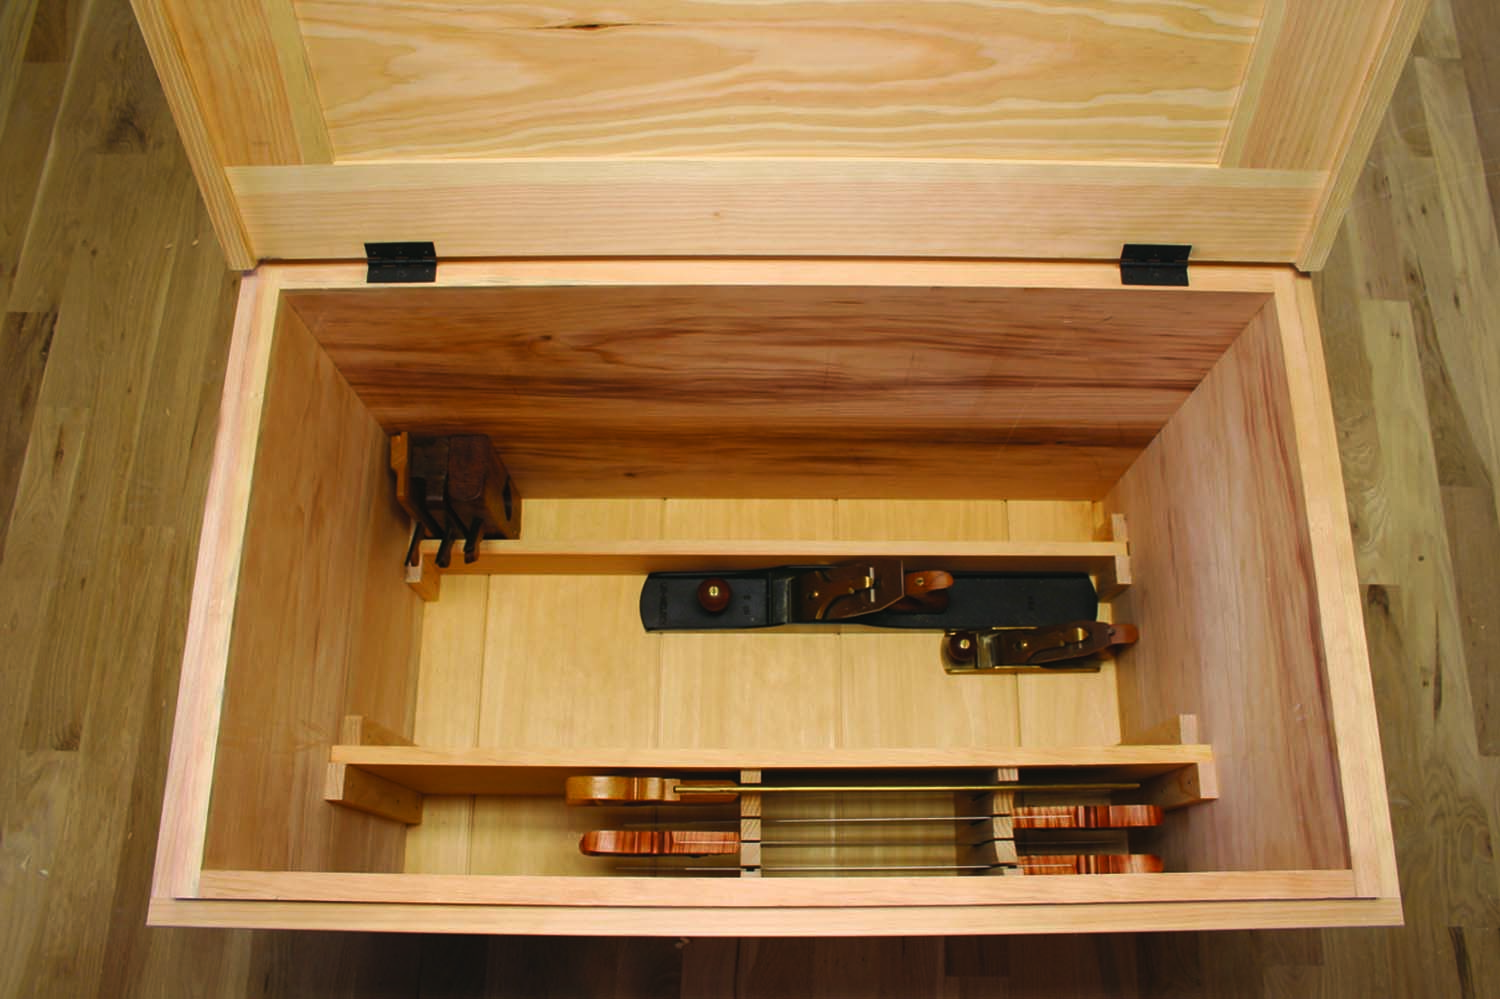
American tool chests tend to have two things on the bottom layer of the tool chest: planes and saws. Some English chests put the saws in a till affixed to the underside of the chest’s lid, some did not. Some American chests would put a saw or two on the lid at times, but mostly the saws went in a rack near the front of the chest.
The back of the chest is a good place for moulding planes and rabbet planes. Set them on their toes with the wedges facing the inside of the chest. A dividing wall under the wedges will hold the planes upright. The good thing is that most moulding planes are the same length and width. Storing the planes upright in your chest is ideal. This allows you to see their profiles and sizes.
This part of the chest will take up only a small part of the bottom area – about 3-1⁄2″ of space plus the thickness of the wall. So there is lots of space left.
Rule No. 10: Trays
The simplest and best way to divide the upper section is to build trays that slide forward and back. Two or three trays are typical. Chests that have trays that slide left and right are out there, though they are rare. Why? Probably because it makes it difficult to fetch the long tools below.
The trays slide forward and back on runners that are nailed and glued to the sides of the chest. These runners are like shallow steps up the side of the chest so that each tray can be pulled out of the chest should you need to repair it.
Rule No. 11: Sticking Stuff to the Lid & Walls
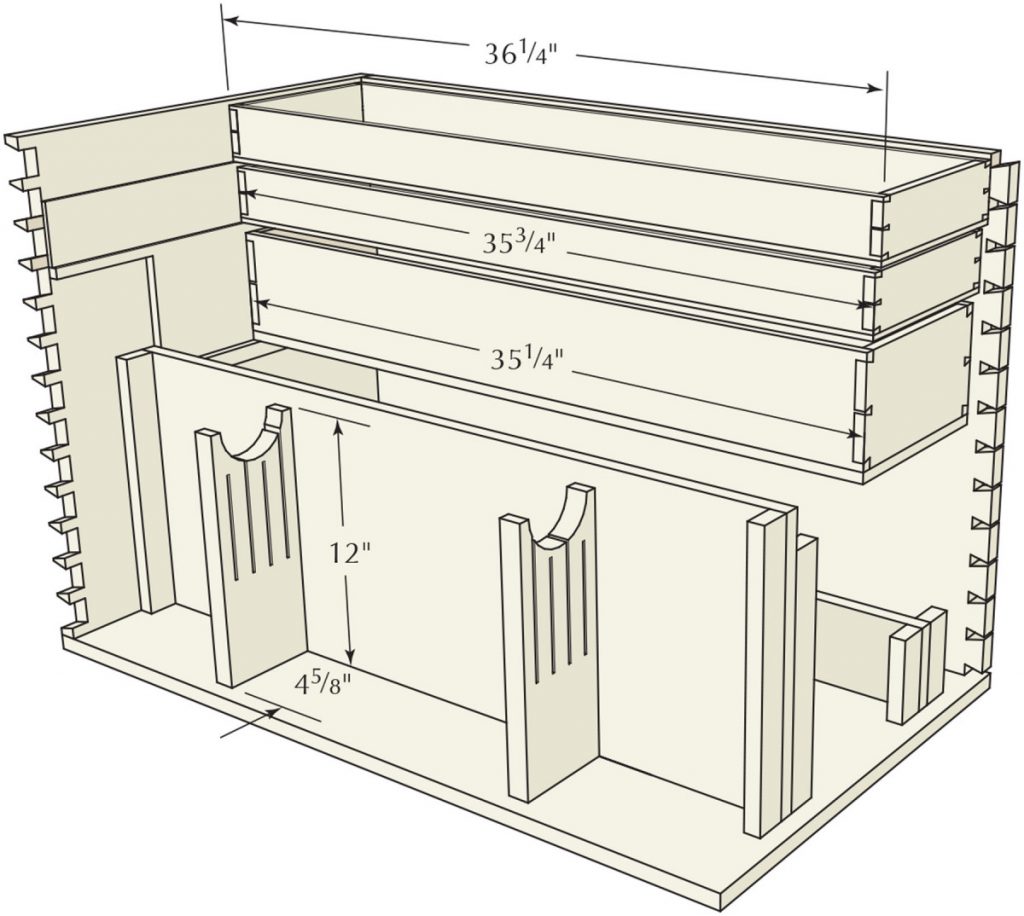
Classic bottom layout. Most chests have three compartments in the bottom. One for saws, one for moulding planes and one for bench and joinery planes.
Don’t forget that the front wall and the lid are good places to store flat stuff. On the lid, some people put a framing square or a few squares. I’ve seen a few handsaws and backsaws hanging on the lid, too. On the front wall of the tool chest you can hang try squares and joinery saws – this is the traditional approach. I simply rest my dovetail and carcase saws against the wall.

Three trays. Here you can see my three sliding trays arrayed so I can see everything in them. I’m only one hand motion away from accessing any of the three bins in the bottom of the chest.
Rule No. 12: Paint the Outside
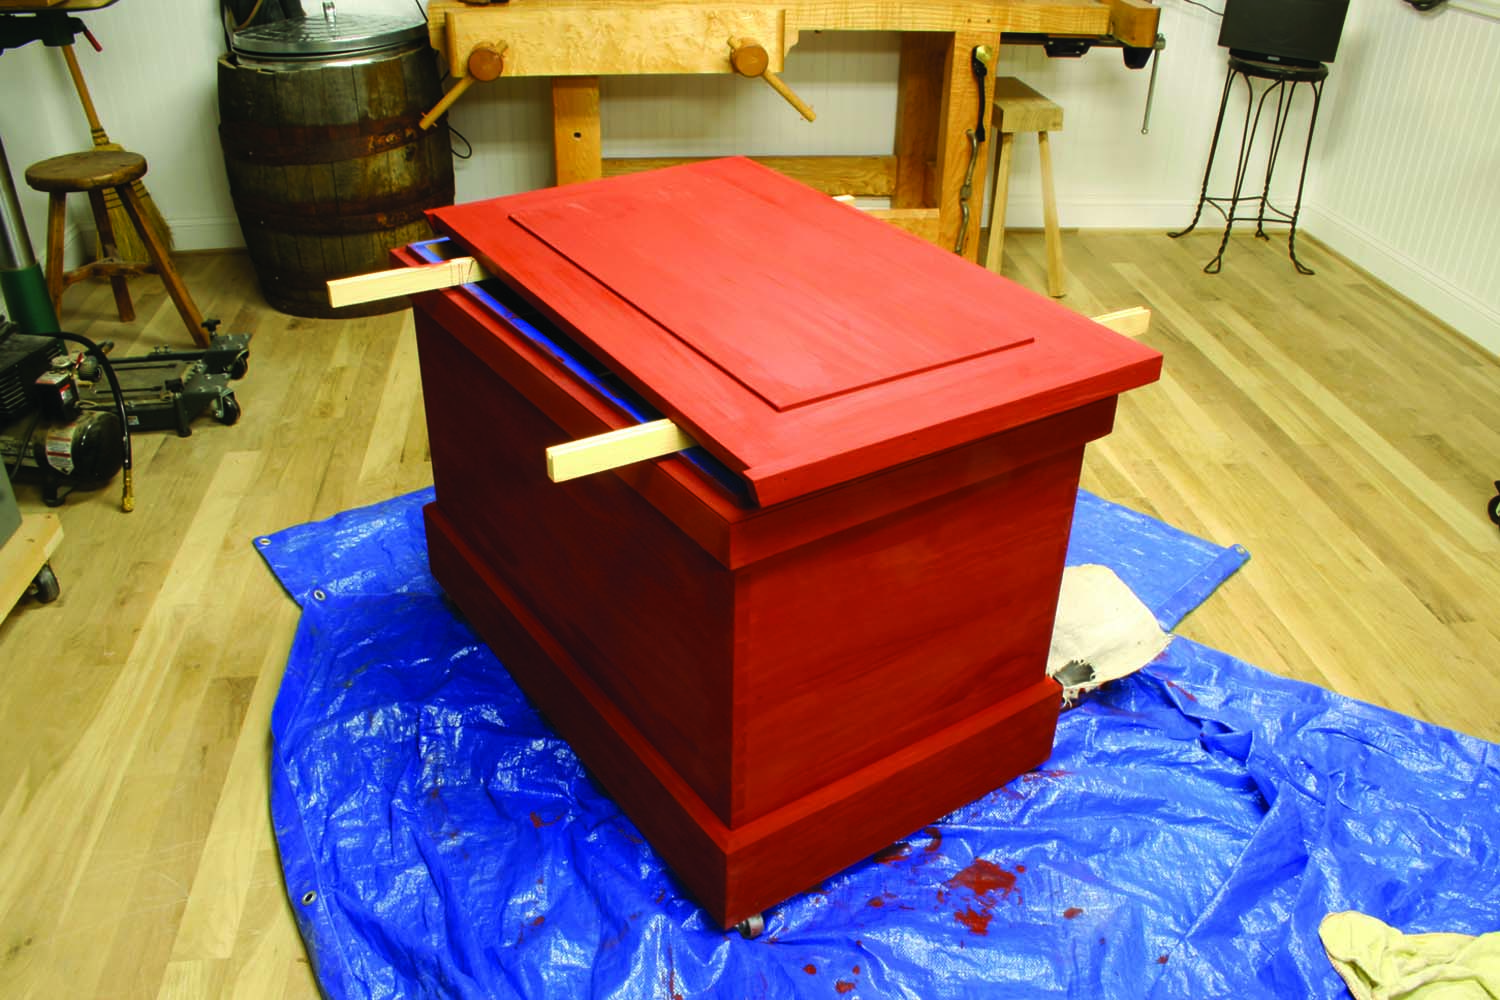
It’s clear. A painted finish is the clear choice for a tool chest. The paint protects the chest from the harsh indignities of workshop life.
This is the easy part. The outside of a tool chest should be painted. The modern choice is to use milk paint, which is durable and looks better as it ages. We don’t have lead-based paints available, which were the paints of choice in the pre-Industrial world.
On the inside of the chest, I recommend skipping a finish. If you must finish the inside, use shellac, which will cure quickly and won’t leave a nasty oily smell like linseed oil will.
‘More Valuable Than a Shipload of Gold’
Without a proper tool chest, the novel “The Life and Strange Surprizing Adventures of Robinson Crusoe” by Daniel Defoe would have been a whole lot shorter.
After Crusoe was shipwrecked off the coast of the Americas in the 1719 novel, he returned to the wrecked vessel to pillage it for supplies. Food, of course, was important to Crusoe. Second on the list: tools.
“And it was after long searching that I found out the carpenter’s chest, which was, indeed, a very useful prize to me, and much more valuable than a shipload of gold would have been at that time. I got it down to my raft, whole as it was, without losing time to look into it, for I knew in general what it contained.”
With the tools in the chest, Crusoe is able to build a whole life for himself, including a house and many niceties. Of course, first he has to learn to become a woodworker. And first he has to learn to sharpen.
On his second trip back to ship: “… I found two or three bags full of nails and spikes, a great screw-jack, a dozen or two of hatchets, and, above all, that most useful thing called a grindstone.”
Crusoe’s first project? Learning to process rough stock into boards so he could build a table and chair. His own words should be encouraging to beginning woodworkers who are teaching themselves the craft.
“And here I must needs observe, that as reason is the substance and origin of the mathematics, so by stating and squaring everything by reason, and by making the most rational judgment of things, every man may be, in time, master of every mechanic art. I had never handled a tool in my life; and yet, in time, by labour, application, and contrivance, I found at last that I wanted nothing but I could have made it, especially if I had had tools.”
Don’t Be a Modern Failure
Many modern efforts to improve our workshops have been unsuccessful. We tried to re-engineer our workbenches so they were portable, and they became too lightweight and spindly. We redesigned the sawbench into plastic sawhorses that are the wrong height and are flimsy. We invented iron quick-release vises, which won’t hold much of anything relating to woodworking.
And we have done the same thing with tool chests.
Our woodworking ancestors may have been uneducated and illiterate, but they certainly weren’t stupid. They had to make a living out of their tool chests, so the design and function of their tool storage was well-considered.
I also have found that a traditional tool chest has other lessons to teach – if you pay attention – including the fact that it holds just the right number of tools to build any piece of furniture – and no more tools than you actually need.
VIDEO: See how easy it is to get to all your tools with just one hand motion.
ARTICLE: Read the rules for workbenches.
Here are some supplies and tools we find essential in our everyday work around the shop. We may receive a commission from sales referred by our links; however, we have carefully selected these products for their usefulness and quality.


As I read this I wondered why you wouldn’t use screws (stainless or steel) instead of nails for the bottom? Either square-cut nails or screws would probably both need holes drilled so time doesn’t seem to be an issue.
Curiosity will probably get me one of these days, Larry
That dog will hunt. He will be happy because he is not loaded down with to many tools that require all of his time and attention to maintain. He only keeps what he can fit in his traditional English dog chest. He also loves to run and hunt which has kept him from getting fat and kept him free from any back issues. For him getting tools out of his chest is easy.
He is a very happy dog 🙂
I own a number of Chris’s books and find him to be a great writer and overall good woodworker. The part about his entire concept of a tool chest that I have never been able to get my head around in his total and complete inability to actually address the current group of people out here Woodworking. I have been in and out of the Woodworking profession and hobby for about 40 years and have worked as a framer, a finisher and a cabinet maker. And in all of that time I have never even once seen a fellow woodworker show up on a job site with a handmade wooden toolbox. Virtually everyone reading any of his articles are primarily hobbyists working out of their own shop. Why would anyone put their tools on the floor inside a box that does not roll around and deem this to be a good thing? When you add casters to your Toolchest you do not increase the footprint. Therefore you were not taking up any more shop space. When you do raise your toolbox off The floor your lower back will spend the rest of your life thanking you. I own and run a private Woodworking school and have done so for the last 15 years. One of my classes is building your own tool chest. I have yet to have my first request to put the Toolchest on the floor and require bending over to get anything out of the chest. Chris, for an undeniablely smart person you seem to have missed the boat on this one. If you continue to promote the floor tool chest don’t you think it would be reasonable to mention the challengers to the back of every person who’s going to build and use it? As a standalone project to build Solely for the joy of building, great idea! As a functional project, nope, that dog just don’t hunt!
If you look closely, you will see that both chests, the grey and the red, have casters. Now, if you put a chest like this in a truck or a van, you have to immobilize it so it won’t go crashing around like a loose cannon. You could set it up on some 4×4’s with the casters suspended off the floor.
As for the back-ache, that’s why it has to be high enough to lean on when you’re reaching down into it.
I need to build one of these boxes.
I’m confused about the statement that a single bottom board will move more than individual boards “that share the expansion and contraction.” Don’t they all move the same direction (i.e. expand or contract) at whatever time, just like all parts of a single large board? Or is there something about the fact that a full-width board will contain a range of growth ring orientations from the center out to both edges, whereas individual boards may all have them in the same orientation, and at least some woods differ in movement radially vs. tangentially?