We may receive a commission when you use our affiliate links. However, this does not impact our recommendations.
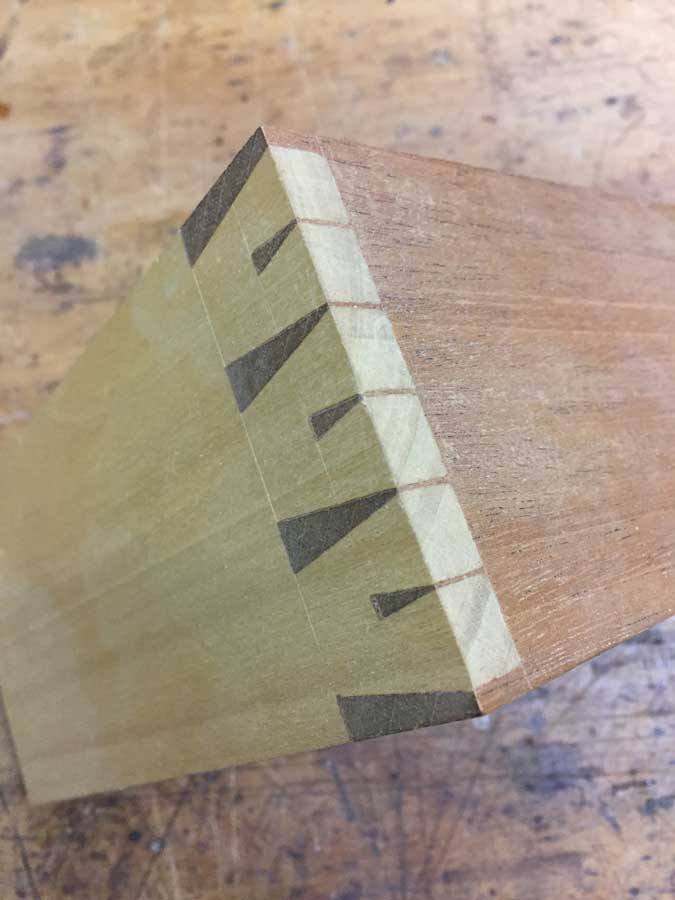 I recently posted on our Instagram account and Twitter feed the opening image from Rob Cosman’s 2006 article “Houndstooth Dovetails,” and it proved remarkably popular – so I figured I might as well post the article. And while that “opener” certainly benefited from good lighting, and great camera and a skilled photographer (as you can see below), the image above is from my phone, and taken just a few minutes ago. Rob’s sample joint (the one used in the opener) has been kicking around on my desk or bookcase since the day I started, and it’s seen a lot of abuse through desk moves and office moves – I even stood on it once (I weighed slightly less then; I’m sure it would still hold me, but I’m not going to test it…). In other words, while these fancy dovetails are perhaps more for show than strength, Rob says they’re stronger than a through-dovetail, and no harder to cut – though the layout is a bit trickier. So, without further ado, here’s how to cut this eye-catching joint:
— Megan Fitzpatrick

This joint adds strength and beauty to any corner. And it’s easier to cut than you might suspect.
by Rob Cosman
pages 66-71
April 2006 Popular Woodworking Magazine
I first saw this joint illustrated in “The Encyclopedia of Furniture Making,” by Ernest Joyce (Sterling). I was fascinated by the complexity of it and for years wished I could cut them myself.
When I finally cut the joint, I realized the only difficult part was the initial layout; the rest was a matter of sawing and chiseling to the line.
I have since been teaching others to cut them and most would agree that it is not as hard as it looks. If you have mastered the through dovetail, this is like cutting two of them at once. There are some tools that will make the job easier. In addition to the proper tools, there are a few tips I have picked up that should help the novice – and maybe the professional.
Why Use the Joint?
In considering strength, any well-done dovetail will usually be stronger than the application requires. However, the houndstooth adds more long-grain-to-long-grain glue surface as well as increasing the amount of pin wood in the joint. In a through dovetail, adding pins to create extra glue surface can make the baseline of the tail board the joint’s weak spot.
However, with two scribe lines, one at the base of the small tails and one at the base of the large tails, the tail board strength is not compromised with the houndstooth. For this reason it could be considered the best way to make a strong corner even stronger.
The Tools
Choosing the right tools for cutting dovetails will result in less frustration. In short, you need a dovetail saw with a straight blade and little set to the teeth. I prefer a rip-tooth configuration. You also need a well-tensioned fret saw, a sharp marking gauge, dividers, a marking knife, a device for marking the slope of your tails, and chisels with small side bevels that allow you to get into the tight corners of the tail section of the joint.
Cutting the Houndstooth
I cut all my dovetails’ tails first. I begin by hand planing the surfaces of each piece flat, smooth and square; this is the first step to an accurate joint and it makes it easier to see pen and knife marks. I label the face side of each piece (my guide here is simply to put the best face out).
I set the marking gauge for the exact thickness of the pin board and scribe this dimension all around the tail board.
After teaching hundreds of people to cut dovetails, I found the biggest problem (after sawing technique) was the transfer of tails to pins. To make this easier and more accurate, I use a technique borrowed from Ian Kirby. I use my skew block plane to cut a shallow (1⁄32″-1⁄64″) rabbet on the inside edge of the tail board. This shallow rabbet provides perfect registering for the tail board when it is set on the end of the pin board prior to scribing the pins.

Cutting a shallow rabbet on the tail board will help you mark your pin board later. The pin board will drop into the rabbet, which will increase your speed and accuracy.
The skew block is convenient to use because of its built-in fence. I set the fence so that with it riding against the end of the tail board, the far point of the blade (set to clear the edge of the plane) cuts right on the scribe line. One or two passes will usually do; however, if the wood is prone to tearing in this cross-grain cut, then a few shallow passes are more effective than one heavy cut. Most important to keep the rabbeted surface parallel to the inside face of the tail board. The next step is to set the marking gauge to establish the baseline of the small houndstooth pins. I find it best to start with hound’s teeth that are two-thirds the thickness of the pin board. With this setting, I scribe the two faces of the tail board; then, with the same setting, I scribe the end of the pin board referencing off the face side. I now set the gauge to be 1⁄32″ less than the thickness of the tail board at the rabbeted end and scribe this on the two faces of the pin board.
I use a pair of dividers to establish the width of the half pins in the end grain of the tail board. I want these half pins to be thick enough to prevent them from breaking or splaying during assembly. On a 5″- to 6″- wide joint, I would make the half pins about 1⁄4″ at the top. I use one leg of my dividers to register on the outside edge of the tail board and I make a point in the end grain with the other leg.

Use dividers to lay out the location of the half-pins on the tail board. Mark a half pin on one edge as shown; then repeat the process on the other edge.
With the interior pins just the width of my saw blade, I use another pair of dividers to step off the number of large tails I want between the half pins. Starting on one half-pin point, I walk to the other half-pin point using the number of tails as the spacing. I adjust the width of the dividers one way or the other until they land right on the opposite half pin point.
Until you have the exact setting, be careful not to leave any points in the end grain. To lay out the small houndstooth tails, I split each of the large tails in half (dividers make this easy). Then, using a dovetail marker, I mark out the tails. With my pen in the first half-pin point, I slide the marker over to it and strike a line across the end and up the face from the second (or furthest) scribe line. On the second point, I strike a line across the end and up the face starting at the first (or closest) scribe line.The third point starts at the second scribe line, the fourth at the first, and so on until I reach the second-to-last point. On the last point, I turn the gauge around to mark the opposite slope of each tail, the first one starting at the second scribe line, the next one at the first, and so forth. I also take the time to clearly mark the waste. A moment invested here can save frustration and expense as a result of having to start over because of an errant cut.

Use your dividers to step off three tails as shown (and marked in ink). Then reset your dividers to divide those tails in half for the houndstooth.
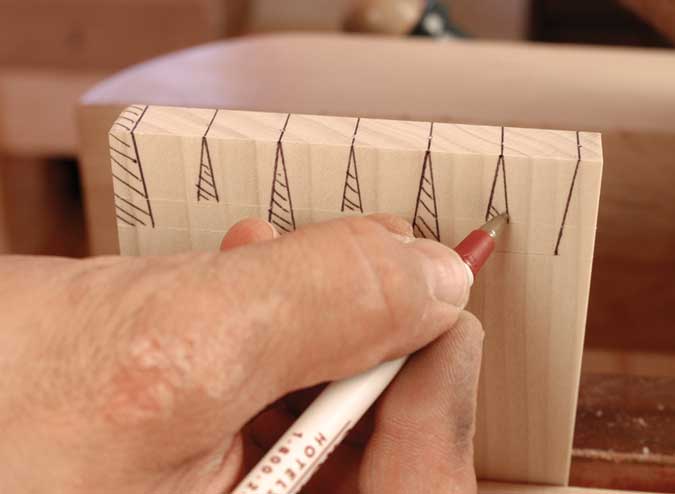
You will save yourself a great deal of frustration if you mark all your waste lines with crosshatching.
The tails are then ready to cut. I secure the tail board in the vise so it’s plumb and keep it low to reduce sawing vibration. I use a shoulder-wide stance and my right foot makes about a 60º angle with the front edge of the bench.
I grip my dovetail saw loosely with three fingers, index finger pointing down the saw. I want my sawing motion to be in a straight line from the tip of the saw to my shoulder. Think of the drive piston on an old steam engine for this. I use my left thumb and forefinger as an anchor point to start my saw. I pinch the top of the board with the bottom third of my thumb and forefinger. This keeps the end point of each digit above the set of the saw teeth. Light lateral pressure with the saw against my thumb and finger will ensure the saw starts cutting where I want it to rather than skirting across the end of the board.
With my thumb and finger pinching the end of the board, I can “inchworm” them one way or the other to move the saw closer and parallel to the line. Lifting to take most of the weight of the saw gives me a smoother start. I start my cut on the forward stroke; once the kerf is started the weight of the brass back will supply the needed downward pressure. Although I add a little extra to speed things up. My job is to aim the saw and move it forward and back. One of my students came up with the five “Ps” to sawing: 1) Pinch the wood; 2) Press the saw against the fingers; 3) Position the blade against the line; 4) Pull up on the saw taking most of the weight; 5) Proceed with the cut.
It can help the new sawyer to first get a shallow perpendicular kerf started across the end grain, then pause, aim the saw to match the angled line and begin sawing. Don’t try to correct an errant cut. It is better to continue off a few degrees and have a straight cut than to mess up the kerf by trying to change direction halfway in. Developing the skill to hold the saw level during the cut comes with practice; so in the beginning, saw to the face scribe line then carefully tilt and saw to the inside scribe line. Cutting to the line will help when cleaning out the waste between the tails – particularly between the small houndstooth tails. I make all the cuts angling the same way before changing and coming back the other way. This gives me a better chance of getting the angles right.
Removing Waste
Before I reposition the board to cut off for the half pins, I use the fret saw to remove the bulk of the waste between the tails. I slip the blade down the kerf to the bottom; feeling the bottom of the kerf with the fret saw blade gives me an idea of level. I then rise up just a bit and begin sawing as I turn the blade. The closer I saw to the scribe line with the fret saw, the easier my chiseling will be. I take care not to cut into the side of the tail.
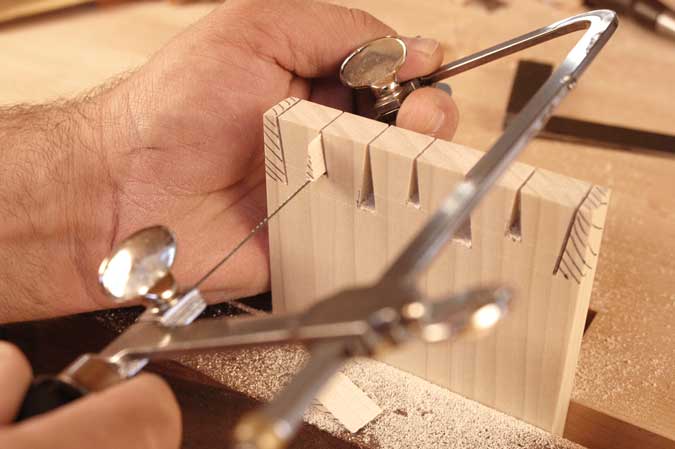
After you define your tails with your dovetail saw, remove as much waste as possible with a fret saw.
My next step is to orient the tail board horizontally in the vise to cut off the half pins. This is the first critical cut. The shoulders have to be on the mark. When I cut out the tails, I am creating a template to which pins will be made to fit. However, this cut already has a template – the inside face of the half pins. The inside of the half pin must meet exactly with the scribe line to ensure there’s no gap.
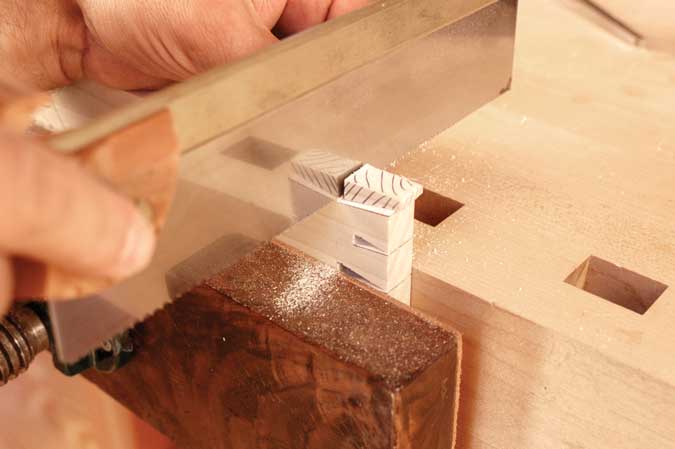
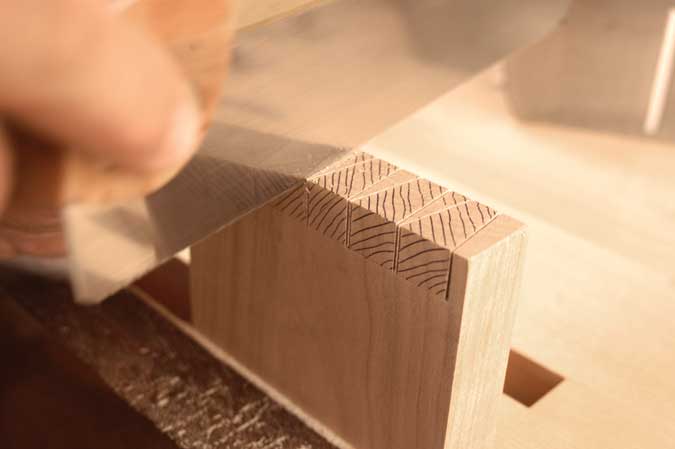
Sawing off the half-pin waste on the ends of the tail board is a critical operation. Make sure your layout lines are precise and deep.
The marking gauge line plays a big role here. If it has been scored deep and clean, as I start to move the dovetail saw across the wood on the waste side of the line, any material between the saw and the line will disintegrate. The saw will magically slide over to the shoulder line, providing a reference point for the saw. Now all I have to do is continue to saw vertically and be careful not to scar the side of the tail as I finish the cut.
Chiseling Between Tails
With the tail board flat on the bench, it is time to chisel out the waste. I always start chopping from the inside of the board and finish from the face side. This is always a two-step process, half from each face. Because the final chop eventually breaks through the waste, should the chisel get away from me the damage will be confined to the inside of the joint. I always use a backer piece to protect my bench.
While some authors advise undercutting this part of the joint, I instead hold my chisel vertical to avoid two problems. The first problem with undercutting is the possibility of exposing a gap should more face-grain material need to be removed than was planned for. These gaps can be fixed but are hard to disguise. The second problem comes from what I call “push back.” The wedge shape of the chisel creates a fair bit of pressure from the waste side of the chop. If the chisel is angled as in undercutting, the wood left supporting the chisel edge at the scribe line is a mere point. Holding the chisel vertical provides the maximum amount of wood at this critical spot. Also, the more waste there is, the greater the pressure on the chisel. For this reason, I try to saw as much of the waste away as I can.
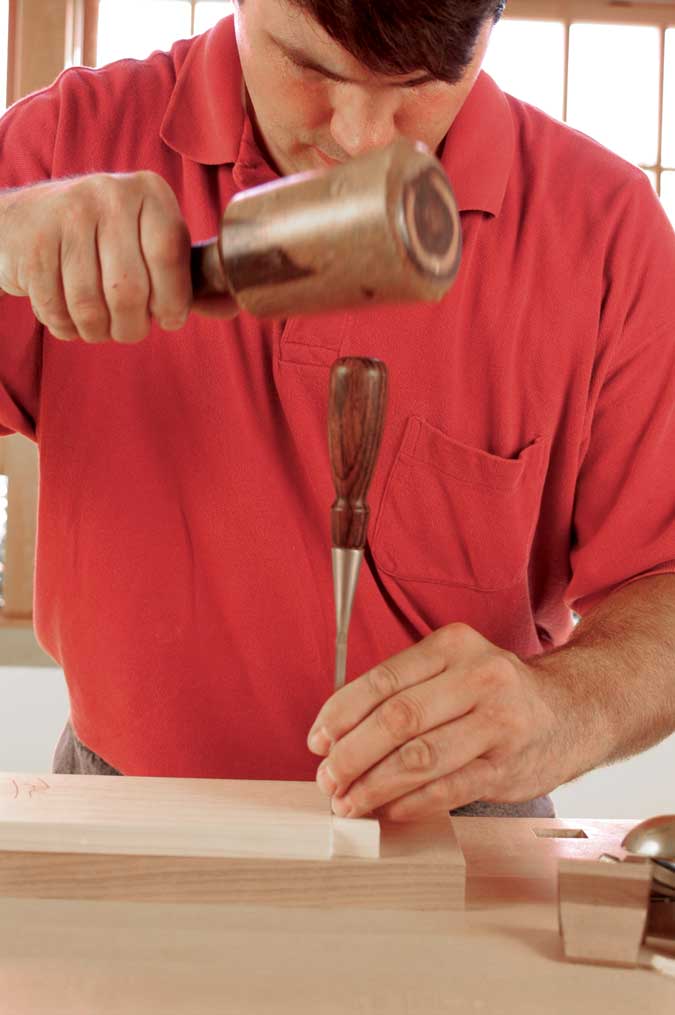
Chiseling the waste between the tails. Notice the body position. This allows me to ensure my chisel is indeed vertical when chopping.
If I have sawn to the line on both sides of the tails, my corners will be clean. If not, I use the corner of a narrow chisel to clean them up.
A small bevel-edge chisel allows me to remove any additional waste between the tails.
Cleaning up the bottom between the small tails is a bit more difficult because of the limited space. With the waste removed, I use a wide chisel to clean the outside half-pin corner. This spot usually has a bit of material left because the square-bottomed saw can’t cut into the angled corner.
Starting the Pin Board
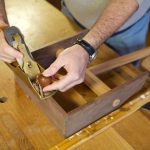
The next step is “make or break” – transferring the tails to the pin board. I like to clamp the pin board upright in the shoulder vise, setting the business end flush with the top of my smoothing plane set on its side. With the pin board firmly held, I move the plane back 7″ or 8″ so I can create a bridge between the two using the tail board. I reference the edge of the tail board rabbet against the inside edge of the pin board. I make sure the long edges of the tail and pin boards are flush. The downward pressure I now apply with my left hand on the tail board is transferred to a much smaller surface area (the end of the pin board and edge of the plane) which makes it easier to keep the tail board from moving while I mark the pins. I approach the side of the tail with my marking knife on a 20º angle. As I bend the knife to lay the blade flat against the side of the tail, the force of the angle holds it tight while dragging the point through the end grain of the pin board. I explain this to my students this way: 80 percent of your effort and concentration needs to be on keeping the knife tight to the side of the tail; only 20 percent is on the mark being cut in the pin board.

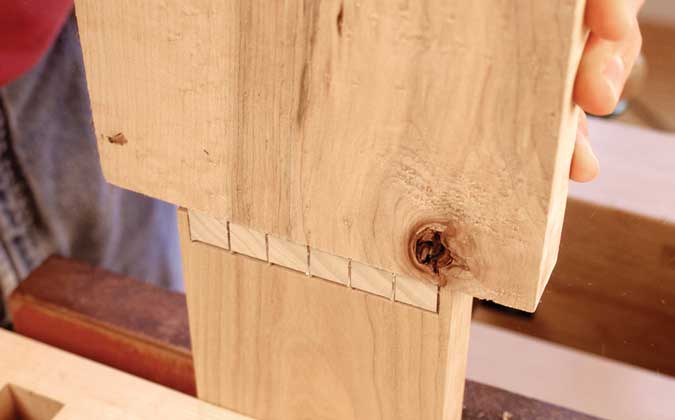
Position the tail board rabbet on your pin board. Use a marking knife to transfer the tail board layout onto your pin board.
Scribing the small tails takes even more care; the space is small and keeping the knife tight to the tail is difficult. Once all the marks are made and before I remove the tail board, I use my bench lamp to inspect the scribe lines to make sure none wandered away from the sides of the tails. As a final procedure on the tail board, I chamfer the inside edges of each tail.

Chamfering the inside edges of your tails will make your joint assemble more easily. I use a chisel.
This is done with a chisel and I start the chamfer in about 1⁄16″ from the end. Although it may change depending on the thickness of the piece, I usually run the chamfer an 1⁄8″-wide down the side of the tail. I use the chisel to clip off the pieces where they meet the scribe line.
Sawing the Pins
Before I start work on the pins, I make sure the board is standing plumb in the vise. The easiest way to check this is with a square against the benchtop and the board. Because I make my vertical cuts by feel, it is critical that the work is plumb. Developing this ability is probably the best sawing skill to have. It helps if you own a pistol-grip dovetail saw because it will register in your hand the same way each time you pick it up. Round-handle saws don’t offer this advantage. I have my students practice making multiple vertical cuts 1⁄16″ apart in the end of a plumb-standing board. Doing this helps spot any left or right drifts that can be corrected.
To lay out the vertical pin lines, I find it easier to draw starting from the scribe than trying to stop on it. For this reason, I strike my lines from the scribe up to the knife marks. I use my dovetail marker on its side to do these. I know from experience it is easy to be so focused on sawing to the line that if the line was drawn past the scribe, I could accidentally saw past it as well. Because of this, I make sure my lines stop where I want my saw to stop.
At this point, it is important to mark the waste clearly and carefully. I take the time to draw hatch marks on all the waste; this is my best bet against cutting on the wrong side of the line, because knife marks are not that easy to see in the end grain of some woods. While some authors advocate rubbing chalk dust into or dragging a pencil through the knife mark to highlight it, I find these suggestions make it harder to be precise. I use my bench lamp to shine light across the end of the board creating a bit of a shadow in the knife marks, which makes them easier to see.
The knife mark leaves a V in the end of the pin board; half of the V must remain with the pin and the other half is wasted in the kerf. If any of the pin half of the V is removed, the joint will be loose. If any of the waste half of the V is left the joint will be too tight. In drawer work where two different species of wood are used there can be some leeway.
Mark your waste areas on your pin board and saw out the waste – trying to split the knife line in half with your saw.
Usually the secondary wood (drawer sides, internal components) is a mildly hard species. The primary wood is often the harder and denser of the two. In this case, the mild wood will compress a little allowing for a good fit even if some of the waste half of the V is left attached to the pin. In casework where both pieces are of the same species that same excess would cause a split in one of the components. Knowing how much you can leave with different woods can only come with experience. For this reason I find it best to shoot for perfection with each cut. Now using the same 5 “Ps” of sawing, I split the knife mark.
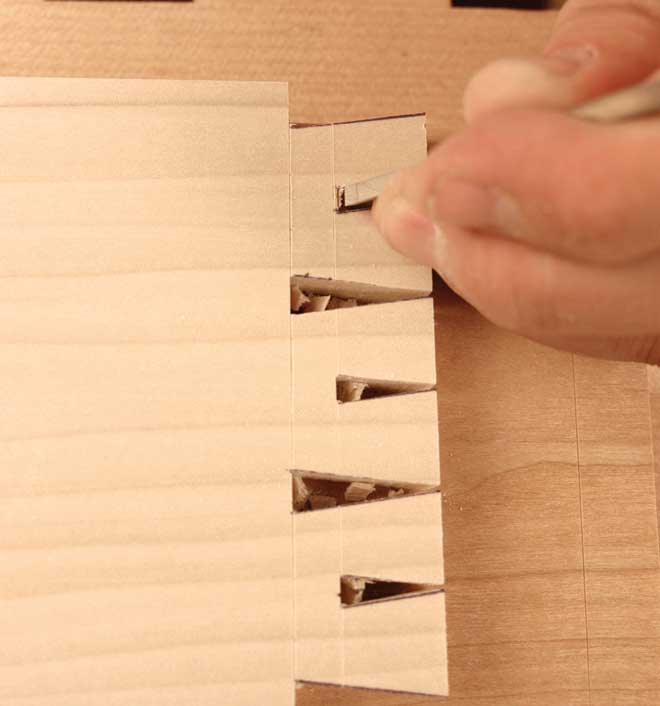
Having the small pin scribe line across the end of the pin board can be a bit confusing, so as soon as I have made all my vertical cuts, I carefully saw out the waste with the fret saw. I then use the fret saw to undercut the waste portion at the back of the small pin. I use a chisel to vertically pare away most of the waste. This makes it easier to tell what is waste and what stays.
Chopping the Pin Board
With the pin board face down on the bench, I chop the waste and am careful to chop in the scribe and down almost to the back of the small pin. I flip the board over, then with a chisel narrow enough to get between the large and small pins, I chop from the scribe until I break through the waste. It helps to tilt the chisel to ride the angled edge of the pin; this produces a clean corner between the side of the pin and the bottom of the socket. It also means less work in the next step.
Then I clamp the piece vertically and remove any waste. I want the corners to be clean and sharp. I am also careful not to leave a bump in the bottoms of the sockets. The final procedure requires that I turn the board around to finish paring to the back of the small pin. A narrow chisel is easier to use here and requires less force to cut the end grain. I first make a vertical pare with the chisel in the scribe at the back of the small pin, with the bevel facing the waste. If the grain is angled in the wrong direction for a clean pare, I take shallow pares to sneak up on the scribe. A quick horizontal clipping of the pared wood at the base, and the joint is ready to assemble.
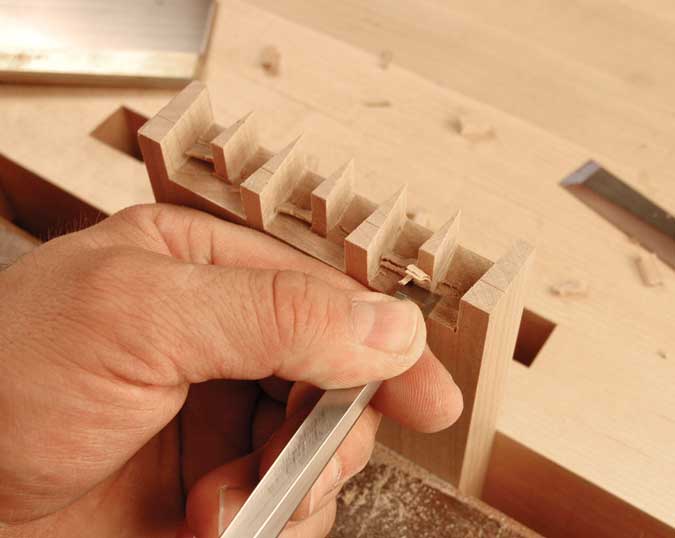
Once you have removed most of the waste with your fret saw, you’ll need to remove an extra chunk of waste behind the houndstooth by chopping and paring it out.
Don’t Dry Fit the Joint
If you’ve worked accurately, dry fitting will only make the final fit less than it could have been. As stated earlier, I start with stock that is square, flat and smooth. Accurate layout lines allow for accurate sawing. The tail cuts have to be perpendicular across the end and straight to the scribe; exact angles aren’t critical.
Transferring the tails to the pins must be accurate, and inspecting before moving the tail board will let you know if the lines in the pin board are where they should be. The pin-saw cuts must be perpendicular to the end and must split the knife marks. It is easy to see if you have left too much of the knife mark. You can check the bottom of the pin sockets with a straightedge to be sure there are no bumps that would keep the joint from seating. Providing the chisel work has been done to the scribe lines, this joint will fit. Everything a dry fit would tell you can be read from your cuts and scribe lines before assembly.
Tips for Glue-up
Having everything handy makes the glue up less stressful and all but ensures a successful finale. Steel hammer, small square, pallet knife, glue, wiping rag, pounding block (an extra one is wise) and a few clamps just in case. I apply the glue sparingly; you don’t want a lot of excess glue running down the boards nor do you want it collecting in the bottom of the pin sockets.

A pallet knife allows you to apply glue quickly and in the right places. Coat all the long-grain surfaces.
I glue all the mating long-grain surfaces and a touch on the end-grain shoulders of the tail board. The wet glue will act as a lubricant to help you to get the joint together. The extra surface area in a houndstooth adds substantially to the assembly friction, so any help is welcome. With the pin board firmly in the vise, I get the joint started with just hand pressure.
Once things are lined up, I use a pounding block and hammer to completely seat the joint. The pounding block needs to be wide enough to cover the entire joint; this will prevent splitting the tail board should part of the joint go together more easily than another. I always orient the block so that I’m pounding through the end grain. This offers a much more positive transfer of force. It is a good idea to have the end of the block smooth and square. You don’t want any unnecessary dents caused by a rough block.
A pounding block distributes your blows evenly across the joint.
If the marking gauge was set for a little less than the thickness of the tail board, the joint will seat before the pounding block starts running into the ends of the pins. This is a lot easier than trying to pound around all those small pins to seat the joint. At this point I remove the piece from the vise and check it for square. If it has to be adjusted, I always reseat it when I am done. If it’s necessary, a clamp across the joint, squeezing the half pins together, will help hold it square and seated.
I wipe away any excess glue from the outside right away; planing will do the final cleanup. Any glue on the inside is best removed once it has skinned over enough so it doesn’t stick to everything in sight. If there are noticeable gaps, they are easier to repair while the glue is soft. These are always repaired in the end grain and from the side that will show the most.
Wedges cut along the grain and from the same species will almost disappear. Some woods are more forgiving with this procedure than others. Mahogany end grain is the best I have seen at absorbing a wedge. With a bit of practice, it won’t take long before repairing gaps is something of memories. PWM
 If you’re new to dovetails altogether, check out our eMag on the joint – in it, you’ll find expert instruction for through-dovetails, half-blinds, sliding dovetails and more (by hand and power).
Here are some supplies and tools we find essential in our everyday work around the shop. We may receive a commission from sales referred by our links; however, we have carefully selected these products for their usefulness and quality.