


We may receive a commission when you use our affiliate links. However, this does not impact our recommendations.
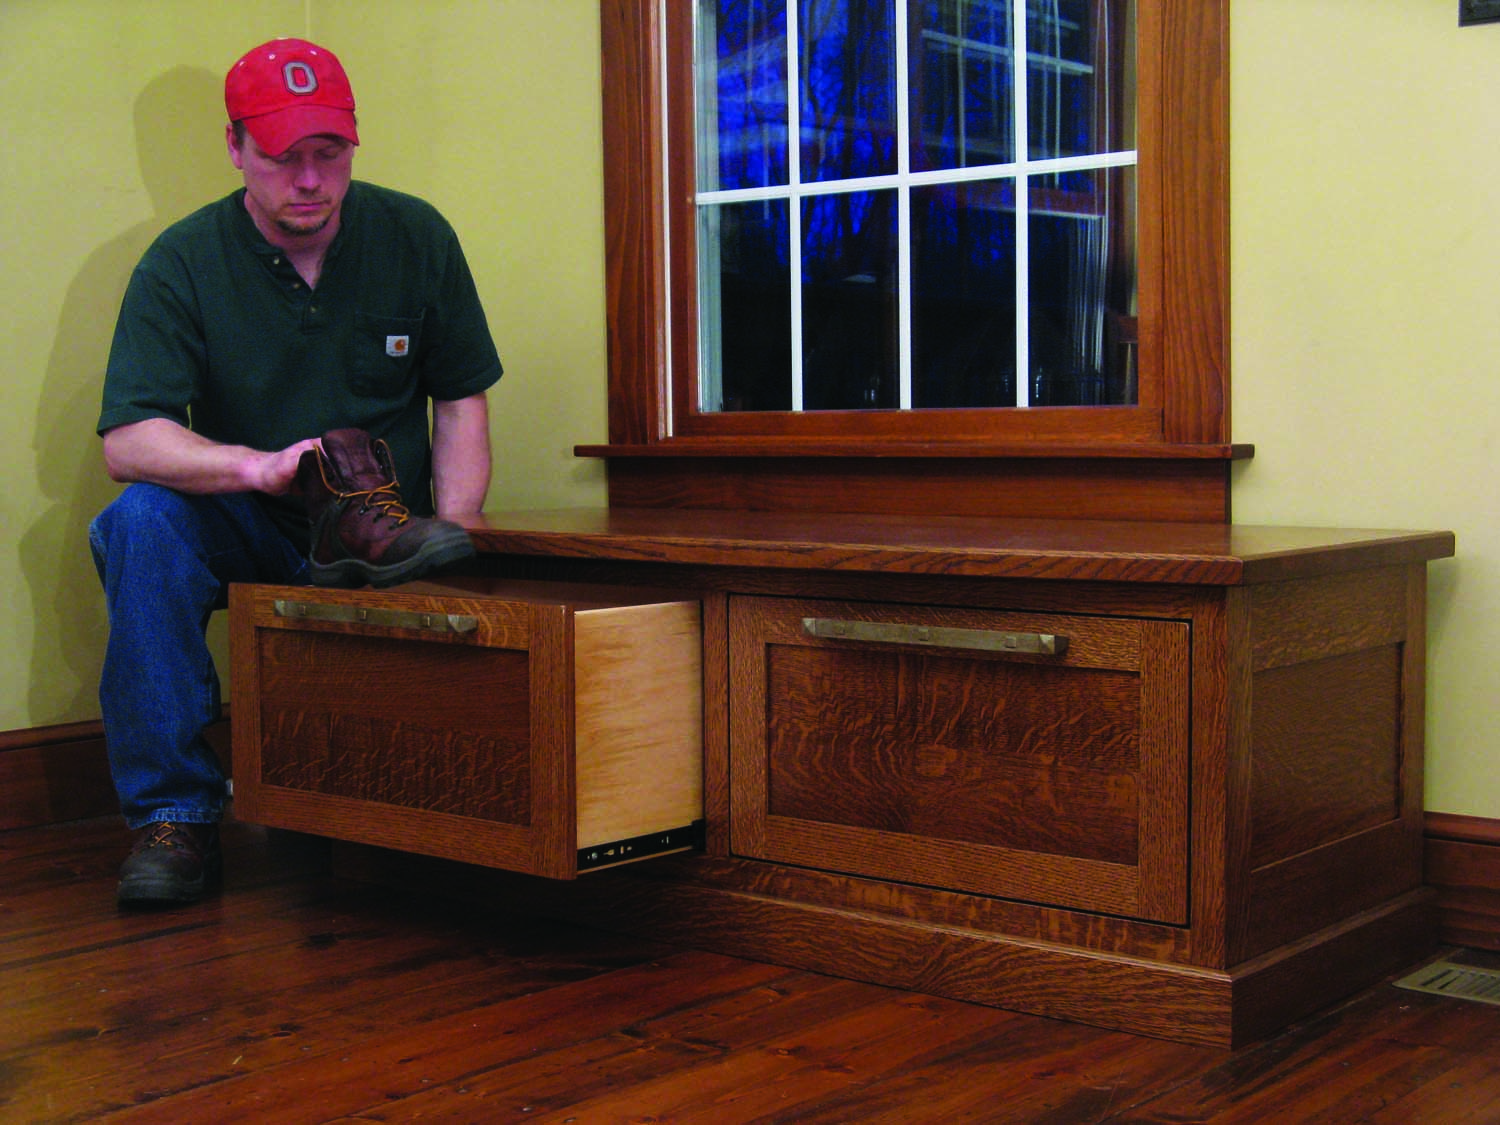 I’m a boot guy. I wear work boots pretty much every day I spend in my shop—and as a hard-working professional cabinetmaker, that can often be six days a week.
I’ve got three pairs of well-worn Carhartts to cycle through, plus a pair of hiking boots. They’ve been cluttering up my hallway for years, but no more. This boot bench provides plenty of storage space for all of them plus a convenient place to sit while tying up my laces.
How it’s constructed
I’ve blended three different construction techniques in building this bench. The end panels and the drawer fronts are classic frame-and-panel assemblies, giving the bench an old-fashioned look (Fig. A).
The front of the bench, however, is a face frame made with butt joints and pocket screws. The face frame is joined to the end panels with a lock miter, giving the impression that the corners of the chest are made with thick pieces of wood. (In reality, all the framing pieces are 3/4″ thick.) But those corners wouldn’t fool anyone who knows wood well. Did you notice that they have ray-flake figure on both sides? If they were solid pieces, only one side would be quartersawn; the neighboring side would be plainsawn, which doesn’t show ray-flake figure. I prefer the “all-quartersawn” look, even though it’s artificial.
The third construction method is quite simple: The bottom and the back of the bench are made of plywood. Screwed together at a right angle, they add the rigidity necessary for a large box with an open front.
Frame-and-panel work
The most efficient way to begin building the bench is to make the end panels and the drawer fronts at the same. They’re built exactly the same way, so you only have to set up your tablesaw one time to cut the joints.
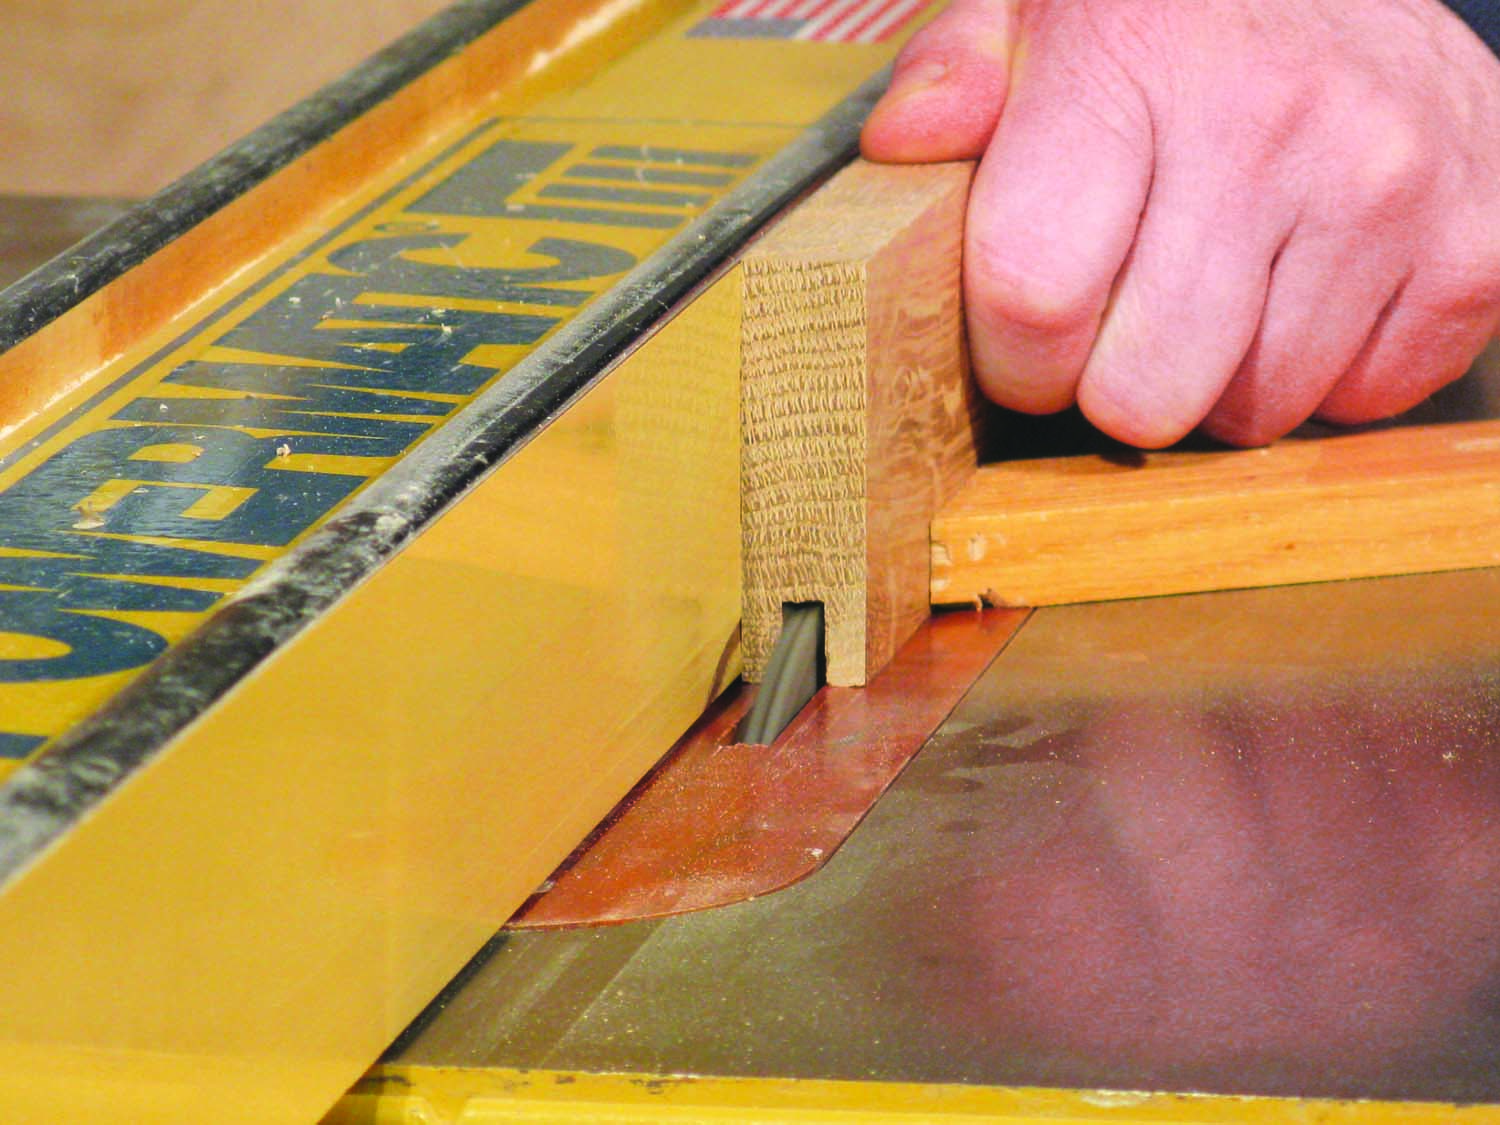
Photo 1. Begin by building the frame-and-panel ends of the bench. Most of the joints are cut with a dado blade. First, cut grooves in all the rails and stiles.
Begin by milling the end panels’ stiles and rails (A1, A2 and A3) and the drawer fronts’ stiles and rails (B1 and B2). Rip all of these pieces to final width and trim them to final length. Cut a groove along the inside edge of each piece (Photo 1). Cut mating tenons on the rails (Photo 2).
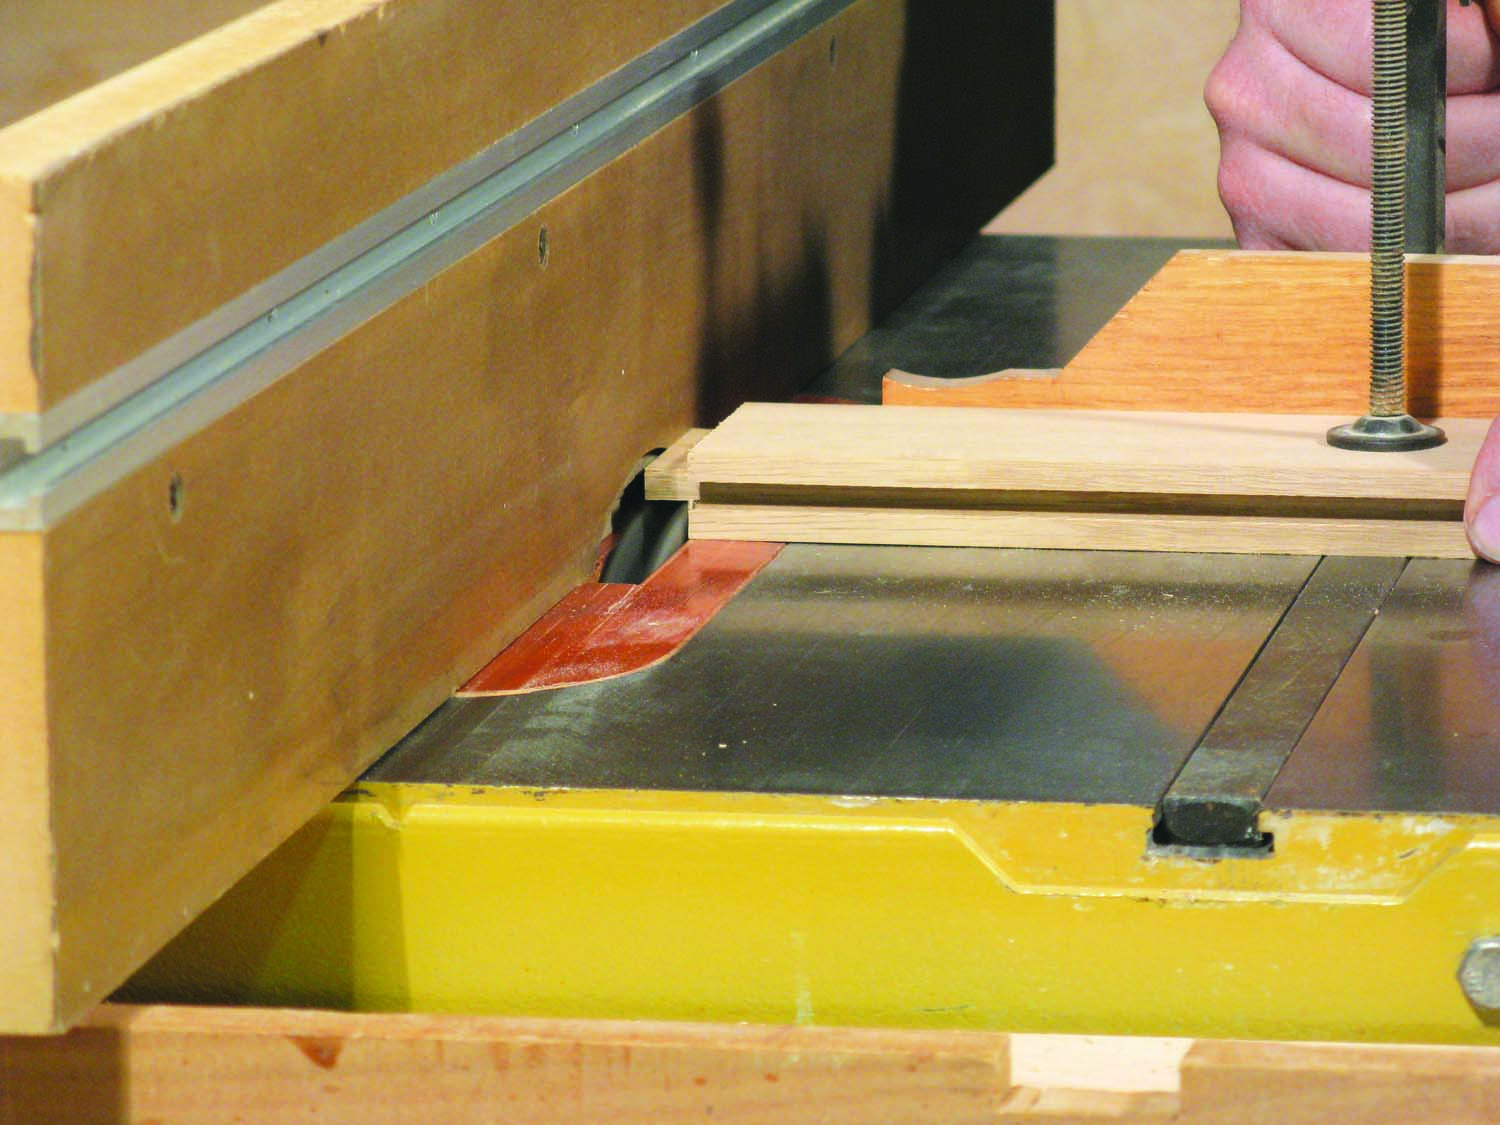
Photo 2. Cut tenons on the ends of the rails. A clamping accessory for the miter gauge keeps the workpiece securely in place.
Glue up the panels (A4 and B3). You can start with material that’s 5/8″ thick, glue it together, then run it through the planer to the final thickness of 1/2″. Assemble the frames, without glue, then measure the distance between the bottoms of opposite grooves to determine each panel’s final dimensions (see Cutting List). I place rubber “spaceballs” in the grooves to allow room for the panels to expand in high humidity (See Fig. 02), so I subtract 3/8″ from those groove-to-groove measurements to calculate each panel’s dimensions. Cut a rabbet all the way around the panels to allow them to fit into the grooves (Photo 3).
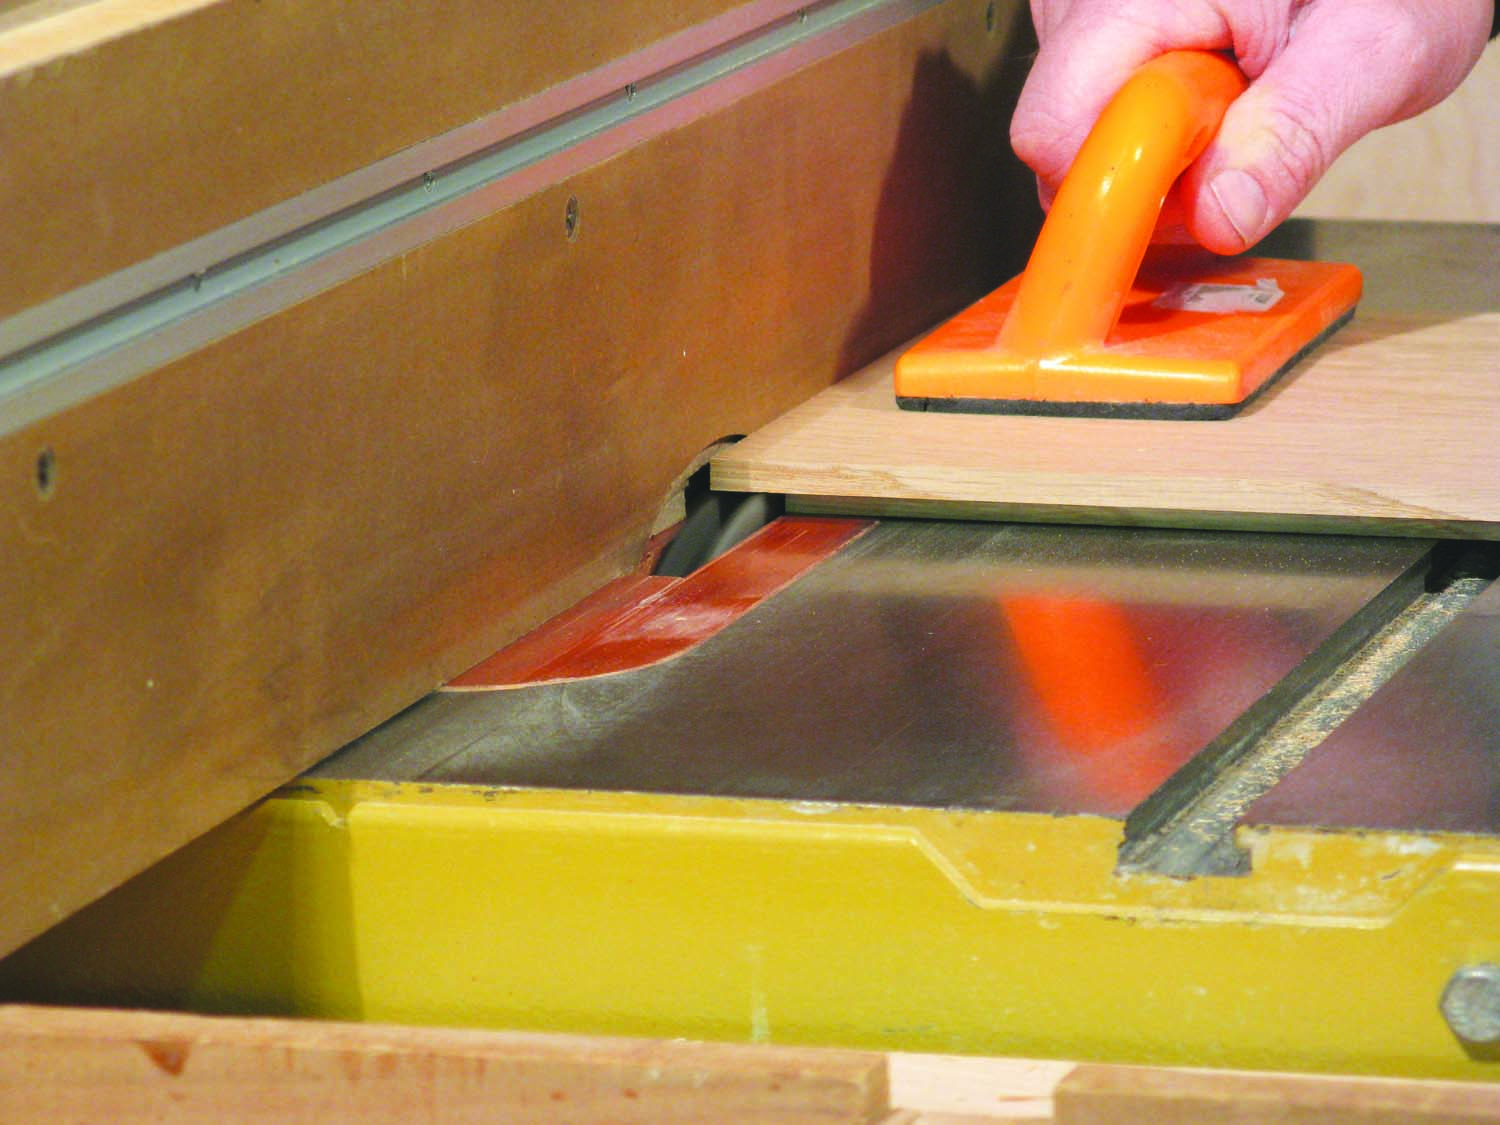
Photo 3. Saw rabbets all the way around the panels. Apply stain and finish to the outside face of the panels, then glue the frame-and-panel assemblies.
If you’ll be staining your piece, apply the stain now to the outside face of the panels. Add one or two topcoats of finish as well. Staining and finishing all the way to the edges of the panels guarantees that bare wood won’t show when the panels shrink, which they’re sure to do at some point.
Glue the frame-and-panel assemblies. After the glue dries, sand all the joints even, front and back.
Build the case
Mill the parts for the face frame (C1 through C4). The openings for the drawers should be 1/8″ larger, all the way around, than the drawer front frames you’ve made.
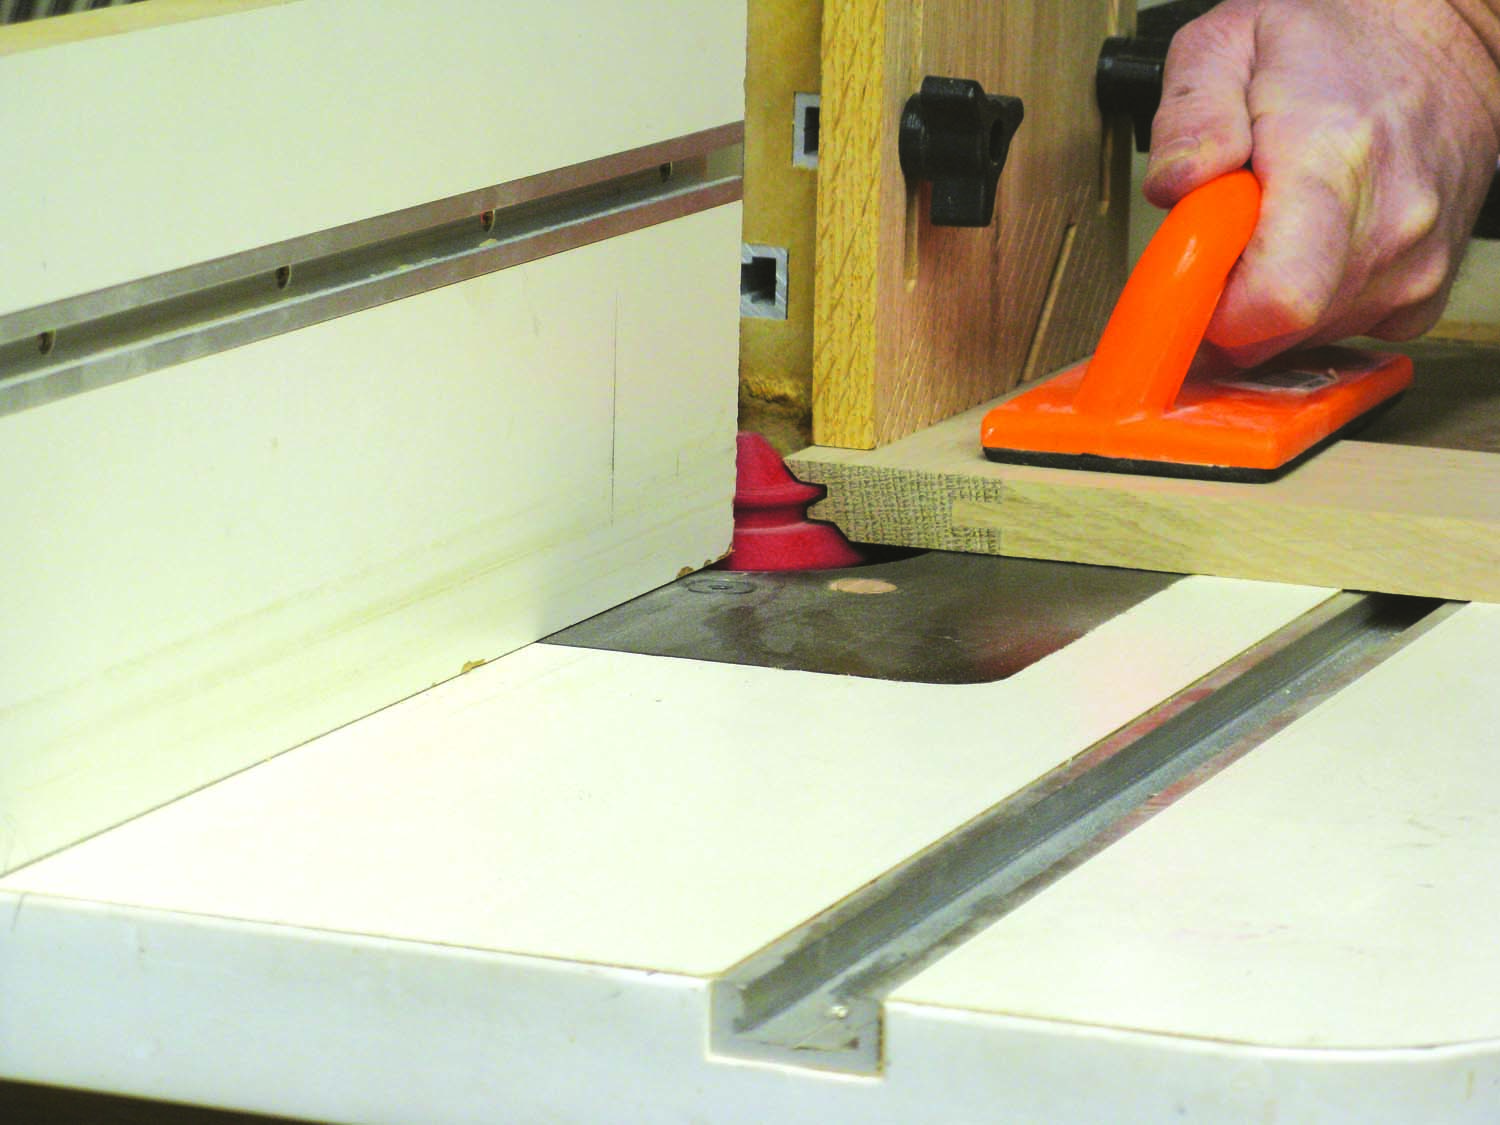
Photo 4. Rout a lock miter on the front stiles of each end panel. When cutting these joints, one piece is always held horizontally. The mating piece is routed vertically.
Cut mating lock miter joints on the end panels and the face frame’s stiles (Photos 4 and 5). You’ll need to make some test cuts in scrap wood first, of course, in order to correctly set the router bit’s height and the fence’s position. These joints don’t have to be lock miters—they could be splined, instead. I prefer lock miters because they’re much easier to glue up. Assemble the face frame with pocket screws.
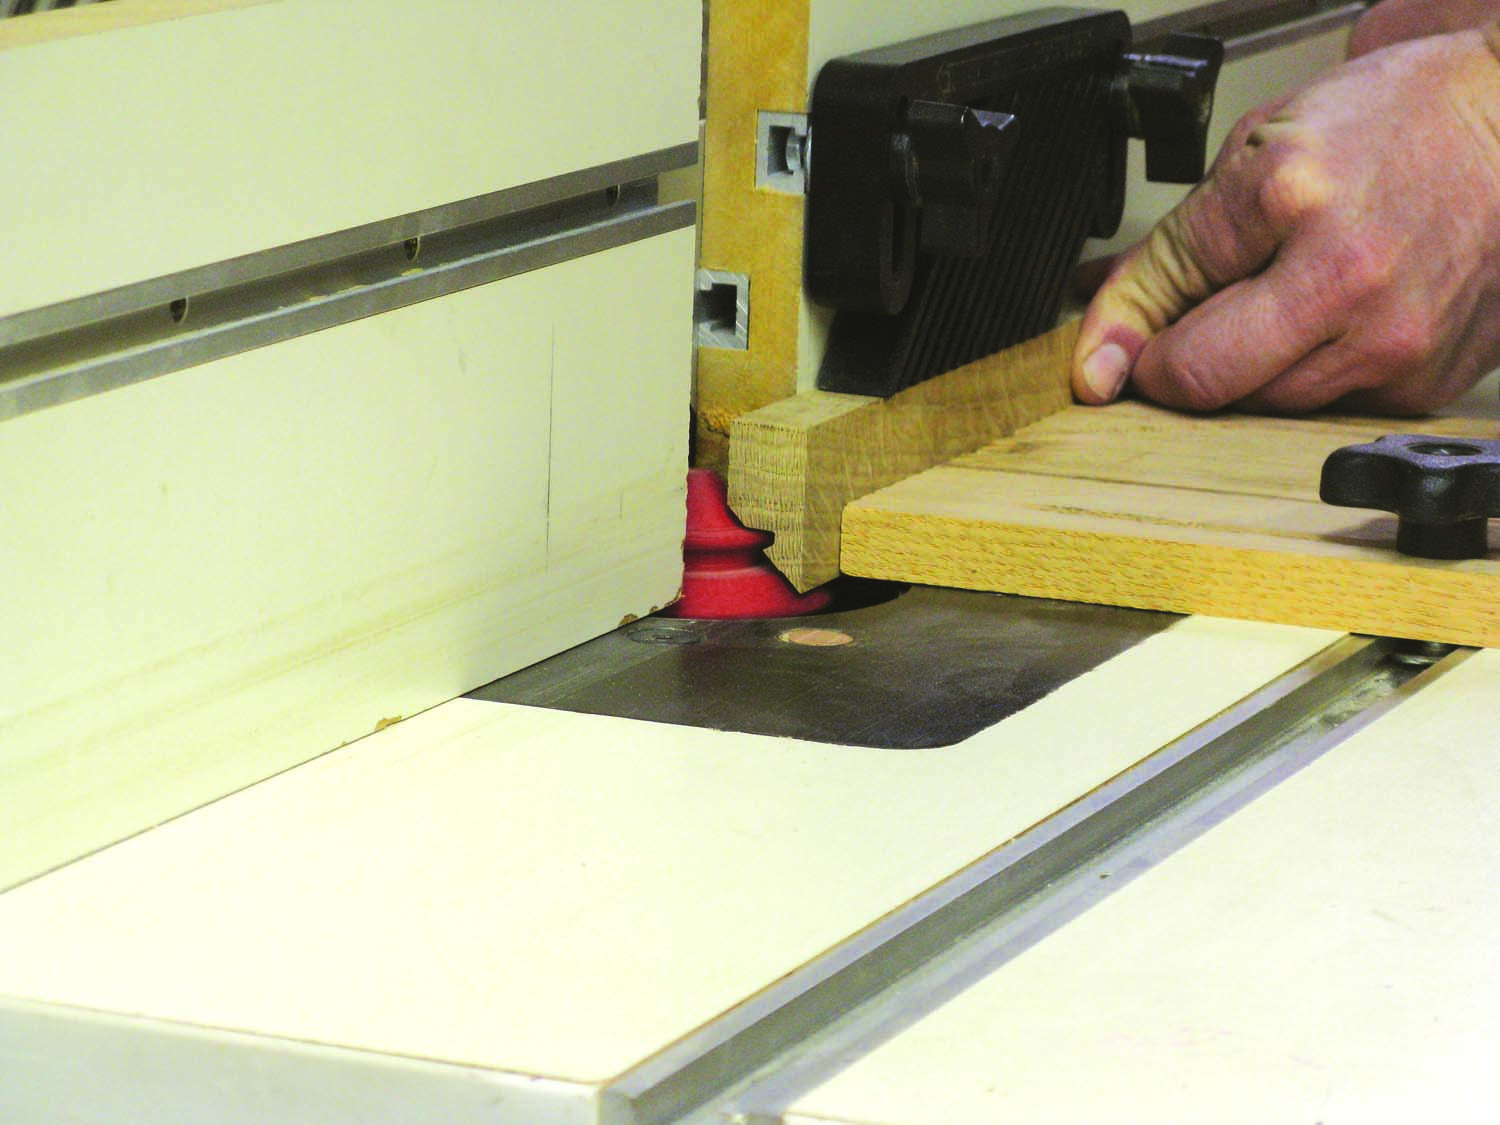
Photo 5. Rout a matching lock miter on the stiles of the cabinet’s face frame. Assemble the face frame with pocket screws.
You’ve now made three sides of the case—the front and two ends. The next step is to assemble them, without glue, in order to make exact measurements for the bottom (D1) and back (D2). Before you do this, be sure to cut the rabbets on the end panels that receive the back (Fig. 02). Clamp the assemblies together, then measure the distance between the end panels to determine the bottom’s length. Measure the distance from the face frame to the rabbets to determine the bottom’s width. Cut the bottom to size, then drill a number of pocket holes around its perimeter, on the underside.
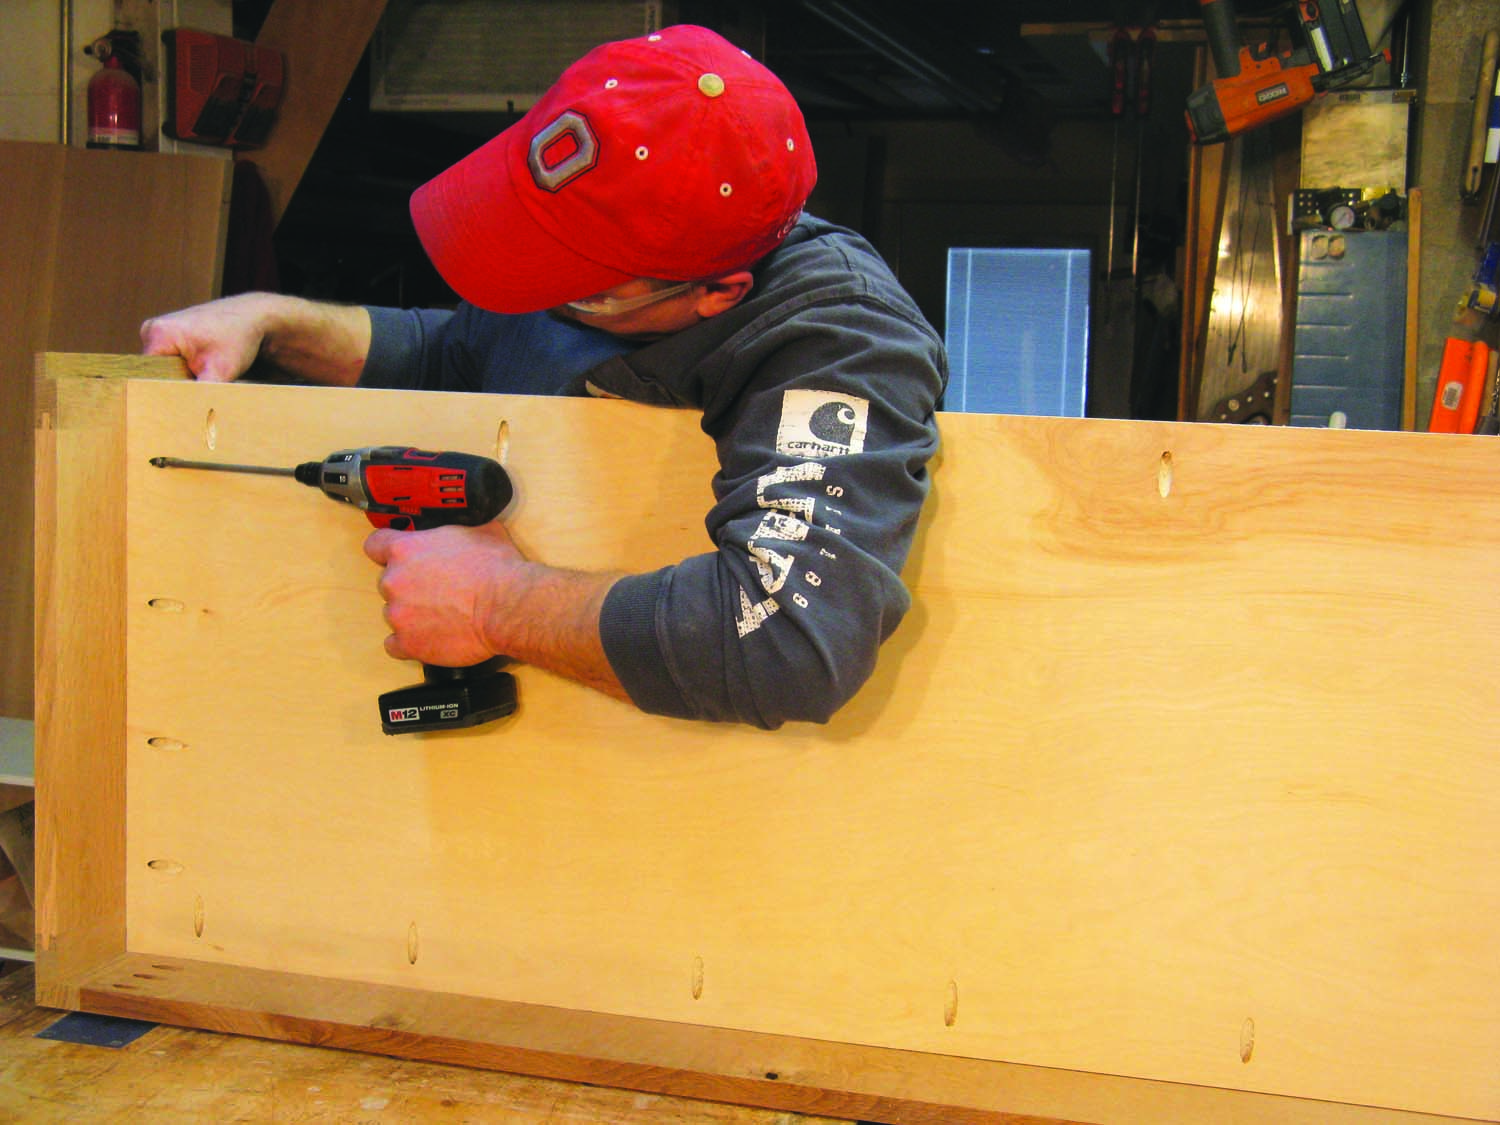
Photo 6. Assemble the case. Start by gluing one end panel to the face frame. Next, use pocket screws to fasten a plywood bottom to both parts.
Glue one of the end panels to the face frame, making sure the two parts are square. After the glue dries, fasten the bottom to these pieces (Photo 6). (Note that the plywood is flush with the top edge of the face frame’s lower rail.) Glue on the remaining end panel (Photo 7).
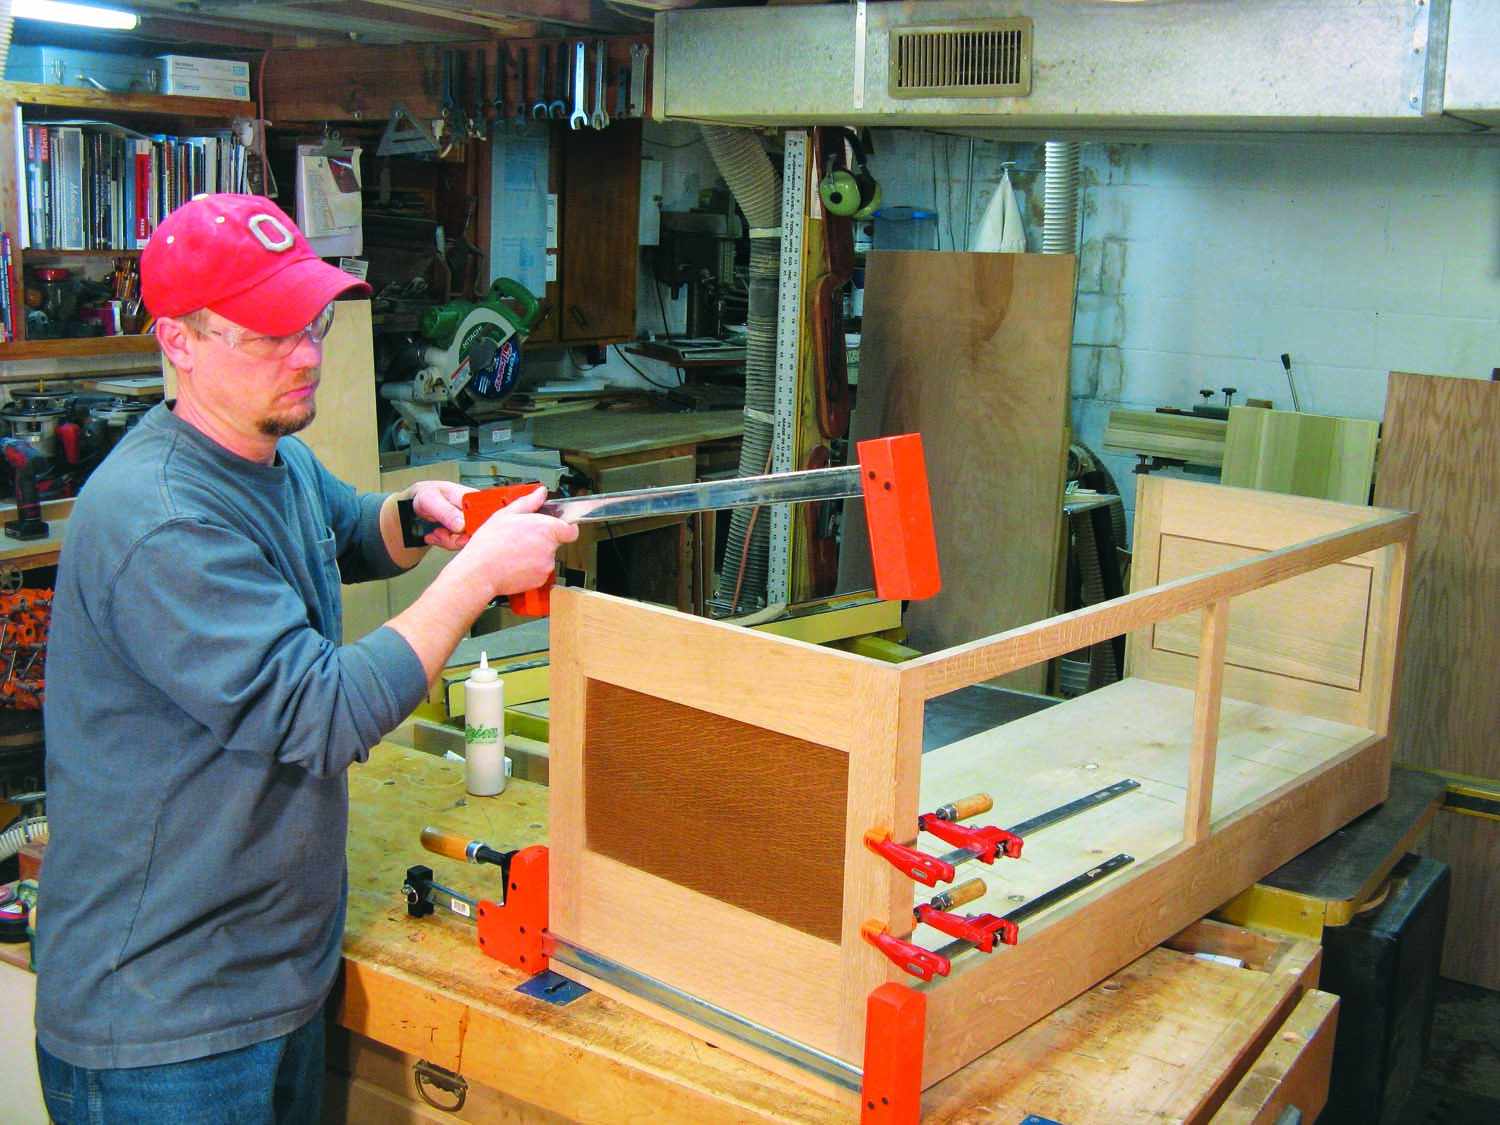
Photo 7. Glue the second end panel in place. The lock miter joints are self-aligning. They won’t slip when you clamp them—a big advantage over any other type of miter joint.
Cut a plywood back to fit the case. Glue and screw it to the end panels and to the plywood bottom. Cut the base molding (D3 and D4) and glue it to the case (Photo 8). Next, add “blocking” pieces (D5 and D6) for mounting the drawer slides—they can be glued and screwed in place. Lastly, add a rail (D7) behind the face frame for attaching the bench’s top (D8). Before gluing and screwing the rail in place, drill countersunk holes through the rail for the screws that will go into the top.
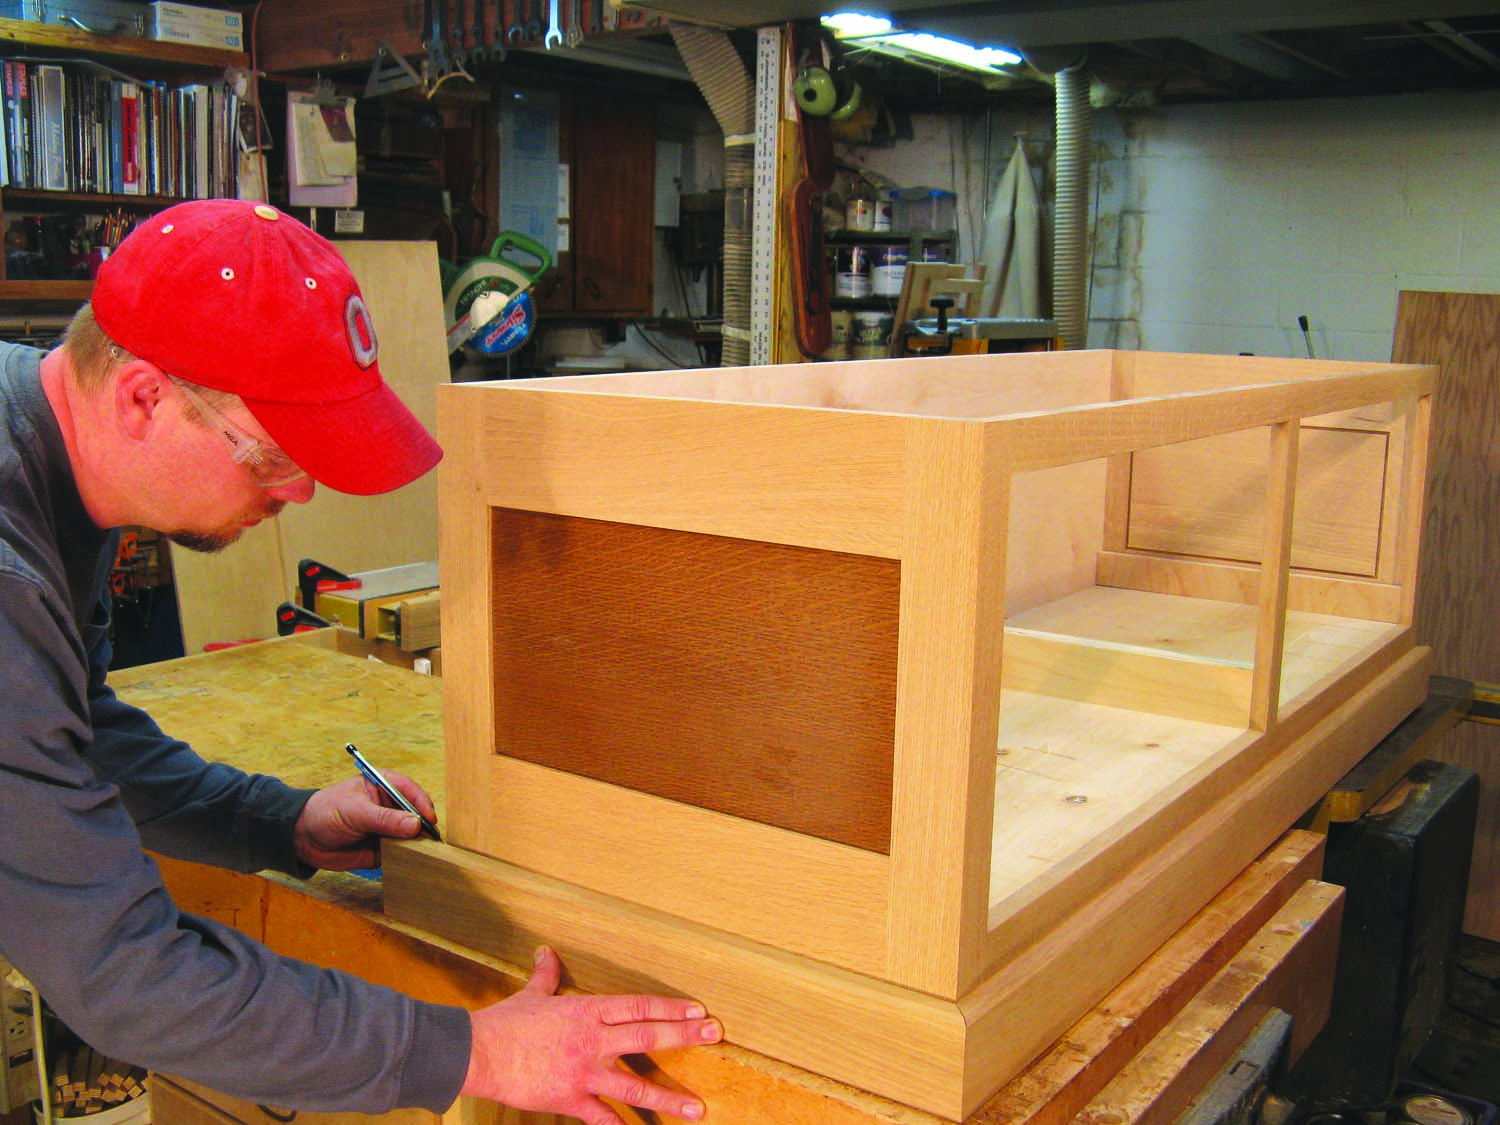
Photo 8. Add molding around the base. Miter and fasten the front piece first. Cut a miter one end of each return, hold the return in place, then mark its exact length.
Make the top

Photo 9. Glue the top. It’s more than 1″ thick, which gives the bench a sturdy, substantial look.
Mill boards to make a top that’s about 1/4″ extra-long and 1/8″ extra-wide. Glue the boards together (Photo 9).
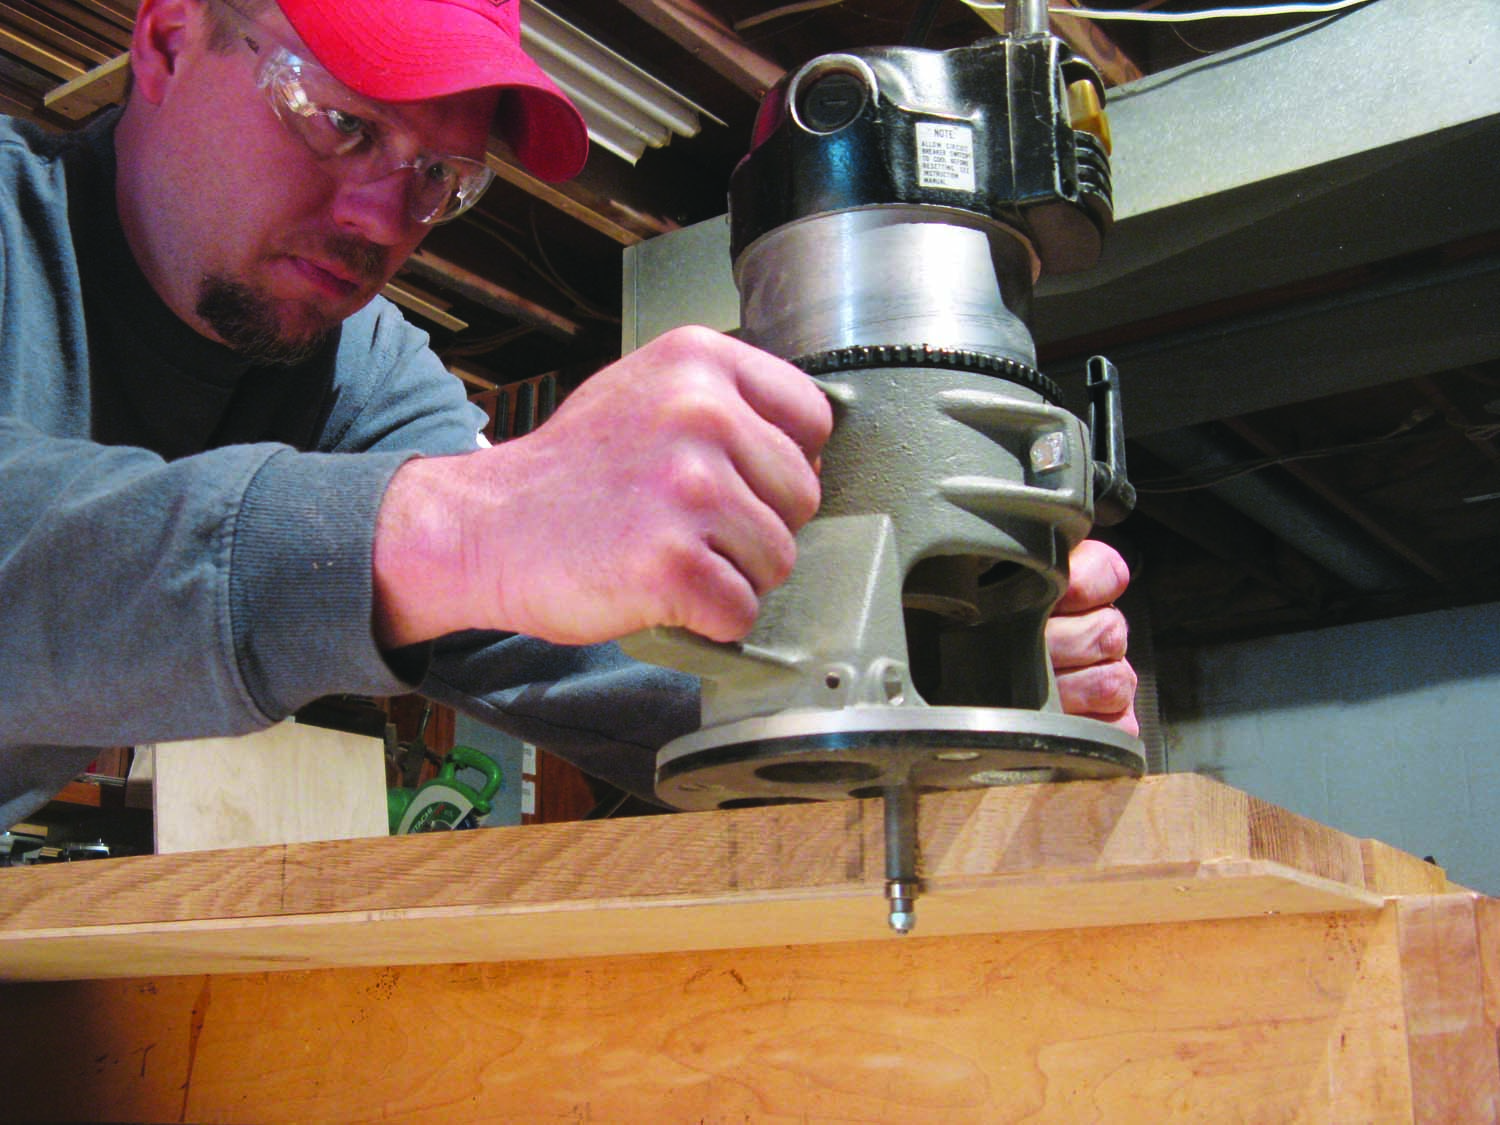
Photo 10. Rout an arc on the front of the top using a flush-trim bit and a 1/4″-thick pattern. This small touch makes the cabinet look less boxy.
Make a full-size pattern for the top from 1/4″ thick MDF or plywood (Fig. 03). You’ll use the pattern to cut an arc on the top’s front edge, using a router and a flush-trim bit (Photo 10). Make the pattern about 2″ longer than the top. (This overhang will provide a surface for your router bit’s bearing to get started on, before the bit cuts into the wood.) I used a bent stick to draw the arc on the pattern’s front edge, then cut the arc with a jigsaw and filed and sanded the arc smooth.
Cutting the arc requires removing a lot of waste wood. You wouldn’t want to do all of this with a router. Ideally, you’d cut 1/16″ away from the line first, using a bandsaw, but the top is so heavy that this requires extra help. You could also use a jigsaw, but only a high-quality machine is capable of making a square cut in wood this thick and hard. The last option is to just use the router, moving the pattern on successive passes so you’re only removing about 1/16″ each time. When you rout, temporarily screw the pattern to the top’s underside.
When you’re done routing the arc, remove the pattern and draw lines on the top indicating the top’s final length. Reposition the pattern on these lines and use the flush-trim bit to even up the glued-up boards. Rout a chamfer around the front and ends of the top.
Build the drawer boxes (E1 through E4). I glue them together and secure the joints with pin nails shot with a pneumatic gun.
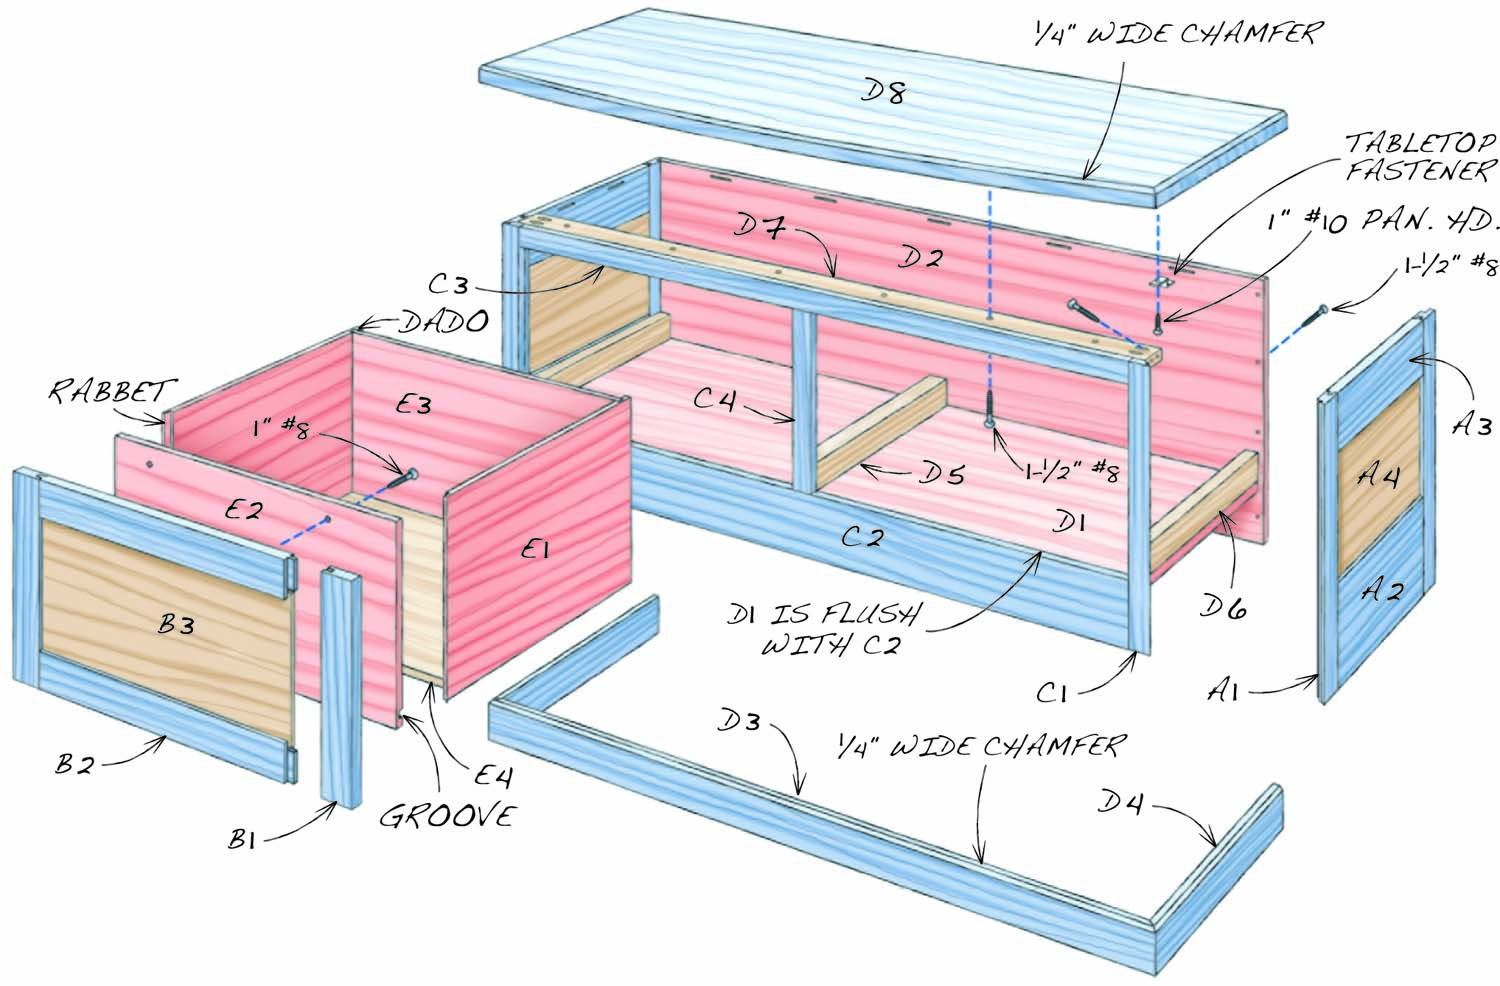
Fig. 01. Exploded View
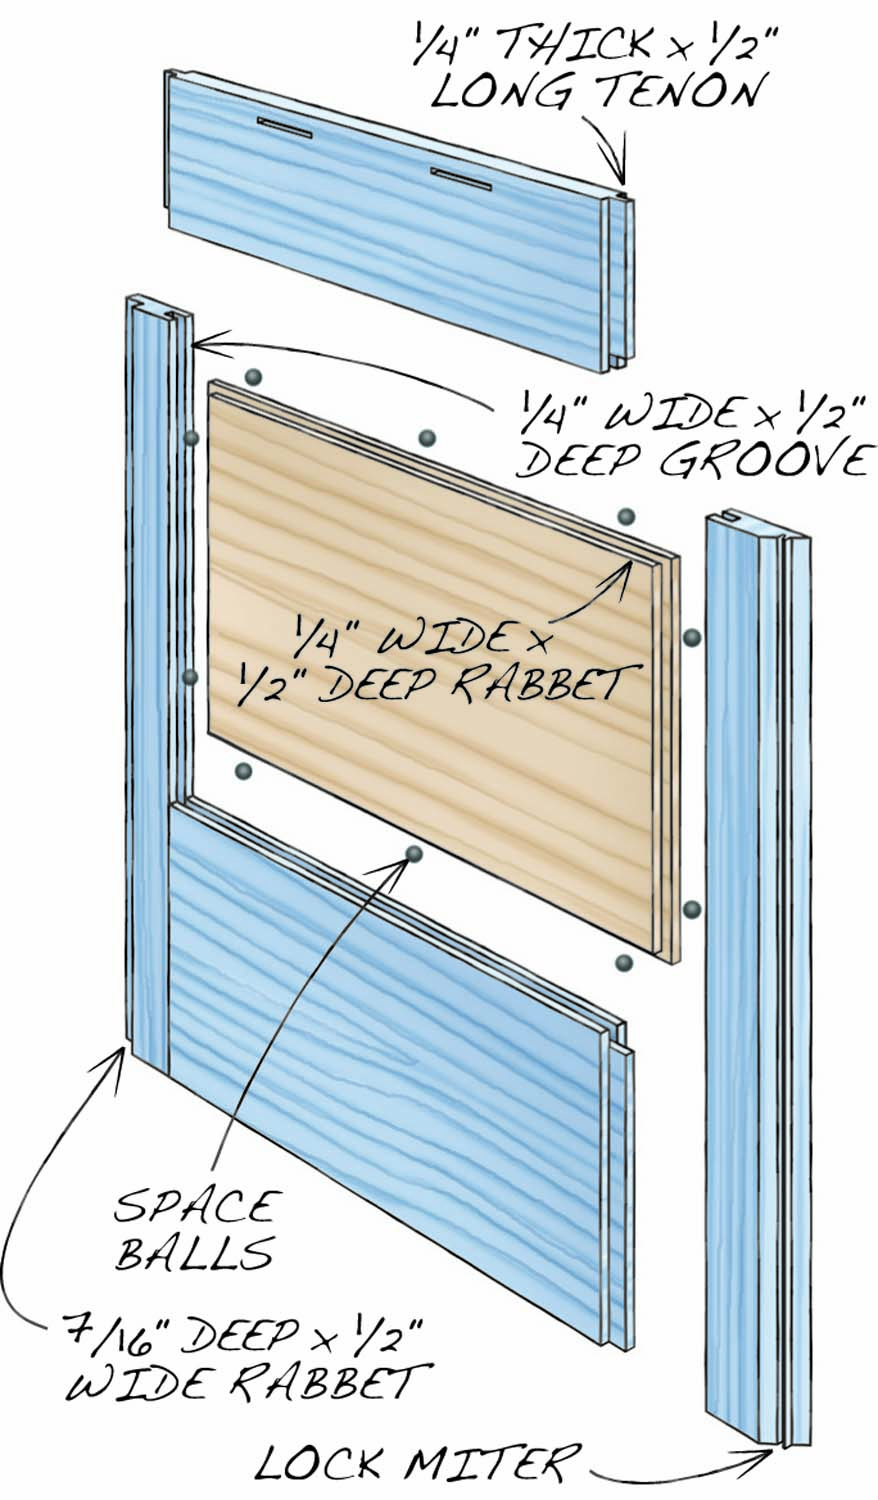
Fig. 02. End Panel Details
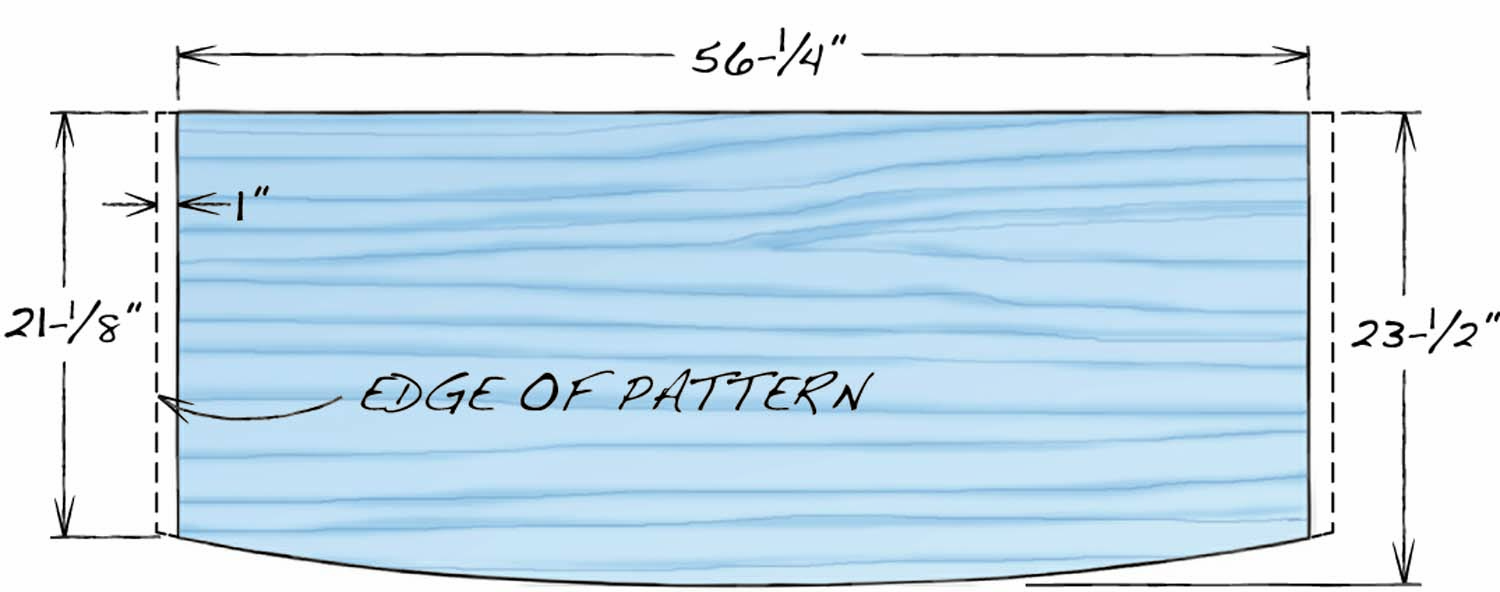
Fig. 03. Plan View of Top
Cutting List
|
Boot Bench |
|||||
|
Overall Dimensions: 20”H x 56-1/4”W x 23-1/2”D |
|||||
|
Section |
Part |
Name |
Qty. |
Material |
Th x W x L |
|
End panels |
A1 |
Stile |
4 |
Quartersawn white oak |
3/4” x 2-1/4” x 18-3/4” |
|
A2 |
Bottom rail |
2 |
Quartersawn white oak |
3/4” x 6-3/4” x 16-1/4” |
|
|
A3 |
Top rail |
2 |
Quartersawn white oak |
3/4” x 3-3/4” x 16-1/4” |
|
|
A4 |
Panel |
2 |
Quartersawn white oak |
1/2” x 8-7/8” x 15-7/8” (a) |
|
|
Drawer fronts |
B1 |
Stile |
4 |
Quartersawn white oak |
3/4” x 2-1/4” x 18-3/4” |
|
B2 |
Rail |
4 |
Quartersawn white oak |
3/4” x 2-1/4” x 21” |
|
|
B3 |
Panel |
2 |
Quartersawn white oak |
1/2” x 8-7/8” x 20-5/8” (a) |
|
|
Face frame |
C1 |
Stile |
2 |
Quartersawn white oak |
3/4” x 1-9/16” x 18-3/4” |
|
C2 |
Bottom rail |
1 |
Quartersawn white oak |
3/4” x 4-1/2” x 51” |
|
|
C3 |
Top rail |
1 |
Quartersawn white oak |
3/4” x 1-1/2” x 51” |
|
|
C4 |
Center stile |
1 |
Quartersawn white oak |
3/4” x 1-1/2” x 12-3/4” |
|
|
Cabinet parts |
D1 |
Bottom |
1 |
Birch plywood |
3/4” x 18-1/4” x 52-5/8” |
|
D2 |
Back |
1 |
Birch plywood |
3/4” x 18-3/4” x 53-1/2” |
|
|
D3 |
Front molding |
1 |
Quartersawn white oak |
3/4” x 3” x 57” |
|
|
D4 |
Return molding |
2 |
Quartersawn white oak |
3/4” x 3” x 21” |
|
|
D5 |
Drawer blocking 1 |
4 |
Birch plywood |
3/4” x 2” x 18-1/8” |
|
|
D6 |
Drawer blocking 2 |
2 |
Birch plywood |
1/4” x 2” x 18-1/8” |
|
|
D7 |
Top-fastening rail |
1 |
Birch plywood |
3/4” x 2-1/2” x 52-5/8” |
|
|
D8 |
Top |
1 |
Quartersawn white oak |
1-1/4” x 23-1/2” x 56-1/4” |
|
|
Drawer boxes |
E1 |
Side |
4 |
Baltic birch plywood |
1/2” x 12” x 18” |
|
E2 |
Front |
2 |
Baltic birch plywood |
1/2” x 12” x 23-1/4” |
|
|
E3 |
Back |
2 |
Baltic birch plywood |
1/2” x 11-1/8” x 23-1/4” |
|
|
E4 |
Bottom |
2 |
Baltic birch plywood |
1/2” x 17-1/4” x 23-1/4” |
|
|
Notes a) Panels are a total of 3/8″ less in width and length than the distance between the bottoms of the grooves in the stiles and rails. |
|||||
Add top and drawers
At this point, I’m ready for sanding, staining and finishing. To get the color I wanted—which worked great on my floors years ago—I mixed two parts Minwax Dark Walnut and one part Minwax Provincial oil-based stains (see Sources). I then sprayed on three coats of pre-catalyzed lacquer, but any clear and durable topcoat, such as a good polyurethane finish, would work.
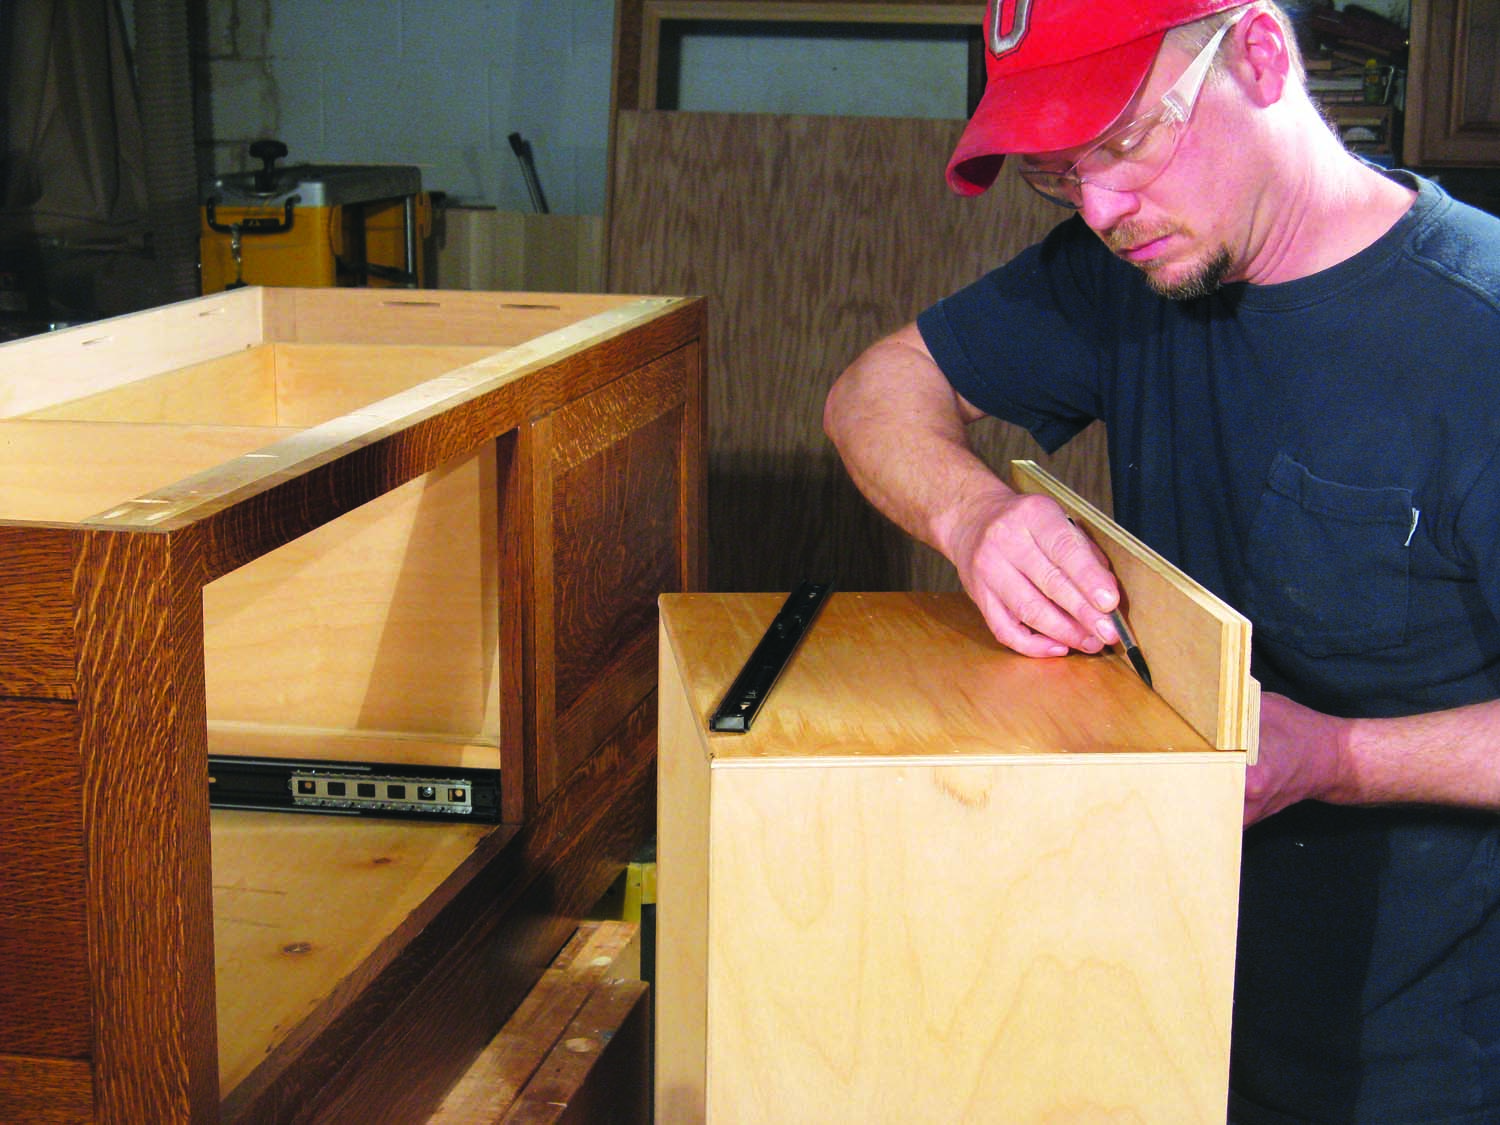
Photo 11. Make the drawer boxes and add slides. Draw a line indicating where the center of the runner goes using a simple two-board jig.
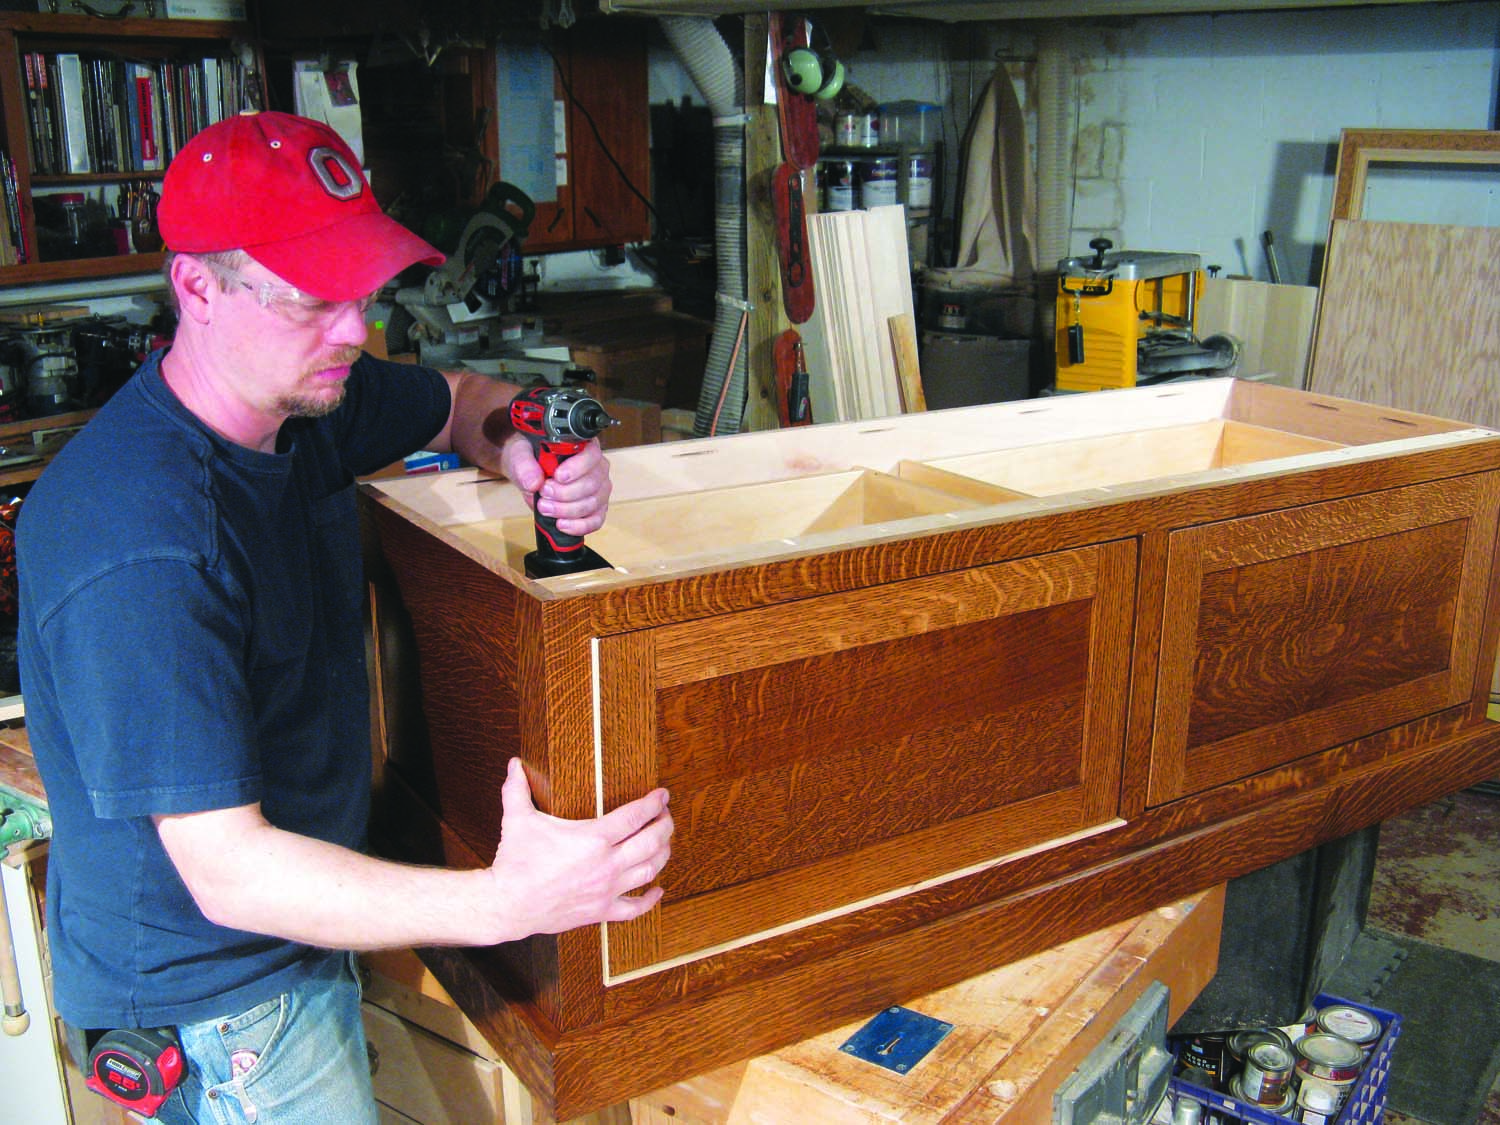
Photo 12. Fasten the drawer fronts to the drawer boxes from the inside. Use 1/8″ spacing strips to position the fronts.
After the finish has dried for a few days, install the drawer slides (Photo 11). Slide the boxes into the cabinet. Prepare some 1/8″-thick spacing strips and place them in the drawer opening (Photo 12). Position the drawer front in the opening and pull it tight to the vertical strip. Drill pilot holes, then fasten the drawer front to the drawer box. Add the drawer handles, then remove the drawer boxes to attach the top (Photo 13).
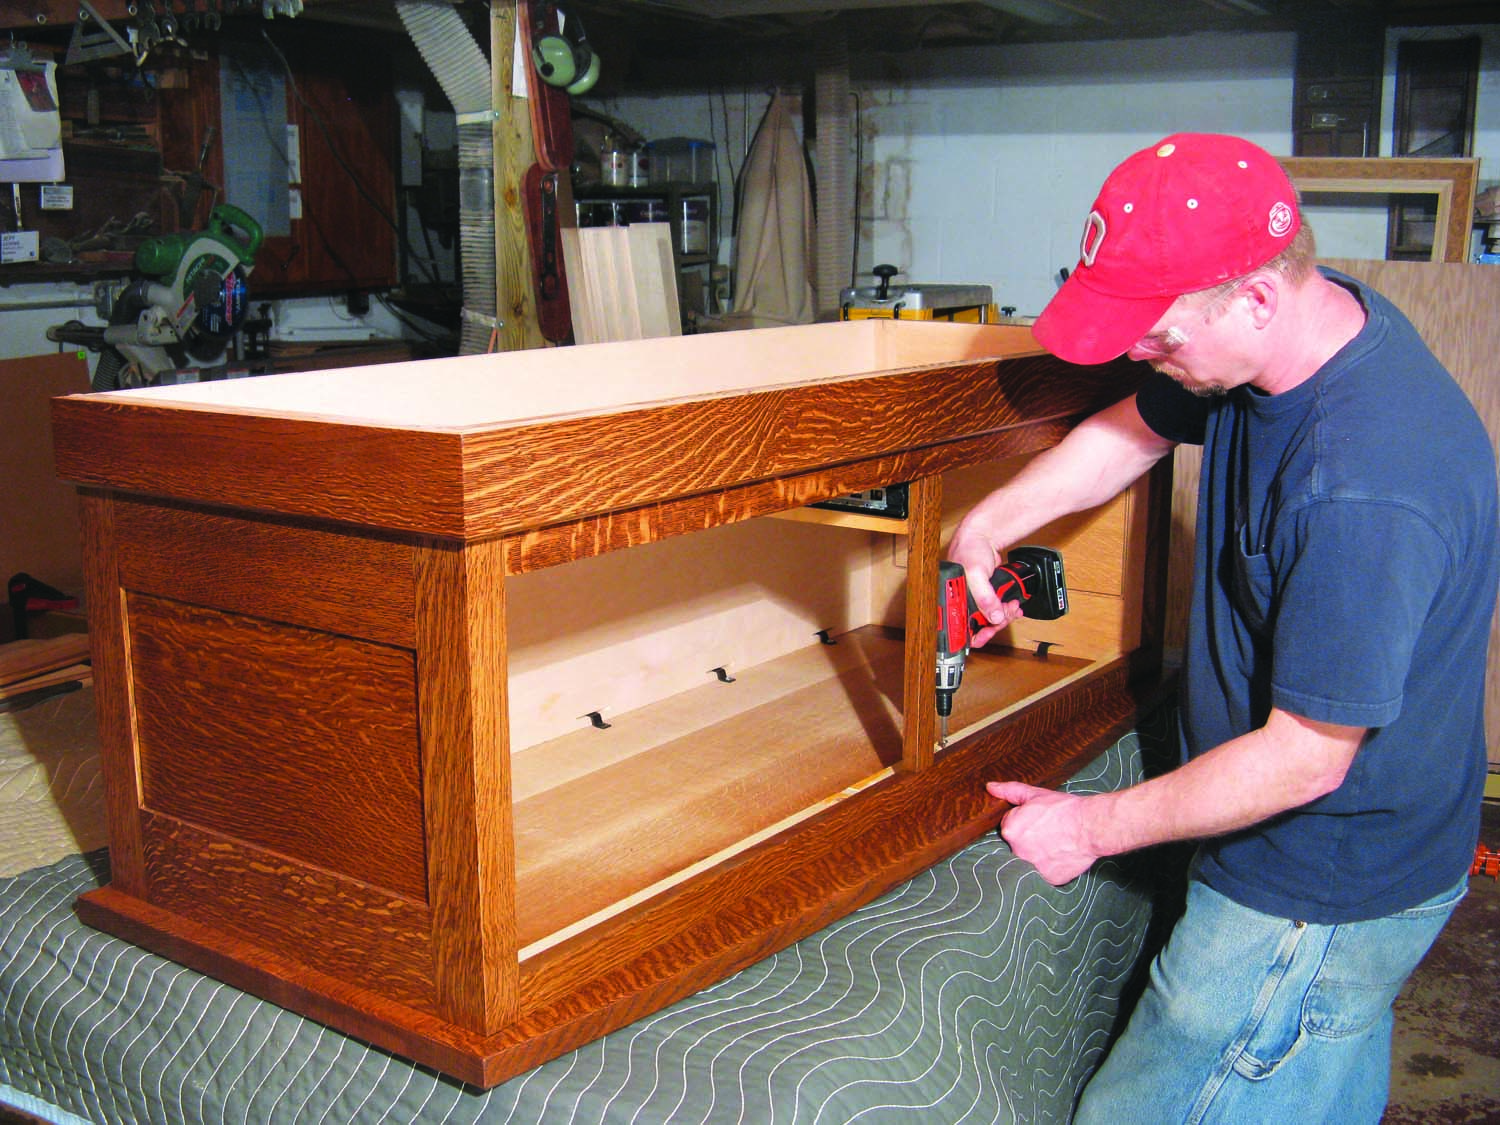
Photo 13. Attach the top. Fasten the front face frame directly to the top, but use tabletop fasteners around the sides and back. They’ll allow the top to move without cracking.
Here are some supplies and tools we find essential in our everyday work around the shop. We may receive a commission from sales referred by our links; however, we have carefully selected these products for their usefulness and quality.


