We may receive a commission when you use our affiliate links. However, this does not impact our recommendations.
You don’t have to own a lathe to make replacement handles that will feel like an extension of your hand.
by Roger Holmes
pgs. 84-88
From the February 2002 issue #126
Buy the issue now
A few months ago I had to face the unpleasant truth about my chisels. Given to me years ago by my father, my trusty old set of Marples bevel-edge chisels had run out of steel. Ground and sharpened to stubs, they had to be replaced.
A little research into the chisel market revealed a surprisingly large selection. The important consideration, it seemed to me, was performance – which blades would take the keenest edge and hold it longest. But when I’d plowed through a stack of reviews (not being a tool steel expert, I relied on the tests and experience of others) and narrowed the field, I found I’d overlooked a second important consideration: handles.
No matter how marvelous the cutting edge, if the tool feels like a billy club in your hand it’s of little use. Several of the top-performing chisels had clunky handles, while the handles I liked best were attached to chisels that didn’t rate so high. Marples chisels, while not at the top of the league performance ratings, were a good value for money. But instead of the leather-washered, well proportioned ash handles of my old set, they come today with rather billy-clubbish handles of composite or ash. In the end, I found myself buying several chisels as much for their handles as for their steel.
The more I thought about it, the more this seemed an unhappy compromise. It was once common practice to sell unhandled chisels. Craftsmen bought the chisel blade then bought or made a handle. Makes sense – and if they made their own handle, it was cheaper. Few, if any, tool merchants sell unhandled chisels today. But you can still get the best of both worlds. Ignore the handle and buy the tool for its steel or its value for money or whatever else appeals to you. Then cut off and replace the offending handle.
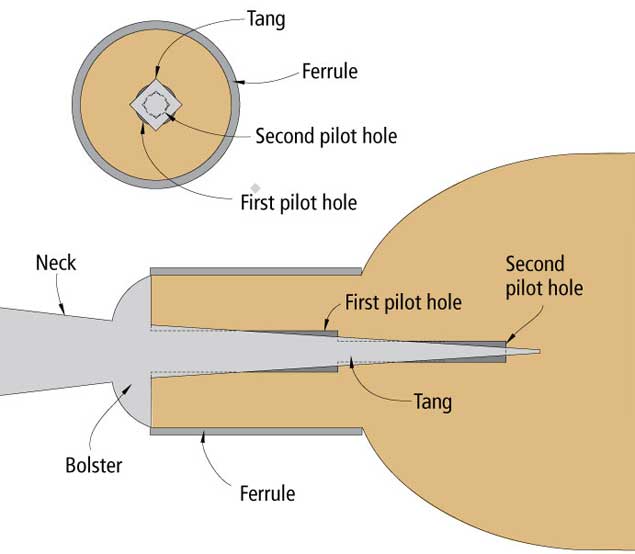
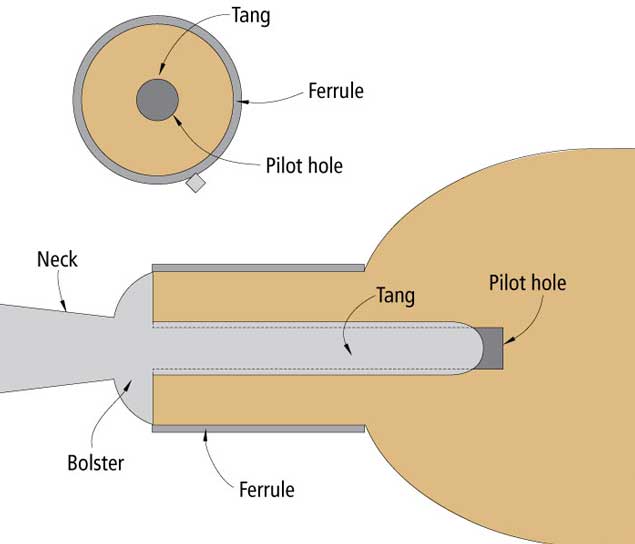
You can turn a chisel handle on a lathe in a few minutes. If you don’t have a lathe, you can shape one with drawknife, spokeshave, plane or chisel almost as quickly. Sounds simple. And for the most part, it is. Most bench chisels are attached to their handles by a tang, as shown in the drawing. The only real difficulties in rehandling a chisel involve making the pilot hole in the handle for the tang. The hole must be sized to ensure a tight fit without splitting the handle. And it must align the handle and the blade on the same axis. So, before you slice off the handles of your favorite chisels for replacement, rehandle a similar, but less valued, chisel (or two) for practice.
Off With the Old
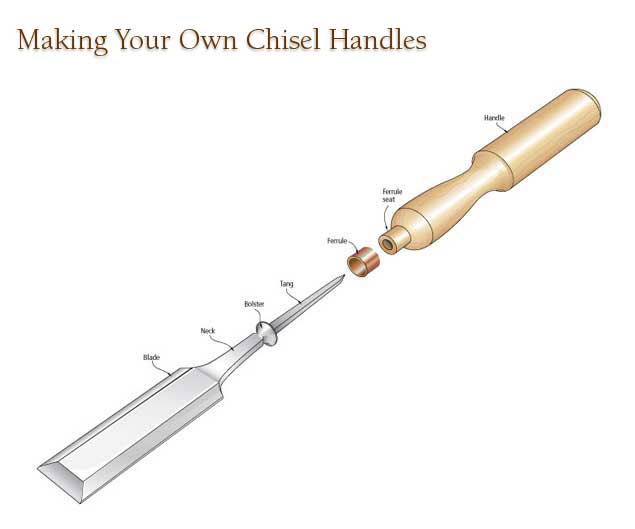
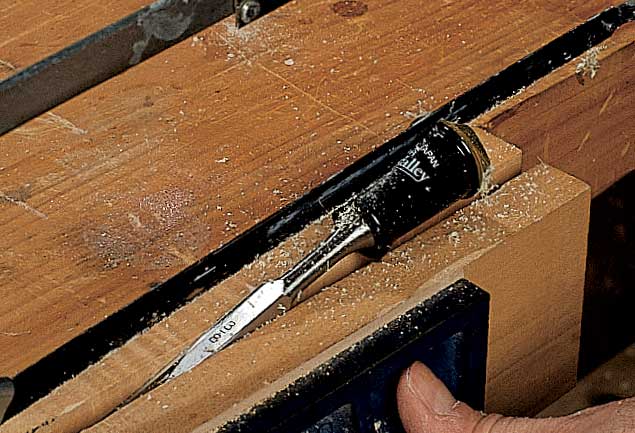
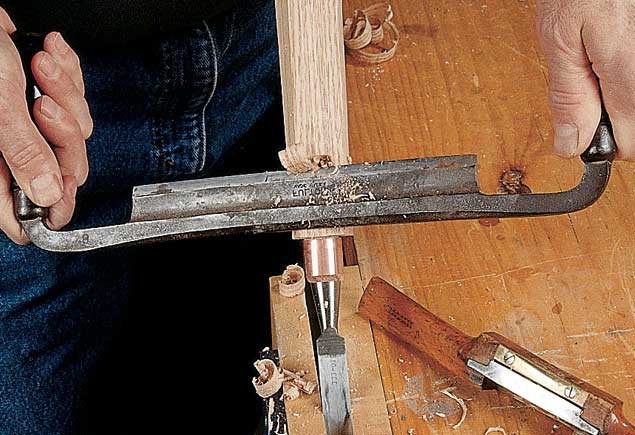
Before you can put on a new handle, you have to get rid of the old one. First, mark the estimated length of the tang on the handle – 2″ or so should do – then cut off the top of the handle above that point. I cut both composite and wood handles with a hacksaw. If I’ve miscalculated the tang length, I won’t ruin the teeth of my nice backsaw.
Saw off the top of the old handle with a hacksaw – you won’t damage the saw teeth if you hit the tang by mistake.
If you’re removing a wooden handle and you want to reuse the ferrule, next make a few saw cuts just above the ferrule down to the tang. Then split away the remainder of the handle, using another chisel as a wedge. You may now be able to drive the ferrule off the tang with a hammer and cold chisel. Or you may need to bore out some of the wood from inside the ferrule to loosen it. If you don’t want to keep the ferrule, just cut through its length with the hacksaw and pry it off the tang.
After making saw cuts at the top of the ferrule in to the tang, split a wooden handle away from the tang.
The process is similar for a composite handle, which is cast in place around the tang. Using the hacksaw, I cut off the end of the handle. Then I make lengthwise cuts down to the tang to quarter the remainder of the handle, which makes it easier to split.
To remove a composite handle, saw lengthwise down to the tang in three or four places, then split the remains of the handle from the tang.
Tang Types
Tangs on my old chisels are four-sided and tapered to a point. Some are irregular and bear the marks of forging. They are seated in the handle in a stepped pilot hole, as shown in the drawings on the following pages.
Tangs on some of my newer chisels are cast, not forged. Those for wooden handles are faceted on four sides, but not tapered. They seat in a single pilot hole. The corners of tapered and faceted tangs dig into the wood to make a tight, torque-resistant fit.

The chisel blade in the center has a forged, four-sided tapered tang. The other blades have cast tangs. The left one, for a composite handle, is cylindrical, with small “fins” along its length. The right blade, for a wooden handle, has four faceted faces but no taper.
Tangs for my composite handled chisels are cylindrical, with small raised “fins” along their length to key them into the composite material formed around them. Driven into a wooden handle bored to the same diameter as the tang (or slightly smaller), the fins might be enough to ensure a tight fit, particularly for a light-duty chisel. I ground facets on the tang and sized the pilot hole accordingly to be on the safe side.

Grind flat facets on a round cast tang made for a composite handle to ensure a tight fit in the new wooden handle.
To ensure that the edges of the tang dig into the wood, the pilot hole should be smaller than the tang. For a square-section tapered tang, the larger of the stepped pilot holes can be the same diameter as the diagonal across the tang as measured about one quarter the length of the tang from the bolster. (The bolster is the flared section between the chisel’s narrow neck and the tang; it seats against the end of the handle.) Take the measure for the smaller hole about three-quarters of the length of the tang from the bolster. For an untapered faceted tang, make a single pilot hole of smaller diameter than the tang’s diagonal measure. The difference in the size of the hole and the tang can be larger in softer woods than harder woods, which have less give and will split more easily.
Ferrules
These short cylinders of brass or copper bind the handle just above the bolster of the chisel. The bolster and ferrule work together to prevent the handle from splitting when the chisel is driven by a mallet. Chisels and gouges used only with hand pressure need no ferrules. But most chisels have ferrules even if they’re intended for fine paring work; some carving tools do not. For many chisels, the greatest risk of splitting the handle comes when fitting the handle, so a ferrule is a good precaution regardless of the tool’s intended use. Chisels and gouges subjected to heavy banging are often fitted with a metal hoop at the top of the chisel to prevent splitting at that end.
The size of the tang and bolster largely determine the size of the ferrule. If you’re replacing a wooden handle, you can reuse the ferrule or use one the same size. If you want to fit a smaller ferrule or you’re replacing a composite handle, make sure there will be enough wood inside the ferrule to accommodate the tang. In general, the diameter of the ferrule must be at least that of the chisel’s bolster.
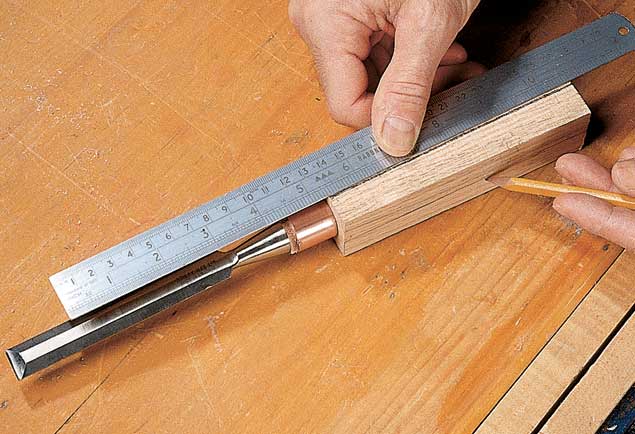
If you don’t reuse a ferrule, you can make your own from copper tubing sold at hardware stores. Or you can buy brass ferrules for a few cents apiece from Lee Valley Tools. These come in a wider range of diameters than are available in copper tube. You need to fit the handle to the ferrule, so always have the ferrule you intend to use before you make the handle. Some chisels are fitted with leather washers that slip over the tang and seat between the bolster and the end of the handle. I think they’re intended somehow to cushion mallet blows, but I can’t say I feel a difference in use. I like them anyway, so I cut them out of a piece of shoemaker’s sole leather and put them on.
Making the Handle
This is the fun part. You can make any kind of handle you can imagine. Turning handles on a lathe is quick and easy – you can make and discard half a dozen before you find the one you want and still be done in an hour. Shaping handles with drawknife, spokeshave, plane or chisels takes longer, but can produce handle shapes – faceted or flattened for example – that are unobtainable on a lathe. And you can combine turning and hand-shaping. If you want to rehandle a chisel but don’t want to make the handle, you can buy a classic boxwood pattern in several sizes from Lee Valley.
You can make handles in a wide variety of shapes quickly and easily on a lathe.
Commercial handles are commonly made of ash, beech or boxwood. But any reasonably hard wood will do. I’m looking forward to making some handles of osage orange, a native here in Nebraska that has tight grain, a lovely orange color, and is tough as nails. Firewood suppliers are excellent sources of ash, maple, birch and other local woods that make fine handles. If you can split handle blanks from the log, you’ll ensure that the grain will run parallel to the handle’s length, the strongest orientation.
On the Lathe
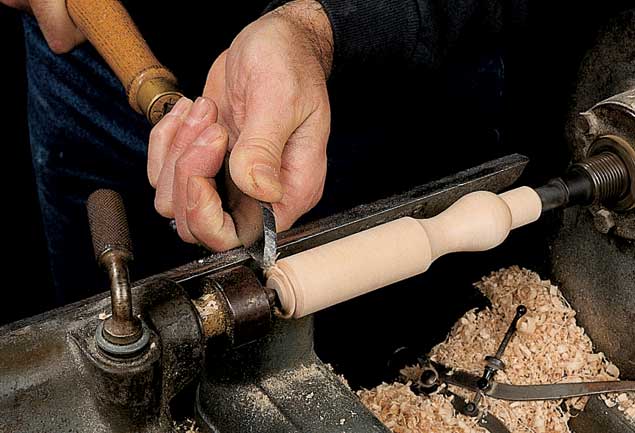
Turning is the easiest way to make a handle. Whatever shape you choose, it is important to fit the ferrule snugly to one end. It needn’t be a forced fit, but it shouldn’t rattle around on the wood, either.
The great advantage of a lathe is in boring the pilot hole for the tang. I mount a chuck and bit on the head stock and feed the handle onto the bit by turning the tailstock’s dead-center wheel. This bores a hole right on the handle’s axis, ensuring that the chisel blade and handle will be properly aligned.
Use machinist’s bits – the tapered nose makes a neater, easier entry than a brad point or other spur bit. Complete the handle’s shape (and rub finish on the spinning handle with a cloth if you wish) before you bore the hole.
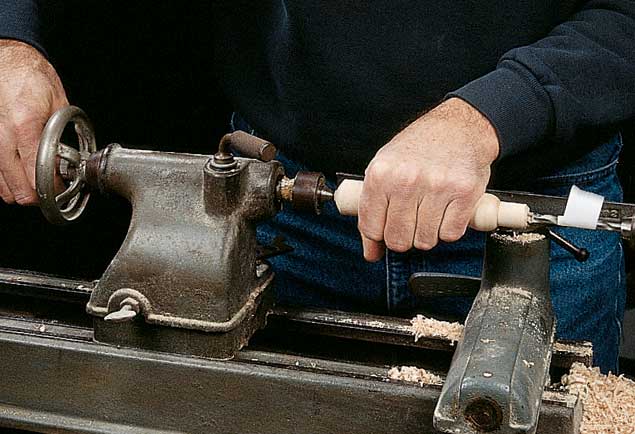
Bore the tang pilot hole on the lathe using a machinist’s drill mounted in a chuck on the head stock. Feed the handle into the spinning bit with the feed wheel on the tail stock.
Assembly
To join chisel and handle, slip the ferrule in place on the end of the chisel handle, add a leather washer if you want one and start the tang in the pilot hole. You can fix the chisel in a vise and drive the handle on. I prefer to upend the chisel and handle and bang the end of the handle on a machine table or other heavy piece of iron. Done this way, the blade’s own weight drives the tang into the handle and I don’t have to worry about the blade slipping in the vise. It takes a while, but unless you’ve badly underestimated the size of the pilot hole, the bolster will eventually seat snugly against the end of the handle. Even if the hole is a bit too tight, splits are usually contained by the ferrule.
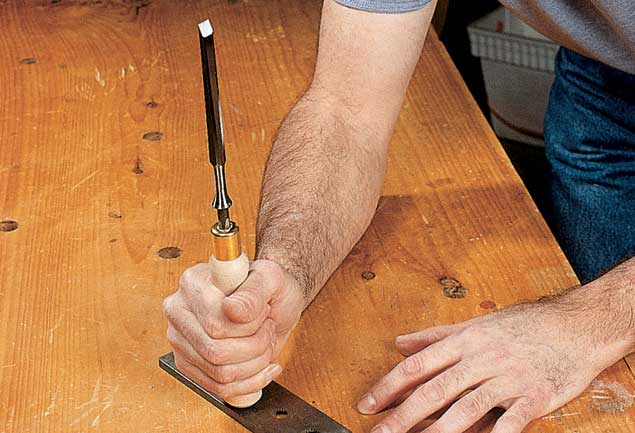
Seat the tang in the handle by repeatedly striking the end of the handle against an iron plate or machine table.
 Hand-shaping a Handle
If you don’t have a lathe, or you want a faceted handle, it is easy to shape one by hand. The tricky part is boring the pilot hole in the handle so that the blade and handle will be aligned. A blade that skews off the handle centerline can be very awkward to use. I think the easiest method is to bore the hole in a square handle blank before shaping the handle. With a drill press the hole can be bored very accurately. Or the blank can be held firmly in a vise for hand drilling. Set a square or two up to gauge the angles.
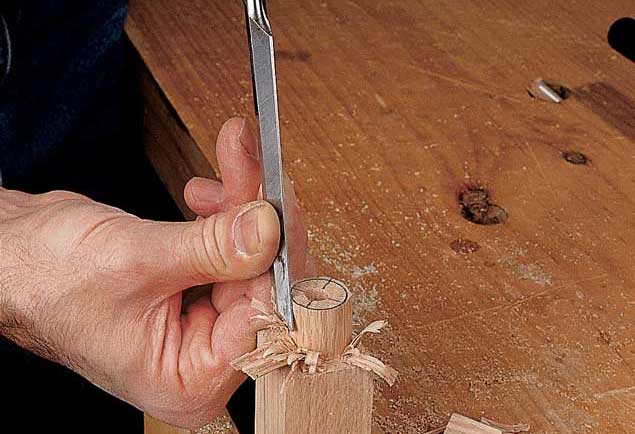
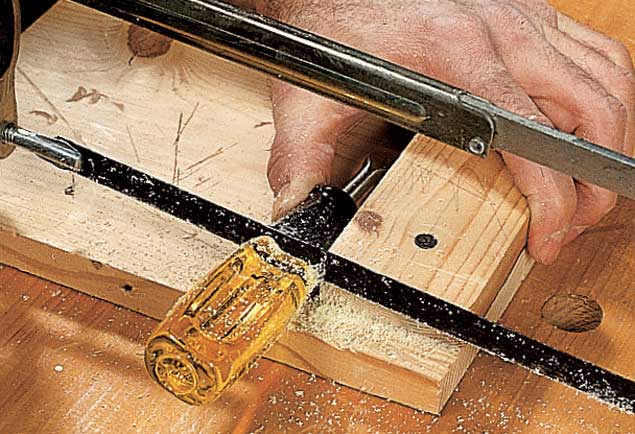
After making cuts at the corner to prevent splitting along the handle’s entire length, form the ferrule seat with a chisel.

If you’re uncertain about the alignment of the tang pilot hole and handle, you can assemble the blade to the handle blank.
Next, form the seat for the ferrule. Make saw cuts in at each corner to prevent splitting beyond the ferrule seat. Then pare carefully with a chisel until the ferrule fits the seat snugly. If you’re confident that the pilot hole is well centered along the length of the blank, you can shape the handle, then assemble it with ferrule and blade as described previously. If you’re uncertain about the orientation of the pilot hole, you can assemble the handle and blade, then shape with drawknife and spokeshaves, as shown in the photos. This can be a bit awkward in spots, but it allows you to make adjustments in the handle to offset an off-center pilot hole.
Draw lines on the handle along the axes of the blade.
Shape the handle parallel to the axes to ensure good blade-handle alignment.
Rehandling a chisel or gouge is very satisfying. A homemade handle may not be stronger or more durable than one from the factory. But it is certainly more personal and is worth doing for that reason alone.
From the February 2002 issue #126
Here are some supplies and tools we find essential in our everyday work around the shop. We may receive a commission from sales referred by our links; however, we have carefully selected these products for their usefulness and quality.