We may receive a commission when you use our affiliate links. However, this does not impact our recommendations.
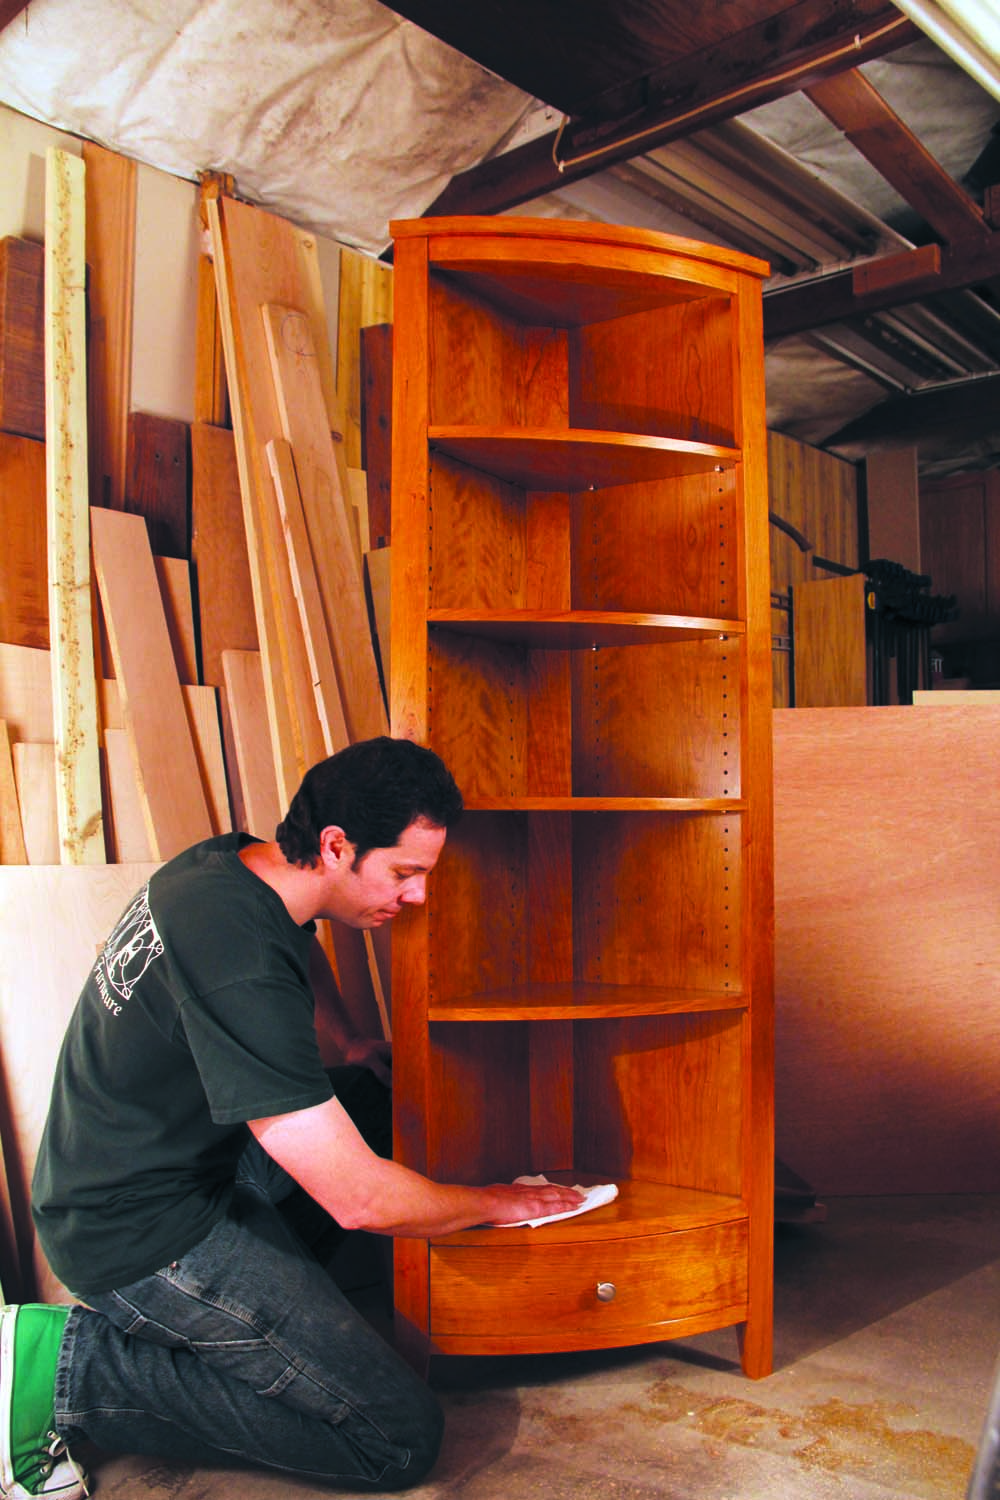 This project looks pretty simple, doesn’t it? It’s just a box with two sides and a few shelves. It’s got a curved drawer, too—which isn’t so simple—but let’s skip that for the moment. As I started building a prototype, I thought, “This is just normal cabinetmaking.”
As it turns out, this cabinet isn’t normal at all. Some things are best done backwards. Normally you’d build a case first, then build a drawer to fit it. Not here—you make the drawer first, then build the case. Normally you’d make a face frame early on and fasten it to the case. Not here—there isn’t any face frame. The stiles are added separately, after the shelves and drawer are installed.
After reversing course a few times, I realized that I had learned quite a few new tricks and skills while building the prototype. I gained experience dealing with irregular shapes, figured out how to build up 3/4″ plywood to make it look thicker and perfected a way to make wide 1/16″ thick edging.
About that drawer—although it doesn’t hold much, by adding visual weight to the bottom of the cabinet, it anchors the whole design. It also anchored the whole building process, in a way. The success of the whole project depends on making a drawer front with a perfectly smooth, even curve. I enlisted some help to work out a foolproof method that doesn’t require any special tools or equipment. I’m very happy with the results. After struggling with the prototype, the actual cabinet went together without a hitch.
Assemble the sides
Start by laying out all of the cabinet’s plywood pieces on one sheet of plywood (Fig. 03). Draw the two sides (A and B) as one unit. Make this large rectangle 1″ wider than the two sides combined and 1″ extra-long. Cut out two cardboard templates for all of the triangular pieces (Fig. 05). These templates are slightly oversize, but be sure to create a 3/4″ gap between the triangles when you lay them out—as shown in Fig. 03—so you have room to turn a jigsaw.
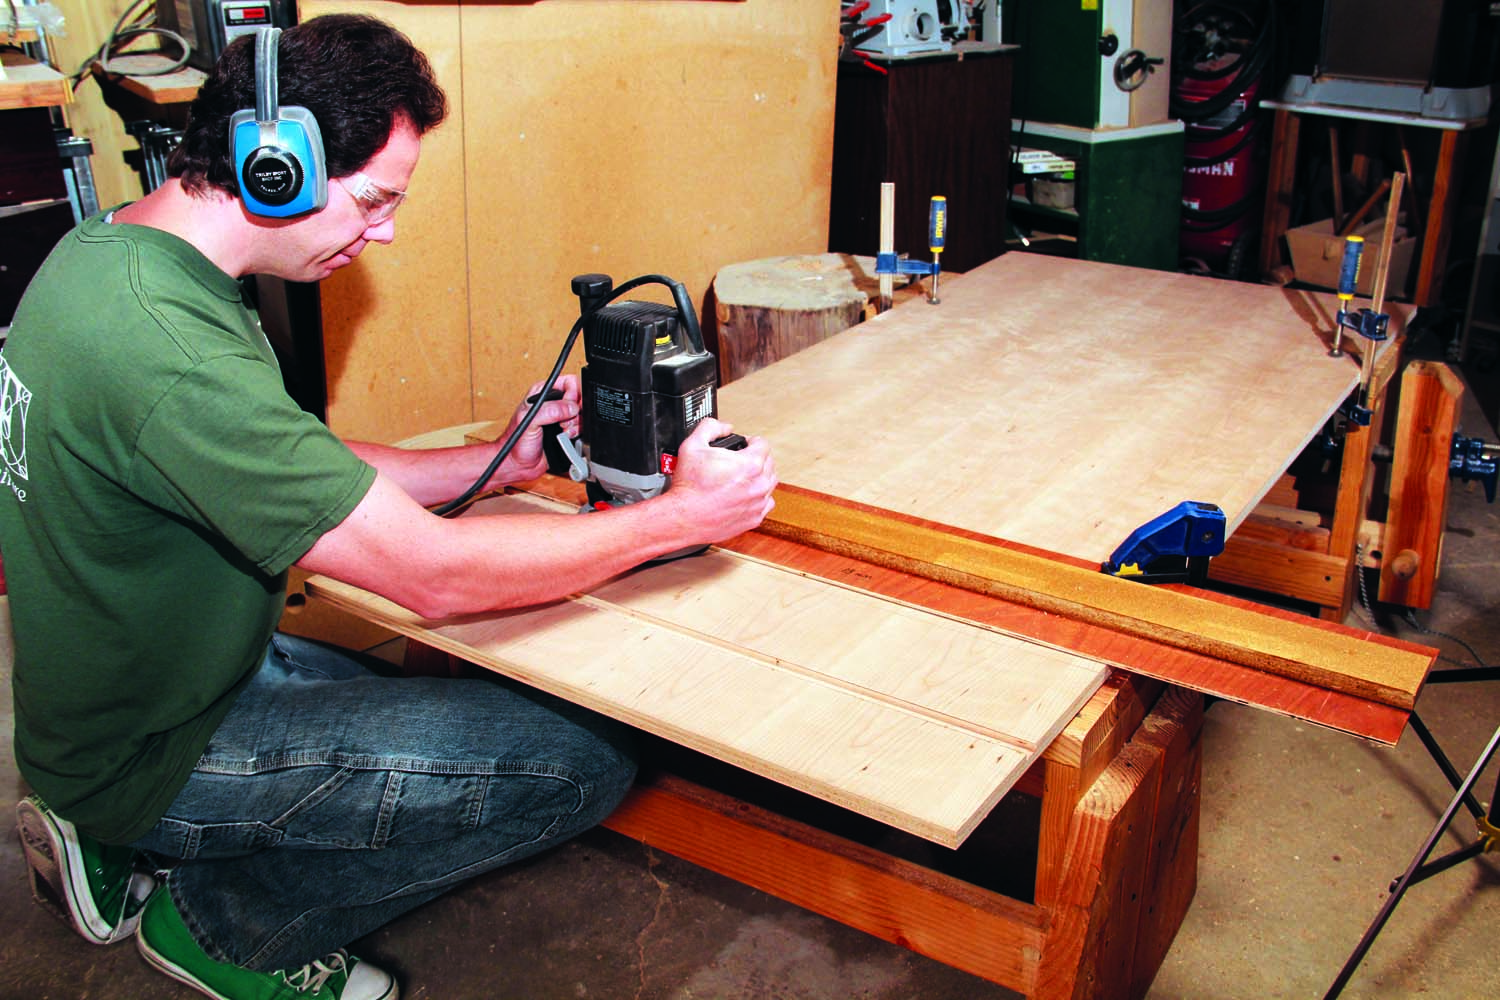
Photo 1. Begin by cutting one piece of plywood for both of the cabinet’s sides. Rout two dadoes and a rabbet to receive the cabinet’s shelves and subtop, then rip the piece into two sections, one for each side.
Break down the plywood into three sections. Trim the section that contains the side pieces to final length. Using a straightedge as a guide, rout two dadoes in the plywood (Photo 1; Fig. 04). These dadoes receive the cabinet’s two fixed shelves (F1 and G1). Rout a rabbet on the top edge of the sides. The rabbet receives the cabinet’s subtop (E1). Rip the plywood into two parts, separating the two side pieces. Both of the them should be at least 3/8″ extra-wide. (Note that side A is 3/4″ narrower than side B.)
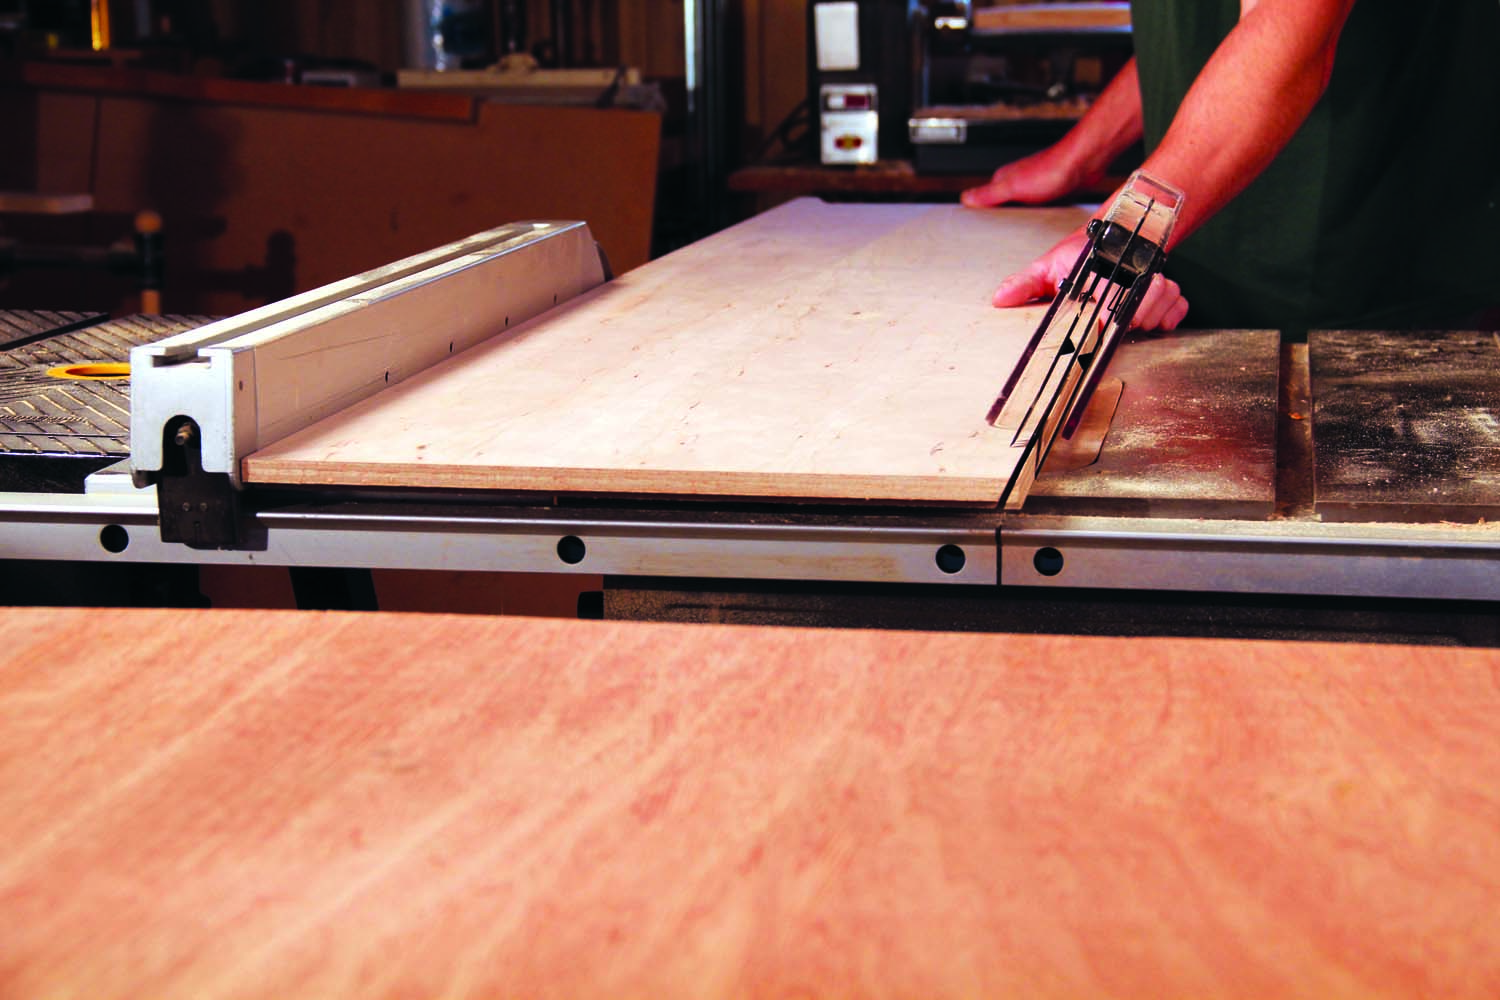
Photo 2. Cut a 65° angle on the front edges of both sides of the cabinet, then rip the pieces to final width.
Mark what will be the front edge of each side, then rip these edges at 65° (Photo 2 and Fig. 09). Make sure these cuts are straight; the stiles will be glued to these edges later on. Rip the other edge of each side, at 90°, to final width. Using a jigsaw, cut out the feet on the bottom end of each side piece. Drill holes for the shelf pins.
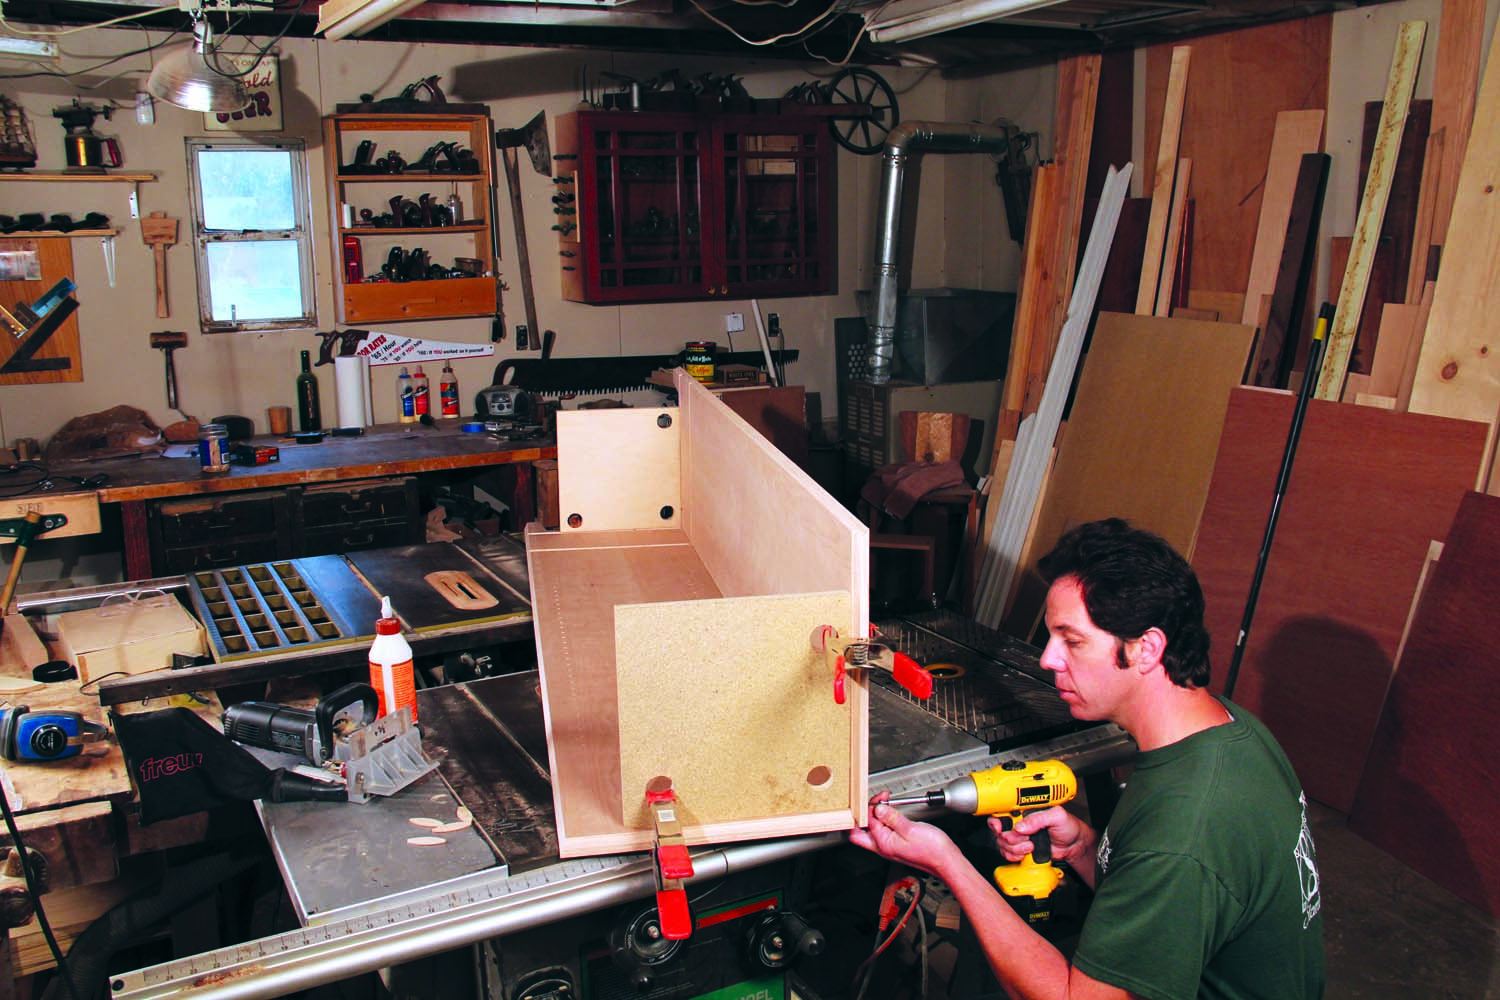
Photo 3. Assemble the two sides with biscuits and screws, using plywood blocks to hold the cabinet square.
Cut biscuit slots about 10″ apart for joining the back corner of the sides. Assemble the pieces, without glue, and drill pilot holes for screws between the slots (Photo 3). Glue and screw the two sides together. You could use clamps instead of screws, but clamps might damage the sides’ angled edges.


Fig. A. Exploded View
Fig. C. Plywood Cutting Diagram
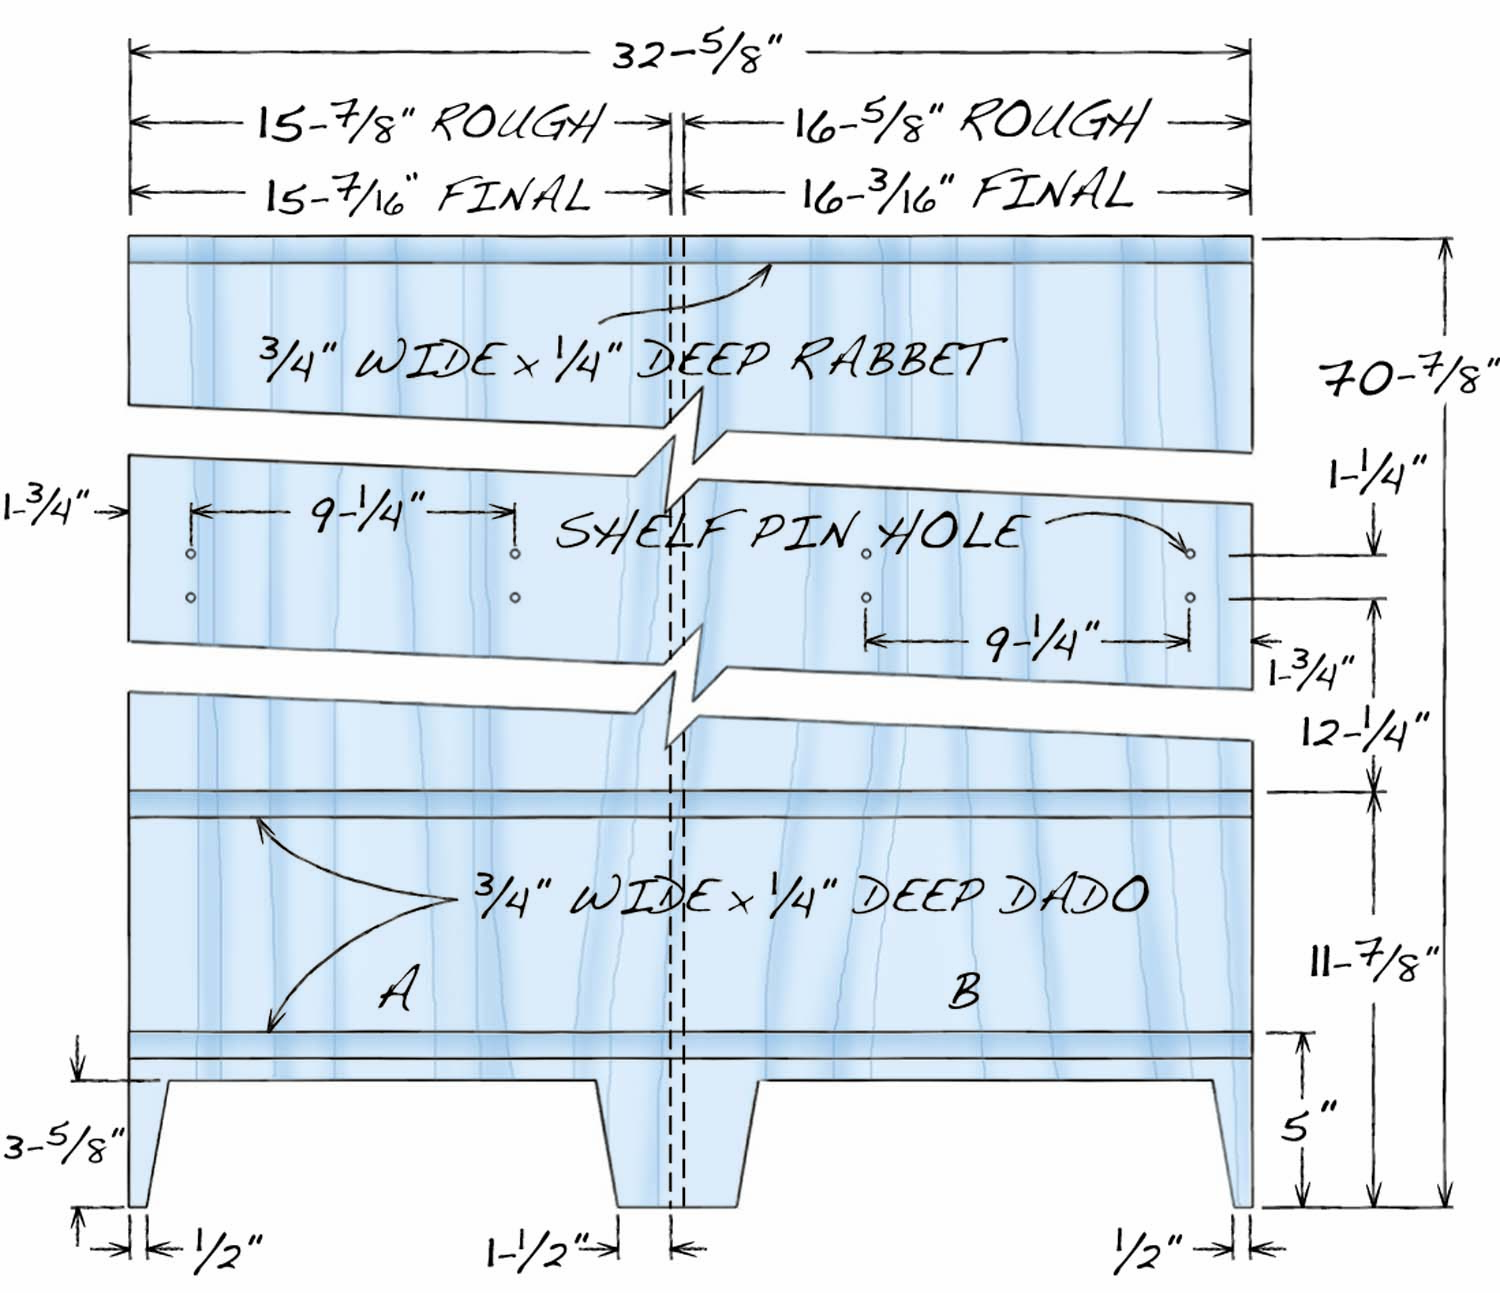
Fig. D. Side Details
Make the subtop and shelves
This is where things start getting tricky. But don’t worry—just follow the procedure below and everything will come out right. Start by making a precise wooden template for the shelves and subtop (Fig 05). You’ll be cutting and sanding a curve on the front edge of the template later on, so choose a material that shows pencil lines clearly and is easy to shape—such as 1/4″ MDF. Place the template in the case, bottomed out on both dadoes, and make two marks 11/16″ beyond the edges of the case (Photo 4 and Fig. 06).
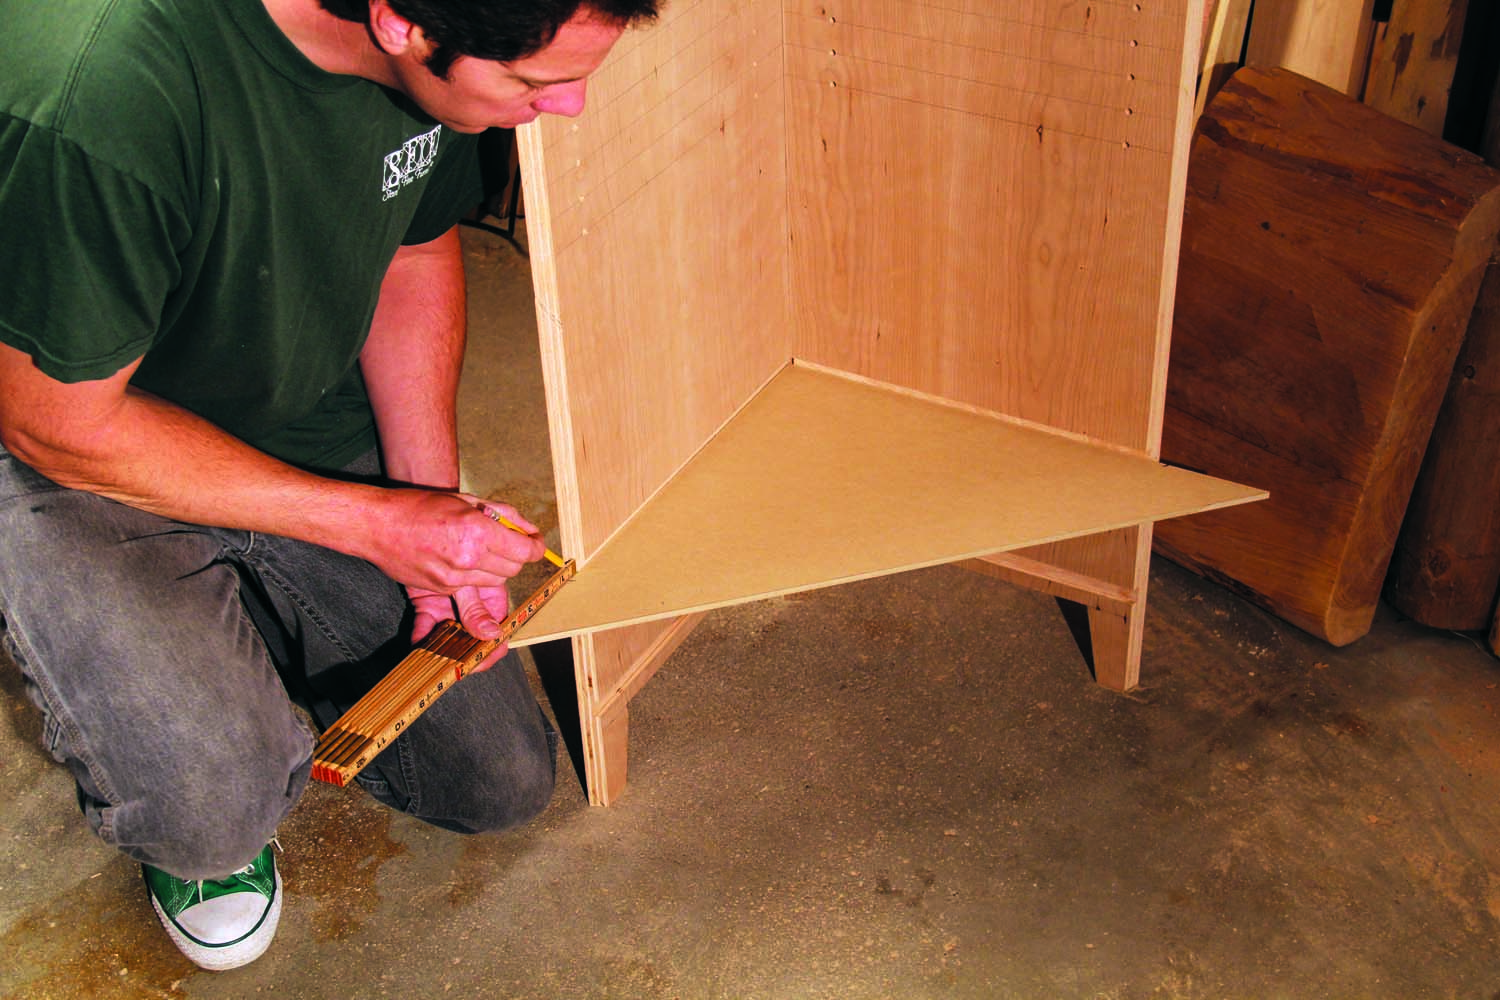
Photo 4. Make a template for the shelves and subtop from 1/4″ MDF. Place the template in the dadoes and make two marks 11/16″ beyond the edges of the cabinet’s sides.
Now it’s time to hit the Pause button. Before you can go any further, you need to know the exact curvature of the drawer that fits between the shelves. (Fig. 02 shows an elegant geometric method for calculating this curve. It works for a cabinet of any size.) The drawer’s front (K) sits flush with the shelves, so once you’ve nailed down the drawer’s curve, you’ve also got the curve for the shelves.

Photo 5. Make the front of the drawer before proceeding any further. You’ll need to know its exact curvature before completing the shelf template.
Knowing the drawer front’s theoretical radius is a good start, but what you actually need now is the drawer front itself (see “Making a Curved Drawer Front,” page XX). The front is laminated from 1/4″ pieces of plywood, not sawn from a giant chunk of wood (Photo 5). When you make a bent lamination, the piece usually flattens out a small amount when it comes out of the clamps. Exactly how much “spring back” you’ll get is impossible to predict. Therefore, you must go through the process of making the drawer front in order to accurately determine its curvature—numbers alone won’t work.
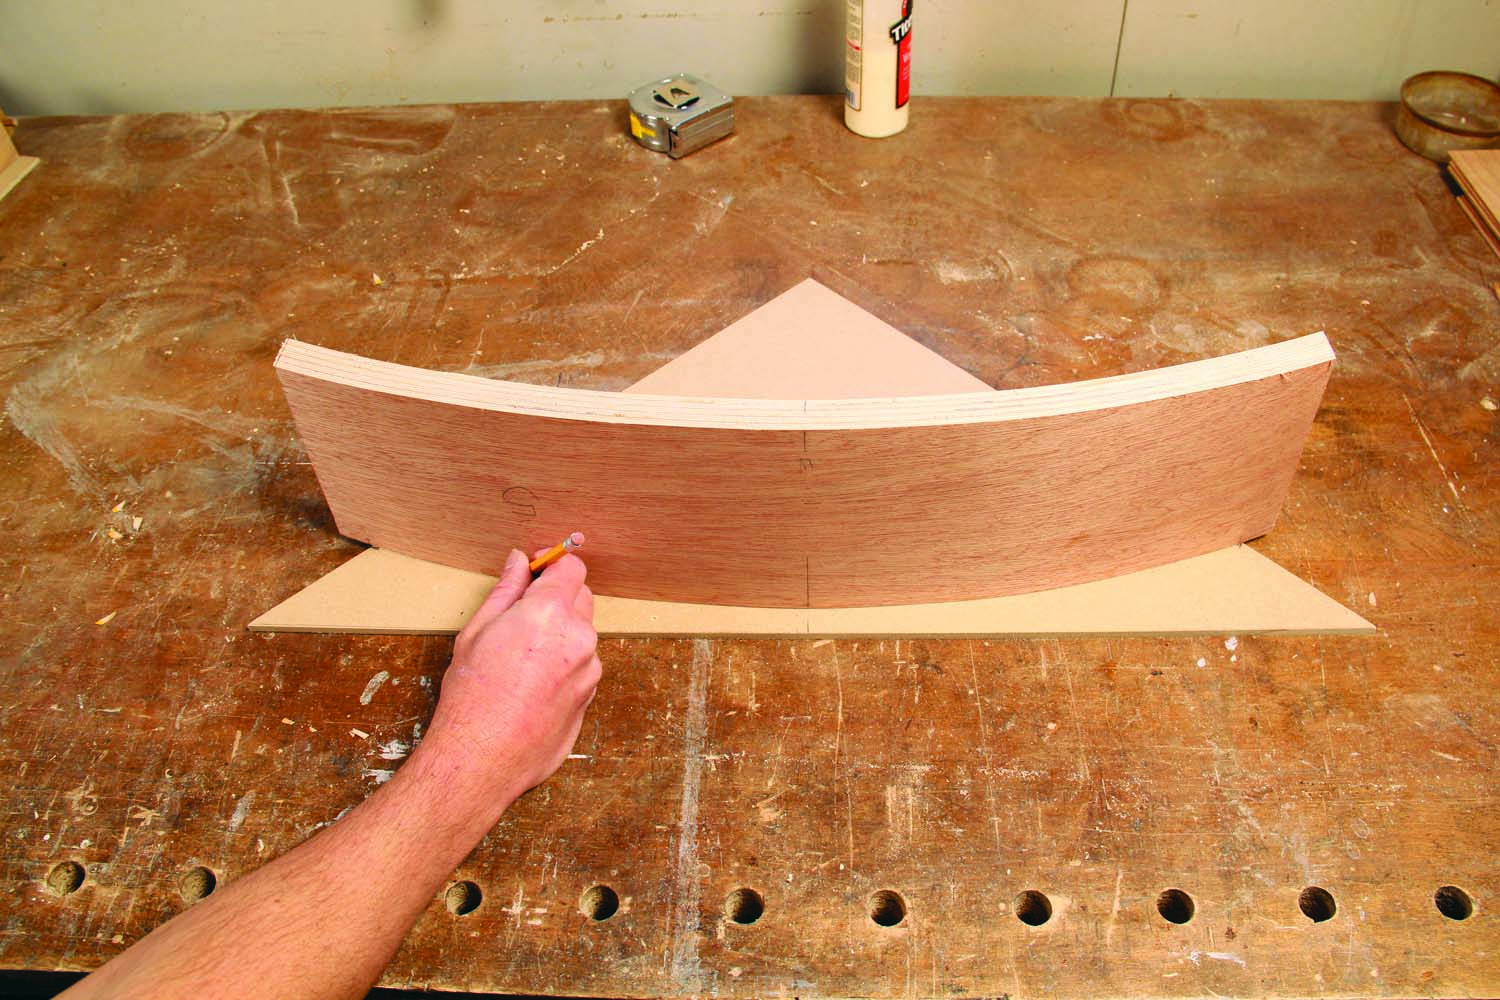
Photo 6. Place the drawer front on the marks you drew on the template, then trace the outline of the drawer’s curve.
Thinking about this, I hope you’ll see that it’s risky to make the shelves first and then try, later on, to make a drawer front that matches their curve. Since the drawer front is veneered, there’s no margin for error. Once the front is bent, it’s impractical to change its shape to match something else. Making the drawer front before making the shelves is the prudent way to go.
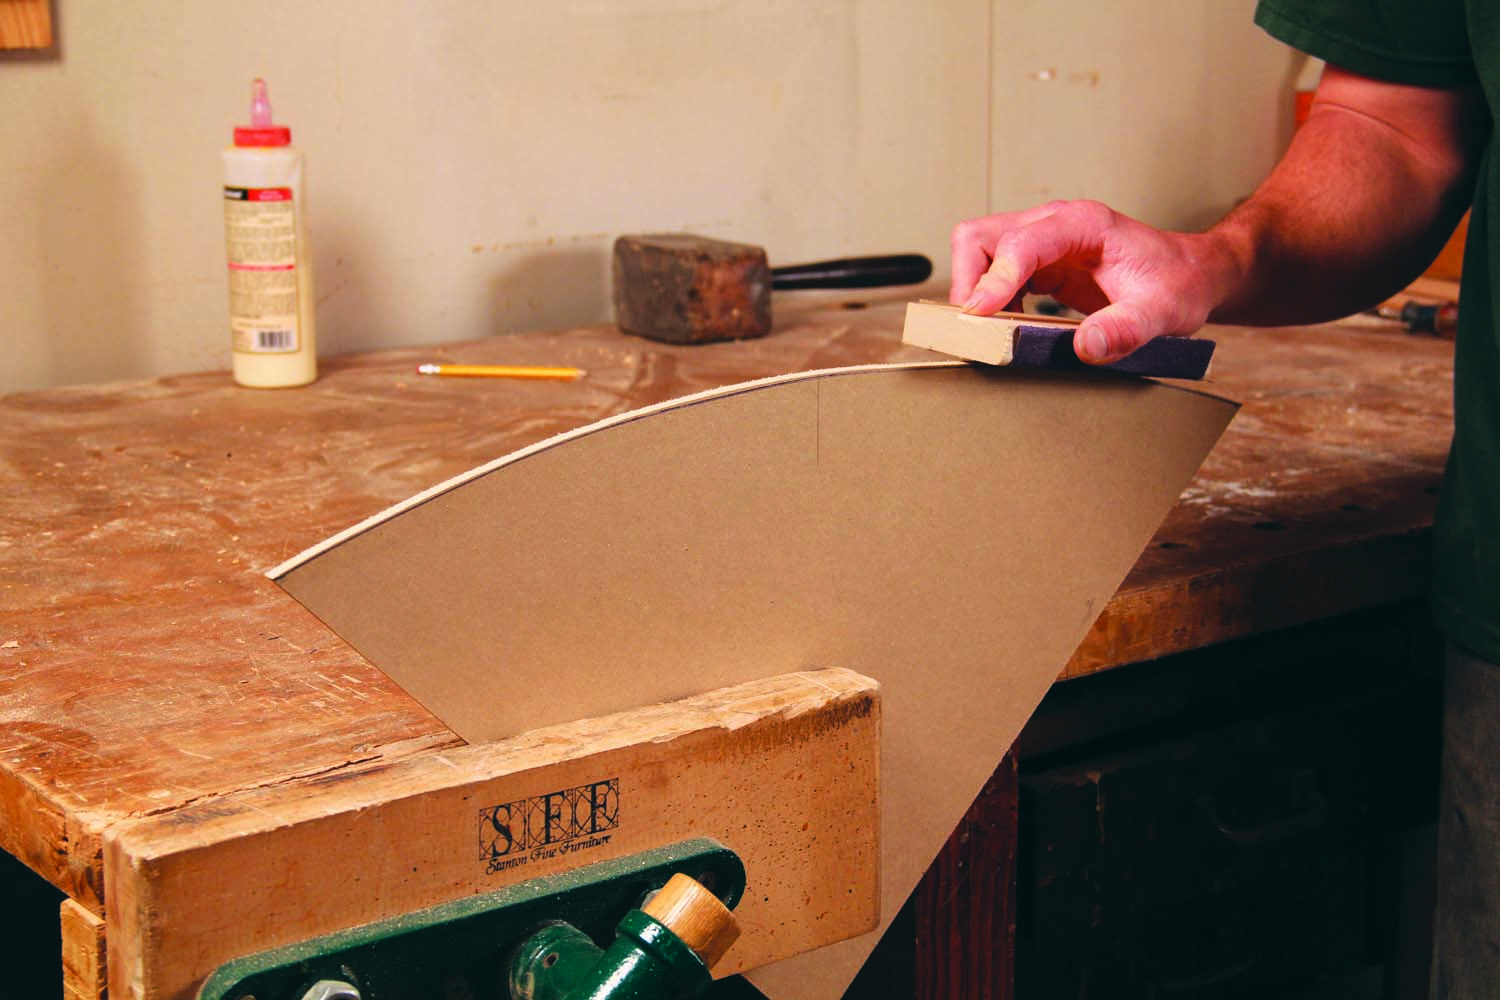
Photo 7. Cut the curve on the bandsaw, then sand down to the line. The shelves and the drawer will be flush with each other, so their curves must match.
Make the front extra-long, using the dimensions given in the cutting list. Place the front on your template and connect the two marks you made (Photo 6). Trace the front’s curve, then cut the template and sand to the line (Photo 7). Compare the template to the drawer front and adjust the template’s curve, if necessary, so they match.

Fig. B. Curve Layout
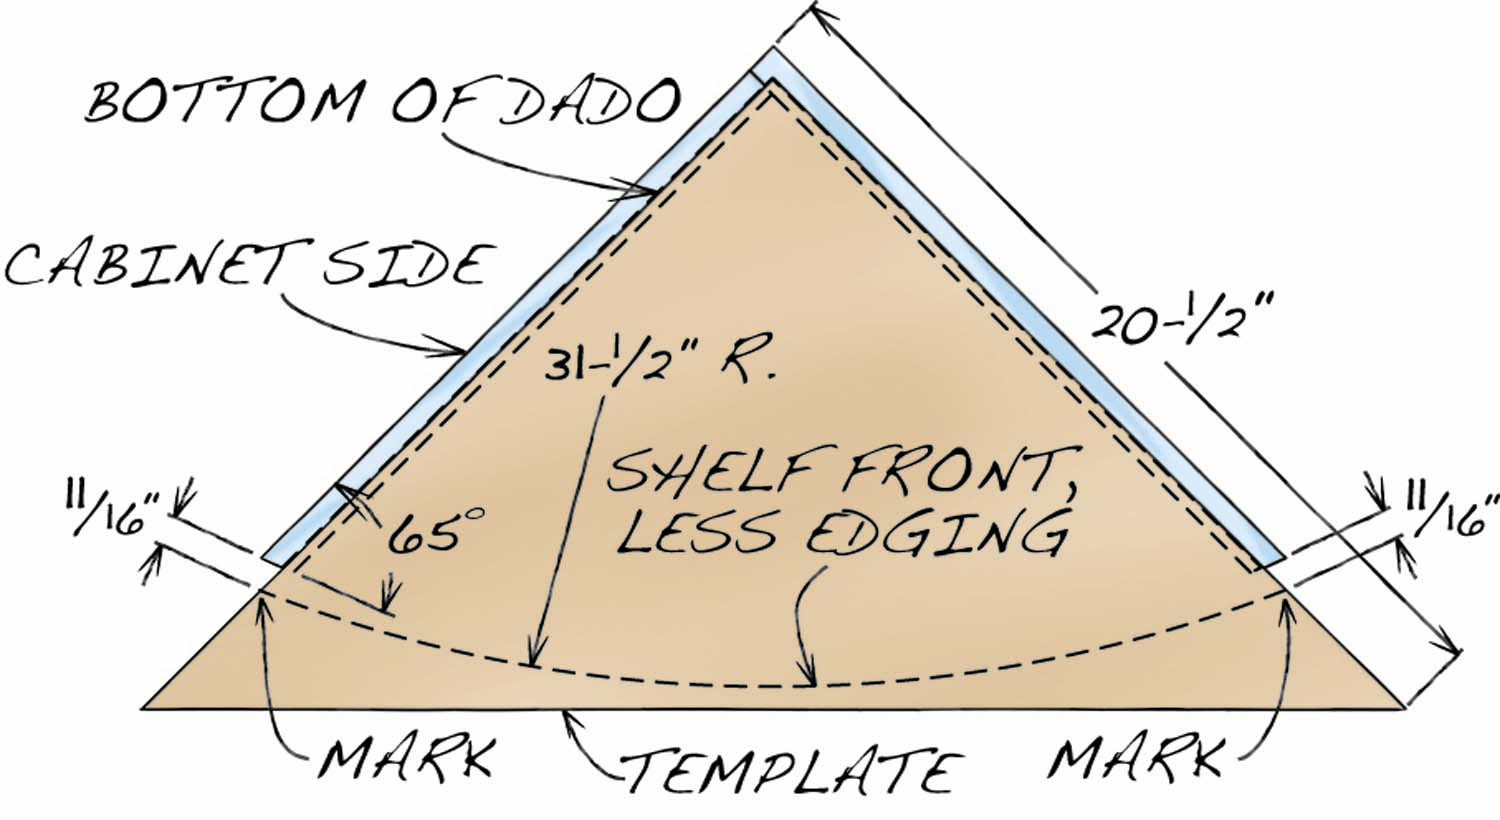
Fig. F. Plan View of Case, with shelf template

Fig. G. Top Details
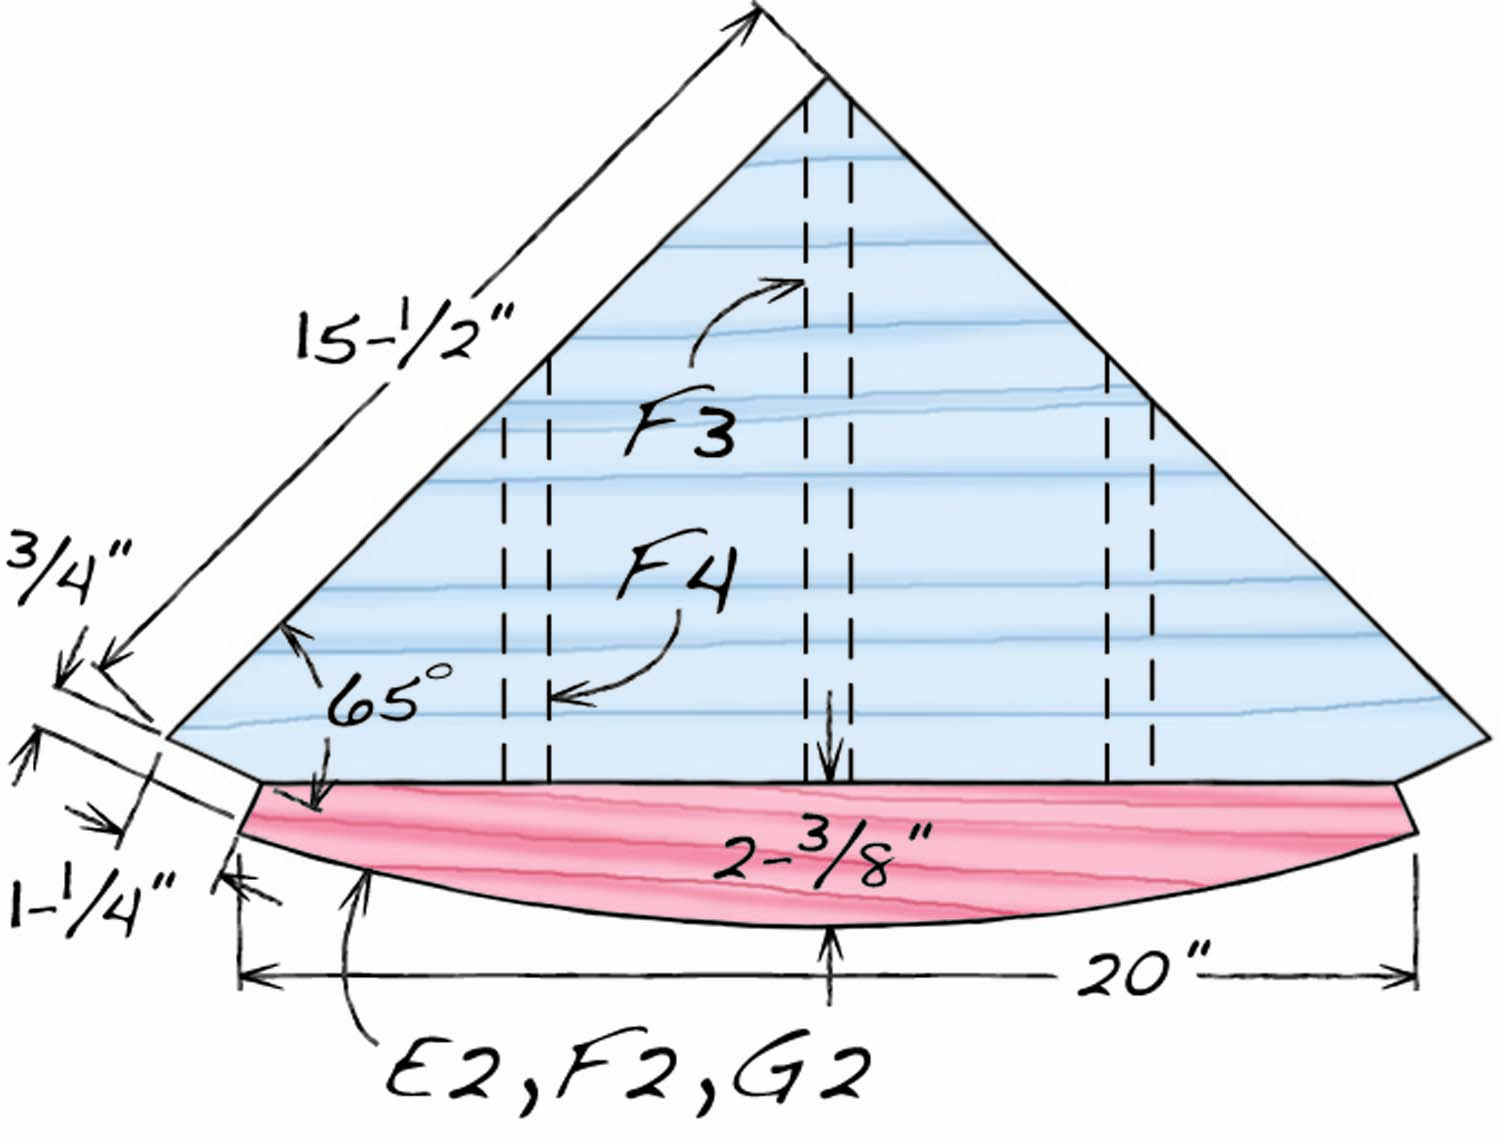
Fig. H. Subtop and shelf details
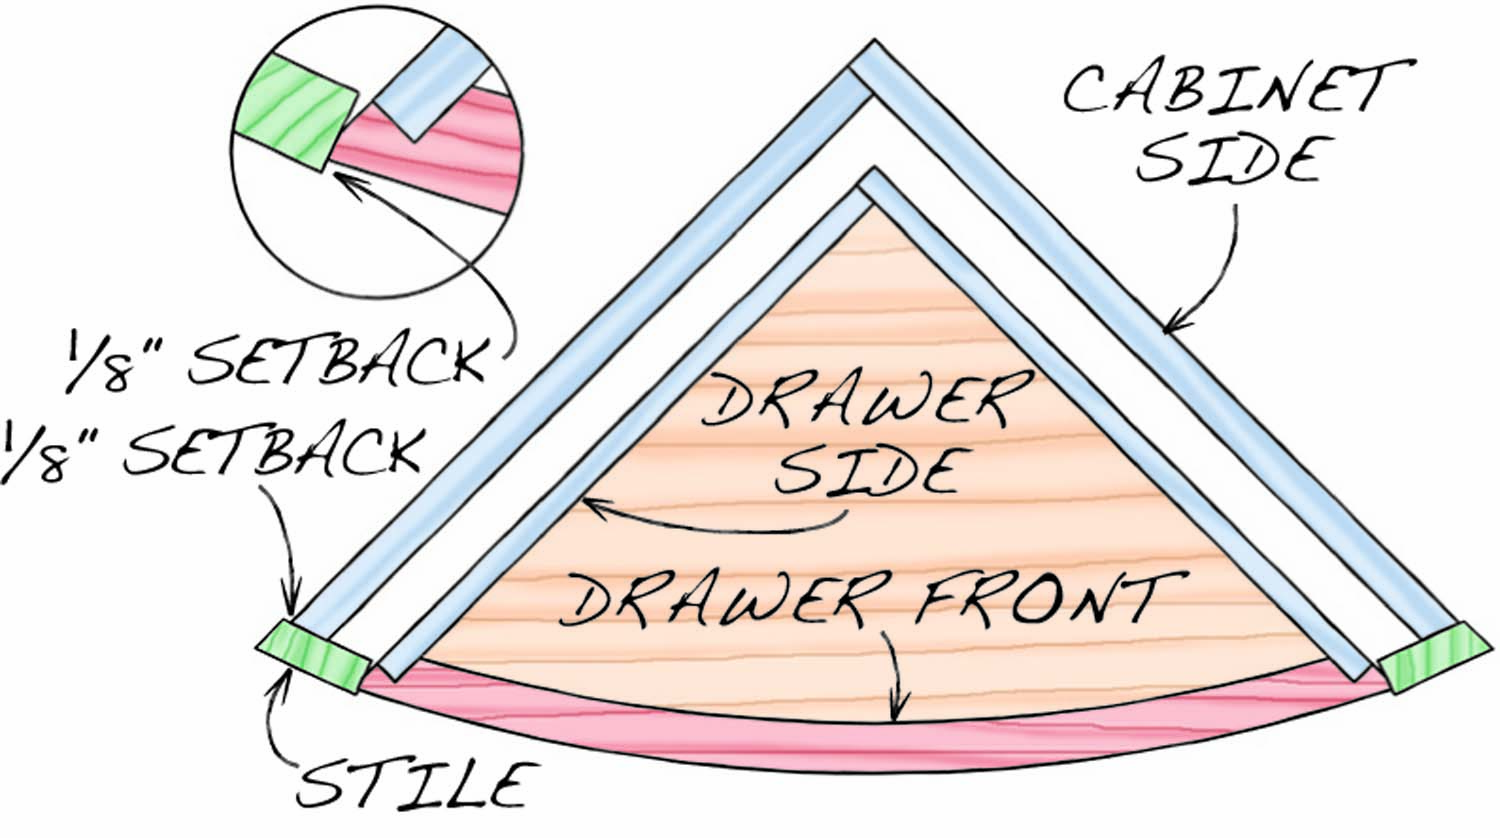
Fig. J. Plan view of drawer inside case

Fig. E. Template Pieces for top and shelves
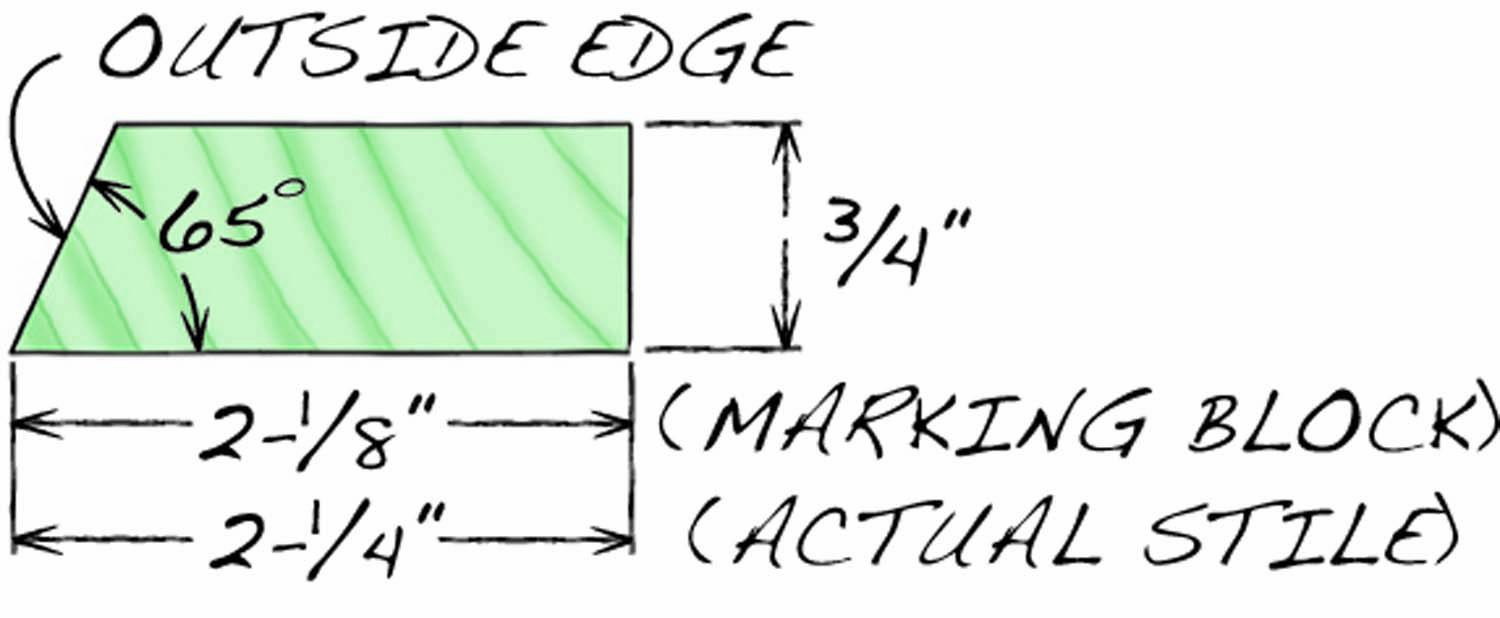
Fig. O. Stile Marking Block
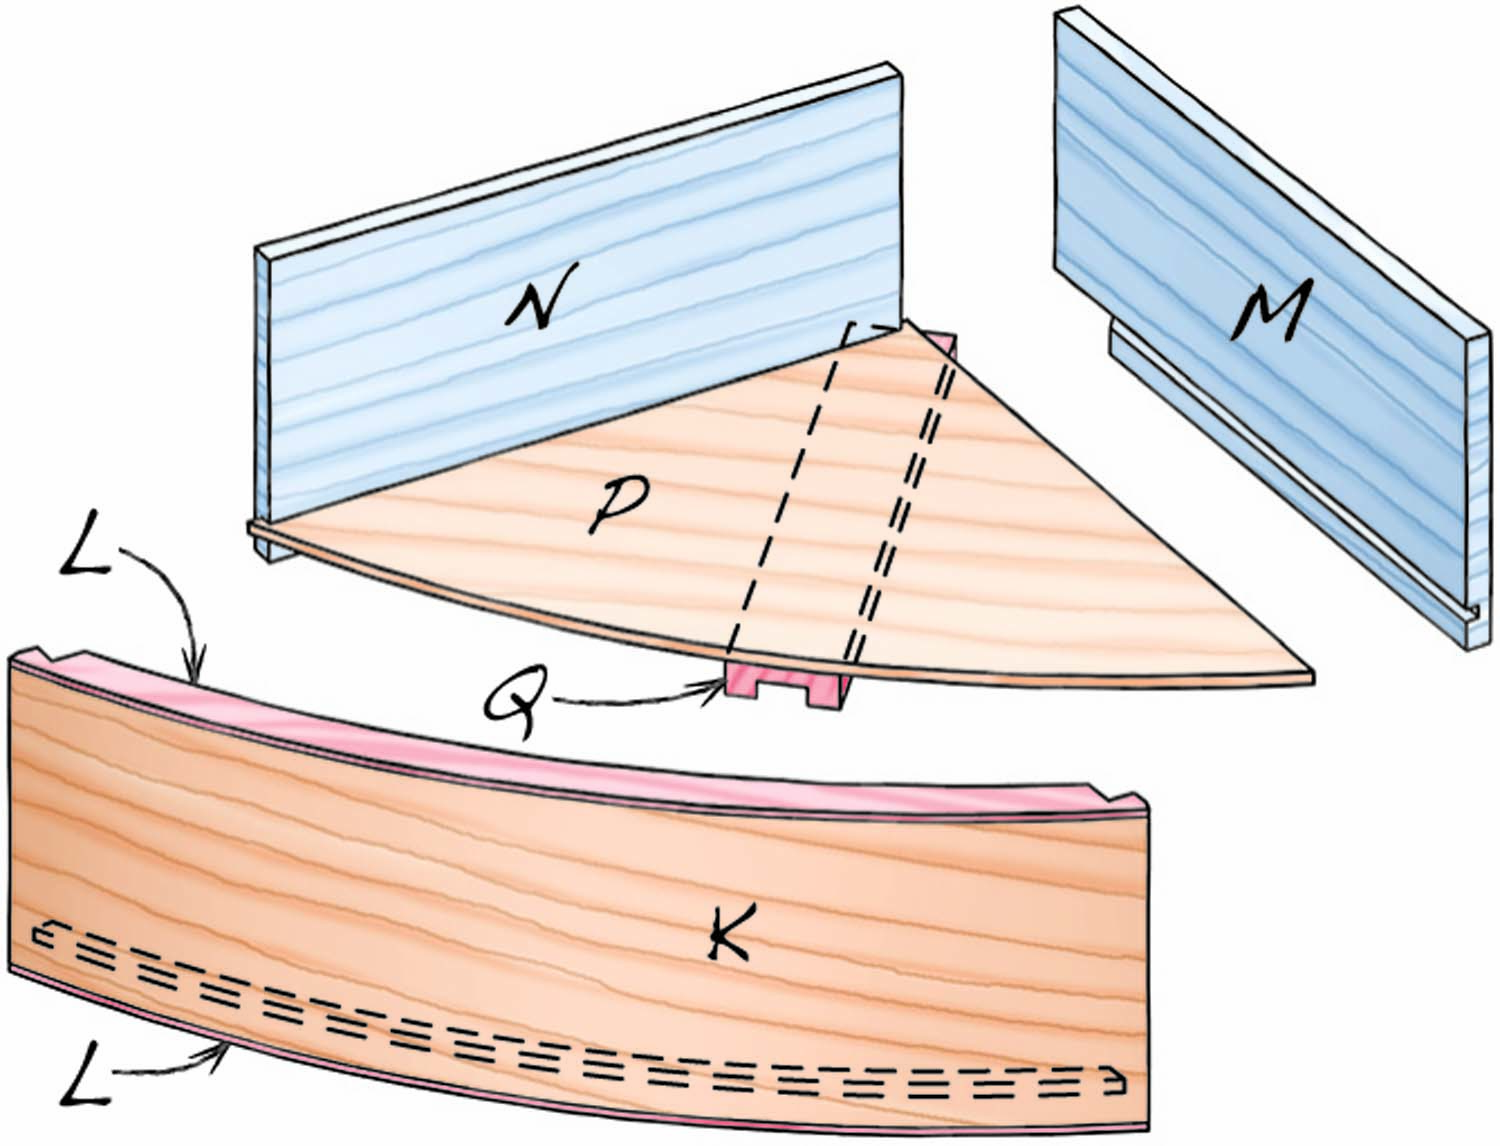
Fig. K. Exploded View of drawer
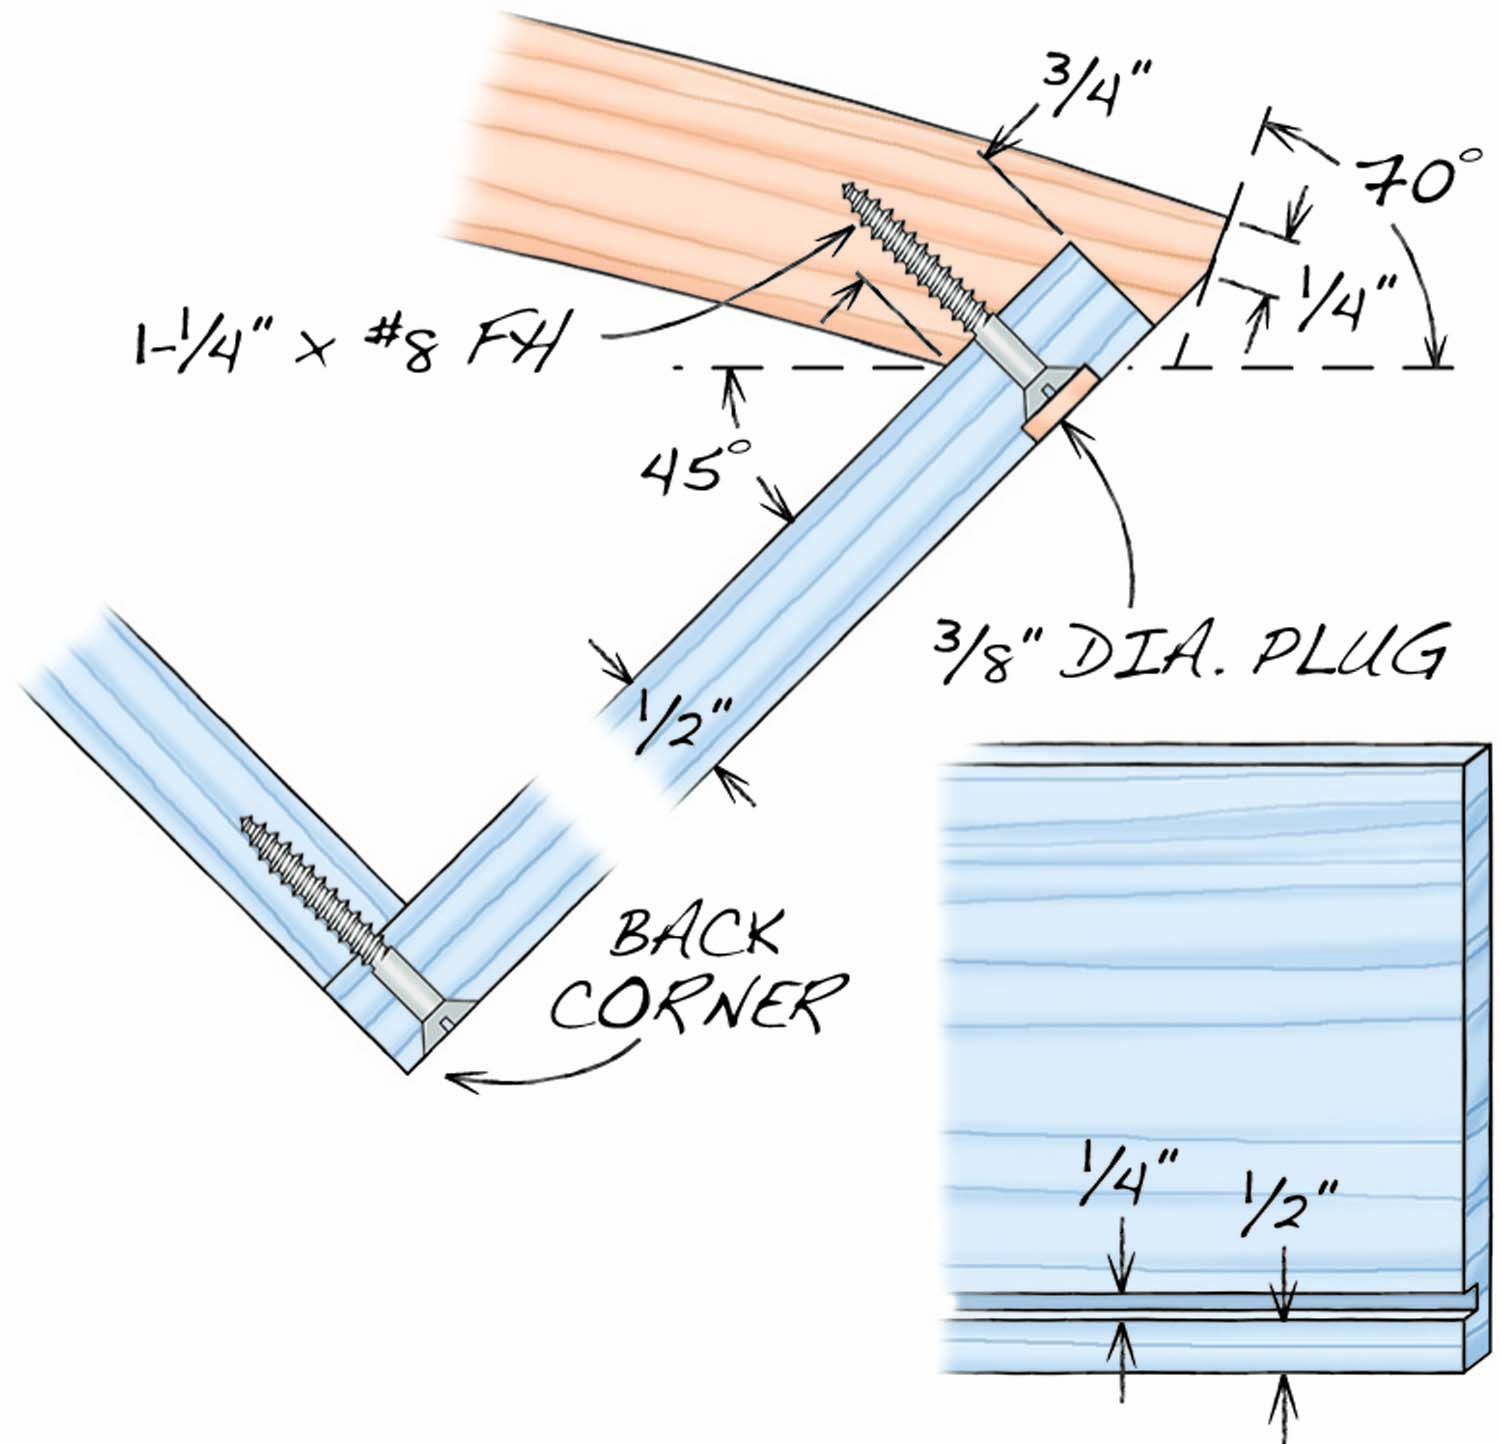
Fig. L. Drawer Details
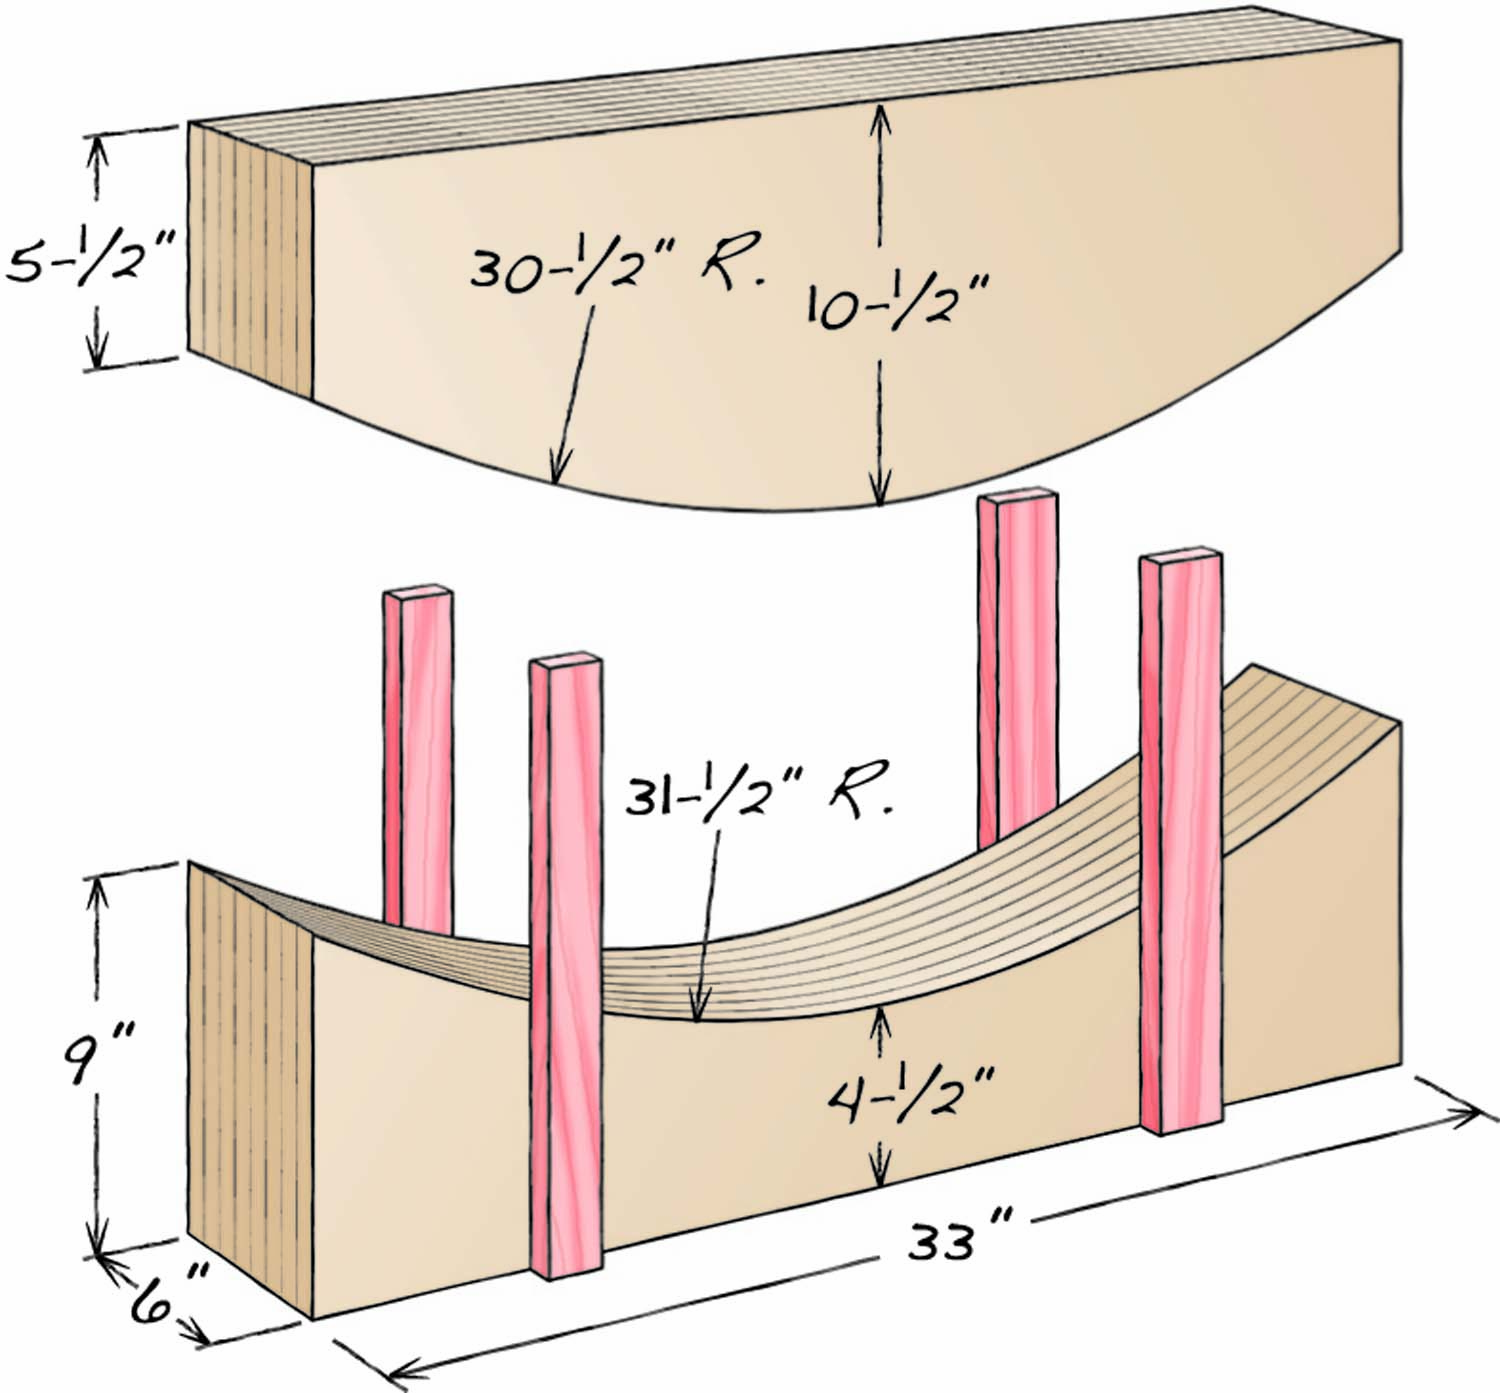
Fig. M. Drawer Front Binding form

Fig. P. Drawer Front cutting jig
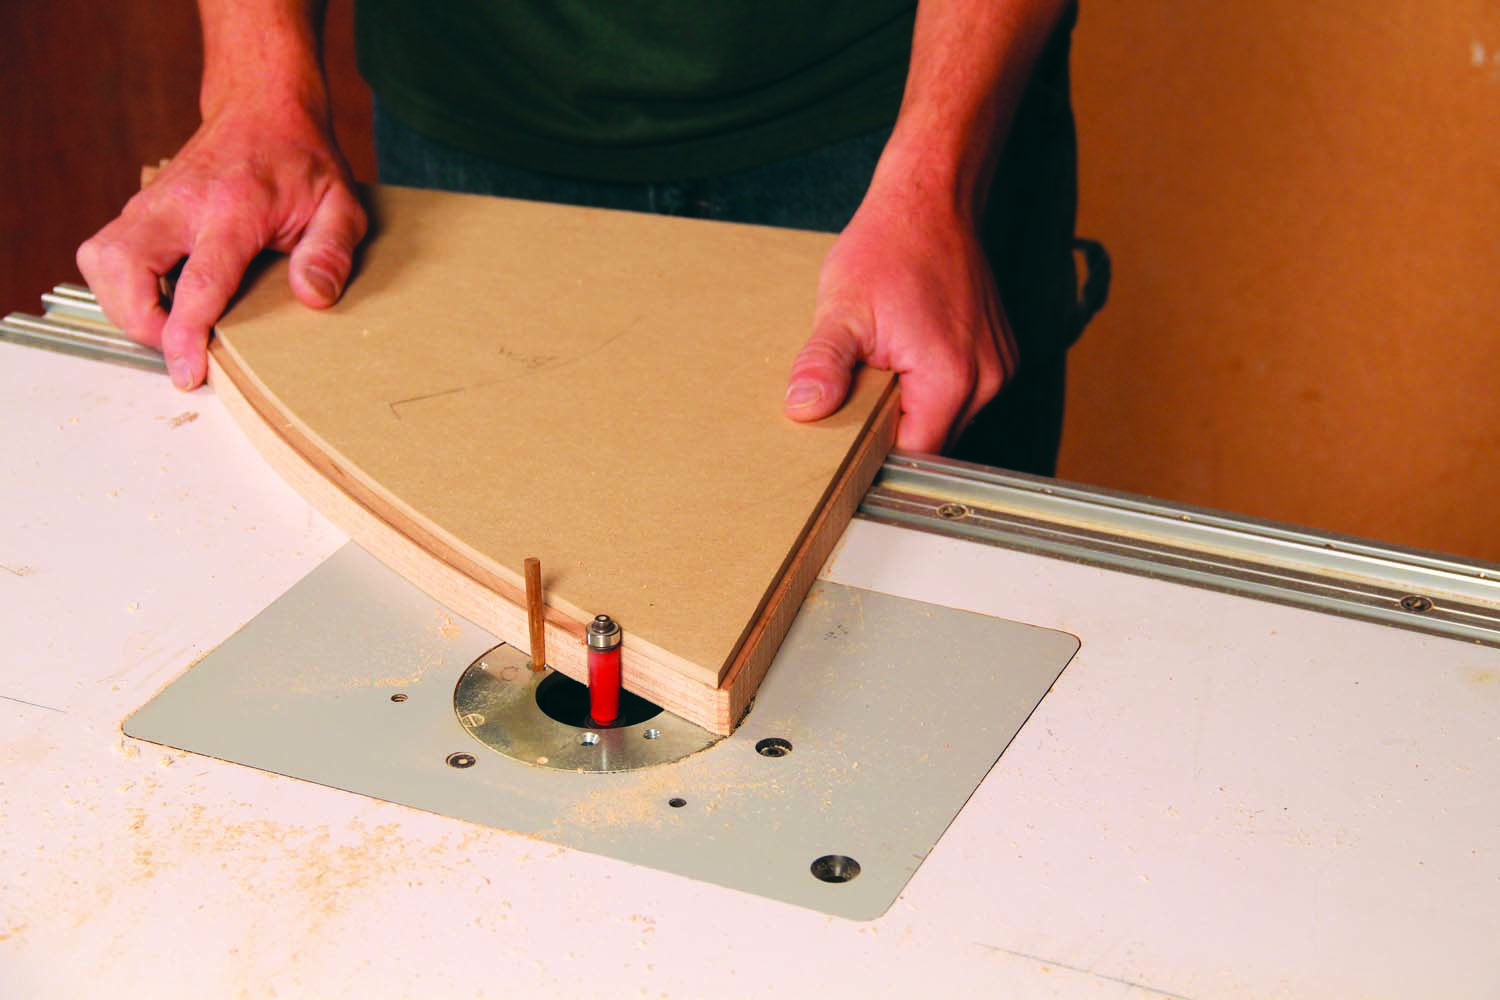
Photo 8. Shape an oversized piece of plywood so that it’s an exact copy of the template. Make three pieces like this—two for the shelves, one for the subtop.
Rough cut all the triangles from the sheet of plywood. Set aside the top piece (J1) for now. Place the MDF template on the remaining triangles, allowing a 1/16″ margin on the straight sides. Trace the template’s curve on each piece. Cut the curve at least 1/16″ oversize, then use double-stick tape to fasten the template to each piece. On the router table, shape each piece of plywood, all the way around, to match the template (Photo 8).
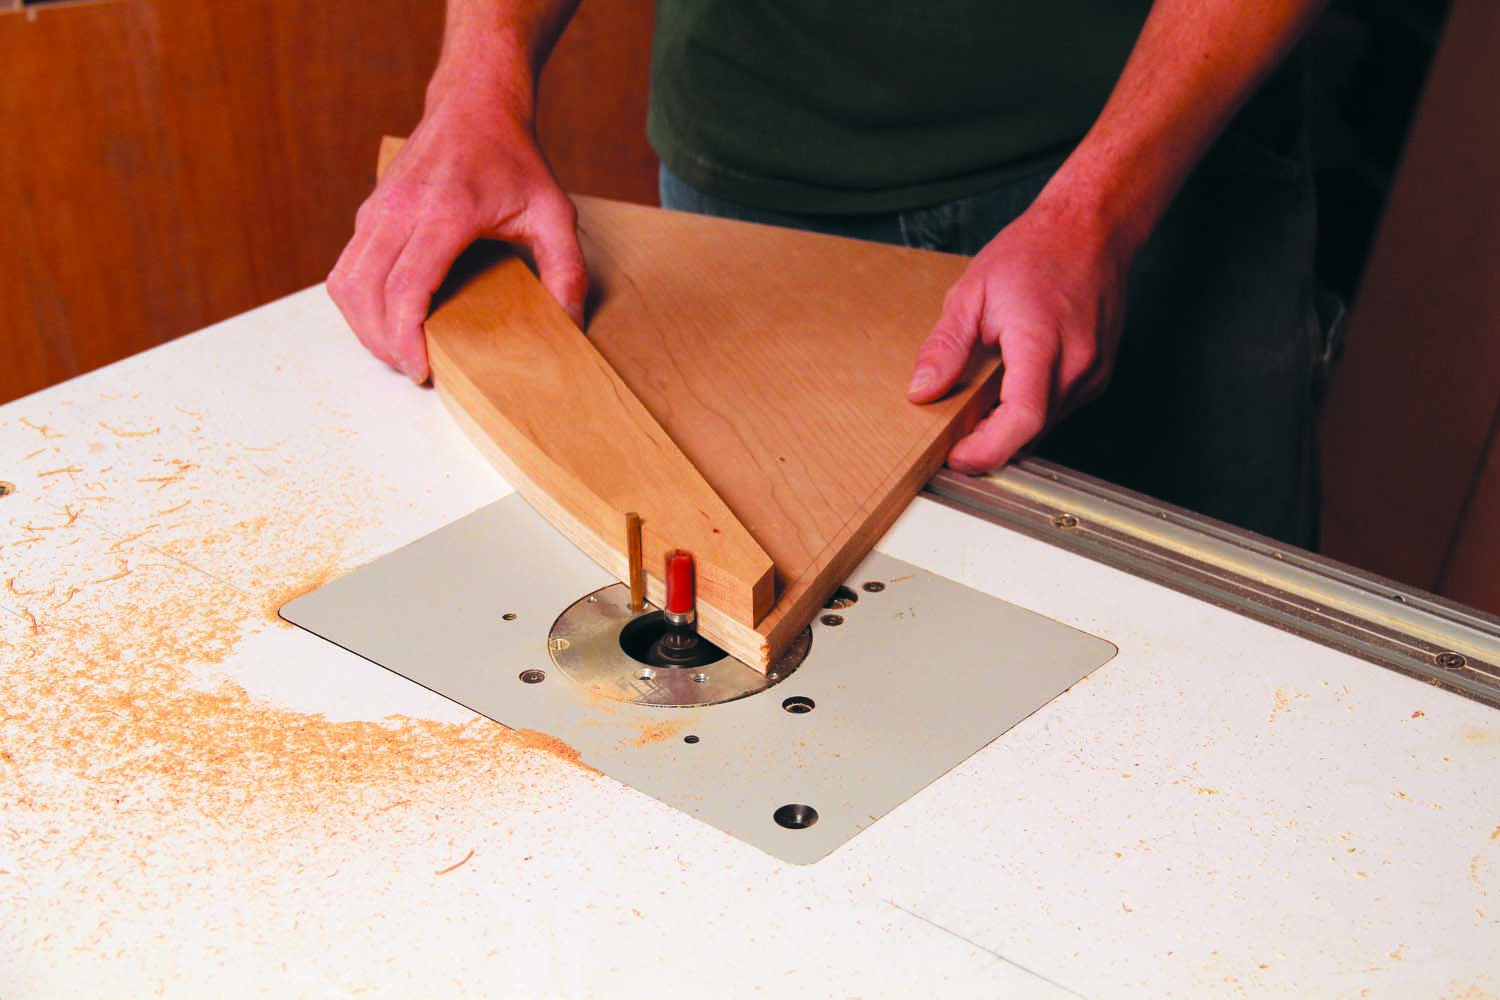
Photo 9. Add a solid-wood “buildup” piece to each of the three parts, then use a pattern bit to make the buildup flush with the plywood.
The subtop (E1) and the two fixed shelves (F1 and G1) have front edges that are thicker than 3/4″. To achieve this look, glue “buildup” pieces (E2, F2, F3, F4 and G2) to each part. Trim the front buildups flush (Photo 9).
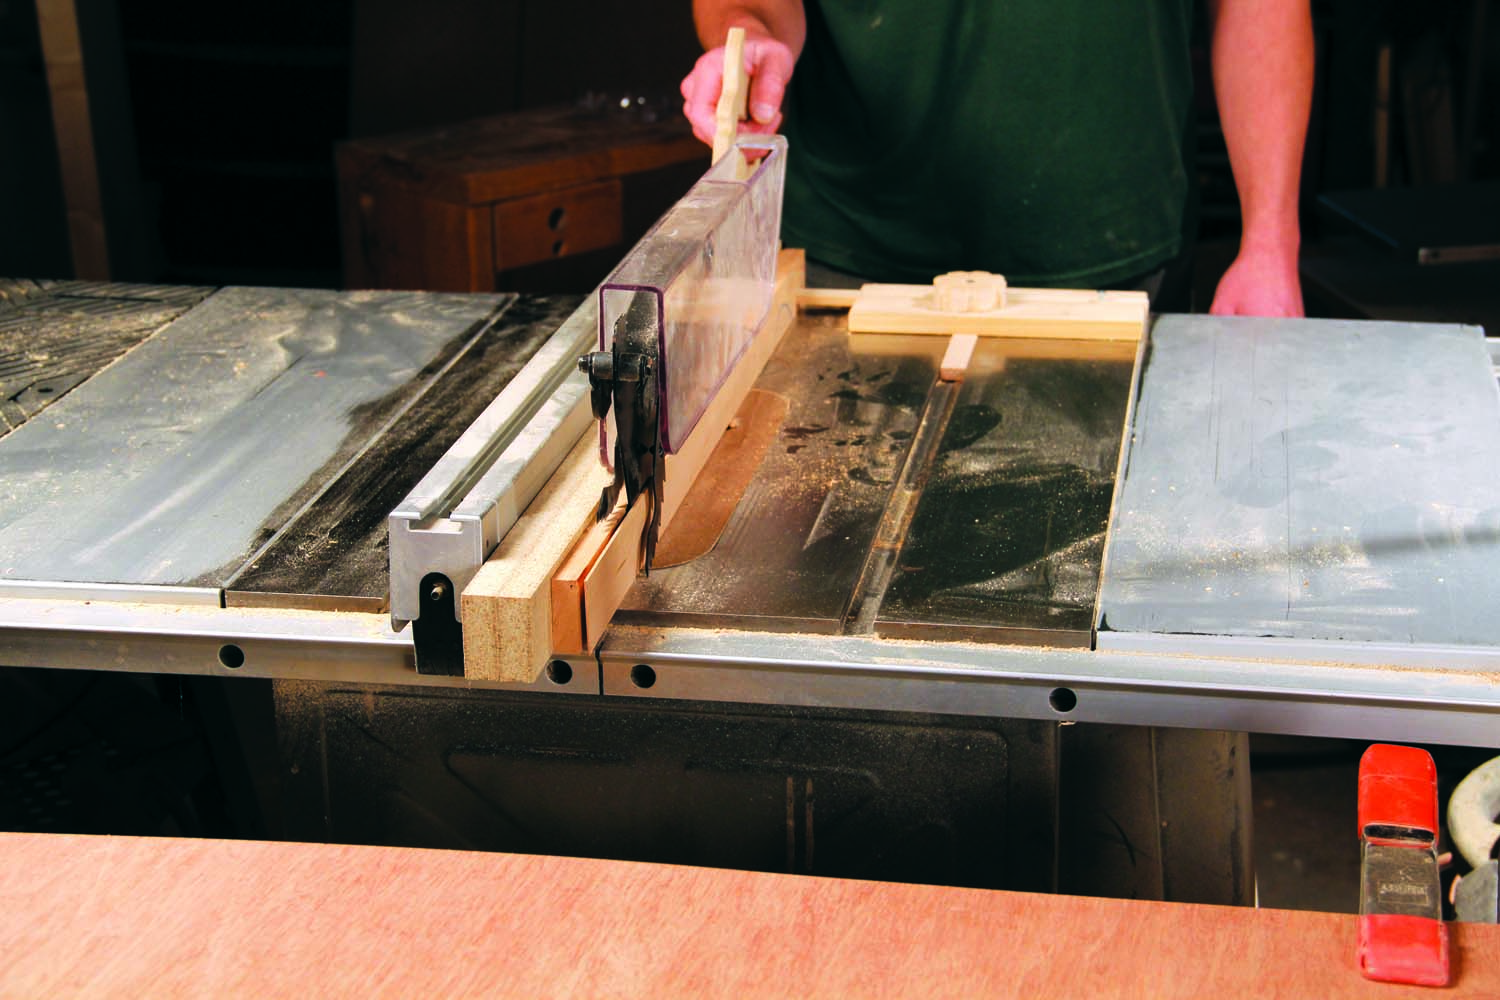
Photo 10. Saw 1/16″ thick pieces of front edging for the shelves and subtop. This method, using a stop locked into a miter slot, allows you to cut multiple pieces from one piece of stock.
Resaw 1/16″ thick edging for the subtop and fixed shelves (E3, F5, and G3). Also, saw edging for the adjustable shelves (H2) and the cabinet’s top (J5 and J6). I prefer using the tablesaw to make edging this thin (Photo 10), but you could also use a bandsaw. I glue the stock to a backer piece so there’s plenty of support—and something to push with my push stick. Rip the edging about 1/8″ wider than the front edges of the subtop and all of the shelves, then glue the edging to each piece (Photo 11). Trim it flush with a small router.
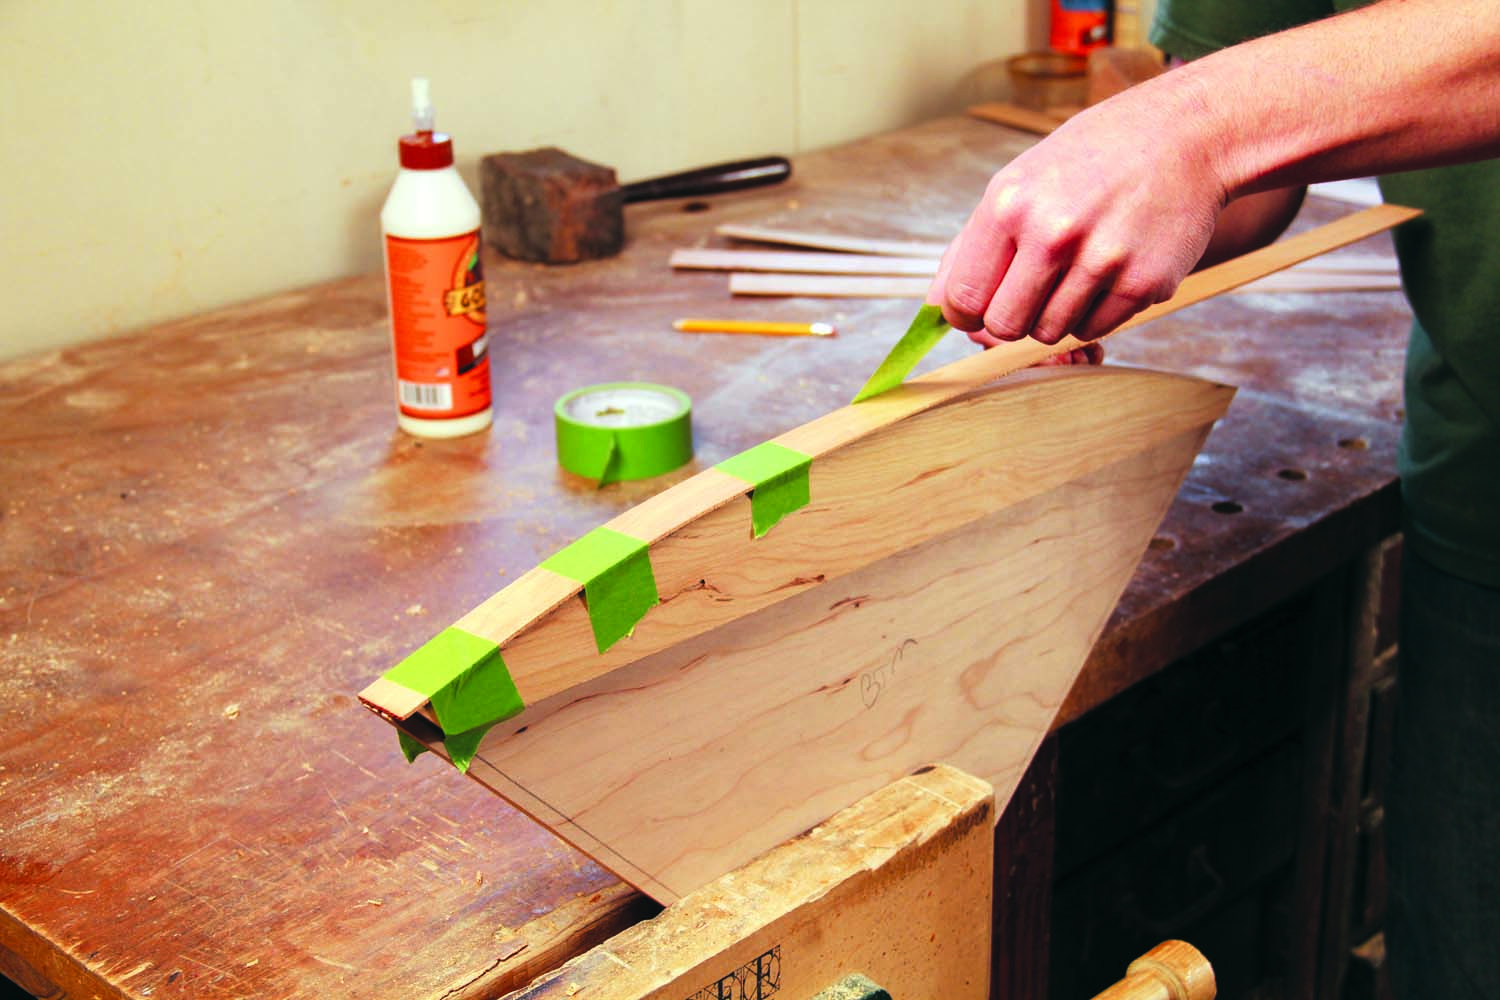
Photo 11. Glue the edging to the shelves and subtop, then trim it flush. Tape is adequate to hold the thin edging in place—you don’t need clamps.
All of these triangular pieces must have notches cut in them to accommodate the cabinet’s stiles (D). The best way to lay out the notches is to use a marking block that’s similar in cross section to the stiles (Fig. 14). Install the shelves and subtop, then mark around the block (Photo 12). When you do this, make sure the angled end of the block is flush with the cabinet’s side. (The block is 1/8″ narrower than the stiles. When you make and install the stiles, tight up against the notches, they’ll automatically be proud of the cabinet’s sides by 1/8″.) Remove the shelves and subtop and carefully cut the notches with a bandsaw. True the cut surfaces with a file. Use the same block to mark the adjustable shelves. Cut these notches about 1/16″ oversize, so the shelves are easier to tip into place.

Photo 12. Slide the shelves and subtop in place, then trace around a block that has the same dimensions as the cabinet’s stiles. Remove the pieces and notch them to receive the stiles.
Build the drawer
You’ll find the exact dimensions for the drawer front’s two-part bending form (Fig. 12) and the dimensions for the support piece used to trim the drawer front and cut its joints (Fig. 13). The dimensions of the joints and other drawer details are shown in Fig. 11. Determine the exact length of the drawer’s front by placing the front on top of one of the fixed shelves. Trace around the notches. When you trim the front, the ends of the drawer should be flush with the notches (Fig. 09).
Before assembling the drawer’s sides, make the guide (Q) and guide strip (R). Cut notches in the back corner of the drawer sides to receive the guide, then assemble the drawer. Install the guide with screws—be sure to center it front and back.
Remove the upper fixed shelf (F1) and add some additional buildup pieces (F3 and F4). These serve to prevent the drawer from tipping down when opened, so their precise location isn’t important. Replace the shelf.
Next, you’ll align the drawer as you install the guide strip on the lower fixed shelf (G1). The location of the strip must be very precise, so the best method is to make the strip adjustable. Here’s how to do it: First, remove the lower fixed shelf from the cabinet. Draw a centerline, front to back, on its top face. Across the centerline, draw a perpendicular line 1″ in from the shelf’s front edge (this represents the inner edge of the drawer front when the drawer is closed). Drill a 1/4″ hole about 2″ back from the shelf’s front edge, on the centerline.
Next, turn to the guide strip. Draw a centerline all the way around it, then drill a 1/4″ hole through the strip about 1/2″ in from one end. Clamp the strip to the shelf and drill pilot holes for the screws you’ll use to adjust the strip. Use an extra-long screw in front, but cut it off even with the top of the guide strip before installing it—this gives you the maximum amount of holding power for a thin piece of wood.
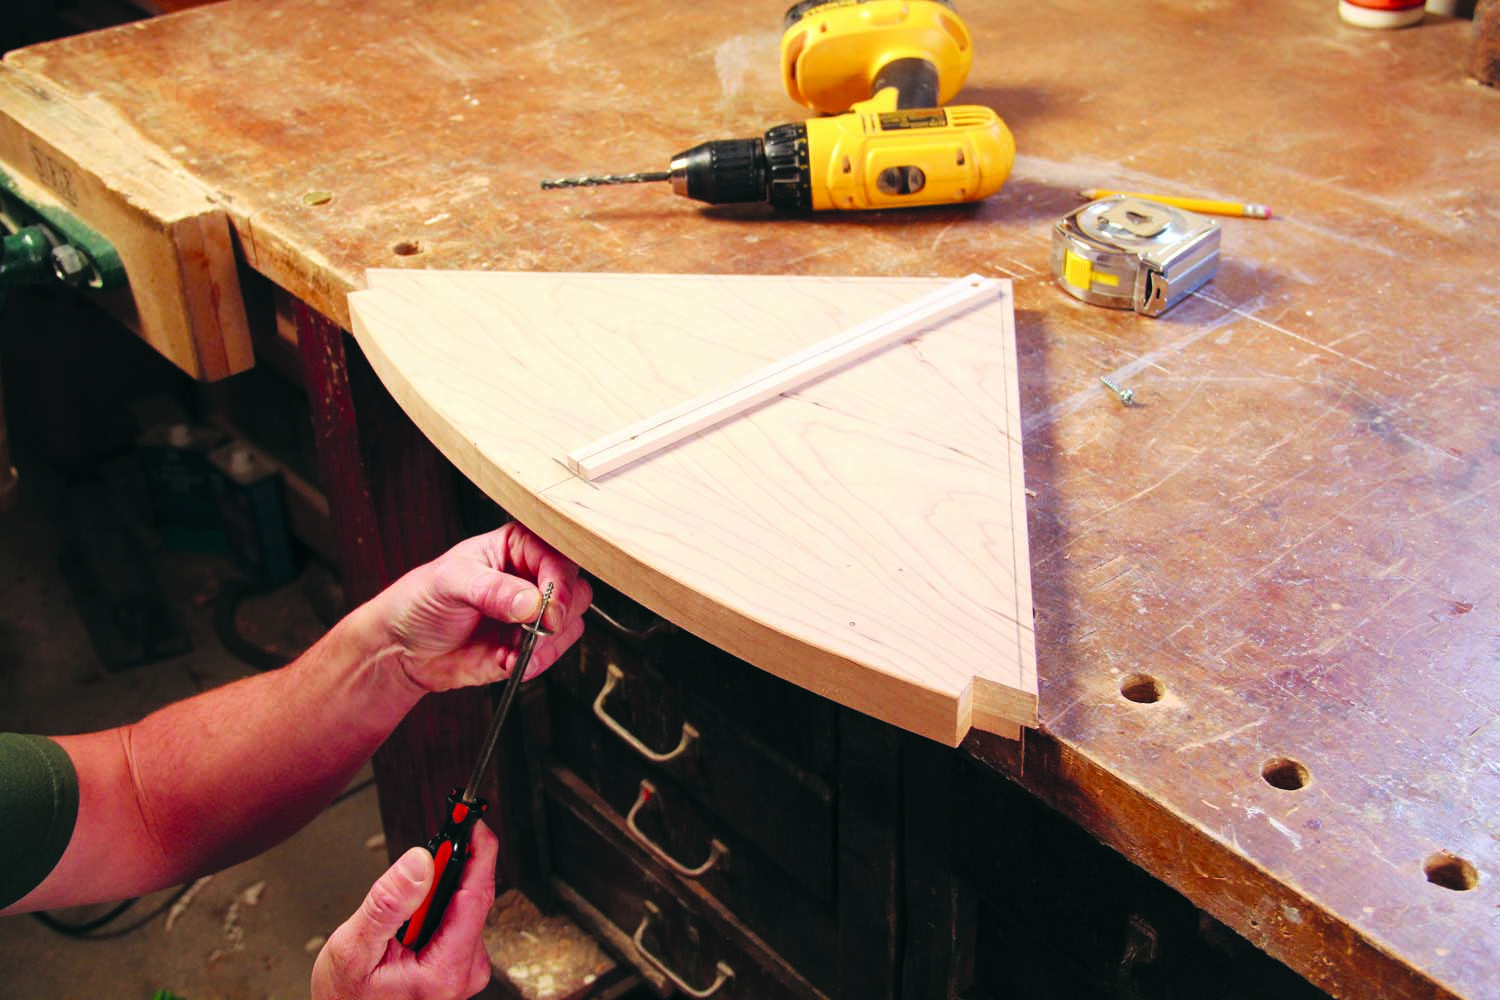
Photo 13. Fasten a drawer-guide strip to the lower shelf. Run a screw from underneath to secure the strip’s front end. The screw passes through an oversize hole, so you can adjust the strip’s position.
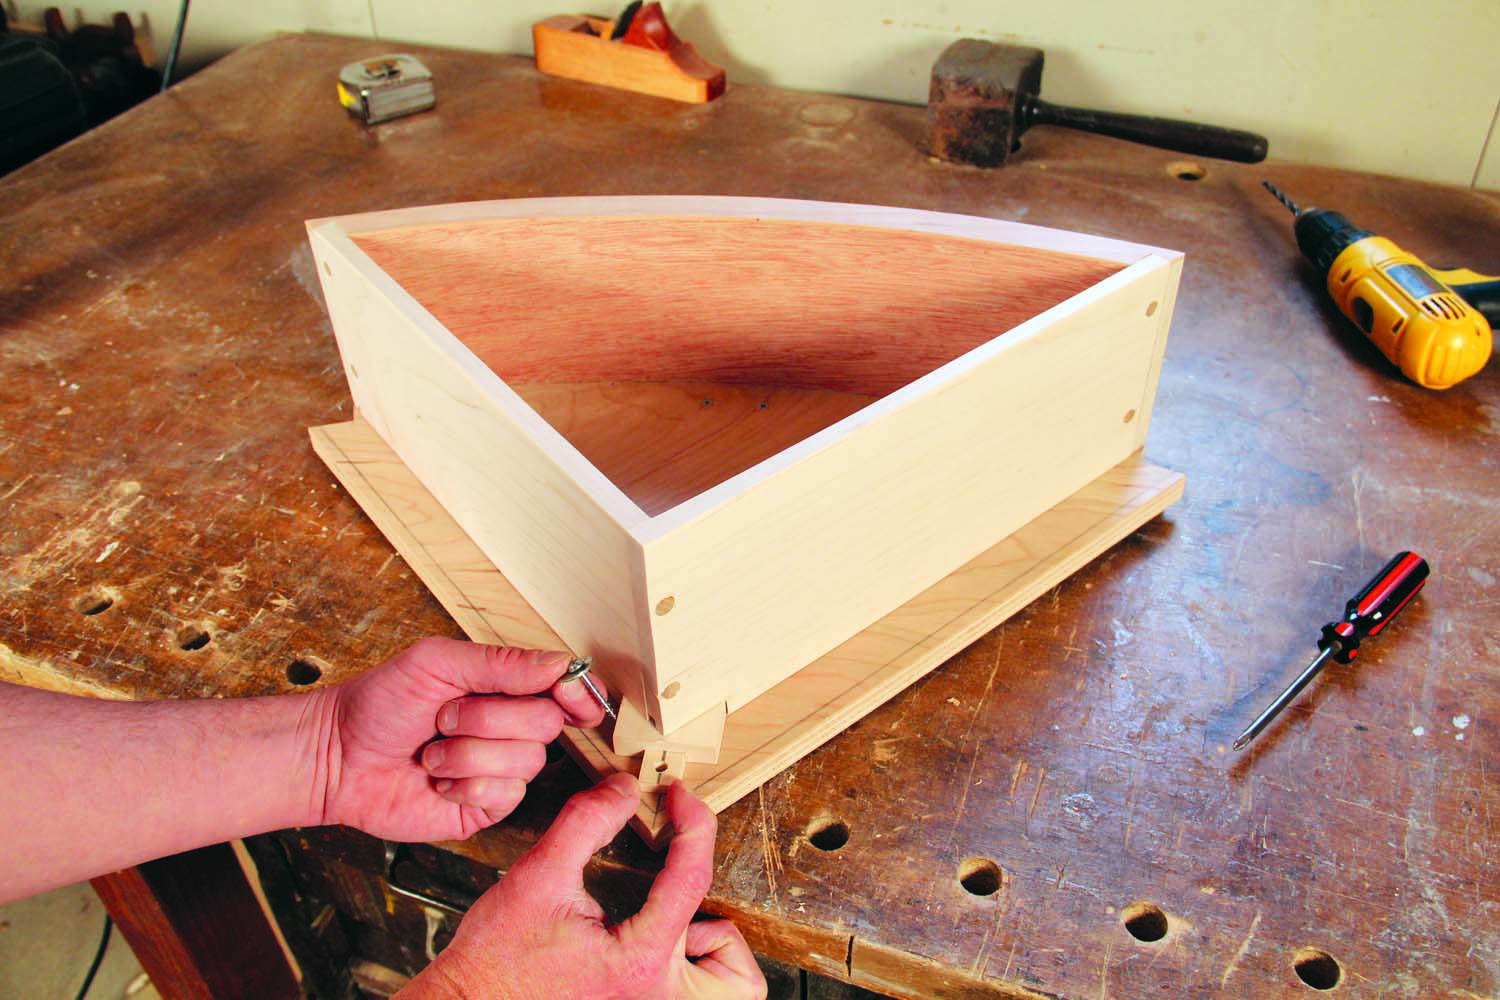
Photo 14. Fasten the back end of the strip with another screw running through an oversize hole. Install the drawer and align its front edge with the shelf, then tighten the screws front and back.
Fasten the front of the strip (Photo 13), but don’t tighten the screw all the way. Place the drawer on the strip, then install the rear screw (Photo 14). Adjust the drawer until its front is flush with the shelf, all the way across, then tighten the screws. Install the shelf in the cabinet and try out the drawer (Photo 15). Fortunately, both fixed shelves are still removable if you need to adjust anything, and you can still tweak the strip, too. Once everything is right, add some more screws to lock the strip in position, then glue and screw the shelves to the cabinet. In addition, glue and screw the subtop in place.
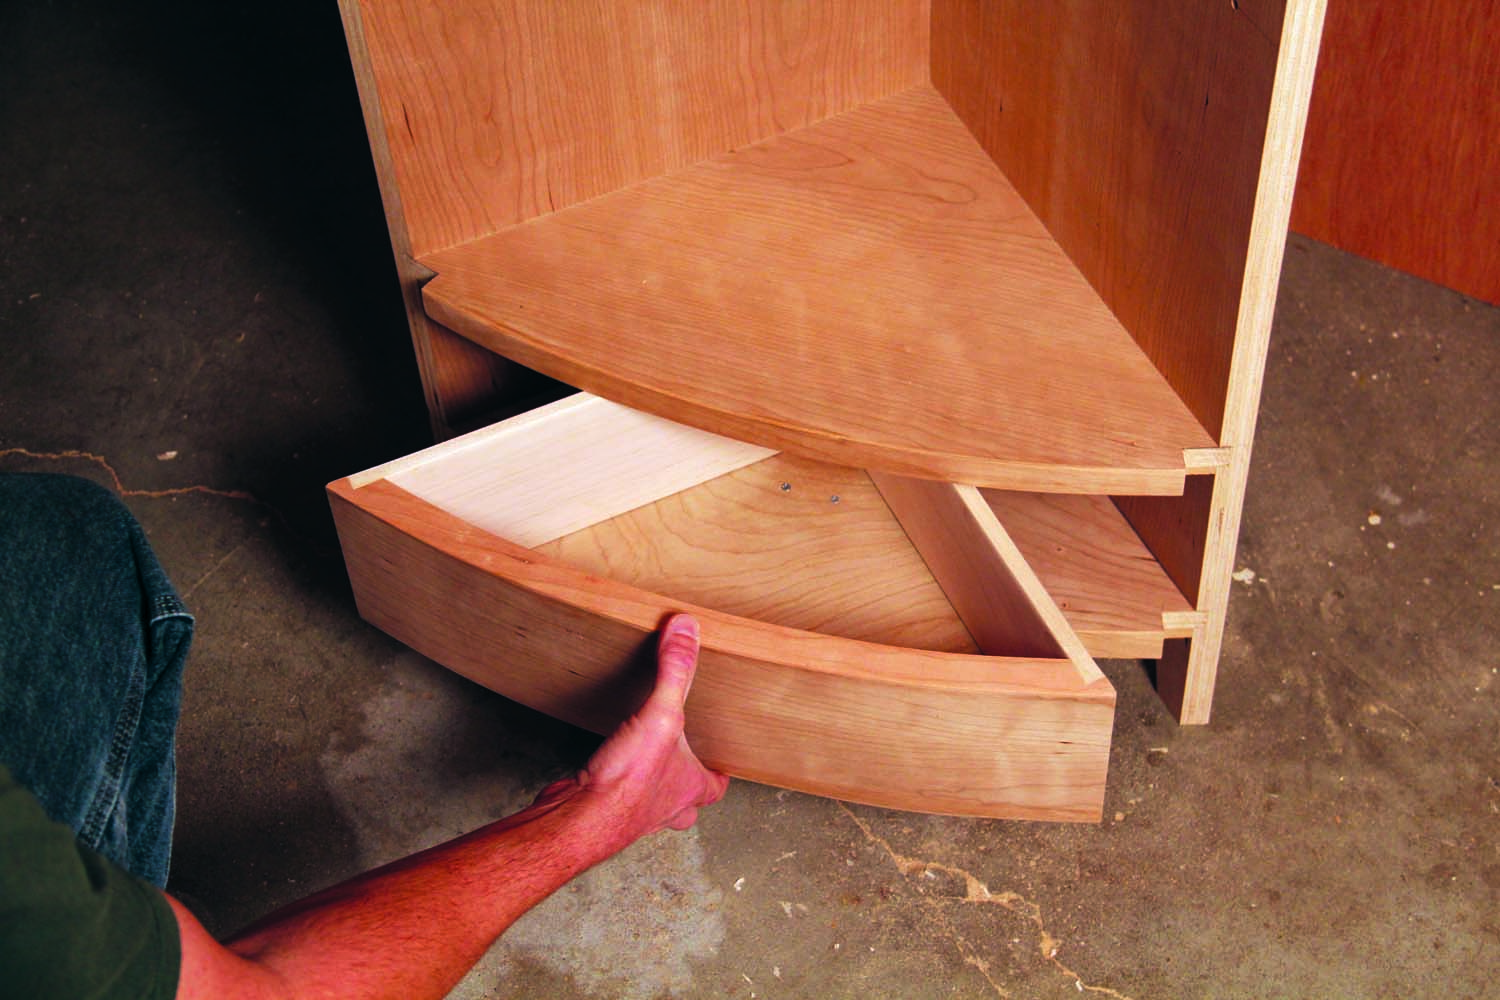
Photo 15. Install the shelf and check the drawer’s operation and alignment. When all is well, glue and screw the shelves in place.
Add the stiles and top
Mill the stiles, cutting one side at an angle (Fig. 14). Cut the bottom ends of the stiles to form tapered legs (Fig. 01). Glue the stiles to the cabinet (Photo 16).

Photo 16. Make the stiles and glue them to the cabinet. Use a long clamping block with an angled edge. Add cleats to the block so it doesn’t slip.
Make the top. You can lay out its front curve in a number of ways, but the best way to ensure that the curve will be smooth and true is to make a 1/4″ MDF template first, as you did for the shelves. The rest of the procedure is similar to building the shelves, but here you’ll need three buildup pieces (J2, J3 and J4) and edging on all three sides (J5 and J6). Fasten the top from underneath (Photo 17).
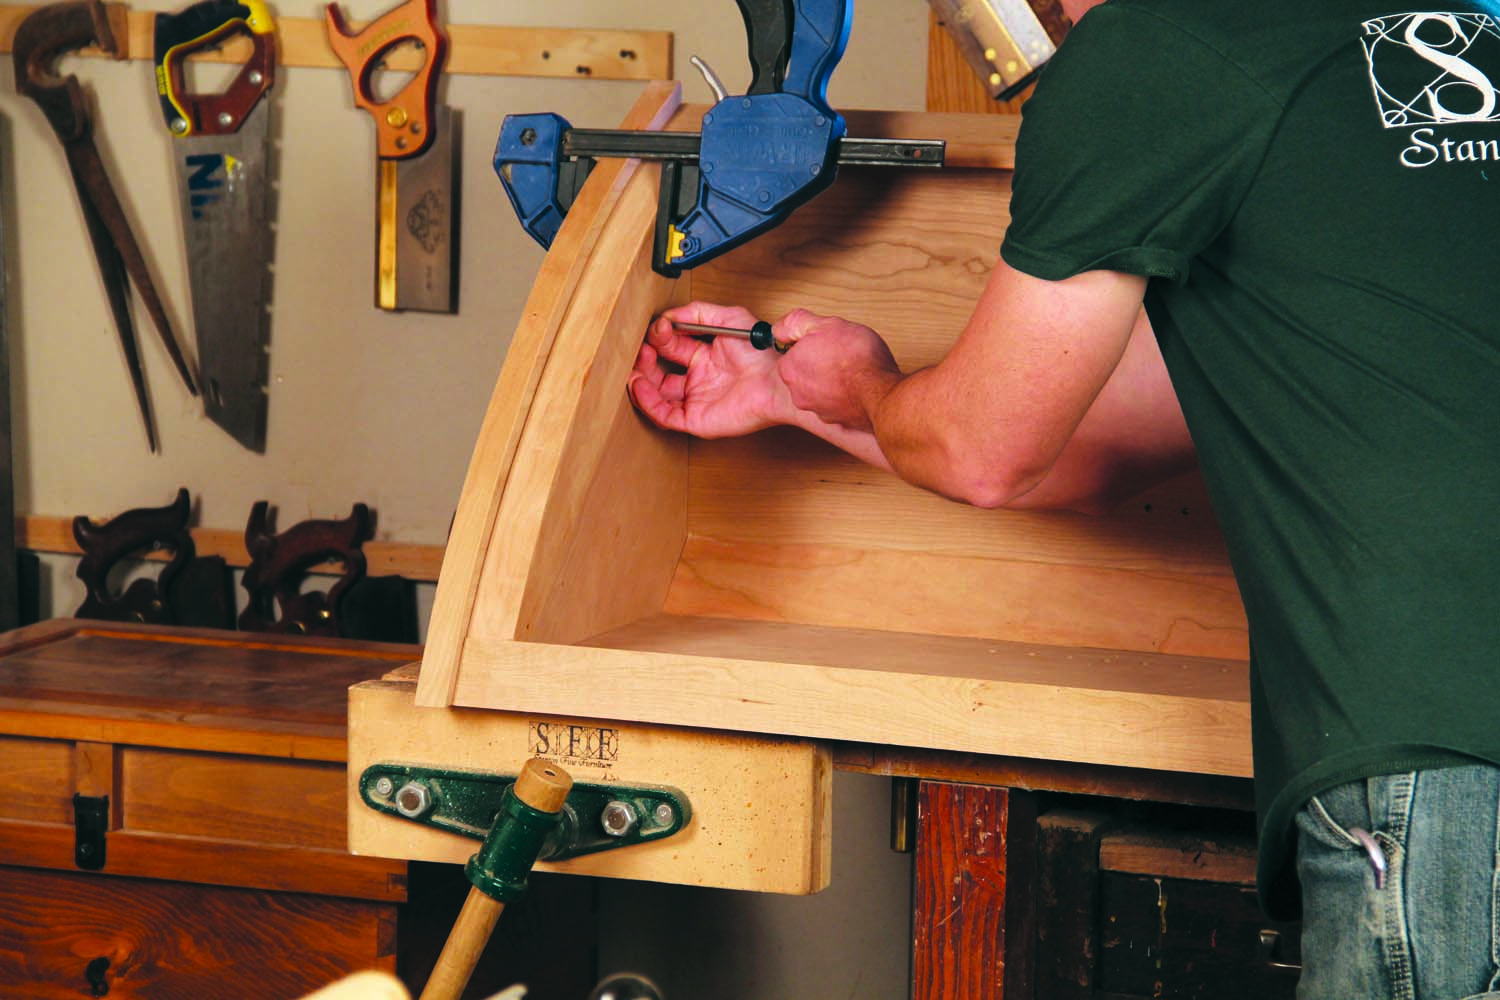
Photo 17. Fasten the top through the subtop. Both of these pieces are made from 3/4″ plywood built up to look extra-thick, like the shelves below.
Make the back (C) and install it in the cabinet. Nail it from the front or screw it from behind. Finish the adjustable shelves by cutting off their back corners.
Here are some supplies and tools we find essential in our everyday work around the shop. We may receive a commission from sales referred by our links; however, we have carefully selected these products for their usefulness and quality.