We may receive a commission when you use our affiliate links. However, this does not impact our recommendations.

This looks like hot-dogging, but it’s not. The work is under control at all times and it’s easy to keep your digits away from the knives.
Assemble the Ends
After all this work, assembly is fast and simple. I chose to drawbore both the bridle joint and the mortise-and-tenon joint. Drawboring is a pegging technique we covered in detail in the Autumn 2005 issue. If you don’t wish to drawbore the joint, simple 3⁄8″-diameter pegs will do. However, if you are going to drawbore the joint, you should drawbore the tenon first and then wedge it – not the other way around.
To assemble, paint glue in the mortise and the notch in the top of the leg. Add your wedges and pegs to the joints. If you want some extra insurance, add a couple clamps across the foot and brace to snug things up. When the glue is dry, cut your pegs and wedges flush.
The long stretcher between the end assemblies is what will keep this table from racking along its length, so this joint needs to be carefully fit. The stretcher’s length adds some extra challenge to the process. At almost 5′ long, it’s too lengthy to wrestle over the table saw (without special equipment). For the prototype table, I used a tenon saw, but because the joint and stretcher are both huge, securing the work and sawing to the line was a challenge. I tried a couple other techniques that combined hand and power tools, but in the end, the best solution was to use a router with a straight bit, followed by a handsaw.
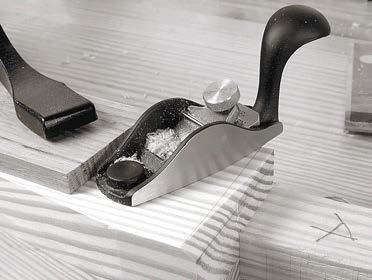
The chamfers on the brace are short and simple. Lay them out, then work from both ends to the middle, which will eliminate blowing out your grain.
The trick is to define the shoulder of the joint accurately with the help of a fence clamped to your work. I wouldn’t recommend trying this with a router that has a round base plate – a flat area on the base is more accurate. (If your router has a round base, temporarily replace the round plastic sub-base with a square piece of 1⁄4″ plywood.)
Set the bit’s depth to 1⁄4″ and cut the shoulder. Now waste away the 3″ x 25⁄8″ area that will become the tenon. Don’t waste away the area that will be later removed with a handsaw at the top of the stretcher – you need this material to support the base of the router.
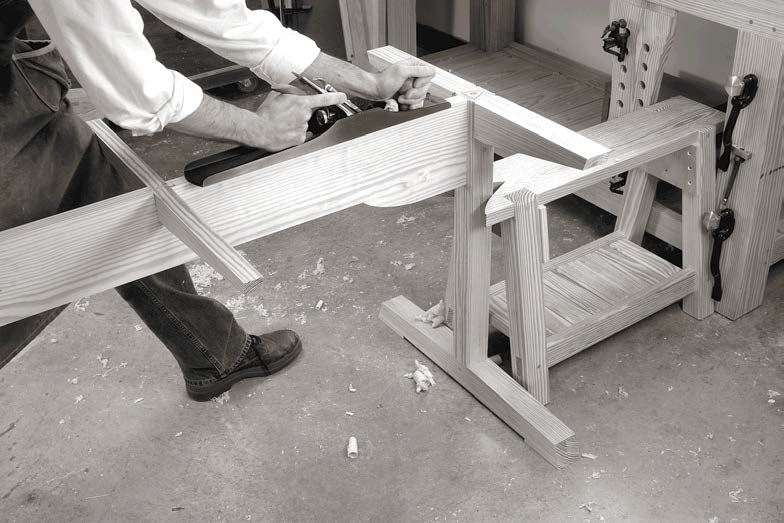
Repeat this operation on the opposite face of the stretcher, and then on the other end. Remove the bulk of the remaining waste with a handsaw. I actually found this easiest to do with the stretcher laid on low sawhorses and one knee holding it in place while I sawed. Then clean up the shoulder with a block plane and chisel and begin to fit the tenon in its mortise.
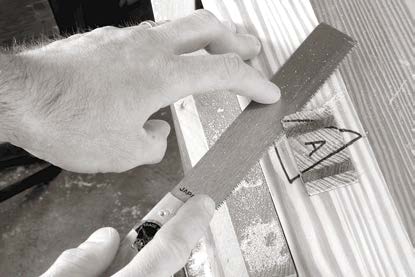
A Japanese flush-cutting saw is a marvel at cleaning up these wedged joints. Use light sawing pressure and work around all sides of the joint to keep the saw cutting true.
Now shape the corbel and glue it to the bottom edge of the stretcher. If you are not going to paint your base, be sure to carefully match the grain so the corbel and stretcher look like they are one piece.
One More Brace – and Buttons
A table this size requires one more brace in the stretcher to support the top. For the prototype table (which had an 8′-long top), two mid-braces were necessary. The smaller braces are simple to cut and fit. I attached the mid-brace using a bridle joint. First saw a 1″ x 11⁄4″ notch in the stretcher and the mid-brace. Fit them using a chisel. Secure the mid-brace with glue and a dowel.
Now you can assemble the entire base using the same routine you used to join the feet to the legs. Saw two kerfs in the tenons on the stretcher. Make wedges. Peg and wedge the joint.
With the base assembled, there are likely going to be some parts that aren’t perfectly aligned. You want the top surfaces of the base to be in the same plane, though that’s a challenge to achieve during glue-up. The top edge of my stretcher was a bit proud, so I knocked it down using a jointer plane.

Adding the corbels to the stretcher greatly simplifies cutting the detail and fitting the tenon. I got this idea from a Shaker example.
The tabletop is secured to its base using wooden buttons. Each button has a 1⁄4″-thick x 1″-long tongue that fits into a matching notch in the base. Then the buttons are screwed to the underside of the top. Making the buttons is easy: I took some wide 3⁄4″-thick scrap and milled a rabbet on the end. Then I ripped the buttons free from the scrap board.
To make the notches in the base, I used a biscuit joiner. The blade of a biscuit joiner is 1⁄8″ thick, so two overlapping cuts gave me the 1⁄4″ groove I needed. If you don’t have a biscuit joiner, you can secure the top with screws. Drill clearance holes through the braces and ream them out to allow the top to expand and contract.
The base is now complete and you can turn your attention to the top. For the project shown on the cover, I asked Senior Editor Robert Lang to make the top because he was writing the story on splines in this issue. For details, see his story titled “A Proper Top for the American Trestle Table” at right.
For the prototype, I made the top using the air-dried cherry boards I mentioned at the beginning of the article. They had to be dressed by hand because they were too wide for the machinery. The challenge of such a top is an article unto itself. Robert’s approach to the top is simpler, looks great and is easily executed.
Again, this isn’t a show surface, so you don’t need to worry about planing across the grain; just get everything flush and in the same plane. I secured my table base against my sawbench for this operation.
Notes on Finishing (and Feasting)
The base is painted a traditional Shaker green. It might look brighter than what you expect from Shaker furniture, but it’s likely dead-on. John T. Kirk, the author of “Shaker World” (Harry N. Abrams), created this green by mixing it according to the Shaker’s recipes. The other hues, particularly the red and yellow, were also bright to our eyes. We usually expect muted tones from the Shakers, but those somber colors are probably the result of fading and patina from age.
To get this color, we let our local Sherwin-Williams do the matching work. They came up with a color they call “Shade-Grown” (SW 6188). For details on applying a painted finish, see “How to Paint Furniture Like a Professional” on page 30.
With the table complete, it’s a remarkable bit of engineering. I cringe (and then marvel) at how my 5-year-old gymnast can vault herself off its edge while the whole thing stays rooted. It is so lightweight that I can lift the end of the 8′-long prototype with two fingers to vacuum up bits of macaroni and cheese.
And then there’s the width. The table here is 32″. I made the first version at 28″. I like the narrow width; eating and entertaining is a far more intimate affair because of it. There’s plenty of room for the place settings, but the narrow width brings an unexpected, welcome closeness.
This is a good thing for both of my families. The table at home knits us tighter together at dinnertime. The version shown here, which now graces our magazine’s office, keeps the editors close at hand as we plan the next issue.
Download the PDF here for drawings and cutlist:
American_Trestle_Table
Here are some supplies and tools we find essential in our everyday work around the shop. We may receive a commission from sales referred by our links; however, we have carefully selected these products for their usefulness and quality.