


We may receive a commission when you use our affiliate links. However, this does not impact our recommendations.
A tool kit for moving beyond the world of straight lines.
A lot of woodworkers shy away from curves. There’s plenty of reasons for this. For starters, some of the common power tools are built for rectangular construction, a table saw is a good example. Limitations imposed by our machines can nudge us away from curves. A second reason is that curves add an extra level of complexity to any design. Doors can be fussy to fit even if they are flat. Why up the ante and mess with a curved door and the extra headaches that take us beyond our comfort zone?
Yet the biggest reason folks avoid the curvy road is stepping out into the unknown. Curves are wild things like the flight of a falcon, beautiful yet unpredictable. A curved line can easily crash into the weeds. In fact it’s a sure thing you need a bigger trashcan next to your drawing board if you venture into the land of curves. Added to that are the challenges of scaling up a curve from a small drawing to a life-sized layout and it’s not surprising that some woodworkers avoid designs with curves.
Curves Beckon
Oddly enough, those reasons for avoiding curves are also the strongest temptations to venture off-road and take the scenic route. It’s exciting to push beyond the fenced in back yard that’s dictated by the table saw and take a bit of risk and to create designs with life and movement. Technical challenges in joinery and layout can add spice and satisfaction to the build process.
The good news is that there are a few basic skills that can help you visualize and unpack curves so you can gain more confidence working with arcs and sweeping lines. Before we discuss a basic tool kit to generate curves, let’s pull back the curtain and understand some basics about simple curves. Dig out your compass and follow along. This is knowledge that’s better caught than taught.
Simple Beginnings
One of the first things to learn about curves is that you can draw and endless array of curved compositions with just three simple compass arcs. I stumbled on this nugget while studying historic design books from the eighteenth century. I found that what often looked like complex and dramatic curves were made from a small trio of simple compass arcs. Sort of like how an artist can create many colors from the three primaries of red, yellow and blue. This is a good way to learn to get comfortable working with curves.

The layout lines on this period drawing offer clues to drawing the curved moldings. (Rules For Drawing the Several Parts of Architecture, By James Gibbs, Public Doman)
The Three Musketeers
Let’s begin with these three arcs. All share one thing in common, they all begin with a straight line. This is important for two reasons. First, a straight line gives us a visual reference to gage the boldness or speed of a curve. Curves can be fast, slow or somewhere in between. A fast curve is like a sharp bend in the highway while a slow curve is gentle. A straight line gives us a visual reference to gauge whether our curve is fast or slow. Secondly, the straight line provides anchor points to establish the beginning and ending of our arc and allows us to locate the exact spot where a complex curve transitions from concave to convex.
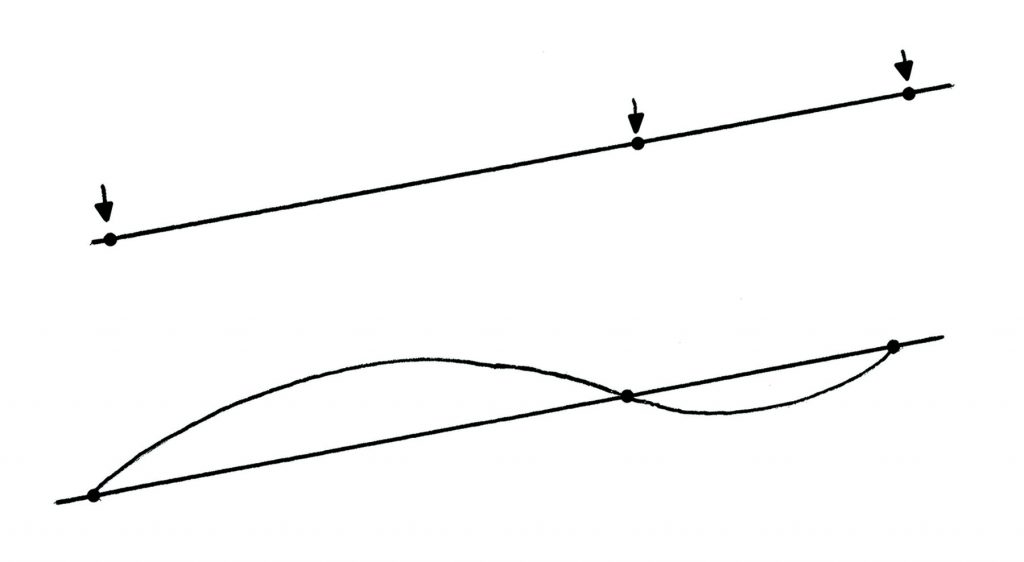
This curve snakes along this straight line, but you control it by marking the start, transition, and ending.
Let’s begin with an aggressive fast curve, a half circle. Mark the start and stop points on your straight line and then locate the halfway point between the two marks. This halfway point is your fulcrum. Place the point of your compass there, adjust the pencil out to the start point and swing an arc from start to finish. This fast curve can be found in simple forms like a tombstone arch in a clock face dial or a raised panel on a door.
Now let’s ease it down to a slower more gradual curve, a quarter circle. The layout begins the same as a half circle except we drop a perpendicular down from our midpoint. Using the midpoint as a fulcrum we strike a half circle downward till it strikes our perpendicular. The spot where it meets at the south pole is our new fulcrum. Set the compass point on the new fulcrum and reset the pencil out to the original start point. Swing the arc from start to finish creating a gentler or slower arc. This arc is often used for a curved pediment on a doorway or the opening under a desk.
Finally let’s draw a slower “Goldilocks curve”. It’s one of those curves that are just right and shows up again and again in furniture and architecture, one sixth of a circle. Adjust our compass to span the width between the beginning and ending of our arc. Swing the pencil down from one side then flip it and swing it down from the opposite side. Where these two arcs cross is our new fulcrum. Without changing our compass setting, swing an arc from start to finish point. This gentle sweeping curve is the basis for many curved molding profiles as well as for curved and serpentine shapes on cabinets and drawers.
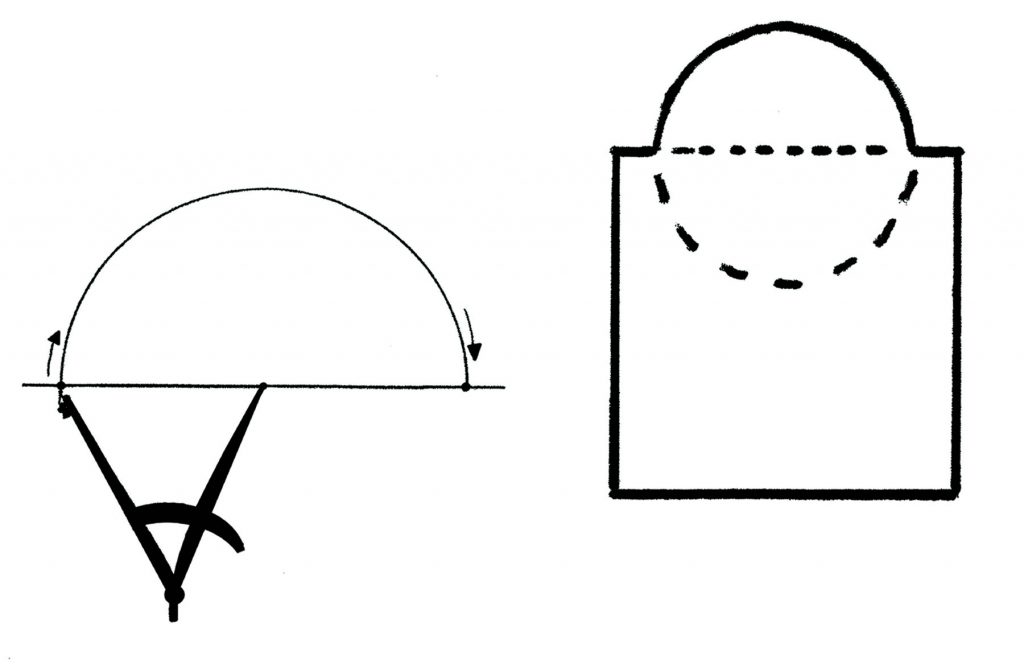
The half circle is a fast curve and the first of our trio of simple curves.

We drop a half circle below out line to locate a fulcrum to draw a quarter circle.
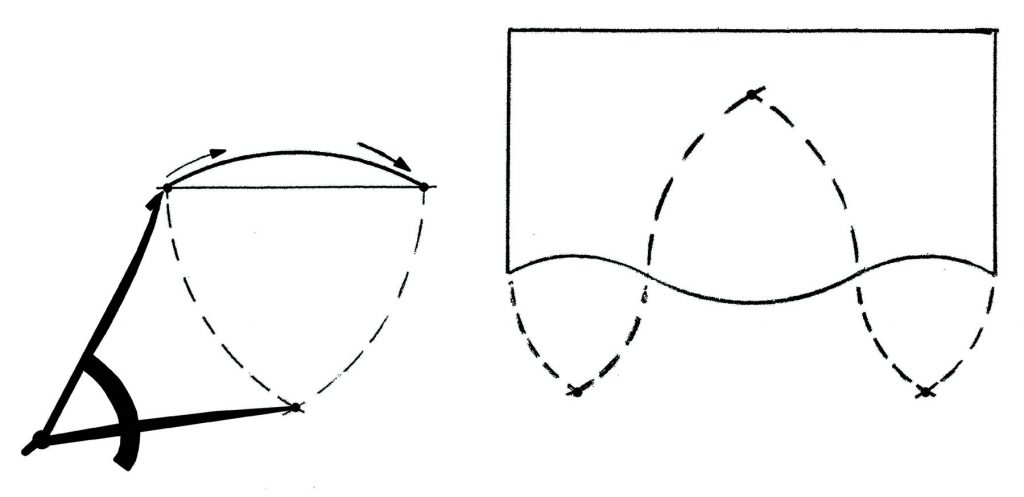
One sixth of a circle is used in molding profiles and also the contours of a bow front chest of drawers.
Compound Curves
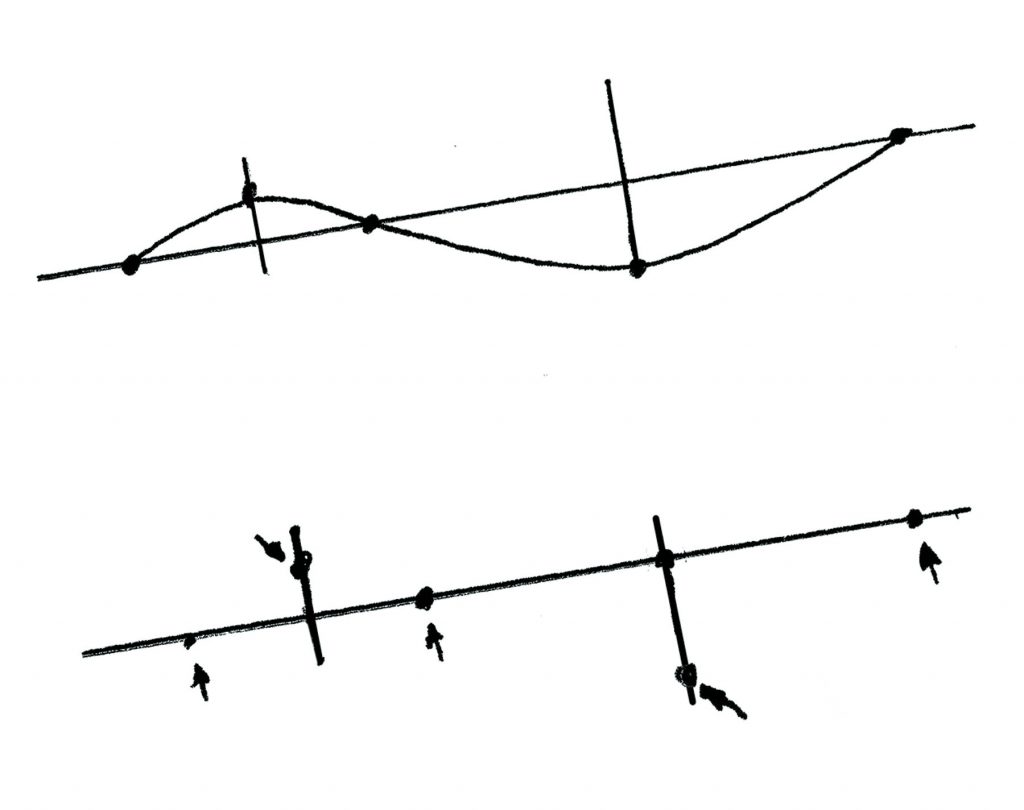
Now let’s play with combinations of curves, stringing together convex with concave arcs. This is where the combinations can explode with endless possibilities from just these three simple arcs. A few techniques can help you combine arcs into graceful flowing lines. Just to get comfortable, let’s begin with some pairings of arcs using our one-sixth curve. Start by drawing a straight line that will extend from the beginning of our first arc and continue to the end of our second arc. Next, mark between these two endpoints a spot that will locate where our curves will transition from concave to convex. In reality this transition point is simply the end of the first curve and the beginning of the second. To draw the first arc draw one curve above our line between our start point and the transition point. Then reset the compass and draw the second arc below the line. You can shift the transition point to different locations to create differing pairs of curves. The combination and possibilities are endless.
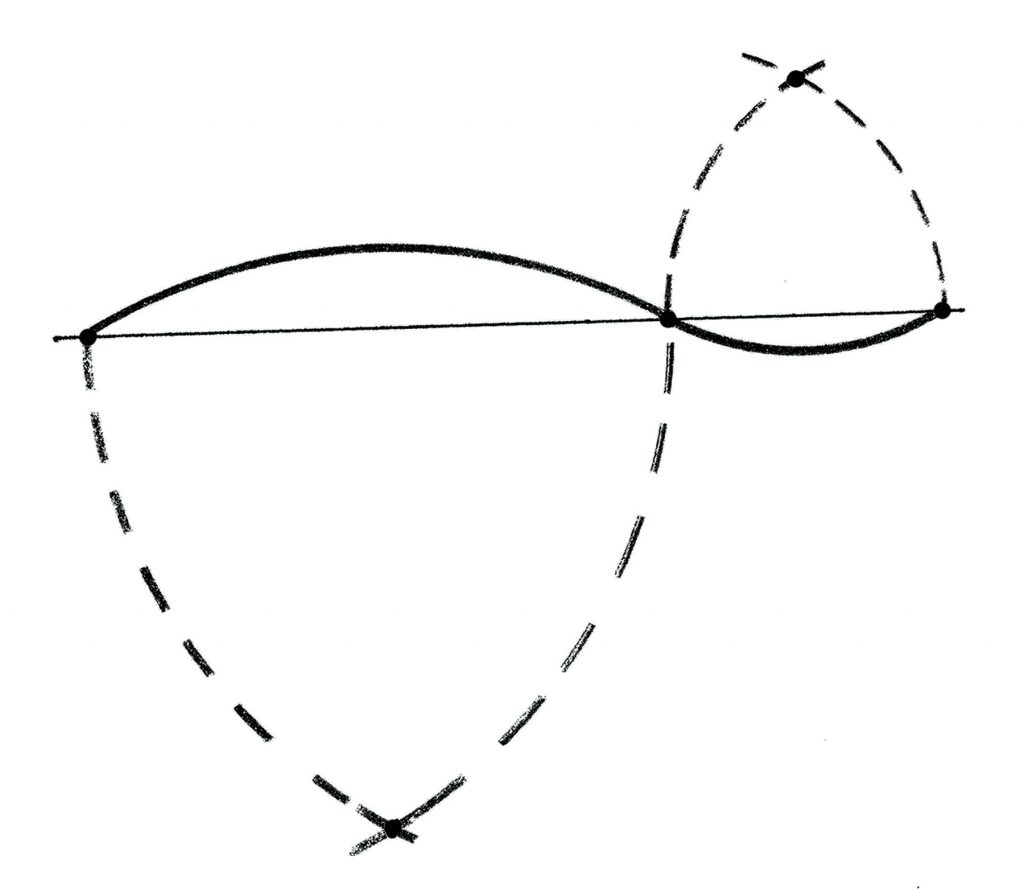
Draw a straight line and draw a series of curves above and below. Possibilities are endless.
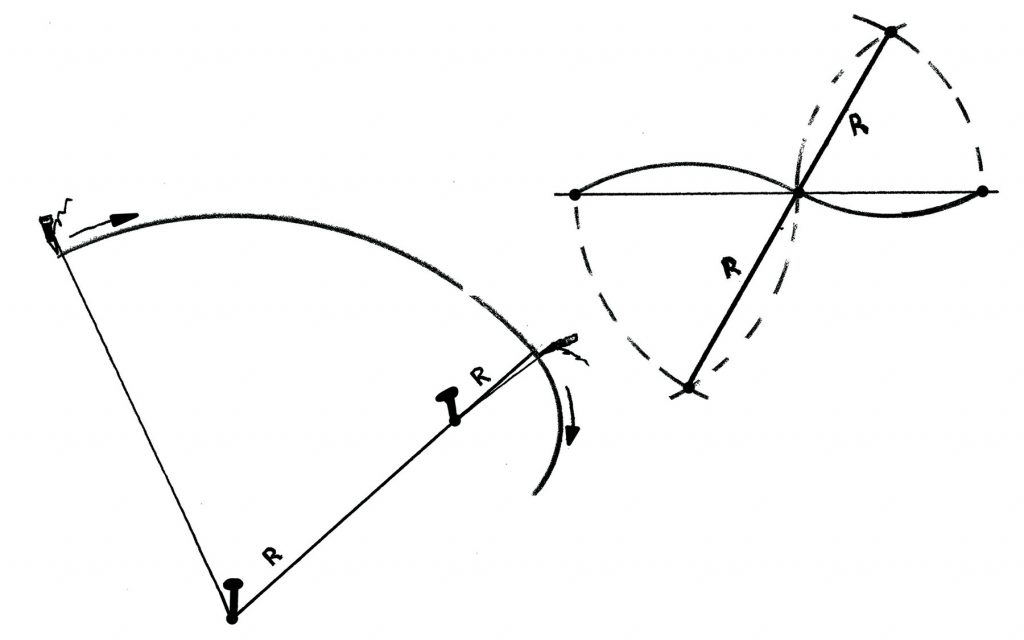
Is it Fair?
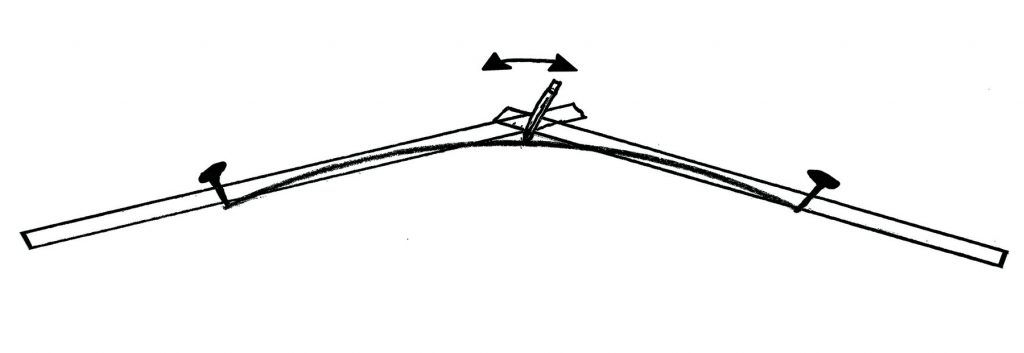
A fair curve simply means it flows smoothly without bumps or interruptions. When laying out curves that flow organically, the transitions are key. Combining different curves so that they flow smoothly is simple if you understand that paired arcs always share a common radius. Note on the drawing for the serpentine curve, that the radii align at the transition point. Conversely, if you draw one arc on one section of a straight line, by simply extending the radius where it meets the transition, anywhere along that radius you can establish a second fulcrum to draw a second curve that flows seamlessly with the first. This also works when combining curves that change speed. This is easy to see when using a string attached to a nail. One nail marks the fulcrum for the larger slower curve, a second nail marks the fulcrum for a smaller faster curve. Notice that when our string swings around and touches our second nail, both arcs share a radii at that point so the smaller arc flows smoothly.
Draw a straight line and draw a series of curves above and below. Possibilities are endless.
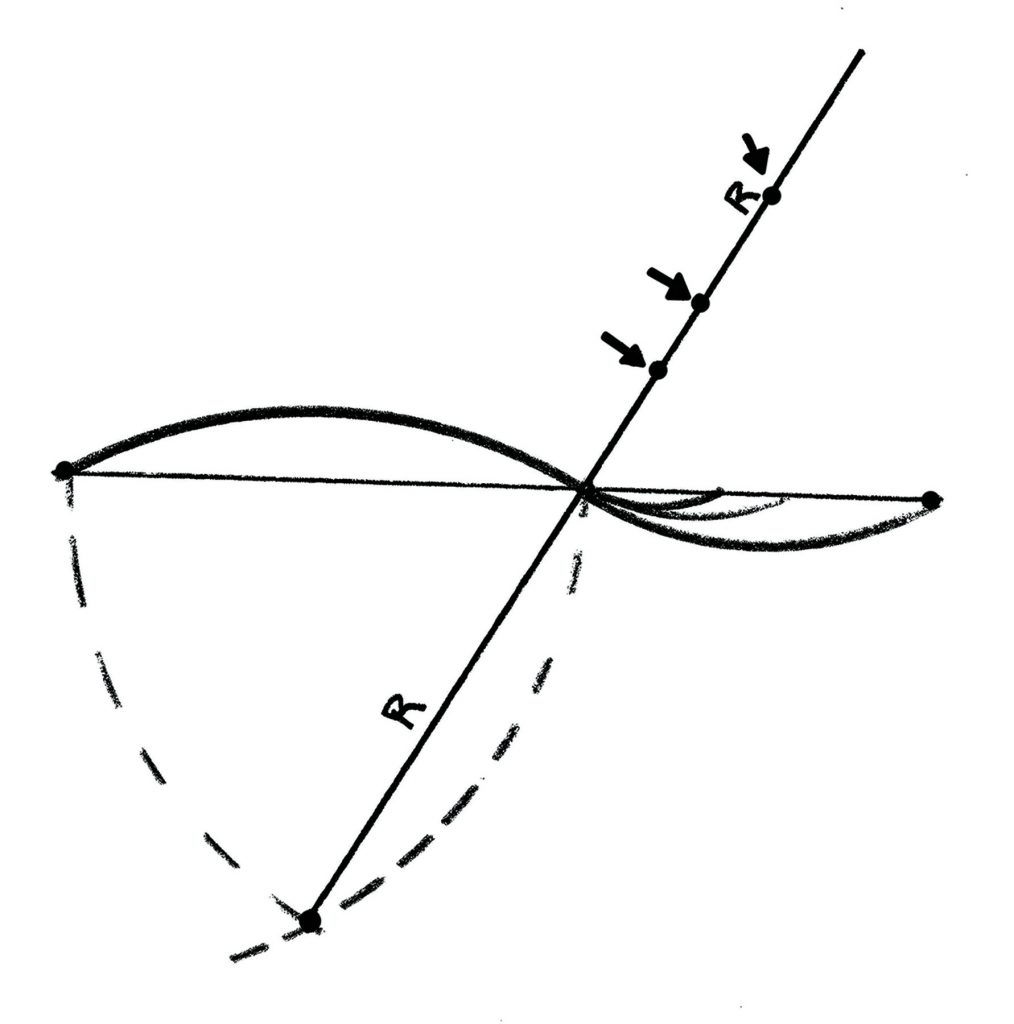
As long as you place a fulcrum on the shared radii, the second curve will flow.
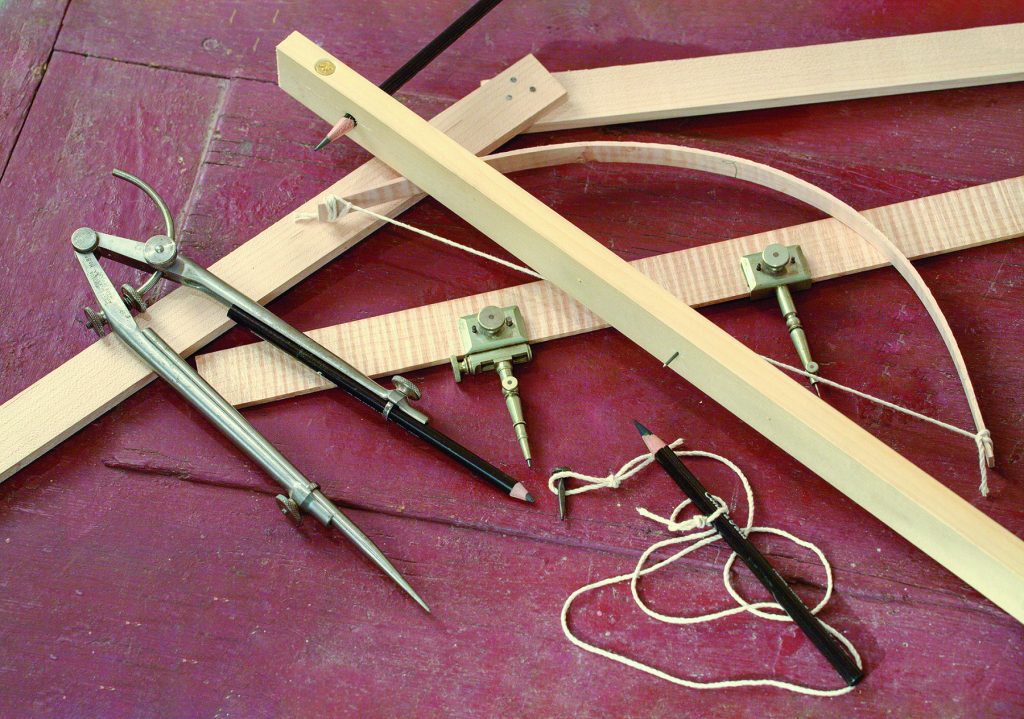
Tool Kit for Curved Layouts
It’s obvious that a compass (dividers equipped with a pencil on one end) is a go to tool for generating curves. My advice is to shy away from compasses that are made for the drafting table, they tend to be lighter weight and won’t hold a setting when making layouts on wood. Regardless of whether you use a compass with a screw adjustment or friction fit, it should hold it’s setting securely. I recommend two compasses, a 6″ and a 10″ or 12″ size. These will cover most small scale layout tasks both at your drawing table as well as on the workpiece.
Going Big
To draw larger arcs that go beyond the reach of your compass there are a number of methods for large scale curves. Possibly the simplest is to use a string anchored on one end to a nail and looped over a pencil on the other. Care must be taken to make sure to apply even tension on the string and being mindful to keep the pencil upright. Trammel points act like a large pair of dividers and are available to purchase both vintage and new. A set of trammels turns any scrap of wood into a precise layout tool. Trammel points designed for the drafting table, unlike compasses will work with wood layouts. Reason being the trammels depend on the wooden beam to keep them solid. If you lack a set of trammel points, it’s easy to improvise a shop made trammel. It’s a stick with a point driven through one end and a pencil attached on the other. A few easy tricks added to this home made tool can up the accuracy and ease of use. I mark a centerline down the length of the beam and locate both pencil and point directly on this centerline. I also strike perpendiculars right over where the pencil and point are located. This makes it easy to measure the exact radius I need or also to relocate the point if required. Instead of just hammering a nail through for the point, I drill a hole with a 1/16″ drill, then grind the shank end of the drill to a smooth sharp point. I snap off the business end of the drill bit and tap it into the beam point first. I find a hardened point gives a positive grip and easier to clean up than a hole left from a nail. I drill a hole for the pencil and make a kerf with a saw to clamp it securely with a screw. It takes less than ten minutes to fabricate this tool.
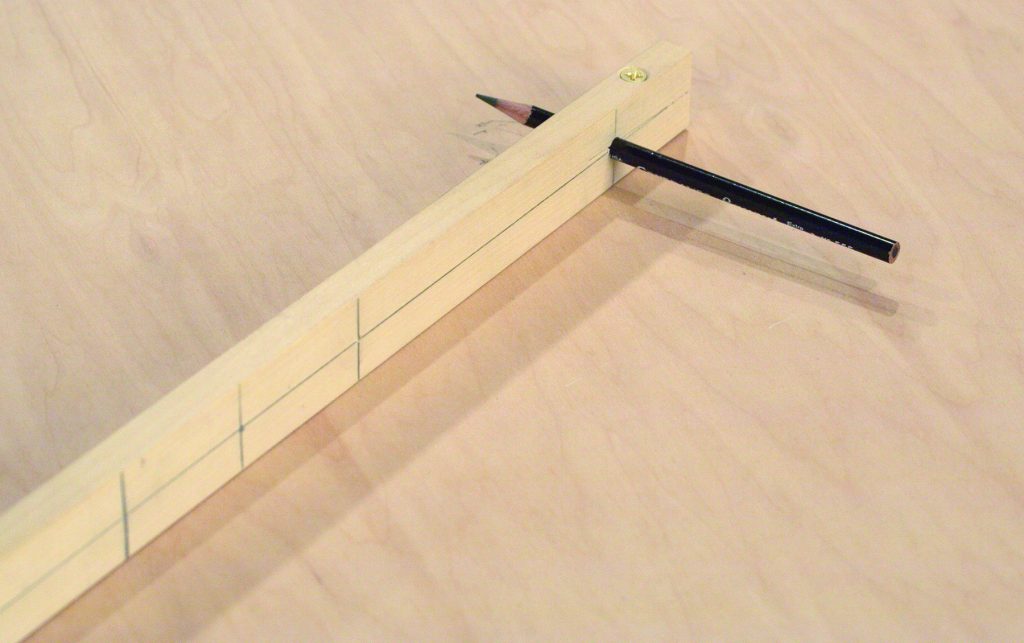
Centerline and cross marks on shop made trammel make this a precision layout instrument.
Going Way Big
You may want to draw a slow gentle arc that exceeds what you can do with a trammel (or exceeds the space to swing a large arc in a crowded workshop). For example, if you wanted to lay a gentle curve along the long edge of a large conference table. This could be a section of a circle with a twenty foot radius. The solution is to use the power of simple geometry to draw the arc. Start by placing a nail at the start and stop points of the arc. Then, find the midpoint and set a third nail out to a distance that would be the highpoint of the arc. Then take a pair of sticks that are longer than the distance between our start and center pin and set them so they meet just over our center nail. Lock them together securely with a couple of screws and remove the center nail. Now place a pencil in the apex where our sticks meet and draw our slow arc by sliding our sticks over the start and stop pins, making sure that our sticks stay in contact with our two pins.
The power of geometry and a couple of sticks to lay out giant arcs.
Irregular Curves
Up to now we’ve discussed regular arcs that have a constant radius to a center point. Yet in nature we often see a curve that begins slowly and gradually gets faster. Think about how a stalk of wheat bends as the grains ripen. One way to draw these arcs is to make use of a tapered batten. Think of it like a fishing rod that’s stout at the bottom and tapers down to much slimmer tip. Select a strip of straight grained wood about three foot long and 3/8″ square. On one end draw a small square in the center that represents the small end of the taper. Lay it flat on the bench and use a block plane to take a shaving on that last six inches of the batten. Then move the plane back six inches and take a second shaving down to the tip. Keep working back six inches at a time making successive passes. You should finish with one pass that extends the whole length of the batten and comes close to our layout mark on the small end. Repeat the process on the remaining sides till you have a tapered batten capable of using as a template to draw graceful irregular curves. To use just tack it to your work using small brads and bend the batten to suit your eye.

Just taper a scrap of straight grained wood and you have a flexible pattern for graceful curves.
Bushwhacking
This knowledge about generating curves with a compass is a great way to layout curves but also offers clues to proficient freehand drawing. I find it helps to first draw a straight line and mark where you want your arc to begin and end. Then mark the midpoint of your arc and mark a reference where you think the highpoint of the arc should lie. Drawing a freehand arc is much easier if you have these reference points to guide your hand and eye.
Freehand curves are made easy if you use a straight line and mark the important boundaries. With a bit of practice, you’ll surprise yourself.
Please take practice time to walk through these drawing sequences yourself. They will help to train your eye and also help you to unpack curves you see in nature and the built world. For more practical information about curved layouts you can refer to “By Hound and Eye” published by Lost Art Press.
Here are some supplies and tools we find essential in our everyday work around the shop. We may receive a commission from sales referred by our links; however, we have carefully selected these products for their usefulness and quality.


